
Micro Space TW2241AH - Vacuum Cleaner TEFAL - Free user manual and instructions
Find the device manual for free Micro Space TW2241AH TEFAL in PDF.


| Product Type | Stick Vacuum Cleaner |
| Brand | Tefal |
| Model | Micro Space TW2241AH |
| Color | Black / Gray |
| Dimensions (L x W x H) | 25 cm x 15 cm x 110 cm |
| Weight | 2.5 kg |
| Power Supply | Rechargeable battery, 22.2 V lithium-ion |
| Motor Power | 800 W |
| Suction Technology | Cyclonic filtration |
| Dust Capacity | 0.5 L |
| Filtration System | Washable HEPA filter |
| Main Functions | Carpet, hard floor, crevice tool, brush tool |
| Runtime (Normal Mode) | 30 minutes |
| Runtime (Turbo Mode) | 15 minutes |
| Charging Time | 4 hours |
| Battery Type | Removable lithium-ion |
| Noise Level | 75 dB |
| Maintenance | Empty dust bin after each use; wash filter monthly |
| Cleaning Accessories | Motorized brush, crevice tool, dusting brush |
| Safety Features | Automatic shut-off when overheated |
| Spare Parts Available | Battery, filter, brush roll, charging adapter |
| Warranty | 2 years |
Frequently Asked Questions - Micro Space TW2241AH TEFAL
User questions about Micro Space TW2241AH TEFAL
0 question about this device. Answer the ones you know or ask your own.
Ask a new question about this device
Download the instructions for your Vacuum Cleaner in PDF format for free! Find your manual Micro Space TW2241AH - TEFAL and take your electronic device back in hand. On this page are published all the documents necessary for the use of your device. Micro Space TW2241AH by TEFAL.
USER MANUAL Micro Space TW2241AH TEFAL
natural_image
Line drawing of a robotic vacuum cleaner (no text or symbols)Micro Space
TW22


natural_image
Illustration of hands using a ruler to measure a measurement (no text or symbols present)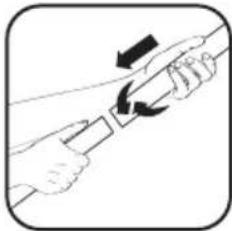
natural_image
Illustration of hands holding a tool with arrows indicating motion (no text or symbols)fig. 1 fig. 2 fig. 3 fig. 4

natural_image
Illustration of a mop with a handle and tool, showing a pushpin and base (no text or symbols)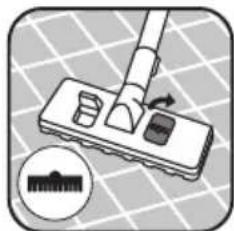
natural_image
Illustration of a cleaning or cleaning tool on a square base with a magnified inset showing a brush (no text or symbols)
natural_image
Simple line drawing of a plug being inserted into a battery (no text or symbols)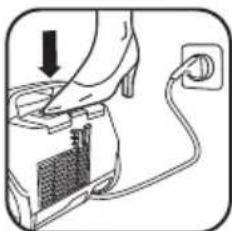
natural_image
Illustration of a hand inserting a plug into a device with a cable (no text or symbols)fig. 6 fig. 5 fig. 7 fig. 8

natural_image
Diagram of a curved device with directional arrows indicating motion or force (no text or symbols)
natural_image
Simple line drawing of a battery connected to a power outlet via cable (no text or symbols)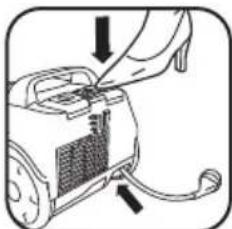
natural_image
Diagram of a hairdryer with a handle and clasp, showing mechanical components without any text or symbolsfig. 9 fig. 10 fig. 11 fig. 12

natural_image
Line drawing of a car interior with a black arrow pointing to the seat area (no text or symbols)
natural_image
Line drawing of a hand holding a device with a sun icon above (no text or symbols)
natural_image
Mechanical assembly diagram showing a component being inserted into a housing (no text or symbols visible)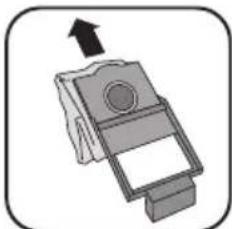
natural_image
Illustration of a mechanical device with an arrow indicating upward motion (no text or symbols)fig. 13

natural_image
Hand pouring liquid into a trash bin with a downward arrow indicating flow (no text or symbols)fig. 17 fig. 18
fig. 14 fig. 15
natural_image
Illustration of a mechanical component with a downward arrow, no text or symbols present
natural_image
Mechanical assembly diagram showing a component inserted into a housing (no text or symbols visible)fig. 16

natural_image
Illustration of hands holding a bag with an arrow indicating direction (no text or symbols)fig. 19
fig. 20

natural_image
Illustration of a hand pouring liquid into a container with a labeled container (no text or symbols)

natural_image
Diagram of a mechanical component with an arrow indicating direction (no text or symbols)
natural_image
Illustration of a hand placing a trash bin into a trash can with a downward arrow (no text or symbols)fig. 23fig. 21 fig. 24fig. 22


natural_image
Illustration of hands cleaning a circular object with a 24-hour mark, no text or symbols present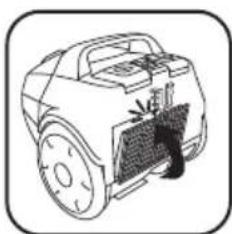
natural_image
Line drawing of a car with a mounted device and exhaust pipe (no text or symbols)fig. 25 fig. 26 fig. 27 fig. 28
1. SAFETY INSTRUCTIONS
For your safety, this appliance complies with all applicable standards and regulations (Low Voltage, Electromagnetic Compatibility, Environmental directives, etc.).
- This appliance is not designed to be used by persons (including children) with reduced physical, sensory or mental capabilities, or by people with no prior knowledge or experience, except where they have benefited from supervision or previous instructions relating to the use of the appliance, from a person responsible for their safety.
Children must be supervised to ensure that they do not play with the appliance.
- This appliance can be used by children aged from 8 years and above and persons with reduced physical, sensory or mental capabilities or who lack experience and knowledge if they have been given supervision or instruction concerning safe use and understand the hazards involved.
Children should not be allowed to play with the appliance.
Children should not clean or perform maintenance procedures on the appliance unless they are supervised by a responsible adult.
Keep the appliance and its cord out of the reach of children.
- Do not use the appliance if the power cord is damaged. The cord winder and cord of your vacuum cleaner must be replaced by a Tefal Approved Service Centre to avoid any risks.
- Never leave the vacuum on unsupervised.
- Do not place the nozzle or the end of the tube near the eyes or ears.
- Do not vacuum wet surfaces, water or any type of liquids, hot substances, superfine substances (plaster, cement, ash, etc.), large sharp waste (glass), harmful products (solvents, abrasives, etc.), corrosive products (acids, cleaning products, etc.), flammable or explosive materials (oil or alcohol based).
- Never immerse the appliance in water or any other liquid; do not spill water on the appliance and do not store it outside.
- Do not use the appliance if it has been dropped and there is visible damage to it, or if it fails to function normally. In this case, do not open the appliance but send it to the nearest Approved Service Centre or contact Tefal Customer Services.
- For cleaning and maintenance operations, refer to page 3.
2. DESCRIPTION
-
Transport handle
-
Wheels
-
Bag compartment
-
Microfilter
-
Bag base runner
-
Bag base
-
Paper bag*
-
Cloth bag*
-
Bag base presence detector
-
Lid
-
Suction inlet
-
Full-bag warning light
-
ON/OFF pedal
-
Power control*
-
Power cord wind pedal
-
Self-standing position
-
Multi-directional wheel
-
Power cord
-
Air outlet foam filter
-
Air outlet grill
-
Crevice nozzle storage space
-
Crevice nozzle
-
Multi-surface nozzle
-
Upholstery nozzle*
-
Parquet nozzle*
-
Mini turbo-brush*
-
Flexible tube with handle and manual power control
-
Telescopic tube*
-
Tubes*
3. USING FOR THE FIRST TIME
Unpacking
- Unpack your appliance, keep your guarantee form and read the instructions carefully before using your appliance for the first time.
- Your vacuum cleaner is an electrical appliance: it should be used under normal operating conditions.
- Check that your vacuum cleaner voltage corresponds to that of your domestic power supply: you will find this information under the appliance.
- Switch off and unplug the appliance:
- immediately after each use;
- before every change of accessories;
- before every clean-up or maintenance procedure, and before changing the filter.
Recommendations and precautions
- Before each use, unwind the power cord completely.
- Do not jam it and do not allow it to come into contact with sources of heat or against sharp edges.
- If you are using an electrical extension, check that it is in good condition and that it is suited to the power of your vacuum cleaner.
- Do not move the vacuum cleaner by pulling on the power cord, the appliance must be moved using its transport handle.
- Do not use the power cord to lift the appliance.
- Do not unplug the appliance by pulling on the power cord.
- Never use the vacuum cleaner without a bag or without a filtration system in place: microfilter, air outlet foam filter.
- Check that the filters are fitted correctly.
- Only use original Tefal bags and filters.
- Use only original Tefal accessories.
- If you have any difficulties in finding accessories or filters for this vacuum cleaner, contact the Tefal Customer Service.
4. USE
Fitting the elements on to the appliance
- Clip the end of the hose to the suction inlet - fig. 1.
- To remove it, unclip the end and pull - fig. 2.
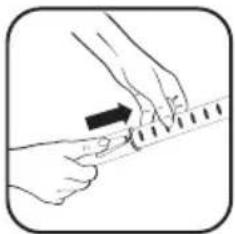
- If your vacuum cleaner is equipped with the telescopic tube* (28): press the adjustment button, extend the length of tube required and then release the button to lock it - fig. 3. Otherwise, assemble the tubes* (29) by turning them slightly - fig. 4.
-
Fit the required accessory on to the end of the tube:
-
For rugs and carpets: use the multi-surface nozzle (23) in the retracted brush position - fig. 5, or the mini Turbo-brush* (26).
- For parquets and smooth floors: use the multi-surface nozzle (23) in the extended brush position - fig. 6 or, for best results, directly use the parquet nozzle* (25).
- For corners and hard-to-reach areas: use the crevice nozzle (22).
- For furniture and fragile surfaces: use the upholstery nozzle* (24).
Warning! Always switch off and unplug your vacuum cleaner before changing the accessories
Plugging in the power cord and switching on the appliance
- Unwind the power cord completely, plug in your vacuum cleaner - fig. 7 and press the ON/OFF pedal (13) - fig. 8.
- Adjust the suction power:
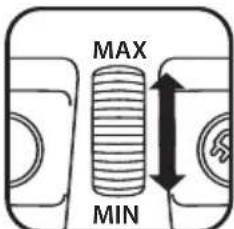
- with the electronic power control* (14): turn the electronic control button* to adjust the suction power: towards the max position for floors and to the min position for furniture and delicate fabrics - fig. 9.
- with the grip's manual power control: open the shutter of the adjustable slider to manually decrease the suction power, e.g.: on fragile surfaces etc. - fig. 10.
Storing and transporting the appliance
- After use, switch off your vacuum cleaner by pressing the ON/OFF pedal (13) - fig. 8 - and unplug it - fig. 11.
- Rewind the power cord by pressing the power cord rewind pedal (15) - fig. 12.
- Place the crevice tool (22) in its storage compartment (21) behind the appliance.
- Place the multi-surface nozzle (23) in the self-standing position - fig. 13.
- Your vacuum cleaner can be easily moved thanks to its transport handle (1).
5. CLEANING AND MAINTENANCE
Important: Always switch off and unplug your vacuum cleaner before carrying out maintenance or cleaning.
Changing the bag
- The full bag warning light (12) indicates that the bag is full or saturated.
If you notice a reduction in the efficiency of your appliance, set the power at maximum and hold the nozzle above the ground. If the full-bag warning light remains red, replace the bag.
- Remove the flexible pipe (27) from the suction inlet (11) - fig. 2.
- Open the lid (10) of your vacuum cleaner - fig.14.
a) If your vacuum cleaner is equipped with a paper bag*:
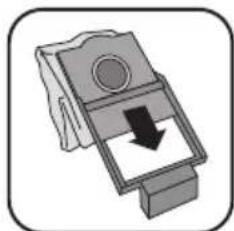
- remove the bag base (6) from the bag compartment (3) - fig. 15, and then remove the paper bag (7) from its base (6) by sliding it on the runners - fig. 16;
- throw the paper bag in a dustbin - fig.17;
- put a new paper bag on the bag base - fig. 18, and then using the bag base runner (5), place it inside the compartment - fig. 19;
- make sure that the paper bag and the bag base are correctly positioned before closing the lid (10).
b) If your vacuum cleaner is equipped with a cloth bag\*:
- remove the bag base (6) from the bag compartment (3) - fig. 15, and then remove the cloth bag (8) from its base (6) by sliding it on the runners - fig. 16;
- open the bag using the retaining clip - fig. 20, and then empty it over a dustbin - fig. 21;
- clean the bag in clean water - fig. 22;
- leave it to dry for at least 24 hours (only refit the bag when it is completely dry);
- close the cloth bag: make sure that the retaining clip is correctly repositioned before refitting the bag in the appliance;
- reposition the cloth bag on the bag base - fig. 18, and then using the bag base runner (5), place it inside the compartment - fig. 19;
- make sure that the cloth bag and the bag base are correctly positioned before closing the lid (10).
Changing the microfilter (4)
Important: change the microfilter every six months
- Remove the flexible pipe (27) from the suction inlet (11) - fig. 2.
- Open the lid (10) of your vacuum cleaner - fig.14.
- Remove the bag from the bag compartment - fig.15.
- Remove the microfilter - fig. 23 and throw it in the dustbin - fig. 24.
- Put a new microfilter in its housing - fig. 25.
- Reposition the bag inside the compartment - fig.19.
- Make sure that the bag and the bag base are correctly positioned before closing the lid (10).
Clean the air outlet foam filter (19)
Important: clean the air outlet foam filter every 6 months
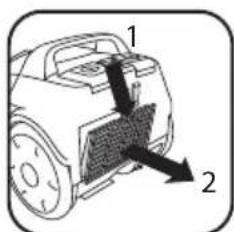
- Remove the air outlet grill (20) positioned behind the appliance - fig. 26.
- Remove the air outlet foam filter (19), wash it in clean water - fig. 27, and leave it to dry for 24 hours.
- Refit the air outlet foam filter (19) in its housing and close the air outlet grill (20) - fig. 28.
Cleaning the vacuum cleaner
- Wipe the body of the vacuum cleaner and accessories with a soft damp cloth, then dry.
- Wipe the lid with a dry cloth.
- Do not use detergents or any corrosive or abrasive products.
6. REPAIR SERVICE
Important: If you notice that your vacuum cleaner is not operating as well, before carrying out any checks, switch it off using the ON/OFF pedal.
Repairs should only be performed by specialists using original spare parts.
If your vacuum cleaner does not function
The appliance is not plugged in: check that the appliance is plugged in correctly.
If your vacuum cleaner has no suction
- An accessory or hose is blocked: unblock the accessory or the hose.
- The vacuum lid is not closed properly: check the position of the bag and close the lid again.
If your vacuum cleaner suction is not working properly or is making a whist-ling noise
- An accessory or hose is partly blocked: unblock the accessory or the hose.
- The bag is full or saturated with fine dust: replace the paper bag* (7), or empty the cloth bag* (8).
- The filtration system is saturated: remove the microfilter and replace it with a new microfilter.
- The manual power control* on the grip is open: close the manual power control.
If the full-bag warning light remains red
- The bag is saturated: replace the paper bag* (7), or empty the cloth bag* (8).
If the lid does not close (bag base presence detection (9))
- Check to see if there is a bag and a bag base (6) in place and make sure they are correctly positioned.
If the suction attachment is difficult to move
- Open the grip's adjustable slider to decrease the power or move the electronic power control* (14) to minimum.
- Check that the nozzle position (23) is adjusted to the surface being vacuumed: for rugs and carpets, use the nozzle in the retracted brush position - fig. 5, for parquets and smooth floors, use the nozzle in the extended brush position - fig. 6.
If the power cord does not wind up completely
- The power cord is slow to wind up: pull the cord out again and press on the power cord rewind pedal.
If a problem persists, take your vacuum cleaner to your nearest Tefal Approved Service Centre.
Guarantee
- This appliance is for domestic use only; any misuse or use that does not comply with the instructions will release the brand from all liability and the guarantee will be cancelled.
- Read the instructions for use carefully before using your appliance for the first time: Tefal shall accept no liability in the event of any use that does not comply with the instructions.
7. ENVIRONMENT
In accordance with current regulations, any appliance that is no longer used must be made permanently inoperable: disconnect and cut the power cord before throwing the appliance away.

Think of the environment!
①Your appliance contains a lot of materials which can be recovered or recycled.
Leave it at a local waste collection point so that is can be processed.
- SAFETY INSTRUCTIONS
- DESCRIPTION
- USING FOR THE FIRST TIME
- Unpacking
- Recommendations and precautions
- USE
- Fitting the elements on to the appliance
- Plugging in the power cord and switching on the appliance
- Storing and transporting the appliance
- CLEANING AND MAINTENANCE
- Changing the bag
- b) If your vacuum cleaner is equipped with a cloth bag\*:
- Changing the microfilter (4)
- Important: change the microfilter every six months
- Clean the air outlet foam filter (19)
- Important: clean the air outlet foam filter every 6 months
- Cleaning the vacuum cleaner
- REPAIR SERVICE
- If your vacuum cleaner does not function
- If your vacuum cleaner has no suction
- If your vacuum cleaner suction is not working properly or is making a whist-ling noise
- If the full-bag warning light remains red
- If the lid does not close (bag base presence detection (9))
- If the suction attachment is difficult to move
- If the power cord does not wind up completely
- Guarantee
- ENVIRONMENT
Brand : TEFAL
Model : Micro Space TW2241AH
Category : Vacuum Cleaner