
Pro Express GV8430E0 - Steam plant TEFAL - Free user manual and instructions
Find the device manual for free Pro Express GV8430E0 TEFAL in PDF.
| Brand | TEFAL |
| Model | Pro Express GV8430E0 |
| Product type | Steam generator |
| Tank capacity | 1,8 L |
| Power | 2400 W (estimated) |
| Heat-up time | Approximately 2 minutes |
| Continuous steam flow | Adjustable (ECO, normal, turbo) |
| Turbo function | Yes, 2-3 impulses for extra steam |
| ECO mode | Yes, energy saving |
| Vertical ironing | Yes |
| Anti-scale system | Integrated scale collector |
| Auto-off system | After 8 minutes of inactivity |
| Safety | Safety valve, thermal fuse |
| Soleplate | Autoclean Catalys (self-cleaning) |
| Locking system | Lock System for transport |
| Steam cord | Ultracord (prevents creasing) |
| Weight (estimated) | Approximately 5,5 kg |
| Dimensions (estimated) | Approximately 35 x 25 x 30 cm |
| Recommended water type | Tap water; if very hard, mix 50% demineralized |
| Maintenance | Clean soleplate with soft cloth; flush boiler every 6 months |
| Warranty | Contact an Authorized Service Center |
Frequently Asked Questions - Pro Express GV8430E0 TEFAL
User questions about Pro Express GV8430E0 TEFAL
0 question about this device. Answer the ones you know or ask your own.
Ask a new question about this device
Download the instructions for your Steam plant in PDF format for free! Find your manual Pro Express GV8430E0 - TEFAL and take your electronic device back in hand. On this page are published all the documents necessary for the use of your device. Pro Express GV8430E0 by TEFAL.
USER MANUAL Pro Express GV8430E0 TEFAL
ANTI-CALC AUTOCLEAN*

natural_image
White Tefal air iron with black and white branding, no visible text or symbols on the device itself.DE * je nach Modell
EN * depending on model
FR * selon modèle
natural_image
Diagram of a car interior with an upward arrow indicating motion or force (no text or symbols)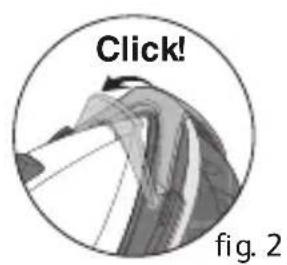
natural_image
Cross-sectional diagram of a mechanical component, possibly a gear or tool, with no visible text or symbols.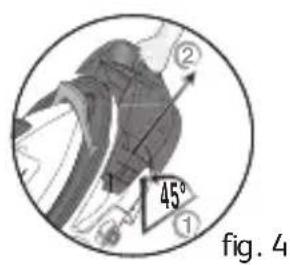
natural_image
Circular cropped image showing a person's torso and arm, labeled 'fig. 6' (no readable text or symbols)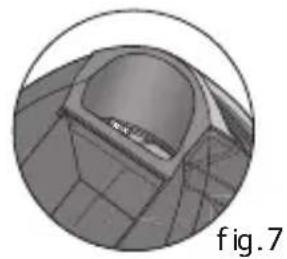
natural_image
3D rendered mechanical component with grid pattern, no visible text or symbols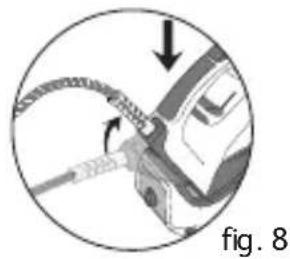
natural_image
Close-up of a mechanical component with a coiled cable and directional arrows, labeled 'fig. 8' (no readable text or symbols)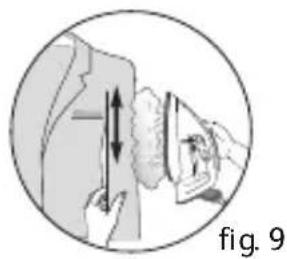
natural_image
Illustration of a hand holding a small object with a vertical double-headed arrow, labeled 'fig. 9' (no text or symbols on the diagram itself)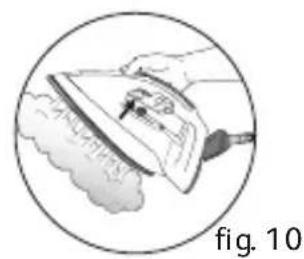
natural_image
Illustration of a hand using a power tool to clean or brush the ceiling (no text or symbols)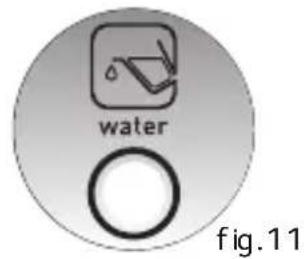


natural_image
Illustration of a hand using a tool to clean or adjust a machine component, labeled 'fig. 24' (no text or symbols on the diagram itself)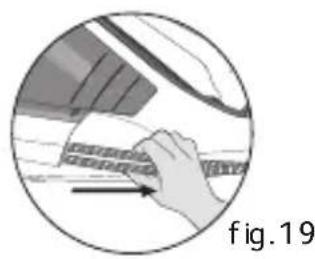
natural_image
Illustration of a hand using a tool on a mechanical component, labeled 'fig.19' (no text or symbols on the diagram itself)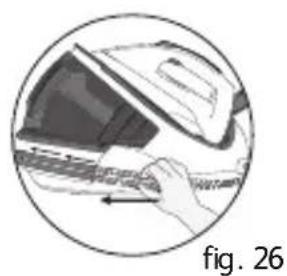
natural_image
Illustration of a hand using a tool to interact with a device, labeled 'fig. 26' (no text or symbols on the diagram itself)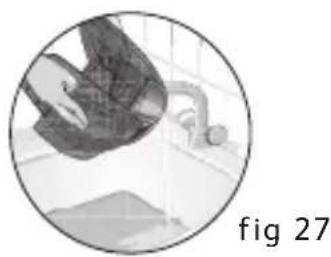
natural_image
Circular grayscale image showing a hand holding a device, with no visible text or symbols.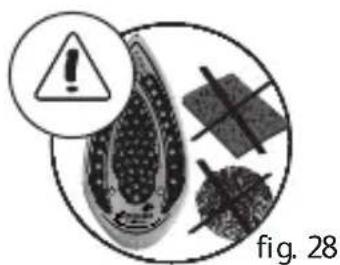
Fig A
natural_image
Close-up of a mechanical component with concentric circles and a curved handle (no visible text or symbols)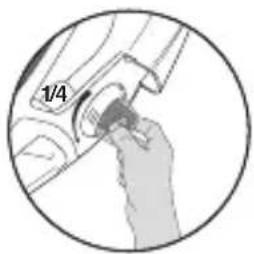
natural_image
Close-up of a hand using a tool to adjust or install a mechanical component, no visible text or symbols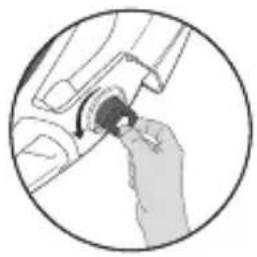
natural_image
Illustration of a hand using a tool to adjust or install a mechanical component (no text or symbols visible)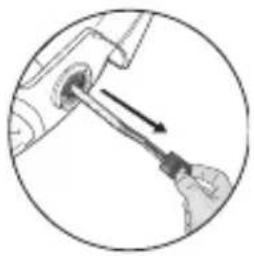
natural_image
Diagram of a hand using a screwdriver to lift a mechanical component (no text or symbols visible)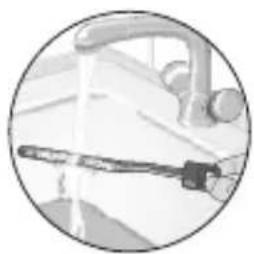
natural_image
Close-up of a kitchen faucet with a tool inserted, no visible text or symbols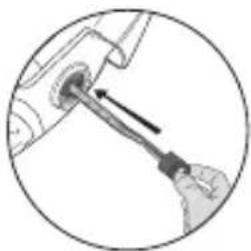
natural_image
Close-up of a hand using a screwdriver to adjust a mechanical component (no text or symbols visible)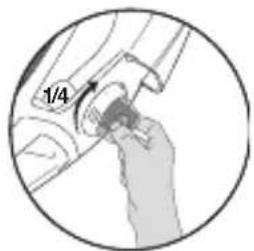
natural_image
Close-up of a hand holding a small mechanical component, possibly a tool or tool, with no visible text or symbols.Fig B
natural_image
Circular diagram showing a mechanical component with concentric circles and a curved slot, no text or symbols present.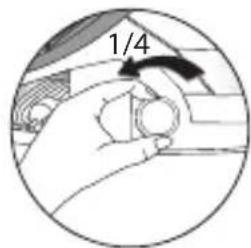
natural_image
Illustration of a hand holding a medical device inside a circular frame (no text or symbols)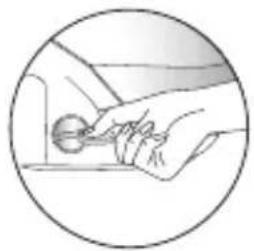
natural_image
Illustration of a hand holding a small object, enclosed in a circular frame (no text or symbols)
natural_image
Illustration of a hand holding a medical device inside a circular frame (no text or symbols)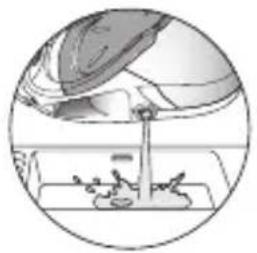
natural_image
Illustration of a mechanical device with a lever and base, showing fluid or material flow (no text or symbols)DE
Important recommendations
Safety instructions
- Please read these instructions carefully before first use. This product has been designed for domestic use only. Any commercial use, inappropriate use or failure to comply with the instructions, the manufacturer accepts no responsibility and the guarantee will not apply.
-
Never unplug the appliance by pulling the power cord. Always unplug your appliance:
-
before filling the water tank or rinsing the boiler,
- before cleaning the appliance,
-
after each use.
-
The appliance must be used and placed on a flat, stable, heat-resistant surface. When you place the iron on the iron rest, make sure that the surface on which you place it is stable.
- This appliance is not intended to be used by persons (including children) with reduced or impaired physical, sensory or mental capacities or persons lacking appropriate knowledge or experience, unless a person responsible for their safety provides either supervision or appropriate instructions concerning use of the appliance prior to its use.
- Children should be supervised to ensure they do not play with the appliance.
- This appliance may be used by children aged 8 or over and persons lacking appropriate knowledge or experience or persons with reduced or impaired
physical, sensory or mental capacities provided that they have been thoroughly instructed regarding use of the appliance, are supervised, and understand the risks involved. Children must not be allowed to play with the appliance. Cleaning and maintenance must not be carried out by children unless they are aged 8 or over and are supervised. Keep the appliance and power cord out of the reach of children under 8 years of age.
- The surfaces of your appliance can reach very high temperatures when functioning, which may cause burns. Do not touch the hot surfaces of the appliance (accessible metal parts and plastic parts adjacent to the metallic parts).
- Never leave the appliance unattended :
- when it is connected to the mains, - until it has cooled down (around 1 hour).
- Before rinsing the boiler/rinsing the anti-scale valve (depending on the model), wait until the appliance is completely cold and has been unplugged for at least 2 hours before unscrewing the boiler rinse cap/ the scale collector cover.
- Warning: if the boiler cap or the boiler rinse cap (depending on the model), is dropped or severely knocked, have it replaced by an Approved Service Centre, as it may be damaged.
- When rinsing the boiler, never fill it directly from the tap.
- The boiler cap must not be opened during use.
- The appliance must not be used if it has been dropped, if it has any visible damage, if it leaks, or if it functions
abnormally in any way. Do not attempt to dismantle your appliance: have it examined at a Tefal Approved Service Centre to avoid any danger.
- Check the electrical power and steam cords for signs of wear or damage prior to use. If the electrical power cord or the steam cord is damaged, it must be replaced by Tefal Approved Service Centre to avoid any danger.
- For your safety, this appliance conforms to all applicable regulations (Low Voltage Directive, Electromagnetic Compatibility, Environment, etc).
- Your steam generator iron is an electrical appliance: it must be used under normal conditions of use. It is designed for domestic use only.
- It is equipped with 2 safety systems:
- a pressure release valve designed to avoid excessive pressure. In the event of malfunction, the valve releases excess steam.
- a thermal fuse to avoid overheating.
• Always plug your steam generator iron:
- into a mains circuit with voltage between 220 V and 240 V (Alternating current only),
- a socket outlet with ab earth connection.
Connecting to the wrong voltage may cause irreparable damage to the appliance and will invalidate your guarantee.
If you are using a mains extension lead, ensure that it is correctly rated (16A) with an earth connection, and is fully extended.
- Completely unwind the power cord before plugging into an earthed socket outlet.
- The sole plate of your iron and the iron rest on the base unit can reach extremely high temperatures, and can cause burns: do not touch them. Never touch the electrical power cords with the sole plate of the iron.
- Always use a vented/mesh ironing board and be careful of hot steam when roning close to the edges of the board.
- Your appliance emits steam, which can cause burns. Always handle the iron with care, especially when ironing vertically. Never direct the steam towards people or animals.
- Never immerse your steam generator iron in water or any other liquid. Never place it under a running tap.
PLEASE RETAIN THIS INSTRUCTION BOOKLET FOR FUTURE REFERENCE
Recommendations importantes
TENTO NÁVOD K POUŽITÍ SI PROSÍM USCHOVEJTE
-
Steam control button
-
Iron temperature control slide
-
Iron thermostat light
-
Ultracord system (depending on model)
-
Iron rest
-
Illuminated on / off switch
-
Electric cord rewind button (depending on model)
-
Power cord storage space
-
Power cord and plug
-
Turbo button (depending on model)*
-
Lock-System hoop (depending on model) *
-
Removable water tank
-
Removable water tank handle
-
Steam generator boiler (in the base unit)
-
Iron-base steam cord
-
Slide storage place for the steam cord
-
Anti-scale valve cap*
-
Anti-scale valve (depending on model)*
-
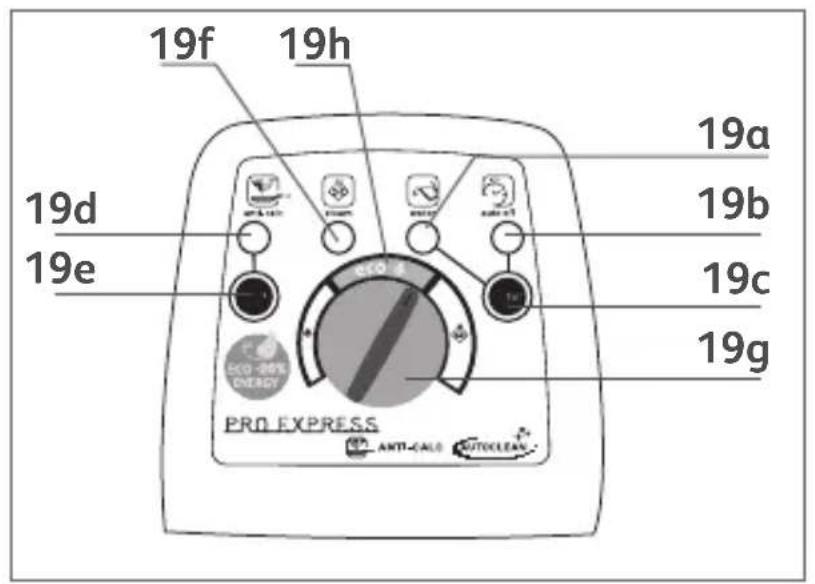
Control panel
a. "Water tank empty" light
b. "Auto off" light
c. Restart button
d. "Anti-calc" light
e. "Reset" button
f. "Steam ready" light
g. Steam output control dial
h. Zone ECO (depending on model)*
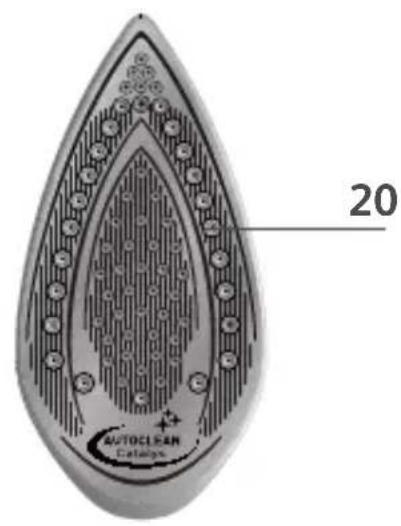
- Autoclean Soleplate (depending on model)*
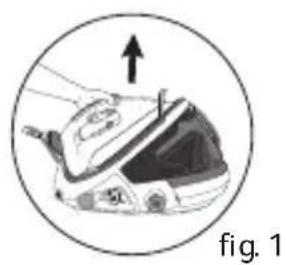
Locking system for retaining the iron on the base - Lock-system (depending on model)
- Your steam generator maybe equipped with a retaining hoop which locks the iron on its base for easier transport and storage – fig.1:
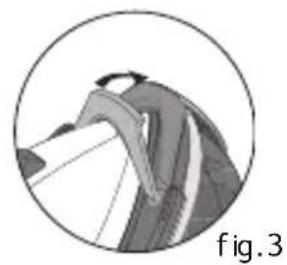
- Locking - fig.2 - Unlocking - fig.3
- To carry your steam generator by the iron handle:
- Place the iron on the iron rest of the generator and raise the retaining hoop over the iron until it locks into place (audible click) – fig.2.
- Grasp the handle of the iron to carry your steam generator – fig.1.
- Ironing Board: due to the powerful steam output, a mesh type ironing board must be used to allow any excess steam to escape and to avoid steam venting sideways.
Preparation
What water may be used?
- Tap water : Your appliance has been designed to function using untreated tap water. If your water is very hard, we recommend you use a mix of 50 % untreated tap water and 50 % distilled water available in most shops.
- Types of water not to use : Heat concentrates the elements contained in water during evaporation. The types of water listed below may contain organic waste, mineral or chemical elements that can cause spitting, brown staining or premature wear of the appliance: water from clothes dryers, scented or softened water, water from refrigerators, batteries, air conditioners, rain water, boiled, filtered or bottled water. These types of water should not be used in your TEFAL iron. Also only use distilled water as advised above.
- Always remember: Never use rainwater or water containing additives (like starch, fragrance or water from domestic appliances). Such additives can affect the steam properties and at high temperature, form deposits in the steam generator chamber which are likely to stain your washing.
Filling the water tank
- Pull the cover up over the iron until the protection system automatically locks (you will hear a "click") - fig.2
- Remove the water tank by pulling on the handle (at the front of the generator) – fig.4.
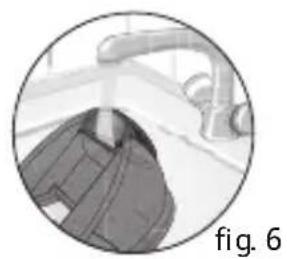
- Fill the tank with water, taking care not to exceed the maximum level – fig.6. and fig.7.
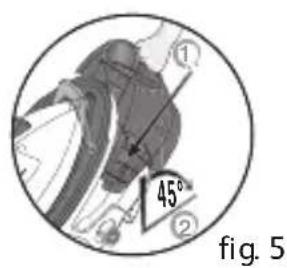
- Slide the tank back into its housing until its "clicks" into place – fig.5.
- Press the unlocking button on the protective cover until you hear a click, and then fold it back on to the generator base unit – fig.3.
Ultracord System (according to model).
- Your iron maybe equipped with an extension cord system to prevent the cord from dragging over the laundry and creasing it again when ironing. It also keeps the cord out of the way of your hand.
Ironing with the Ultracord system:
- The Ultracord system automatically tips back.
- Each time you put the iron back on its base, the Ultracord system fits into the heel of the iron and opens back up automatically when you use the iron.
Storing the generator:
- Fold the connector back onto the heel.
The first time the appliance is used, there may be some fumes and smell but this is not harmful. They will not affect use and will disappear rapidly.
- Completely unwind the power cord and the steam cord from its storage space – 19.
- Lower the retaining hoop (depending on model) to unlock the safety catch – fig.3.
- Plug in your steam generator to an earthed socket.
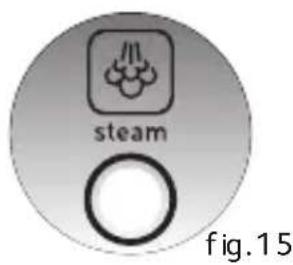
- Press on the on / off switch. The green light (located on the control panel) flashes and the boiler heats up – fig.15.
When the green “steam ready” light stops flashing (after 2 minutes approximately), the appliance is ready.
EN
Use
Steam ironing
- Place the iron's temperature control slide according to the type of fabric to be ironed (see table below).
- The iron's light will come on. Important: whenever you start using your iron and whenever you reduce the temperature during use, the iron is ready for use when its indicator light goes out and when the green light located on the control panel comes on and remains on. During use, when you increase the temperature of the iron, you can start ironing immediately, but make sure you only increase your steam flow once the iron's light has gone out.
- Adjust the steam output control dial (located on the control panel).
- When the iron is in use, the iron thermostat light on the iron comes on and goes off according to the soleplate temperature requirement without this having any effect on the use of the appliance.
- To obtain steam, press on the steam control button under the iron handle and keep it pressed – fig.10. The steam will stop when you release the button.
- When starting, and regularly while it is being used, your steam generator's electric pump injects water into the boiler. It makes a noise but this is quite normal. You may also hear a clicking noise which is the steam valve opening. Again this is normal.
• Always spray starch onto the reverse side of the fabric to be ironed
Do not place the iron on a metal support. When taking a break from ironing, always place the iron on the iron rest plate of the unit. It is equipped with non-slip pads and has been designed to withstand high temperatures. Always use a vented/mesh ironing board and be careful of hot steam when ironing close to the edges of the board.
| SETTING THE TEMPERATURE AND STEAM OUTPUT ACCORDING TO TYPE OF FABRIC TO BE IRONED | ||
| TYPE OF FABRICS | SETTING TEMPERATURECONTROL | SETTING STEAM OUTPUT CONTROLDIAL |
| Synthetics(polyester, acetate, acrylic, polyamide) | ● |  |
| Silk, Wool | ●● |  |
| Linen, cotton | ●●● |  |
To prime the steam circuit, either before using the iron for the first time, or if you have not used the steam function for a few minutes, press the steam control button several times in a row, holding the iron away from your clothes. This will enable any cold water to be ejected from the steam circuit.
Check the garment label if you are not sure what type of fabric it is made of.
- Iron temperature setting:
- Start with the fabrics to be ironed at a low temperature ( ) and finish with those which need higher temperatures ( or Max).
- For mixed fibre fabric: set the ironing temperature to the setting for the most delicate fabric.
- Woollen garments: press repeatedly on the steam control button – fig.10 to obtain short bursts of steam, without placing the iron on the garment itself.
- Steam output setting:
- Thick fabric: increase the steam setting.
- If you intend to iron at low temperature, set the steam control button to MINI and press the steam button whenever needed.
- If you put your thermostat in the "min" position, the iron does not become hot.

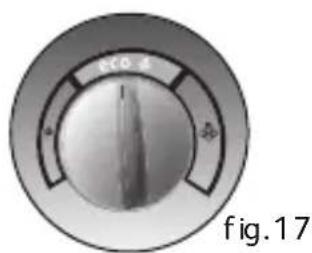
MODE ECO:
Your steam generator iron has an ECO mode function which uses less power whilst still guaranteeing a sufficient steam flow for you to iron your garments properly. In order to use this function, once the thermostat of your iron has been correctly set (see table above), position the steam flow setting on the ECO segment - fig.17. Using the Eco mode will allow you to press fabrics at minimum temperature •••. However, for very thick or wrinkled fabrics, we recommend using the maximum temperature in order to guarantee best results.
Dry ironing
- Do not press the steam control button under the iron handle.
Recommendations: for fabrics other than linen or cotton, hold the iron a few centimetres from the garment to avoid burning the fabric.
- Set the iron temperature control slide and the steam output control dial (located on the control panel) to the MAX position.
- Hang the garment on a coat hanger and hold the fabric slightly taut with one hand. As steam is very hot: never attempt to remove creases from a garment while it is being worn, always hang garments on a coat hanger.
- Holding the iron in a vertical position, tilted slightly forwards, press repeatedly on the steam control button (underneath the iron handle) moving the iron from top to bottom – fig.9.
Refilling the water tank
- When the red "water tank empty" light starts flashing, it means that you have no more steam.fig.11.
- Remove the water tank by pulling on the handle (at the front of the generator) and fill it, taking care not to exceed the maximum level.
- Slide the tank back into its housing until its clicks into place.
- Press the "restart" button on the control panel – fig.12. to continue ironing. When the green light stops flashing, the steam is ready.
TURBO Function (according to model)
- Press the Turbo control 2 or 3 times when you need extra steam:
- for ironing thicker fabrics,
- for getting rid of creases,
- for powerful vertical steaming.
Use the Turbo function with care as its exceptional steam power can cause burns.
Catalysis Autoclean Soleplate (according to model)
- The iron of your steam generator comes with a self-cleaning soleplate which functions by catalysis.
- Its unique coating makes it possible to eliminate all the impurities arising from normal usage.
- We recommend you always place your iron on its base or on the iron rest plate in order to protect its self-cleaning coating.
Maintenance and cleaning
Cleaning your generator
- Do not use detergent or descaling products for cleaning the soleplate base-unit.
- Never hold the iron or the base unit under the tap.
- Cleaning the soleplate (depending on model): The iron of your steam generator comes with a self-cleaning soleplate which functions by catalysis. Its unique coating actively allows it to eliminate all the impurities which are generated every day when the appliance is in normal use. Nevertheless, using your iron at an unsuitable temperature can leave marks which will need to be cleaned manually. In this case we advise you to use a soft damp cloth on the soleplate whilst it is still warm so as not to damage the coating.
- Clean the plastic parts of the appliance occasionally with a soft cloth.
Cleaning tip: For easier, non-corrosive cleaning of your iron's soleplate, use a damp sponge on the soleplate while it is still warm.
Do not use any descaling substances (vinegar, industrial descaling products, etc.) when rinsing the anti-scale valve: they could damage it. Before descaling or cleaning your generator, you must let it cool down for at least 2 hours to avoid any risk of burns.
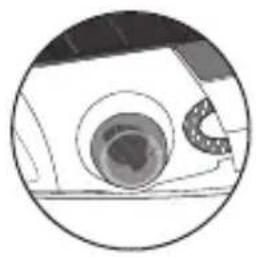
Descaling your generator easily - Fig. A
For longer generator life, and to avoid scale emissions, your generator is equipped with a built-in anti-scale valve. This valve, located in the tank, automatically removes the scale that forms inside. Operation:
- An orange “anti-scale” light located on the control panel starts blinking to tell you that the anti-scale valve needs rinsing - fig.14

Caution: this operation must not be performed until the generator has been unplugged for at least two hours and has completely cooled down. When performing this operation, the generator should be placed near a sink as water may flow out of the tank when it is opened.
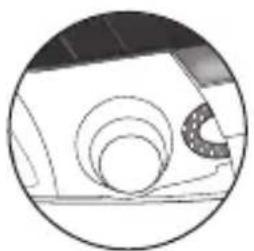
- Once the generator has cooled down completely, remove the anti-scale valve cap.
- Unscrew the anti-scale valve and remove it from the housing; it contains the scale that has built up in the tank.
- To clean the valve properly, just rinse it under running water to remove the scale it contains.
- Put the valve back into its housing and screw it in completely to keep it watertight.
- Put the cap back on.
- In addition to this regular maintenance, we recommend complete rinsing of the tank every six months or after every 25 uses. To do this:
- Check that the steam generator is cold and has been unplugged for more than 2 hours.
-
Place the steam generator on the edge of the sink and put the iron standing upright alongside it.
-
Remove the collector cover and unscrew the scale collector.
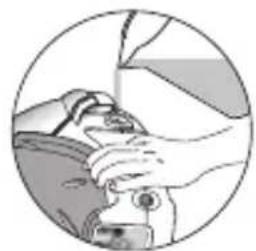
- Hold your steam generator at an angle and use a jug to fill the boiler with with 1/4 litre of tap water.
- Shake the case for a few seconds then empty it completely into the sink.
- Fit the collector back in its housing and screw it on tightly to ensure it is watertight.
- Put the scale collector cover back in place.
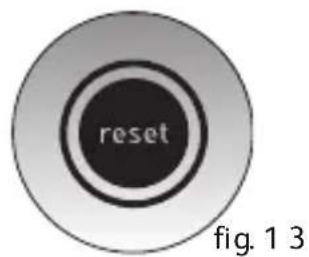
The next time you use your iron, press the “reset” button on the control panel to turn off the orange “anti-scale” light - fig.13
EN
Rinsing the boiler - Fig.B
Caution! Above all, you must not use descaling products to rinse the boiler: they may damage it. Before cleaning or emptying your generator, it is imperative that you leave it to cool for more than 2 hours, to prevent any risk of burns.
- To extend the efficient operating life of your boiler and avoid scale particles on your linen, your generator is equipped with an orange "boiler rinse" warning light that flashes on the control panel after about 10 uses.
- If the orange “boiler rinse” warning light flashes, you can continue ironing normally but remember to rinse the boiler first, the next time that you use it.
- Before proceeding, check that the generator is cool and unplugged for more than 2 hours.
- Place your steam generator on the edge of your sink, with the iron to one side, standing on its heel.
- Unscrew anti-clockwise a quarter of a turn the boiler rinse cap cover
- Using a coin, gently unscrew the boiler rinse cap.
- Holding your steam generator in a tilted position, and using a jug, fill the boiler with 1/4 litre of tap water.
- Shake the base unit for a few moments and then empty it completely into your sink. To obtain the best result, we recommend that this operation is done twice.
- Screw back and tighten up the boiler rinse cap with a coin.
- Put the boiler rinse cap cover back in place.
- The next time you use the generator, hold down the "Reset" button to turn off the orange light - fig.13.
"Auto off" System
- For your safety, the generator is equipped with an “auto off” system which switches the generator to standby mode if it is not used for 8 minutes or if you forget to turn it off.
- A red light blinks on the control panel to indicate that the appliance is in standby mode - fig.16.
• To reactivate the generator: - Press the "Restart" button or push the steam control trigger.
- Wait for the light on the "steam ready" button to stop blinking before your start ironing again.
- If the steam trigger is not pressed for at least 8 minutes, the “auto off” system will cut off your generator for your safety.
Storing your generator
- Place the iron on the iron rest of the generator.
- Press the illuminated on/off switch and unplug the generator.
- Raise the retaining hoop over the iron until it locks into place (audible click) – fig.2. Your iron is then safely retained on its base.
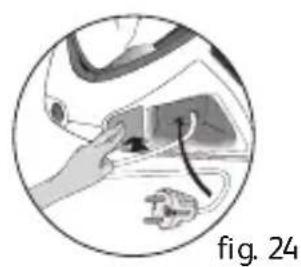
- Store the steam cord in its slide storage place. Take it, fold it in two so as to make a loop. Put the end of this loop in the slide storage place then push gently until you see the end on the other side of the slide storage place – fig.19.
- Fold the Ultracord system back on the heel - fig.8.
- Leave the iron (and the iron rest) to cool down for 1 hour.
- You can then put your steam generator away, carrying it by the handle of the iron.
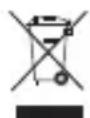
Environment protection first!
Your appliance contains valuable materials which can be recovered or recycled.
Leave it at a local civic waste disposal centre.
A problem with your generator?
| Problems | C auses | Solutions |
| The generator does not come on and the thermostat light and the on/off switch are not illuminated. | The appliance is not switched on. | Check that your appliance is correctly plugged in and press the illuminated on/off switch. |
| The “auto off” system is activated. | Press the "Restart" button or push the steam control trigger. | |
| Water runs out of the holes in the soleplate. | Water has condensed in the pipes because you are using steam for the first time or you have not used it for some time. | Press on the steam control button away from your ironing board until the iron produces steam. |
| The soleplate is not hot enough. | Decrease the steam output while ironing at low temperature (steam output control dial on the control panel). Wait for the thermosta light to go out before activating the steam control button. | |
| Water streaks appear on the linen. Your ironing | board is saturated with water because it is not suitable for use with a steam generator. | Make sure you have a vented/mesh ironing board |
| White streaks come through the holes in the soleplate. | Your boiler has a build-up of scale because it has not been rinsed out regularly. | Rinse the anti-scale valve (see the “descaling your generator” section). Rinse the boiler |
| Brown streaks come through the holes in the soleplate and stain the linen. | You are using chemical descaling agents or additives in the water for ironing. | Never add this type of product in the water tank or in the boiler (see for what water may be used). Contact an Approved Service Centre. |
| Fabric fibres have accumulated in the holes of the soleplate and are burning. | Clean the soleplate with a non-metallic sponge. Vacuum the holes from time to time. | |
| Your linen is not rinsed sufficiently or you have ironed a new garment before washing it | Ensure linen is rinsed thoroughly to remove any soap deposits or chemicals on new garments which may be sucked up by the iron. | |
| The soleplate is dirty or brown and may stain the linen. | You are ironing at too high a temperature. | See our recommendations regarding temperature control setting. |
| You are using starch. | Always spray starch on the reverse side of the fabric to be ironed. | |
| There is no steam or there is little steam. The | water tank is empty (red light on). | Fill the water tank. |
| The steam output control dial is set at minimum. | Increase the steam output (control dial on the control panel). | |
| The soleplate temperature is set to the maximum. | The generator is working but steam is very hot and dry. As a consequence, it is less visible. | |
| The red “water tank empty” light is on. The water tank is empty. Fill the water tank. | ||
| Steam escapes from the anti-scale valve plug. Steam escapes from the rinse plug. | The anti-scale valve plug has not been tightened correctly. The rinse plug has not been tightened correctly. | Tighten the anti-calc valve plug correctly. Tighten the rinse plug correctly. |
| The anti-scale valve plug is damaged. The rinse plug seal is damaged. | Contact an Approved Service Centre to order a new anti-scale valve. | |
| Steam or water escapes under the appliance. | The generator is faulty. Stop using the generator and contact an Approved Service Centre. | |
| The soleplate is scratched or damaged. You have placed your iron flat on a metallic rest-plate. | Always place your iron on its base or on the iron rest plate. | |
| Refer to the section « clean the soleplate ». | ||
HELPLINE: If you have any problems or queries please call our Customer Relations team first for expert help and advice: 0845 602 1454 - UK (01) 677 4003 - ROI or consult our website - www.tefal.co.uk
FR • MERCI DE VOUS RÉFÉRER AUX CONSIGNES DE SÉCURITÉ AU DÉBUT DE CETTE NOTICE AVANT D'UTILISER VOTRE APPAREIL.
Description
"Auto off" - systeem
Still inn temperaturen


- DE
- Important recommendations
- Safety instructions
- PLEASE RETAIN THIS INSTRUCTION BOOKLET FOR FUTURE REFERENCE
- Recommendations importantes
- TENTO NÁVOD K POUŽITÍ SI PROSÍM USCHOVEJTE
- Locking system for retaining the iron on the base - Lock-system (depending on model)
- Preparation
- What water may be used?
- Filling the water tank
- Ultracord System (according to model).
- Use
- Steam ironing
- - Iron temperature setting:
- - Steam output setting:
- MODE ECO:
- Dry ironing
- Refilling the water tank
- TURBO Function (according to model)
- Catalysis Autoclean Soleplate (according to model)
- Maintenance and cleaning
- Cleaning your generator
- Descaling your generator easily - Fig. A
- Rinsing the boiler - Fig.B
- "Auto off" System
- Storing your generator
- Environment protection first!
- FR • MERCI DE VOUS RÉFÉRER AUX CONSIGNES DE SÉCURITÉ AU DÉBUT DE CETTE NOTICE AVANT D'UTILISER VOTRE APPAREIL.
- Description
- "Auto off" - systeem
- Still inn temperaturen
Brand : TEFAL
Model : Pro Express GV8430E0
Category : Steam plant