
BioPower - Mechanical chipper STIGA - Free user manual and instructions
Find the device manual for free BioPower STIGA in PDF.
| Product type | Mechanical chipper (shredder) |
| Brand | STIGA |
| Model | BioPower |
| Power supply | 230-240 V AC single-phase, 10 A |
| Maximum branch diameter | 40 mm |
| Blade type | 2 double-edged blades (reversible) |
| Motor protection | Integrated overload protection device |
| Safety interlock | Prevents starting when the housing is open |
| Recommended residual current circuit breaker | Yes, for electrical safety |
| Emergency stop | Red button |
| Noise level | Compliant with directive 2000/14/EC |
| Use | Private, non-professional |
| Materials to shred | Twigs, branches, hedge trimmings and brushwood |
| Materials not to shred | Glass, metal, stones, plastic, fabric, soil roots |
| Routine maintenance | Clean after use, brush the blades, no water jet |
| Blade replacement | Possible, reversible blades, Allen key provided |
| Spare parts | Use only original STIGA parts |
| Warranty | According to legal provisions, excluding normal wear |
| Compliance standards | EN 13683, EN 292-2, EU directives |
Frequently Asked Questions - BioPower STIGA
User questions about BioPower STIGA
0 question about this device. Answer the ones you know or ask your own.
Ask a new question about this device
Download the instructions for your Mechanical chipper in PDF format for free! Find your manual BioPower - STIGA and take your electronic device back in hand. On this page are published all the documents necessary for the use of your device. BioPower by STIGA.
USER MANUAL BioPower STIGA
RECYCLING - ÅTERVINNING Chipper - Kompostkvarn
BioPower
BRUKSANVISNING SV .... 3
KAYTTOOHJEET FI.....8
BRUGSANVISNING DA....13
BRUKSANVISNING NO... 18
INSTRUCTIONS FOR USE EN....28
MODE D'EMPLO FR....33
GEBRUKSAANWJZINGI NL....38
ISTRUZIONI PER L'USO IT....43
INSTRUCCIONES DE USO ES....48
INSTRUÇÉS DE UTILIZÂO PT......53
INSTRUKCJA OBSLUGI PL....58
HHCTPYKIIH NIOJIb3OBATEJI RU....63
NAVOD KPOUZITI CS....69
HASZNALATI UTASITAS HU...73
NAVODILA ZA UPORABO SI.....78
SAKERHETSFORESKRIFTER

BYTE/VANDNING AV KNIVAR
NULSPÄNDINGSAFBBRYDER
NULSPÄNDINGSAFBRYDER
This symbol indicates WARNING. Personal injury and/or damage to property may result if the instructions are not followed carefully.
GENERAL
- Study the warning stickers on the machine. Replace damaged or illegible warning stickers.
- Please read through these instructions carefully. Learn all the controls and the correct use of the machine. Keep these instructions.
- Never use the machine if others, particularly children or animals, are in the vicinity. Anyone who is not aware of these regulations may not use the machine. Never let children use the machine.
- The user is responsible for accidents that happen to other people or their property.
PREPARATIONS
- Wear protective gloves, protective glasses and hearing protectors. Avoid loose clothing.
Always stand steadily and in balance. Do not stretch towards the machine. Never stand at a higher level than the machine during use.
During use, the machine should be flat and on a firm surface. - Ensure that all screws and nuts are properly tightened before use.
- Only use the machine in dry conditions and never outdoors when it is raining.
- Never use the machine with damaged safety devices or without protection.
USING THE MACHINE
- Hard objects such as stones, bottle, cans or pieces of metal must not be fed into the feeding hopper. This can cause damage to the machine.
- If the machine becomes blocked, stop the motor and disconnect the plug. Pull out any objects and check for damage.
- Do not tug on the connection cable. Do not hold the cable taught. This can cause damage in the plugs or in the cable's insulation. Such damage is invisible but can be dangerous.
-
Always keep the connection cable away from the machine. Disconnect the plug from the electric socket and check the cable regularly for signs of damage or ageing. Do not use the machine with a damaged connection cable.
-
If the fuse blows or if the overload protection is triggered, this is a sign that the machine is overloaded and/or that two many appliances are connected to the same lead. Check the cause and remedy. Do not install a more powerful fuse.
- Keep hands, other parts of your body and clothing away from the feeding hopper and the discharge chute. Never wear loose clothing or clothes with belts or straps when using the machine.
- Keep away from the discharge zone when starting the motor.
- Do not allow the pile of processed material to build up inside the discharge chute. This blocks new material and can block the machine.
- Keep your face and the rest of your body away from the feeding hopper.
- Never move the machine by pulling the cable. The machine must not be moved with the motor running.
- Do not leave the machine unsupervised, but first switch off the motor and disconnect the plug.
MAINTENANCE AND STORAGE
- During cleaning and maintenance, wear protective gloves to avoid injury.
- Switch off the motor and disconnect the plug before carrying out checks or maintenance on the machine.
- If a foreign object comes into contact with the blades or if the machine produces an abnormal noise level or abnormal vibrations, switch off the motor immediately. Disconnect the plug and check for any damage.
- The manufacturer's obligations and liability (according to the Product Liability Act) only apply on the condition that only spare parts approved by the manufacturer or spare parts of at least the same quality are used.
- Store the machine in a dry place.
- When, after many years of service, your machine needs to be replaced or is no longer required, we recommend that the machine is returned to your distributor for recycling.
1 GENERAL

This symbol indicates WARNING. Serious personal injury and/or damage to property may result if the instructions are not followed carefully.

You must read these instructions for use and its SAFETY INSTRUCTIONS carefully, before starting up the machine.
SYMBOLS
The following symbols appear on the machine. They are there to remind you of the care and attention required during use and maintenance. This is what the symbols mean:
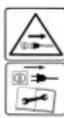
Warning! Read the instruction manual and the safety instructions before using the machine.
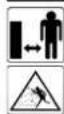
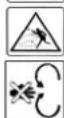
Warning! Keep spectators away. Beware of objects being flung out.

Warning! Do not put hands or feet under the cover of the machine when it is running.

Warning - rotating blades! The blades will continue to rotate after the machine has been switched off.
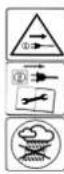
Warning! Remove the plug from the wall socket before carrying out any kind of maintenance.

Warning! Only use the machine in dry conditions and never outdoors when it is raining.
Warning! Wear safety gloves, safety goggles and hearing protection.
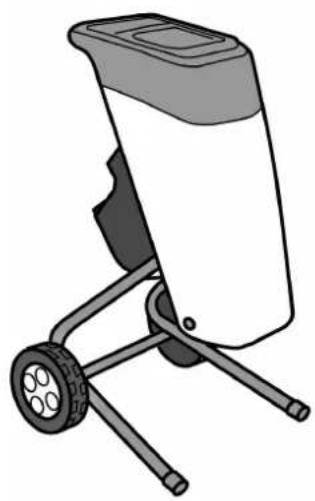
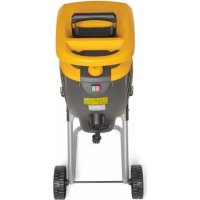
ASSEMBLY
- Open the box and unpack all the parts.
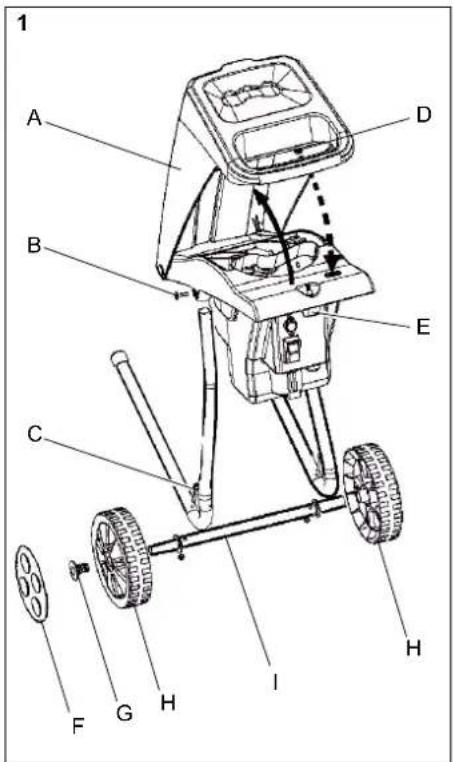
- See fig. 1. Open the casing (A) by releasing the knob (E) to access the leg's mounting holes.
- Install the legs using two screws M6x20 (B). Tighten using the Allen key provided.
- Install the wheel axle (I) using the two M6x50 screws (C) and nuts. Use the wrenches provided.
- Slide the wheels (H) on to the axles.
- Install the lugs (G) in the end of the axles. Knock in the lugs using a hammer.
- Install the wheel caps (F).
USING THE MACHINE
GENERAL
This machine is only intended for private use, not to be used professionally.
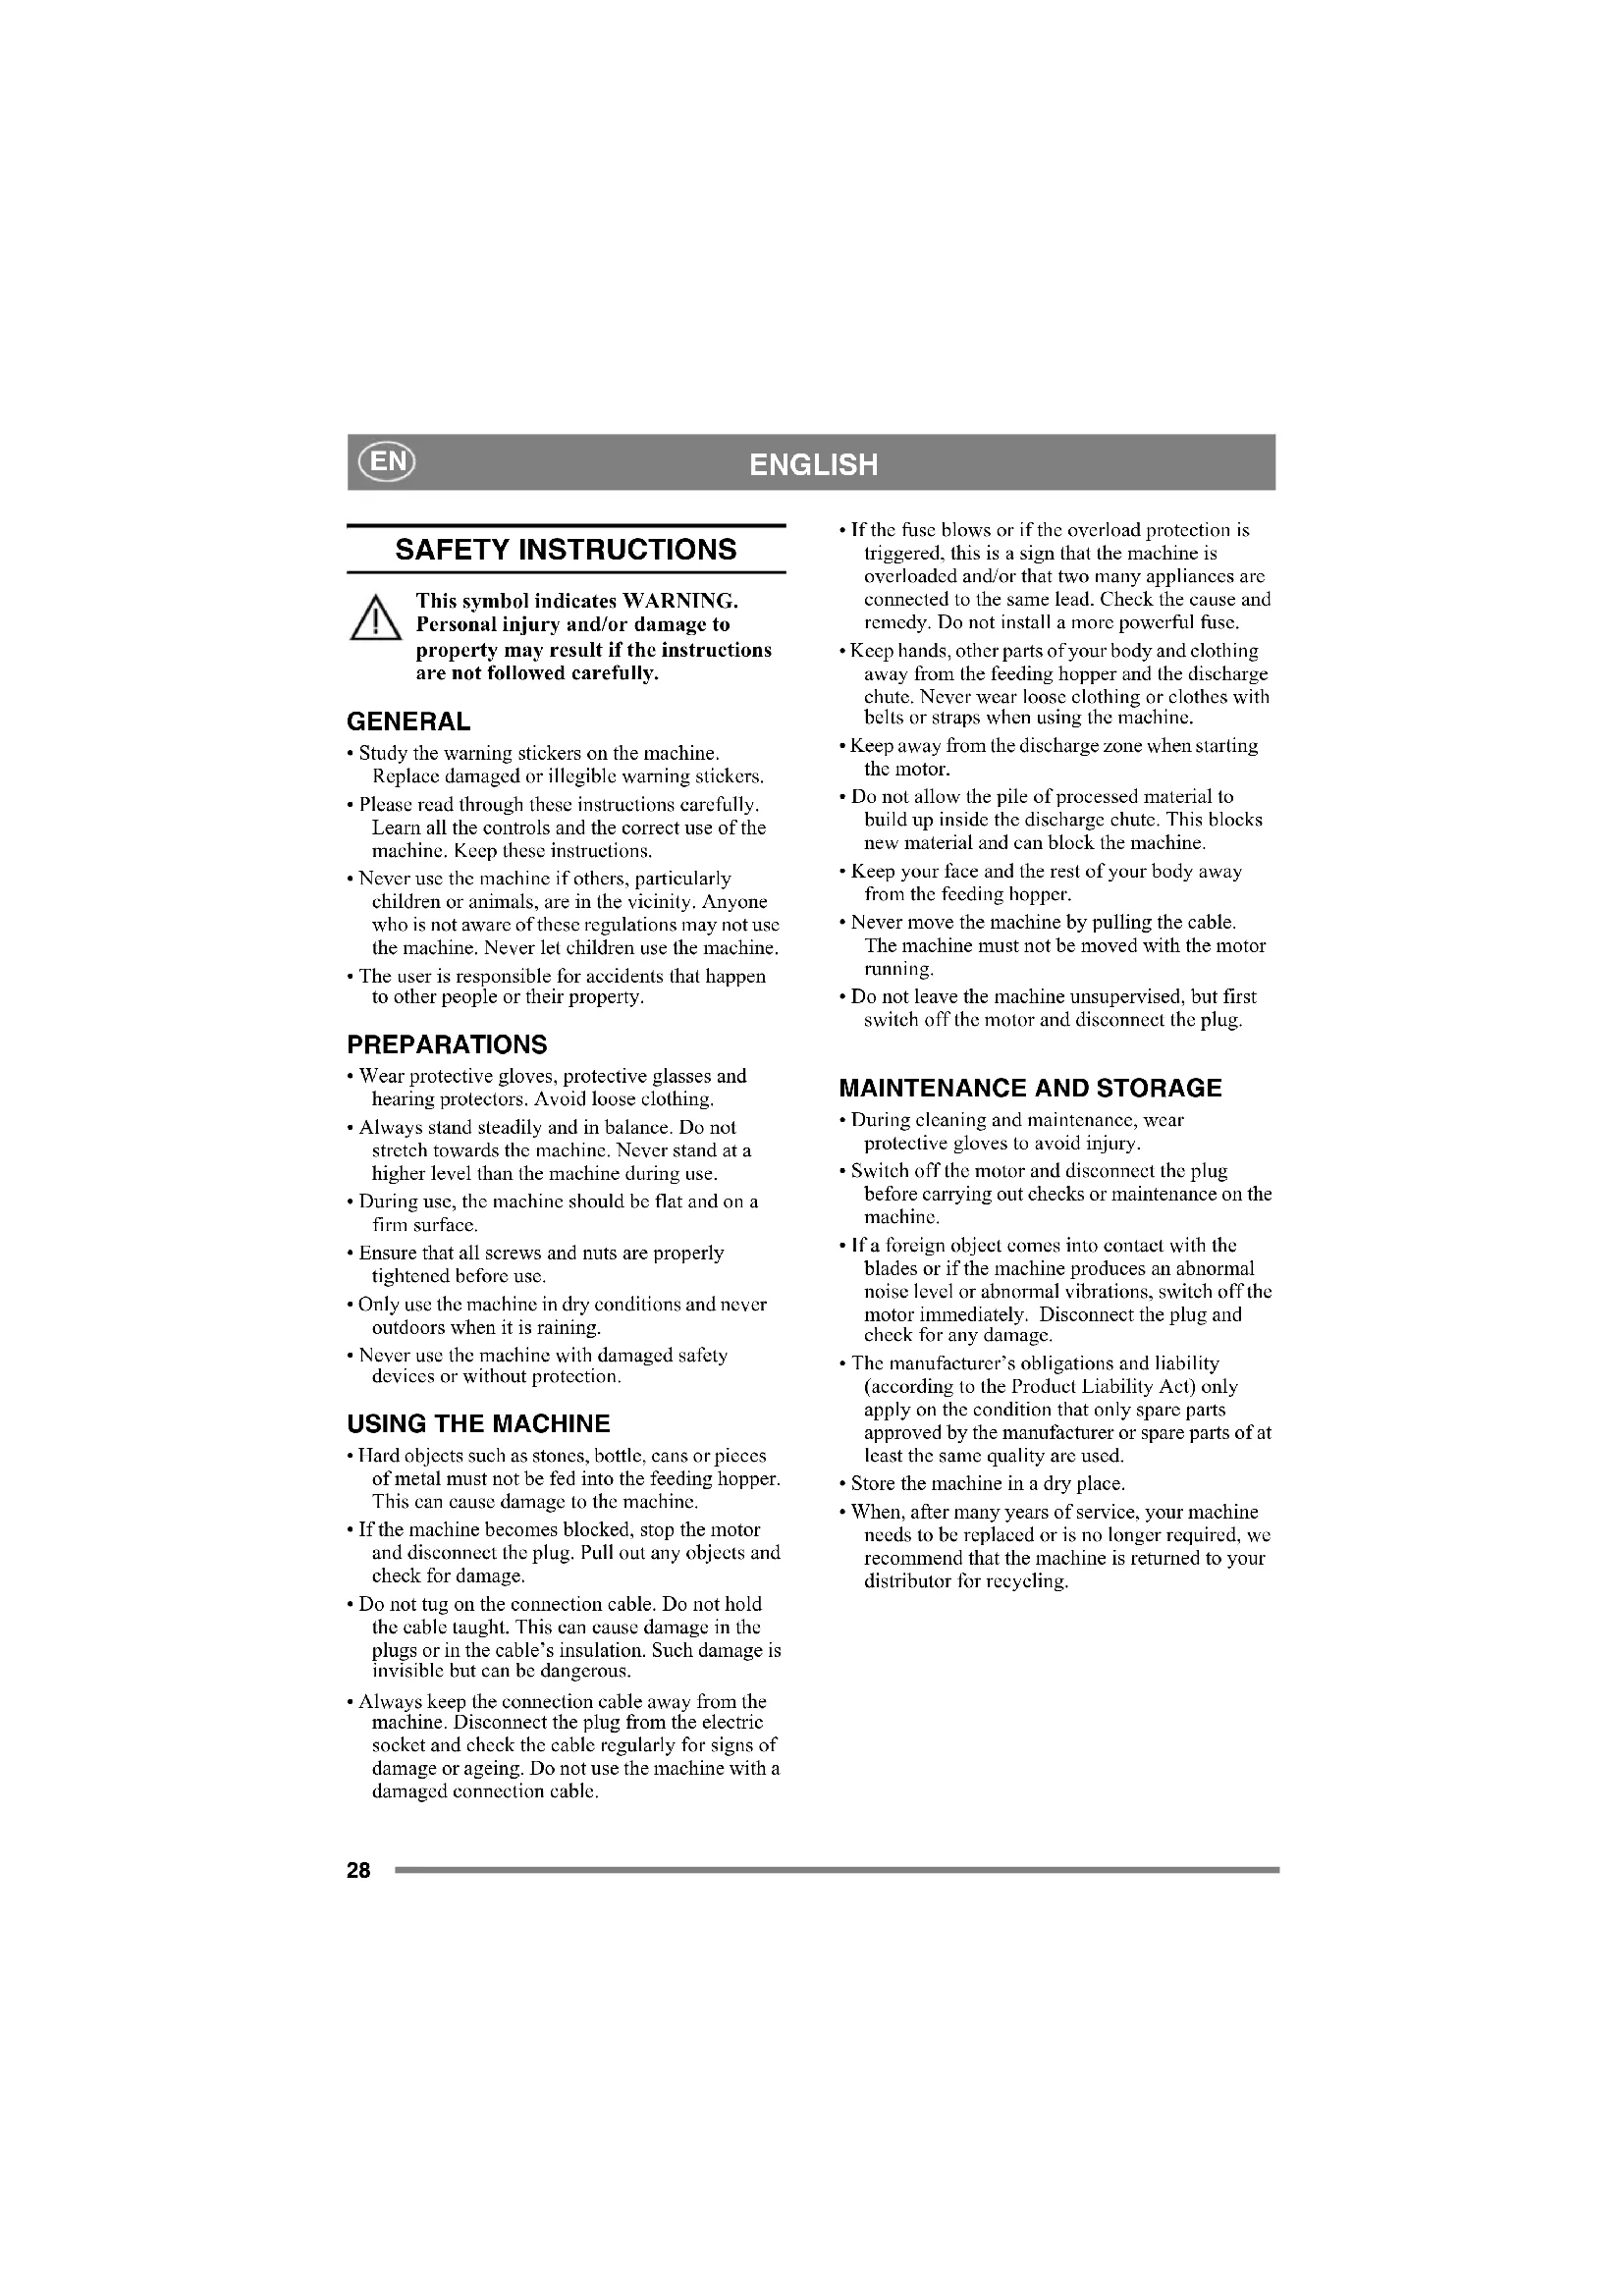
The compost grinder is designed to grind organic material such as dry plant residue, twigs, sticks and branches.
TRANSPORT
Take great care during transport and when the machine is to be lifted. Lift the machine by taking a firm grip of the legs by the mounting to the motor housing, under the compost grinder, and lift carefully. Never lift the machine using the cover.
ELECTRICAL CONNECTION
Connect the machine to a 230-240 VAC single phase electric socket with a protective conductor (earth). The electric circuit should be fused with a 10A inert fuse.
Always use a protectively earthed rubber connection cable. The cable should be of good quality, intended for outdoor use.
The cable's cross-section should be at least 3 × 1.5 mm².
The connector (female contact) must be moistureproof.
You are recommended to use an earth leakage circuit breaker which interrupts the current in the event of something happening to the machine or connection cable.

ENGLISH
If a portable earth leakage circuit breaker (e.g. STIGA, order no. 8290-9010-01) is used, it should always be placed between the electric socket and the connection cable.
Even if an earth leakage circuit breaker is used, safety cannot be guaranteed. Always follow the safety instructions provided. Ideally wear shoes with thick rubber soles.
Test the operation of the earth leakage circuit breaker before each use.
In the event of unfavourable electrical mains conditions, brief voltage drops can occur when you start the apparatus which can affect other appliances (e.g. causing lights to flicker).
With a mains impedance of Z_max < 0.35 ohm , such disturbances are unlikely.
STARTING AND STOPPING THE MOTOR

Ensure that the grinder is empty before starting the motor.
- See fig. 2. Connect the electric cable to the power socket (M).
- Start the motor by pressing in the green start button (K).
- Stop the motor by pressing in the red stop button (L).
- Disconnect the connection cable from the power socket.
MOTOR PROTECTION
The grinder is equipped with built-in motor protection which prevents the motor being overloaded. In the event of blockage, the current is cut after a few seconds and the motor stops.

Always disconnect the plug from the electric socket before opening the casing.
Corrective action in the event of overloading:
- Disconnect the connection cable so that the grinder is not powered.
- Open the casing (A) by releasing the knob (E).
- Remove the jammed material.
- Close the casing and tighten the knob.
- Wait for at least one minute after the motor has stopped.
- Connect the connection cable and reset the motor protection by pressing the reset button (J).
EMERGENCY STOP
In order to emergency stop the machine, press the red pushbutton (L).
DISCONNECT SWITCH
The machine is equipped with a disconnect switch. This means that the main switch is automatically disconnected in the event of a loss of current. The machine can be started again by reconnecting the plug and turning on the main switch.
INTERLOCK
The grinder is equipped with an electric interlock, which prevents the motor from starting when the casing is open.

The interlock must never be tampered with. Risk of serious injury.
The interlock consists of the pin (D), which affects an integrated switch.
Always tighten the knob (E) fully when closing the casing so that the pin affects the switch correctly.
GRINDING
The following types of material can be ground in the compost grinder:
-
twigs and branches
-
waste from cutting bushes.
-
waste from hedge-trimming.
-
plant parts and other garden waste which is suitable for grinding.
Examples of materials which are not suitable for grinding include:
- glass, metal, plastic bags, stones, fabric, earth-covered roots.
- waste that does not have a firm consistency, e.g. kitchen waste.
To prevent damage to the machine, you are recommended not to exceed the following maximum sizes of twigs and branches:
<40 mm in diameter.
Feel free to stand the grinder on a tarpaulin or similar before grinding. This will catch the ground material and make removal easier.
Branches and twigs should be ground shortly after being cut. They become extremely hard when they dry out, and the maximum diameter of what can be ground is reduced.
ENGLISH

A large proportion of garden waste contains a lot of water and therefore sticks easily. Such material should be allowed to dry for a few days before being processed.
Store the grinder indoors in a dry place.
COMPOSTING
The processed material can be composted in various ways:
- The material can be placed in a heap directly on the ground (cold composting).
- The material can be placed in a plastic container, wooden crate, skeleton container or similar (cold composting).
- The material can be placed in an insulated compost holder. The heat is then held for longer and the rotting process also continues during the winter. This method produces faster results (warm composting).
- The material can be spread directly onto the garden (surface composting).
MAINTENANCE

Always disconnect the plug from the electric socket before any maintenance. Always wear protective gloves to avoid injury.
Generally speaking, compost grinders require very little maintenance. In order to maintain the efficiency of the machine and to achieve a long service life, observe the following:
- keep the air openings clean and free of obstructing material.
- check the customer-installed nuts and screws (tighten if necessary).
CLEANING
Always clean the compost grinder after each use.

Never use a high-pressure washer or running water when cleaning the grinder!
Brush away dirt and plant residue, which could be caught in the blades. Wipe the outside of the grinder clean using a cloth which has been moistened with a mild detergent and water.
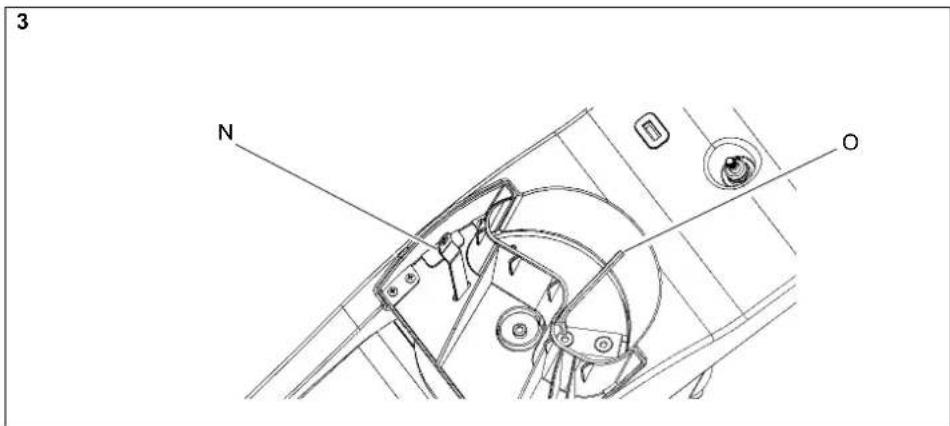
REPLACING/TURNING BLADES
The grinder is equipped with two blades. Each blade has two edges, only one of which is used. The other edge is a spare. The blades can therefore
be turned. When both edges have worn out, the blades must be replaced. Removal and installation of the blades is carried out as follows:
- Disconnect the connection cable so that the grinder is not powered.
- See fig. 1. Open the casing (E) by releasing the knob (E).
- Lock the rotor by inserting the wrench provided (N) in fig. 3.
- Unscrew the blade screws using the Allen key provided (O).
- Turn/replace the blade and tighten the screws.
- Remove the wrench (N).
- Carry out the same procedure with the other blade.
SERVICE
Authorised service stations carry out repairs and servicing. They use genuine spare parts.

Under no circumstances may parts other than genuine spare parts be used. This is a requirement stipulated by the Testing Authority. The machine is approved and tested with these parts. If the machine requires servicing, repairs or maintenance which entail dismantling of the cover, this must be performed by an authorised service station.
The manufacturer reserves the right to make alterations to the product without prior notification.
PURCHASE TERMS
A full warranty is issued against manufacturing and material defects. The user must carefully follow the instructions given in the enclosed documentation.
Warranty period
According to relevant laws.
Exceptions
The guarantee does not cover damage due to:
- Neglect by the user to acquaint themselves with accompanying documentation
- Carelessness
- Incorrect and non-permitted use or assembly
- The use of non-genuine spare parts
- The use of accessories not supplied or approved by GGP
Neither does the guarantee cover:
- wearing components such as blades, belts, wheels and cables
- Normal wear
- Motors. These are covered by the motor manufacturer's warranties, with separate terms and conditions.
The purchaser is covered the national laws of each country. The rights to which the purchaser is entitled with the support of these laws are not restricted by this warranty.
RECYCLING
Waste handling according to the WEEE Directive (2002/96/EC)
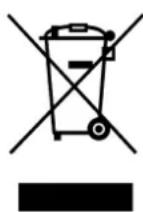
Protect the environment!
Not allowed to be disposed of among household waste!
This product contains electric and electronic components to be recycled.
Hand over the product for recycling at advised place, e.g. municipal recycling station.
RÉGLES DE SECURITÉ

CHMBOJIbO 03NaHaiOT cNeIyIOIIee:

IpeyipckcHHe!
Ipepa6oToC MaHHIOH3yHTe
pyKOBOCTBO IO KcIIyataaHH HpaBnla
TEXHNK 6c01aHOCTH.

IpeynpckJeHne! YdaJIHTe HocroponHHx!OcTepeaRtccb BHe3aHOro BbOpacBaHHia!
IpeJynpekdeHHe! OHaCHOCTb - HnHaJaHHc KOHCNoCTe NIO KpbIKy pa6oTaIOeMaHHb!

IpeIyIpyeKJeHHe!BpaIaHOIIHecra HOxN! HOxN BpaIaHOrTa IIO HepuH NocJIe BbIKIOCHHH MaHHbI!
IpeyippeKJieHIE!
IpeBbIOJIeHHemIO6bIXpa0rIO
TeXIIIEcKOMyO6cTyKHBaIIIO
H3REKITE HITENICEbHyHO BnIKy H3
po3CTKN.

PpeynpexHHe! MaHHa paccHTaHa Ha KcHMyataHIO TOIbKO B cyHX yCIOBHX-3aIIpeHaeTc pa6Ota MAHHbI BHe HOMeHEnH BO
BpMIOJIA.

IpeyipexkienHe! HaCBAHte paOohne pyKaBnbl, 3aHTbE OKN H cpeCTBa 3aHTbOpraHOB Cnyxa.
CBOPKA
- BckpoitTe JIINK II paacnkyIe BCE aactH.
2.Cm.phc.1.OtKpoTKeKox(A)NyTeM OCBO60KJHeHHpyKoTKn(E)IINIOCTyIIa K ycTaHOBOUHbIM OTBCPCTHM OIOp
3.YCTAHOBHTOEONOpb,HNIOJIb3yJBABHHTa M6x20(B).3aHHTcBHHtbcHOMOJIbTO TopeBOrKIIIOHaH3KOMIJIeKTaIOCTaBKH.
4.YCTAHOBHTE KOIECHYIOOCb(I),HCIOJIb3yIINBA BHITa M6x50(C)HraIKN.IpHMEnIITe RaEHbIe KIOOH IN3 KOMIIJIeKTA IOCTABKN. - HaBnHbRe KoJecca (H) Ha oCh.
6.YCTAHOBHTe ONOpB (G) HA KOHeI ocEl. 3aHHTe IaIKN OIOOP, HcIOJIb3y MoIOTOK. - YcTaiOBHTe KOJIaIaIK KJIec (F).
3KCNJYATAURA MAUNHbI
OBUNEYKA3AHNA
3TaMaHHaIpeHa3HaeHaTOJIbKOJINJHHO HOJIb3OBAHn HcIOJIeKHT IpOMbIIJIeHHO KOJIyataHH.
H3MeJIbHHTeJIb KOMIOCTa IIpeHa3NaHcHd H3MeJIbIeIIH OprAIHHueCKHX MaTePhAIOB, TaKHX KAOKCTaRTKn pactEHNI, NaIKN H cyBu.
TPAHCNOPTNPOBKA
Bybte OOC6eHNOOCTOPOKHHBO Bpemr
TpanICIOPTNPOBKN HIOJIbEMaMIINIIb.
PiHMnIeMaIMHHy AKKpyATHO, IPOVHO
3aXBtIBaB MaOpHb B3BIMHCb 3a KOkyx
1BHTAeTbN IOI NMEJIbHITcEM KOMIOCTA.
3aIPcHaactcIOHNHMAtb MaHHy 3a KpbHky.
3NEKTPNUECKOE COEINHEHNE
IIOKIIIOAHTe MaHHH Ky K OJIOHOa3HIOI
OeKTPnHECKo P03eTKe Ha 230-240 B-C
3aIHITbIM IPOBOIHINKOM (3cMJC).
OeKTPnEeKaIeB IOJKNHa 6bTTb 3aHHHeHa
NaCCBHbIM IuaABKM IpEOxpaHHTcEM Ha 10 A.
O63aTeJIbHO HcIOJIb3yIte pe3HIOBbIM COeHHHTJIbHbIK Ka6JIb C 3aIHHTbIM 3a3EMJIHcEM. Ka6JIb DOJIHKII 6bITb XOpOIero KaHeCTBa, IIpeHa3HaueHHbIM IIN HApYKHOI OIPHMeIIIIIA.
IIOpeHoeceHHeKa6eJIa-HeMeHee3x1,5 MM2.
Pa3bEm (OXBtBBAIOHn qactb) JO.TKeH 6b1b BIAHOHcPOHHaCMBIM.
PeKOMeHnyETcI pHMeHrABTOMaTHueckn BbIKHOATcB,cpaBATbBAOoiII npYtceKa H3EMIO,KOTOpBI pa3pBiBaet IeII B CJIyae HEHCINPABHOCHT MAHHHI HIN JepEKTACoCJHNTEBHO K6EJI.
EcnHcnoJIbByetc HoptaTHBnI
ABOMATHCCKHN BIKIOHOATeIb 3aHTbOT
yTeKN Ha 3EMIO (HaNPmep, STIGA, HOpem I
3aKa3a8290-9003-01), 6o3aTeJIbHo
IOKIOHOaHTe cTO MeKJy OKeTPhueckO
IIIeNEeJIbHO pOeTKOH COEHHHTJIbHM
ka6eICM.
JaKe npH HCIOJIbOBAHH ABTOMATHEcKO BbIKHOHATCJIA,3aIIHHaHOICrOOTyTEKHa 3eMIIIO,6e3oNAIOCTIIE MOKe 6bITb
rapaHTnpoBaHa. Crporo co6HoaJte HpHJIaracMbIe IpaBnJA TxHHKb 6c0HachOCTH. JyHHe Bcero HaDeBaTb 6bYb c ToJIcToI pe3HHOBoi IOHOIBoi.
BcKn pa3 neped pa6oTo c MaHHHOI npOBepHte HcnpaBHocb aHTOMaTHueCKOT BbIKIOHaTcJIA, 3aHHaIOHcTO OYTEKN Ha 3eMIIIO.
PnHe6JiaOuHpyTHbIX Hapamctpax HcTOHHKa 3JIeKPOINHTAHN MoKeT IPOHXC0INTb KpaTKOBpeMeHHOE HAJIeHN He HApJxKeHH NpH 3aIyck aIprata, KOtOpoe MOKeT BIIHITb Ha pyrthe 3JIeKpHueCkne Pn6OpBn (HaPiMep, 3aCTABJI MHRATb JAMIOQH). PnHMneJaHce HcTOHHKa ZMHK. <0,35) OM TAKHC BO3MyIChHH MaIOBcPOrTHb.
3ANYCKIOCTAHOBKA DBNIGATEJI

Ipea 3aHcykOM ABHrAteJy6eHntecb, TTO HMeJIbHTeJIb NcT.
1.Cm.pnc.2.IoKIOHHTCIOCKTPUcckn Ka6eJI K IITENCEJIHOI PO3e TE HtAIIHA (M).
2.3anycHTHe IBHrAteJIb HauKaTHEm 3eJeHoi KIOIKN Iycka (K).
3. OctaHOBHTBHTBAHJHaKATHEM KpachOH KOHN OCTaHOBA (L).
4. OToeINHHTe coeHHHTeHBHbI Ka6eJIb OT HtEICcJBHOH PO3CTKN.
3AUNTA DBNATEN
H3MeIbHrTeJIb Cna6KeIN BcTpoEHIOI 3aIHITOn IIBHrATeJI, KOTOPa IIpeIoTbpaIIaET NPERpy3Ky IIBHrATcJI.
Bcnyae 3actonopnBaHnTOKOTKJIOHaetc Hecp3 Hcccko kckyH,H DBHrareh octaHABHbaeTc.

IpeoKpBTHcHKOxyXa 063aTe.1bHO BBHHMaHTe HtHeCJIbHyIO BnIKy N3 pO3ETKn.
PnpokIeHCTBnBcIyueHepepy3K:
- OToCoeHHHTe coeHHHTeHbHn Ka6eHb, HTO6b OTKJIOHTb 3JCKTPOIHHTAHNC H3MCJIbHTCJIa.
- OrkpoHrKe KoxyX (A) IyTeM oCBO6oKdEHHpyKoTKn (E).
- YdaJIHTe 3acTpBbIIH MaTepeHaI.
- 3akpoitcrekoqxH3aTahnHtpeykoTky.
- IIOIOKJNTIe MeMeIEe OIOH MNIHYbI C

MOMEHTA OCTaHOBKN IBHrATEJI.
- PIOcHINHTC COeHHHTCBHbIKa6cJIb H BepHNTe 3aHHTy DBHrAteTBA HCxOHDoe COCTOHHHC HAKATHEKHOIH KOBIOHcBPOca(J).
ABAPINHbI OCTAHOB
YTObI BnIOJIINb abApHIIIO octaIOB MaIIHII, HAKMHTc KpachyIO KOHIOK (L).
PA3bEINHHTeJIb
MaHHHa cH6keHa pa3bcHHHTeJcM. 3TO O3HAAeT, TTO IaBHI BIKIOHYaTeJI ABOTOMATHueCKn pa3bEHHaETcO6pbIbA BIKIPoIHHTAH.MaHHa MOKCT bHiB 3AnyIIHe CHOBa IYTeM IOIDcoEHHeHHI HtTECCEBHO BIKN H BIKIOHCHN IABHORO BIKIOHYaJIa.
БЛOKИPOВКА
H3MeIbHTe.Ib Cha6KeH 3NeKTPHuecKoB 6IOKHPOBKoK, KOToPAI IpeIDTbpAiaet 3Anyck IBHrataI pN OTKpbITOM KoxyXe.

3aippeaaetca pa60ta npH HcHnPABHOB 6IOKHPoBKe! OAnchoctb TaKeJeIO TpABoM!
BIOKHPOBKa cpa6aTbIbAeT, KOrTa IIITHoT (D) HAKHMact HA BCTPOCHHb BBIKHOATcJIb.
Ipn 3akpbltnn KOKyxa o6raTeJIbHIO Do ynpora 3aTnBaHTe pykoRTy (E),YTO6bIo obeCneHTb HADICKaIIcc cpa6aTBHaHHe IITHΦTa N BbIKIOUoATEJIa.
N3MEJIbYEHNE
B H3MEJIbHHTeJI KOMIOCTa MOrY H3MEJIbHaTbCJcIeIyIOIIHe THIb MaTePhAJOB:
- BCTBn Cuyb8
OTXOJIOTIOIOp3KNKCTOB
OTXOJIOTIOINPABHHBaHNNHBNOHN3ROpO
JnHn Hpytnce caiobie OTXobl, KOTOpBIE HnIOINbI DnHnMcIbChHH.
IpHmepb MaTepeHaIOB, KOtOpbIe He IpiHrOJIbI bIa H3MeJIbYeHH:
CTEKIO,MeTALIIIJIACTHKOBBIE MeIKH,TKaIH, IOKpbITbIe 3emTeiKOPHH.
IIEBepIbeOTXOJI,IIaIIpHMeP,KyXOHIIHe OTo6pOcM.
BoH36eKaHHeIOBpeKJdeHnMaIIHHbI peKOMcHdyctcr He IpcBbHsATb CICyIOHnC MaKCHMaJIbHBe pa3MePb BeTbe H cyYbe:
<40MMBIIHaMeTpe.
IpeH N3MeJIeHIIeM peKOMeIIyetycTc
yCTAHOBHTb H3MeJIHHTeJIb Ha 6pe3EHT HJIN
HOIO6HOC HOkpbIbaJO. 3TO IO3BOHNT COBHPaTb
H3MeJIbHaembl MaTePHaJI H O6JIeHTH er
yJaIEHNC.
Bpe3yIbTaPe3KnCyuHBeTBNIOJXHb6bTb KOPOTKO H3MeJIbHeHb.IoCJIe BbICbXaHHO OH CTAHOBITcOCHb TBcPbIMH, H MaKChMaJIbHb IINAmETp, JOIyCKaHOHH H3MeJIbHeHc, yMeIIbIIaTeTc.
BoIbIIaIaTbCaIOBbIXOTXIOOBHMeETBbICOKoe COJIpeKHaHHe BIAH H, CIEIOBATEJIbHO, IeTKO CJINIACTc. IIpeoIobApOToKoi TAKOTo MaTePnAIA HCO60XIOHMIOb CMy BbCOxHybBTcEHNC INECKObHXIIeH.
XpaHHTe H3MeJIbHTeJIb B IOMeIIeHHB CyXOM MCCTC.
KOMNIOCTIPOBAHNE
O6pa6aTbIbAeMbIM MaTePHaJI MoKeT KOMIOCTHPOBAtbCra pa3HbMn CIOOCoAMH:
MATEPHaJI MOKeT CBAHBAITcB KUYI INPMo HA 3eMIe (XIOIOHOE KOIMIOCTHPOBaHHe).
- MATEPHAI MOKCT IOMCIIATBCB IIIACTKHOBBI KOITTEHIEP, DEPEBAIIIBI JIHK, peIeTuaTBI KOHTEINCP HINIOIO6HyTO TAPY (XHOIDOC KOMIOCTHPOBAHHe).
MATEPHAI MOKETIOMEIIATBCB B REPMEHTHYCKMOCTb,IN KOMIOCTa. TaKHM O6p3OM pacCEHBAHHE TEIa 3AMEJIeTcH, IN IPOUeCC HIEcTHHBAHHH IIPOIOJAKCTCR 3HMOH. TOT MeTOJ YCKOPAEIT PnHROTOBJHE KOMIOCTA (TEIIOUC KOMIOCTHPOBAHNC).
MATEPHAIOKETpaccpeJeHbce HENOCPECTBeHHoHaIOyBE(IOBepxHOcTHoe KOMIOCTHPoBaIIHe).
TEXHNUECKOE OBCJYKINBAHNE

IpeBbHIO.THeHHemTexHueckoro
06cIyKbHaHH BceIa BbHMaHte
IIIEHCJIbHyIO BnIKy H3
3JEKTPhueCKoH pOeTKH,Bo
H36BaAHNC TpaBM HaCbaHtC pa6OuHc
pyKaBHnbl.
KaK npaBHIO, H3MeJHHTeJH KOMIOCTa
IpaKaTHNEcCKn He Tpe6yOT TEXHHueCKO
06CJyKBaHN. JIcoxpanEHNN
IPOHNBOITeJIbHOCTN MaIHINH II IOCTHXeHH
IIHNTJEbIHorO cpoKa CJyKbI coBIOaJIte
CJeYIOHHe peKoMeHNaHH:
IpeoopaHnTe OTBepCTHaOT 3aKyInopHBaan H 3acopeHHOpaBaTbBAemIM MaTePHaTIOM.
IpOBePHTHe HAIHITHE 3ATRKKY Taek H BHTOB, yCTaHABJHBAeMbIX 3aKa3HKMo (Iph HcO6XOJIHMOCT 3aIHNTC).
CHCTKA
KaKaIpa3,3aKOHnBa5oY,O6raCJbHO BIIIOINHTe YHCTKY HMeJIHTeJI KOMIOCTa.

IpnHCTKe H3Me.IbHTeJIa 3aepnHaeeTc pHmehrTb MoeyHbIe MaIIHH BbICOKO DaBteHH N.II npoToHyIO BOy!
YdaJIHTeIeTKoI rpa3b H paCTHeIbHbe ocTaTKe, KOtOpBc MOrYr 3aCtpeBaITb B HoJax. HaHcTO IpoTpHc HmCJIbHTeJIb CHApyKn, HcIOJIb3y RaTkAbe, YbJIaXHeHHy MoTKM MoIOIHIM cpcCTBOM H BOIOI.
3AMEHA/IOBOPOT HOKEN
H3MeIbHTeJIcII6KeII IyBMyIOKaMn. KaJbIb HOKe HMeET IBe KpOMKn, H3 KOTOpbIX ToIbKO OHa paOoay. Apyra KpOMKa HJIbCTCR 3aIaCHO. IIO 3ToI IIpyuHHe IpeIycMoTpe NIOBOPOT HOKeI. PIn H3HOce O6EH KpOMK HOKn IIOJIeKAT 3aMHe. YdaJIeHHe IyTaONBaIOKHOKe J BbIIOHHOTcCJeIyHOHN M6pa3OM:
1..OTcoeHHHTecocHHHTeJIbIbKa6JIb,YTO6bl OTKJIOHTb H3MeJIbHTeJIb OT IINTAHII.
2.Cm.pnc.1.OTKpoTKeKoKyx(E)IyTeM ocbo6oxJdeHnpykoTKnE).
3. 3actonophtope potop, BCTaBnB raeuHbI KJIHO (N) H3 KOMIIIEKta IIOCTaBKN, KaK IOKa3aHO Ha pnc. 3.
4.BbIePiTe BnHtBIOKa, HcIIIOJIb3y TOpueBOI KJIOU(O) H3 KOMIIIEKTA IOCTABKN.
- IIOBepHHTe/3aMeHHTe HOK H 3aTARHHTe BnHTM.
- YdaIHTe raeCHbH KJIIOU (N).
- BbIOJIHHTe ty ke camyIO pOUIeIpy c IpyHM HOKOM.
OBCJNYKINBAHNE
YIOJHOMOCHNHCIyHKTBIOcJyKBAHNN BbIOJIINIOITpeMOITnTexo6cIyKBAHHe.IpH 3TOM yNOTpe6JHOOTcIHpMeHHBte 3aIacHbIe qactH.

Hn npn KaKHX 6oCTOHTeBCTBax Hc OanykaeTcN PnHMneHHe 3aIacHbIX Tactei cTOpOHHHx H3rTOOBtE. TeTpeBOBaHHe nPpDyBIACTcPOraHAMn texHHueckoi ATReCTauHH
06opyoBHaHH.MaIIHnA ppoIIa HCbHTaHH N COOTBCTCTByET
TpeBOBaHmPn yIOTpeBHeHH
ΦHPMcHHbIX 3aIacHbX qactei.
Pa60tbln npoФnIakTHe,peMoHTy H texHHueckOMy 06cIyKHBaHIO MAHHbI, KOTOpbc CB3aHbIC ydaJIeHNbEM KOKYa,doI.Khbl BBIIOJHHTbc yIIO.HOMOCHBBIM IyHKTOM 06cIyKHBaHH.
H3TOTOBHTCILbOCTaBJIeT3aCO6oIpaBOHa H3MeHeHHH H3JeJIHH6e3IpeJIbAPHTeJIbHO ryeDMJIeHH.
UCIOBnI PNOOBETEHN
BbdaetcnoHnHaRaapTaTHNOOTHO HMOEeKTOB H3TOTOBJIeHHN H MATEpHaIOB.
PiJb3oBaTeJB 603aH TIIaTeJIbHO CO6JIIOaIb
HHTpyKHIHH, COePkaIIHeeC B IIpHJaTaemO JOKyMeTTaIIHH.
Fapantniih npno
CorIacIO COOTBeTcTBYIOHMM 3aKoIIAM.
Hcknoeenn
IapaaTHHIIbe 063aTeJIbCTBa IIe pacipoctpaHIOrTaHa IOBpeKJeHHB BCJeICTBHe:
Ipehe6pekeHHHIOJIb3OBATEJEEM 3HaKOMCTBOM cOIOPOBOIDTeJIbHOJOKyMeHTaIIHe
-Heoctopoxkhoctn
-HeHaJIeKaIeRo Hn Hepa3peHnHoRIOHnMCHENHHNc6OpKN
- HcHIOJIb3OBaHHHeHcHpMCHHbIX 3aIacHbIX qacte
HcnoB30BaHHn npHnHaJicKHOCTe, Hc nocTabIaEBHX HnHe oObpeHHBX GGP.

Kpome toro, rapaTHnHbIe 083aTeJIbCTBa He paHIOPOCTpaHHOTcHa:
H3HaIIIBaIOIIIEcKOMIOHOHTb, TaKHe KaK HOJI, pCMHI, KOJIcca H KaOJIH
HOpMaJIbIbI H3IOc
- IBHrAeJIi. Ha IBHrAeJIi paIipOcIpaHIOHTcRAPaIHIIIbe 063aTeJIbCTBA H3ROTOBHeJIABHrAeJIc OTJeJIbHbIMN IIOJOKeHHMnHyCIOBHNH.
HaNOKyIaTeJIpaCnPocTpaHAROTc
COOTBCTCTBYIOHc3AOKHb KaKIOH cTpaHb.
IIpaba, KOTOpMHo6laJaet NOKyIaTeJIb corIaHcHO
3THM 3aKOHAm, He OrPaHHBaOHTc JaHHoH rapaHTHei.
YTNJIN3ALN
06paueHne cOTXoAMN B COOTBeTCTBnC DInpeKtBuW WEEE (2002/96/EC)

Beperehte Okpykaohnyo cepy! He npyncKathe yTHIN3aHn 6obpyIOBAHH BmCtEc c 6bIToBbIMN OTXoJaMn!
JaHHoE H3dJIHe coepKHT
JIeKTpHecKe HIOeKToPiBIIbe
KOMIOHEHTbI, KOtOpBie
HOIOeKAT BTOPHOH
Hepepa6OTke.
Ipeaabaie H3iCine Jn CneHaaJIIOyTHIN3aINH IN nepeap6otKH, HanpHMeP, B HNYKtbi c6opa yTHINcbipb.
BEZPECNOSTNI POKNY

This product conforms to
Low Voltage Directive 73/23/EEC, 93/68/EEC
- Electromagnetic Compatibility Directive 89/336/EEC
- Machinery Directive 98/37/EEC with special reference to appendix 1 of the
Directive regarding essential health and safety requirements in conjunction with manufacturing
- Noise Emission Directive 2000/14/EC
This product has been developed and manufactured in conformance with the
FEN13883,EN282-2,ENISO 3744,ENISO 11390
EN10038,EN2022,EN10037-4,EN10037-12
Ten produit odpowiada nastepujacyn normom:
Certification Manager

- RECYCLING - ÅTERVINNING Chipper - Kompostkvarn
- SAKERHETSFORESKRIFTER
- BYTE/VANDNING AV KNIVAR
- NULSPÄNDINGSAFBBRYDER
- NULSPÄNDINGSAFBRYDER
- GENERAL
- PREPARATIONS
- USING THE MACHINE
- MAINTENANCE AND STORAGE
- GENERAL
- SYMBOLS
- ASSEMBLY
- TRANSPORT
- ELECTRICAL CONNECTION
- ENGLISH
- STARTING AND STOPPING THE MOTOR
- MOTOR PROTECTION
- EMERGENCY STOP
- DISCONNECT SWITCH
- INTERLOCK
- GRINDING
- <40 mm in diameter.
- COMPOSTING
- MAINTENANCE
- CLEANING
- REPLACING/TURNING BLADES
- SERVICE
- PURCHASE TERMS
- Warranty period
- Exceptions
- RECYCLING
- Waste handling according to the WEEE Directive (2002/96/EC)
- RÉGLES DE SECURITÉ
- CBOPKA
- 3KCNJYATAURA MAUNHbI
- OBUNEYKA3AHNA
- TPAHCNOPTNPOBKA
- 3NEKTPNUECKOE COEINHEHNE
- 3ANYCKIOCTAHOBKA DBNIGATEJI
- 3AUNTA DBNATEN
- ABAPINHbI OCTAHOB
- PA3bEINHHTeJIb
- БЛOKИPOВКА
- N3MEJIbYEHNE
- <40MMBIIHaMeTpe.
- KOMNIOCTIPOBAHNE
- TEXHNUECKOE OBCJYKINBAHNE
- CHCTKA
- 3AMEHA/IOBOPOT HOKEN
- OBCJNYKINBAHNE
- UCIOBnI PNOOBETEHN
- Fapantniih npno
- Hcknoeenn
- YTNJIN3ALN
- 06paueHne cOTXoAMN B COOTBeTCTBnC DInpeKtBuW WEEE (2002/96/EC)
- BEZPECNOSTNI POKNY
Brand : STIGA
Model : BioPower
Category : Mechanical chipper