
CoolTec CT3cc - Shaver BRAUN - Free user manual and instructions
Find the device manual for free CoolTec CT3cc BRAUN in PDF.
| Product type | Refreshing electric shaver |
| Brand | Braun |
| Model | CoolTec CT3cc |
| Shaving technology | Shaving system with cooling element |
| Blade type | Shaving cassette (foil and cutter block) |
| Trimmer | Retractable trimmer for long hairs |
| Cooling function | Yes, with dedicated switch |
| Power supply | Rechargeable via special low-voltage adapter (492-XXXX) |
| Battery life without cooling | Up to 45 minutes |
| Battery life with cooling | Approximately 15 minutes |
| Display | Illuminated screen: charge status, cleaning, lock, cooling |
| Cleaning system | Clean&Charge station (automatic cleaning, charging, lubrication) |
| Manual cleaning | Under running water or with brush |
| Travel lock | Yes, long press for 3 seconds |
| Recommended use | Dry for optimal cooling effect |
| Battery | Rechargeable, sufficient capacity for multiple shaves |
| Included accessories | Charging stand, cleaning brush, storage case, protective cap |
| Spare parts | Shaving cassette (40S/40B), cleaning cartridge (CCR) |
| Warranty | 2 years, except for normal wear |
Frequently Asked Questions - CoolTec CT3cc BRAUN
User questions about CoolTec CT3cc BRAUN
0 question about this device. Answer the ones you know or ask your own.
Ask a new question about this device
Download the instructions for your Shaver in PDF format for free! Find your manual CoolTec CT3cc - BRAUN and take your electronic device back in hand. On this page are published all the documents necessary for the use of your device. CoolTec CT3cc by BRAUN.
USER MANUAL CoolTec CT3cc BRAUN
(Sharecall charged at local rates)
www.service.braun.com

CT5cc
CT4cc
CT4s
CT6cc
CT3cc
CT2cc
CT2s
CT4s
CT2s

+
CT6cc
CT5cc
CT4cc
CT3cc
CT2cc
15
16a
16b
17
18


A
B
C
D
English
Our products are designed to meet the highest standards of quality, functionality and design. We hope you enjoy your new Braun Shaver.
This shaver cools the skin to give you a cooling sensation for a pleasant shave.
Read these instructions completely, they contain safety information. Keep them for future reference.
Warning
Your appliance is provided with a special cord set, which has an integrated Safety Extra Low Voltage power supply. Do not exchange or tamper with any part of it, otherwise there is risk of an electric shock. Only use the special cord set provided with your appliance.
If the appliance is marked 492, you can use it with any Braun power supply coded 492-XXXX.

appliance is suitable for use in a bathtub or shower. For safety reasons the appliance can only be operated cordless.
We recommend not to use the shaver with any foam or gel to ensure that you
- experience the optimal cooling effect.
- get the optimal cleaning performance from the Clean&Charge station (for cc models).
- avoid potential damage to the device.
Do not shave with a damaged foil or cord.
This appliance can be used by children aged from 8 years and above and persons with reduced physical, sensory or mental capabilities or lack of experience and knowledge if they have been given supervision or instruction concerning the safe use of the appliance and understand the hazards involved.
Children shall not play with the appliance. Cleaning and user maintenance shall not be made by children unless they are older than 8 years and supervised.
Oil bottle (not with all models)
Keep out of reach of children. Do not swallow. Do not apply to eyes. Dispose of properly when empty.
Clean&Charge Station (models CT6cc/CT5cc/CT4cc/ CT3cc/CT2cc only)
To prevent the cleaning fluid from leaking, ensure that the Clean&Charge station is placed on a flat surface. When a cleaning cartridge is installed, do not tip, move suddenly or transport the station in any way as cleaning fluid might spill out of the cartridge. Do not place the station inside a mirror cabinet, nor place it on a polished or lacquered surface.
The cleaning cartridge contains a highly flammable liquid so keep it away from sources of ignition. Do not expose to direct sunlight and cigarette smoking nor store it over a radiator. Keep away from children.
Do not refill the cartridge and use only original Braun refill cartridges.
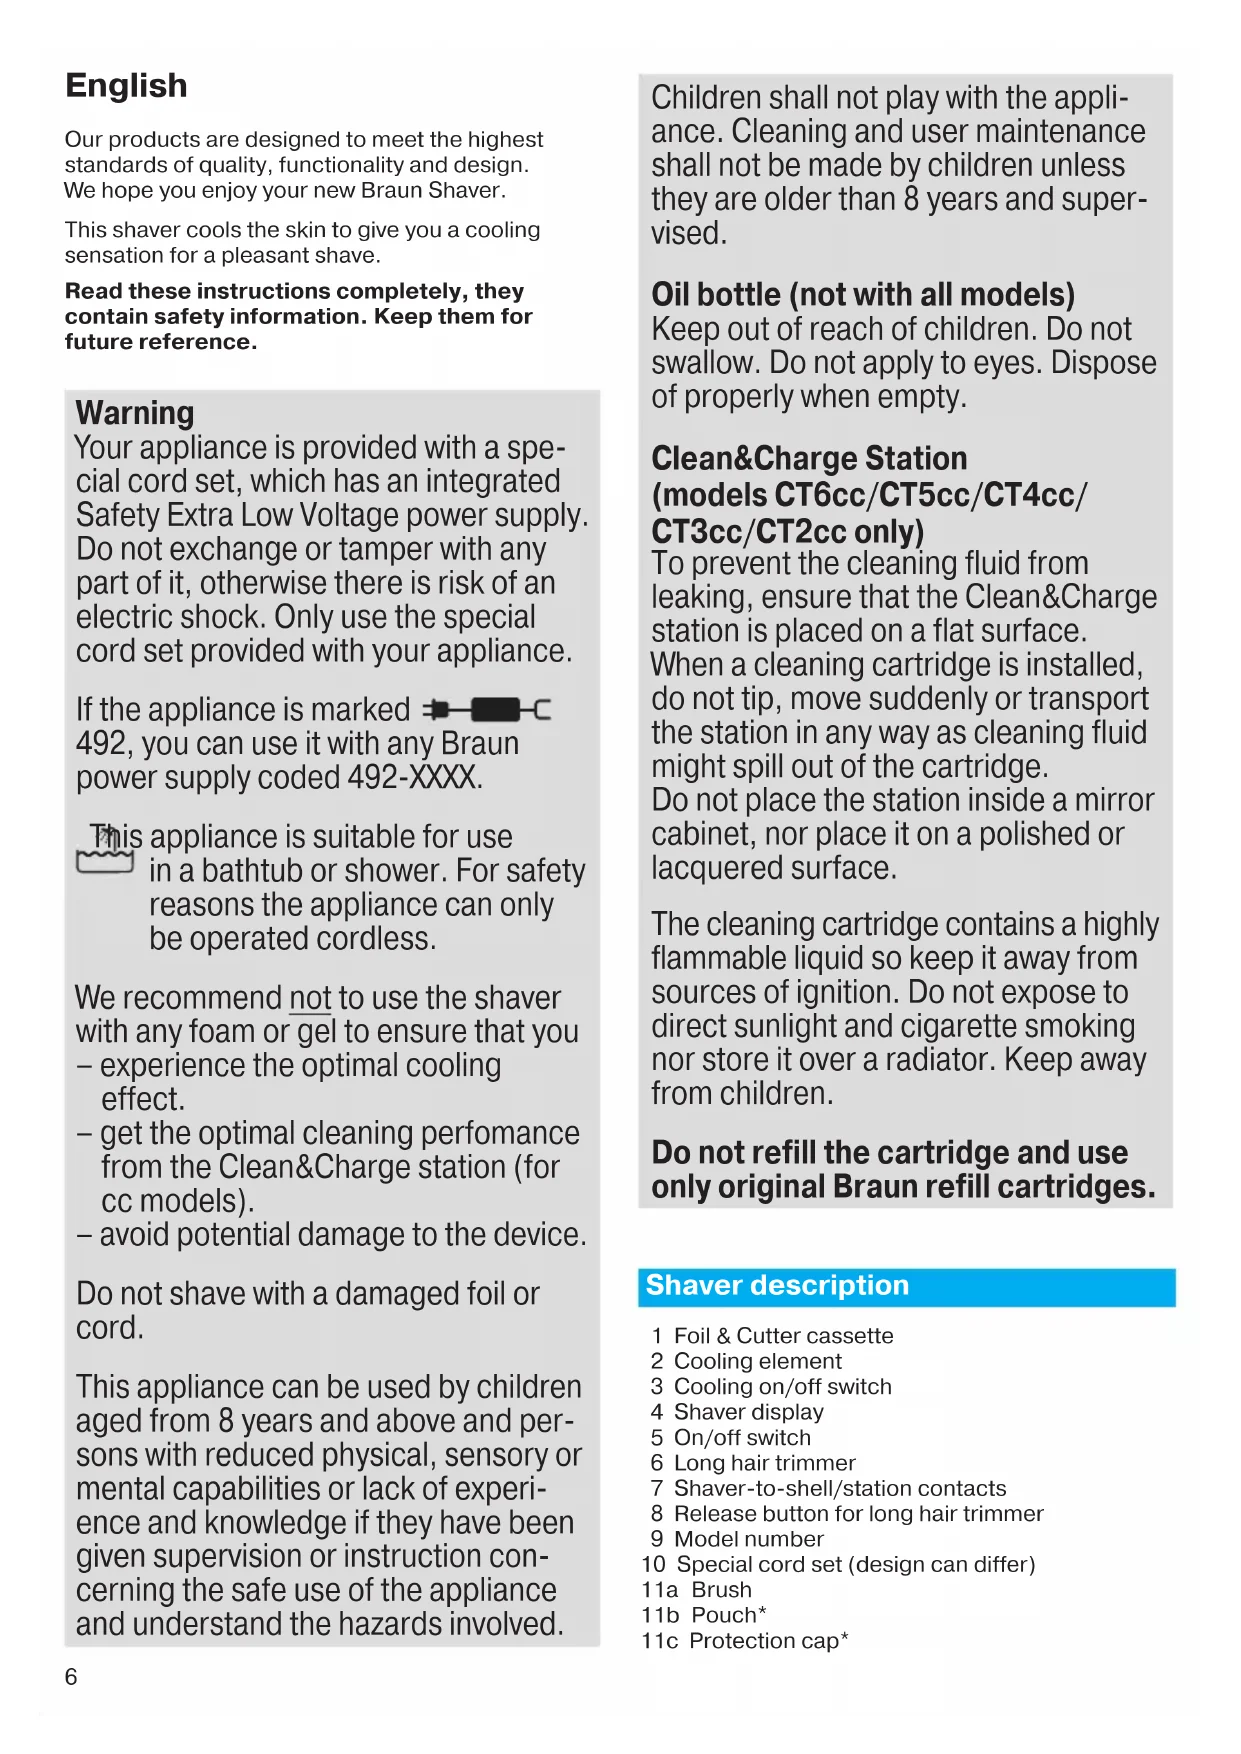
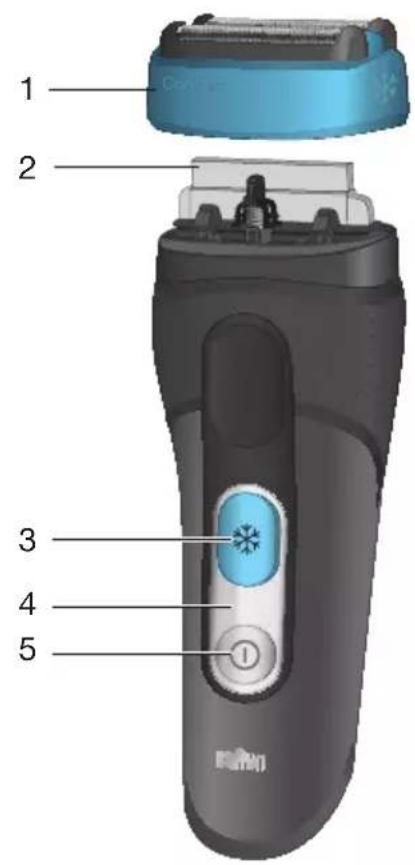
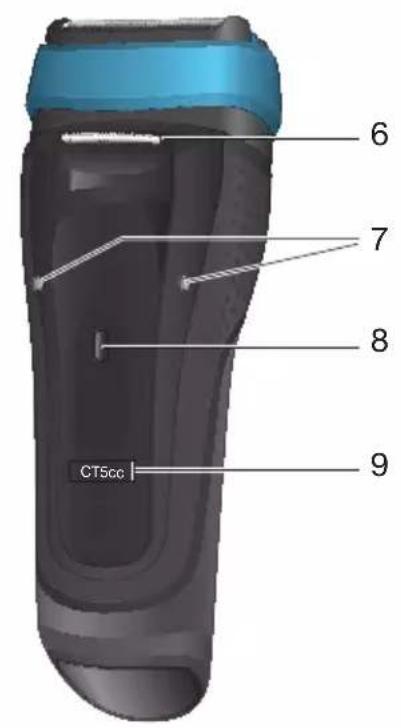
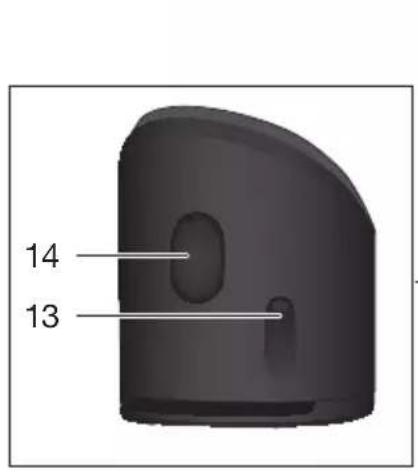
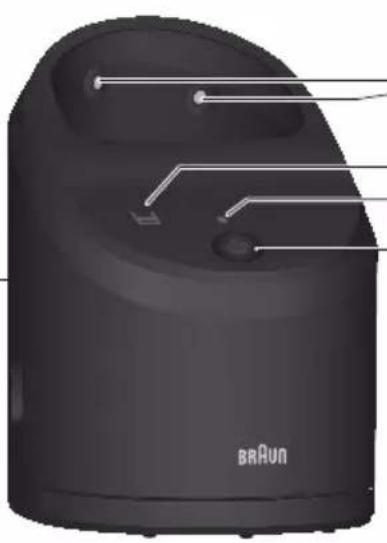
Shaver description
1 Foil & Cutter cassette
2 Cooling element
3 Cooling on/off switch
4 Shaver display
5 On/off switch
6 Long hair trimmer
7 Shaver-to-shell/station contacts
8 Release button for long hair trimmer
9 Model number
10 Special cord set (design can differ)
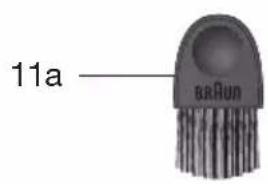
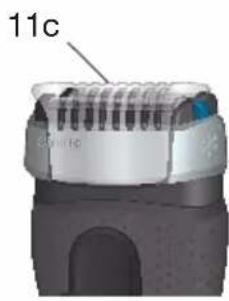
11a Brush
11b Pouch
11c Protection cap
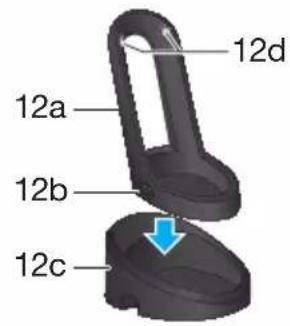
12a Charging shell
12b Shell power socket
12c Stand for charging shell*
12d Shell-to-shaver contacts
*not with all models
First use and Charging
Prior to first use connect the shaver to an electrical outlet using the charging shell as described below or for models CT6cc/CT5cc/CT4cc/CT3cc/ CT2cc the Clean&Charge station (see Chapter «Clean&Charge station»).
Note: The shaver can only be charged via the charging shell or the Clean&Charge station. Models CT4s/CT2s must not be used with the Clean&Charge station.
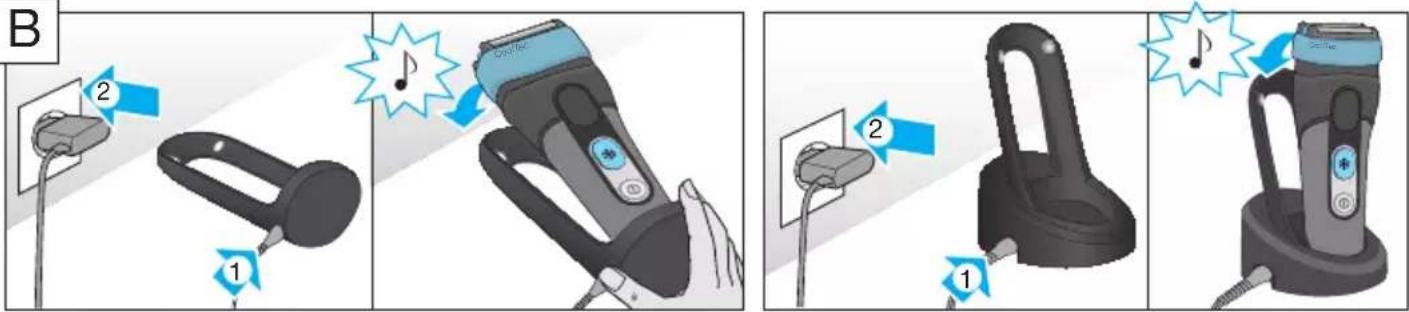
Charging shell (see fig. B)
- Click the charging shell (12a) onto the stand (12c - models CT4s/CT2s only). Using the special cord set (10), connect the shell power socket (12b) to an electrical outlet.
- Place the shaver into the charging shell. The contacts (7) on the back of the shaver need to align with the contacts (12d) in the charging shell. A beep sound confirms that the shaver sits properly in the station.
- The shaver will be automatically charged.
Charging and basic operating information
-
A full charge provides the following operating times according to your beard growth and environmental temperatures:
-
about 45 minutes without activated cooling function
-
about 15 minutes with activated cooling function; afterwards 20 minutes operating time without cooling function.
-
Recommended ambient temperature for charging is 5^ to 35^ . The battery may not charge properly or at all under extreme low or high temperatures. Recommended ambient temperature for shaving is 15^ to 35^ .
- Do not expose the appliance to temperatures higher than 50^ for extended periods of time.
- When the shaver is connected to an electrical outlet, it may take some minutes until the display illuminates.
Shaver display
Charge status
During charging the symbol in the on/off switch (5) blinks green. When fully charged, it will light up for a few seconds, provided the shaver is connected to an electrical outlet.
Low charge
The symbol in the on/off switch (5) shines red when the battery is running low. You should be able to finish your shave. When switching off the shaver a beep sound reminds you of the low charge status.
Cooling Status
The symbol shines blue with activated cooling function. When the battery is running low it starts blinking.
Cleaning Status (only models CT6cc/CT5cc/ CT4cc/CT3cc/CT2cc)
The cleaning indicator lights up, when the shaver needs to be cleaned in the Clean&Charge station.
Travel lock
The lock symbol rights up when the shaver has been locked to avoid unintended starting of the motor (e.g. for storing it in a suitcase).
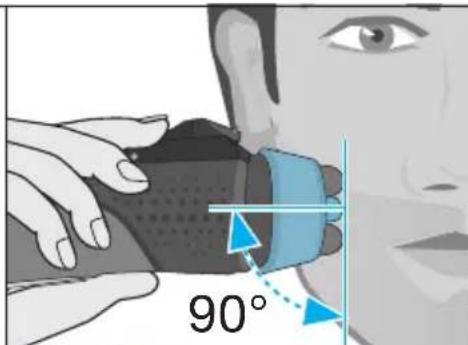
Using the shaver (see fig. A)
Press the on/off switch (5) to operate the shaver.
Tips for a perfect dry shave
For best results, Braun recommends you to follow 3 simple steps:
- Always shave before washing your face.
- At all times, hold the shaver at right angles (90^) to your skin.
- Stretch your skin and shave against the direction of your beard growth.
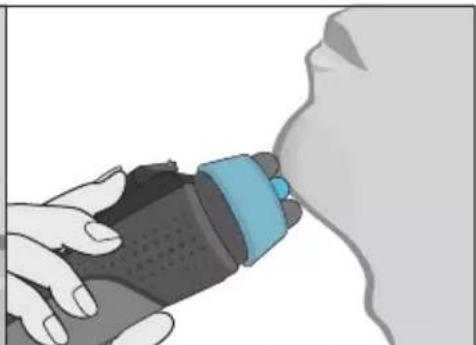
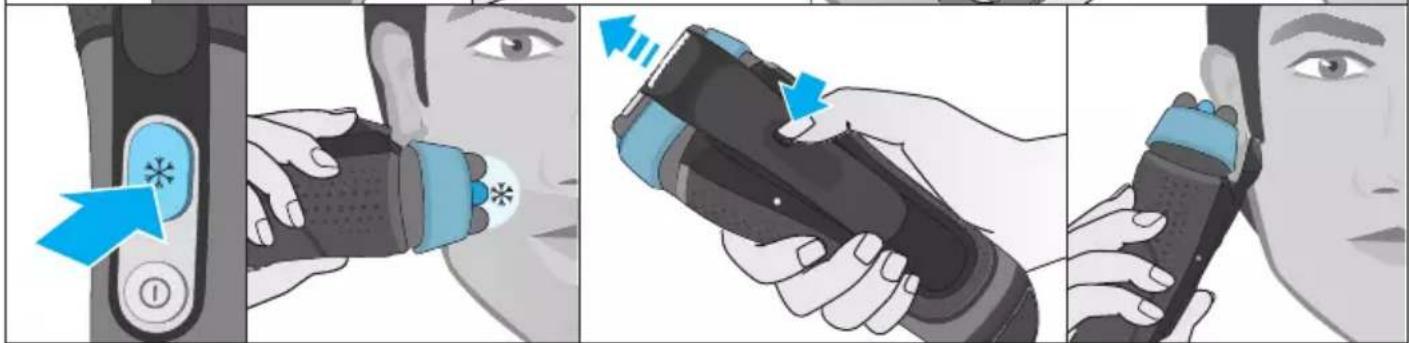
Cooling
Note: The cooling sensation experienced may differ from person to person. It is influenced by personal and environmental factors (e.g. skin, environmental temperature).
Activation: To activate the cooling function, press the cooling switch (3) during shaving. The symbol in the cooling switch shines blue. For best cooling performance, we recommend to wait a few seconds after the cooling function has been activated. Then continue shaving as usual.
Low battery: The symbol in the cooling switch (3) starts blinking when the battery is running low and there is not enough energy left for the cooling function. You should be able to finish your shave with activated cooling function. We recommend to charge the appliance afterwards to have the cooling function available for the next shave.
You can deactivate the cooling function by pressing the cooling switch again.
Long hair trimmer
To trim sideburns, moustache or beard, press the
release button (8) and slide the long hair trimmer (6) upwards.
Travel lock
- Activation: By pressing the on/off switch (5) for 3 seconds the shaver is locked. This is confirmed by a beep sound and the lock symbol in the display. Afterwards the display turns off.
- Deactivation: By pressing the on/off switch for 3 seconds the shaver is unlocked again.
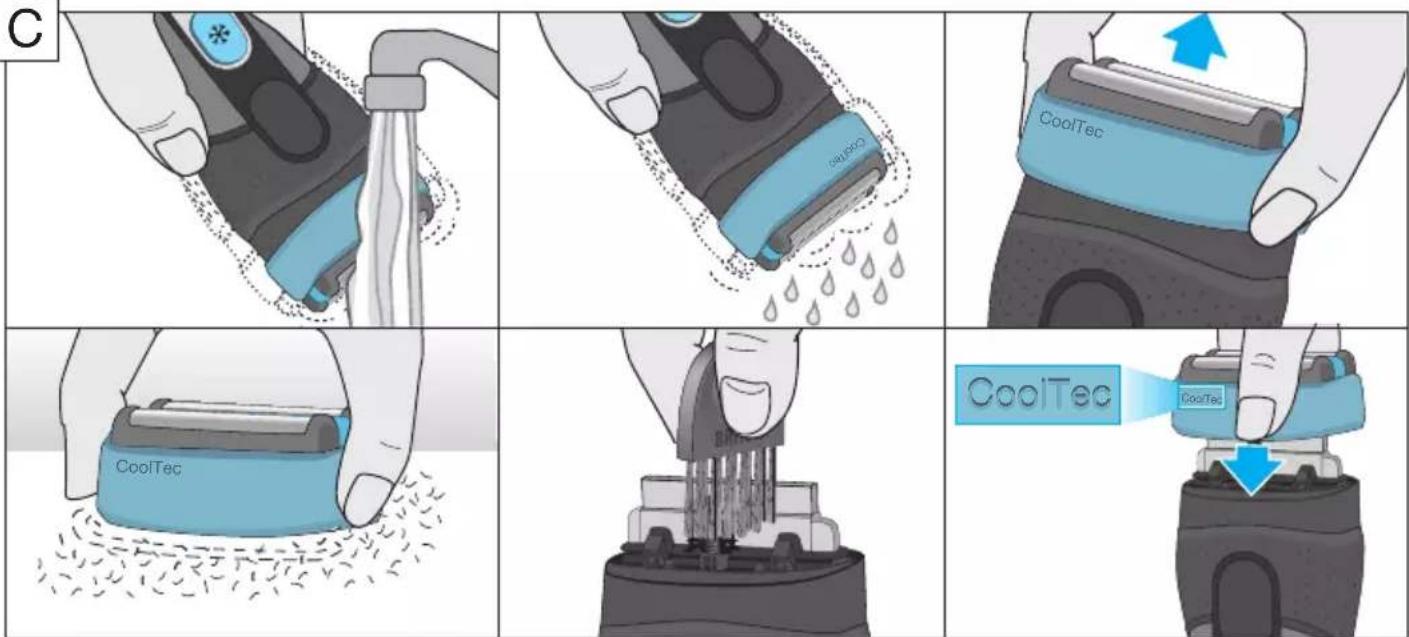
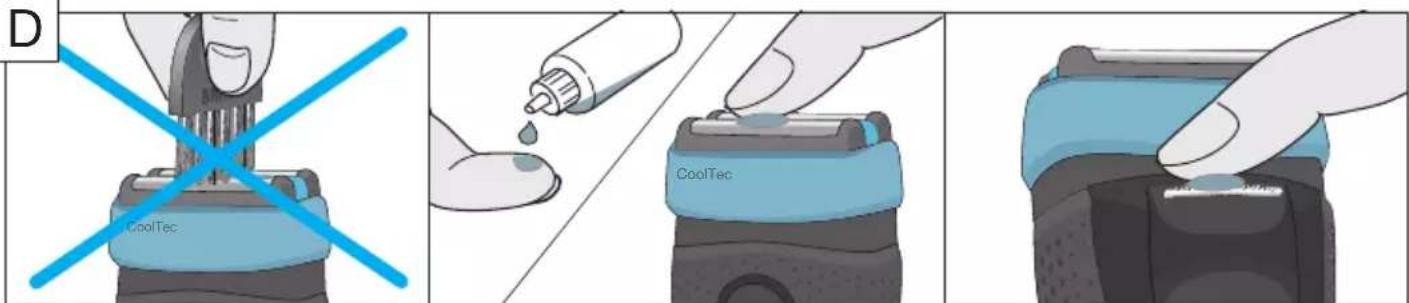
Manual cleaning of the shaver (see fig. C/D)
Cleaning under running water:
- Switch the shaver on (cordless) and rinse the shaver head under hot running water until all residues have been removed. You may use liquid soap without abrasive substances. Rinse off all foam and let the shaver run for a few more seconds.
- Next, switch off the shaver, remove the Foil & Cutter cassette and let it dry.
- If you regularly clean the shaver under water, then once a week apply a drop of light machine oil on top of the Foil & Cutter cassette.
Cleaning with a brush:
- Switch off the shaver. Remove the Foil & Cutter cassette (1) and tap it out on a flat surface. Using a brush, clean the inner area of the pivoting head. Do not clean the cassette with the brush as this may damage it!
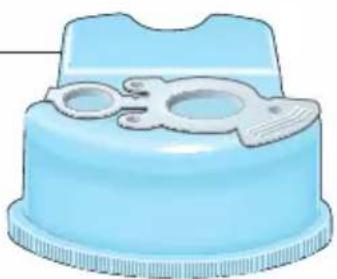
Clean&Charge station
模型CT6cc/CT5cc/CT4cc/CT3cc/CT2cc)
The Clean&Charge station has been developed for cleaning, charging, lubricating, disinfecting and storing your Braun shaver.
13 Station power socket
14 Lift button for cartridge exchange
15 Station-to-shaver contacts
16a Level indicator
16b Status light
17 Start button
18 Cleaning cartridge
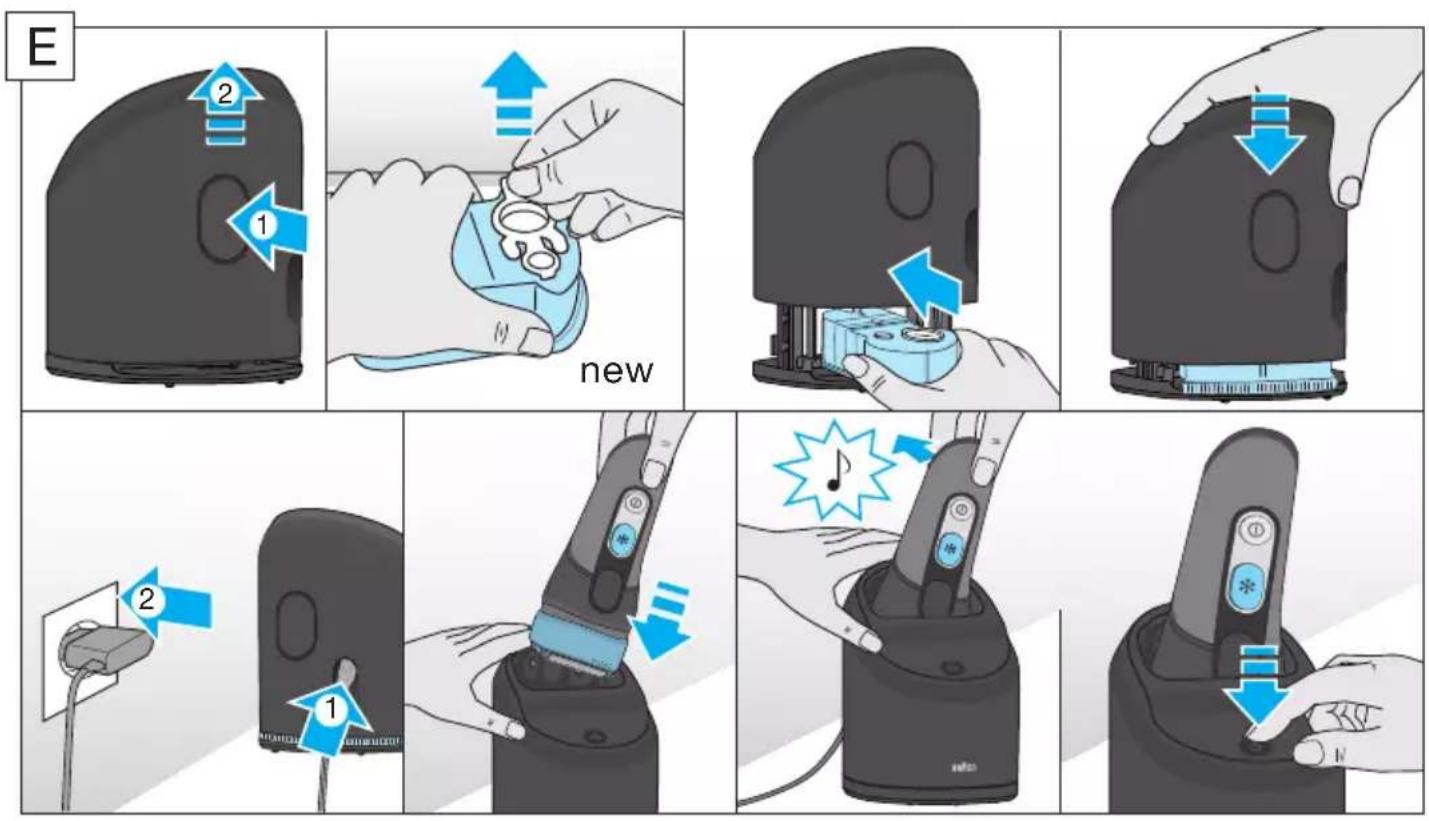
Installing the Clean&Charge station (see fig. E)
- Remove the protection foil from the Clean&Charge station display.
- Press the lift button (14) at the rear side of the Clean&Charge station to lift up the housing.
- Hold the cleaning cartridge (18) down on a flat, stable surface (e.g. table).
- Carefully remove the lid from the cartridge.
- Slide the cartridge from the rear side into the base of the station until it snaps into place.
-
Slowly close the housing by pushing it down until it locks.
-
Using the special cord set (10), connect the station power socket (13) to an electrical outlet.
Charging the shaver in the Clean&Charge station
Insert the shaver head down into the Clean&Charge station.
Important: The shaver needs to be dry and free from any foam or soap residue!
The contacts (7) on the back of the shaver need to align with the contacts (15) in the Clean&Charge station. Push the shaver in the correct position.
A beep sound confirms that the shaver sits properly in the station. The Clean&Charge station will automatically charge the shaver.
Cleaning the shaver
When the cleaning indicator lights up in the shaver display, insert the shaver into the Clean&Charge station, upside down and with the front showing.
Start automatic cleaning
Start the cleaning process by pressing the start button (17). If the status light (16b) does not shine (Clean&Charge station switches to stand-by after about 10 minutes), press the start button twice. Otherwise cleaning will not start.
For best shaving results, we recommend cleaning after each shave.
The cleaning program consists of several cycles, where cleaning fluid is flushed through the shaver head. The cleaning time takes 3 minutes. During this time the status light of the Clean&Charge station blinks.
Leave the shaver in the station for drying. It takes several hours until remaining moisture evaporates depending on the climatic conditions. Afterwards the shaver is ready for use.
After completing the cleaning and charging session, the indicators of the Clean&Charge station turn off.
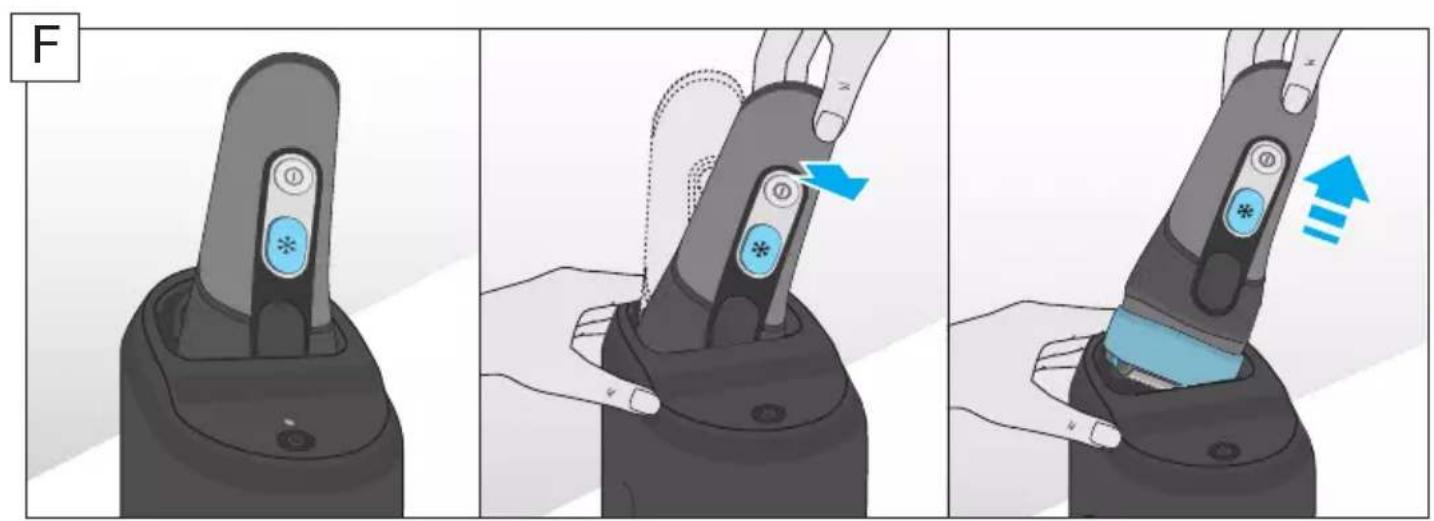
Removing the shaver from the Clean&Charge station (see fig. F)
Hold the Clean&Charge station with one hand and tilt the shaver slightly to the front to release it.
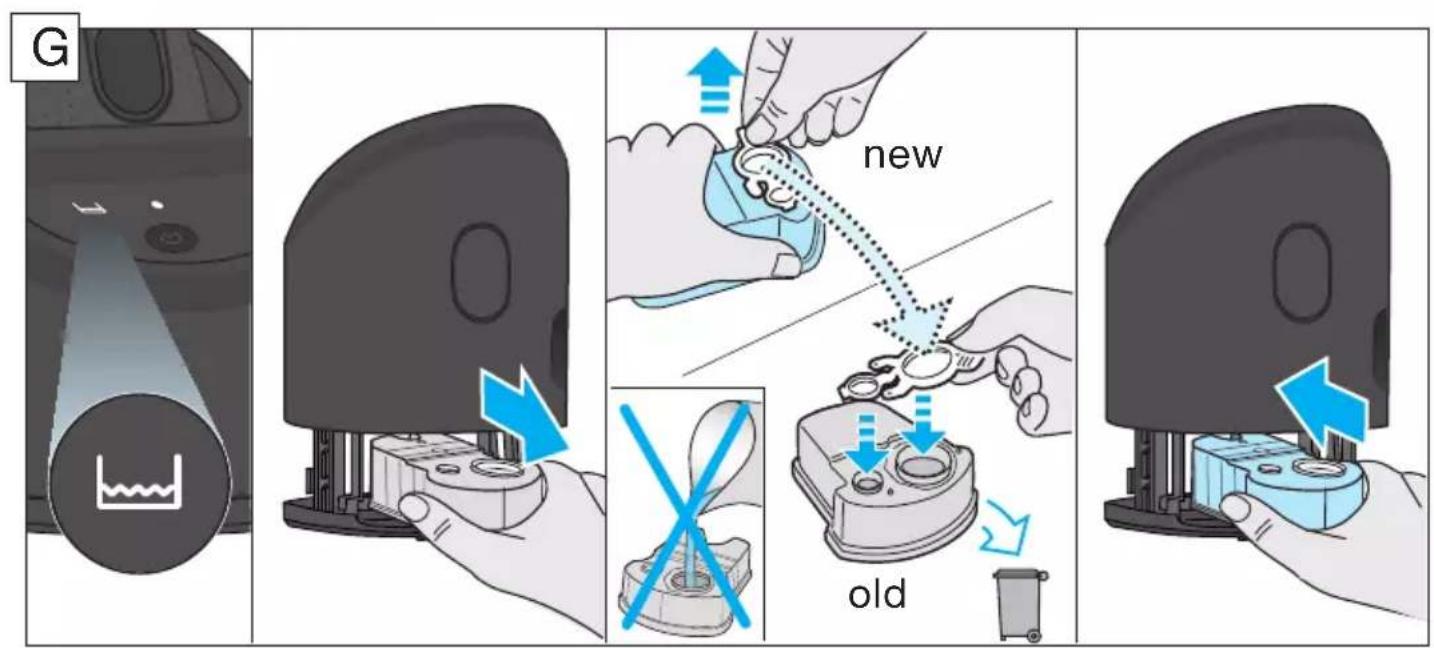
Cleaning Cartridge / Replacement (see fig. G)
When the level indicator lights up permanently red, the remaining fluid in the cartridge is sufficient for about 3 more cycles. When the level indicator blinks red, the cartridge needs to be replaced (about every 3-4 weeks when used daily).
After having pressed the lift button (14) to open the housing, wait for a few seconds before removing the used cartridge to avoid any dripping. Before discarding the used cartridge, make sure to close the openings using the lid of the new cartridge, since the used cartridge will contain contaminated cleaning solution.
The hygienic cleaning cartridge contains ethanol or isopropanol (specification see cartridge), which once opened will naturally evaporate slowly. Each cartridge, if not used daily, should be replaced after approximately 8 weeks to ensure optimal disinfection.
The cleaning cartridge also contains lubricants, for the shaving system which may leave residual marks on the outer foil frame and the cleaning chamber of the Clean&Charge station after cleaning. These marks can be removed easily by wiping gently with a damp cloth.
Accessories
Braun recommends changing your shaver's Foil & Cutter cassette every 18 months to maintain your shaver's maximum performance.
Available at your dealer or Braun Service Centres:
- Foil & Cutter cassette: 40S/40B
- Cleaning cartridge Clean&Charge: CCR
Environmental notice
Product contains batteries and/or recyclable electric waste. For environment protection do not dispose of in household waste, but for recycling take to electric waste collection points provided in your country.
The cleaning cartridge can be disposed of with regular household waste.
Subject to change without notice.
For electrical specifications, see printing on the special cord set.
Trouble-Shooting
| Problem Possible reason Remedy | ||
| SHAYER | ||
| Unpleasant smell from the shaver head. | 1. Shaver head is cleaned with water.2. Cleaning cartridge is in use for more than 8 weeks. | 1. When cleaning the shaver head with water only use hot water and from time to time some liquid soap (without abrasive substances). Remove Foil & Cutter cassette to let it dry.2. Change cleaning cartridge at least every 8 weeks. |
| Battery performance dropped significantly. | 1. Shaver head is regularly cleaned with water but not lubricated.2. Foil and cutter are worn which requires more power for each shave. | 1. If the shaver is regularly cleaned with water, apply a drop of light machine oil on top of the foil once a week for lubrication.2. Renew Foil & Cutter cassette. |
| Shaving performance dropped significantly. | 1. Shaving system is clogged.2. Foil and cutter are worn. | 1. Soak the Foil & Cutter cassette into hot water with a drop of dish liquid. Afterwards rinse it properly and tap it out. Once dry apply a drop of light machine oil on the foil.2. Renew Foil & Cutter cassette. |
| Cooling element is warm. | 1. Shaver was used with cooling function a couple of minutes before.2. Battery capacity is too low for the cooling function. | 1. You can use the shaver like this or turn on the cooling function and wait a few seconds until it is activated again.2. Charge the shaver after each shave to ensure sufficient battery capacity for the cooling function. |
| Shaver head is damp. | 1. Drying time after automatic cleaning was not sufficient.2. Drain of the Clean&Charge station is clogged. | 1. Clean directly after shaving to allow enough time for drying.2. Clean the drain with a wooden toothpick. |
| CLEAN&CHARGE STATION | ||
| Cleaning does not start when pressing the start button. | 1. Shaver is not placed properly in the Clean&Charge station.2. Cleaning cartridge contains not enough cleaning fluid (display lights red).3. Appliance is in stand-by mode. | 1. Insert shaver into the Clean&Charge station (contacts of the shaver need to align with contacts in the station).2. Insert new cleaning cartridge.3. Press start button twice. |
| Increased consumption of cleaning fluid. | Drain of the Clean&Charge station is clogged. | - Clean the drain with a wooden toothpick.- Regularly wipe the tub clean. |
Guarantee
We grant a 2 year guarantee on the product commencing on the date of purchase. Within the guarantee period we will eliminate any defects in the appliance resulting from faults in materials or workmanship, free of charge either by repairing or replacing the complete appliance at our discretion.
This guarantee extends to every country where this appliance is supplied by Braun or its appointed distributor.
This guarantee does not cover: damage due to improper use, normal wear or use as well as defects that have a negligible effect on the value or operation of the appliance. The guarantee becomes void if repairs are undertaken by unauthorised persons and if original Braun parts are not used.
To obtain service within the guarantee period, hand in or send the complete appliance with your sales receipt to an authorised Braun Customer Service Centre (address information available online at www.service.braun.com).
For UK only:
This guarantee in no way affects your rights under statutory law.
François
Installation de la station Clean&Charge (cf fig. E)
Cistici kazeta/Vymena (viz obr.G)
Stanica Clean&Charge
(len modelly CT6cc/CT5cc/CT4cc/CT3cc/CT2cc)
Stanica Clean&Charge bola vyvinutá načistenie, dobijanie, mazanie,dezinfekciu a uloženie holiaceho strojčeka Braun.
13 Zasuvka stanice
14 Tlačidlo zdvihnutia na výmenu kazety
15 Kontakty pre nabijanie v stanici
16a Ukazovatel' hodnoty
16b Stavová kontrlka
17 Tlacidlo spustenia
18 Cistiaca kazeta
Ctanhéra Clean&Charge (camoto CT6cc/CT5cc/CT4cc/CT3cc/CT2cc)
3aДа пеюТВратиЕ n3TчанetoHa ПОчИСТВацаТ TeuHOC, yBepeTe ce, Чe станцяТа Clean&Charge e nocta- В�на Вьрху ПLOСКа NOВьрхHOCT.
3akIIOUbaHe npn nbTybaHe
- AkTbUpaHe: Ype3 HaTnCKaHe Ha 6yToHa 3a BkJIIOuBaHe/IN3KJIIOUBaHe (5)В npOdbJnxEHe Ha 3 cekyHdN, Camo6pbcHaChKaTa ce 3akJIIOUba. Toba CE NOTBbPjXdABA OT 3ByKOB CnHaN CmBOJa 3a 3akJIIOUba He Ha dncnJe. CneI TOBa dncnJeT Ce IN3KJIIOUBa.
- DeaktnBupane: Ype3 HaTnCKaHe Ha 6yToHa 3a BKJIIOUBAHe/H3KJIIOUBAHe B npOdbJxKeHne Ha 3 CekyHn, Camo6pbchauKaTc Ce OTKJIIOUBA OTHOBO.
PbUHO NOuNCtBaHe Ha
camo6pbchauKaTa(BX.ΦnC/D)
IOnuTbaHe IOn Teuaa BOJa:
BkIIOUcTe cAmO6pbcHaQKaTa (6e3XnUHO) n 3nIIaKHeTe rIaBaTa NoT euaa TOnla BOda,
DOKATO BCNUCKOCTaTbCn CaOTcTaPHeH. MoKe Da N3NoJ3BaTe TeueH canyH 6e3 abpa3NBH BeIecTBA. N3JIaKHeTe CJIaNaTApHa NocTaBeTe Camo6pbChauKaTa Da pa6OTn OSe HRAKO KcKHyNl.
CneTobaN3KIOUeTe CamO6pbCHaVkata,N3BaTeMpexKuKaTa NpeXnIg 6Iok N OCTaBeTe Da n3CbxHaT.
Ako peoBHO IOuHCTBaTe cAmO6pbchauKaTa IOD BOda, BeHbX B CeIMuCaTa HaHaCraIe Tn O eHa KaPKa JIeKO MaUNHIO MaCNo BbPxy MpeKNUKaTa npeKeun 6Jok
Почистванецүтka:
- I3KJIIOUcTe cAmO6pbchauKaTa. MaxHeTe MpeXnKata n peXeun 6Iok (1) n rN noCTaBeTe Bbpxy IIoCKa NOBbPxHOCT. KaTo n3NoJ3BaTe YeTka, NouchTeTe BbTpEshHaTa 3OHa Ha ONOpHaTa rJaBa. He nouchTaBaiTe peXeun 6Iok C yeTkata, 3aIoTO TOBa MoKe Da rO nobpeDi!
Topaui INDnKaTOp 03Haayet, YTO Heo6xOIMOBbIIOJIHITb UNTKy 6pntBbIB yCTpoiCTBeClean&Charge.
INHdkatop 6JOKUPOBKn OT CnyaHORO BKJIIOUeHnA
CnMBoJ 6IokpOBKn 3aIopaeTc np aKTNbauN 6IokpOBKn 6pntBbl Ine IpeDoTbpaueHn CnyaHOrO BKJIIOUeHnE ee MOTopa (HaIpIMep, pnp TpaHCnOpTIpOBKe B YemOdaHe).
IcnoJb3ObaHne 6pntTbbI (cm.pnc.A)
ДяначаэКсплуataцибрNTыНжмITEKHONKY BKJIIOUeHЯ/ВыКЛIOUeHЯ(5).
CobetblIJIuIealbHoro6pntb
Дя habлuyшero pe3yltata Braun pekomehnyet cIeIOBaTb 3 npoctbIM npabnlaM:
- Bcerda 6peiTecb nepei yMbIbaHneM.
- CtapaTeceb depXaTb 6pntBy noJ yrJom 90 K KOxKe.
- Cnertka HataRnBaIe Te Koxy u nepemEuAte 6pntBy B HappaBHeHn IpOTNB pOCTa BOJoc.
OxlaXdEHe
Примочанe: ИNTEHCBHOCt b OUsyUeHnOxJaXdEHHЯBJIaTeC cy6beKTHBHOи 3aBUCNT OTOCOBeHHoCTe ΦI3NIOJrN KOxN TOrO IIN INHOQeJIOBeka nФakTOpOB OkpykaIOuSei Cpebl (HaNPIMep, ee TemnepaTpybl).
AKTUBaJra:ДЯ aKTUBaUHnФyHKUHn OXJaJxDeHnB IpoUeCSe 6pntbHaXMMTe Ha KHOJIky BKJIIOUeHnOxJaXDeHn (3).CmBoI * Ha KHONKe BKLIOUeHnOxJaXDeHn 6yIeT CBETbCSnHM;ДЯ IOCTNKeHnHaNJyUWeTo ΕΦΦeKTaMbI peKOMeHNyEMNoOxJaTb HeCKoJbKO CeKYHn PocJe aKTUBaUHnФyHKUHn. PocJe 3TOrO Bbl MoKTe nPoJoJXaTb 6pntbCry O6bIuHbIM O6pa30M.
Hn3kn 3apraa kkymylTopa: npn CHnxKeHHN 3apra aKKymyIaTopa DO yPOBn, HeIOCTaTOUHOr OJRA OCUuEcTBLeHnA yHKnOxJaXDeHnC NMB0J * Ha KONKe BkIIOueHnI NOcJIeDHe HauHHaET
MnraTb. OctabWeiC8 3HeprH, OHaKO, XBaNT dIa3aBepWeHn8 6pntb8 npiaKtBnPoBaHHoYHKcNIOxJaXdEHH.
MblcoBetyem3apxkaTb npn6op nocJe kaxdoTo 6pntbIgTTO,HTO6blyHKUIN OXJaXdHnI 6blnaIOCTynHa pni cLeNyUoE m ceaHce 6pntbI.
NoBTOpHOe HaKaTne KHOKN BKNIOueHnOxJaXKeHHN DeaKTbnpyET yHKUHO.
Tpmmep dIaIINHHbIX BOJOC
YnCTKa nO, Ctpye BObl
BkIIOUHTe 6pITby (He NOdkIIOUaK 3JIeKTpOceTn). OOnIOChNTe rOIOBky 6pITbI N MOyIb nepeKlIOUeHnpeXIMa TOUHO 6pITbI POI, TROPYI npOTOHNO BOIOJ DO ydaJIeHnR BCex OCTaTKOB BOIOc. Bbl MoKeTe NCIOJIb3OBAtB XNIDKOeMbILO 6e3 abpa3INBbIX BeueCTB.CMOITe NeHy IN BkIIOUHTe 6pITby Ha HeCKoJIbKO CeKYHd.
- 3aTeM, BbIKIIOuINB 6pntBy, OTCOeINHnTe KACCETy Foil & Cutter (1) n daIte 6pntBe npocoxHyTb.
- EcIn Bbl peRyIaRHO uHCTnTe 6pntBy nOcTpyeB0dbI, pa3 B HeJeIO peKOMeHdyETcra HaHOCNTb KaJIIO CBeTlORo MaUHHOrO MaCJa Ha BepXHIOU qactb kaccetb Foil & Cutter.
BbTaKKe MoKTe NcNoJIb3OBAt bIJIa YnCTKn 6pNTBb IBXODaIyIO B KOMNJIeKT UeTky:
- Bыкючite 6рntby. ChIMnte kaccety Foil & Cutter (1) И постучite eio no Плоскои NOBepxhoCTN Дя удалин HaXODaUHXC8 BHyTpN 3aRpy3HeHn. Испьзу щeTKy, OuchTe BHYTrpENHIO UO qactb пlaBaIooJI er rolOBKn. He Испьзу Te UIe TKY Дя UNCTKII KACCetbl BO n36exKaHne NOBpeXdEHn NOcJeDHe!
UcTpoIcTBO uNCTKN 3apAdkn
Clean&Charge (Для моделу CT6cc/CT5cc/CT4cc/CT3cc/CT2cc)
UctpoicTBO Clean&Charge npedHa3naeHOn dnyuNCTKN, P0d3apRAnK, CMa3KN, De3nHΦekCUN INxpanenHn 6pntBbl Braun.
13 Pa3bem əJIeKTpOpiNTaHnY yCTpOiCTBa
14 Khonka noobema dla 3aMeHb KaTpua
15 KOHTaKtblIJIy IIOIDCOeINHeHnK yCTpOiCTBy 6pNTBbl
16a CBeTOBOn INHdNkATOp yPOBnA
16b CBeTOBOH INDnKATOP COCTOHN
17 Khonka nycka
18 YnctTauKapTpNdx
YctahOBka yctpoicTba Clean&Charge (cm.pnc.E)
- YdaJInte 3aunTHyIO foIbIg y c IncnIe yCTpoIcTba Clean&Charge.
HaxMTe Ha KhoNky (14) Ha 3aJHei cToPoHe yctpoiCTBa Clean&Charge Ira noIbema KoKxya. - Плобкite чостяший kapтпдж (18) на ровны, устончыю NOBepxHocTb (нарример, на стол).
- OctopoxxHo ydaJInte KpbIshKy KapTpnuJka.
BCTaBbTe KapTpIxK C3aIIN BHyTpB OCHOBaHn yCTpoIcTba HaxMITE Ha Hero, NOKa OH XeCTKO He 3aΦuKcnpyeTc. - MeДлЕнно HabKIMMaTe Ha KoxyX Do eRo NOHOrO onyckaHnI NΦkCaUIn.
BCTaBbTe cneuaJIbHbI uHyp (10) B pa3bEm 3JekTpOuNTaHnY yCtpoNcTba (13) nNodklUOHTe erO K 3JekTpocETn.
Подзарянka 6рNTБыВ устpoичтBE Clean&Charge
BCTaBBTe 6pntBy B yCtpoiCTBO rOJOBKo BHN3.
BaxkHO: 6pntBa DoJxHa 6bItb cyXo; Ha He Hne JdoJxHo 6bItb OCTaTKOB NeHb IJIIMMbIa!
KoHTaKTbI (7) Ha 3aDHeN NOBepXHOCTn 6pNTbblOJXHbI CTbIKOBaTbC R KOHTaTMn (15) yCTpoiCTBa.
BCTaBbTe 6pntBy Do ynpa. 3BykoBoi CnHai NoTBePxxJaet, YTO 6pntBa 6bla yCTaHOBHeHa B yCTpoIcTB O npabNlbo. IOn3apJka NaHETcA ABTomatueckn.
- Kacceta Foil & Cutter: 40S/40B
- Ynctraui KaptpnJx Clean&Charge: CCR
3koIorHuecka HOpMaucnA
IpoDyKT coDEpXNT aKKymJYTOpbl n/nn IpepepaTaBbIbAeMbIe OTxObl 3JIeKTPnueCKoro OobopyIOBaHn. B ueJx 3aunbl OKpyKaIOUe Cpebl He Bbl6paCbIbAte N3dJIne BMeCTe C6blTOBbIMN OTxODAMN. IpePaIe erO B NyHKtbl C6opa OTxODB 3JIeKTPnueCKoro OobopyIOBaHn B BaWe CTpaHe.
IcnoJb3ObaHHbI YnCTaUH N KApTpNdx MOxHO yTUN3INPOBaTb BMeCTe C O6bIHbIM 6blTOBbIM MyCOPOM.
Coepxahne MoXeT 6bITb N3MeHHe 6e3 npedBapnteIbHOro yBeOMJeHHa.
3JIeKtpnueckne cpeuΦkaucn HaneaTaHbHa CpeuaJbHom shype.
ПОВОпOCAM BыINОЛнEHня rapaHTиHOrO nIIN ПОслeгараТиНоGO OБсLуЖИВaHЯ, a TaKxe В Слуае BOЗнКHOВЕнЯ Прблем пи ИСПОЛьЗOBAHи ПpoДуКцИ, Прocьба CBЯЗыВаТьсЯ С Инфорmaционнoi СлужбоJ Сервиca BRAUN no Тeleфony 8 800 200 2020.
Bn3dennmeMoryT6bITbBHeceHbN3MeHeHna6e3 npedBaPnteIbHOrOyBeDOMHeHna.
PekomeHdaunnopeuHIOBO3HkaUx npo6JeM
| ПюбLEMа Возможная р孥ни Рецени | ||
| БРИТВА | ||
| Нелриговий залaxи 3 Головки брітвы. | 1. Головka брітвы піорьевалась вodо.2.Заменчесягогаркіпгірпджа не піорьков们лась boilee8 He'delb. | 1. Ппі рістікі Головки брітвы вodоі IncpIoB3угіteТолькі Горayчio Bovody, Иногда - КіздоМьлі,He co\'edржашee abpa3iVBhix Beu\'ecTB.OТco\'ednHite kaccety Foil & Cutter дlya npocuyskii.2. П\'р\'иЗ\'в\'ODITE заменч\'с\'ц\'е\"rgo кaptr\'dja kakMinmumk kaskdble 8 He\'eJb. |
| Су\'е\'ь\'н\'о\'е сніж\'е\ п\'р\'и\'ь\'н\'е\'ь\'н\'о\'e\ a\'К\'у\'м\'ь\'л\'Topa. | 1. ГOLOBK a bprTbI pereyraRno cHCTITcR BODO, Ho He CMA3bIBAeTcR.2.ИЗ\'OC bpeoi\'e cETkn i pexyu\'ego blokA tpe6yET bOLbweo KOInchctBa 3Heprni pri KaJdOM bprtbe. | 1.Е\'SIN bprTbA pereyraRno ChSTITcR BODO, pa3 B Me\'sU NaHOCITE kaPJIIO CBETLNO Ma\shinHOrO MaClaHa H BepXHIOU qactb cETkn dlya CMa3Kn.2.З\'amenite KACCETy Foil & Cutter. |
| Су\'е\'ь\'н\'о\'e\ сніж\'е\ п\'р\'и\'ь\'н\'e\'ь\'н\'о\'e\ bpei\'u\'eо з\'lementa. | 1.Зacop bpeoi\'e cNttembl.2.ИЗ\'OC bpeoi\'e cETkn i pexyu\'ego blokA. | 1.Зamoyte KACCETy Foil & Cutter b rorpuey Boide, B KOTOPU DoabavLeHa KaIIra CpeiCTBa dlya MbyTb IocSybl.3aTeM T'zateJIbNo PpOMoi Te KACCETu NocTyuTe EIO O KaKyU-NH6yDb NOBepxHocTb dlya ydaIaHEny CoDPKazuxCByHTprn 3aRpy3NeHn. Пocle npocuykn HaHecnte KaPJIIO CBETLNO Ma\shinHOrO MaClaHa cETky.2.З\'amenite KACCETy Foil & Cutter. |
| Har\'e\'ь\'н\'e\ oxlajdaiou\'e\ э\'lementa. | 1.БрітВа HeCKOLbKO MInHyT Na3aI nd InCPIb3OBAJaCb B pexKime akTIBaCIu OXIAJXdEHHa.2.Hn3kI zaprД aKKymjIaTopa, HeDcOCTaTOUHbI Dny PoIdepXaHnI PhYNKciu OXIAJXdEHHa. | 1.Вы м\'о\'ete IncpOJIb3OvAtb bprTby B ob'shHOM pexKime (t.e. 6e3Функ\'uOxIaXJdEHHa)Л\'БО BKIQUHTb PocIeDHIQUI NdoJxDaTbCBy e'e AKTIBaCIu, KOTOPa npoI3OiDeT uepe3 HeckolbKO cekyHd.2.П\'oIzapr\'gai Te bprTby kajdyb рazпocle bprTbI dlya PocIePjKahnIzaPraJa da BaIapei, DoCTaTOUHOrO dlya Ocyu\'eCTBLeHHaФунк\'uOxIAJxDeHHa. |
| Вл\'ж\'oc'tb ГOLOBK\ брітвы. | 1.П\'oc`e abTomatueckoi\ чic'tkn bprTbI He ycpeIa\ npocoxHytB.2.З\'acop cIiBnHO O'TBepCTnI yct\rɔiCTBa Clean&Charge. | 1.Ocui\'eCTBJIyTeЧИСТКу cpa3yпocle bprTbI, YTObI bprTbA yCpeIa npocoxHytB.2.Ocui\'eCTBNIe npocIcTky cIiBnHO O'TBepCTnI depeBeyHoi 3ybochnstko. |
YCTPOICTBO CLEAN&CHARGE
IIndkaTOp YnueHna 3aogpEbC8, KOnn6pntBy Heo6xIDNo nouCTnTu npucptpoi Clean&Charge.
БлOKуВання
CnMBoJ 6IOKyBaHHaT aIopReTbcR, KOJI 6pNTBa 6yJa 3a6IIOKOBaHa, Uo6 yHnKHyTu HHehBMnCHOrO II 3aNyCKy (HaPnKlaJ, 3 MeTOU 36epirAHnY Iy BaJI3i).
3acTocyBaHHa 6pNTBn (dVB.MaJIIOHOKA)
HaTnchItb nepemKau BMnKaHHa/BmKahHra (5) Iry noatky po6oTu 6pntBu.
Ppaktnuhi nopadn dny iedealbno cyxoro roiHHa
IЯ haikpauo rope3yltaty Braun pekomehye BnKohybaTu 3 npocti di:
1.3aBxIroJIbCJIO BMBaHHo6nHy
2. 3aBkDn TpMaIte 6pNTBy nID npMm Kytom (90°)do wKipn.
3. Hataryte ukiy Ta roitbc npotn Hanpmy pocty uetnn.
OxolonJXeHHa
Приитka: BiДуTTЯ OXОЛоДжЕня мОже BiДpi3нЯТиСЯ ДЯ КОЖНоI OKpeMoI ЛОДиН.icle 3aJexKITbBiD OOCиCTnx ФakTOpiВ Ta ФakTOpiB 3OBHiшьогO cepeДовиша (HapprNKlaI, WkIpN, TempepaTpyN 3OBHiшьогO cepeДовишa).
BmkaHn: ybimkHyTn fynKciIO oxoJodKeHHa HATNCiTB nepemkaoyoxoJodKeHHa (3) nIac roJIHH.CmbonHa nepemkaayoxoJodKeHH IOUHe CBITNTSCnCINHM KOJIbOpOM.ДЯ NaHauKpaIoTO OXOJODKeHHa MnpaIMMO 3aueKaTu KIIbKa CeKHyN dnicrTO, kФyHKsIgoxoJodKeHH6yla yBimKHeHa. Notim npoDobKyuTe rOIHHa, k3a3Bnua.
Hn3bKn 3apRd akymyIaTopa: cIMBol na
nepeMnKaui oxoJoxeHHra (3) nouHaec 6nImaTn,
KoJIn aKymyIaTOp po3pJxKaETbcr i He BnCTaue
eHepri dNf yHKciO xoJOnJxHeHH. Ane Bam
NOBnHHO BnCTaHTn 3apAry, uO6 3akInTu rOIiHH
3 yBIMKHeHO OyHKciEIO OxJOnJxHeHH.
Mn peKomeHdyEmo 3apJxKatn npnaD oPpa3y
nicra roJIHHra dIra TOrO uO6 niD vac hAcTyHnOro
roJIHHra yHKciI oxoJOnJxHeHH 6yla DoCTynHa.
Bn moxete BmKHytn fynkuio oxoJoxeHH, 3HOBy HaTNCyBUn Ha nepemkaoy oxoJoxeHH.
TpimepdIaIOBrix BOLOCKIB
UctaHOBka npictpoIO Clean&Charge
(ДИВ.МАЛЮНОКЕ)
- 3HIMITb 3axnCHm MaTepiA13 DnCnJIeIO npNCtpoIO Clean&Charge.
-
HaTnCHiTb NiIOMHy KHONky (14) Na 3aIhBomy 6ozi npictpoIO Clean&Charge, oob niIhAtn KOpnyc.
-
PnTncHtB YnCTaHn 6aLoHnK (18) Do nlaackoi, CTiKOI NOBepXHi (Ha npNKlaI, Do cToIy).
- AkypaTHO 3HIMITb KPNUky 3 6aJOnHUnka.
- NocyHbTe 6aJIOHcNk i3 3aIbHO 6Oky Ha onOpHy NOBepXHIO npicTPOIO, NOKi BIn He cTaHe Ha MicCe.
- Повьльно зakрип Te Kopnyc,HaTnCKaIOUH Na HbOroBHN3,do ynpy.
3a donomoroio cneiaJIbHOI uHypoBOi yCTaHOBKn (10) niknouitb po3'em kINBHeHH npucTpoIO (13) do eJekTpOmepeki.
3apraKa 6pntBn y npncptoi Clean&Charge
BCTaBTe 6pntbY hacaIKOIO Bn3 y npncTpii YnueHHJ.
BaxJInBO: 6pntBa NOBHHa 6yTu cyXOIO Ta BilbHOIO BiD NiH Ta 3aIIuKIB Mnla!
KoHTaKTn (7) Ha 3aHbOMy 6Oci 6pntBn Heo6XiHo 3'EnHaTn 3 KOHTaKTamn (15) Ha npncTpoi. BcTaHOBiTb 6pntBy B npabInbHe NOLOKeHH. 3ByKObN CnHaN iD TBePdXyE, 00 6pntBa npabInbHo po3MiueHa y npncTpoi. 3apraKa NoCHETbcA ABOTMaTHUHO.
UHsueHHa 6pntbnu npncTroClean&Charge
Pn 3aopnhi iHnkaTopa YnueHHa Ha nucnnei 6pntBn, BCTaBte 6pntBy B npncptpiy uHneHHa Ta 3apnDOROpn DHom Ta nepeD him bokom.
3anyck aBTOMaTHHOrO yIeHH
3aynctiB npoec uuueHHHaTnCKaHHm KhoNKn 3ayncky (17).KaIoo iHdkaTop cTany (16b) He cBiTuTbcra (npncptpi Clean&Charge nepemkaetbcra Ha pexim OuykBaHH np6Jn3Ho uepe3 10 xBunH), HATNCHTb KHONky 3ayncky DbiHi. IHaKwe uuueHHn He po3noHeTbcra.
Дяdo柴rHeHHHaKpauuxpe3yIbTaTIB roJIHHaPEKOMeHdyEmOuHSeHHnicJia KoxHOro roJIHH.
Pporpama YnueHHa CKlaadaeTbcra 3 dekiIbKOx
zukliv, nic yac knx uNCTya piniHa npOTiKae uepe3
HacaKy bprTN. Yac YnueHHa 3aMae 3 XBNIHN.
PpOraROM zboTo yacy iNdkaTop cTaHy npNCtpoIO
Clean&Charge 6nMae.
3aIIuTe 6pntBy B npncTpoI dny cyuKn. Lc 3aImae DeKilbKa rOINH, NOKN BnnapoBvOtbcra 3aIIuKn BOJOrn, 3aJIeXHO BiD, KImaTHuHNx yMOB. IicJra UboRo 6pntBa rOTOBa DO BVKOpNCtAHnR.
Iicra 3aBepueHHra cNKJy uHsEHHra Ta 3apAdkn - iHnkaTopnpncTpOo Clean&Charge BmNkaotbcra.
BnMaHn6pntBn 3 npncTropo Clean&Charge (INB. MaJIIOHOK F)
TpmaTe npucTpii HnueHna Ta 3apAkn Ondiepykoio i 3neIka haxniliTb 6pntBy Bpeed, oobBnHrtn II.
KoJn iHdNkATOp pIBH NoCTiHo CBIITbcr YepBOHm,TO 3aJIuIeHOi piDHH y 6aIoHUnky BnCTaHTb npi6JIn3HO ue Ha 3 uKn. Kojn iHdNkATOp pIBH 6JIIMaE YepBOHm,TO 6aIoHUnK Heo6xIDHO 3amIHNTn (pnp6JIn3HO KOxHi 3-4 TuxHi npn 0OJeHHOMy BVKOpNCtAHHI).
IicnaHaTnCKaHnPiDnOMHOi KhoNk (14)IJIa BiKpnTTa KopnyCy - 3aueKaIte KInbKa CeKyHd, nepu Hix 3HimaTu BnKOpNCtAHn 6aJOnHnK, uO6 yHnKHytn KaanHH. Nepu,Hix yTnI3yBaTu BnKOpNCtAHn 6aJOnHnK, nepeKoHaITeC8, 0OTBOpN 3akpnti, BnKOpNCTOByOuH KpiUkY HOBOrO 6aJOnHnKa, OckInbKn BnKOpNCtAHn 6aJOnHnK 6yDe MicNTTu 3a6pyDHeHn YIcTAAH P03HN.
TirieHicHa YnCTaHa PiDHa MiCTNtB eTNIOBn a6o i3OpponIOBn Cnpt (3aIexKHO BiM MoJeI kapTpndka),Akn NiCJI BIDKnPTT TaKapTpndka NOuHae NOBilbHO BNnapOByBaTncr.
Koxhen 6aJohnuK, kUo Bin He BnKOpncTOByeTbcra
IooHn, cII, 3MIHO npu6n3Ho uepe3 8 TnxHIB,
IO6 3a6e3neHTn ONTMalbHy de3IHΦekciio.
YnCTaHb6aJIOHcHK TaKoX MICTNb 3MaUyBaJIbHi MaTepiAn DnA CnCTeM NTOJIHHa KIMOxyTb 3aIiHa cIiHa 3OBHIHNpaMI i3OJIcIHORo MaTepiAny Ta KaMepe YNueHn npNCtpoO Clean&Charge.Lc cnDi MoKyb ByTN IerKO BuaJeHi IpocTm IpOTnpAHm BOLOTO TkaHNOIO.
Akkeccyapn
Braun pekomehdye 3amHOBaTN 6pntbEny kaceTy 3 i3oJauHm MaTePiaIOM BaWoI 6pNTBu KoxHi 18 MicaIb IJIpiTpMKN MaKcMaJIbHOI npOdyK- TNBHOCTi pOboOoi eEeKTNBHOCTI 6pNTBu.
HaBHy Baunx dInlepiB a6o cepBicnX ueHtpax Braun:
- Kace Ta Foil & Cutter: 40S/40B
-Чистаян балонник Clean&Charge: CCR
Ytvnizaaia
Mictntb akymytaTopn Ta/a6o eJektpoHhi BiXOdi,aki niIraTb nepepo6ci. BnkOpncTaHni npCTpii He MoxHa BnKUdaTnca 3 3araIbHMN BiXoDamn a6o CmITrM 3 MeTOIO OxopoHN HaBKOINuHbOro CepeOBOuHa He BnKUdaTn B KOHTeHep dIЯ NObyTOBnx BiXoDiB. 3DaTI Ha nepepo6ky B nyHKTu npHOMy eJIeKTPoHHx BiXoDiB y KpaIHi BaWoro npOxNBaHHa.
MokjInBa 3MiHa daHoro po3iJy 6e3 nonepeHbOro NObiDomJIeHHra.
Ytni3yBaTu NOro MoXHa y cepBicHomy UeHTpi Braun a6o y BiNobiDnHex nyHKtax 360py BTOpHHOIC npOBHN, npedCTaBLeHnx y BaSi KpaIHi.
YnCTaHm 6aIOHcK MoXHa yTNIi3yBaTu pa3OM i3 3BnuAHMn BiXoIaMn DomaunhOro FocnoapCTBa.
IiJaRAe MOxJIbUIM 3MiHaM 6e3 IOnaTkoBOrO NOBIDOMJIeHHra.
EneKtpoTexhiXapaKTepeNCTnKN DnBiTbCnHa npOwTaMNoBaHnx No3HaueHHx Ha CneCiJIbHi shHypobi yCTaHOBci.
Bci iHsi BmOrn, pa30m 3 BmOram BiDkoDyBaHHa 3bntkIB, He diiChi, kUO Hawa BiNObIaIbHiCTb He BCTaHOBJIeHa 3aKOHHM YINOM.
Bnnadkn,Ha kI He po3noBcIOJxyeTbcra paaHTi:
-ДeФЕKTN,BVKJIHKaHIΦOpC-MaxOpHIMNOBCTaBnHAMN;
- BUKOPINCTAHH3 npopeciHOIO MeTOIO a6O 3 METOIO OTpIMaHHI npu6yTKy;
- nopuyenHHBIMOr IHCTpyKuii 3 eKcnnyaTauii;
-HeBipHe BCTaHOBJIeHHHaHpyrM Mepexi XNBJIeHH(KUO Ue BUMaraetbCra);
-3ДиСЕнгТХИЧИЗ 3MiH;
-MexaHiHIIoUKOJKeHHI;
-ДЯпILAдВ,ИОпрацIOТьHa 6aTapeKax -роботаЗ HeBIДПОВIДнHMn a6о CnpaцBOBaHIMn 6bTaapeKamn,БyIb-яКI NOШКОДжЕНЯ,BNKЛКаHi CnpaцBOBaHIMn a60 NiДТΙΚAIOUHMn 6bTaapeKamn;
- NOUKOJXeHHa 3 BUNH TBapNH, rpu3yHIB Ta KOMax (B TOMy YnCJI y BnPaIkax 3HaXoJXeHHraPn3yHIB Ta KOMax ycepeDnHi np6opib)
-ДябрNTВ -зМ'ЯТаabonopBaHa ciTka.
Ybara!IpaANTiHn TaIOH NiDIAe BUNyueHNOB pa3i 3BepHeHHr DO cepBicHO rHTpy 3 npoxAHm Ipo BnKoHaHHraPaANTiHOrO pemOnTy. NicJr IPOBeDEHHr pEMOnTy rapaHTiHm TaIOHOM 6yde BBaxATNC 3aONBHeHH OPINHA JNCTa BnKoHaHOpeMOHTy 3I WtAMNOM CEPBicHO rENTpy Ta NiINsCAHn CNOXNBaHem IPO OTPMaHHRA BnPO6y 3 pEmOnTy. IpaHTiHn CTpOK NOOBKyETbcra Ha TepMin, AKN daHN Bnpi6 3hAxODINBCa B cepBichOMy ceHTpi B peMOHTi.
B pa3i BnHnKHeHHcKJaADHOuCiB 3 BnKOHaHHaRapaHTiHoro Ta nicJraPapaHTiHoro O6ClyrOByBaHH npoxaHH 3BepTaTncs Da iHΦOpMauiHoI Cnyk6n cepbicy npeDCTaBHnKa KOMNaHII BnPo6HnKa B YkpaHi.
Telefoh rapaoyi lihi 0 800 505 000. D3BiHKn no YkpaHni 3i CtaioHapHX TelefoHHx Homepi E 6e3KoHTOBHmN. D3BHKN 3 MOiIbHnx TelefoHIB ONaHuTbcra 3rIDHO TapuΦiB BiINOBiDHorO onepaTopa.
Takox MoXHa OTPMaTHI DOaTKOBy iHΦOpMaζio Ha cepBicHomy nopTaI Bnpo6Hnka B iHTepHeTi www. service.braun.com
| (Clean&Charge) جز | |||
| \( j\ddot{a}\ddot{a}\dot{a}\dot{a}\dot{a}\dot{a}\dot{a}\dot{a}\dot{a}\dot{a}\dot{a}\dot{a}\dot{a}\dot{a}\dot{a}\dot{a}\dot{a}\dot{a}\dot{a}\dot{a}\dot{a}\dot{a}\dot{a}\dot{a}\dot{a}\dot{a}\dot{a}\ddot{a}\ddot{a}\dot{a}\dot{a}\dot{a}\dot{a}\dot{a}\dot{a}\dot{a}\dot{a}\dot{a}\dot{a}\dot{a}\dot{a}\dot{a}\dot{a}\dot{a}\dot{a}\dot{a}\dot{a}\dot{a}\dot{a}\dot{a}\dot{a}\dot{\text{ }}\ddot{a}\ddot{a}\dot{a}\dot{a}\dot{a}\dot{a}\dot{a}\dot{a}\dot{a}\dot{a}\dot{a}\dot{a}\dot{a}\dot{a}\dot{a}\dot{a}\dot{a}\dot{a}\dot{a}\dot{a}\dot{a}\dot{a}\dot{a}\dot{a}\ddot{a}\ddot{b}\ddot{b}\ddot{b}\ddot{b}\ddot{b}\ddot{b}\ddot{b}\ddot{b}\ddot{b}\ddot{b}\ddot{b}\ddot{b}\ddot{b}\ddot{b}\ddot{b}\ddot{b}\ddot{b}\ddot{b}\ddot{b}\ddot{b}\ddot{a}\ddot{a}\ddot{a}\ddot{a}\ddot{a}\ddot{a}\ddot{a}\ddot{a}\ddot{a}\ddot{a}\ddot{a}\ddot{a}\ddot{a}\ddot{a}\ddot{a}\ddot{a}\ddot{a}\ddot{a}\ddot{a}\ddot{a}\ddot{b}\ddot{b}\ddot{b}\ddot{b}\ddot{b}\ddot{b}\ddot{b}\ddot{b}\ddot{b}\ddot{b}\ddot{b}\ddot{b}\ddot{b}\ddot{b}\ddot{b}\ddot{b}\ddot{b}\ddot{b}\ddotp\ddot{a}\ddot{a}\ddot{a}\ddot{a}\ddot{a}\ddot{a}\ddot{a}\ddot{a}\ddot{a}\ddot{a}\ddot{a}\ddot{a}\ddot{a}\ddot{a}\ddot{a}\ddot{a}\ddot{a}\ddot{a}\ddot{a}\ddot{a} \) | \( j\ddot{a}\ddot{a}\ddot{a}\ddot{a}\ddot{a}\ddot{a}\ddot{a}\ddot{a}\ddot{a}\ddot{a}\ddot{a}\ddot{a}\ddot{a}\ddot{a}\ddot{a}\ddot{a}\ddot{a}\ddot{a}\ddot{a}\ddot{b} \) | \( j\ddot{a}\ddot{a}\ddot{a}\ddot{a}\ddot{a}\ddot{a}\ddot{a}\ddot{a}\ddot{a}\ddot{a}\ddot{a}\ddot{a}\ddot{a}\ddot{a}\ddot{a}\ddot{a}\ddot{a}\ddot{a}\ddot{\text{ }}\ddot{\text{ }}\ddot{\text{ }}\ddot{\text{ }}\ddot{\text{ }}\ddot{\text{ }}\ddot{\text{ }}\ddot{\text{ }}\ddot{\text{ }}\ddot{\text{ }}\ddot{\text{ }}\ddot{\text{ }}\ddot{\text{ }}\ddot{\text{ }}\ddot{\text{ }}\ddOT\ddot{\text{ }}\ddot{\text{ }}\ddot{\text{ }}\ddot{\text{ }}\ddot{\text{ }}\ddot{\text{ }}\ddot{\text{ }}\ddot{\text{ }}\ddot{\text{ }}\ddot{\text{ }}\ddot{\text{ }}\ddot{\text{ }}\ddot{\text{ }}\ddot{\text{ }}\text{ }}\ddot{\text{ }}\ddot{\text{ }}\ddot{\text{ }}\ddot{\text{ }}\ddot{\text{ }}\ddot{\text{ }}\ddot{\text{ }}\ddot{\text{ }}\ddot{\text{ }}\ddot{\text{ }}\ddot{\text{ }}\ddot{\text{ }}\ddot{\text{ }}\ddot{\text{} }\ddot{\text{} }\ddot{\text{} }\ddot{\text{} }\ddot{\text{} }\ddot{\text{} }\ddot{\text{} }\ddot{\text{} }\ddot{\text{} }\ddot{\text{} }\ddot{\text{} }\ddot{\text{} }\ddot{\text{} }\ddot{\text{} }\ddot{\text{} }\ddot{\text{} }\ddot{\text{} }\ddot{\mathrm{}}\ddot{\text{} }\ddot{\text{} }\ddot{\text{} }\ddot{\text{} }\ddot{\text{} }\ddot{\text{} }\ddot{\text{} }\ddot{\text{} }\ddot{\text{} }\ddot{\text{} }\ddot{\text{} }\ddot{\text{} }\ddot{\text{} }\ddot{\text{} }\ddot{\text{} }\ddot{\text{} }\ddot{a}\ddot{a}\ddot{a}\ddot{a}\ddot{a}\ddot{a}\ddot{a}\ddot{a}\ddot{a}\ddot{a}\ddot{a}\ddot{a}\ddot{a}\ddot{a}\ddot{a}\ddot{a}\ddot{a}\ddot{a}\ddot{a}\ddot{a} \)\( .\ddot{a}\ddot{a}\ddot{a}\ddot{a}\ddot{a}\ddot{a}\ddot{a}\ddot{a}\ddot{a}\ddot{a}\ddot{a}\ddot{a}\ddot{a}\ddot{a}\ddot{a}\ddot{a}\ddot{a}\ddot{a}\ddot{a}\ddot{ a}\ddot{a}\ddot{a}\ddot{a}\ddot{a}\ddot{a}\ddot{a}\ddot{a}\ddot{a}\ddot{a}\ddot{a}\ddot{a}\ddot{a}\ddot{a}\ddot{a}\ddot{a}\ddot{a}\ddot{a}\ddot{a}\ddot{a}\ddot{ a} \) | \( j\ddot{a}\ddot{a}\ddot{a}\ddot{a}\ddot{a}\ddot{a}\ddot{a}\ddot{a}\ddot{a}\ddot{a}\ddot{a}\ddot{a}\ddot{a}\ddot{a}\ddot{a}\ddot{a}\ddot{a}\ddot{a}\ddot{l}\ddot{l}\ddot{l}\ddot{l}\ddot{l}\ddot{l}\ddot{l}\ddot{l}\ddot{l}\ddot{l}\ddot{l}\ddot{l}\ddot{l}\ddot{l}\ddot{l}\ddot{l}\ddot{l}\ddot{l}\ddot{l}\ddot{l}\ddot{l}\ddot{l}\ddot{l}\ddot{l}\ddot{l}\ddot{a}\ddot{a}\ddot{a}\ddot{a}\ddot{a}\ddot{a}\ddot{a}\ddot{a}\ddot{a}\ddot{a}\ddot{a}\ddot{a}\ddot{a}\ddot{a}\ddot{a}\ddot{a}\ddot{a}\ddot{a}\ddot{a}\ddot{0}\ddot{0} \) |
Country of origin: Germany Year of manufacture
To determine the year of manufacture, refer to the 3-digit production code located near the type plate. The first digit of the production code refers to the last digit of the year of manufacture. The next two digits refer to the calendar week in the year of manufacture. Example: "201" - The product was manufactured in week 01 of 2012.
山
1
11111111111111111
pae 1e e 1
1201"J.
.2012 01
1 1 1 1 1 1 1 1 1 1 1 1 1 1 1 1 1 1 1
iill 100 111 111 111 111
1
1111 1111 1111 1111 1111
1 1 1 1 1 1 1 1 1 1 1 1 1 1 1 1 1 1 1 1 1 1 1 1 1 1 1 1 1 1 1 1 1 1 1 1 1 1 1 1 1 1 1 1 1 1 1 1 1 1 1
L 13-4 J5) 1
Clean&Charge jJn J (F
Cleane (Clean&Charge) jLj
J L 101 11 11 11
(GKjll jil) 1g/c /Jd
1 1 1 1 1 1 1 1 1 1 1 1 1 1 1 1 1 1 1 1 1 1 1
( )Gle3T6cc/CT5cc/CT4cc/CT3cc/CT2cc(
Clean&Charge) jg j
Jl 13
jll Jy 14
Jy 15
16a
16b
17
18
(EK) Clean&Charge
Jg Jg Jg Jg Jg Jg Jg Jg Jg Jg Jg Jg Jg Jg Jg Jg Jg Jg Jg Jg Jg Jg Jg Jg Jg Jg Jg Jg Jg Jg Jg Jg Jg Jg Jg Jg Jg Jg Jg Jg Jg Jg Jg Jg Jg Jg Jg Jg Jg Jg Jg
Clean&Charge
1 1 1 1 1 1 1 1 1 1 1 1 1 1 1 1 1 1 1 1 1 1 1 1 1 1 1 1 1 1 1 1 1 1 1 1 1 1 1 1 1 1 1 1 1 1 1 1 1 1 1
(8)Jgj (6)Jg
J
1/11 11 11 11 11 11 11 11 11 11 11 11 11 11 11 11 11 11 11 11 11 11 11 11 11 11 11 11 11 11 11 11 11 11 000000000000000000000000000000000000000000000000000000000000000000000000
A 1
sIglll 111 111 111 111 111 111 111 111 111 111 111 111 111 111 111 111 111 111 111 111 111 111 111 111 1
Llalp 111
Jl Jll Jl lloie Jl 10
Jl Ieag jic) d g ydl Jj
.
(A)
(5)/
a aag aeg gagg aag aag aag aag aag aag aag aag aag aag aag aag aag aag aag aag aag aag aag aag aag aag aag aag aag aag aag aag aag aag aag aag aag aag aag aag aag aag aag aag aag aag aag aag aag aag aag aag aag aag aeg gaae gaae gaae gaae gaae gaae gaae gaae gaae gaae gaae gaae gaae gaae gaae gaae gaae gaae gaae gaae gaae gaae gaae gaae gaae gaae gaae gaae gaae gaae gaae gaae gaae gaae
*
J 1
(3)
(4)
(5)
C 1000000000000000000000000000000000000000000000000000000000000000000000000000000000
J 35 5 J
Lg 1 g, j k J
35 15
J 35 15
J 35 15
J 35 15
J 35 15
J 35 15
#
#
cfofofofofofofofofofofofofofofofofofofofofofofofofofofofofofofofofofofofofofofofofofofofofofofofofofofofofofofofofofofofofofofofofofofofofofofofofofofofofofofofofofofofofofo
#
11/11111111111 111111111111111 11111111111111 5) 100.4yallalocpln no kssuus LleLg 2000000000000000000000000000000000000000000
1
aagg gjz jlll lglf * jol jy
jssn no klc. bill dill
. 11
/CT6cc/CT5cc () CT4cc/CT3cc/CT2cc
a aal 10. (Clean&Charge)
12b
*J 12c
12d
y
JgJgJgJgJgJgJgJgJgJgJgJgJgJgJgJgJgJgJgJgJgJgJgJgJgJgJgJgJgJgJgJgJgJgJgJgJgJgJgJgJgJgJgJgJgJgJgJg
LlJ LJI JIe IJI
J
Cleane 1
(Clean&Charge) j4j gJ
/CT6cc/CT5cc/CT4cc/CT3cc J
J
CT6cc/CT5cc/CT4cc/CT3cc J
J
J
J
Clean&Charge
J
(Clean&Charge) j4j gJ
J
.(Clean&Charge) j4j e CT4s/CT2s
(BK)
J (12a) 1
. (bCT4s/CT2s -12c)
(12b) J
.(10) K
.
.
.
.
.
.
.
.
.
.
.
aalwI Jgog
g 1111111111111111111111111111111111111111111
8J 1
aai
()
Ey1JnJ. JIbJgIgIoo
i jll no salg, uall coofo g jll
.
CleAn&Charge
CT6cc/CT5cc/CT2s
cbw (Clean&Charge) j4g
ieg. kill Jlll yu pa Jau jiu giu
5y j 1j 1 1 1
Jlll 8 5
Clean&Charge)
.
Jl 1 Jll 1 Jll
Jg Jl 1 1
g g 1
Jl6bJg10jLg10
Jaaui yg. aill oge s Jo dley
a
#
1
2
3
4
5
山
jg jolj 7
山
9
() 10
11a
11b
*Lae 11c
12a
JgIyIgIgIgIgIgIgIgIgIgIgIgIgIgIgIgIgIgIgIgIgIgIgIgIgIgIgIgIgIgIgIgIgIgIgIgIgIgIgIgIgIgIgIg
JlJooLg j gj .
y
150
a
y g aLolS 10
Lbai.1.
aJLg
g j 1b jao o aL J81
0g j 1
y,g. 11
1
492 Cjll 1
joll jll jil jol 0000010000000000000000000000
XXXX-492
jplaoiX1cll jy1oipai
bass LaaLg, JLoyI gJgJg.
Lg

- English
- Warning
- Oil bottle (not with all models)
- Clean&Charge Station (models CT6cc/CT5cc/CT4cc/ CT3cc/CT2cc only)
- Shaver description
- First use and Charging
- Charging shell (see fig. B)
- Charging and basic operating information
- Shaver display
- Charge status
- Low charge
- Cooling Status
- Travel lock
- Using the shaver (see fig. A)
- Tips for a perfect dry shave
- Cooling
- Long hair trimmer
- Manual cleaning of the shaver (see fig. C/D)
- Cleaning under running water:
- Cleaning with a brush:
- Clean&Charge station
- 模型CT6cc/CT5cc/CT4cc/CT3cc/CT2cc)
- Installing the Clean&Charge station (see fig. E)
- Charging the shaver in the Clean&Charge station
- Important: The shaver needs to be dry and free from any foam or soap residue!
- Cleaning the shaver
- Start automatic cleaning
- For best shaving results, we recommend cleaning after each shave.
- Removing the shaver from the Clean&Charge station (see fig. F)
- Cleaning Cartridge / Replacement (see fig. G)
- Accessories
- Environmental notice
- Guarantee
- For UK only:
- François
- Installation de la station Clean&Charge (cf fig. E)
- Cistici kazeta/Vymena (viz obr.G)
- Stanica Clean&Charge
- Ctanhéra Clean&Charge (camoto CT6cc/CT5cc/CT4cc/CT3cc/CT2cc)
- 3akIIOUbaHe npn nbTybaHe
- PbUHO NOuNCtBaHe Ha
- camo6pbchauKaTa(BX.ΦnC/D)
- INHdkatop 6JOKUPOBKn OT CnyaHORO BKJIIOUeHnA
- IcnoJb3ObaHne 6pntTbbI (cm.pnc.A)
- CobetblIJIuIealbHoro6pntb
- OxlaXdEHe
- Tpmmep dIaIINHHbIX BOJOC
- YnCTKa nO, Ctpye BObl
- BbTaKKe MoKTe NcNoJIb3OBAt bIJIa YnCTKn 6pNTBb IBXODaIyIO B KOMNJIeKT UeTky:
- UcTpoIcTBO uNCTKN 3apAdkn
- Clean&Charge (Для моделу CT6cc/CT5cc/CT4cc/CT3cc/CT2cc)
- YctahOBka yctpoicTba Clean&Charge (cm.pnc.E)
- Подзарянka 6рNTБыВ устpoичтBE Clean&Charge
- BaxkHO: 6pntBa DoJxHa 6bItb cyXo; Ha He Hne JdoJxHo 6bItb OCTaTKOB NeHb IJIIMMbIa!
- 3koIorHuecka HOpMaucnA
- PekomeHdaunnopeuHIOBO3HkaUx npo6JeM
- БлOKуВання
- 3acTocyBaHHa 6pNTBn (dVB.MaJIIOHOKA)
- Ppaktnuhi nopadn dny iedealbno cyxoro roiHHa
- OxolonJXeHHa
- TpimepdIaIOBrix BOLOCKIB
- UctaHOBka npictpoIO Clean&Charge
- (ДИВ.МАЛЮНОКЕ)
- 3apraKa 6pntBn y npncptoi Clean&Charge
- BaxJInBO: 6pntBa NOBHHa 6yTu cyXOIO Ta BilbHOIO BiD NiH Ta 3aIIuKIB Mnla!
- UHsueHHa 6pntbnu npncTroClean&Charge
- 3anyck aBTOMaTHHOrO yIeHH
- Дяdo柴rHeHHHaKpauuxpe3yIbTaTIB roJIHHaPEKOMeHdyEmOuHSeHHnicJia KoxHOro roJIHH.
- BnMaHn6pntBn 3 npncTropo Clean&Charge (INB. MaJIIOHOK F)
- Akkeccyapn
- Ytvnizaaia
- Country of origin: Germany Year of manufacture
- (EK) Clean&Charge
- Clean&Charge
- J
- A 1
- (A)
- #
- 1
- JgJgJgJgJgJgJgJgJgJgJgJgJgJgJgJgJgJgJgJgJgJgJgJgJgJgJgJgJgJgJgJgJgJgJgJgJgJgJgJgJgJgJgJgJgJgJgJg
- aalwI Jgog
Brand : BRAUN
Model : CoolTec CT3cc
Category : Shaver