
S5 Plus - Camcorder EZVIZ - Free user manual and instructions
Find the device manual for free S5 Plus EZVIZ in PDF.
Frequently Asked Questions - S5 Plus EZVIZ
User questions about S5 Plus EZVIZ
0 question about this device. Answer the ones you know or ask your own.
Ask a new question about this device
Download the instructions for your Camcorder in PDF format for free! Find your manual S5 Plus - EZVIZ and take your electronic device back in hand. On this page are published all the documents necessary for the use of your device. S5 Plus by EZVIZ.
USER MANUAL S5 Plus EZVIZ
COPYRIGHT ©2016 Hangzhou Hikvision Digital Technology Co., Ltd. or its subsidiaries. ALL RIGHTS RESERVED.
About this Manual
The Manual includes instructions for using and managing the product. Pictures, charts, images and all other information hereinafter are for description and explanation only. The information contained in the Manual is subject to change, without notice, due to firmware updates or other reasons. Please find the latest version in the ezvizTM website (http://www.ezvizlife.com).
Any and all information, including, among others, wordings, pictures, graphs are the properties of Hangzhou Hikvision Digital Technology Co., Ltd. or its subsidiaries (hereinafter referred to be "Hikvision"). This user manual (hereinafter referred to be "the Manual") cannot be reproduced, changed, translated, or distributed, partially or wholly, by any means, without the prior written permission of Hikvision. Unless otherwise stipulated, Hikvision does not make any warranties, guarantees or representations, express or implied, regarding to the Manual.
Trademarks Acknowledgement
ezviz™, ™™, and other Hikvision's trademarks and logos are the properties of Hikvision in various jurisdictions. Other trademarks and logos mentioned below are the properties of their respective owners.
Legal Disclaimer
TO THE MAXIMUM EXTENT PERMITTED BY APPLICABLE LAW, THE PRODUCT DESCRIBED, WITH ITS HARDWARE, SOFTWARE AND FIRMWARE, IS PROVIDED "AS IS", WITH ALL FAULTS AND ERRORS, AND HIKVISION MAKES NO WARRANTYES, EXPRESS OR IMPLIED, INCLUDING WITHOUT LIMITATION, MERCHANTABILITY, SATISFACTORY QUALITY, FITNESS FOR A PARTICULAR PURPOSE, AND NONINFRINGEMENT OF THIRD PARTY. IN NO EVENT WILL HIKVISION, ITS DIRECTORS, OFFICERS, EMPLOYEES, OR AGENTS BE LIABLE TO YOU FOR ANY SPECIAL, CONSEQUENTIAL, INCIDENTAL, OR INDIRECT DAMAGES, INCLUDING, AMONG OTHERS, DAMAGES FOR LOSS OF BUSINESS PROFITS, BUSINESS INTERR UPTION, OR LOSS OF DATA OR DOCUMENTATION, IN CONNECTION WITH THE USE OF THIS PRODUCT, EVEN IF HIKVISION HAS BEEN ADVISED OF THE POSSIBILITY OF SUCH DAMAGES. TO THE MAXIMUM EXTENT PERMITTED BY APPLICABLE LAW, IN NO EVENT SHALL HIKVISION'S TOTAL LIABILITY FOR ALL DAMAGES EXCEED THE PURCHASE PRICE THE PRODUCT.
HIKVISION does not undertake any liability for personal injury or property damage, as the result of product interruption or service termination cause by: a) improper installation or usage other than as equested; b) the protection of national or public interests; c) Force Majeure; d) yourself or the third party, including not limitation, using any third party's products, software, applications, and among others.
REGARDING TO THE PRODUCT WITH INTERNET ACCESS, THE USE OF PRODUCT SHALL BE WHOLLY AT
YOUR OWN RISKS. HIKVISION SHALL NOT TAKE ANY RESPONSIBILITES FOR ABNORMAL OPERATION, PRIVACY LEAKAGE OR OTHER DAMAGES RESULTING FROM CYBER ATTACK, HACKER ATTACK, VIRUS INSPECTION, OR OTHER INTERNET SECURITY RISKS; HOWEVER, HIKVISION WILL PROVIDE TIMELY TECHNICAL SUPPORT IF REQUIRED.
SURVEILLANCE LAWS VARY BY JURISDICTION. PLEASE CHECK ALL RELEVANT LAWS IN YOUR JURISDICTION BEFORE USING THIS PRODUCT IN ORDER TO ENSURE THAT YOUR USE CONFORMS TO THE APPLICABLE LAW. YOU Futher AGREE THAT THIS PRODUCT IS ONLY FOR CIVIL USE, AND HIKVISION SHALL NOT BE LIABLE IN THE EVENT THAT THIS PRODUCT IS USED WITH ILLEGITIMATE PURPOSES, SUCH AS THIRD PARTY RIGHTS INFRINGEMENT, MEDICAL TREATMENT, SAFETY EQUIPMENT OR OTHER SITUATIONS WHERE THE PRODUCT FAILURE COULD LEAD TO DEATH OR PERSONAL INJURY, OR WEAPON OF MASS DESTRUCTION, CHEMICAL AND BIOLOGICAL WEAPON, NUCLEAR EXPLOSION, AND ANY UNSAFE NUCLEAR ENERGY USES OR ANTI-HUMANITY USAGES. YOU SHOULD UNDERTAKE ALL RESPONSIBILITIES FOR LOSSES OR DAMAGES RESULTING FROM THE ABOVE USAGES WHATSOEVER. IN THE EVENT OF ANY CONFLICTS BETWEEN THE ABOVE AND THE APPLICABLE LAW, THE LATER PREVAIRS.
Regulatory Information

This device complies with Part 15 of the FCC Rules. Operation is subject to the following two conditions:
(1) This device may not cause harmful interference, and
(2) This device must accept any interference received, including interference that may cause undesired operation.
Please take attention that changes or modification not expressly approved by the party responsible for compliance could void the user's authority to operate the equipment.
Note: This product has been tested and found to comply with the limits for a Class B digital device, pursuant to Part 15 of the FCC Rules. These limits are designed to provide reasonable protection against harmful interference in a residential installation. This product generates, uses, and can radiate radio frequency energy and, if not installed and used in accordance with the instructions, may cause harmful interference to radio communications. However, there is no guarantee that interference will not occur in a particular installation. If this product does cause harmful interference to radio or television reception, which can be determined by turning the equipment off and on, the user is encouraged to try to correct the interference by one or more of the following measures:
—Reorient or relocate the receiving antenna.
—Increase the separation between the equipment and receiver.
- Connect the equipment into an outlet on a circuit different from that to which the receiver is connected.
- Consult the dealer or an experienced radio/TV technician for help.

EU Conformity Statement
This product and - if applicable - the supplied accessories too are marked with "CE" and comply therefore with the applicable harmonized European standards listed under the Radio Equipment Directive 2014/53/EU, the EMC Directive 2014/30/EU, the RoHS Directive 2011/65/EU.
2012/19/EU (WEEE directive): Products marked with this symbol cannot be disposed of as unsorted municipal waste in the European Union. For proper recycling, return this product to your local supplier upon the purchase of equivalent new equipment, or dispose of it at designated collection points. For more information see: www. recyclethis.info.
2006/66/EC and its amendment 2013/56/EU (battery directive): This product contains a battery that cannot be disposed of as unsorted municipal waste in the European Union. See the product documentation for specific battery information. The battery is marked with this symbol, which may include lettering to indicate cadmium [Cd], lead (Pb), or mercury (Hg). For proper recycling, return the battery to your supplier or to a designated collection point. For more information see: www.recyclethis.info.
Industry Canada ICES-003 Compliance
This device meets the CAN ICES-3 (B)/NMB-3(B) standards requirements.
EC DECLARATION OF CONFORMITY
Hereby, Hangzhou Hikvision Digital Technology Co., Ltd. declares that the radio equipment type [CS-SP200, CS-SP206, CS-SP208, CS-SP300, CS-SP306, CS-SP308] is in compliance with Directive 2014/53/EU.
The full text of the EC DECLARATION OF CONFORMITY is available at the following web link: http://www.ezvizlife.com/declaration-of-conformity
Safety Instruction
CAUTION: THE PRODUCT IS BUILT IN A REPLACEABLE BATTERY. RISK OF EXPLOSION IF BATTERY IS REPLACED BY AN INCORRECT TYPE. DISPOSE OF USED BATTERIES ACCORDING TO THE INSTRUCTIONS.
Due to the product shape and dimension, the name and address of the importer/manufacturer are printed on the package.
SAVE THIS MANUAL FOR FUTURE REFERENCE
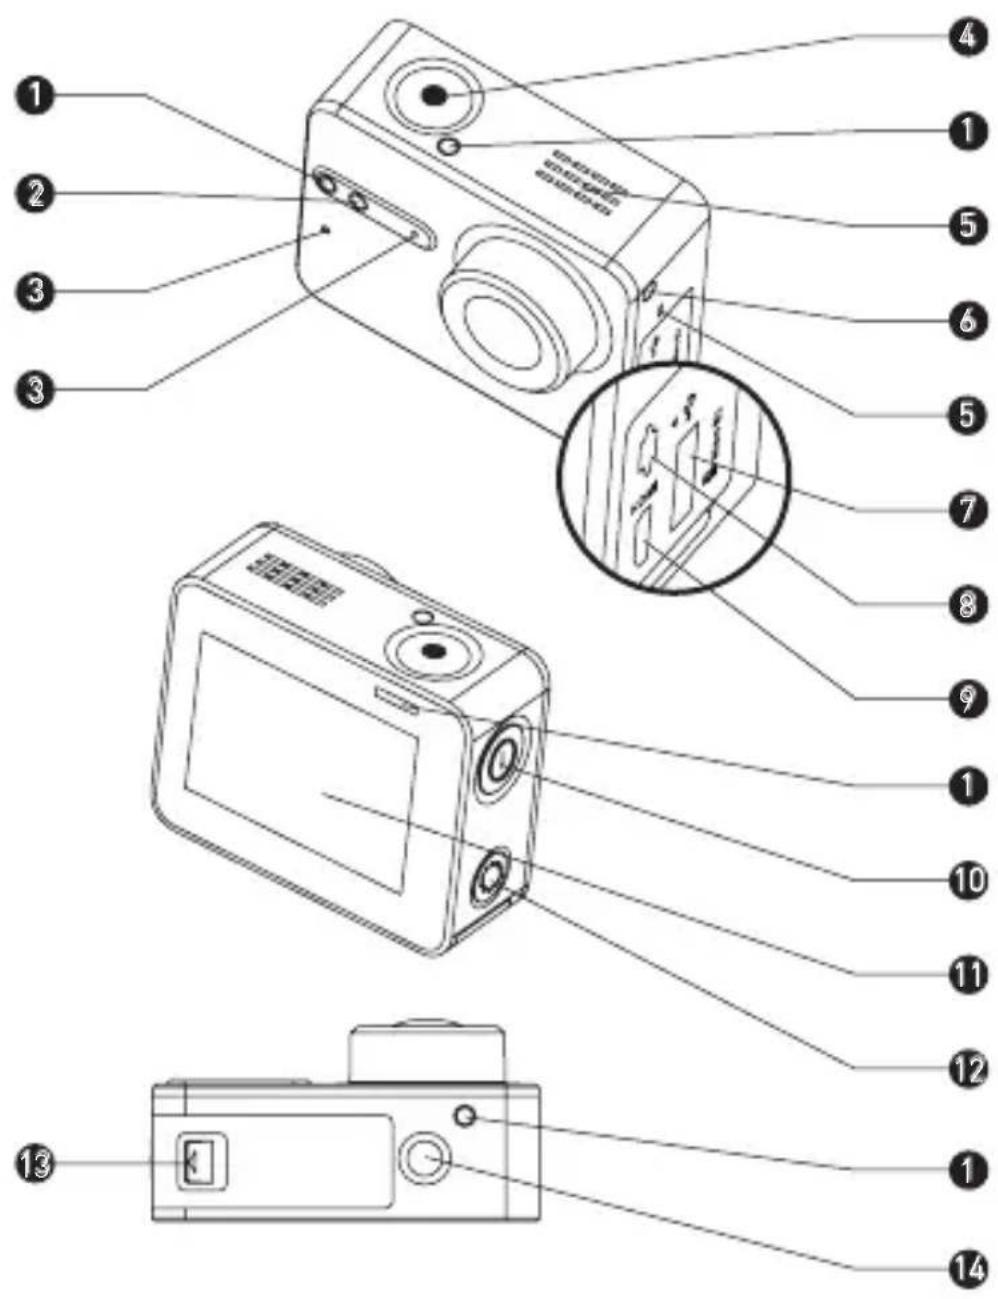
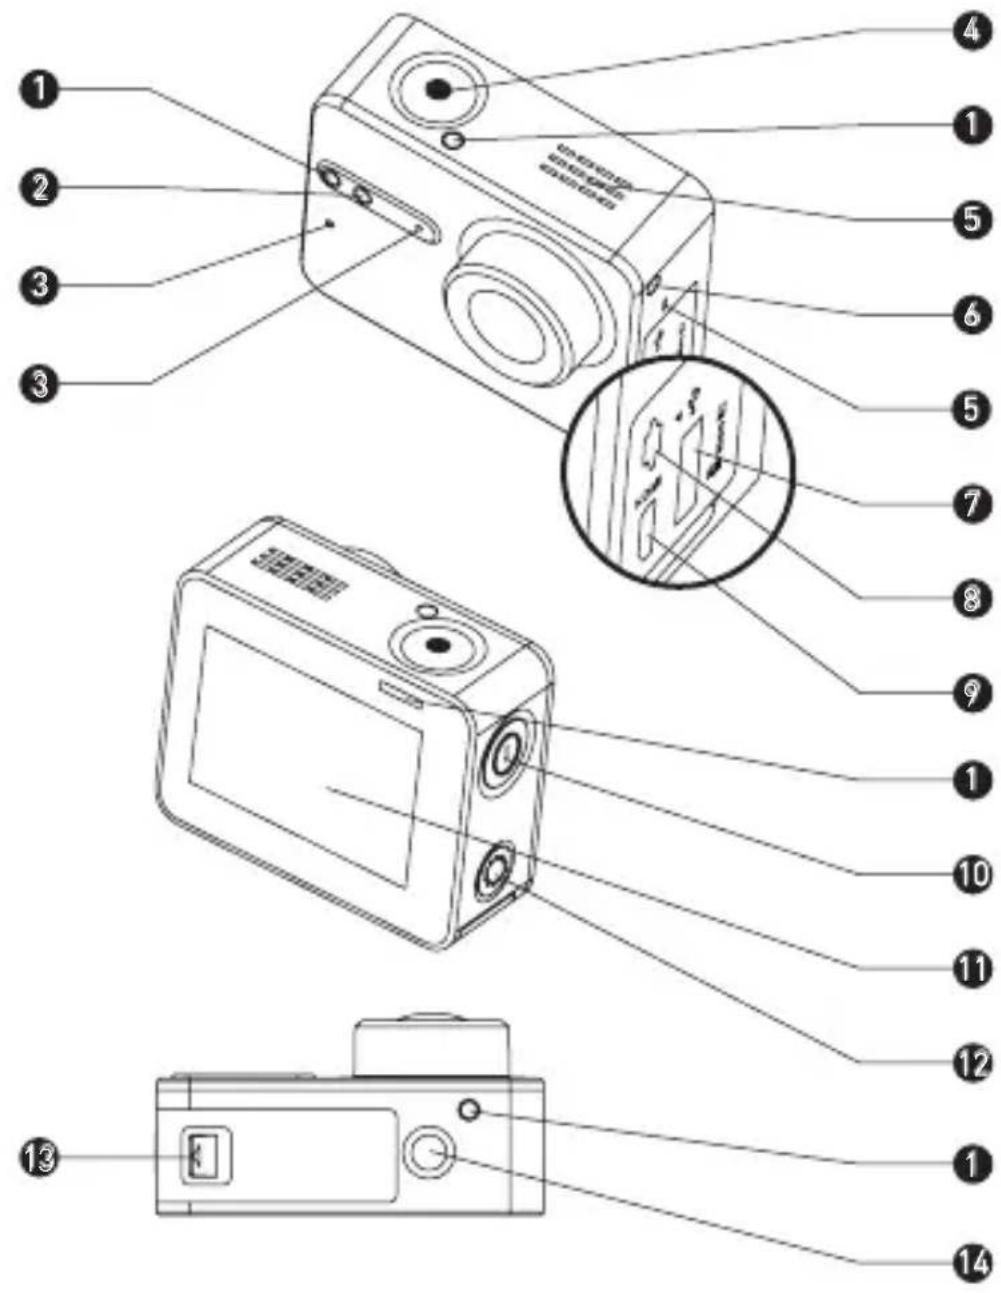
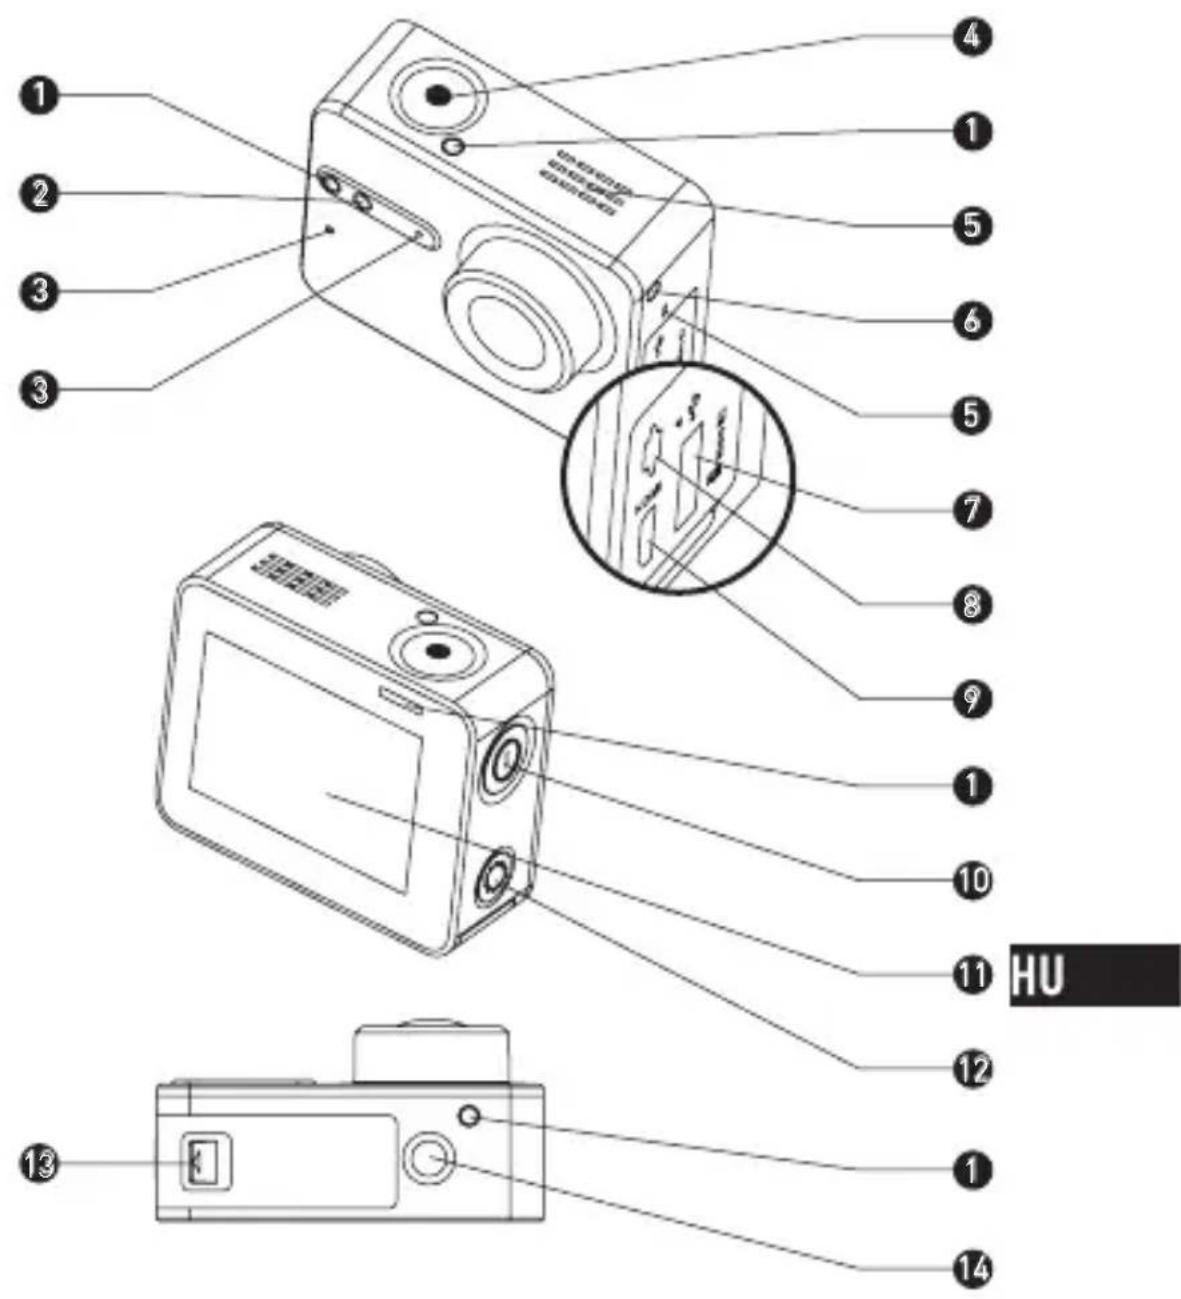
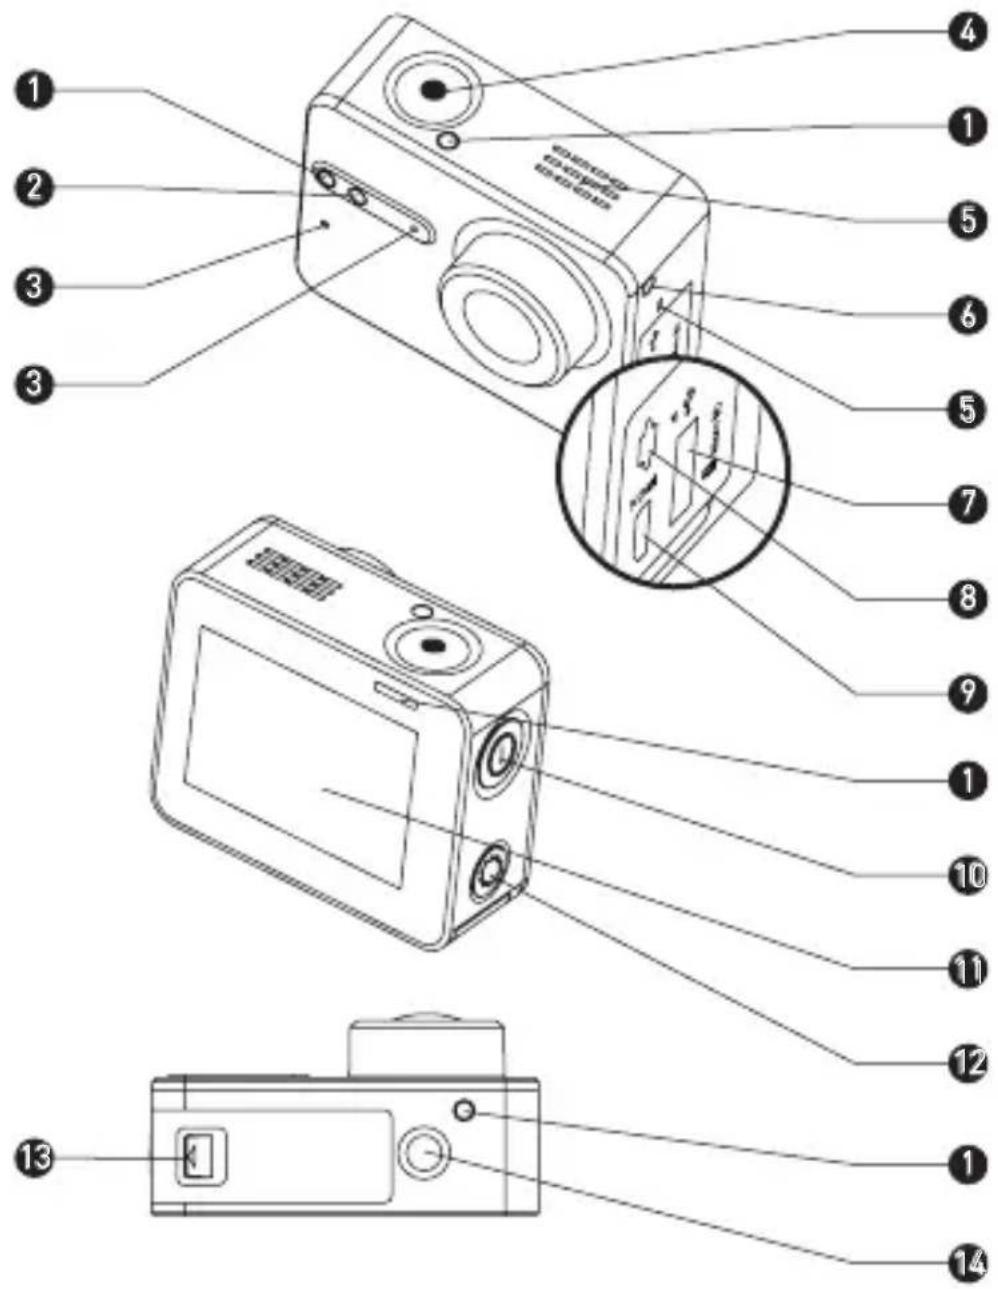
Basics
1 Recording Status LED Indicator Steady on: Standby
Flicker: Recording
2 Wi-Fi Status LED Indicator Unlit: Wi-Fi is off
Flicker: Wi-Fi is on
3 MIC Microphone
4 Shutter Start/Stop recording
5 Speaker Audible sound and video playback
6 Power LED Indicator Steady Red: Charging
Steady Blue: Charged
7 microSD Card Slot
Insert a microSD card for storage. The microSD card is not included in the box. Please purchase separately (see page 5 for the recommended microSD card models).
8 USB Interface USB data transfer and charging.
9 micro-HDMI Interface HDMI output
10 Power Button
Hold down for 0.5 second to power on, 3 seconds to power off.
11 LCD Screen LCD touch screen
12 Setup Button Press to enter video settings menu
Hold down to turn on Wi-Fi
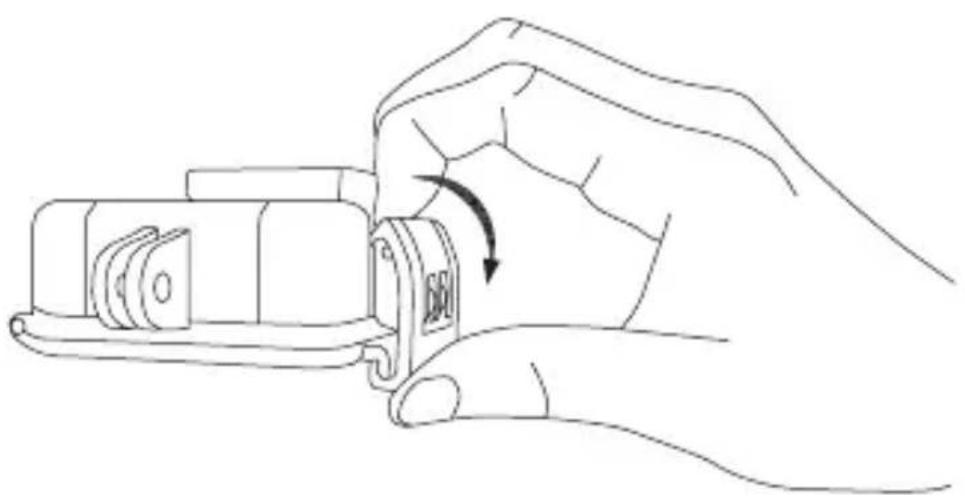
13 Battery cover Hold down the arrow and
I pull out the cover. You can replace the battery if it runs out.
14 Standard Bracket Interface (1/4 inch)
Interface for various brackets.
Display Introduction
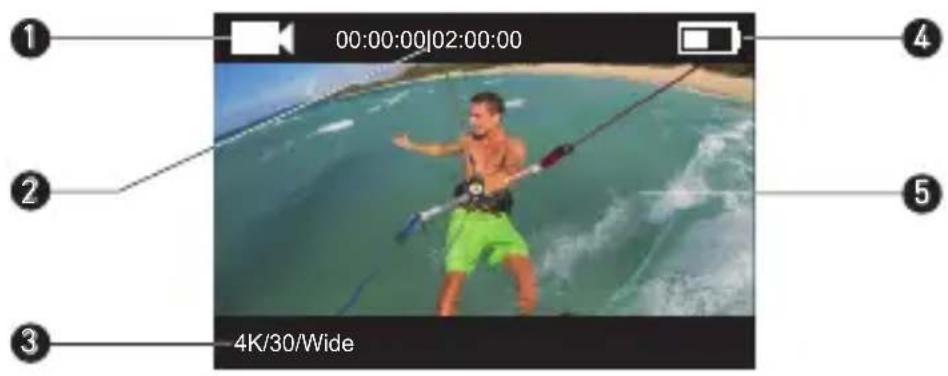
1 Current Recording Mode

Video

Photo

Burst


Time Lapse
2 Video: Time Already Recorded / Time Left for Recording
Photo & Busrt & Time Lapse: Captured Picture Number / Left Picture Number
3 Video: Resolution/Frame Rate/Field of View
Photo: Resolution
Burst: Resolution/Capture Rate
Time Lapse: Resolution/Capture Interval
4 Battery Status
5 Live view or playback image
Operation
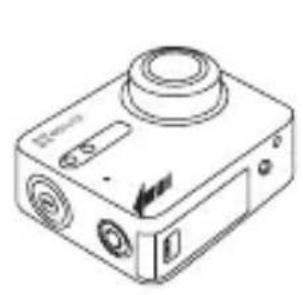
Step 1
Take out camera
The camera is placed inside a waterproof housing by default. Before using the camera for the first time, take out the camera from waterproof housing to insert the microSD card and charge.
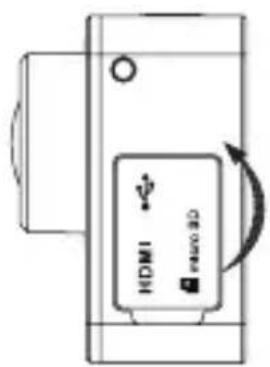
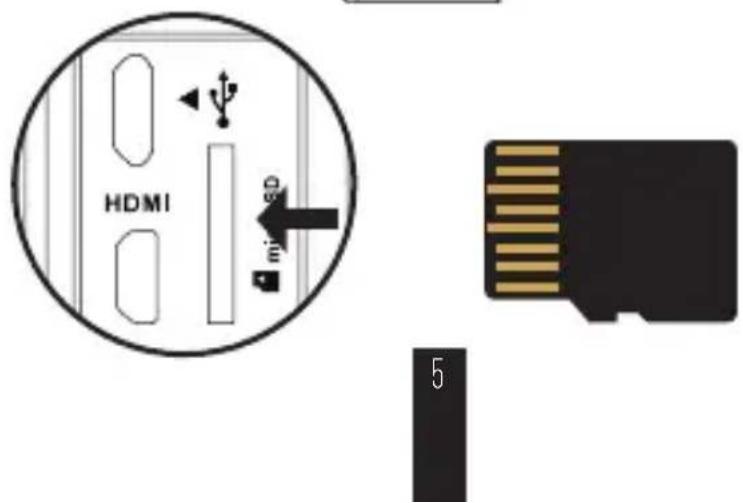
Step 2
Insert the microSD card.
The camera supports video and picture storage in the local memory card.
Insert the microSD card into the microSD card slot. (Use the recommended card model and the card capacity should be no less than 4GB.)
MicroSD Card Level Requirement: Class 10 and above.
MicroSD Card Recommendation:
SANDISK EXTREME® 32GB microSDHC™
SANDISK EXTREME® 64GB microSDHC™
LEXAR® 32GB microSDHC™
LEXAR® 64GB microSDHC™
Step 3
Charge the camera.
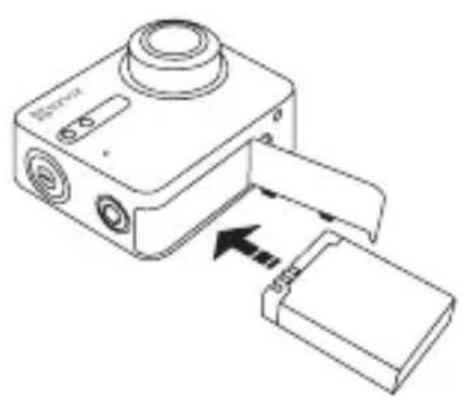
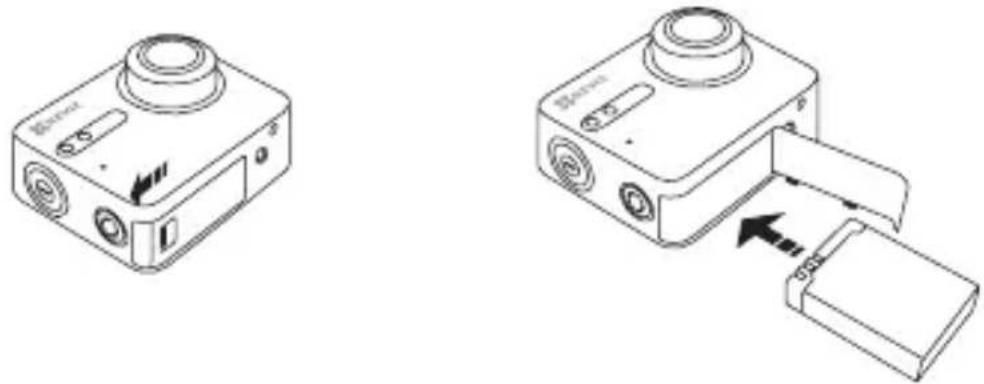
1 Install the Battery
Hold down the arrow and pull out the cover according to the arrow. Insert the battery and replace the battery cover.
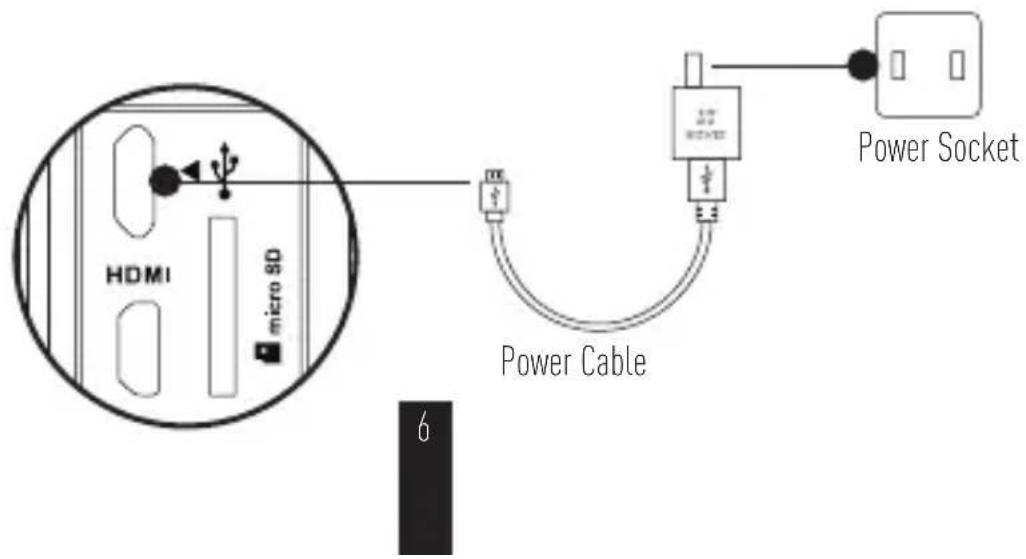
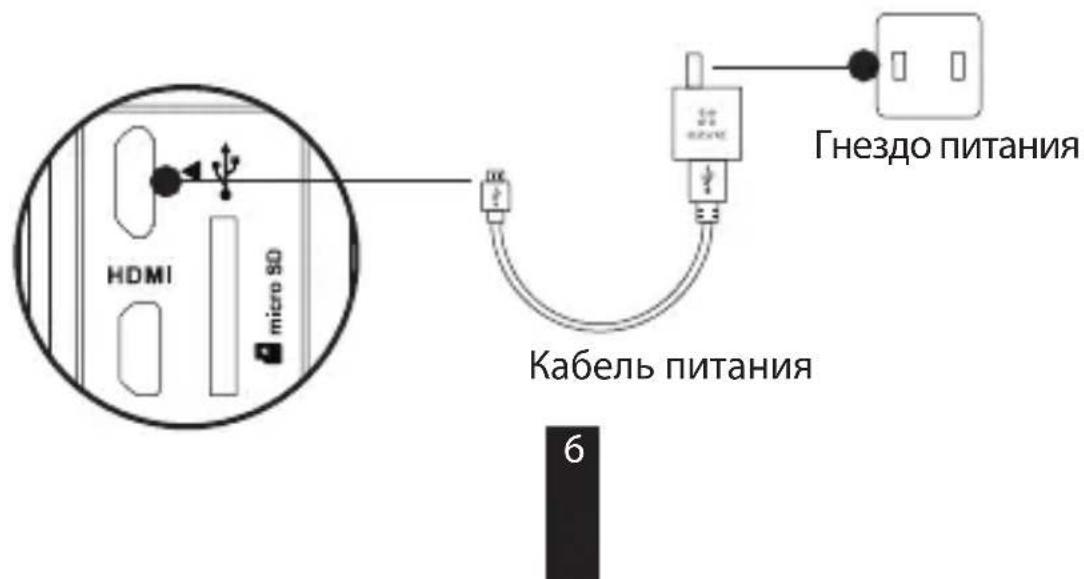
2 Connect to Power
It's advised to fully charge the camera in the power-off status before you use the camera for the first time.
Power-on and Power-off
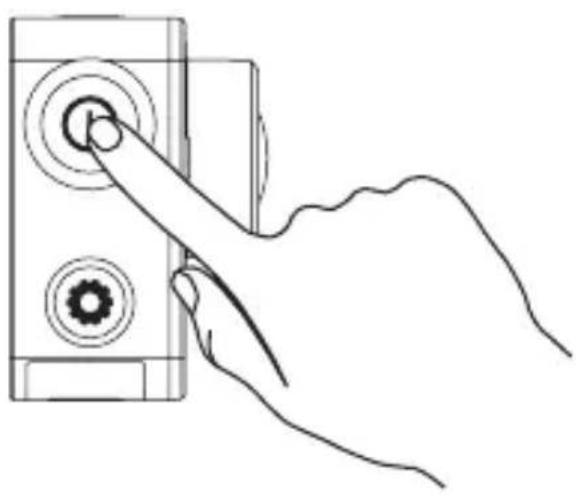
Power on
Hold down the power button and release until the buzzer alerting. The buzzer alerts quickly and the Camera Status LED Indicator flickers in purple. When the indicator turns steady blue, the camera is power-on and standby.
Power off
Hold down the power button and release until the buzzer alerting and the Camera Status LED Indicator turning off, the camera is power-off.

You are not allowed to power off the camera when the camera is recording or capturing photos.
Record
The camera supports four recording modes.
| Video Record video | |
| Photo Capture a photo | |
| Burst Capture multiple photos in a short time interval. | |
| Time Lapse Photo/ Time Lapse Video | Continuously capture photos in a predefined interval; Continuously capture photos in a predefined interval and make the photos into a video. |
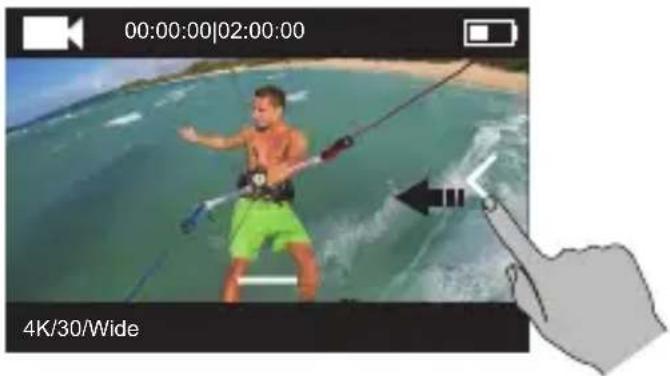
Press record.
Press to switch to the next recording mode or playback.
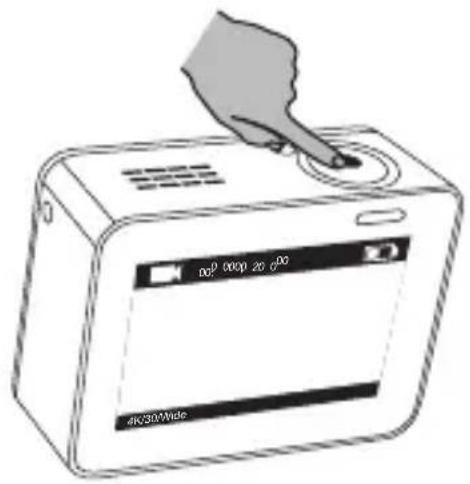
Set Parameters
Tap on the touch screen to show the current recording mode.
Slide upward or press onset the advanced recording parameters.
Slide to left to enter the main menu. You can change recording mode or tap Icon to enter the camera setup menu.
Wireless Control
You can turn on the camera's Wi-Fi to allow the remote control or EZVIZ SPORTS app to connect with the camera.
Hold down to turn on Wi-Fi.
You can set the wireless control mode in the setup menu.
- If you select App as the wireless control mode, you can search the "EZVIZ SPORTS" on App Store or Google Play™ to download and install the app.
Turn on the Wi-Fi function of your mobile phone, find the Wi-Fi signal of camera and connect with it.
Wi-Fi Name: EZVIZ_XXXX
Wi-Fi Password: 1234567890

The default Wi-Fi name and password are for first-time log-in purposes only. You must change this default password to better protect against security risks, such as the unauthorized access by others to the product that may prevent the product from functioning properly and/or lead to other undesirable consequences.
The Wi-Fi name and password will be reset to default after the camera is reset.
- If you select Remote as the wireless control mode, refer to the Quick Start Guide of Remote Control for details.
Connect with Display
You can connect the S1 and monitor with a HDMI cable to play back videos and photos, record, and get live video.
Connect the camera to the display with a micro-HDMI cable, and power on the camera to show the live view or playback on the display.
The HDMI cable is not included in the box. Please purchase separately.
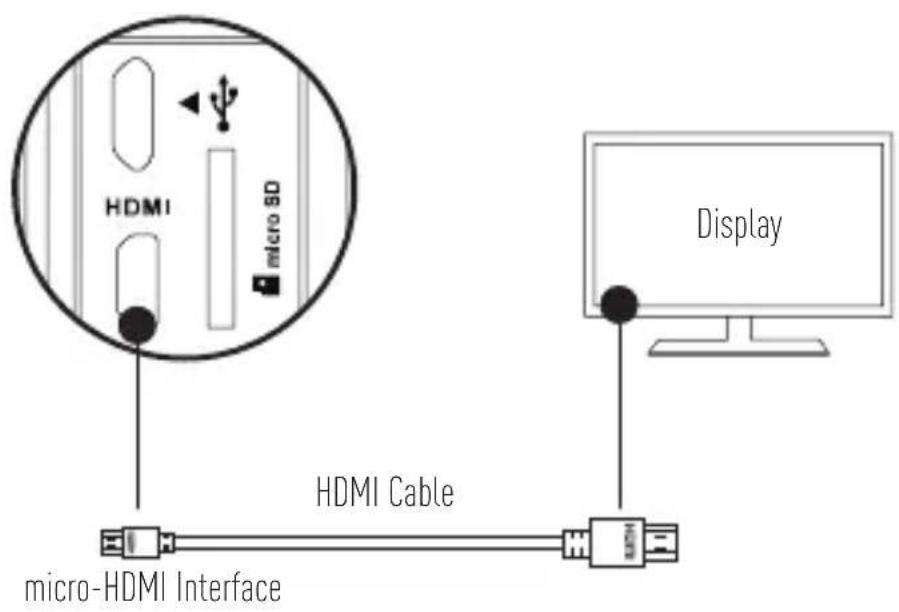
The LCD screen will be invalid when the camera connects with a display. You can switch the recording mode or enter menu with buttons.

Next Item/Next Mode


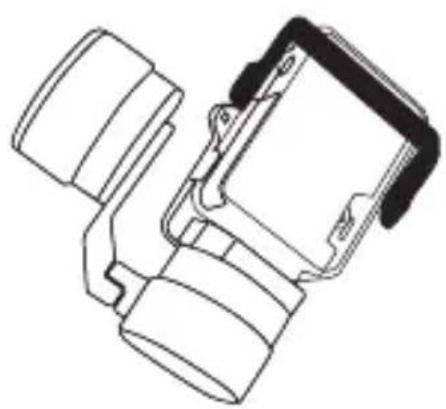
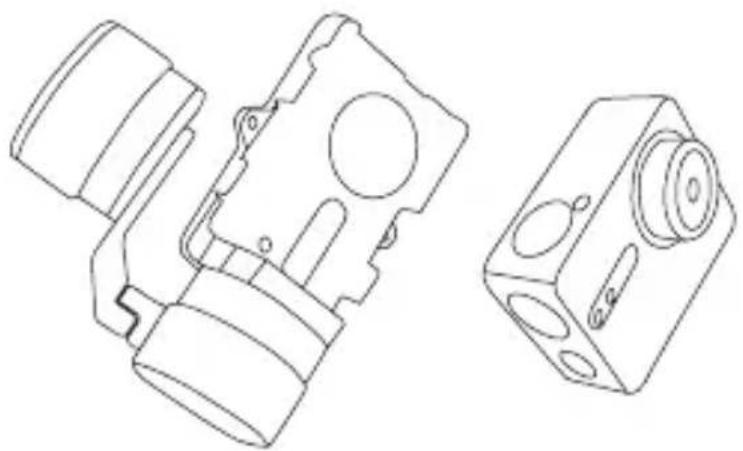
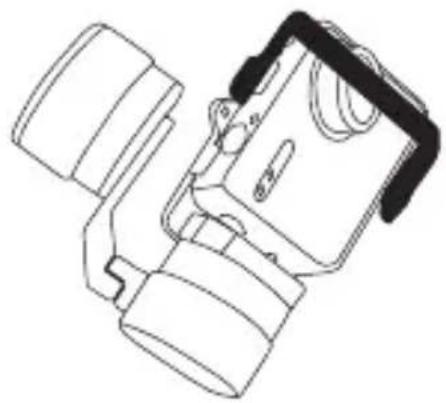
Appendix: Frame Adapter Usage
EN
The frame adapter is included in the camera package. With the frame adapter, the camera can be used with various kinds of accessories.
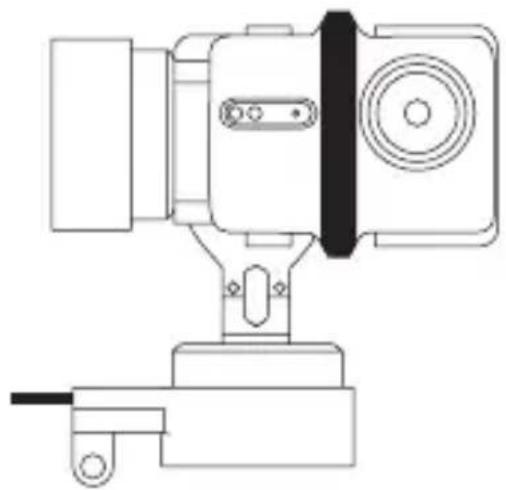
Applicatio 1 Installing on the Aerial Vehicle
The figure of installed camera on the aerial vehicle is shown below.
- Place the fixing frame on the aerial vehicle.
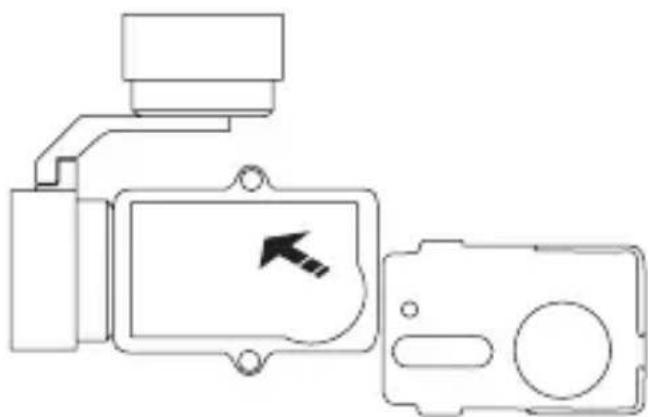
- Align the camera lens with the hole on the fixing frame.
- Properly place the fixing bracket according to the screw holes on the frame and then secure the two screws.
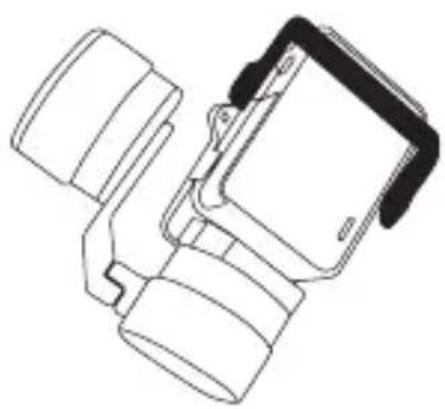
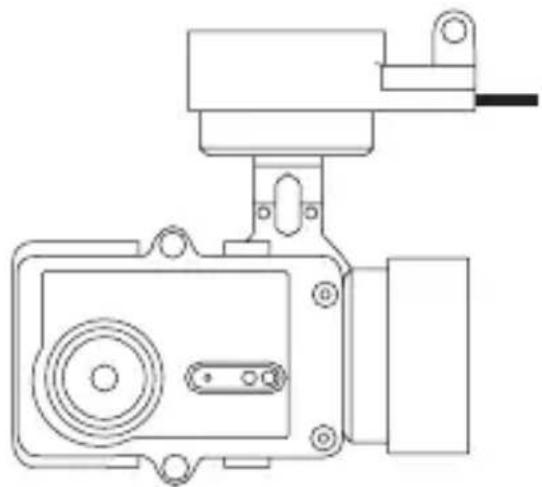
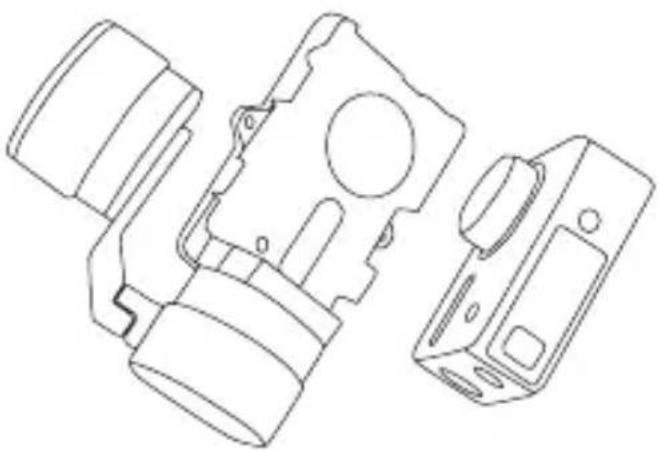
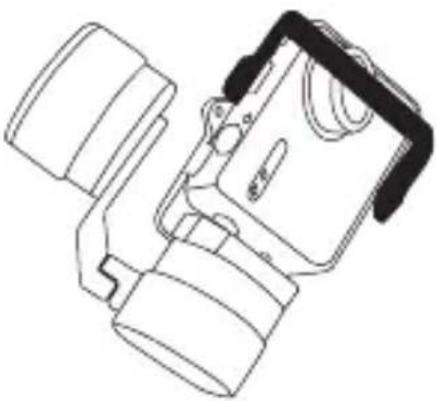
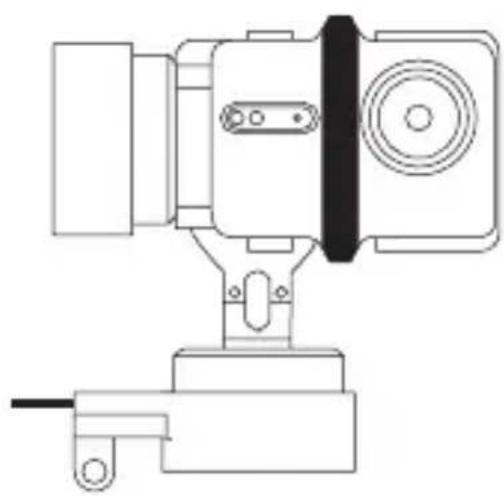
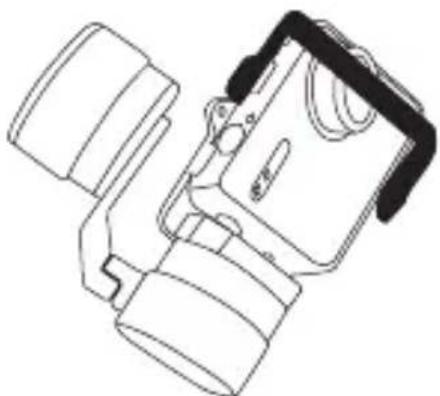
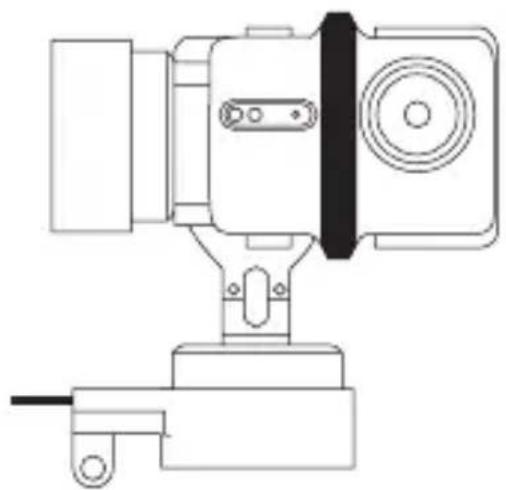
Applicatio 2 Installing on the Stabilizer
The figure of installed camera on the stabilizer is shown below.

- Place the fixing frame on the stabilizer.

- Backward place the camera on the fixing frame.
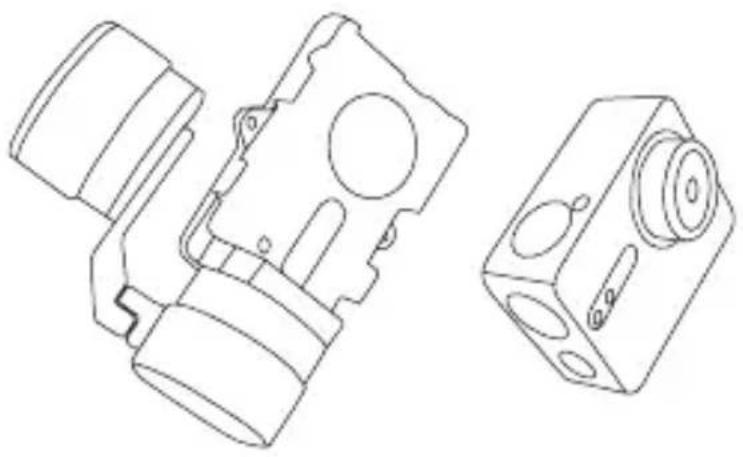
- Properly place the fixing bracket according to the screw holes on the frame and then secure the two screws.
Allgemeines
DE

14 Interface de support standard (1/4 de pouce)
Rafale: Résolution/Cadence d'acquisition
13 Coperchio battery
Hold inde for at tende for Wi-Fi
Hold inde for at tende for Wi-Fi.
Du kan indstille tilstanden for tradløs betjening i indstellingsmenuen.
Pekm "Chmka", "Cepn Hn Chmkn" n "Time Lapse": Home Ha
3acheta Chmka/Homep Ha octaBaua CHMka
3 Bndeo: Pa3dneAteHa cnoc6HocT/kadpoBa yeCTota/3pntAho noAe
Chmka:Pa3neAHTeHa cnoCo6HocT
CepinHn Chmkn: Pa3dIeIHTeHa cncoc6HocT/ckopocT Ha 3aChemaHe
Time Lapse (Taɪmʌnc) pekɪm: PaʒeʌnTeʌHa cɒncO6Hoc/TɪnTepBaʌHa
3aChemaHe
4 CbctOaHHe Ha 6aTepeNraTa
5 PperAe,Ha kNBo nAn B3pOu3BexJaHe Ha n3o6paJxHne
ДeйстВиe
CTbNka 1
I3BaTe KaMepata
По подаизиране kамера Трябьа Да ce сьхраньа Бв Вodочиьkaьф. Ппеди пьрьоначанота и уnotpe6a, ИЗбадete kamepersа ot Bo-doyctочиья kaьф, за постуte microSD kapтata и за зapedи-te kamepersa.

BU
Ctbnka 2
Noctabete microSD kaptata.
Kamepata noiBpka 3aHc Ha Bndeo n cHmkn BbB Brpaedeta kapTa c npMeT.
BmbkheTe Mnkpo SD kapTa 6 cAOT Ha Mnkpo SD kapTa. (H3noA3BaIte npenopbuaHnMoJeA KapTa, kaTo kanaunTeTbT n He Tp6Ba da e no4 4 I5).
I0-DoIy e noka3aHa fIgypa Ha kamepa, MoHTnpaHa Bbpxy cTa6nAn3aTOp.

- NocTaBete kpeneknna eIemnt BbpxdpoHa.
- Bbphete o6patno kamepata Bbpxy kpejknna eIeMeNT.

- Hamectete kpenekha ta kon3oA toHcnpmo otBopnte ha BnHToBeTe Ha eAlementa n cEeToBa 3aterHeTe DaTa BnHTa.
Alapok
1 yctaHOBNTe aKKymyIaTOp
Haxmte Ha ctpelky n cTnHite KpbIshky no cTpeJIke.YcTaHOBITE aKKymyJrTop n BepHTe Ha MeCTO KpbIshky OTceKa aKKymyJrTopa.
2 POnKJIIOUHTe NITaHne
IpepeBbIMnIOJIb3OBAHnEMKamepbI peKOMeHnyETcIIOJIHOCTbIO 3apAITbe B BbIKJIIOUeHHOM COCTOAHIN.
BbIKJIIOUeHHe NITaHnIa
Haxmte nydepknaite KhoNky nHaHna ①, a noCle cnHana 3ymMepa OTnycntne ee. CnD-nHdkaTOp COCTOHNs KaMepbI rachet N Kamepa OTKJIouyae

3aIpeuaeTcBbIKIOUaTb NITaHHe KamepbI, KOrda OHa IpON3BODNT 3aINCb INI
delaet fOToCHIMKn.
3aПись
Kamepa noidepXnBaet yeTbipe pexIma 3aInncn.
- TOnHO pa3MeCTIe fIKCnpyUoI KPOHHTeIH COrlaCHO OTBepCTNm IOB BnHTbI Ha pamKe, a 3aTeM 3aΦNKcnpuTe DByMa BnHTaMn.
RU
IpimHeHne 2:YcTaHOBka Ha cTa6nIn3aTope
PncyHOK KaMepbI, yCTaHOBJIeHHoH Ha cTa6nIn3aTope, noka3aH HIXke.
- YctaHOBInTe 0HKcnpuyo paMKy Ha letaTeIbHbI aannapat.
- YctaHOBInTe KaMepy c 6o6paTHoN CTOpObI fNKcnpUoJe paMKn.
- TOnHO pa3MeCTIe fIKCnpyUoI KPOHHTeIH COrlaCHO OTBepCTNm IOB BnHTbI Ha pamKe, a 3aTeM 3aΦNKcnpuTe DByMa BnHTaMn.
RU
Ulevaade

Thank you for purchasing EZVIZ products. This limited warranty gives you, the original purchaser of the EZVIZ product, specific legal rights. You may also have other legal rights that vary by state, province or jurisdiction. The disclaimers, exclusions, and limitations of liability under this limited warranty will not apply to the extent prohibited by applicable law. No distributor, reseller, agent, or employee is authorized to make any medication, extension, or addition to this limited warranty.
Your EZVIZ product is warranted for a period of one (1) year from the date of purchase against defects in materials and workmanship, or such longer period as may be required by law in the country or state where this product is sold, when used normally in accordance with user manual.
You can request warranty service by emailing us at support@dezvizlife.com .
For any defective EZVIZ products under warranty, HANGZHOU HIKVISION DIGITAL TECHNOLOGY CO., LTD. ("the Company") will, at its option, (i) repair or replace your product free of charge; (ii) exchange your product with a functional equivalent product; (iii) or refund the original purchase price, provided you provide the original purchase receipt or copy, brief explanation of the defect, and return the product in its original packaging. At the sole discretion of the Company, repair or replacement may be made with a new or refurbished product or components. This warranty does not cover the postal cost, insurance and any other incidental charges incurred by you in returning the product. Except where prohibited by applicable law, this is your sole and exclusive remedy for breach of this limited warranty. Any product that has either been repaired or replaced under this limited warranty will be covered by the terms of this limited warranty for the longer of ninety (90) days from the date of delivery or the remaining original warranty period. This warranty does not apply and is void:
- If the warranty claim is made outside the warranty period or if the proof of purchase is not provided.
- For any malfunction, defect or failure caused by or resulting from the evidence of impact, mishandling, tampering, use contrary to the applicable instruction manual, incorrect power line voltage, accident, loss, theft, fire, flood or other Acts of God, shipping damage or damage resulting from repairs performed by unauthorized personnel.
- For any consumable parts, such as batteries, where the malfunction is due to the normal aging of the product.
Cosmetic damage, including but not limited to scratches, dents and broken plastic on ports.
Any software, even if packaged or sold with EZVIZ hardware. - For any other damages free from defects in material or workmanship.
Routine cleaning, normal cosmetic and mechanical wear and tear.
Please do not hesitate to contact your seller, or send e-mails to us support@dezvizlife.com, with any questions.
COPYRIGHT ©2016 HANGZHOU HIKVISION DIGITAL TECHNOLOGY CO., LTD. ALL RIGHTS RESERVED.