EL Range 8x42 - Binoculars Swarovski - Free user manual and instructions
Find the device manual for free EL Range 8x42 Swarovski in PDF.
Frequently Asked Questions - EL Range 8x42 Swarovski
User questions about EL Range 8x42 Swarovski
0 question about this device. Answer the ones you know or ask your own.
Ask a new question about this device
Download the instructions for your Binoculars in PDF format for free! Find your manual EL Range 8x42 - Swarovski and take your electronic device back in hand. On this page are published all the documents necessary for the use of your device. EL Range 8x42 by Swarovski.
USER MANUAL EL Range 8x42 Swarovski
We thank you for choosing this product from SWAROVSKI OPTIK. If you have any questions, please consult your specialist dealer or contact us directly at www.SWAROVSKIOPTIK.COM.
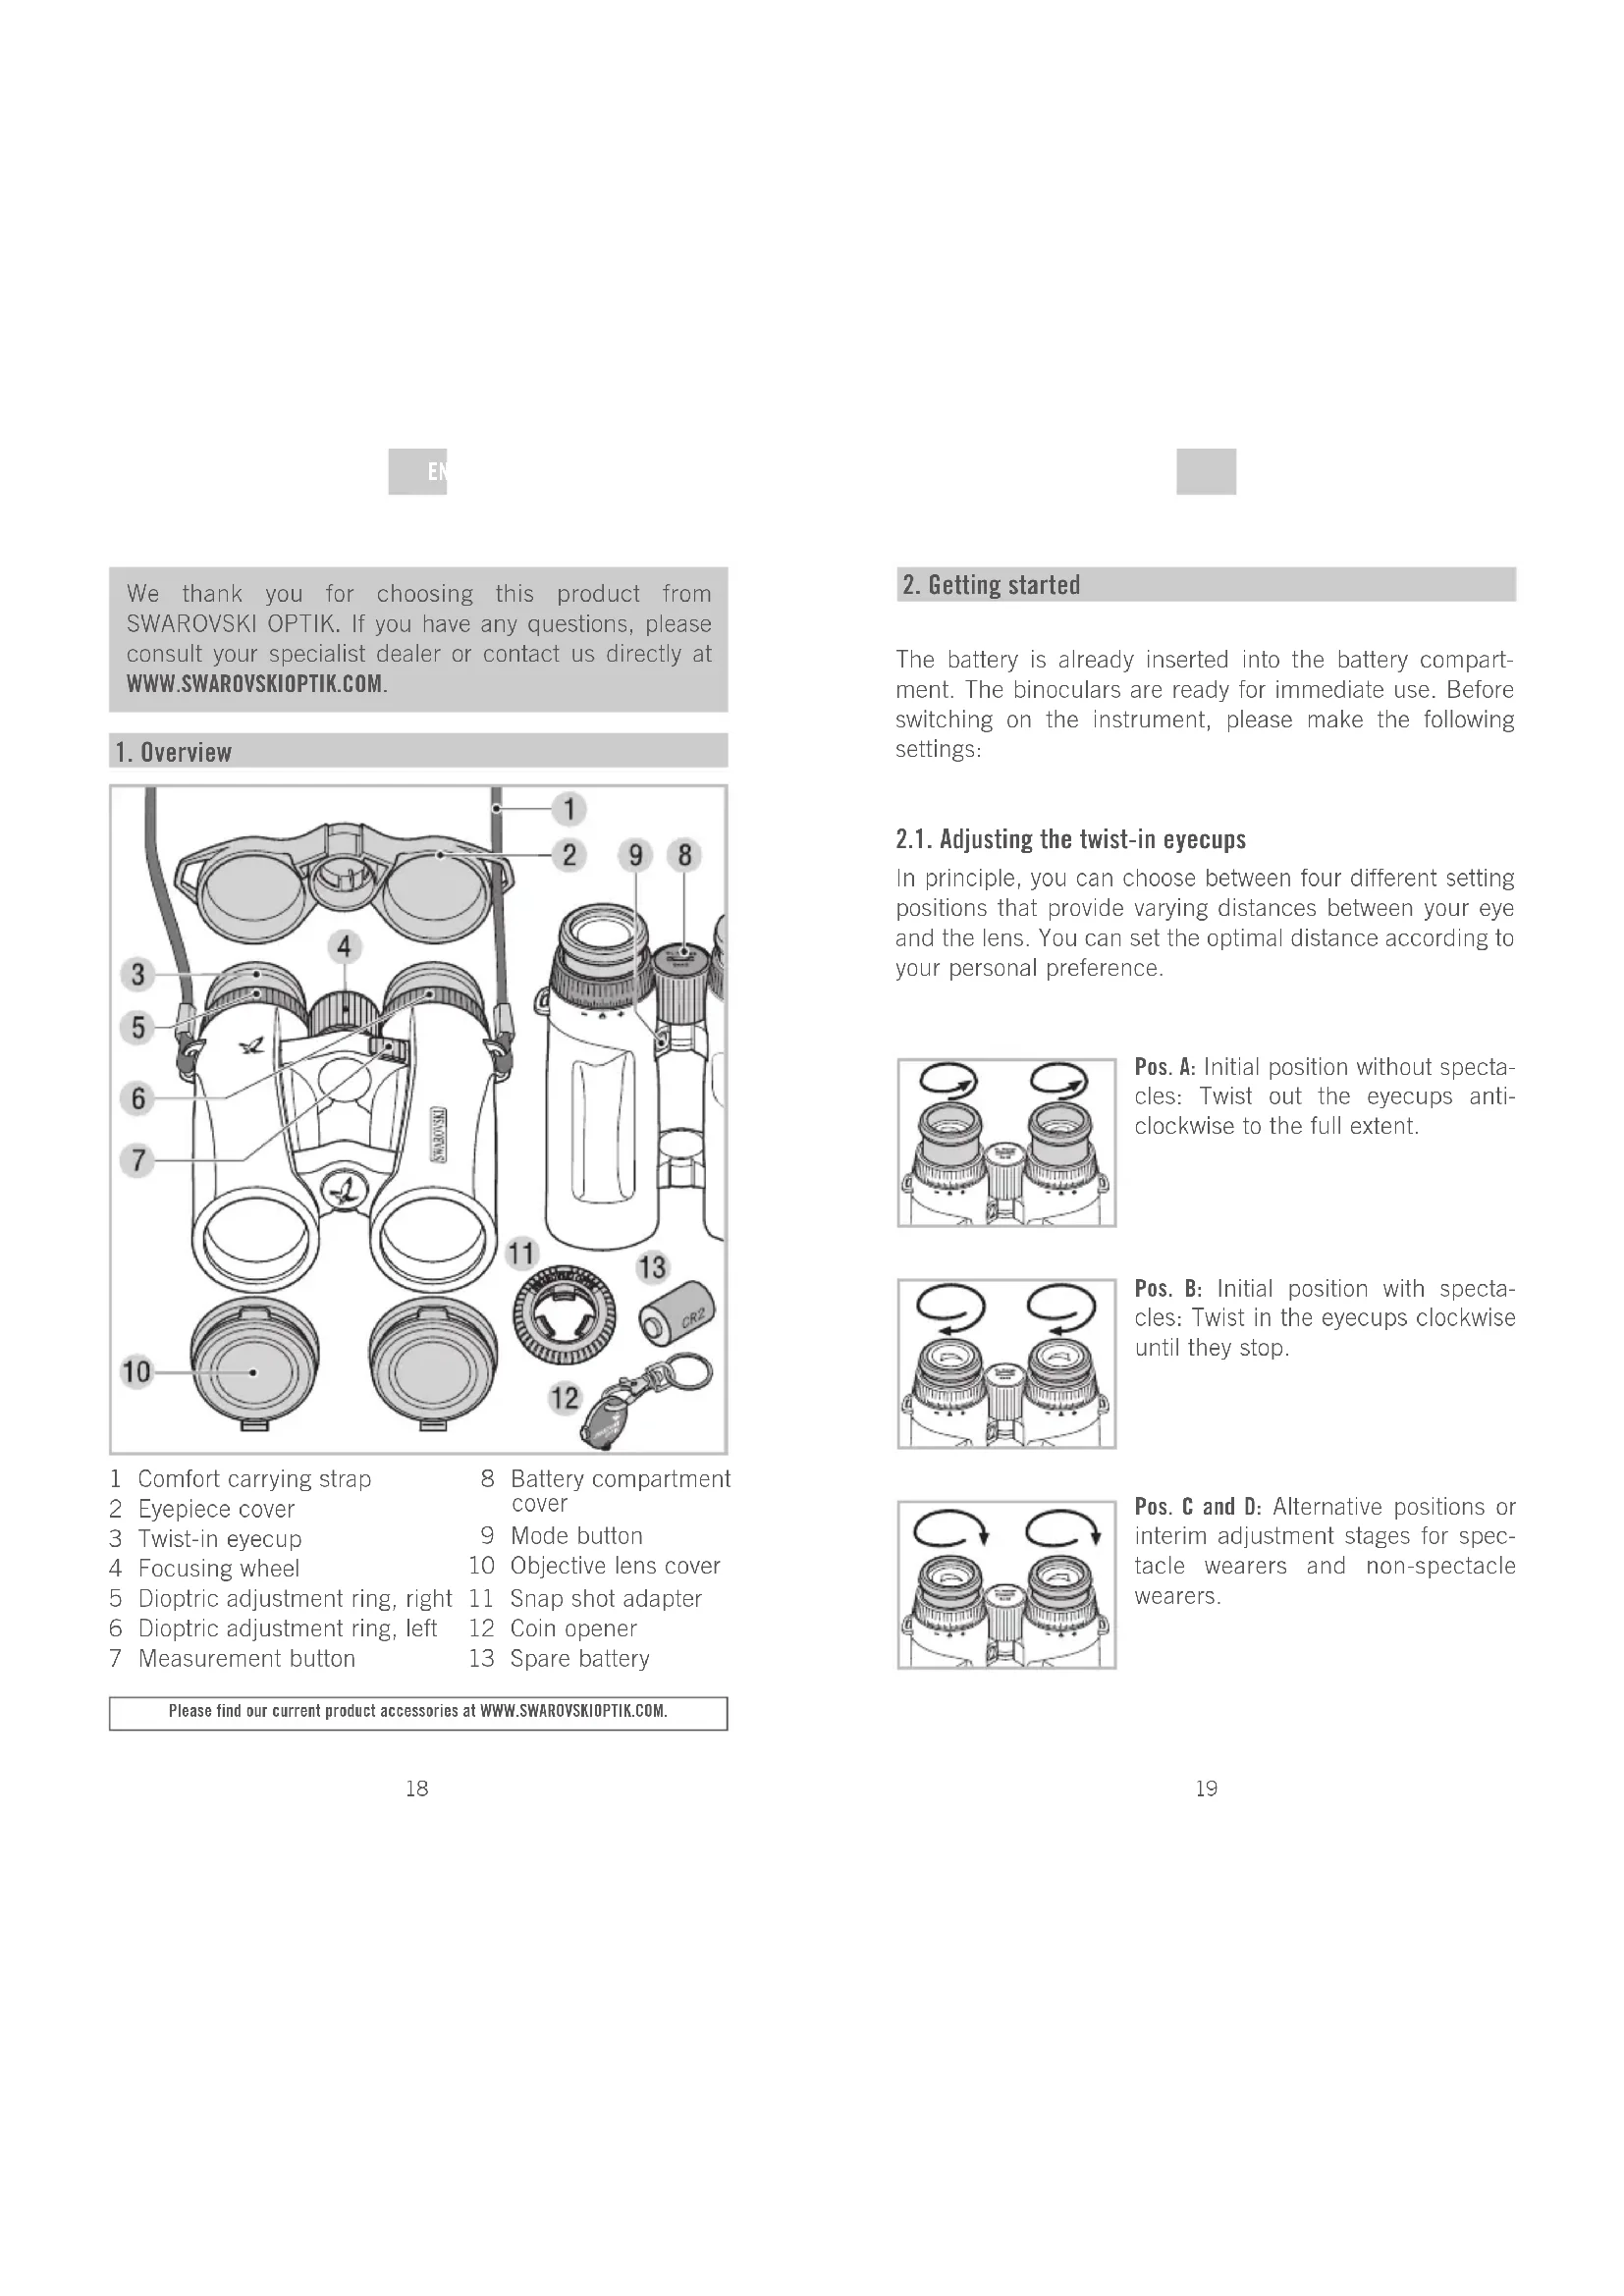
1. Overview

1 Comfort carrying strap
2 Eyepiece cover
3 Twist-in eyecup
4 Focusing wheel
5 Dioptic adjustment ring, right
6 Dioptric adjustment ring, left
7 Measurement button
8 Battery compartment cover
9 Mode button
10 Objective lens cover
11 Snap shot adapter
12 Coin opener
13 Spare battery
Please find our current product accessories at www.SWAROVSKIOPTIK.COM.
2. Getting started
The battery is already inserted into the battery compartment. The binoculars are ready for immediate use. Before switching on the instrument, please make the following settings:
2.1. Adjusting the twist-in eyecups
In principle, you can choose between four different setting positions that provide varying distances between your eye and the lens. You can set the optimal distance according to your personal preference.

Pos. A: Initial position without spectacles: Twist out the eyecups anticlockwise to the full extent.

Pos. B: Initial position with spectacles: Twist in the eyecups clockwise until they stop.

Pos. C and D: Alternative positions or interim adjustment stages for spectacle wearers and non-spectacle wearers.
EN E
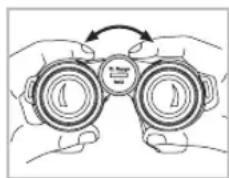
2.2. Adjusting the interpupillary distance
To see a single round image, adjust the separation between the two halves of the binoculars until the irritating shadows disappear.

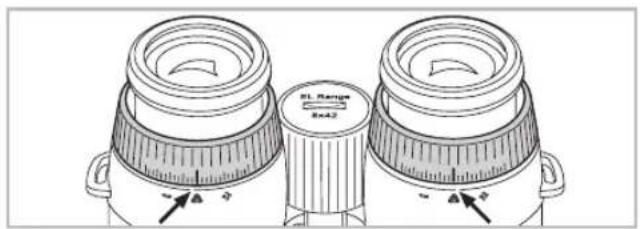
2.3. Use with equal acuity of both eyes
a. Pull out the left and right dioptic adjustment ring and turn it until the long bar on the dioptic scale is in line with the small triangle underneath the ring.

b. Once you have finished, push the dioptic adjustment rings back in.
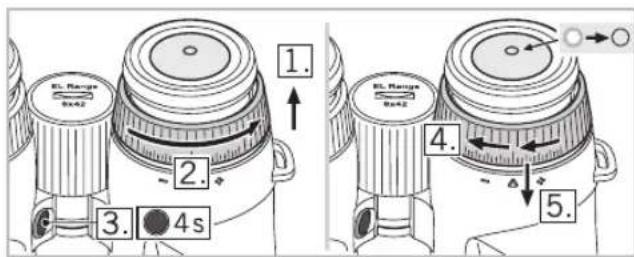
2.4. Dioptric compensation
To achieve optimal image quality, it is necessary to correct any varying visual acuity between the left and right eye.
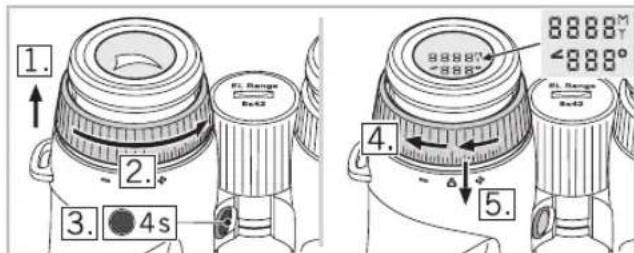
- First pull out the left dioptic adjustment ring.
- Turn the dioptic adjustment ring anticlockwise until it stops.
- Hold down the mode button for 4 seconds. This takes you to the dioptic compensation adjustment mode (display remains illuminated for 30 seconds). To exit this mode early, press the measurement button or mode button again.
- Now look through the left eyepiece at the display with your left eye and slowly turn the dioptic adjustment ring clockwise until the display comes into clear focus.
- Once you have finished, push the dioptic adjustment ring back in.
- Repeat steps 1 to 5 with the right dioptric adjustment ring to optimally adjust the focus for the right eye (aiming mark).
NOTE:
Setting the twist-in eyecups and eye relief precisely helps to ensure maximum viewing comfort for the display (see chapter 3.1. and 3.2.).
E
TIP:
The aiming mark and range indication can be set comfortably even without a target. Place the binoculars on a table upright or look at a nearby dark object. Adjusting each dioptric position separately allows you to achieve optimum sharpness because your eye is not distracted by a target under observation.
2.5. Adjusting the focus

To adjust your object focus from the shortest focusing distance (see Technical Data Sheet) to infinity, simply turn the focusing wheel. In the infinity position, the wide bar on the focusing wheel points upward.
3. Operation
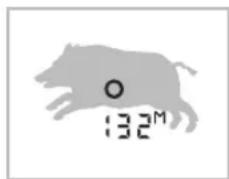
3.1. Single measurement

Briefly pressing the measurement button causes the aiming mark to appear. Once the button is released, the measured range is shown on the display. For optical safety reasons, another measurement cannot be
taken until after approx. 2 seconds have elapsed. During this safety pause, a continuous series of minus symbols appears on the display. The measurement is in progress.
3.2. Scan Mode
Scan Mode is used to continually measure the range of moving targets. The instrument switches to Scan Mode automatically if the measurement button is held down for over 3 seconds. In Scan Mode,
measurements will be taken continually until the measurement button is released (max. 120 seconds). The maximum range of Scan Mode is approx. 1,000m
If the measurement button is not pressed for 5 seconds, the display turns off automatically.
4. Menu navigation
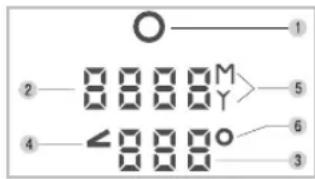
4.1. Display

- Aiming mark
- Display of the measured range in yards or metres (4-digit).
-
Measured angle in degrees or corrected shooting distance
-
Angle symbol
- Display in yards (Y) or metres (M)
- Degree symbol (°)
4.2. Additional functions and programmes
The following programmes (P) are available:
P1 Individual brightness settings
P2 Information shown on lower display row:
- Angle in degrees
- P2 off (lower display row off)
- Corrected ballistic shooting distance (angle-dependent)
P3 Toggle metres/yards
P4 Automatic brightness adjustment (on/off)
EN
Factory settings:
- P1: Level 3
- P2: Off
- P3: Metre
- P4: On
Selecting the programmes:
Hold down the mode button for 2 seconds. This takes you to the main menu: Now use the measurement button to make the programme setting you require.
To switch to the next menu item, press the mode button briefly. If you do not press any button within 5 seconds, the menu will close automatically and and return to the measurement mode. Your settings are saved automatically.
See the technical data sheet for more menu navigation information.
NOTE:
Your settings are still retained even after replacing the battery.
4.3. Brightness setting display (P1, P4)
In P1 - individual brightness setting - first select the appropriate display brightness level for you. There are 5 brightness levels to choose from.
In P4, turn the automatic brightness adjustment on or off.
- On: The binocular automatically adjusts the display brightness based on the brightness level you have chosen.
- Off: The display is constantly illuminated at the brightness level you have chosen.
4.4. Angle program (P2)
For each distance measured, you can also display the angle of the binoculars to the object under observation. This angular position means that the corrected shooting distance can also be displayed.
Adjusting the measured angle
On the lower row of the display, you can show either:
The angle
- Or no additional information
- Or the corrected shooting distance.
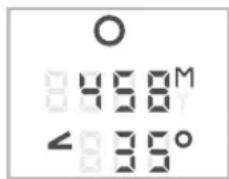
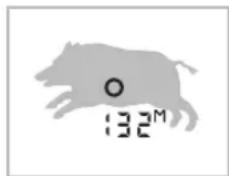
Display showing measured angle

Display not showing measured angle
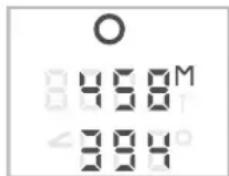
Display showing corrected shooting distance
SWAROAIM (corrected ballistic shooting distance)
When shooting at an angle (up or down), the force and effect of gravity is less than with a horizontal shot. This results in a flatter trajectory and a shifting of the point of impact.
For a detailed description, visit WWW.SWAROVSKIDOPTIK.COM.
卧
4.5. Yard / metre setting (P3)
The binoculars can display the measured distance in yards or metres. To switch between these two units briefly press the measurement button on menu P3. The unit chosen here also applies for the corrected ballistic shooting distance.
5. Accessories
5.1. Assembly instructions for objective lens cover

5.2. Accessories
For detailed information about accessories, visit www.SWAROVSKIOPTIK.COM.
6. General Information
6.1. Range
The following factors have an impact on the maximum measurement range:
| Range higher Range lower | ||
| Colour of target | Light Dark | |
| Surface | Shiny Matt | |
| Angle to target | At right angle Acute | |
| Size of object | Large Small | |
| Sunlight | Little (cloudy) | A lot (bright sunshine) |
| Atmospheric conditions | Clear Misty | |
| Object structure | Plane (e.g. wall) Variable(e.g. bush, tree) | |
6.2. Serial number
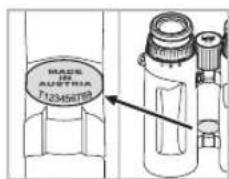
The serial number of your binocular is located on the made in austria emblem.
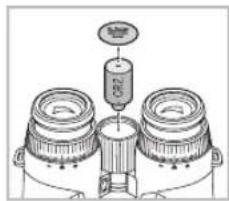
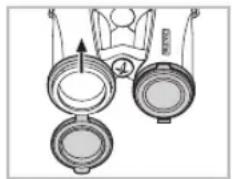
6.3. Replacing the battery
Check how much charge is left in the battery. A flashing aiming mark when the instrument is switched on indicates a low battery. From the time the low battery indicator first starts flashing, there is sufficient power for around 100 more measurements.
Replacing the battery
-
Use the coin opener to open the battery compartment cover in the focusing wheel. Remove the dead battery.
-
Insert a new CR 2 battery, making sure that the poles are correctly aligned (see markings inside com
partment). Use leak-proof batteries only.
Warning: Do not use rechargeable batteries!
- Finally, screw the battery cover back on.
Batteries Directive
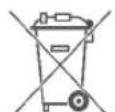
Batteries must not be disposed of as household waste and you are legally obliged to return used batteries. Local facilities exist for returning used batteries free of charge (e.g. in retail outlets or
at communal collection points). Batteries are labelled with a crossed-out wheeled bin and the chemical symbol of the harmful substance they contain: "Cd" for cadmium, "Hg" for mercury and "Pb" for lead.
Please help us to protect the environment.

6.4. Troubleshooting and display information
| Problem Probable Cause | Remedy | |
| The field of view is shaded at the periphery (vignet-ted). | The eyecups have not been adjusted correctly for use with or without spectacles. | Spectacle wearers need to twist the eye-cups right in to the stop position. When using without spec-tacles, the eyecups need twisting out to the required position (see chapter 3.1.). |
| The display shows “----” for the di-stance measured. | 1. The measurement range has been exceeded.2. The object is not reflective enough.3. Target out of focus. | 1. See chapter 4.2. See chapter 7.1.3. See chapter 3.5. |
| The display shows “co” for the distance measured (clean optic). | 1. The distance to the target is shorter than the minimum measurement range.2. The objective lens is dirty. | 1. See Technical Data Sheet.2. Clean the objective lens. |
| The aiming mark flashes when the instrument is switched on. | The battery is low. There is sufficient power for around 100 more measurements. Replace the battery or briefly warm the current one. | |
| Display, aiming mark and target are not all in focus at same time. | Dioptric adjustment is not optimal. | See chapter 3.4. |
| “Err” appears on the display | Electronic fault Press | the measure-ment button again.On repeated occurrence of “Err”, please contact SWAROVSKI OPTIK customer service. |
7. Maintenance and care
7.1. Lens-cleaning cloth
You can clean high sensitive lens surfaces with the enclosed special microfibre cloth. It is suitable for objective lens, ocular lens and spectacles.
Please keep the cloth clean, as dirt can damage the lens surface. If the cloth becomes soiled it can be washed in lukewarm soapy water and left to dry. Please only use for cleaning lens surfaces!
7.2. Cleaning
We have designed all elements and surfaces to require little care.
To ensure the long-lasting optical brilliance of your binoculars, you should keep the glass surfaces free of dirt, oil and grease. When cleaning the lenses, first remove larger particles with an optical lens brush. For the subsequent thorough cleaning we recommend breathing onto the lens surface to form a coat of condensation and then cleaning it with a soft, moist cloth.
The housing is best cleansed with a soft, moist cloth (don't use the lens-cleaning cloth).
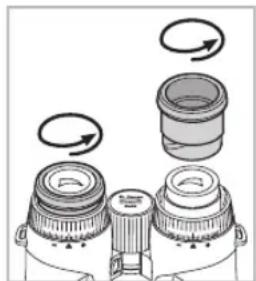

In the event of hard-to-remove dirt (e.g. sand) the eye cups can be unscrewed and cleaned easily.
E
7.3. Storage
You should keep your binoculars in their bag in a dry, well ventilated place.

If the instrument is wet, it must be dried prior to storage.
In tropical regions or regions with a high humidity the best place to store the instrument is an air-tight receptacle along with a moisture-absorbing agent (e.g. silica gel).
8. Contents
EL Range
2x batteries (CR2)
Eyepiece cover
Objective lens cover
Comfort carrying strap
Snap Shot Adapter
Coin opener
Lens-cleaning cloth
Field Bag
Instruction manual, Technical Data Sheet
Quick Guide
EL Range CD
9. Conformity
The device conforms to Directives 2002/95/EC on the restriction of the use of certain hazardous substances in electrical and electronic equipment, 2002/96/EC on waste electrical and electronic equipment (WEEE) and 2004/108/ EC on electromagnetic compatibility.
FCC Compliance Statement
This equipment has been tested and found to comply with the limits for a Class B digital device, pursuant to part 15 of the FCC Rules. These limits are designed to provide reasonable protection against harmful interference in a residential installation. This equipment generates, uses and can radiate radio frequency energy and, if not installed and used in
accordance with the instructions, may cause harmful interference to radio communications. However, there is no guarantee that interference will not occur in a particular installation. If this equipment does cause harmful interference to radio or television reception, which can be determined by turning the equipment off and on, the user is encouraged to try to correct the interference by one or more of the following measures:
Reorient or relocate the receiving antenna.
- Increase the separation between the equipment and receiver.
- Consult the dealer or an experienced radio/TV technician for help.
SWAROVSKI OPTIK KG is not responsible for any radio or television interference caused by unauthorized modifications of this equipment or the substitution or attachment of connecting cables and equipment other than those specified by SWAROVSKI OPTIK KG. The correction of interference caused by such unauthorized modification, substitution or attachment is the responsibility of the user.
SWAROVSKI OPTIK patents USA
US 7,924,515 B2
patents pending:
US 2009/0303457 A1
US 2011/0051117 A1
US 2011/0164242 A1
US 2011/0128619 A1
- Swaroaim
WEEE/ElektroG

This symbol indicates that this product must not be disposed of as household waste under the WEEE Directive (Waste Electrical and Electronic Equipment Directive) and national laws.
This product must be returned to a dedicated collection site. You can obtain information about collection sites for waste equipment from your local authorities or from

an authorised site for the disposal of waste electrical and electronic equipment.
Disposing of this product correctly helps to protect the environment and prevents potential damage to both the environment and human health which could occur if the products are not handled correctly.
10. For your safety!
10.1.WARNING!
The product meets the requirements of a Class 1 laser pursuant to the applicable standards EN 60825-1, IEC 60825-1, FDA 21 CFR 1040.10 and 1040.11 respectively except for deviations pursuant to Laser Notice No. 50, dated June 24, 2007. As such, the instrument is safe for eyes and can be used for any application, but must not be aimed at people directly.
10.2. General information
Under no circumstances should the housing be opened by unauthorized personnel!

Never point the instrument at people from close distances!
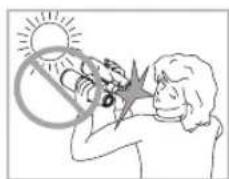
Never look directly at the sun with the binoculars! This will damage your eyes!

Never look through the binoculars when walking, you could encounter obstacles!

Please protect your binoculars from jolts and jars.

Repair and service work shall only be carried out by either SWAROVSKI OPTIK Absam (Austria) or SWAROVSKI OPTIK North America and any work by non-authorised parties shall render the warranty void.
All data are typical values.
We reserve the right to make changes regarding design and delivery.
We accept no liability for printing errors. BA-697-01, 06/2014
FR
Harnais de transport comfortable
Snap Shot Adapter
Jeton de dévissage
Tissu de nettoyage
Field Bag
11 Snap shot adapter
No3.BHΓ:AaBtePHTAHNBHe NO3nUHN, T.e. npOMexy-ToHbIe CTyneHn DA Tetex, KTO HOCNT H He HOCNT OCHN.

2.2.PerympoBkaMex3paKOBoropacToHHa
AII NOUYEHIN H3O6paXeHIN B ODHON OKpyxHOCTn pa3BeNTe IIOOBHNK 6HHOKHA Na TKOYrO, YTObI NCye3AN TeH N NOMEXN.

2.3. Hcnoa30BaHHe np6opa npn paBHO OCTPOTe 3peHH 060nx rAa3
a. BbDnHbTe aeBoe n npBaoe KOaO dnoTpnHn HbOaKn n NobopaunBaIte nx Do tex nop, noka dAnHHa rncKa Ha dnoTprnHoi shkaAe He coBmecHTcra TpeyroAbHnKoM Ha HxJHe CTopoHe np60pa.
b.3aTeM 3aABnHbTe KOaJdNoHTpHHOH HABoKNO6paTHO.
2.4. HHTepBaA dONTPnHHOHaBOaKN
A NOyehn ONTHMaBHO KaeCTBa N3O6paKeHH MoKET Tpe6oBaTbCg DONoAHHTeALHoe BbIPaBHnBaHne C yHeTom pa3HO OCTpoTb 3peHH AEBOR n PpABOr rA3a.

1.Chaayaa BbIaBnHbTe AeBOe KOaIO DNoITpNHOH NaCTPOK.
2.BpaaTe KOaO dHONTPnHO HAcTPOKn npOTNB acoBo CTpeAKn Do ynpa.
3. Haxmte n ydepxnBaTe KhoNky pexHMa B TeueHne Yetbipex cekyHa. Bbl nepeJeTe B pexM yctaHOKn INTEpBaA dnoTprnHn HABOK (dncnCBEHTcB TEHeHne 30 cekyHa).YTObbln n3 3TOrO peXHMa paHbIe, NOBtOPHo Haxmte KhoNky n3MepeHn nn KhoNky pexHMa.
4.Tenepb nocmOTpe AeBbIM rAa3OM Ha dncnneupe3 AeBbOkyIep IN MeAeHHO BpaauTe KOIbO AOIOHTPNHO HAcTpoKn, NOKa I3o6paeHHe dncnneJe cTaHET YETKNM.
5.3aTeM 3aBbHbTe KOaLIO dHOITPNHO HABoKn O6paTHO.
6. TOBTOPHeAeHCTBnA, ONncaHHbE B nyHKtax 1-5, C npaBBIM KOABUOM ANONTPnHNOH HABOAKN, YTO6bl YCTAHOBNTb ONTMaALHyIO pe3KoCTb N3O6paXeHnA Dn PnBaBOrIra3a (npuueAbHOm MapKn).


ПРМЕЧАнE:
TouHЯ HAcToPoiKa HaIa3HnKOB I MExk3pa4KOBorO
pacCToRHHIO3BOAerT DOCTNHy ONITMaIbHOrO 3pHTeIbHOro
KOMΦopTaHa DcIe ee (cm. pa3deI 3.1., 3.2.).
TNOAE3HbIM COBET:
HactoKy npuuebHOm MapKn HnHnKAtopa DaAhoCTM MoKHO AERKO BInOAnHTb 6e3 HabeEHHn npnbopa Ha oBeKT npueaHBnra. NomeCTnte 6nHOKb Ha cToA nn nocmotpnte uepe3 HrO Ha 6n3KO paCnOAnKeHHbI TeMHbI pPeAMet. NocpeACTBOM OTeALBOH HAcTPOHN COOTBETCTBYIOe AnontpnN DOCTnraETc ONTMaHbHa pe3KoCTb, TaK KaK rAa3 PnTOM He OTBaeKaETc HA OBeKT HABODKN.
2.5.HactpoKa pe3KocTn H306paXeHna
NobopaunBaJ maxOBnK fokcHpOBKn, Bbl MojTe HaBOuNTb Ha pe3KoCTb H3O6paKeHHe AIO6o Ro 6beKaTt:OT camoro 6An3KOrO pacctOraHHn (CM. TexHnueckyU CneuNfKnAciu)do 6eckoHeHoCTn. Pn HaBOKe Ha
6eckOHeHocb 7nPOKa pNcKa MaxOBnka fokycnpOBKn HappaBHeHa BBepx.
3. Θκηλγαταμη
3.1.OaHOKpaTHoe H3MepeHne

Pn KpatKOBpeMeHHOM HaxaTHN KHONKN 3MpeHnN NOBAAETcR npuebHa MapKa. OTnyCTNB KHONKY, Bbl yBNAnTE pe3yNbTaT n3MpeHnN paCtOHN Ha DCnIeE. AAppeoTbpauence Hpe3MepHOH
HaRpy3Kn Ha Ia3a BbIIOAnHeHne CcAeYIOUeTo N3MepeHnA OnyckaETCA ToIbKO pIIMepHO Yepe3 ABe CEkyHbI.
3.2.PexnM cKaHnpoBaHHa
BpeKmE cKaHnPoBaHn npOncxOaHT noCToHHoe n3MepeHne pacCToHnH IO dBXJyUxxCra ceAe. Pekm CkaHnpOBaHn BkHouaETcABTO-MaTHueckn,ecmApKb HaxaToI KHOIIky n3MepeHn 60aeTpex
cekyH. Noka KhoNka H3MepenHa depKHTcH haxaToi (MaKc. 120 c), H3MepenHa OcyuecTBaHOTcB pexHMe cKaHnpoBaHn. MaKcMaIbHa aAlbHOCTb H3MepenHa B pexHMe cKaHnpoBaHn coCTaBAreT OKAo 1.000 M.
4. Habirauqna no MeHIO
4.1.Диспай
1.Пицьнамарka
2. Noka3n3MepHemoropacctoRnB RpaXnn Metpax(B Bnde 4-3NaHOrO YnCna).
3. OTo6paXeHne pe3yIbTaTob H3MepeHnYrMaB rpaDycax HnOtKoppeKTnpoBaHHoro pacCToHnNdo ceA
HactpoiKa yIaOBbIX n3MepeHn
B HnKHe CTPOKe AHCnAe MoKet Noka3bBaTbCn An6o
yroA
- AN6O HNKaKoI DOIOANHTeAHoH INHΦOpMaUIN
- AN6O OTKOPKEKTHPOBAHHOe pacCToRnHe Do UeAN.

H3o6paKHeHnHaAUCnAee C n3MepeHnEm yraOBbX BeaunH

N3o6paKHeHn Ha DnCnAee 6e3 N3MepeHnYrAOBbIX BeaUNH

H3o6paKeHHe Ha DCnAee C noka3OM oTKopp. pacCToHnO do cEAn
SWAROAIM (OKoppeKTHPOBAHHOe 6aAANCTHueCKHe paCToHMe dO eAn)
PnBbCTpeNe NOyAOM (BBePx HN BHN3) 3eMHoe npTAAKeHne DeIcTByeT HNaYe, Yem npr rOpu3OHTaNbHOM BbICTpeE. TpaekTopnaNoLa TaN B 30m CAYyae HeCKoAko BblpabHBaetc, a TOkA nonaHaHn CMeuaetc.
Iopob6hoe onncanHe moXHO haHTn Ha caTe WWW.SWAROVSKIOPTIK.COM.

4.5.YctahOBka npAOB/MetPOB(P3)
BnHOKMb MoKET NOKa3bBaTb H3MepReEme pAcCTOHHe B npdax nn Metpax. Bb6op OcUeCTBAreTc KpaTKBpeMeHHbIM HaxaTneM KhoNkN H3MepEHn B MeHIO P3. Bb6paHna 3deCb eHNuca H3MepEHn TaKKe NcNoB3yEtc DaY OTkoppeKTHPOBaHHoro 6aAMnCTUeCKOro paCCTOHHa Do ceHn.
5.Akceccyapbl
5.1.нсчкпя no montaxу 3aunTHOH KpbIshK o6beKTBa
5.2.Akceccyapbl
Iopob6nHa INHOpMaunO6 akceccyapax nomeeHa ha caTe WWW.SWAROVSKIOPTIK.COM.
6.06uyeyka3aHn
6.1.AaBbHocTb DeIcTBn
MaKcHMaBHaJaAaBHOCTb N3MepeHn 3aBnCnT OT CaeDyIOUHX
akTopoB:
Bce npamctpby ABARIOCTTMOOBIMN
PpO3B0ADTCABOCABARCTaC060nPpBOHMcHRTb KCHPKDyKHOHNOMKAKNTOCABKN,ONHEHCET OBTcTBeHHoCTA 803MOKHKoEOTHeAHTK.
B69701,06/2014
Garantie
DE
With this SWAROVSKI OPTIK product, you purchased a high-quality product, which comes with a worldwide warranty of 10 years on the binoculars and 2 years on the electronics from the date of purchase according to the following terms and conditions by SWAROVSKI OPTIK:
If defects in material and/or workmanship appear, we will take over material costs for the entire warranty period. We reserve the right in such instances to repair or replace the instrument or the defective part at our discretion. During the first five years we will take over the costs for materials and work.
This guarantee in no way limits the statutory warranty obligations.
In the event that the range of products is changed, we reserve the right to repair defective instruments or to replace them with those of equal value.
On account of the functional principle and the special manner of construction of optronic instruments the following special condition applies: Insofar as is functionally necessary, all instruments are supplied ready to operate with brand-name batteries either already inserted or enclosed separately. We can assume no liability for these batteries. The warranty conditions of the respective manufacturers apply and it is they who decide on warranty matters - especially regarding damage due to spent batteries.
We undertake no liability for repairs carried out by a repair shop which has not been authorized by us, nor for damages caused by improper use, nor for direct or indirect damages brought about by defects on the instrument. In addition, all parts are excluded from the warranty which are subject to natural wear, such as eye cups, carry straps, cases, armouring, etc.
This warranty is valid only when this warranty/service document has been duly dated, stamped and signed by the authorized dealer on the day of purchase.
In a warranty case and as well for service and/or repair work please present the instrument to your authorized SWAROVSKI OPTIK dealer together with this warranty/service document or send it, delivery-free, directly to our address. Instruments sent without the warranty/service document enclosed will be repaired and the costs charged to the customer. The return shipment of the instrument, insured (means of transport at our discretion), is free of charge in the case of repairs covered under warranty, otherwise charged to the customer. For shipments to foreign countries any foreign customs duties or fiscal charges are charged to the recipient.
This warranty is given by SWAROVSKI OPTIK KG, Absam, Austria. The place of jurisdiction is Innsbruck; Austrian law applies.
Insofar as other guarantees/warranties (whether legally prescribed or voluntary) are pledged in individual countries, these must be fulfilled by the respective importer or authorized dealer. SWAROVSKI OPTIK KG, Absam, Austria can therefore accept liability only when a legal obligation exists to do so.
Remarks for the United States of America:
For warranty services all products purchased in the United States, our only warranty authorized service is through SWAROVSKI OPTIK North America. For further information please call 1-800-426-3089.
Garantie
FR
PnN N3MeHEnnAccoTHMeHTa PPOyKmMblMOXEMOTpMoHTnPoBaTb DeEeKTHbI Pn6Op HN 3aMeHtB ETo Ha aHaONHHb.
BCaeCTBnE OOC6EHHOCTe FyHKUHOHPOBAHn H KOHCTpyKUHN OIOAOKTPOHHbIX pInpbOBO CYueCTByET CyeHOUee CNEuABHoY cAOBHe: Bce npbo, ITOCTABAAReME C 3a0Da, FOToBbI K3cNMyaTuAn, ECN Heo6xObHNO M NOCAOBHM 3KcNAYAutaTaN, B KOMNAeKTE NocTABKN IMMeHTOR BCTPOeHHBe B pInbOp MM OTAEbHO pINMaRAeMBte 3AeMeHTbl NITAHn 3BcEChTBX pOn13BOIDTeAEJ. PpOn13BOIDTeAeH He Hecet OTBETCTBEHHOCTn 3a pa60ty 3AeEMeHTOB NITAHN; AHH XeDECTBY TAPHTN COOTBTCTBYOUcero pON13BOIDTeA, KOTOpBn CAMOCTOrAEbHO peIeaTe O DeCTBNN RapAHNTHBIX 063aTEAECTB, B YACTCHOTN, B CAYue BtIEKAHNI 3AeEMeHTOB NITAHN.
PmmeHHe rapaHTn NCKMIOaETc, ECAM PemOH BblnoAHEB HeaTOp30BAHOM CepBNC-LEHTpe, pnp6b BILIN H3 CTPOB E pesybTaTE HEAEMXgEOI PmmeHHeN, BO3HNKIM PnPMbE MM KOCBEHHIE ybIKTN B peSyTate 06hApkyHenry y npbOpa DeEkeTbO. TapaHTHbIE O63raTbCTBa HE paCpOcPTpaHrOToC RAkCECCyApBI, NOBBePckHeBIE cECTeBHOMy H3HOcy, HapnMeP HarAA3HNKII, NOBecHbIe pemHII, FyTAJIbI, apMNpyHOJIe NOKBbITIN I,T4.
TapaHTnHa npHbop pH3Haetc AINb pN HAMHIN rapAHTHHOrTO TAOHA, 3aONHeHHORO B DeHb NOKyKN, H Ha HEM HMEcTc NOAIMCb N WtAMn TOPROBOI ORpHAnBaUN, yaKa3Ha TAKK E DaT PNOAAX.
PnHAcTMyEHnIpaHTHHORO CyaHry, a TaKae Ia PPOBEdHnpeMOHTa HmCepBCHHO 06cAkyHbAHnI pINbOp BMeCTe c rapAHTHHbIM TAOHOMpeAEETCE MeCTHOMy AHepy KOMAnH SWAROVSKI OPTIK HnHapBaHTeB CBApe IPON3BOADTEAHLAOXeHHBMIIaTeXOM. PnOTCYCTBHnIpaHTHHORo TAHOHa PEmOH BTBIOHNHETC TObKO 3a BO3MeHEHnI. NocE BbIOANHEHnIpaHTHHORo PemOHTO DOCTABxI pINbOp OOCyETBAAETCBcNtAHO COBsAteALbHM CTpAXOBAHHEM OTIPBAHEHn (CNOCO6 DOCTABKN NO BbIDOPy PON3BOADTEA), B INbHS CAYaIX BAaDEAEu. pINbOPOA Bo3MeUaET CTOHMoCTb PEmOH Ta DOCTABKn. PInp HEo6xoAMMOCTN DOCTABKn pINbOp 3a NpeDeABy ABCTPMn ONATA TAmOXeHHbIX INHBIX C60pOB- 3a CHTNOYATAE.
HactoianraapHTINBuaaTcKOMnAHmE SWARovSKI OPTIK KG,A6cam, ABCTPN. MeTO paccMOTpeHH CNPOB- INHc6pyK; DeNCTByET ABCTPNKCKO 3aKOHOATEALECTBO.
B CAYaE cM B ApyHx CTpaHax 3aKOHOaTeAeHbHo Nm D0pOBOaHo npHHrTaBn AEChbyOT HbE YCaOBnraPahTHN,TO MMIOPTep NAn dCTPNbIoTOB B aHHo CTpaHE O63aH IN BbINOHaTb. KomnaHn SWARovSKI OPTIK KG, ABcAm, ABcTPhN, MOKET OTBeuHbNo 3To rapaHTn Anb, eCM 3To 3aKpenHeHO Ha 3aKOHOaTeAeHbHom ypoBHe.