STwinner - Stroller CASUALPLAY - Free user manual and instructions
Find the device manual for free STwinner CASUALPLAY in PDF.
Frequently Asked Questions - STwinner CASUALPLAY
User questions about STwinner CASUALPLAY
0 question about this device. Answer the ones you know or ask your own.
Ask a new question about this device
Download the instructions for your Stroller in PDF format for free! Find your manual STwinner - CASUALPLAY and take your electronic device back in hand. On this page are published all the documents necessary for the use of your device. STwinner by CASUALPLAY.
USER MANUAL STwinner CASUALPLAY
Cnepoeae aen eannne paaepeae aeenee ene
CAT: Conserved of only resolut de compo per potider lunde e esus eare con a cembricn.
G: Kees up your receipt in order to encourage your doctor as a consumer.
CONSOFT2004
Conscnato o scinttni fesio a proveda acquisio por polor cerearior
yard drift camc
P: Quand a rado cmo proa de compia e para turaz naimagao.
B:Bawahran Sla Ine Cufing ou, um Hria Verbraunherrepo au doon
1. kermint
67. Hshtzehnaiinlneanrnnnre 1
H
snttcty 100000000000000000000000000000000000000000000
Pl Zehmajn narnk zonpu,dy min kzydian prw knnrerns
P: C005HHTO 12K 12K 12K 12K 12K 12K 12K 12K 12K 12K 12K 12K 12K 12K 12K 12K 12K 12K 12K 12K 12K 12K 12K 12K 12K 12
ipsswnhtponr
100
C. C. 1
yand 2000006721111111111111111111111
- Lactulose is the most active for its metabolic process, but it is also not as efficient as lactitol in reducing the production of lactose. However, sucrose and maltose are important sources of lacto-oligosaccharides, but the latter provides a more complete
P A erreee eae aee eaeiee eae ee eae
1
T
127.000000000000000000000000000000000000000000
CASUALPLAY would like to thank you for purchasing this pushchair.
This product has been designed, manufactured and approved under the strictest safest regulations. It has been designed to be easy to use, but we need your collaboration for optimal functioning results.
Please read these instructions carefully before using the pushchair for the first time. The comfort and safety of your child depends on the correct use of this product.
Please contact us if you have any type of query.
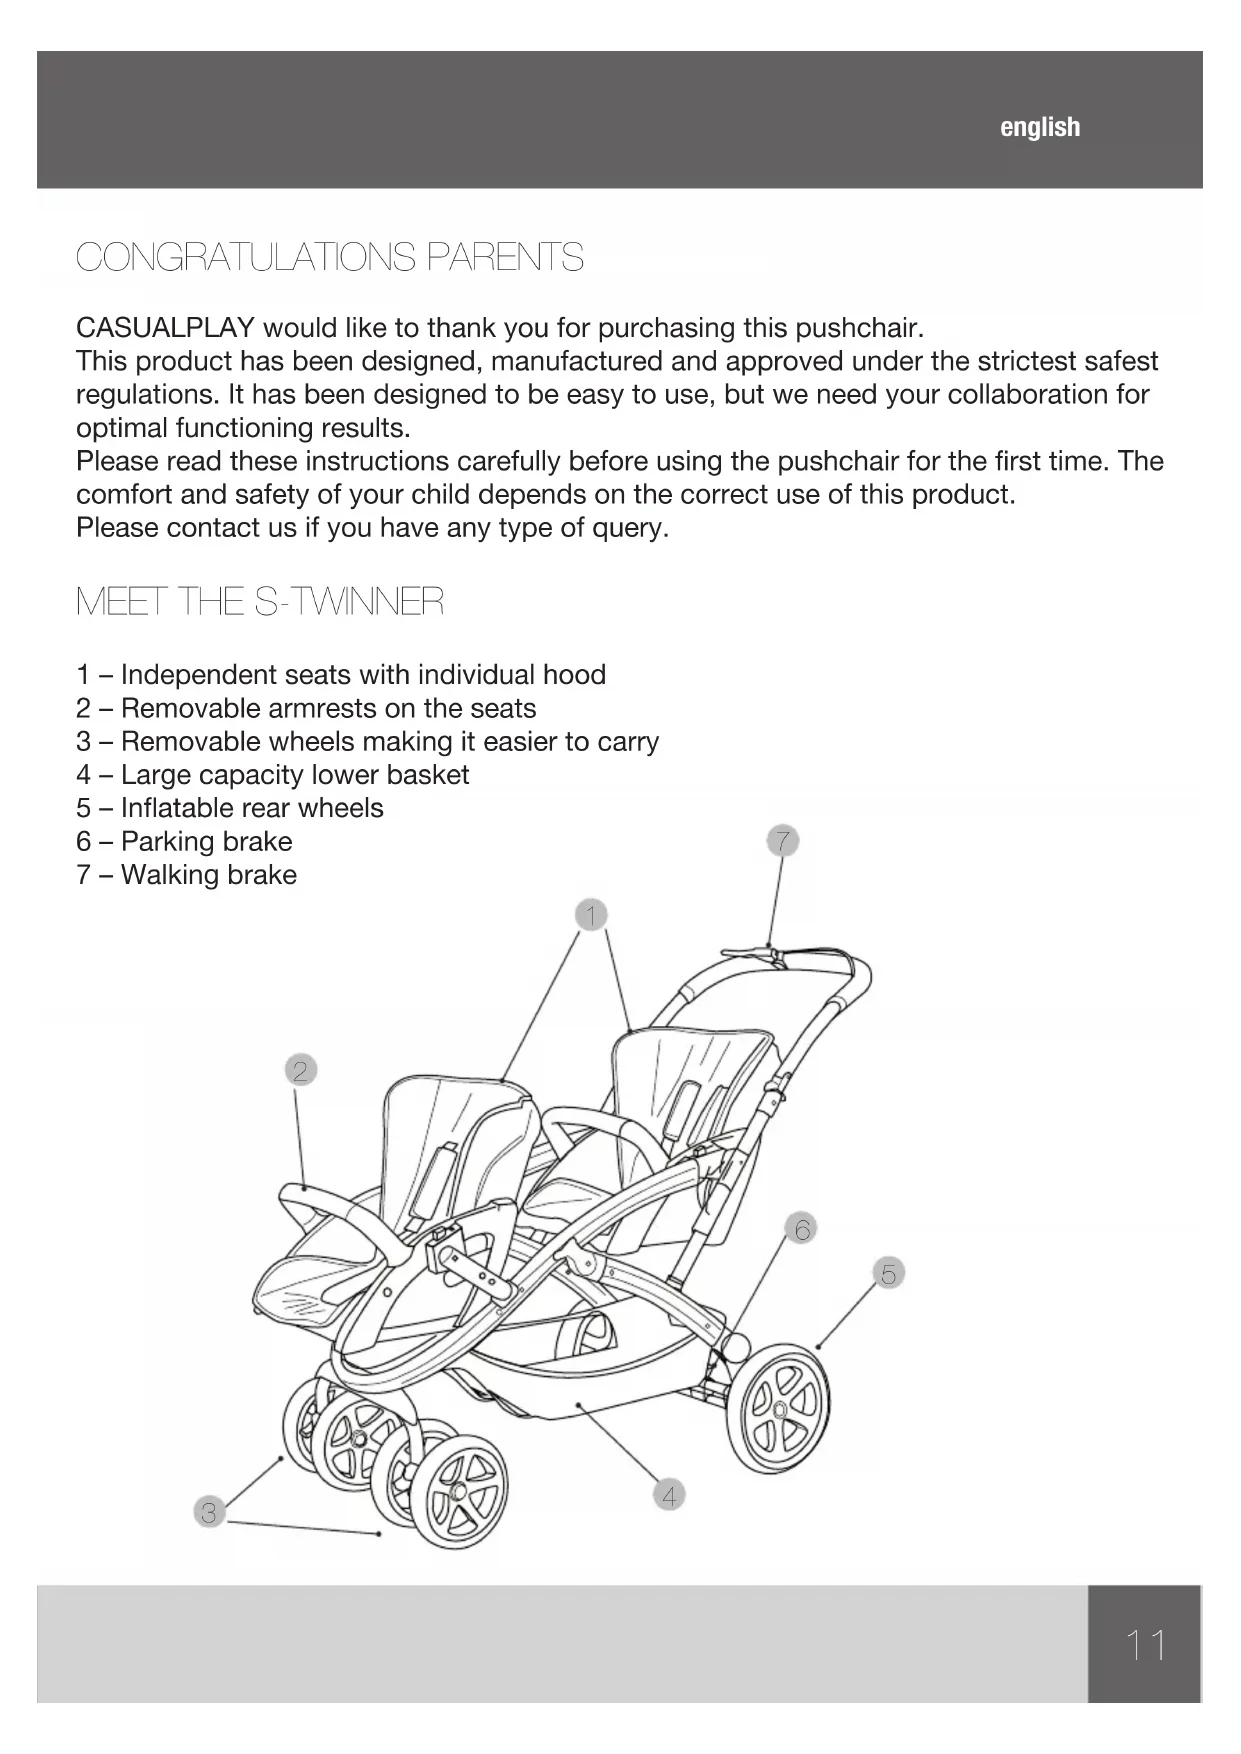
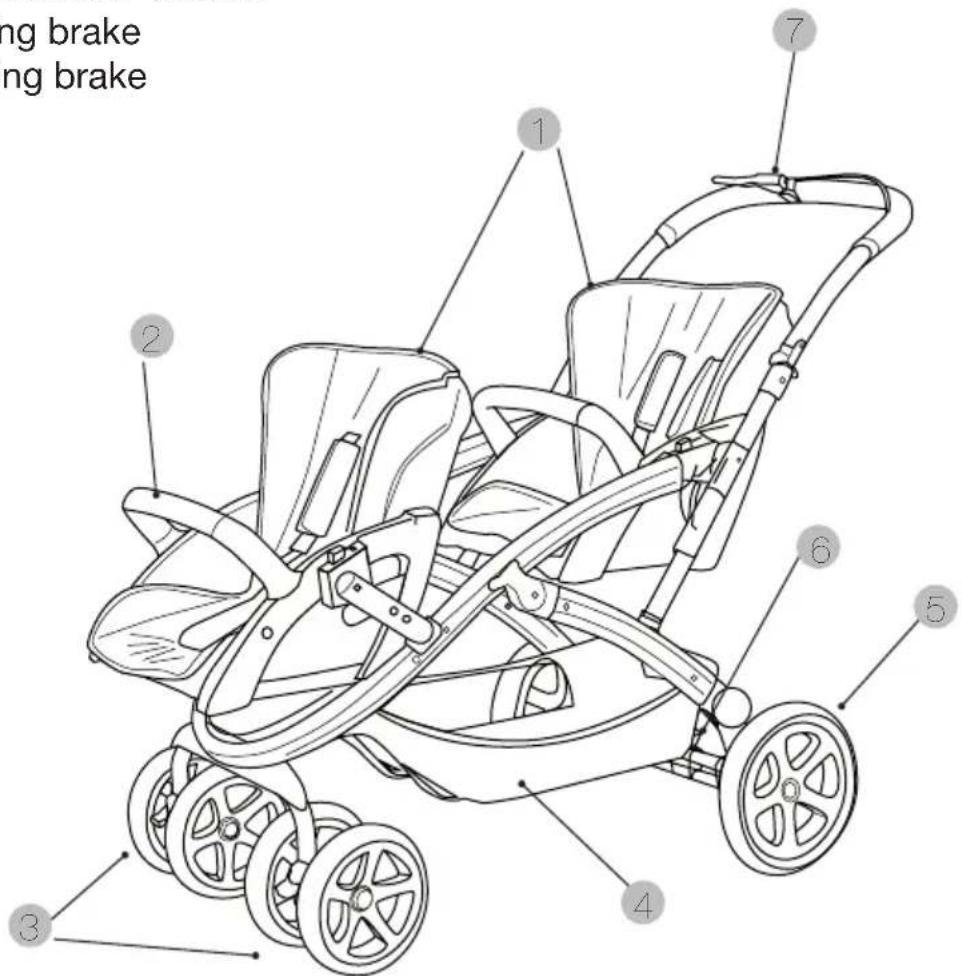
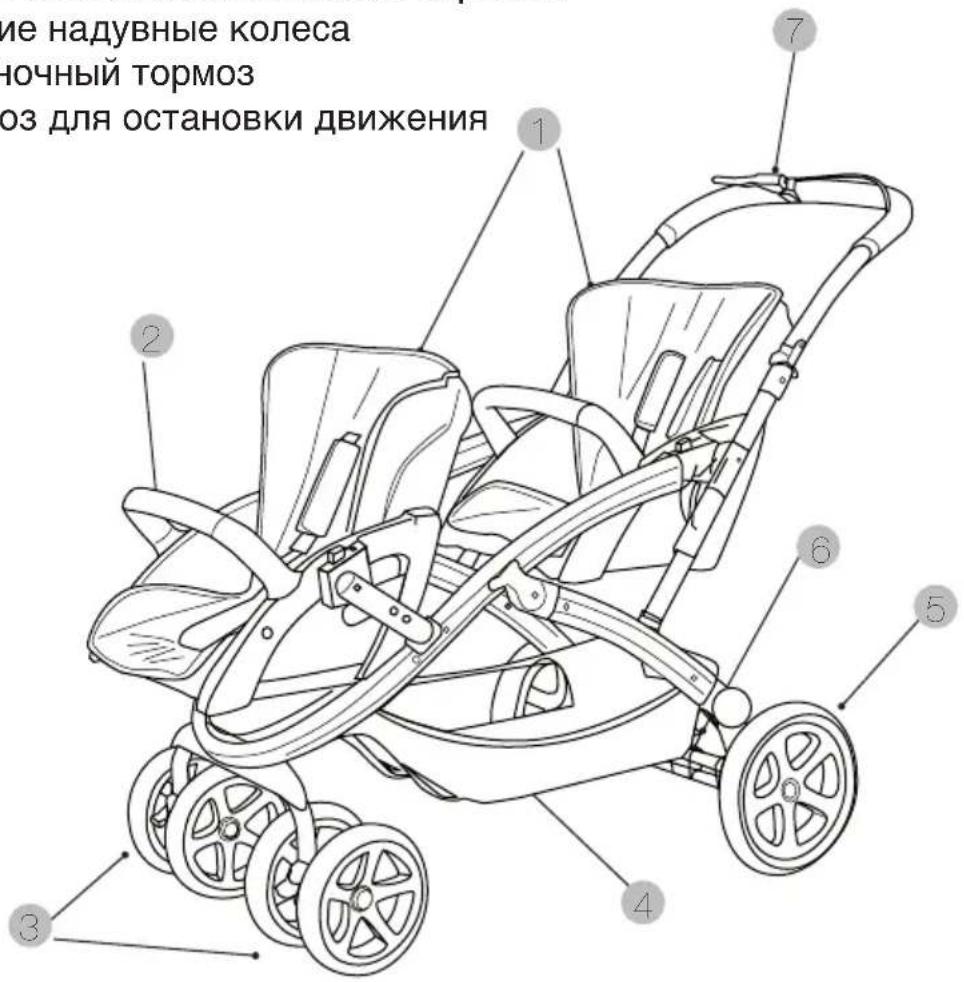
MEET THE S-TWINNER
1 - Independent seats with individual hood
2 - Removable armrests on the seats
3 - Removable wheels making it easier to carry
4 - Large capacity lower basket
5 - Inflatable rear wheels
6 - Parking brake
7 - Walking brake
Important – Keep these instructions for future reference
THIS VEHICLE IS DESIGNED FOR CHILDREN FROM 0 MONTHS AND UP TO A
MAXIMUM WEIGHT OF 15kg
WARNING AND SAFETY NOTES
WARNING: Never leave the child unattended.
WARNING: Make sure that all the locking devices are activated before use.
WARNING: To prevent injuries, make sure that the child is kept away at a safe distance when folding and unfolding this product.
WARNING: Do not let the child play with this product.
WARNING: Always use the restraint system.
WARNING: Check that the fastening devices for the carrycot, the seat or the car seat are correctly activated before use.
WARNING: This product is not suitable for running or skating.
WARNING: Never lift the S-TWINNER holding it by the PRIMA EASY, PRIMA FIX, NUNO/
FOLK, BABY 0+, SONO. We recommend you hold the pushchair chassis to lift it.
WARNING: Check that the fastening devices for the PRIMA EASY, PRIMA FIX, NUNO/
FOLK, BABY 0+ , SONO and the seat are correctly activated before use.
WARNING: This vehicle may not be used by more than two children at once.
- Put the parking brake on when getting the child in and out of the pushchair.
- Any load suspended from the handlebar, seat backrest or sides of the pushchair affects the stability of the vehicle.
- Do not use accessories or replacement parts that have not been approved by the manufacturer.
- The maximum weight that can be carried i the basket is 5kg
MAINTENANCE
- From time to time grease the mobile parts with a lubricating product (not grease or oil).
- Check the brakes, harness, clasps and mechanisms that may become loose or suffer wear and tear through use.
- Clean the chassis with a damp cloth (never use abrasive products or solvents). Use a sponge with warm water and a mild detergent on the plastic parts.
- Follow the washing instructions for the fabric parts of the pushchair, leave them to dry fully before folding the pushchair. Do the same if the pushchair has been exposed to damp conditions to prevent mould from forming.
- Do not use accessories that have not been approved by the manufacturer.
INSTRUCTIONS FOR USE
UNFOLDING (illustrations 1-5)
- Release the safety catch (Fig.1).
- Unlock the safety latch (Fig.2).
- Slide the buttons on both sides of the handlebar to release the opening mechanism (Fig.3).
- Unfold the chassis by pulling the handlebar upwards (Fig.4).
- The front wheels are released and automatically lock into place. Check they are correctly fastened.
- Make sure that the safety fastener is in the correct position. It clicks into place (Fig.5-6).
FITTING THE FRONT ADAPTORS (Illustration 7)
- Fit each adaptor into the corresponding slot, pressing them until they are both correctly inserted.
FITTING THE FRONT WHEELS (Illustration 8)
- Insert the axle of each wheel set into the slots of the chassis (A). When the axle has been inserted, press the lower button (B) and push until it clicks locked. Check that the two wheel sets are securely fastened into place.
LOCKING THE FRONT WHEELS (Illustration 9)
- To lock the swivel function of the front wheels, press the buttons between the two wheels downwards.
- To unlock the wheels, press the button upwards.
PARKING BRAKE FUNCTIONING (Illustration 10)
- To activate the brake press the button situated between the rear wheels.
- Raise the button to take the brake off.
WALKING BRAKE FUNCTIONING (Illustration 11)
- The walking brake lever is situated on the upper right-hand side of the handlebar.
- Press the lever to stop the pushchair and release it to continue moving.
FITTING AND REMOVING THE ARMRESTS ON THE SEAT (illustrations 12-14)
- Insert the ends of the armrests into the front slots on the seat (Fig.12-13).
- To remove the armrests (Fig.14), individually press both of the side buttons on the lower front part of the armrests (1) and pull (2).
FITTING THE SEAT (Illustrations 15-17)
- Put the parking brake on.
- Insert the connectors into the two front and rear side slots (Fig.15-16). Make sure that the green mark appears in the window to indicate it is correctly fastened (Fig.17). The child can now be placed in the seat.
WARNING: THE CHILD SHOULD NOT BE IN THE SEAT WHILE ANY CHANGES ARE MADE TO IT (CHANGING THE WAY IT FACES, FITTING OR REMOVING THE SEAT).
CHANGING THE WAY THE SEAT FACES (illustrations 18-21)
- Put the parking brake on.
- Press the side buttons on both sides of the seat. A red mark will appear in the window (Fig.18). Then pull the seat upwards (Fig.19).
- Install the seat in the required position (Fig.20) and make sure that the green mark appears in the window indicating it is correctly fastened (Fig.21). The child can now be placed in the seat.
ADJUSTING THE SAFETY HARNESS (illustrations 22-24)
- Put the parking brake on (Fig.22).
- Check that the safety harness is open before placing the child in the seat.
- Seat the child, adjusting the height of the chest straps and the abdominal belt of the harness (A) to fit the child (Fig.23).
- Fasten all the parts of the fastening clip: chest straps, abdominal belt and crotch strap (Fig.24).
ADJUSTING THE BACKREST (illustrations 25-27)
- The backrest has 2 reclining positions.
- Pull the lever situated on the back of the seat upwards (Fig.25), and place the backrest in the required position (Figs.26-27). Once the position has been chosen, release the lever on the back.
FOLDING THE S-TWINNER (illustrations 28-33)
- Remove the seats, the PRIMA EASY, PRIMA FIX, NUNO/FOLK, BABY 0+, SONO.
- Unlock the safety latch (Fig.28).
- Simultaneously lift the buttons on the handlebar (Fig.29) and pull the pushchair handle forwards (Fig.30).
- With the brake on, push the handlebar downwards until the pushchair is in the position shown (Fig.31).
- Make sure that the safety fastener is in place. It clicks when in the correct position (Fig.32).
- Close the safety catch (Fig.33).
RAIN COVER
WARNING: THIS RAIN COVER CAN NOT BE USED ON A PUSHCHAIR THAT IS NOT FITTED WITH A HOOD.
- Unfold the hood.
- Place the rain cover on the pushchair and fasten the zip to the hood, and fasten the Velcro strips to the chassis.
BASKET
- The basket fastens onto the lower part of the frame with clasps, to remove it simply undo the clasps.
- The maximum weight the basket can carry is 5kg .
- It is advisable to empty the basket before folding the pushchair up.
UNISYSTEM
This exclusive system of connectors means that the S-Twinner pushchair can be used with the following complements: Prima, Prima fix, Baby Zero Plus, Sono, Nuno/Folk. For both of them the procedure to attach them is the following:
- Put the parking brake on (Fig.34)
WARNING: WHILE USING THE PRIMA EASY, PRIMA FIX, NUNO/FOLK, BABY 0+ , SONO ON THE S-TWINNER, ALWAYS PLACE THE HANDLE IN THE CARRYING POSITION (Fig.35-36)
- Place the PRIMA EASY, PRIMA FIX, NUNO/FOLK, BABY 0+ , SONO on the pushchair, facing backwards
- Line the connectors of the PRIMA EASY, PRIMA FIX, NUNO/FOLK, BABY 0+, SONO up with the slots (Fig.37)
- Press downwards until it clicks into place and a green mark appears in each one of the windows on the sides of the connectors (Fig.38)
- To remove it, press and then release the red button on both connectors (a red mark will appear in the windows) and pull upwards to release it from the pushchair chassis (Fig.39)
FÉLICITATION AUX PARENTS
LERNEN SIE DEN S-TWINNER KENNEN
ATTENZIONE: Anything that is not a good idea to do in the house, such as a baby bath, should be avoided.
AZ S-TWINNER BEMUTATÁSA
ZAPOZNAJ SIE Z S-TWINNER
BCTPECHAUTE S-TWINNER!
1-OTdJIbHbIE CnDEHnC INHINBnDyalbHbIMKanIOWOHAMN
2-CbemHbIe NOJIOKOTHNKn Ha CnDEHnX
3-cbemHbIe KOleCa IJnJIerKOro nepeBnXeHnA
4-увелочьиобемнхкенКорзны
5-3aHnHe NaIyBhble KOleca
6-CTOHAOHbI TopMo3
7-TopMO3ДЛЯ OCTaHOBKN DBNIXEHN
BhImaTeIbHo npOHTaIe HNCTpyKcIIO nepei 3KcIpyaTaUnei n 3aONHnTe IJ npIMHeHnB 6yDyUeM.