Avant - Stroller CASUALPLAY - Free user manual and instructions
Find the device manual for free Avant CASUALPLAY in PDF.
User questions about Avant CASUALPLAY
0 question about this device. Answer the ones you know or ask your own.
Ask a new question about this device
Download the instructions for your Stroller in PDF format for free! Find your manual Avant - CASUALPLAY and take your electronic device back in hand. On this page are published all the documents necessary for the use of your device. Avant by CASUALPLAY.
USER MANUAL Avant CASUALPLAY
natural_image
Three-panel illustration showing a stroller, a car, and a vehicle chassis (no text or symbols)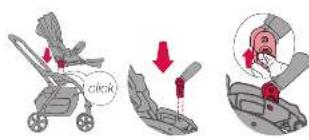
text_image
click8.9.10
GB: Keep up your receipt in order to exercise your right as a consumer.
cez voto tichot
b. In contrast, a method of using the standard error correction method is required to be used in the case
GCT Leasing, the area of the local and administrative district (the local district) to rural areas of the city.
CD. The complete system is the fault to make algorithmic to the object A process in the disaster for the world in the subhorizon.
P. adquacytis, a non- and/or anis, a non- and/or anis, a non- and/or anis, a non- and/or anis, a non- and/or anis, a non- and/or anis, a non- and/or anis, a non- and/or anis, a non- and/or anis, a non- and/or anis, a non- and/or anis, a non- and/or anis, a non- and/or anis, a
- 2009, a new report of the annual financial reports to account for the year ended December 31, 2009.
C2: Verbalan is a man in the Verbalan is a woman who has her own and his father of religion.
11.3. N-gas a bexa tja a pyct. 102, a sec. ta/2016 to last tlaay (e)isb24 e sec; 1022201801-1023
The following table is in Chinese:
text_image
Labeled diagram of a stroller with numbered parts for identificationtext_image
Labeled diagram of a stroller with numbered parts for identification
text_image
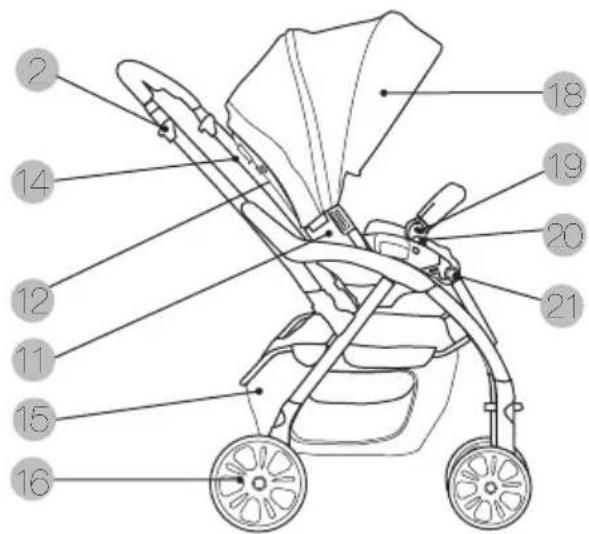
2 14 12 11 15 16 18 19 20 21Congratulations Parents!
CASUALPLAY would like to thank you for purchasing this pushchair.
This product has been designed, manufactured and approved under the strictest safest regulations. It has been designed to be easy to use, but we need your collaboration for optimal functioning results.
Please read these instructions carefully before using the pushchair for the The comfort and safety of your child depends on the correct use of this product. Please contact us if you have any type of query.
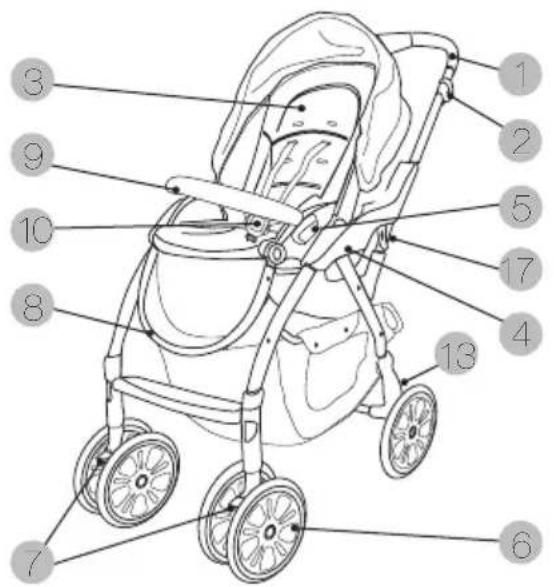
Meet the Avant
- Handlebar
- Safety catch
- Mattress pad
- Unisystem
- Seat release button
- Swivel wheels
- Front wheel lock
- Footrest
- Armrest
- Safety harness
- Reversible seat
-
Backrest
-
Parking brake
- Backrest adjuster
- Basket
- Rear wheels
- Locking device
- Hood
- Armrest adjustment button
- Armrest release button
- Footrest adjustment button
text_image
Labeled diagram of a stroller with numbered parts for identification
text_image
2 14 12 11 15 16 18 19 20 21Important - Keep these instructions for future reference
This vehicle is designed for children from 0 months and up to 15 kg.
WARNINGS AND SAFETY NOTES
WARNING Never leave your child unattended.
WARNING Ensure that all the locking devices are engaged before use.
WARNING To avoid injury ensure that your child is kept away when unfolding and folding this product.
WARNING Do not let your child play with this product.
WARNING Always use the restraint system.
WARNING Check that the pram body or seat unit c attachment devices are correctly engaged before use.
WARNING This product is not suitable for running or skating.
WARNING: Never lift the Avant up by holding the SONO, PRIMA, PRIMA FIX, NUNO/FOLK, BABY 0+, NEWMOON, METROPOL.
Lift it up by holding the chassis of the pushchair.
WARNING: Check that all the fastening devices of the PRIMA, PRIMA FIX, NUNO/FOLK, BABY 0+, NEWMOO
METROPOL and of the seat are correctly in place before using the product.
- For children under 6 months it is advisable to use the most reclined position.
- Put the parking brake on when getting the child in and out of the pushchair.
- Any load suspended from the handles, backrest of the seat or sides of the pushchair, affects the stability of the vehicle.
- This vehicle has been designed to be used by only one child at a time.
- Do not use accessories or replacement parts that have not been approved by the manufacturer.
User Instructions
IMPORTANT: The Avant comes with the wheels detached. Before unfolding the pushchair for the first time, fit the wheels.
Fitting the rear wheels (illustration 1)
- Fit the rear wheels by pressing the central button (a) and inserting the axle into the hole (b) of the rear wheel bearer (fig. 1). It will click when correctly in place. Check that the wheel is secure and turns freely.
Fitting the front wheels (illustration 2)
- Fit the wheel sets into the slots, pressing them upwards until they click into place.
Unfolding (illustrations 3–5)
- Release the locking device on the left bar of the chassis (fig. 3).
- Unfold the pushchair by pulling the handlebar (fig. 4) upwards in a swift movement (fig. 5). The devices will click when locked into place.
Parking brake functioning (illustrations 6–7)
- The parking brake is situated on the upper right hand side of the handlebar and is activated by pressing the lever downwards until you hear a click indicating that the brake is on the pushchair (fig. 6).
- To take the brake off, press the lower button and the brake will be released automatically (fig. 7).
Fitting the seat (Illustration 8)
- Put the parking brake on.
- Insert the connectors into the corresponding side slots (fig. 8). They will click into place. The child can now sit in the seat.
Fitting the armrest (illustrations 9–10)
- Insert the ends of the armrest into the front slots of the pushchair (fig. 9).
- To remove the armrest, press the buttons on the sides and pull the armrest upwards (fig. 10).
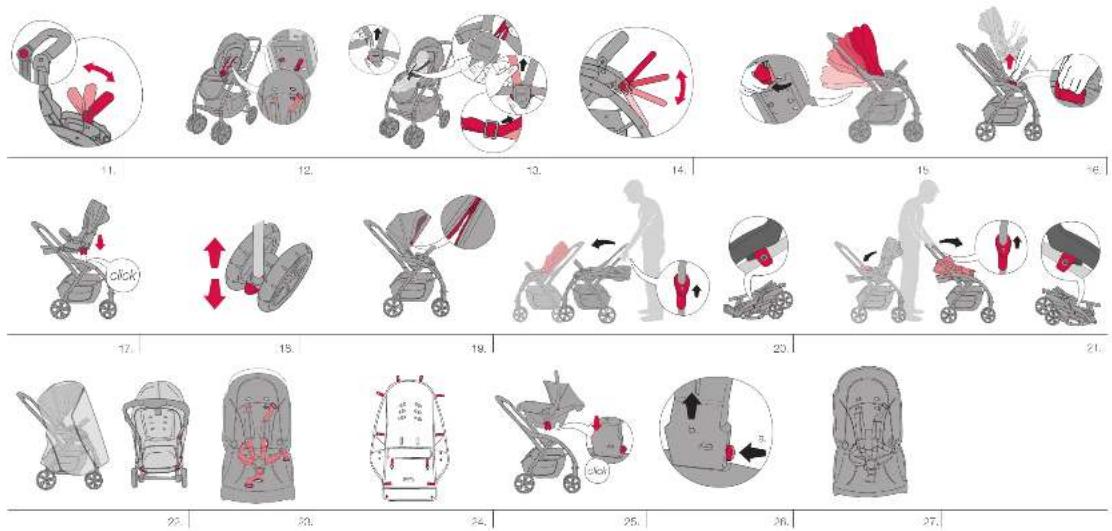
Adjusting the armrest (illustration 11)
- Press the side buttons on the inside of the armrest, and pull the armrest backwards or forwards to the required position (fig. 11).
- The armrest has a position while in use. It will click when correctly in place.
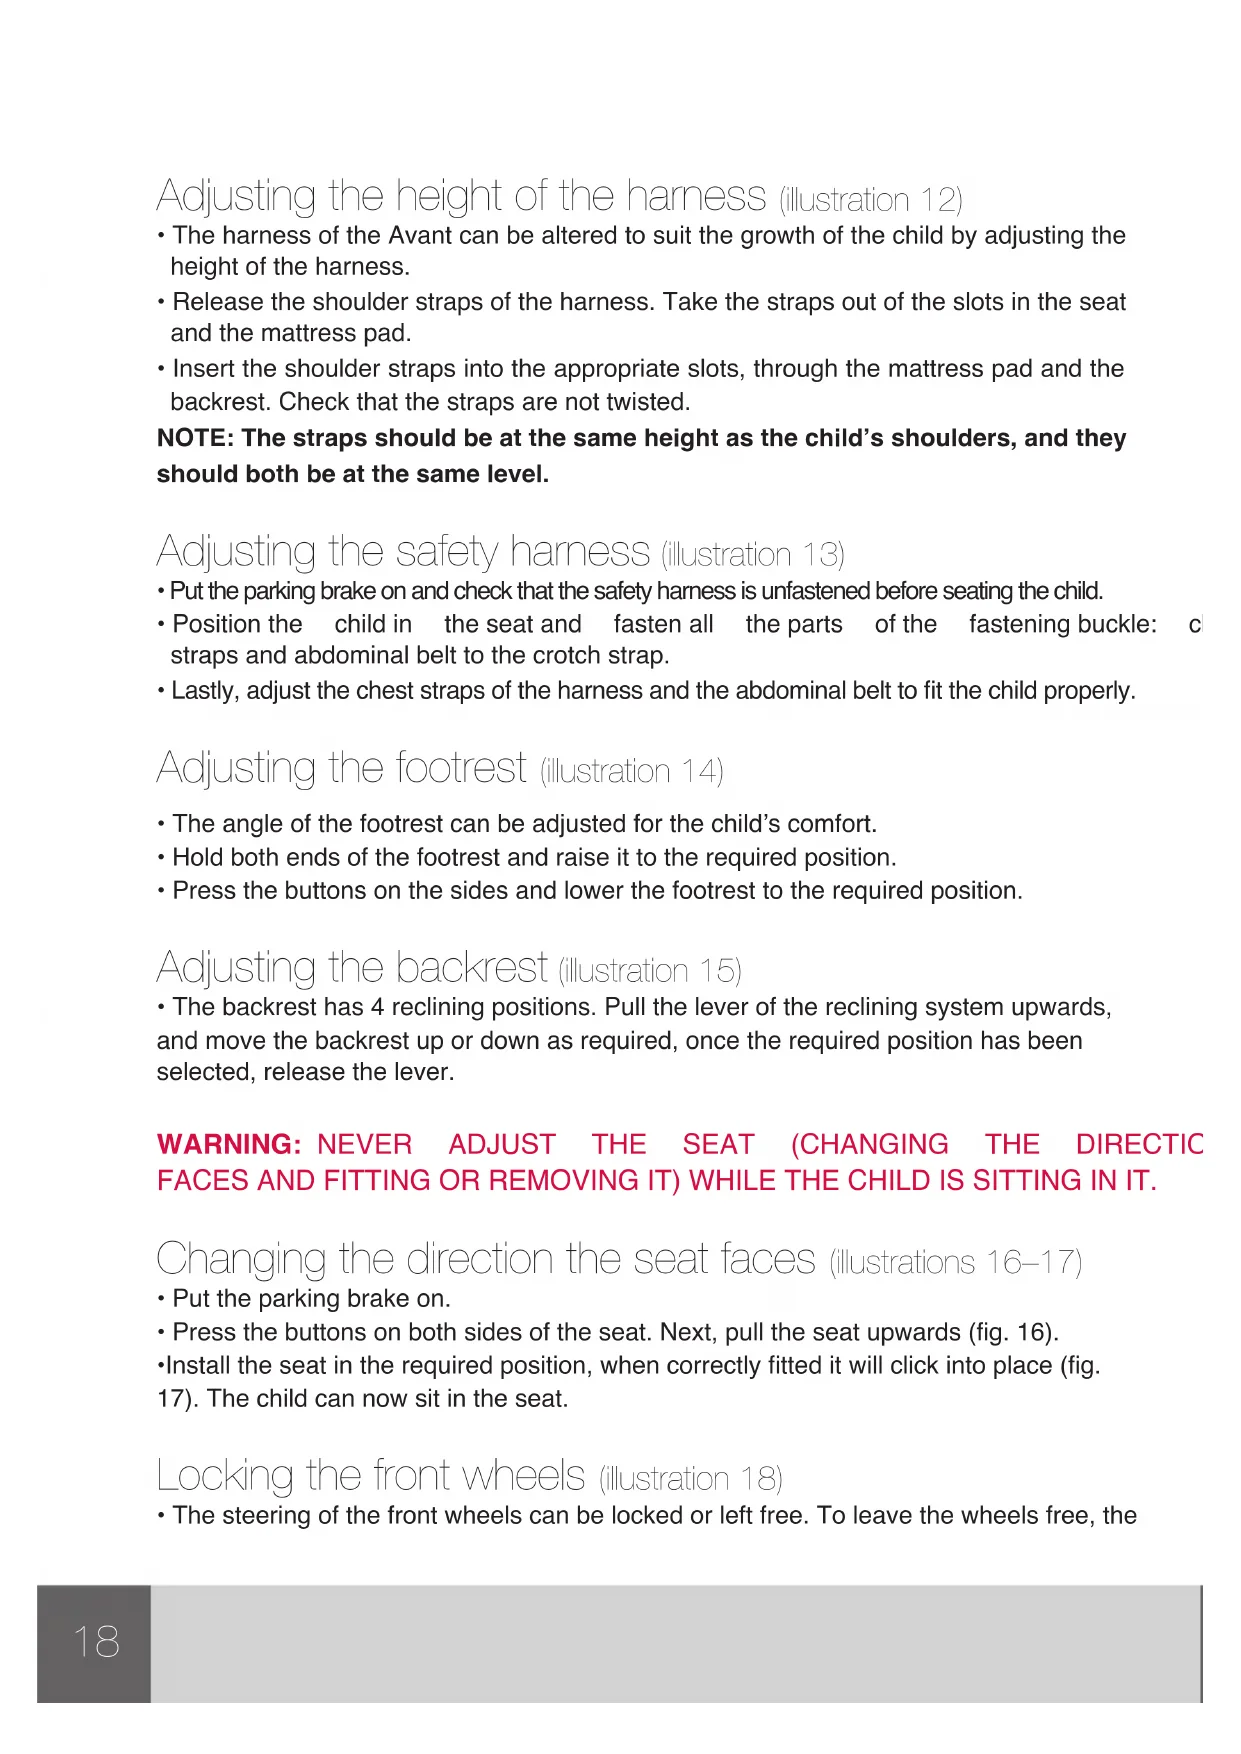
Adjusting the height of the harness (illustration 12)
- The harness of the Avant can be altered to suit the growth of the child by adjusting the height of the harness.
- Release the shoulder straps of the harness. Take the straps out of the slots in the seat and the mattress pad.
- Insert the shoulder straps into the appropriate slots, through the mattress pad and the backrest. Check that the straps are not twisted.
NOTE: The straps should be at the same height as the child's shoulders, and they should both be at the same level.
Adjusting the safety harness (illustration 13)
- Put the parking brake on and check that the safety harness is unfastened before seating the child.
- Position the child in the seat and fasten all the parts of the fastening buckle: c straps and abdominal belt to the crotch strap.
- Lastly, adjust the chest straps of the harness and the abdominal belt to fit the child properly.
Adjusting the footrest (illustration 14)
- The angle of the footrest can be adjusted for the child's comfort.
- Hold both ends of the footrest and raise it to the required position.
- Press the buttons on the sides and lower the footrest to the required position.
Adjusting the backrest (illustration 15)
- The backrest has 4 reclining positions. Pull the lever of the reclining system upwards, and move the backrest up or down as required, once the required position has been selected, release the lever.
WARNING: NEVER ADJUST THE SEAT (CHANGING THE DIRECTIC FACES AND FITTING OR REMOVING IT) WHILE THE CHILD IS SITTING IN IT.
Changing the direction the seat faces (illustrations 16–17)
- Put the parking brake on.
- Press the buttons on both sides of the seat. Next, pull the seat upwards (fig. 16).
- Install the seat in the required position, when correctly fitted it will click into place (fig. 17). The child can now sit in the seat.
Locking the front wheels (illustration 18)
- The steering of the front wheels can be locked or left free. To leave the wheels free, the
levers on both sides should be set to the upper position. To lock them in place, press the levers downwards, they will click when locked into place.
Hood (illustration 19)
- The hood is fastened to the seat, only the upholstery may be taken off to be washed. Follow the washing instructions printed on the care label of the hood.
- Unfasten the zip on the front part of the hood, undo the Velcro and clips on the sides (fig. 19).
- Unfasten the Velcro on the back of the pushchair backrest.
- To fit the upholstery back on follow the same steps in reverse.
Folding (illustrations 20–21)
NOTE: The Avant can be folded with or without the seat in place.
WARNING: The Avant cannot be folded with the complements (sono, prima, prima fix, nuno/folk, baby 0+, newmoon, metropol).
Folding with the seat facing forwards (illustration 20)
- Fold the hood and place the backrest in the horizontal position
- Slide the two catches on the sides of the handlebar.
- Push the handlebar forwards.
- Fold the chassis fully and check that the locking device (coloured red) has secured the chassis to prevent it from opening accidentally.
Folding in the reverse position, with the seat facing backwards (illustration 21)
- Fold the hood.
- Move the armrest forwards, and place the seat backrest in the folding position.
- Slide the two catches on the sides of the handlebar.
- Push the handlebar forwards.
- Fold the chassis fully and check that the locking device (coloured red) has secured the chassis to prevent it from opening accidentally.
Fitting the rain cover (illustration 22)
NOTICE: THIS RAIN COVER SHALL NOT BE USED ON A PUSHCHAIR NOT FITTED WITH A CANOPY TO INSTALL IT.
- Unfold the hood.
- Place the rain cover on top of the Avant, take care when fitting the rain cover to make sure that the openings are at the back of the pushchair.
- Pass the handlebar through the openings and fasten the Velcro strips.
- Lastly, fasten the two Velcro strips to the basket.
Fitting/removing the harness (illustration 23)
• Pass the buckles of the harness through the vents in the seat and the mattress pad.
NOTE: take care when fitting the harness to make sure that the straps are not twisted.
- For the harness to be fitted, position the harness on the seat of the Avant, so that the buckle is facing upwards.
- Insert the crotch strap through the mnattress pad and the seat.
- Do the same with the two abdominal straps and the two chest straps.
- The chest straps can be placed in 3 different positions, depending on the child's height. The chest straps should be positioned at the height of the child's shoulders and both straps should be at the same level.
- Fit the chest pads.
Removing/fitting the mattress pad (illustration 24)
- Unfasten the 6 press studs on the back of the backrest.
- Then unfasten the 4 side studs and the 4 studs underneath the seat.
- Lastly, pass the harness buckles through the openings in the seat and the mattress pad.
- To fit the mattress pad follow the same steps in reverse, fitting the harness last.
NOTE: take care when fitting the harness to make sure that the straps are not twisted.
Unisystem (Illustrations 25–26)
- This exclusive fastening system means that the following complements can be used on the Avant pushchair: sono, prima, prima fix, nuno/folk, baby 0+, newmoon, metropol.
• The procedure for fitting all of them is the following: - Put the parking brake on.
- Place the sono, prima, prima fix, nuno/folk, baby 0+, newmoon, metropol on the pushchair, facing backwards.
NOTE: THE HANDLE OF THE BABY ZERO PLUS SHOULD BE SET TO THE CARRYING POSITION WHEN IT IS USED WITH THE AVANT.
- Line the fasteners of the sono, prima, prima fix, nuno/folk, baby 0+, newmoon, metropol up with the slots.
- Press downwards until it clicks into place (fig. 25).
- To remove it, press and then release the red button on both fasteners and pull upwards to release it from the chassis of the pushchair (fig. 26).
NOTE: THE AVANT CAN BE FOLDED WITHOUT THE SEAT OR WITH THE SEAT FACING FORWARDS OR BACKWARDS. IT CAN NOT BE FOLDED WITH THE COMPLEMENTS.
Fitting the muff (illustration 27)
NOTE: The muff is a complement that is sold separately.
- Remove the chest pads.
• Pass the buckles of the harness through the vents in the seat and the mattress pad.
NOTE: take care when fitting the harness to make sure that the straps are not twisted.
- Unfasten the safety harness. Place the muff on the seat and insert all the parts of the harness through the corresponding vents.
- Fasten all the parts of the buckle, and fit the chest pads.
Basket
- The basket is clipped onto the bottom part of the chassis, to take it off simply unfasten the clips and remove it.
- The maximum weight that can be carried in the basket is 2.5 kg.
- It is advisable to empty the basket before folding the pushchair.
Maintenance
- Periodically grease the mobile parts with a lubricating product (not grease or oil).
- Check the brakes, harness, clips and mechanisms that can become loose or worn out through use.
- Clean the chassis with a damp cloth (never use abrasive products or solvents). Use a sponge with warm water and mild detergent on the plastic parts.
- Follow the washing instructions for the fabric parts of the pushchair, let them dry fully before folding. Do the same if the pushchair has been exposed to damp conditions to prevent mould from forming.
- Do not use accessories that have not been approved by the manufacturer.
Félicitation aux parents
text_image
Labeled diagram of a stroller with numbered parts for identification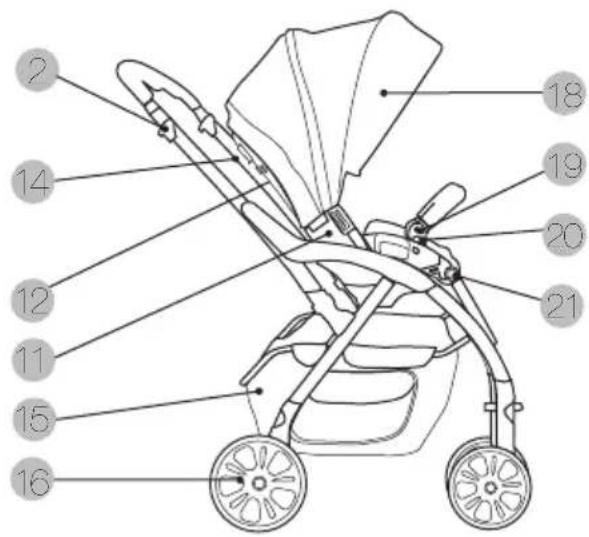
text_image
Labeled diagram of a stroller with numbered parts for identificationtext_image
Labeled diagram of a stroller with numbered parts for identificationtext_image
Labeled diagram of a stroller with numbered parts for identification
text_image
Labeled diagram of a stroller with numbered parts for identificationIMPORTANTE - CONSERVAR PARA FUTURAS REFERÊNCIAS
text_image
Labeled diagram of a stroller with numbered parts for identification
text_image
2 14 12 11 15 16 18 19 20 21text_image
Labeled diagram of a stroller with numbered parts for identification
text_image
2 14 12 11 15 16 18 19 20 21DŮLEŽITÉ – USCHOVAT PRO POZDĚJŠÍ NAHLÉDNUTÍ
text_image
Labeled diagram of a stroller with numbered parts for identification
text_image
2 14 12 11 15 16 18 19 20 21FONTOS – ÓRIZZE MEG KÉSŐBBI TÁJÉKOZÓDÁS CÉLJÁBÓL
text_image
Labeled diagram of a stroller with numbered parts for identification- Brzda
- Nastavenie operadla
- Košík
- Zadné kolieska
- Zatvárací mechanizmus
- Strieška
- Tlačidlo na nastavenie opierky na ruky
- Tlačidlo na uvol'nenie opierky na ruky
- Tlačidlo na nastavenie opierky na nohy

text_image
2 14 12 11 15 16 18 19 20 21DôLEŽITÉ -- ODLOŽIŤ PRE PRÍPAD POUŽITIA V BUDÚCNOSTI
text_image
Labeled diagram of a stroller with numbered parts for identification