Livi - Stroller CASUALPLAY - Free user manual and instructions
Find the device manual for free Livi CASUALPLAY in PDF.

Frequently Asked Questions - Livi CASUALPLAY
User questions about Livi CASUALPLAY
0 question about this device. Answer the ones you know or ask your own.
Ask a new question about this device
Download the instructions for your Stroller in PDF format for free! Find your manual Livi - CASUALPLAY and take your electronic device back in hand. On this page are published all the documents necessary for the use of your device. Livi by CASUALPLAY.
USER MANUAL Livi CASUALPLAY
Congratulations parents!
CASUALPLAY would like to thank you for purchasing this pushchair.
This product has been designed, manufactured and approved under the strictest safest regulations. It has been designed to be easy to use, but we need your collaboration for optimal functioning results.
Please read these instructions carefully before using the pushchair for the first time. The comfort and safety of your child depends on the correct use of this product.
Please contact us if you have any type of query.
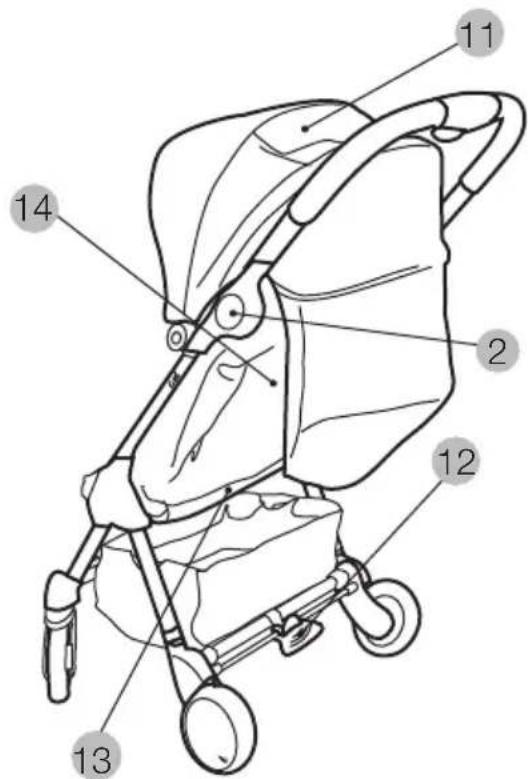
Meet the Livi
- Folding button
- Safety button
- Locking device
- Basket
- Leg rest
- Swivel front wheels
-
Front wheel lock
-
Footrest
-
Harness
-
Adjustable backrest
11.Hood - Parking brake
- Folding/carrying handle
- Backrest adjuster

IMPORTANT - KEEP THESE INSTRUCTIONS FOR FUTURE REFERENCE
This vehicle is designed for children from 0 months and up to 15kg .
WARNING Never leave your child unattended.
WARNING Ensure that all the locking devices are engaged before use.
WARNING To avoid injury ensure that your child is kept away when unfolding and folding this product.
WARNING Do not let your child play with this product.
WARNING Always use the restraint system.
WARNING Check that the pram body or seat unit or car seat attachment devices are correctly engaged before use.
WARNING This product is not suitable for running or skating.
- For children under 6 months it is advisable to use the most reclined position.
- Put the parking brake on when getting the child in and out of the pushchair.
- Any load suspended from the handles, backrest of the seat or sides of the pushchair, affects the stability of the vehicle.
- This vehicle has been designed to be used by only one child at a time.
- Do not use accessories or replacement parts that have not been approved by the manufacturer.
NOTE: The Livi cot carrycot is compatible with the Livi pushchair. To fit and use this combination, follow the instructions included with the Livi cot carrycot.
User Instructions Unfolding (illustrations 1 - 4)
- Release the locking device situated on the left-hand bar of the chassis (fig. 1).
- Unfold the pushchair by pulling the handlebar upwards in a swift movement (fig. 2, 3 and 4).
Fitting the hood (illustration 5)
- Fit the hood by pressing the clips on both ends into the slots on the sides of the pushchair (fig. 5). They will click when correctly fastened into place. To remove the hood, press the tab upwards and pull forwards.
Folding (illustrations 6-11)
- Fold the hood forwards (fig.6).
- Hold the folding button on the handlebar down (a), and at the same time, press the side button (b) (fig.7). Push the handlebar downwards (fig.8).
- Fold the chassis to the position shown in figure 9.
- Press the folding handle and pull upwards (fig.10).
- Fasten the locking device to prevent the pushchair from coming open accidentally (fig.11).
Parking brake functioning (illustration 12)
- To put the brake on press the pedal between the rear wheels downwards.
- To release the brake, pull the pedal upwards.
Adjusting the safety harness (illustrations 13-14)
- The harness has a chest section (3 positions) and an abdominal section (2 positions), both of these sections need to be adjusted to fit the child properly.
- For the chest section, pass the harness buckles through the vents in the seat and the upholstery (fig.13).
- Choose the position to fit the child, bearing in mind that both straps should be at the same level.
- Insert the buckles through the slots, making sure the harness straps are not twisted.
NOTE: Access the buckles through the opening in the upholstery, found on the top rear part of the backrest.
NOTE: For children under 6 months, place the harness and the seat backrest in the lowest position.
- For the abdominal section, follow the same steps as for the chest section.
- Put the parking brake on and make sure the safety harness is open before seating the child in the pushchair.
- Place the child in the pushchair and fasten all the parts of the fastening clasp: chest straps and abdominal belt to the crotch strap (fig. 14).
- Lastly, adjust the harness chest straps and the abdominal belt to fit the child correctly.
Adjusting the backrest (illustration 15)
- To raise the backrest, press the cam of the fastening clip situated in the middle of the rear part of the backrest, pulling the strap at the same time. (fig. 15).
- To lower the backrest, press the cam of the fastening clip, and at the same time press the backrest to the required position.
Locking the front wheels (illustration 16)
- The front wheels can be used locked into place or left free. To leave the wheels free the levers on both sides should be in the upper position.
- To lock the wheels, turn the wheels so they coincide with the grooves and move the levers downwards. They will click when correctly locked into place.
Leg rest (illustrations 17-18)
- Lift the leg rest (1) and pull the support out found on the seat (2). It will click when correctly fastened (fig.17).
- Put the leg rest down on top of the support (fig.18).
- Follow the same steps in reverse to put the support away.
Fitting and removing the upholstery (ilustr. 19-23)
Take the hood off.
- Unfasten the two top hooks, one on each side of the chassis (fig.19).
- Pull the sides of the upholstery, and unfasten the two Velcro straps that secure the upholstery to the chassis (fig.20). Pass the clips through the side slots of the chassis (fig.21).
- Next, unfasten the two straps that secure the upholstery to the seat, first unfastening the press studs on the straps found under the seat (fig.22).
- Lastly unfasten the three press studs found under the seat (fig.23), open and pass the crotch strap buckle through the hole in the upholstery.
- Follow the same steps in reverse to put the upholstery back on again.
Fitting the rain cover (illustration 24)
- The rain cover is fitted onto the pushchair with the hood open.
- Then fasten the two Velcro strips of the rain cover to the sides of the chassis.
- Lastly, fasten the Velcro strip situated on the lower front part of the rain cover.
Fitting/removing the adaptors
NOTE: the adaptors can only be used in combination with one of the following complements: Sono, Baby 0+ or Nuno/Folk.
WARNING: the adaptors only have one fitting position, do not try to force them.
- Put the parking brake on the LIVI.
- Place the adaptor on the side of the LIVI chassis, lining the adaptor up with the anchor point.
- Slide the adaptor (fig.25) until you hear it click confirming that it is correctly installed (fig.26).
- Repeat the same steps to fit the other adaptor.
- To remove the adaptors, first press the button upwards and then slide it towards the top part of the chassis (fig.27).
- Do the same with the other adaptor.
Unisystem
This exclusive anchoring system means that the following complements can be used on the LIVI pushchair: SONO, BABY 0+ or NUNO/FOLK.
NOTE: The SONO, BABY 0+ or NUNO/FOLK complements can all be fitted with or without the LIVI upholstery. If you don't want to remove the upholstery, place the backrest of the LIVI seat in its lowest position.
WARNING: before installing any complement, you should fit the adaptors onto the LIVI and make sure that they are correctly fastened.
- Put the parking brake on the LIVI.
-
Place the SONO, BABY 0+ or NUNO/FOLK on the pushchair, facing backwards.
-
Line the anchors of the SONO, BABY 0+ or NUNO/FOLK up with the slots of the LIVI adaptors (fig.28).
- Press downwards until you hear it click into place, and a green signal appears in each of the side windows of the anchors (fig.29).
WARNING: Check that the fastening devices are correctly engaged before using the product.
- To remove the SONO, BABY 0+ or NUNO/FOLK press and then release the red button on both anchors. A red signal will appear in each of the side windows (fig.30).
- Next, pull upwards to release it from the pushchair chassis.
Basket
- The basket is clipped onto the lower part of the chassis, to remove the basket simply undo the clips and take it off.
- The maximum weight the basket can hold is 2.5kg .
- It is advisable to empty the basket before folding the pushchair.
Maintenance
- Regularly grease the mobile parts with a lubricating product (not grease or oil).
- Inspect the brakes, harness, clips and mechanisms that may become loose or suffer from wear and tear over time.
- Clean the chassis with a damp cloth (never use abrasive products or solvents).
- Use a sponge with warm water and a mild detergent on the plastic parts.
- Following the washing instructions for the textile parts of the pushchair, leave them to dry fully before folding the pushchair. Do the same if the pushchair has been exposed to damp conditions to prevent mould from forming.
- Do not use accessories that have not been approved by the manufacturer.