 — Stroller — Mode d'emploi PDF")
Quadro (2012) - Stroller Teutonia - Free user manual and instructions
Find the device manual for free Quadro (2012) Teutonia in PDF.
| Product type | Stroller |
| Brand | Teutonia |
| Model | Quadro (2012) |
| Category | Sport stroller |
| Recommended age | From birth to approximately 3 years |
| Maximum child weight | 15 kg |
| Harness type | 5-point, height adjustable (3 positions) |
| Backrest recline positions | 4 (reclined, upright, and fully forward) |
| Footrest positions | 3 |
| Reversible seat | Yes |
| Height-adjustable and swivel handle | Yes |
| Swivel wheels with lock | Yes |
| Parking brake | Yes, with adjustment |
| Removable canopy | Yes, with ventilation via zipper |
| Rain cover | Included |
| Storage basket (max load) | 5 kg |
| Operating temperature | -20°C to +60°C |
| Fabric parts care | Machine washable at 30°C, delicate cycle, without bleach |
| Metal parts care | Clean every 4 weeks and lubricate |
| Spare parts and repairability | Available from authorized Teutonia dealer |
Frequently Asked Questions - Quadro (2012) Teutonia
User questions about Quadro (2012) Teutonia
0 question about this device. Answer the ones you know or ask your own.
Ask a new question about this device
Download the instructions for your Stroller in PDF format for free! Find your manual Quadro (2012) - Teutonia and take your electronic device back in hand. On this page are published all the documents necessary for the use of your device. Quadro (2012) by Teutonia.
USER MANUAL Quadro (2012) Teutonia
First class for little ones
Bedienungsanleitung
operating instructions
mode d'emploi
käyttoohje
brunksanvisning
gebruiksaanwijzing
brugsanvisning
brunksanvisning
teutonia products combine traditional workmanship and technical innovations with fashionable design. teutonia stands for quality that meets most stringent requirements. The teutonia logo with the rainbow is your guarantee that this is a genuine teutonia model. Read the instructions carefully before use (especially our safety notes) and keep them handy for future reference. Your child's safety may be affected if you do not follow these instructions. Instructions on what to do in the event of a complaint are given starting on page 81.
We are convinced that by selecting this product you have made a good choice and your child will be safe in a teutonia stroller/pram. Please contact your dealer should you nevertheless have reason for complaint.
Your teutonia team
General
The product has been tested in a temperature range of -20^ to +60^ (-4 F to +140 F). Besides the many positive properties of our materials such as air permeability, etc., many fabrics are very sensitive to intensive solar radiation. Past experience has shown us that the rays of the sun are now so aggressive that we at teu tonia have to recommend that you park the pram in the shade. Avoid exposing it to direct sunlight, and the fresh colours on your buggy will be preserved for longer. Colours may vary. No complaints may be made in this regard. Please note that improper handling, possible water rings, or differences in colour (as described above) do not justify a complaint. Regular care of all metal parts, particularly the chrome parts and especially after trips to the sea, is necessary on the pram to maintain a quality appearance. Commercially available treatment products are sufficient for this. The axles must be cleaned and lightly oiled approximately every 4 weeks.
General Safety Notes
! ATTENTION:
You are responsible for the safety of your child. Not complying with these notes may put the safety of your child at risk. Nevertheless, all possibly occurring conditions and unforeseeable situations cannot be covered. Common sense, caution and vigilance are factors this product cannot provide; they are taken for granted in persons using the stroller/pram. The person using the stroller/pram and its appropriate accessories should understand all instructions. You should explain the operation of the stroller/pram to all persons using it and its appropriate accessories. Consult an authorised teutonia dealer if any of the instructions are incomprehensible and more detailed explanations are required, or if you have further queries.
- WARNING: Never leave your child unattended
- WARNING: Always use the restraint system.
- WARNING: Ensure that all the locking devices are engaged before use
- WARNING: To avoid injury ensure that your child is kept away when unfolding and folding this product
- WARNING: Do not let your child play with this product
- WARNING: Check that the pram body or seat unit attachment devices are correctly engaged before use
- WARNING: This product is not suitable for running and skating
- WARNING: Any load attached to the handle affects the stability of the stroller/pram.
Additional important safety notes
- We point out explicitly that the use of accessories or spare parts not made or approved by teutonia may compromise the safety of this product and will void all warrantyclaims.
- This pram is intended for only one child.
-
The seat or the carry-cot may not be used in the car.
-
The pushchair seat is designed for a child up to 15 kg.
- Carry-cots, prams and sports buggies may be used only for transport and are not a substitute for a cot or a cradle.
Always park the stroller/pram out of the reach of children and do not allow children to play in or with the stroller/pram. - Please never park the stroller/pram without first applying the brakes. Make sure that the brakes have locked properly.
- The brakes should always be applied when you sit or lift your child in and out of the stroller/pram.
- Always avoid parking on slopes.
- When using public transport take special care to ensure the stroller/pram stands firmly and safely.
- Wheel the stroller/pram slowly and gently up and down steps.
- Never place objects on the folding top.
- The shopping net can be loaded to a maximum of 5 kg (11 lbs). Please always place heavy objects in the centre of the shoppingbasket.
- When unfolding and folding the chassis makes sure that you do not pinch yourself or others.
- Make sure that no locks disengage while carrying the stroller/pram over obstacles (e.g. steps).
- When adjusting the stroller/pram make sure that your child is clear of moveable parts.
- The stroller/pram can be damaged or destroyed by overloading, improper folding or use of unapproved accessories.
- The foot rest is not suitable for transporting heavy loads or a second child.
- Before using the stroller/pram for the first time: please remove the labels or tags that DO NOT refer to safety instructions or notes.
- Never use the foot rest or the safety bar to lift or carry the stroller/pram.
Parking the pram/buggy
Attention: Under certain circumstances, the wheels may cause discolouration of floor surfaces.
Foreign bodies (e.g. little stones) in the wheels must be removed to prevent any potential damage to floor surfaces. Extreme heat, in particular direct contact with hot surfaces (e.g. in the car in summer) can lead to permanent deformations on hollow cavity tyres.
Related complaints or claims for compensation will not be recognized.
Cleaning the textile parts
To remove small stains, use a cloth dampened with clear water and carefully clean the spot. Avoid brisk rubbing (especially on dark fabrics). Normally, all removable fabric parts can be washed in the washing machine with a fine fabric detergent (no brightening agents) at 30^ / 85^ (gentle cycle). Please check separate care labels on the fabric parts.
Rain Cover
In rainy weather fit the rain cover over the entire stroller/pram before it starts to rain.
Caution: The rain cover is not a toy! Never leave your child unsupervised. For the best possible ventilation of the stroller/pram we recommend using the rain cover only for the duration of the rain shower.
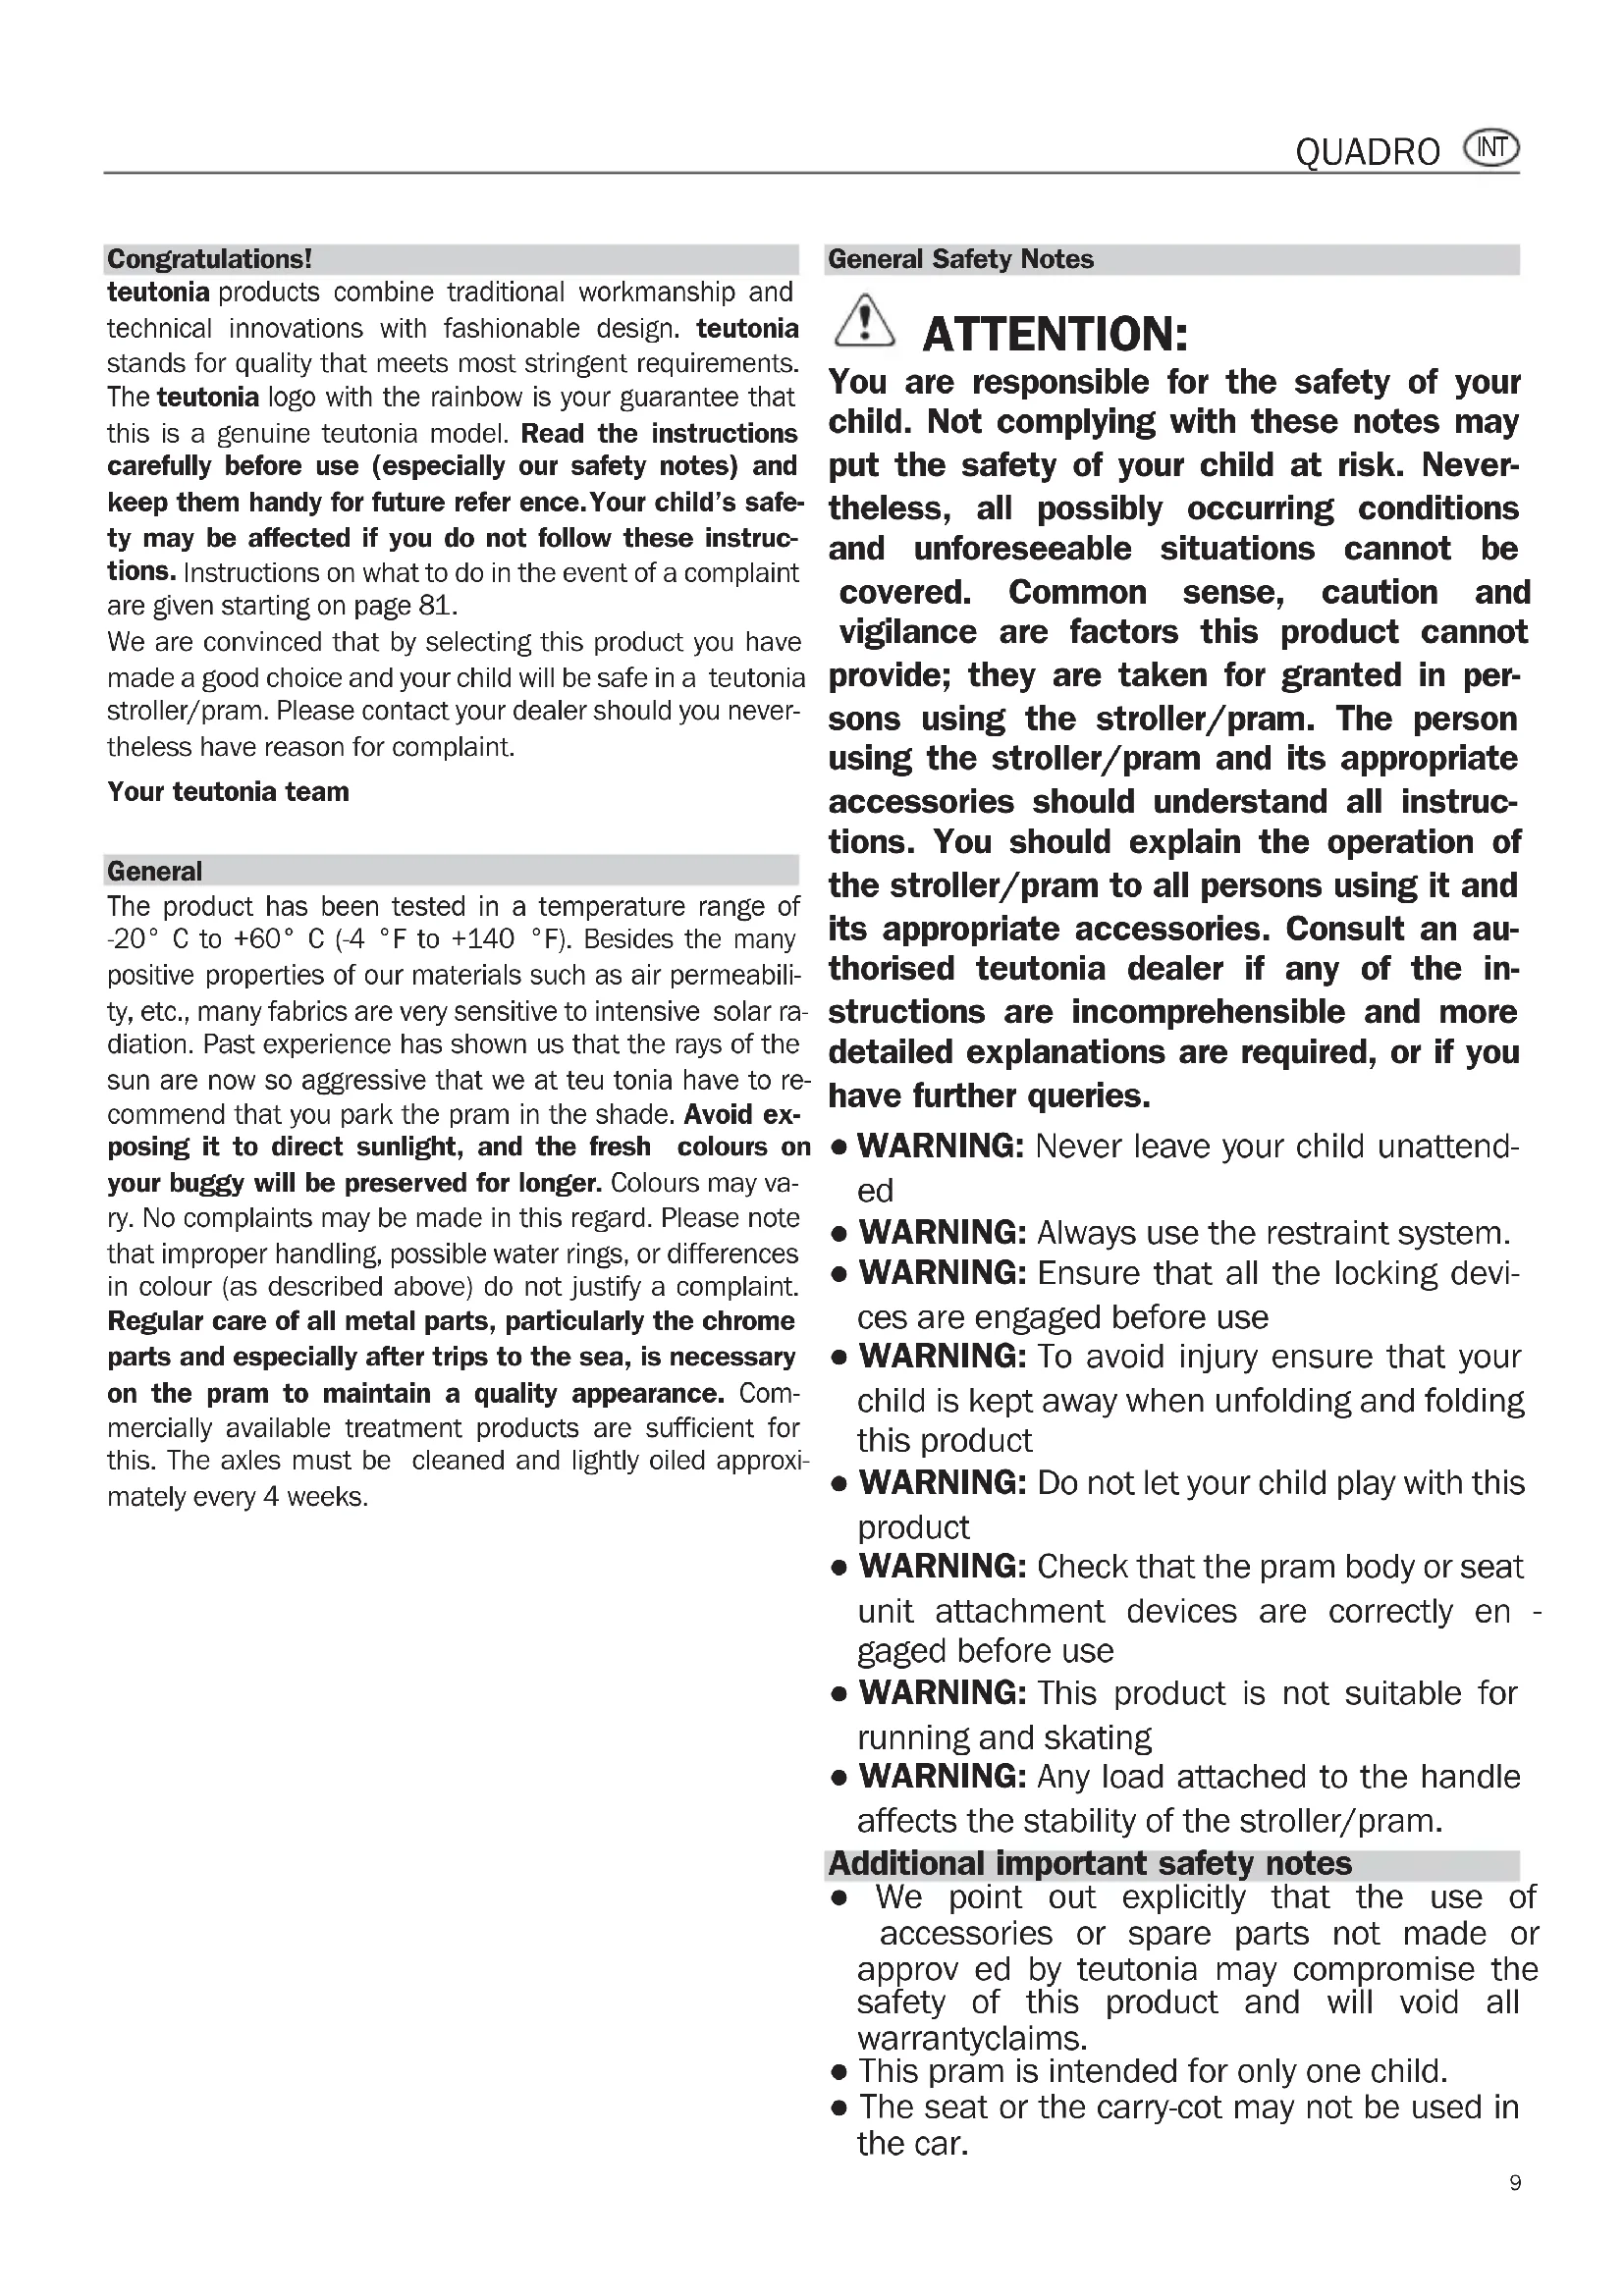
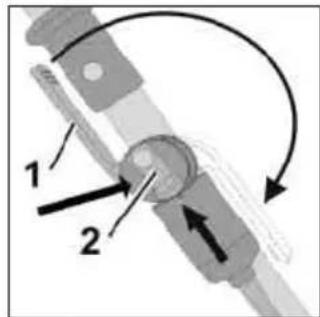
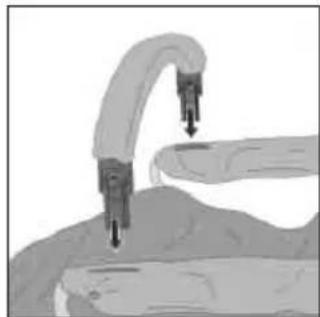
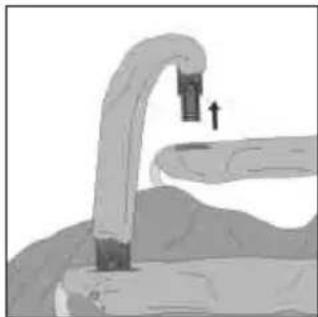
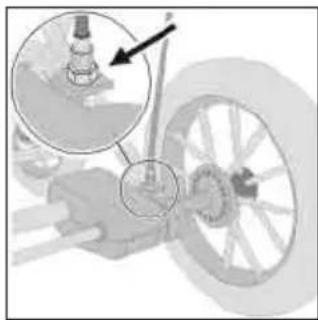
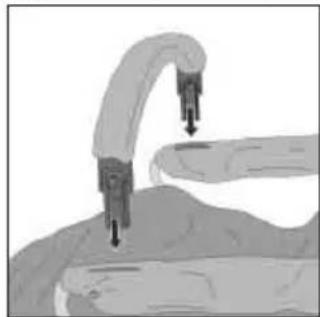
Removing the hood cover
Both hood bars must be removed from the cover before washing. (See illustration)
Loosen the screw using a screw driver and remove the press stud. Now pull the cover bar out of the joint and out of the hood cover. After washing, reassemble in reverse order.
When doing this, make sure you are mixed into both stitched guides. They do not be mixed up.
Unfolding the Chassis

Pull up the folding handle 1 (hand grip) till it locks in one sharp movement so that both handle ends 2 fully engage in the left and the right lock.
WARNING: Ensure that all the locking devices are engaged before use.
Folding the Chassis
Pivot the folding handle to the side with the locking rods. Now pull the two unlocking rods on both sides 1 up-wardsand press the slide forwards. The chassis is folded up to the arrester 2, which prevents inadvertent folding. The chassis does not fully fold unless the foot step 3 on the
right-hand side of the stroller has been pushed. You can reduce the storage size further by folding down the top of the handle.
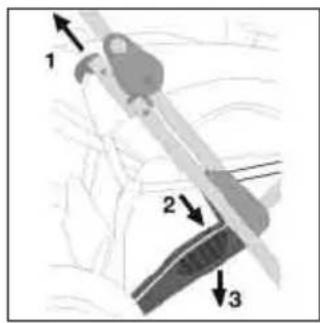
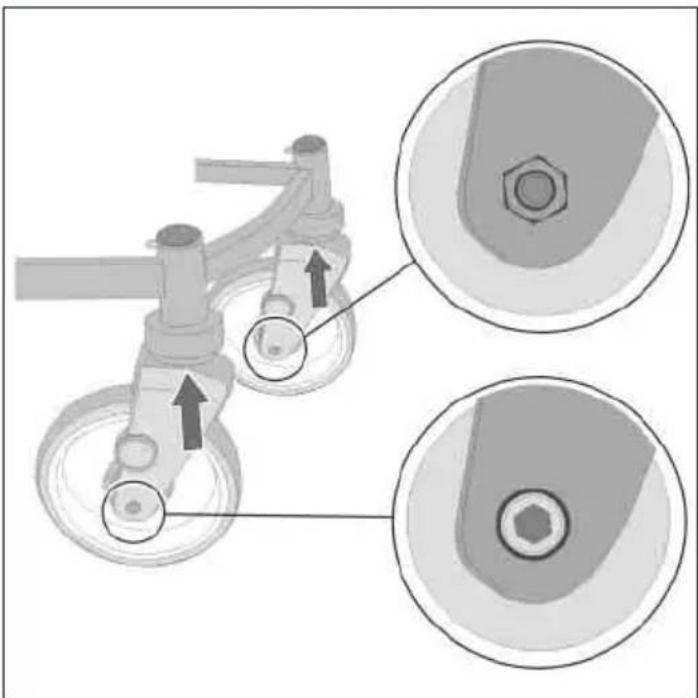
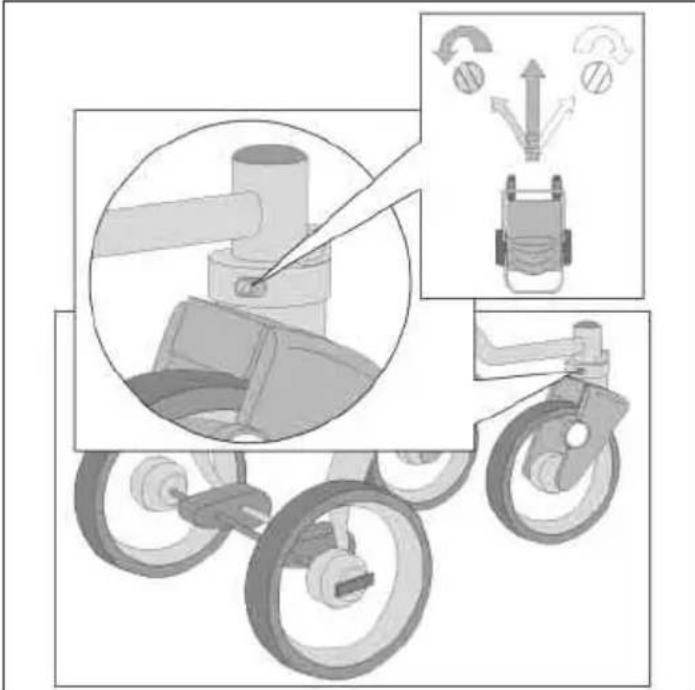
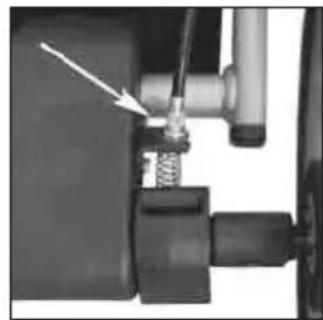
Assembling and removing the wheels

Before assembling or removing the wheels, press the locking spring 1. When assembling the wheels, make sure that the locking spring engages properly.
Removing the swivel wheel
Assembling the wheels

Swivel wheel
Swivel wheel unlocked Swivel wheel locked
We recommend that you do not lock the wheels while moving as this will give a more comfortable ride.
Seat cover
The seat cover can be removed completely from the seat unit for washing. Simply open the snaps on the seat unit. The seat and lying area is designed for use on both sides, once the hood cover has been removed. Open the side zips, pull the cover from the head part and the crotch strap to the other side; reattach the middle part to the lateral parts.
Attention: When mounting the seat cover, thread the ends of the 5-point restraint back through the relevant openings without twisting the straps.

Height-Adjustable, Foldable Handle
To change the height of the handle, press in the adjusting buttons on both sides of the handle.
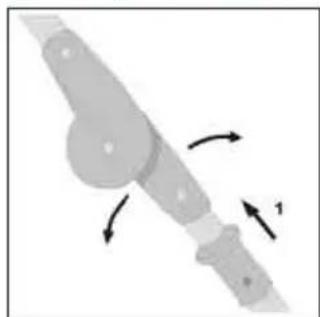
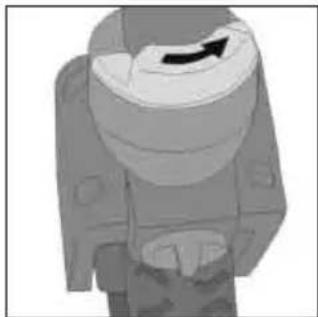
Swivelling the Foldable Handle
In order to tilt the slide, simultaneously pull the two sockets 1 on the slide upwards and then start tilting. Make sure that the slide locks again in the two main clasps on the left and right and that it is not stuck.
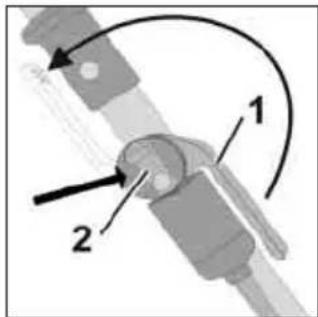
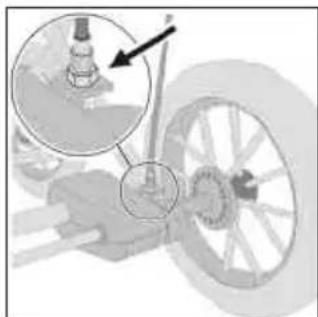
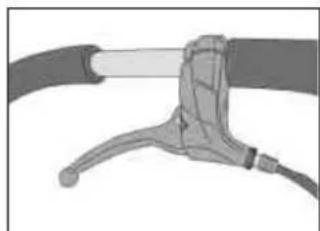
Parking brake
Applying the parking brake (Fig.1)
Move brake lever 1 in the direction of the arrow until the safety lever 2 audibly clicks into place; the parking brake is on. Releasing the parking brake (Fig.2)
Press the safety lever 2 and move brake lever 1 in the direction of the arrow as far as it will go; the parking brake is released.
Tip: If the parking brake cannot be operated easily, push the pram a few centimetres forwards or backwards so that the brake rods grip the rims correctly. Each time you apply the brake, make sure that the brake has locked completely and that the pram is standing securely.
Supplement to the parking brake

If you should notice a change to the braking action, loosen the lock nut first in order to be able to implement settings on the adjusting screw (unscrew). Then re-attach the lock nut.
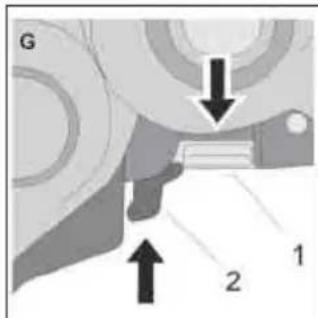
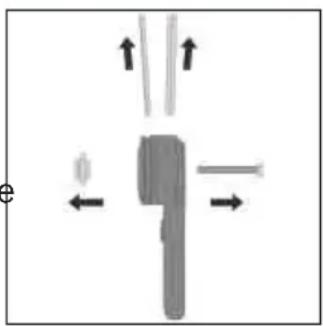
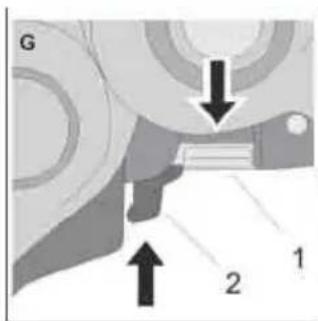
Removing the body
Secure the pushchair against accidental rolling.
On both sides of the body brace:
Push and hold the safety lever (2) upwards (arrow direction).
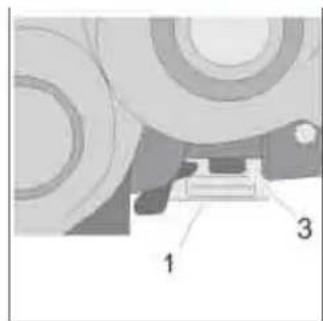
Depress the arrester (1) until it locks into place; the red marking (3) becomes visible. Lift off the body.

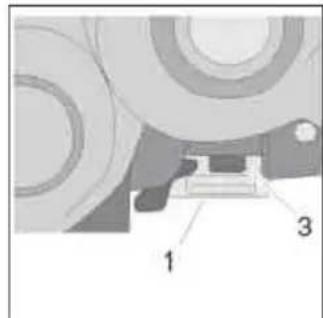
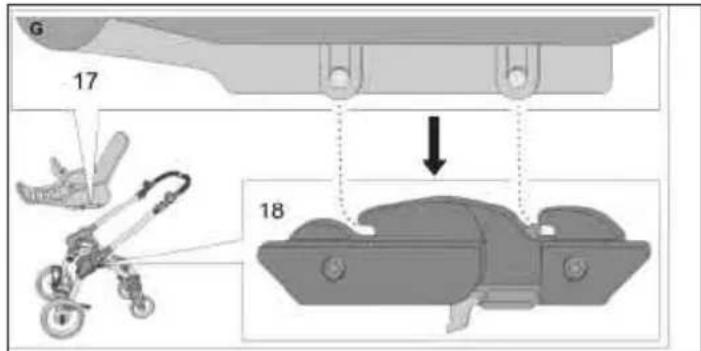
Attaching the body
Secure the pushchair against accidental rolling.
On both sides of the body brace:
Set down the body (17) evenly onto the two body braces (18) until it audibly locks into place. The body is securely locked in if the red marking (3) is not visible.
WARNING:
Check that the pram body or seat unit attachment devices are correctly engaged before use.
How to use the hood
Push the insert pieces for the hood joints into the corresponding openings on the armrest or on the carry-cot.
Attention: You must secure the press studs on the back end of the cover onto the rear of the backrest as the cover is also used as a protection against falling out.
If you need to remove the hood, undo the press studs on the rear of the backrest; press the release buttons on the insert pieces of the hood joints and pull the joints out of the openings. You can open the zip at the top of the hood for ventilation.
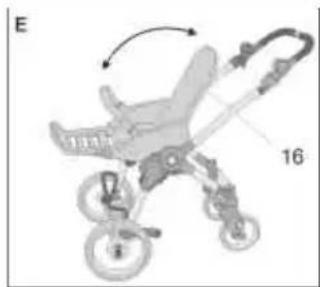
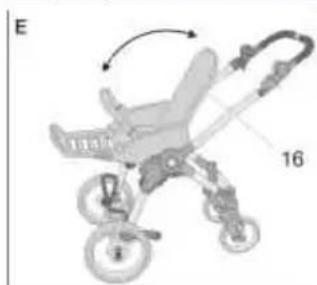
Adjusting the back rest
Pull up on the arrester of the back rest (16) to change its inclination angle (4 seating and prostrate positions + folding position all the way forward)
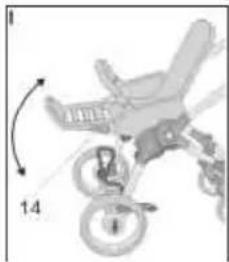
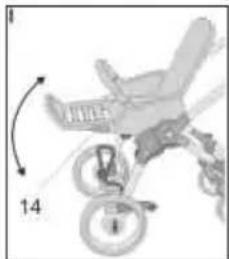
Adjusting the foot rest
Press and hold the foot rest arrester (14); there are three positions available for the foot rest.
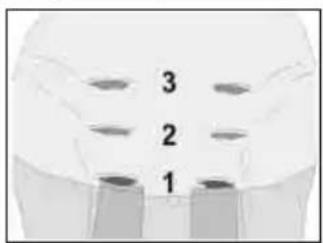
Using the 5-point harness
You can position the shoulder harnesses at 3 levels.
Always use the position closest to the shoulder level of your child.

Open the harness by pressing both sides of the buckle latches as shown in Fig. 1. It is not necessary to separate the chest restraints from the waist restraints. Sit your child in the stroller, move both its arms through the harness opening and insert the buckle latch into the crotch belt latch.
WARNING: Always use the crotch strap in combination with the waist belt.
Attaching points (D-rings) for a separate belt harness are provided at the outer ends of the waist restraints.
Adjusting the restraints
Shoulder restraints tighten loosen

Using the Reclined Surface Extension (available as an accessory)
If you need to, you can attach the washable bed extensions at the foot of the sports buggy inlay using the push locks.
Safety bar
Push the insert pieces on the safety bar through the slots in the seat cover into the receptacles beneath, which are located in the armrests. Make sure that the safety bar has clicked into place on both sides. To remove it, press the release buttons on the insert pieces. In order to make it easier for your child to get in and out, it suffices to release and fold up one side of the bar.
Special features of the model variations
Models with deceleration brake:
You are able to control the deceleration brake using the brake on the handlebar. The braking action can be fine-tuned using the adjustment screw on
the brake lever.
Note: The brake should only be used to slow the wheels, not to block them.
Warning: When reordering rear wheels, please ensure that the supplier is aware of the deceleration brake as the brake requires a special brake disc. The foot brake will not function if the wrong brake disc is used!
Adjusting the straight-running stability

Shade holder on pram
Toutes nos felicitations!
Satta fast overdelen
YeypxirarhaKaTbIMn pydsnporOryhbly KhoNkno 06yHm CTOpOHAM KOJACKn, SCTaHority perynpyemyo psKs Ha JyIayMSIO TBICOTS.
OTKnebiraHny nepeknDho psykN

ДЯ OTKeBirAHnPsKu Cnyesyt
OeHOrpyMHyHO TbITaHSTb Tpyx 06y
TtSkn1 Ha psky, noCny yUdo
psKs MOxHo 6seyT nypymcTntb.
Ppocnyenty npn 3Tom 3a Tym,
YTO6bl pska Hy
3aknnHnIacb N rHorb 3a
fNkCnporanaCb T nparom N Jyrom
fNkcatopax.
CTOHAOHbI TOPM03


PerynnpOBkA cTOrHOuHDoTo pmo3a (pnc.1)
IpyerHsTb TOPMO3HOB pHuad 1 r Hanparnyn cTpykn eo CbluHODO 3aucnyHn npyeoxpaHHTyNbHOo pbHaDa 2.
CTOHAHbI TopMo3 3aeYnCTrOraH.
PacTopMaxxurahny (pnc.2)
HaxaTb npyeoxpaHHTyIbHbI pbHaad 2 n nppyerHsTb TOPMo3HOBpbHaad 1 r HanpaIyHmCtpynk eo snopa. CToarHoHybI TOPMo3pactopMOkyH.
Yka3aHny: Ecnn CTOrHOchBt TopMo3 3aeyIcTsyTC TpSeOM, npyyerHbTy KOJRACKS Ha HyCKoJIbKO caHTmUyTpor rnpye nn Ha3ae, YTO6bI TopMO3bIy CToPxHN ppaIIbHO nOanI rO6oea. Y6 yXeaIITycb npn KaKeom 3aeyIcTrraHm I NOHON KINKCaUN NHa eYXHO SCTOnuHROCTN KOJIaCKN.
DOnonHyHnK CTOrHOHOMs TOPMO3S
IpiO6hapsxHnN 3MyHyHnN 3ΦΦyKTHIOCTN CT0HOHODO TOpMO3a ChauHa OTrpyHnTy KOHTpdaNk, YTO eact r03MOXHOCTb TbINOHNtB pydsInporKn Ha SCTaHOrOHom rHTy (TbIHNTu). I0 OKOHaHHnPydsInporOK Chora 3aФNKcnporaTb KOHTpaNks.
CHATNE BepxHeu Yactn
PnHbMepblIpyeTbpaeHHcnyaHoro OTKaTbIBaHHKOJIACKN.
C obex ctopoH depkaTeJI BepxHeJ qactn:
CDBHHTb npeOxpaHnteHbHbI pbHaR (2) BBepx (B HapBaJIeHNn CTpeKN) u ydePKuBaTb.
BdaBnTb 1) Bn3 TaK, Yo6bI OH 3aueJIKNHJNC, NOABNTc KpaCha MetKa (3). POnHrTb BepxHIOU qactb BBepx.
YctaHOBka BepxHeu actn

PnHbMepblIpyoTbpaueHnCnyaHoro OTKaTbIBAHN KOJACKN.
C obex cTOpOH KpenIeHn BepxHeu qactn:
paBHomepHo yCTaHOBnTb BepxHIOU qAcTb (17) CBepxHa 06a KpeJIeHn (18) TaK, YTObI OHa 3aФNKcnpOBAIacb CO CblIIMMbIM IeNtKOM. BepxHnA qAcTb 3aФNKcnpOBAHa HaIeXH0, ecnn KpacHnA MetKa (3) He BnHa.
PpIMEYAHNE:
Ipeed nCpOJIb3OBaHnEM npOBepuTb, yTO6bl CnDeHbe CnOPTNBHO KOJIACKN IIN Kopo6 6bl IpaBnBHO BBe-EN B 3auePJIeHne.
3KcnnsataaunrTaHTA
Bctarby Hanpabnloune eytani Tyhra CootryTCTRSIOuy OTyptnr I noeNOKOTHKy IIN KOp3nHe.
BHHMaHMy: O63aTyIbHO 3akpynITy KHONK Ha 3aeHym KOHy TyHTa Ha o6paTHo CTOpOHy CnIHKn, TAK KAK TAKIM O6pa3OM TyHT eYiCTTSyT r KaCyCTry 3aunTbI OT rblnaeAHn.ДЯ ChrTnA TyHTa OCnAbSy, pIn HyO6xoEmMOCTn, KONKHa O6paTHo CTOpOHy CnIHKn, HaxMNtY e6bnokpsUmy KONk Ha rCTarHbIX eyTaIAX COUYHyHn TyHTa rypx n TBiHbTy CoCHNyHyHn I3 OTRypCTn.ДЯ npOryTpirraHn rbl MoKyTy OTkpbl MOJIHNIO S N3doNOrbA TyHTa.
PerynipoBka cnnHKn
TnHyb KcTop CnHKN (16) BBepx, YTObI OTpeYnpoBaT hAKIOH (4 NOJoxeHNA "CnJa" N "JIeKa" + CLOXeHHoN NOJoxeHne cpeDi).
Perylnpobka noctabkn IJH
HaKaTb cKcTOp NOCTaBKn DnHOR (14) N ydePKNBaTb B 3TOMNOLOXeHN, NOCTaBky MOXHOyCTaHOBtB BOHOM n3 3 pa3HbIXNOLOXeHN.
IcnoB3ObaHne nTn3BeHHoro pemHr 6e3oNaCHOCTN

BbMOKTepeyIIpOBAbBbICOTy
nueeBBx pEmHe(3noIOKeHn).
Bcerda yctahabnBaIte pEmHb
HaTy BbICOTy, KOTOPaB HAn6oBb
Wei CTeneHH COOTBECTBYET BblCote nue BaWero pe6eHka.

YTO6bI OTKpbITb pemeHb, HAXMnTe C 06eHX CTOpOH Ha 3bIKN 3aMka, KAK NOKa3aHO Ha PNC.1.Het HeO6XoIMMOCTN OTdJIaTb IIpeYeBbIe peMHN OT NORChbIX. YCaJNTe peBeHKa B KOJIACKy, IpocuHbTe pyKn B OTBepCTne pemeH IN BCTaBbTe R3bIKN 3aMka B 3aMOK WArOBORo PEMHn.
ПРИМЕЧАНЕ: Всегда Исторьшу Teшаговп peMeнь BmecTe B nOrcHbIM pemHem.
PpncocobneHn dnn npcoeHNHeHn OTdIbHOro pemHHoro 6noka (D-KoNbua) HaxoJrTaHa BHeuHnx KOuaX NorChbIX pemHei.
Perynupobka pemHei
PaeeeBbpeMHN 3aTnHyTb OCAa6nTb

IcnoIb30raHny ydnnHnteIa CneYhBa ena noNsnyxauydo nOIOXyHn (rxoent r coCTar npnaeynKHOCTy)
PnHyo6xoENoMocTn BbMoXyTu c NOMOuBtU TyKpyHbIX COyeHNyHm SCTaHorNTb THOxHO uACTu rCTaHDo s3Na CnOPTNRHO KOJIACKN MOUSSOC Hacaeks eJr SeiInHyHn NOrgPxHOCTn eJr JyXaHn.
PnyeoxpaHHTyIbHaeyesda

Bctarby rctarhbly eytan npyeoxpahntybnHO esn Hpy3 na3bI r 06wnrky cneynbI r paonnojxHHbl yoe Hm 3axmbi I noeNOKOTHKax. O6patNTy rHImaHny, TTObI npyeoxpahHTyhbHaesda ro7la r 3auynHny no o6yIM CTOPoHAM. Jnra CHTINHakMNITy ey6loKnpsuany KhoNk Ha rCTarHbIX eYtAnx. Jnro 6OlydUnHn PocaeKn n TbcaeKn py6yHka eoCTaTOHOr TOcoyenHtB n OeHrTaTgPx OeHS CTOPoHS esn.

Ocobehnoctn OTeJIbHbIX MoJen
MoJIc 3aMeJIOUIM TopMO3HbIM MExaHn3MOM:
IIN Cpa6aTbIBAHN3aMeJIAHOIe ITOPM03a HaxKaTb pyKoRTky TOPMO3a Ha pyUke KOJIACKn. PeryNIPOBaHHe TOPMO3HO DeIcTBn IPOUN3BOIDTC NOMOUsyCTaHO
BOUHoro BnHTa Ha TOPMO3HOM pbIaRe KOJIaCKN.
PnmeuHHe:TopMO3 npeHa3HaueH dIy INaBHO 3aMeJeHHXoJa H MeoKet NcNoJb3ObaTbCdN6IbOKnpOBKn KoneC.
BHHMaHHe: B Cnyae 3aKa3a CmEHbIX 3aDnHX KOJec CJIeNyET OTdIbHO yKa3aTb Ha HAnHyHe 3aMeIJIIOUeRO TOPMO3a, T.K. dIHa Hero Tpe6yETcOc6bI TopMO3HOn DnCK.
PnncnoJIb3OBAHn HnnpaBnIbHoro TOpMo3Horo DnCKa 6yET HapyuSha pa6oTa cTOrHOrTO TOpMo3a!

Pydsnporka npmaHnyHoCTn erxkyHna

3aKMM KO3bIPbKa Ha KONrCKy
Blahopřejeme!
Vyrobky teutonia jsou symbiozou perfektniho reme -slneho zpracovani, technologickych inovaci a modniho designu. Jmeno teutonia je synonymem kvality, kvality schopne uspokojit iy nejnarocnejsi. Logo firmy teutonia s duhou vam zarucje, ze se Juda o originalni model znacky teutonia. Pred uvedenim do provozu si peclive prectete tento navod (hlavnene nase bezpechnostniPokyny) a uschovejte jej pro pripad pozdjejsich nejasnosti. Pokyny pro pripad reklamace najdete od strany 81 tohoto nadvodu.
What to do in the event of a complaint
RIGHTS IN THE EVENT OF JUSTIFIED COMPLAINTS
If you have grounds for complaint, you have statutory rights against your dealer, who has sold the pram to you, which are unaffected by the information below. To provide proof that your pram was purchased from your dealer, please retain the handover form you filled in and signed, together with your receipt, for the duration of the statutory warranty period. This period lasts 2 years and commences when the pram is handed over to you.
WHAT IS COVERED IN THE EVENT OF A COMPLAINT?
Claims under warranty cover any defective materials or workmanship apparent at the time of the handover. The warranty does not cover
- natural symptoms of wear and tear or damage due to excessive use
- damage due to unsuitable or incorrect use
- damage due to faulty assembly or use
- damage due to carelessness or poor maintenance of the pram
- damage due to incorrect modifications to the pram
Defects must be reported immediately to prevent consequential damage.
DO YOU HAVE GROUNDS FOR COMPLAINT OR NOT?
RUST: the frame is provided with a protective coating. If it is not serviced or is treated badly, however, rust spots may form. This is not considered a defect.
SCRATCHES: scratches are considered normal symptoms of wear and tear and not a defect.
MOULD: textiles which have got damp and then not been dried properly (see instructions for use) may go mouldy and do not represent poor workmanship.
FABRICS FADING:
sunlight, sweat, cleaning agents, wear (especially at points within easy reach) or over-frequent washing can all lead to fading; fading is thus not considered a defect.
PILLING OF FABRICS:
pilling is possible and is not considered a defect. As in the case of woollen jumpers, you can treat fabrics with a clothes brush or a textile razor to eliminate the majority of the bobbles.
TORN SEAMS/
PRESS STUDS/FABRIC:
please check carefully on purchase, whether all fabric parts, seams and press studs are properly sewn and attached and whether all the zips work properly.
WHEELS:
worn wheels are natural symptoms of wear. Damage to pneumatic tyres due to external effects, sharp objects or use with the wrong air pressure (for max. air pressure, see tyre case) is not considered poor workmanship.
Our wheels are not balanced. Slight imbalance due to the production process can therefore not be ruled out and as a result, is not considered a defect.
WHAT YOU SHOULD DO WHEN PURCHASING
Please go through the handover form with us to rule out as far as possible your needing to make a claim under warranty.
PROCEDURE IN THE EVENT OF COMPLAINS
If you subsequently find a defect, please report this to us, the dealer from whom you bought the pram, by telephone without delay so that we can discuss how to proceed. This ensures that justified complaints can be dealt with quickly and without great distances having to be covered. So your contact for any repairs or complaints is your teutonia dealer.
USE, CARE AND MAINTENANCE
The pram is a means of transport for your child, and needs to be looked after and maintained in accordance with the instructions for use in order to maintain its original quality.
We draw your attention expressly to the fact that only original accessories and spare parts may be used.
Übergabe-Check
Name:
Adresse:
PLZ:
Ort:
Telephone no. (incl. code):
e-mail:
Type of pram:
QA/Chassis no:
Colour (design) of fabric:
Accessories:
Handover form, to be filled in by customer
Product complete OK
Function checked OK
Folding mechanism OK
Ride characteristics OK
Wheels checked OK
Adjusting mechanisms checked OK
Brake safety checked OK
Suspension checked OK
Good condition
Check frame OK (especially for damage to paintwork, scratches and other obvious defects)
Check fabric parts OK (especially for tears, seams, press-studs)
Check plastic parts OK
I have checked the pram and am satisfied that it has been supplied in its entirety and that all functions are working properly.
I have found the following defects:
These will be rectified either by:
□ repair replacement
I have received adequate information about the product and its functions prior to purchase, am aware of the care and maintenance instructions and most particularly, have obtained a copy of the instructions for use with the information they contain regarding my rights in the event of a complaint.
Date of purchase:
Customer (signature)
Dealer (signature)
Dealer stamp
Technische Änderungen vorbehalten.
We reserve the right to make changes that promote technical changes.
Reservation sur des modifications techniques.
ikeus teknisiin mutoksiin pidatetaan.
Teutonia forbehaller sig ratten till tekiska forandringar.
Technische wijzigingen voorbehouden.
Vi forbeholder os retten til tekniskeændringer.
Med forbehold om tekniske endringer.
Salvo modifiche tecniche.
Ns reservamos el derecho a realizar modificaciones Tecnicas.
paBO Ha BHeCHe TExHnuecknx N3MeHeHm COxpaHReTcra.
^已 Technické zminy vyhrazeny.
Zastrzegamy sobie prawo do technicznychzmian.