
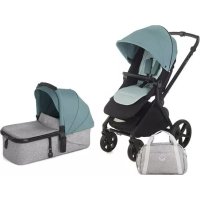
Aero - Stroller JANE - Free user manual and instructions
Find the device manual for free Aero JANE in PDF.
| Product type | Stroller |
| Brand | Jane |
| Model | Aero |
| Usage | Child from 6 months to 15 kg |
| Max basket weight | 4 kg |
| Number of backrest positions | 5 |
| Number of leg rest positions | 4 |
| Number of handlebar positions | 5 |
| Brake | Parking brake on both rear wheels |
| PRO-FIX system | Compatible with Koos, Matrix Light 2, Micro car seats |
| Front wheels | Swivel with directional lock |
| Harness | 5-point restraint system (safety harness) |
| Maintenance | Clean with warm water and soap, lubricate with silicone spray |
| Canopy | Removable, do not place objects on it |
| Front bar | Removable with safety covers |
| Warranty | Conforms to law 23/2003 of July 10, 2003 |
| Registration | www.jane.es |
Frequently Asked Questions - Aero JANE
User questions about Aero JANE
0 question about this device. Answer the ones you know or ask your own.
Ask a new question about this device
Download the instructions for your Stroller in PDF format for free! Find your manual Aero - JANE and take your electronic device back in hand. On this page are published all the documents necessary for the use of your device. Aero by JANE.
USER MANUAL Aero JANE
IMPORTANT - Keep these instructions for future reference.
WARNING: Never leave your child unattended.
WARNING: Ensure that all the locking devices are engaged before use.
WARNING: To avoid injury ensure that your child is kept away when unfolding and folding this product.
WARNING: Do not let your child play with this product.
WARNING: This seat unit is not suitable for children under 6 months.
WARNING: Always use the restraint system.
WARNING: Check that the pram body or seat unit or car seat attachment devices are correctly engaged before use.
WARNING: This product is not suitable for running or skating.
This vehicle is intended for children from 6 months and up to 15kg
Suitable for children under 6 months old only with accessories approved by JANE.
The parking device shall be engaged when placing and removing the children.
Any load attached to the handle and/or on the back of the backrest and/or on the sides of the vehicle will affect the stability of the vehicle.
This vehicle has been designed to be used by one child. Do not use it with more children at the same time.

Never use accessories that have not been approved by JANE, S.A.
For car seats used in conjunction with a chassis, this vehicle does not replace a cot or a bed. Should your child need to sleep, then it should be placed in a suitable pram body, cot or bed.
Only replacement parts supplied or recommended by JANE shall be used.
The maximum amount carried in the basket must never exceed the weight indicated on the basket (4kg)

1.- UNFOLDING
To unfold your AERO pushchair simultaneously pull the buttons on the handlebar. 1 Once it is unfolded make sure that the cross on the back is completely taut, as this locks the pushchair so that it does not accidentally fold up. 2
WARNING: It is important to make sure that the child is kept away from the pushchair while it is being folded or unfolded.
WARNING: The appearance of cutting, compression and pinch points are inevitable during these operations.
2.- PRO-FIX SYSTEM
The chassis of your pushchair includes the PRO-FIX system, ready for fitting any of the following baby carriers: Koos, Matrix Light 2, Micro. The PRO FIX system makes it easy to fasten and remove these accessories onto and off the chassis, in a quick, simple and safe way, with them securely fastened onto the chassis. To do this, follow the instructions for these accessories carefully. To access the PRO-FIX system zone unfasten the upholstery clasps and take off the two covers concealing the system. Store the covers in a safe place and put them back on once you have stopped using the baby carrier. 1-3.2
This function is necessary for using the pushchair with different baby carriers.
To remove the backrest first take the upholstery off the armrest and the seat
Press the button situated on the both sides of the base of the backrest while you take the tube of the backrest out of its fastening. 4.1
Then release the reclining adjusters from the backrest by pushing upwards gently. 2-5
Follow the steps in reverse to put the backrest back on again.
4.- FRONT SWIVEL WHEELS
Your AERO has front swivel wheels that can be steered or the steering can be locked.
To lock the wheels press the lever downwards when the wheels are in line with the longitudinal axle of the pushchair
6.1 To unlock the steering, pull the lever upwards. 6.2

5.- BRAKE
Your AERO has a braking system that acts simultaneously on both rear wheels. Use it as a parking brake whenever you can, it is an important safety element.
Press the brake lever to put the brake on.
Push the lever upwards to release the brake. 7
WARNING: When the brake is on make sure that the pushchair has braked correctly. It may be necessary to push the pushchair slightly for the brake to be fully activated.
WARNING: Make sure the parking brake is activated before putting the child in or out of the pushchair.
6.- SAFETY HARNESSE
Your AERO has a safety harness so that your child is always safe.
The two side fastening points of the seat can be used to fasten a supplementary harness (see section 3

7. ADJUSTING THE BACKREST
The backrest of the AERO can be reclined to make the child more comfortable. The reclining system has 5 positions. Pull the rear lever while you lower the backrest. 9.1 To raise it there is no need to press the lever, simply push the backrest as it is fitted with a free movement mechanism.9.2
8. ADJUSTING THE FOOTREST
The position of the footrest can also be adjusted to suit the required position of the child at all times. It has 4 different positions.
Press the lever found on the foot board on both sides of the pushchair while moving the footrest downwards. 10 To move it upwards you don't need to press the button as it has a free movement mechanism.
WARNING: Never allow the child to stand up on the footrest or footboard.

9. - PROTECTOR
To get the protector out, press the button situated on the lower part of the armrest. 11 Once it is out, put the covers in place designed to cover up the holes of the protector.
These covers have two functions, an aesthetic one as they hide the hole and a safety one as they prevent the child from putting his fingers in the hole. 12
WARNING: The child should be kept away from the mobile parts when the responsible adult is handling these.
10.- ADJUSTING THE POSITION OF THE HANDLEBAR
Your AERO is fitted with a system to adjust the position of the handle making it more comfortable. Press the button and keep it pressed while you adjust the position of the handlebar. It has 5 positions so you can choose the one that suits you best. 13
11.- FOLDING
Simultaneously pull the 2 handles on the handlebar upwards while raising the pedal on the lower compass as shown in the diagram. 14.1-14.2
Then push the handlebar downwards so the pushchair folds up. 15
Lastly, adjust the handle to leave your AERO folded as compactly as possible.
Note: If you fold the pushchair with the hammock in the reclined position the hood may come loose, it is advisable to put the hammock in the vertical position.
WARNING: It is important to make sure that the child is kept away from the pushchair while it is being folded or unfolded.
WARNING: The appearance of cutting, compression and pinch points are inevitable during these operations.
12.-HOOD
To fit the hood to the chassis, slide it until fits into the sides of the handlebar. 16
Follow this step in reverse to remove it.
WARNING: Do not put weight on top of the hood.

13.- MAINTENANCE
Do not expose the cover to sunlight for long periods.
Wash the plastic parts with warm water and soap and carefully dry all the components after.
The cover can be removed for washing.
Regularly grease the mobile parts and mechanisms with a silicone-based spray. Do not use oil or grease.
For your safety and the good conservation of this product, it is important to bring it to one of our official workshops for regular inspections.
14. RAIN COVER
The rain cover for your AERO is very easy to fit into place, simply cover the hammock and fit the hooks to the chassis to fasten it. It has a small window that can be rolled up and secured with Velcro strips so the child is free to investigate his surroundings. 17


INFORMATION ABOUT THE GUARANTEE
This article comes with a guarantee in accordance with the provisions of law 23/2003 of 10th July. Keep your receipt as proof of purchase, it is essential to present the receipt in the shop where you bought the product to confirm validity of the guarantee in the event of any problems.
This guarantee excludes any defects or breakages caused by inappropriate use of the article or inobservance of the safety and maintenance rules listed in the instruction pages and on the care labels, as well as faults caused by wear and tear through normal use and daily handling.
The label displaying the chassis number of the model should never be taken off, it contains important information.
Notice:
For the maximum safety and care of your new JANE product, it is very important that you complete the registration card found on the web page www.jane.es
This registration means we can inform you, if necessary, of the evolution and maintenance of your product. Additionally, if you would like, we can also inform you about new models or news that we think may be useful for you.
AERO

AERO


INDEX
INFORMATIONS SUR LA GARANTIE
IyctaHOBKaHIOHOHa Ha aaccn,OnyckaTe erO,noka He HaeHeHe He pyuKoJIACKn.16
Tc06b ChrB erO, BInONHnTE 3Ty onepaunIO B oBpaTHOM npAKe.
PENyPEXEHE:HeKnaCTbTaeKeJIbeBauHaKanOT.

13.-yXoOa
OBVBKa He DonJHnHa HaxoNTbCn NOI npMblIM COHHeYHbIMN LyuAMn DnITeBHOE BpEMr.
TnactKOBbIe HacTN MOnTE TENIOB OBOO CMbIOM,3aTEM TaaTeNbHO BbCYuINBaNTBCE DeTAM.
06NBky moxho CHrB dNCTnPK.
PeyIyHPO Cm3bIaIe NIOBnXhBle Yactn MExAHm3bl CNIKHOHOB CM3KOHe HcNOnb3yIe B 3TNx cpeTInTeBHOE MAcoN XJkp.
B centen630anachocnH n4n coxpaHHoCTn DAHHoro 13eHNBAxHO, cy0bI erO nepnoiueckc oCMAtpnBaII NIOoN H aHmX OfPHInaB- hIX MaTcpeCKN.
14.-DOXDEBVK
DoxdeBn Baaew konrAero yctahabmBaetcOeyhJeKo.Bam HkyHToTbKO HApBtB rAmak nPnKpeNITb ERO kPOUkAMn K WACCn. Ha DoxDeBnke IMeTcM ManeHbKoe OOKoKo, KOtOpoe cKaTbBAeTcB BpyOn HnFKnCpYTe NmNyKAMn, YTOsbpeBekOM CBO6DHO 3uyatb BCE, TTO HAXOHTCB BOKPY Hero. 17


MHΦOPMAUJI O ΓAPAHTNI
DaHHoe n3dene IMeet rapaHTnIO, npedyCMOTpeHHyIO 3aKoHOM 23 / 2003 or 10 nIOJIa. CoXpaHInTe ToBaHbI qEK, Heo6xoJIMbI dI npEsbBnEHn B mArzHIe, rDe Bbl npNo6pENnN3dene, IJIIO TBePbExEHNIO pUdNueckO cnbl B cnyae IIO60 peKlamauM.
DaHnHa rapaHTna He paccnoctpaHReTcRa Ha depeKbI nNoLOMKn, KOTOpBle ABNIAOTcpe3yNbTaTOM HENpaBnblHoN 3KnnyatauINn HApUeHenn HOpM 6e3oNaChOCTn I yxoJa, ONCaHbHbX B INhCTpyKuNn HA 3tKeTKe NO npaBnAm CTnpKn, KAK NHa 3NeMeHTb ECECTBeHHoro N3HOCA, NOBBWneCra PnHOPMaHbHom ExeJHeHBHom NOb3OBaHN.
Hn B KOem cnyahe He cpbBaIte 3tIKeTky C HOMepom waccn Baew moen, oha copeknt Baxkyu INHOpMaunio.
BHHMaHHe:
Дяг Мaksмально наджхости n 3a60ы o Baшем HOBOM n3djeninФчрmbi JANE,Очев BAхноЧTO6bI Bbl 3anONHINn pernctpaioHnh bTaoH, KOTOpB bI haJdeTe Ha cTpaHnue www.jane.iges
PerncpaHn03BONIT Bam nOlyaTb HnOpmaHIO, B cnyae Heo6xOIMOCCTN, 06 n3MeHeHHnx N 06 yXoJe 3a BaAMM N3denn
em. TaKke BcRda, KOrDa Bbl noXeNaTe, Mbl MoXeM INHOpmipoBaT BacoB OBObIX moDeNx HOBOCTx, KOtOpBie, Mbl NoIanaem, 6byuHTHepeCbHIMnDnBAe.
AERO

AERO


INDHOLDSFORTEGNELSE
ADVARSEL 94
1.- UDFOLDNING 95
2.- PRO FIX-SYSTEM 95
3.- UDTAGNING AF LIGGESTOLEN 96
4.- BEVAEGELIGE FORHJUL 96
5.-BREMSE 96
6. SIKKERHEDSSELET0J 96
7.-INDSTILLING AF RYGLAENET 97
8.-INDSTILLING AF FODSTOTTEN 97
9.- BESKYTTELSESINDRETNING 97
10.-INDSTILLING AF HANDTAGET 97
11.- SAMMENFOLDNING 98
12.- KALECHE 98
13.-VEDLIGEHOLDELS98
14.- REGNSLAG 98
ADVARSEL
VIGTIGT - Opbevariennevejledningtil senerebrg.
ADVARSEL: Afterlad aldrig barnet Eden opsyn.
ADVAREL: Kontroller, at alle laseanordninger er blokeret korrekt for brug.
INFORMACJA GWARANCYJNA
local commercial N 2
Tel.917632238
MÁLAGA
C/ Antonio Martelo, 2-4
Tel. 952 31 91 31
PALMA DE MALLORCA
C/Gremio Zapateros, 51
Pol. Ind. Son Castello
Tel. 971 43 08 60
SEVILLA
C/Feria.73
Tel 954 90 2379
VALENCIA
C/ Borrull, 27
Tel.963921079
ZARAGOZA
please contact our export department
export@jane.es

IM-1582


- 1.- UNFOLDING
- 2.- PRO-FIX SYSTEM
- 4.- FRONT SWIVEL WHEELS
- 5.- BRAKE
- 6.- SAFETY HARNESSE
- ADJUSTING THE BACKREST
- ADJUSTING THE FOOTREST
- - PROTECTOR
- 10.- ADJUSTING THE POSITION OF THE HANDLEBAR
- 11.- FOLDING
- 12.-HOOD
- 13.- MAINTENANCE
- RAIN COVER
- INFORMATION ABOUT THE GUARANTEE
- Notice:
- INDEX
- INFORMATIONS SUR LA GARANTIE
- 13.-yXoOa
- 14.-DOXDEBVK
- MHΦOPMAUJI O ΓAPAHTNI
- INDHOLDSFORTEGNELSE
- ADVARSEL
- INFORMACJA GWARANCYJNA
- MÁLAGA
- PALMA DE MALLORCA
- SEVILLA
- VALENCIA
- ZARAGOZA
- please contact our export department
Brand : JANE
Model : Aero
Category : Stroller