
Travel System Rider - Stroller JANE - Free user manual and instructions
Find the device manual for free Travel System Rider JANE in PDF.


| Product type | Travel System stroller |
| Brand | Jane |
| Model | Travel System Rider |
| Recommended age | From birth (with carrycot) up to about 3 years (in seat mode) |
| Maximum child weight | Up to 25 kg |
| Stroller weight | Approximately 12.5 kg |
| Unfolded dimensions | Approximately 110 x 60 x 100 cm (L x W x H) |
| Folded dimensions | Approximately 85 x 60 x 40 cm (L x W x H) |
| Wheels | 4 all-terrain wheels with suspension, puncture-proof, front swivel and lockable wheels |
| Brake | Rear foot brake with lock |
| Reclining backrest | Yes, multiple positions up to full recline (carrycot) |
| Adjustable footrest | Yes, adjustable in multiple positions |
| Canopy | XXL canopy with ventilation window and UV protection |
| Harness | 5-point harness adjustable in height |
| Storage basket | Large basket under the stroller (capacity up to 5 kg) |
| Fold | Compact and easy fold, with locking system |
| Compatibility | Compatible with Jane car seats and other brands via adapters (not included) |
| Materials | Aluminum frame, washable fabrics |
| Maintenance and cleaning | Wash fabrics at 30°C max, frame with soapy water |
| Safety | Compliant with EN 1888 standard, effective brake, 5-point harness, anti-rollback |
| Spare parts and repairability | Available through Jane customer service or authorized dealers (wheels, harness, canopy) |
| Included accessories | Carrycot, seat, canopy, harness, basket |
| General information | User manual available for download on manufacturer's website |
Frequently Asked Questions - Travel System Rider JANE
User questions about Travel System Rider JANE
0 question about this device. Answer the ones you know or ask your own.
Ask a new question about this device
Download the instructions for your Stroller in PDF format for free! Find your manual Travel System Rider - JANE and take your electronic device back in hand. On this page are published all the documents necessary for the use of your device. Travel System Rider by JANE.
USER MANUAL Travel System Rider JANE
natural_image
Two JANE brand baby strollers with black and gray body designs, displayed side by side (no text or symbols on the models themselves)



español 15
english 21
français 27
deutsch 33
italiano 39
português 45
nederlands 51
norsk 57
svenska 63
русский 69
dansk 75
polski 81
slovenščina 87
slovensko 93
český 99
magyar 105




RIDER
RIDER



bar
| Category | Value | |---|---| | MONTAJE Y DESMONTAJE DE LAS RUEDAS | 18 | | PLEGADO Y DESPLEGADO | 18 | | SISTEMA PRO-FIX | 18 | | MONTAJE Y DESMONTAJE DE LA HAMACA | 18 | | AJUSTE DEL ÁNGULO DE LA HAMAQUITA | 19 | | USO DEL APOYABRAZOS DE SEGURIDAD | 19 | | EMPLEO DE CAPOTA | 19 | | AJUSTE DEL MANILLAR | 19 | | AJUSTE DEL REPOSAPIÉS | 19 | | USO DEL CINTURÓN | 19 | | USO DEL FRENO DEL ESTACIONAMIENTO | 20 | | REGULACIÓN DE LA DUREZA DE LA SUSPENSIÓN | 20 | | BROQUEO DE LAS RUEDAS DELANTERAS | 20 | | MANTENIMIENTO | 20 | | CONJUNTO DE LLUVIA | 20 | | INFORMACIÓN SOBRE LA GARANTÍA | 21 | The chart displays a single bar for the INDICE category and includes a color-coded legend (e.g., cyan, magenta, yellow) to indicate the Spanish adoptions. The red vertical bar labeled 'español' extends to the right, indicating it is an Spanish adoption.


ADVERTENCIAS
ADVERTENCIAS
Important – Keep these instructions for future reference.
WARNING Never leave your child unattended.
WARNING Ensure that all the locking devices are engaged before use.
WARNING To avoid injury ensure that your child is kept away when unfolding and folding this product.
WARNING Do not let your child play with this product
WARNING This seat unit is not suitable for children under 6 months.
WARNING Always use the restraint system.
WARNING Check that the pram body or seat unit or car seat attachment devices are correctly engaged before use.
WARNING This product is not suitable for running or skating.
This vehicle is intended for children from 6 months and up to 15 kg.
Suitable for children under 6 months old only with accessories approved by JANÉ.
The parking device shall be engaged when placing and removing the children.
Any load attached to the handle and/or on the back of the backrest and/or on the sides



of the vehicle will affect the stability of the vehicle.
This vehicle has been designed to be used by one child. Do not use it with more children at the same time.
Never use accessories that have not been approved by JANÉ, S.A.
For car seats used in conjunction with a chassis, this vehicle does not replace a cot or a bed. Should your child need to sleep, then it should be placed in a suitable pram body, cot or bed.
Only replacement parts supplied or recommended by JANÉ shall be used.
The maximum amount carried in the basket must never exceed the weight indicated on the basket (4 kg).


1.- FITTING AND REMOVING THE WHEELS
Before using the RIDER pushchair for the first time it is necessary to fit the rear wheels. To fit the wheels press the button on the middle of the wheel and insert the axle into the rear wheel bearer and push until it slots firmly into place. If you need to remove the wheels, press the central button and take the wheel off.
2.- FOLDING AND UNFOLDING
To unfold your RIDER, lightly press the bar on the back to tilt the buggy and make it easier to manoeuvre. 3 Then hold the handlebar with one hand while you press the locking pedal at the bottom on the right. 4 Pull the handlebar and unfold until it clicks and locks into place. 5
To fold your RIDER place the hammock in the folding position (P) (see ADJUSTING THE ANGLE OF THE SEAT). Then pull the two slide catches on the sides and push the handlebar forwards until the pushchair is completely folded. 7-7.a
When folding the pushchair it is useful to place the hammock facing forwards as this makes it fold up more compactly.
WARNING: You must make sure that the child is kept away from the pushchair while it is being folded or unfolded. During these operations the appearance of sharp points and compression areas are inevitable.

3.- PRO-FIX SYSTEM
The chassis of your pushchair includes the PRO-FIX system, ready to incorporate the following auto safety elements: Micro, Transporter, Matrix Light and Strata. 1-8.a The PRO-FIX system makes it easier to attach and remove these accessories to and from the chassis, securing them to the chassis in a quick, simple and safe way. To do this follow the instructions for these accessories carefully.
WARNING: It is necessary to remove the hammock from the pushchair to attach any of the auto accessories.
4.- FITTING AND REMOVING THE HAMMOCK
Your RIDER is fitted with the pro-fix system. With this system, the RIDER hammock can be attached perfectly to the chassis. What's more, the hammock is reversible so it can be positioned facing you or facing forwards. -8.a To take the hammock off, simultaneously pull the unlocking levers situated on both sides of the hammock.

The hammock can be reclined so your baby can travel in the most comfortable position possible at all times. Pull the lever on the upper part of the hammock and tilt it to one of the 3 possible positions. 10
WARNING: Position P is only to be used when folding the pushchair, you must not use this position when your baby is in the hammock. 11
6.- USING THE SAFETY ARMREST
The safety armrest is designed to fit into the slots on the hammock.
If required it is possible to release one side of the armrest and it will still be completely articulated by the other side. There are buttons on the lower part to do this. 2-12a
WARNING: The child should be kept away from the mobile parts when the responsible adult is handling these. The appearance of cutting, compression and pinch points are inevitable during these operations.


7.- USING THE HOOD
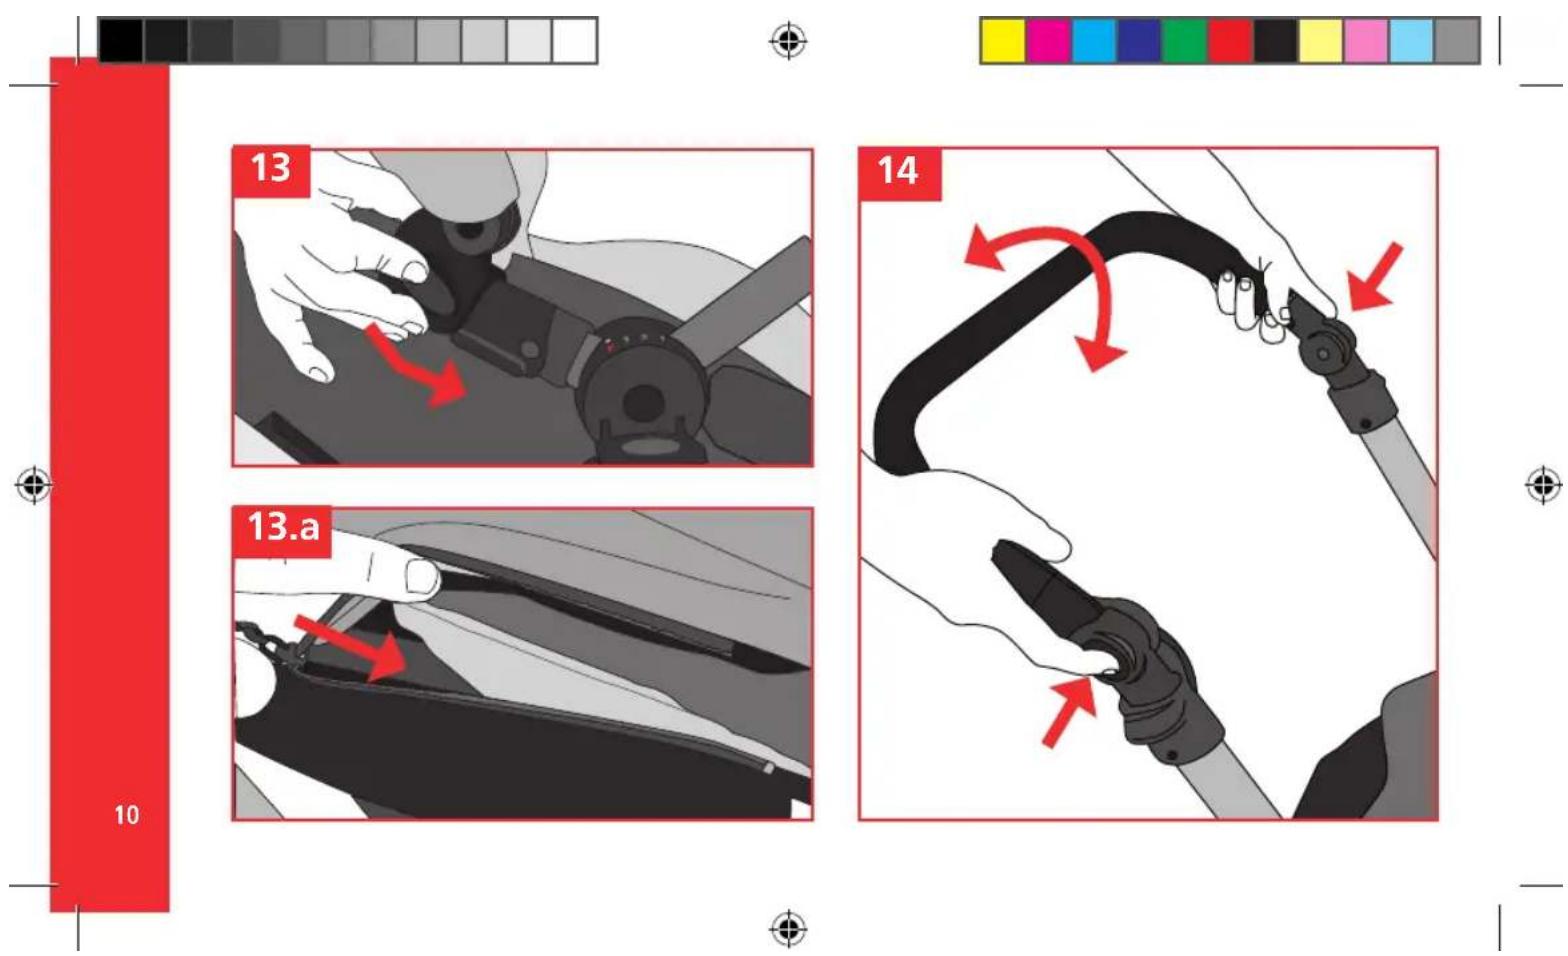
To fasten the hood onto the frame of the hammock, slide it from the top down to the corresponding slots on the central part. Use the zip on the hood to attach it to the frame. 13-13a Follow the same steps in reverse order to take the hood off.
8.- ADJUSTING THE HANDLEBAR
The handlebar can be set to 7 different positions. Simultaneously press the buttons on both sides of the handlebar.
9.- SEAT BELT
Your pushchair has a safety harness to keep your child safe at all times. Fit the belt onto the child whenever he is using the pushchair. 15
10.- ADJUSTING THE FOOTREST
The footrest can be adjusted to 5 different positions. Use your thumb to simultaneously press the two buttons on the lower part of the hammock. 6



PUTTING THE BRAKE ON: Push the lever downwards. TAKING THE BRAKE OFF: Pull the lever upwards. 7.a
To adjust the brake: If you need a more precise adjustment follow the indications in figure. 8
WARNING: When the brake is on make sure that the push-chair has braked correctly. It may be necessary to push the pushchair slightly for the brake to be fully activated.
12.- ADJUSTING THE STRENGTH OF THE SUSPENSION
To increase the strength turn the lever clockwise. 9 To reduce it turn the lever anti-clockwise. 9.a
To lock the front wheels, press the button situated behind each front wheel bearer. 20
14.- MAINTENANCE
Do not expose the upholstery to the sun for prolonged periods of time. Wash the plastic parts with soap and warm water, then dry all the parts thoroughly.
Regularly check the brakes, harnesses and fastening elements that may suffer wear and tear through use.
Remember to adjust the brake from time to time using the method explained in figure. 8
For your safety and the good conservation of this product, it is important to bring it to one of our official workshops for regular inspections.
15.-RAIN COVER
The rain cover of your RIDER is very easy to fit, simply cover the hammock and fit the hooks onto the chassis to secure it. The rain cover has a small window which can be rolled up and held with Velcro so the child is free to investigate his surroundings. 21


INFORMATION ABOUT THE GUARANTEE
This article comes with a guarantee in accordance with the provisions of law 23 / 2003 of 10th July. Keep your receipt as proof of purchase, it is essential to present the receipt in the shop where you bought the product to confirm validity of the guarantee in the event of any problems.
This guarantee excludes any defects or breakages caused by inappropriate use of the article or inobservance of the safety and maintenance rules listed in the instruction pages and on the care labels, as well as faults caused by wear and tear through normal use and daily handling.
The label displaying the chassis number of the model should never be taken off, it contains important information.
Notice:
For the maximum safety and care of your new JANÉ product, it is very important that you complete the registration card found on the web page www.jane.es
This registration means we can inform you, if necessary, of the evolution and maintenance of your product. Additionally, if you would like, we can also inform you about new models or news that we think may be useful for you.

bar
TABLE OF CONTENTS | Item | Count | |---|---| | Avertissements 1. MONTAGE ET DÉMONTAGE DES ROUES | 34 | | 2. PLIAGE ET DÉPLIAGE | 34 | | 3. SYSTÈME PRO-FIX | 34 | | 4. MONTAGE ET DÉMONTAGE DU HAMAC | 34 | | 5. RÉGLAGE DE L'ANGLE D'INCLINAISON DU HAMAC | 35 | | 6. UTILISATION DU GARDE-CORPS | 35 | | 7. UTILISATION DE LA CAPOTE | 35 | | 8. RÉGLAGE DU GUIDON | 35 | | 9. RÉGLAGE DU REPOSE-JAMBES | 35 | | 10. UTILISATION DE LA CEINTURE | 35 | | 11. UTILISATION DU FREIN DE STATIONNEMENT | 36 | | 12. RÉGLAGE FERMETÉ DE LA SUSPENSION | 36 | | 13. BLOCAGE DES ROUES AVANT | 36 | | 14. ENTRETIEN | 36 | | 15. HABILLAGE DE PLUIE | 36 | | INFORMATIONS SUR LA GARANTIE | 37 | français 31


AVERTISSEMENT
AVERTISSEMENT
INFORMATIONS SUR LA GARANTIE
INFORMACJA GWARANCYJNA


- RIDER
- ADVERTENCIAS
- 1.- FITTING AND REMOVING THE WHEELS
- 2.- FOLDING AND UNFOLDING
- 3.- PRO-FIX SYSTEM
- 4.- FITTING AND REMOVING THE HAMMOCK
- 6.- USING THE SAFETY ARMREST
- 7.- USING THE HOOD
- 8.- ADJUSTING THE HANDLEBAR
- 9.- SEAT BELT
- 10.- ADJUSTING THE FOOTREST
- 12.- ADJUSTING THE STRENGTH OF THE SUSPENSION
- 14.- MAINTENANCE
- 15.-RAIN COVER
- INFORMATION ABOUT THE GUARANTEE
- Notice:
- AVERTISSEMENT
- INFORMATIONS SUR LA GARANTIE
- INFORMACJA GWARANCYJNA
Brand : JANE
Model : Travel System Rider
Category : Stroller