Twinside - Stroller JANE - Free user manual and instructions
Find the device manual for free Twinside JANE in PDF.

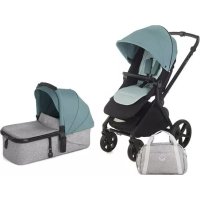
| Product type | Stroller bassinet |
| Brand | Jane |
| Model | Twinside |
| Usage | From birth until the child can sit up unaided |
| Maximum child weight | 9 kg |
| Recommended age | From birth to approximately 6 months |
| Approximate dimensions | 80 x 40 x 20 cm (approx.) |
| Materials | Plastic structure, washable textile cover |
| Hood | Foldable, unfoldable, and removable |
| Protection bar | Removable with release buttons, do not use as carrying handle |
| Foot cover | Removable, zipper |
| Attachment system | Profix adapters for Jane chassis |
| Chassis compatibility | Kendo, Walky, Muum, Epic, Crosswalk, Rider, Trider |
| Folding | Folding straps, adapters to turn inward |
| Maintenance | Hand wash at 30°C max, air dry in the shade |
| Safety | Do not leave unattended, do not use if parts are broken, do not add mattress |
| Warranty | Compliant with Legislative Decree 1/2015, registration on janeworld.com recommended |
| Included accessories | Hood, foot cover, protection bar, Profix adapters |
| Product weight | Not specified (estimated between 4 and 6 kg) |
Frequently Asked Questions - Twinside JANE
User questions about Twinside JANE
0 question about this device. Answer the ones you know or ask your own.
Ask a new question about this device
Download the instructions for your Stroller in PDF format for free! Find your manual Twinside - JANE and take your electronic device back in hand. On this page are published all the documents necessary for the use of your device. Twinside by JANE.
USER MANUAL Twinside JANE
natural_image
Exterior view of a gray and white baby box with a hooded lid and internal tubing (no text or symbols visible)$$ \frac{1}{2} = \frac{1}{3}\left(\frac{1}{4}\right)^{2} + \frac{1}{3}\left(\frac{1}{4}\right)^{2} + \dots + \frac{1}{3}\left(\frac{1}{4}\right)^{2} + \dots + \frac{1}{3}\left(\frac{1}{4}\right)^{2} + \dots + \frac{1}{3}\left(\frac{1}{4}\right)^{2} + \dots + \frac{1}{3}\left(\frac{1}{4}\right)^{2} + \dots + \frac{\sqrt{3}}{3} + \sqrt{3} + \sqrt{3} + \sqrt{3} + \sqrt{3} + \sqrt{3} + \sqrt{3} + \sqrt{3} + \sqrt{3} + \sqrt{3} + \sqrt{3} + \sqrt{3} + \sqrt{3} + \sqrt{3} + \sqrt{3} + \sqrt{3} + \sqrt{3} + \sqrt{3} - \sqrt{3} + \sqrt{3} + \sqrt{3} + \sqrt{3} + \sqrt{3} + \sqrt{3} + \sqrt{3} + \sqrt{3} + \sqrt{3} + \sqrt{3} + \sqrt{3} + \sqrt{3} + \sqrt{3} + \sqrt{3} + \sqrt{3} + \sqrt{3} + \sqrt{2} $$
ESPAÑOL 12 ENGLISH 20 FRANÇAIS 28 DEUTSCH 36 ITALIANO 44 PORTUGUES 52 POLSKI 60 ČESKÝ POLSKI 68 CATALÁ 75
MICRO-BB
figures

natural_image
3D rendered illustration of a car seatbelt with black band and white strap (no text or symbols)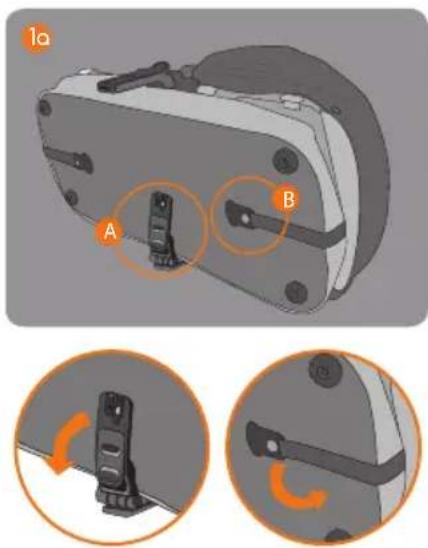
MICRO-BB

natural_image
Illustration of a person's seatbelt being adjusted for a car seatbelt, showing orange arrows indicating adjustment (no text or symbols present)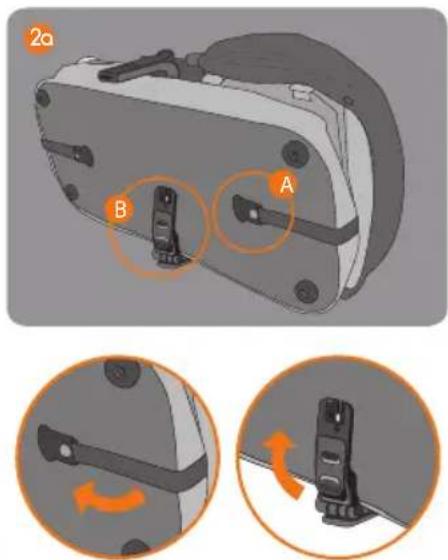
E
natural_image
Close-up of hands adjusting a seatbelt (no text or symbols visible)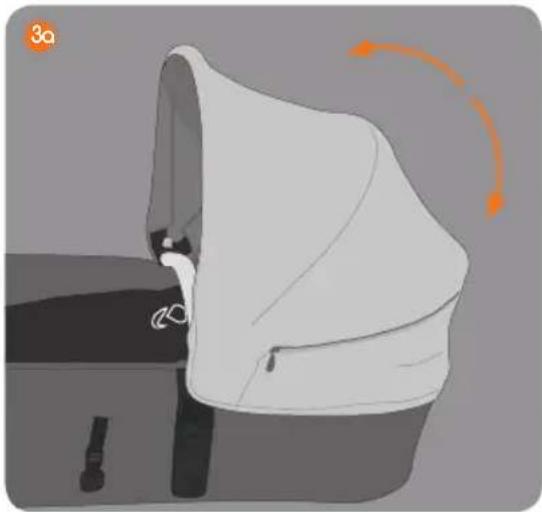
natural_image
Illustration of a white jacket with orange motion arrows indicating rotation (no text or symbols)MICRO-BB
natural_image
Illustration of a hand adjusting a car seatbelt, next to an orange circular icon with the letter F (no text or symbols on the diagram itself)
natural_image
3D rendered image of a baby stroller with orange motion arrows indicating movement (no text or symbols)
natural_image
Illustration of a gray suitcase with an open lid and orange arrows indicating motion or movement (no text or symbols)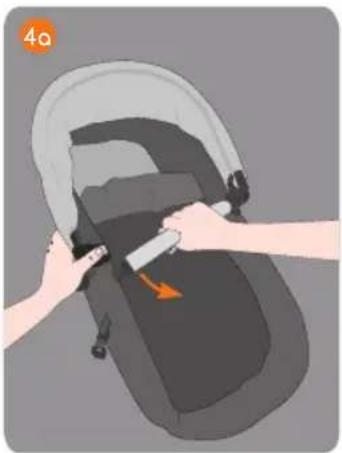
natural_image
Illustration of hands installing a seatbelt on a car seat (no text or symbols)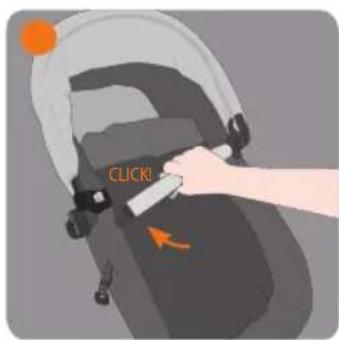


natural_image
Illustration of a person using a stroller to adjust or install a device, with no visible text or symbols.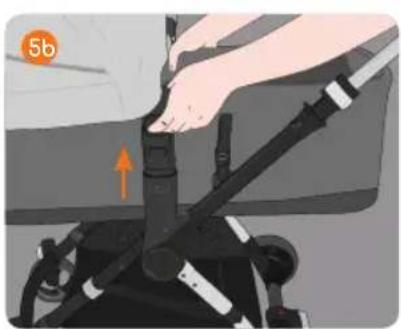
natural_image
Illustration of a person adjusting a vehicle seatbelt with an orange arrow indicating motion (no text or symbols)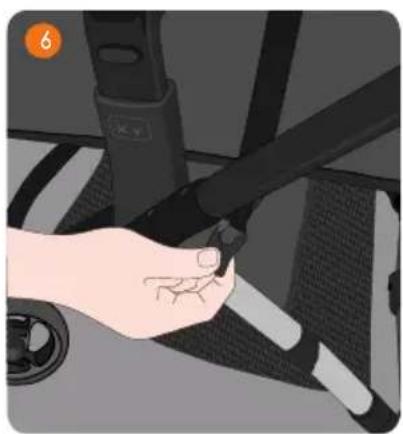
natural_image
Illustration of a hand adjusting a car seatbelt (no text or symbols visible)MICRO-BB

natural_image
Illustration of a hand holding a black object with an arrow indicating motion (no text or symbols)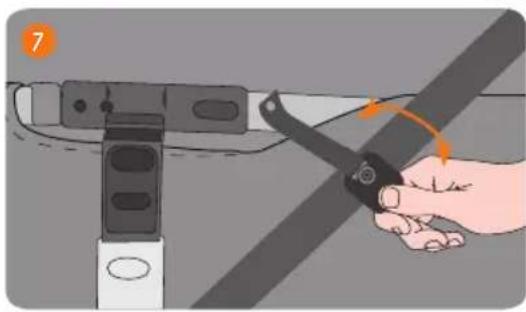
natural_image
Illustration of a hand using a tool to adjust a cable or switch component (no text or symbols visible)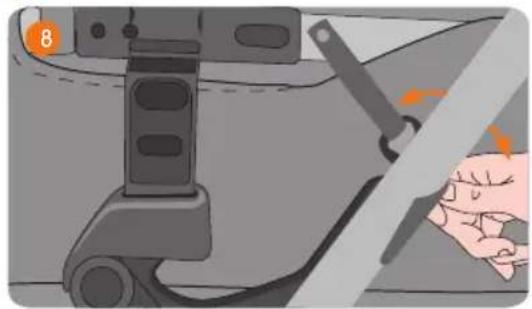
natural_image
Illustration of a car seatbelt switch and hand inserting a belt (no text or symbols)
INSTRUCCIONES
ÍNDICE
A. LISTA DE PIEZAS 14
A. LISTA DE PIEZAS
1- CINTAS DE PLEGADO
2- CAPOTA
3- CUBREPIES
4- SISTEMA PROFIX
5- CINTA ANTI BALANCEO
6- BARRA PROTECTORA

B. INFORMATION AND SAFETY WARNINGS 23
C. UNFOLDING 24
D. FOLDING 24
E. USING THE HOOD 24
F. BUMPER BAR AND FOOT COVER 24
G. FITTING ONTO A JANE PUSHCHAIR 25
H. MAINTENANCE 25
I. INFORMATION ABOUT THE GUARANTEE 26

A. PART LIST
1- FOLDING STRAPS
2- HOOD
3- FOOT COVER
4- PROFIX SYSTEM
5- ANTI-ROCKING STRAP
6- PROTECTOR BAR

B. INFORMATION AND SAFETY WARNINGS
Instructions
IMPORTANT: Read carefully and keep them for future reference.
WARNINGS:
- Read the instructions carefully before use and keep them for future reference.
- The bumper bar is a protector bar, do not use it as a carry handle while the child is in the carrycot.
- This product is only suitable for a child who cannot sit up unaided.
- Do not leave your child unattended.
- Do not let other children play unattended near the carrycot.
- Do not use if any part is broken, torn or missing.
- Never use the carrycot on a stand.
- Do not add an extra mattress pad.
- Do not leave the flexible carry handles inside the carrycot.
- Use only on a firm, horizontal level and dry surface.
USAGE RESTRICTIONS:
- Never use accessories that have not been approved by JANÉ.
- Be aware of the risk of open fire and other source of strong heat, such as electric bar fires, gas fires, etc., in the vicinity of carrycot.
- Regularly check the bottom of the carrycot to look for any signs of damage or tears.
- This carrycot is designed for children from birth up to 9 kg.
- Check that the child's head is in a higher position than the rest of the child's body.
- This product is only suitable for children who are unable to sit up unaided, or turn over and who cannot yet push themselves with their hands and knees. Maximum weight of the child: 9 kg.
C. UNFOLDING
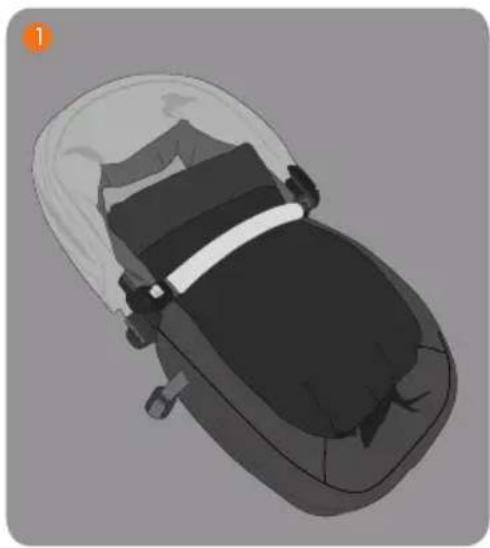
Place the MICRO-BB folding carrycot on a flat surface

Turn the ProFix adaptor a outwards. Open the folding straps so the side walls unfold completely. b
Make sure that the walls are fully unfolded!
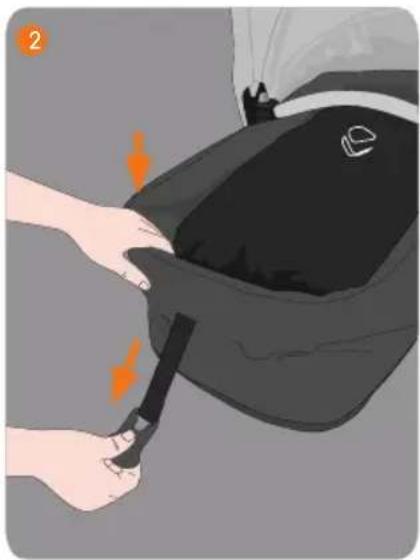
D. FOLDING
Fold the hood. Close the foot cover. 2 - 2a Pull the folding straps and fasten them at the points found on the base of the carrycat. a
Fold the ProFix adaptor inwards.

WARNING: Do not do this while the baby is in the seat. The appearance of cutting, compression and pinch points are inevitable during these operations.
E. USING THE HOOD
The hood can be folded, unfolded and removed.
To fit the hood insert the spokes into the hood support until they click into place. 3 To remove the hood, follow the same process in reverse.


WARNING: Do not put weight on top of the hood.
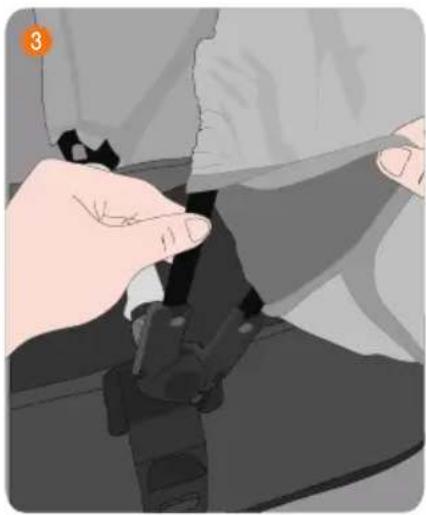
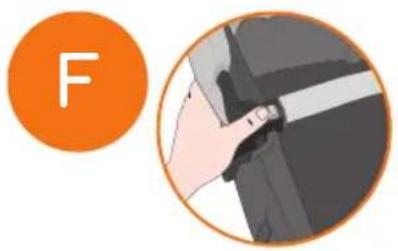
F. BUMPER BAR AND FOOT COVER

WARNING: The bumper bar is a protector bar, do not use it as a carry handle while the child is in the carrycot.
To position your baby comfortably, open the foot cover and the bumper bar. First release the bumper bar by pressing the button 4a and turning it anti-clockwise. Open the zip to the required position.

To completely remove the foot cover open both the zips. 4c
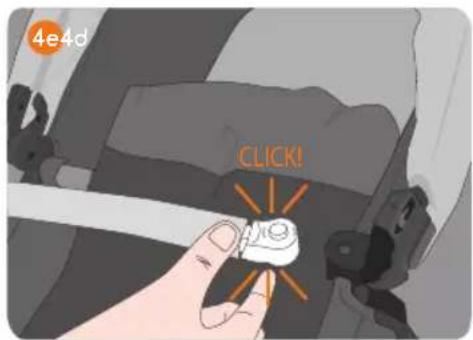
Follow the procedure in reverse to close the bumper bar until you hear it click back into place. 4d
You can take the bumper bar off by pressing both round buttons at the same time and pulling the bumper bar outwards.4e Follow the same procedure in reverse to attach the bar again, making sure it clicks into place.

WARNING: The child should be kept away from the mobile parts when the responsible adult is handling these. The appearance of cutting, compression and pinch points are inevitable during these operations.
To fasten the carrycot to a Jané chassis, position the carrycot so that the child's head is at the end opposite the handlebar. 5
Insert the Profix adaptors into the slots in the chassis armrests, intended for this; they will click when locked into place. 5a

TAKE CARE! Before using it, make sure that all the locking catches are closed.
To detach the carrycot from the chassis, pull the unlocking buttons on the adaptors upwards and detach the carrycot from the pushchair by lifting it up. 5b
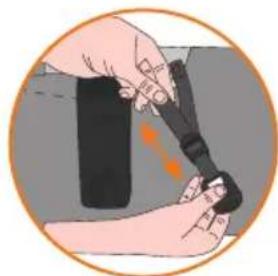
To prevent the carrycat from rocking, when attaching it to the pushchair use the fastening system following the instructions. Adjust the strap to tighten it.
-KENDO, WALKY 6
-MUUM 7
-EPIC, RIDER, TRIDER 8

WARNING: Unlock the system before removing the carrycot.
H. MAINTENANCE
Clean the plastic parts with soap and warm water, then carefully dry all the components.
Hand wash at temperature no higher than 30^ C. Leave to dry naturally in a shaded place.
If the upholstery is exposed to sunlight for prolonged periods of time it may affect the colour of the fabric.
MICRO-BB comes with a guarantee with precise specifications for correct maintenance, which are important for the guarantee to remain fully valid.
For your safety and the good conservation of this product, it is important to bring it to one of our official workshops for regular inspections.

I. INFORMATION ABOUT THE GUARANTEE
This product comes with a guarantee in compliance with Royal Legislative Decree 1 / 2015 of 24 July. Keep your purchase receipt, you will need to show it in the shop where you bought the product to prove the guarantee is valid if you have any complaints.
This guarantee excludes any defects or breakages caused by inappropriate use of the article or inobservance of the safety and maintenance rules listed in the instruction pages and on the care labels, as well as faults caused by wear and tear through normal use and daily handling.
The label displaying the chassis number of the model should never be taken off, it contains important information.

NOTICE: For maximum safety and care for your new JANÉ item, it is very important that you register your new product on our website www.janeworld.com. This registration means we can inform you, if necessary, of the evolution and maintenance of your product. Additionally, if you would like, we can also inform you about new models or news that we think may be useful for you.


NOTICE
INDEX
A. LISTE DES PIÈCES 30
B. INFORMATION ET CONSEILS DE SÉCURITÉ 31
C. DÉPLIAGE 32
D. PLIAGE 32
E. UTILISATION DE LA CAPOTE 32
F. BARRE DE PROTECTION ET COUVRE-PIEDS 32
G. MONTAGE SUR UNE POUSSETTE JANÉ 33
H. ENTRETIEN 33
I. INFORMATIONS RELATIVES À LA GARANTIE 34

A. LISTE DES PIÈCES
1- SANGLES DE PLIAGE
2- CAPOTE
3- COUVRE-PIEDS
4- SYSTÈME PROFIX
5- SANGLE ANTI-BALANCEMENT
6- ARCEAU DE SÉCURITÉ

B. INFORMATION ET CONSEILS DE SÉCURITÉ
Instructions
A. TEILELISTE
1- FALTGURTE
2- HAUBE
3- FUSSSACK
4- PROFIX-SYSTEM
5- ANTIWIPPGURT
6- SCHUTZBÜGEL

A. LISTA DEI COMPONENTI
1- CINGHIE DI CHIUSURA
2- CAPOTTINA
3- POGGIAPIEDI
4- SISTEMA PROFIX
5- CINGHIA ANTI DONDOLIO
6- BARRA DI PROTEZIONE

A. LISTA DE PEÇAS
1- FITAS DE DOBRAGEM
2- CAPOTA
3- COBRE-PÉS
4- SISTEMA PROFIX
5- FITA ANTI-BALANCEAMENTO
6- BARRA PROTETORA

A. LISTA CZEŚCI
1- PASY ŚCIĄGAJĄCE
2- DASZEK
3- POKROWIEC NA NOGI
4- SYSTEM PROFIX
5- PAS MOCUJACY
6- PAŁAK ZABEZPIECZAJĄCY

B. INFORMACJE DOTYCZĄCE BEZPIECZEŃSTWA I OSTRZEŻENIA
Instrukcje
I. INFORMACJA GWARANCYJNA
A. SEZNAM DÍLŮ
1- UPEVŇOVACÍ PÁSKY
2- STŘÍŠKA
3- NÁNOŽNÍK
4- SYSTÉM PROFIX
5- POJISTNÁ PÁSKA PPROTI HOUPÁNÍ
6- OCHRANNÁ HRAZDIČKA

B. DŮLEŽITÉ BEZPEČNOSTNÍ INFORMACE
Návod k obsluze
A. LLSSMADEEPIREZAS
1- CINTESDEPEGAD
2- CAPOTA
3- COBREPEUS
4- SISTEMA PROFIX
5- CINTA ANTI BALANCEIG
6- BARRA PROTECTORA