AKS 2010 - Cooker IGNIS - Free user manual and instructions
Find the device manual for free AKS 2010 IGNIS in PDF.
Frequently Asked Questions - AKS 2010 IGNIS
User questions about AKS 2010 IGNIS
0 question about this device. Answer the ones you know or ask your own.
Ask a new question about this device
Download the instructions for your Cooker in PDF format for free! Find your manual AKS 2010 - IGNIS and take your electronic device back in hand. On this page are published all the documents necessary for the use of your device. AKS 2010 by IGNIS.
USER MANUAL AKS 2010 IGNIS
IMPORTANT SAFETY INSTRUCTIONS
YOUR SAFETY AND THAT OF OTHERS IS VERY IMPORTANT
This manual and the appliance itself provide important safety warnings, to be read and observed at all times.

This is the danger symbol, pertaining to safety, which alerts users to potential risks to themselves and others.
All safety warnings are preceded by the danger symbol and the following terms:

DANGER

WARNING
Indicates a hazardous situation which, if not avoided, will cause serious injury.
Indicates a hazardous situation which, if not avoided, could cause serious injury.
All safety warnings give specific details of the potential risk present and indicate how to reduce risk of injury, damage and electric shock resulting from improper use of the appliance. Carefully observe the following instructions:
- The appliance must be disconnected from the power supply before carrying out any installation work.
Installation and maintenance must be carried out by a qualified technician, in compliance with the manufacturer's instructions and local safety regulations. Do not repair or replace any part of the appliance unless specifically stated in the user manual.
Regulations require that the appliance is earthed.
The power cable must be long enough for connecting the appliance, once fitted in its housing, to the power supply socket.
For installation to comply with current safety regulations, an all-pole disconnect switch with minimum contact gap of 3mm must be utilized.
-
Do not use multiple plug adapters or extension leads.
-
Do not pull the power supply cable in order to unplug the appliance.
-
The electrical components must not be accessible to the user after installation.
-
Do not touch the appliance with any wet part of the body and do not operate it when barefoot.
This appliance is designed solely for use as a domestic appliance for cooking food. No other type of use is permitted (e.g.: heating rooms). The Manufacturer declines all responsibility for inappropriate use or incorrect setting of the controls.
The appliance is not intended for use by persons (including children) with any physical, sensory or mental impairment, or without experience and knowledge of the appliance, unless supervised or previously instructed in its use by those responsible for their safety.
The accessible parts of the appliance may become very hot during use. Young children should be kept away from the appliance and supervised to ensure that they do not play with it.
During and after use, do not touch the heating elements or interior surfaces of the appliance - risk of burns. Do not allow the appliance to come into contact with cloths or other flammable materials until all the components have cooled sufficiently.
At the end of cooking, exercise caution when opening the appliance door, letting the hot air or steam exit gradually before accessing the oven. When the appliance door is shut, hot air is vented from the aperture above the control panel. Do not obstruct the vent apertures.
-
Use oven gloves to remove pans and accessories, taking care not to touch the heating elements.
-
Do not place flammable materials in or near the appliance: a fire may break out if the appliance is inadvertently switched on.
Do not heat or cook sealed jars or containers in the appliance. The pressure that builds up inside might cause the jar to explode, damaging the appliance.
-
Do not use containers made of synthetic materials.
-
Overheated oils and fats catch fire easily. Always remain vigilant when cooking foods rich in fat and oil.
-
Never leave the appliance unattended during food drying.
If alcoholic beverages are used when cooking foods (e.g. rum, cognac, wine), remember that alcohol evaporates at high temperatures. As a result, there is a risk that vapours released by the alcohol may catch fire upon coming into contact with the electrical heating element.
Scrapping of household appliances
This appliance is manufactured with recyclable or reusable materials. Dispse of it in accordance with local waste disposal regulations. Before scrapping, cut off the power supply cable.
For further information on the treatment, recovery and recycling of household electrical appliances, contact your competent local authority, the collection service for household waste or the store where you purchased the appliance.
INSTALLATION
After unpacking the oven, be sure that it has not been damaged during transport and that the oven door closes properly. In the event of problems, contact the dealer or your nearest After-sales Service. To avoid any damage, only remove the oven from its polystyrene foam base at the time of installation.
PREPARING THE HOUSING UNIT
- Kitchen units in contact with the oven must be heat resistant (min 90^ ).
- Carry out all cabinet cutting work before fitting the oven in the housing and carefully remove all wood chips and sawdust.
- After installation, the bottom of the oven must no longer be accessible.
- For correct appliance operation, do not obstruct the minimum gap between the worktop and the upper edge of the oven.
ELECTRICAL CONNECTION
Be sure the power voltage specified on the appliance dataplate is the same as the mains voltage. The dataplate is on the front edge of the oven (visible when the door is open).
Power cable replacement (cable type indicated on the connection label) must be carried out by a qualified electrician. Contact an authorized service centre.
INTERCONNECTING HOB AND OVEN
IMPORTANT: do not connect the oven to the power supply before you have finished connecting the oven and hob. Before connecting the oven to the power supply, be sure that the hob is among the ones listed in the hob/oven pairing product sheet provided. Connect the hob connectors to the oven connectors as shown in the Installation Instruction, be sure that you match the colours and that the connector slots are aligned. Insert the connectors and push them in until they click into place. Unscrew the nut of the ground screw located on the top covering of the oven and insert the yellow/green earth wire, leaving the washer in place. Firmly retighten the nut of the ground screw.
IMPORTANT: if the hob terminals do not match the connection and colours of the sockets on the oven, require the adapter kit, code AMC 873, available from After Sales Service.
GENERAL RECOMMENDATIONS
Before use:
- Remove cardboard protection pieces, protective film and adhesive labels from accessories.
- Remove the accessories from the oven and heat it at 200^ for about an hour to eliminate the smell and fumes from the insulating materials and protective grease.
During use:
- Do not place heavy objects on the door as they could damage it.
- Do not cling to the door or hang anything from the handle.
- Do not cover the inside of the oven with aluminium foil.
-
Do not pour water into the inside of a hot oven; this could damage the enamel coating.
-
Do not drag pots or pans across the bottom of the oven as this could damage the enamel coating.
- Be sure that the electrical cables of other appliances do not touch hot parts of the oven or become trapped in the door.
- Do not expose the oven to atmospheric agents.
SAFEGUARDING THE ENVIRONMENT

Disposal of packing material
The packing material is 100% recyclable and is marked with the recycle symbol (C). The various parts of the packing must therefore be disposed of responsibly and in full compliance with local authority regulations governing waste disposal.
Scrapping the product
This appliance is marked in compliance with European Directive 2002/96/EC, Waste Electrical and Electronic Equipment (WEEE).
- By ensuring this product is disposed of correctly, you will help avoid potential negative consequences for the environment and human health, which could otherwise be caused by inappropriate waste handling of this product.
The symbol on the product or on the accompanying documentation indicates that it should not be treated as domestic waste but must be taken to an appropriate collection centre for the recycling of electrical and electronic equipment.
Energy saving
- Only pre-heat the oven if specified in the cooking table or your recipe.
- Use dark lacquered or enamelled baking moulds as they absorb heat far better.
Switch the oven off 10/15 minutes before the set cooking time. Food requiring prolonged cooking will continue to cook even once the oven is switched off.
DECLARATION OF CONFORMITY (C)
This oven, which is intended to come into contact with foodstuffs, complies with European Regulation (C €) n.1935/2004 and has been designed, manufactured and sold in conformity with the safety requirements of the "Low Voltage" directive 2006/95/CE (which replaces 73/23/CEE and subsequent amendments), the protection requirements of "EMC" 2004/108/CE.
TROUBLESHOOTING GUIDE
The oven does not work:
- Check for the presence of mains electrical power and if the oven is connected to the electrical supply.
- Turn off the oven and restart it to see if the fault persists.
The door will not open:
- Turn off the oven and restart it to see if the fault persists.
- Important: during self-cleaning, the oven door will not open. Wait until it unlocks automatically (see paragraph "Cleaning cycle of ovens with pyrolysis function").
The electronic programmer does not work:
If the display shows the letter "F" followed by a number, contact your nearest After-sales Service. Specify in this case the number that follows the letter "F".
AFTER-SALES SERVICE
Before calling the After-Sales Service:
- See if you can solve the problem yourself with the help of the suggestions given in the "Troubleshooting guide".
- Switch the appliance off and back on again it to see if the fault persists.
If after the above checks the fault still occurs, get in touch with the nearest After-sales Service.
Always specify:
- a brief description of the fault;
- the type and exact model of the oven;
the service number (number after the word Service on the rating plate), located on the right hand edge of the oven cavity (visible when the oven door is open). The service number is also indicated on the guarantee booklet; - your full address;
- your telephone number.
SERVICE

0000 000 00000
If any repairs are required, please contact an authorised After-sales Service (to guarantee that original spare parts will be used and repairs carried out correctly).
CLEANING

WARNING
- Do not use steam cleaning equipment.
- Clean the oven only when it is cool.
- Disconnect power before servicing.
Oven exterior
IMPORTANT: do not use corrosive or abrasive detergents. If any of these products unintentionally comes into contact with the appliance, clean immediately with a damp cloth.
Clean the surfaces with a damp cloth. If it is very dirty, add a few drops of washing up detergent to the water. Finish off with a dry cloth.
Oven interior
IMPORTANT: do not use abrasive sponges or metallic scrapers or scourers. Over time, these can ruin enamelled surfaces and the oven door glass.
After every use, allow the oven to cool then clean it preferably while it is still warm in order to remove built-up dirt and stains caused by food residues (e.g. food with a high sugar content).
- Use proprietary oven detergents and follow the manufacturer's instructions to the letter.
Clean the door glass with a suitable liquid detergent. The oven door can be removed to facilitate cleaning (see MAINTENANCE).
The top heating element of the grill (see MAINTENANCE) can be lowered (some models only) to clean the roof of the oven.
N.B.: during prolonged cooking of foods with a high water content (e.g. pizza, vegetables, etc.) condensation may form on the inside of the door and around the seal. When the oven is cold, dry the inside of the door with a cloth or sponge.
Accessories:
Soak the accessories in water with washing up detergent immediately after use, handling them with oven gloves if still hot.
- Food residues can be easily removed using a brush or sponge.
Cleaning the rear wall and catalytic side panels of the oven (if present):
IMPORTANT: do not use corrosive or abrasive detergents, coarse brushes, pot scourers or oven sprays which could damage the catalytic surface and ruin its self-cleaning properties.
- Operate the oven empty with the fan-assisted function at 200^ for about one hour
- Next, leave the appliance to cool down before removing any food residue with a sponge.
MAINTENANCE

- Use protective gloves.
- Ensure the oven is cold before carrying out the following operations.
- Disconnect power before servicing.
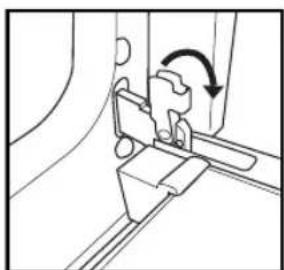
REMOVING THE DOOR
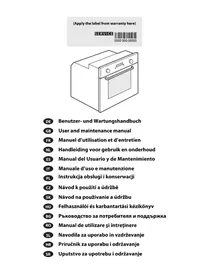
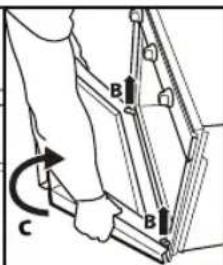
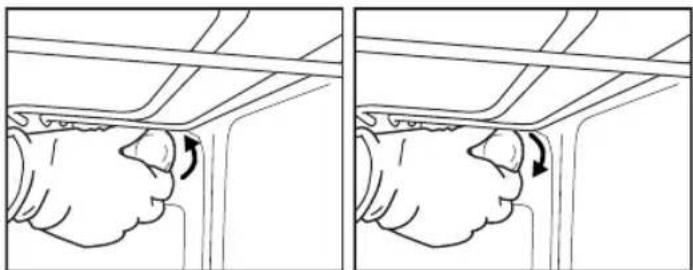
To remove the door:
- Open the door fully.
- Lift the catches and push them forwards as far as they will go (Fig. 1).
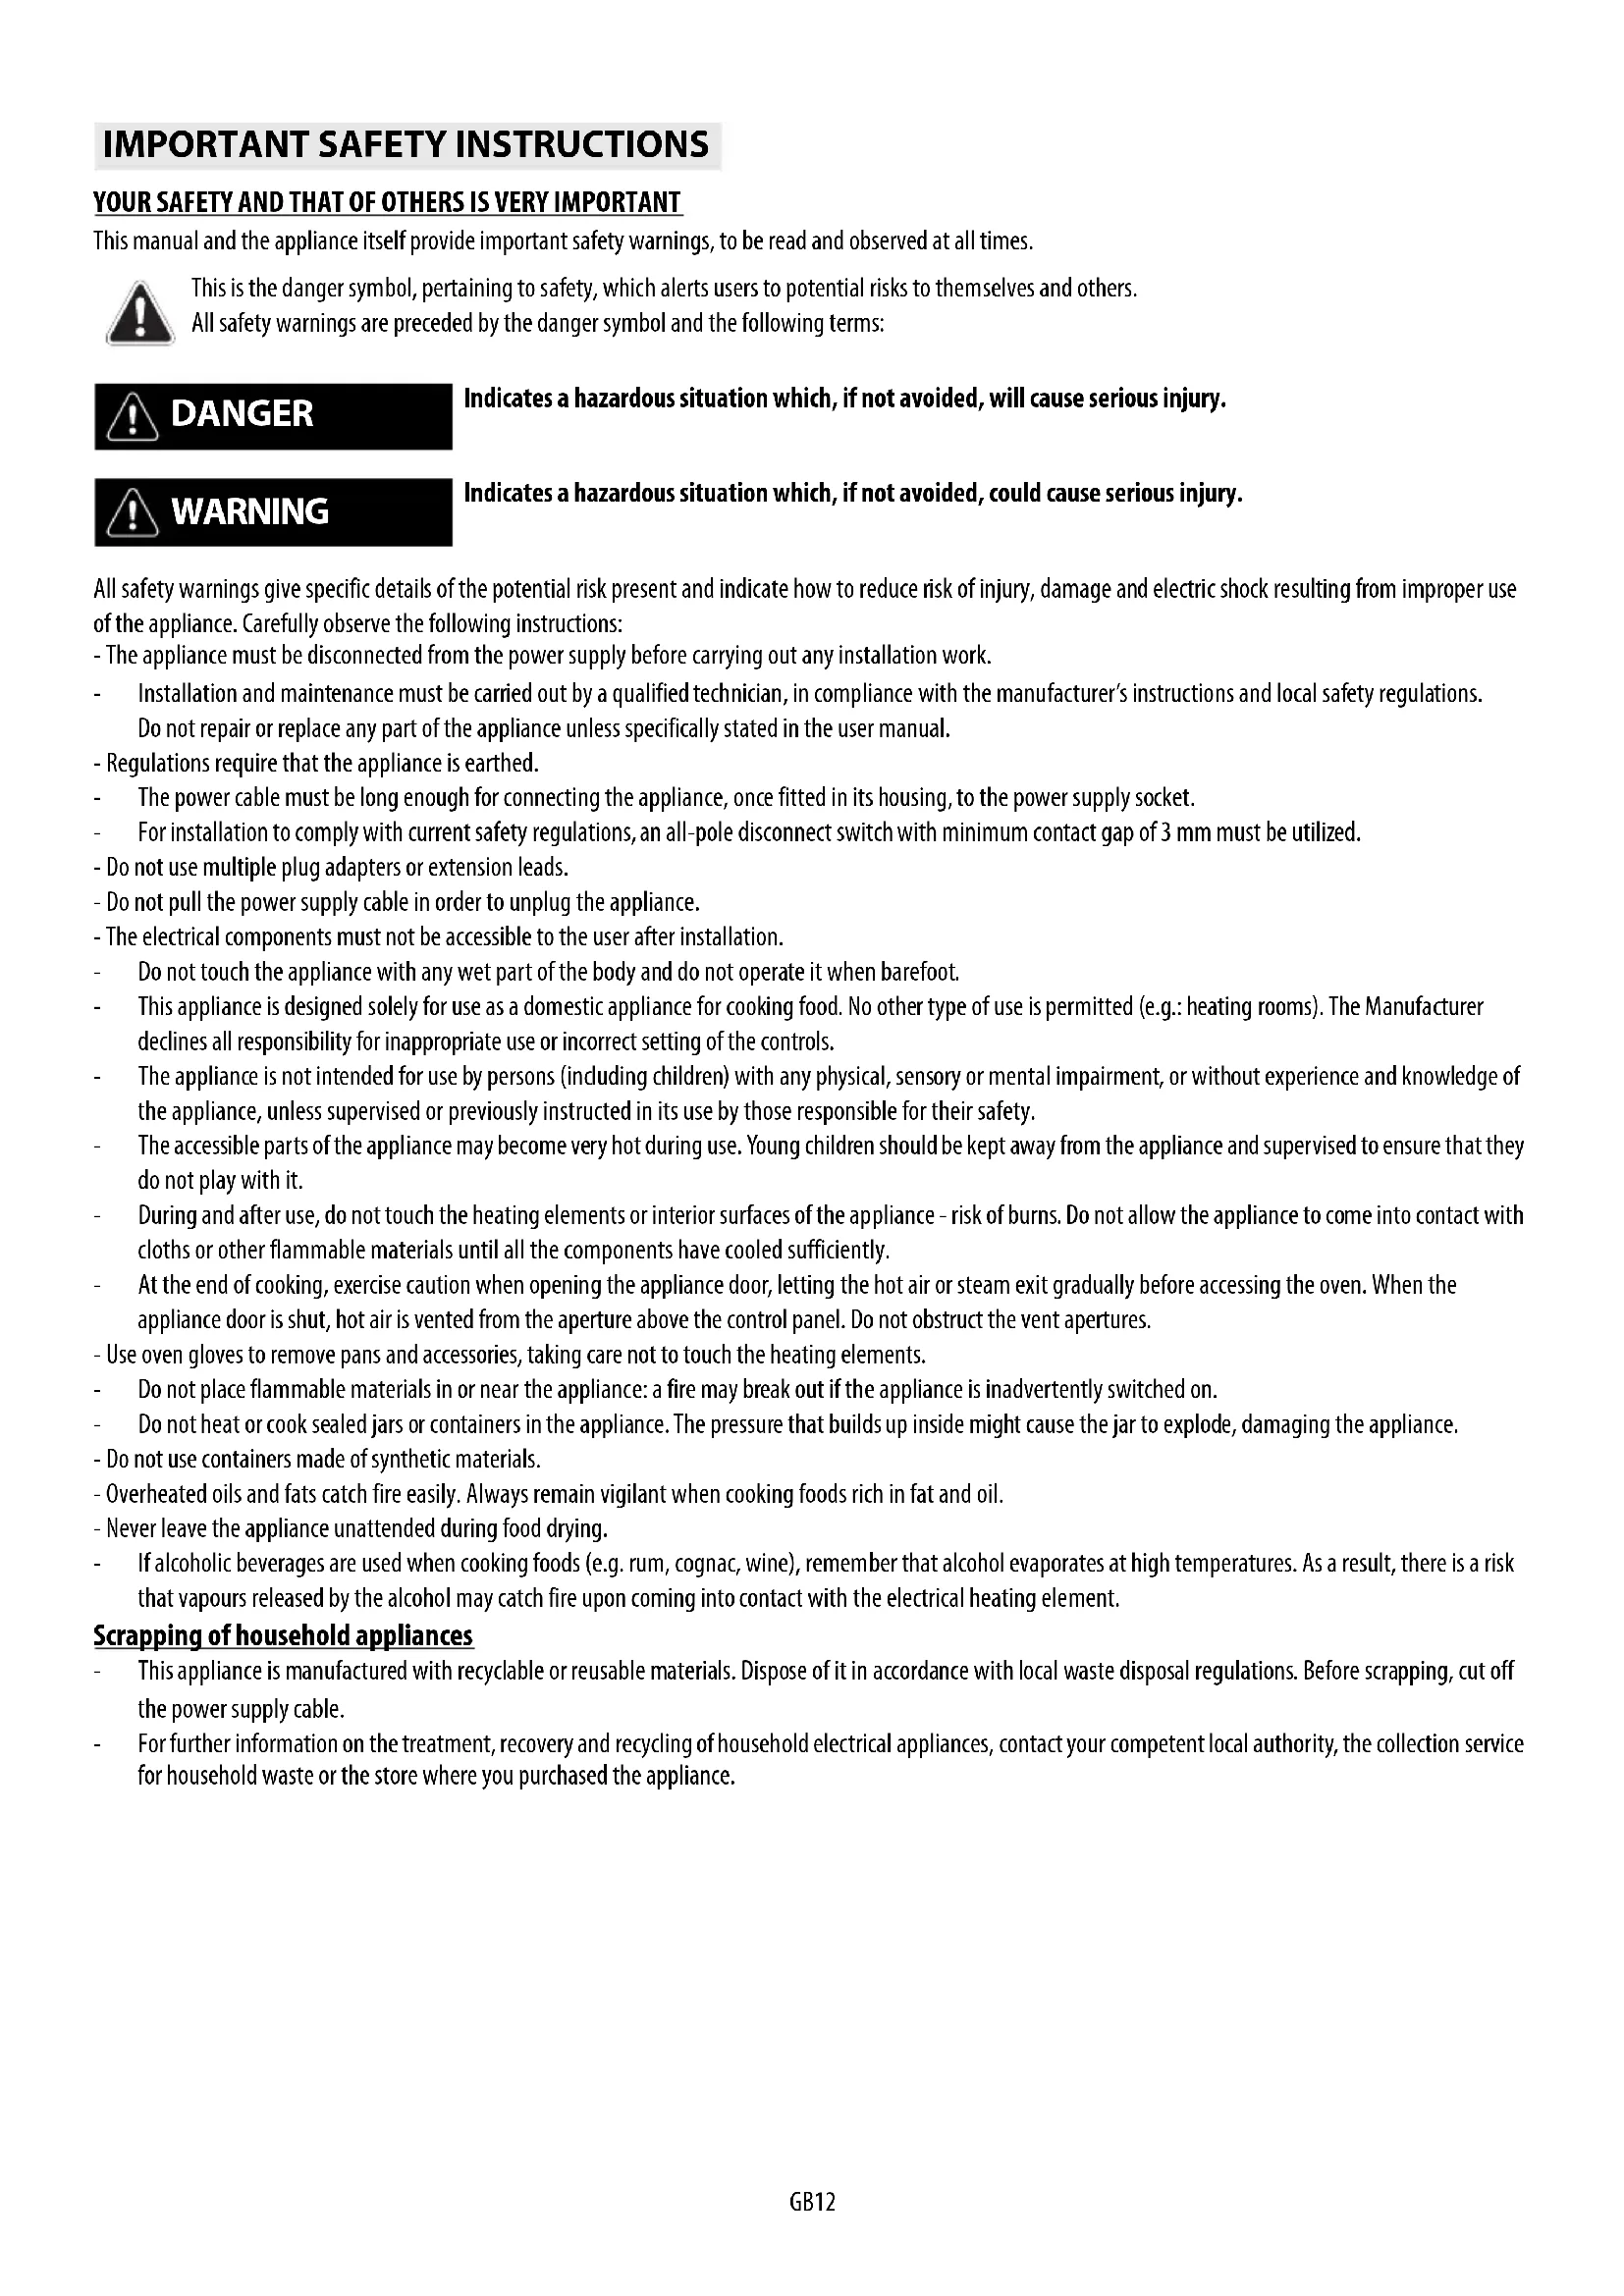
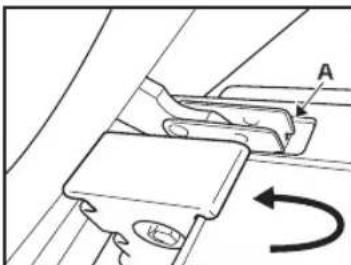
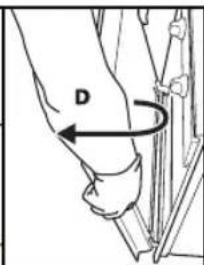
- Close the door as far as it will go (A), lift it up (B) and turn it (C) until it is released (D) (Fig. 2).
To refit the door:
- Insert the hinges in their seats.
- Open the door fully.
- Lower the two catches.
- Close the door.
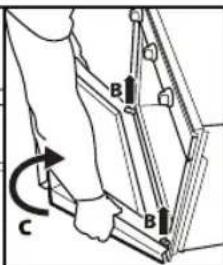
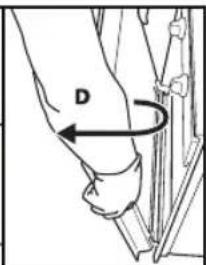
Fig.1 Fig.2
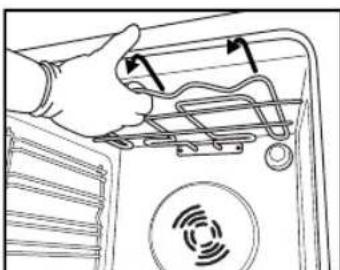
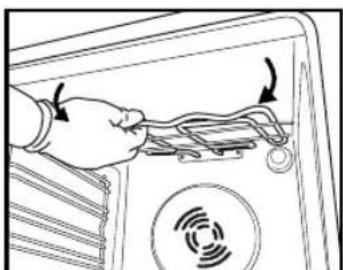
MOVING THE TOP HEATING ELEMENT (SOME MODELS ONLY)
- Remove the side accessory holder grilles (Fig. 3).
- Pull the heating element out a little (Fig.4) and lower it (Fig. 5).
- To reposition the heating element, lift it up, pulling it slightly towards you, be sure it comes to rest on the lateral supports.
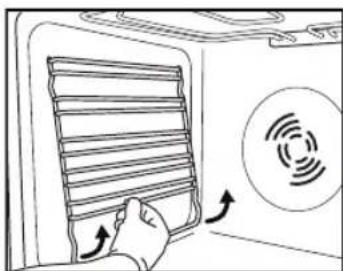
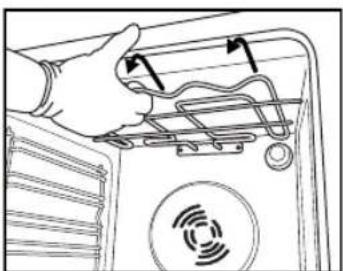
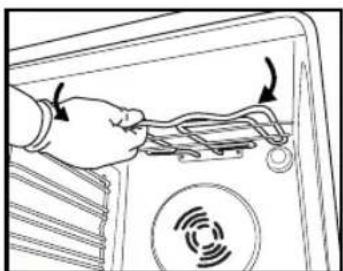
Fig.3 Fig.4 Fig.5
REPLACING THE OVEN LAMP
To replace the rear lamp (if present):
- Disconnect the oven from the power supply.
- Unscrew the lamp cover (Fig. 6), replace the lamp (see note for lamp type) and screw the lamp cover back on (Fig. 7).
- Reconnect the oven to the power supply.
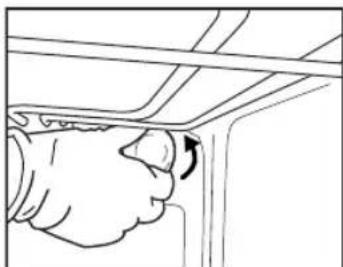
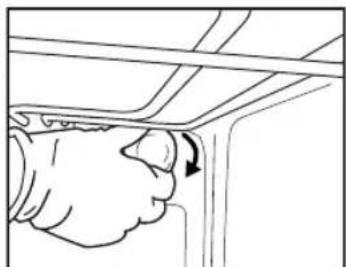
Fig.6 Fig.7
N.B.:
- Only use 25-40W/230V type E-14, T300°C incandescent lamps.
- Lamps are available from our After-sales Service.
IMPORTANT:
- Do not use the oven until the lamp cover has been repositioned.
INSTRUCTIONS FOR OVEN USE
FOR ELECTRICAL CONNECTION, SEE THE PARAGRAPH ON INSTALLATION
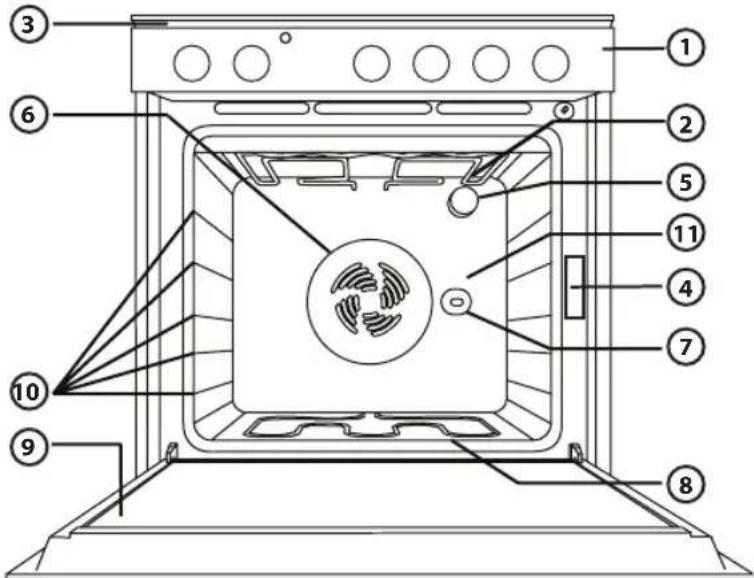
- Control panel
- Upper heating element/grill
- Cooling system (if present)
- Dataplate (not to be removed)
5.Light - Baking ventilation system (if present)
- Turnspit (if present)
- Lower heating element (not visible)
- Door
- Position of shelves
- Rear wall
N.B.:
- At the end of cooking, after the oven has been switched off, the cooling fan may continue to run for a while.
COMPATIBLE ACCESSORIES
(for the accessories supplied with oven refer to the tech fiche)

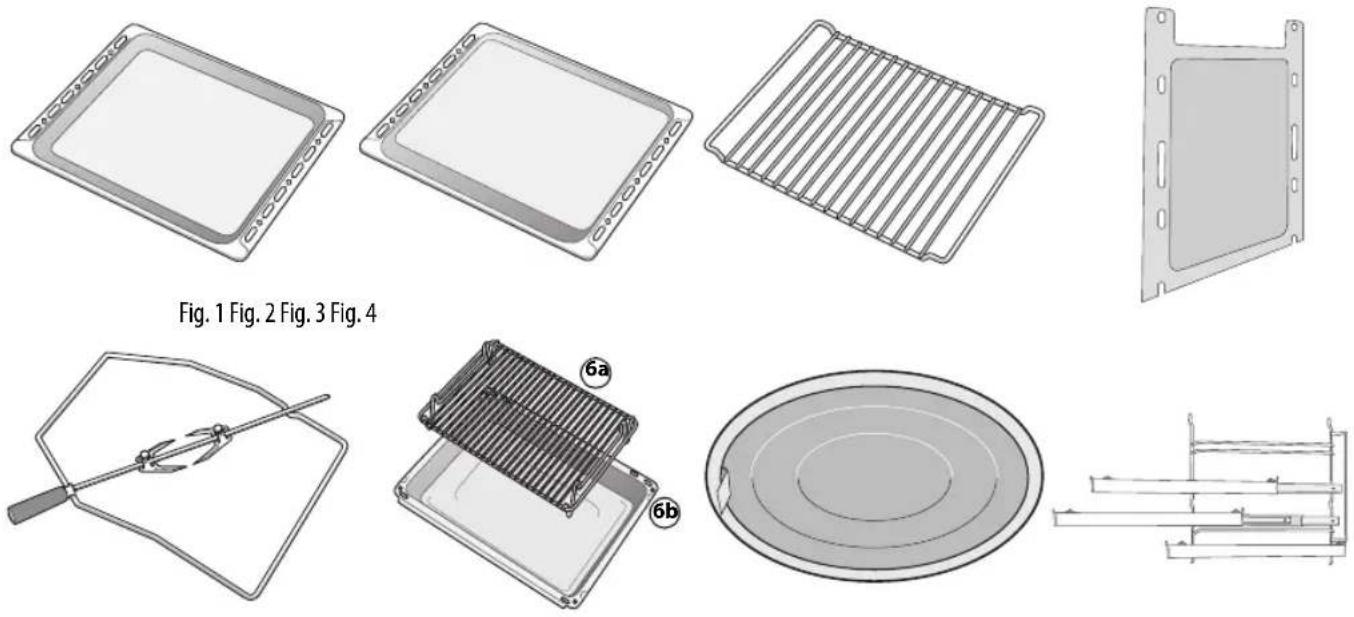
For collecting fat and bits of food when placed under the wire shelf, or as a plate for cooking meat, chicken and fish, etc., with or without vegetables. Pour a little water into the drip-tray to avoid spatters of fat and smoke.
Baking tray (Fig. 2)
For baking biscuits, cakes and pizzas.
Wire shelf (Fig. 3)
For gring food or as a support for pots, cake tins and other cooking receptacle. It can be placed on any available level. The wire shelf can be inserted with its curvature facing up or down.
Catalytic side panels (Fig. 4)
These panels have a special microporous enamel coating that absorbs fat spatters. It is advisable to do an automatic cleaning cycle after cooking particularly fatty food (see CLEANING).
Turnspit (Fig. 5)
Use the turnspit as indicated on Fig. 9. Also check "Recommended use and tips" section for advice.
Grill Pan Set (Fig. 6)
The set comprises a wire shelf (6a) and an enamelled recipient (6b). This set must be placed on the wire shelf (3) and used with the Grill function.
Grease filter (Fig. 7)
Use only for particularly greasy cooking. Hook it on the rear wall of the oven compartment, opposite the fan. It can be cleaned in a dishwasher and used with the fan-assisted function.
Sliding shelves (Fig. 8)
They allow the wire shelves and drip-trays to be pulled half out during cooking. Suitable for all the accessories, they can be cleaned in a dishwasher.
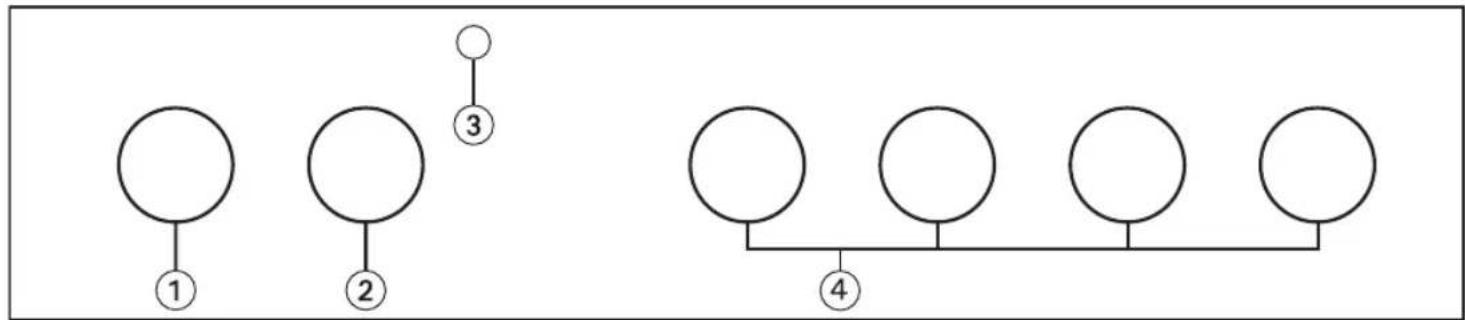
- Function selector knob
- Thermostat knob
- Red thermostat led
- Hob control knobs
SWITCHING ON THE OVEN
Turn the selector knob to the required function. The oven light switches on.
Turn the thermostat knob clockwise to the required temperature. The red thermostat led lights up, switching off again when the oven reaches the selected temperature. At the end of cooking, turn the knobs to "0".
HOW TO USE THE HOB
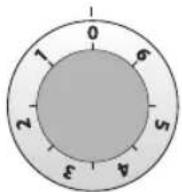
The oven control panel features 4 adjustable knobs (from 0 to 6) that control hob operation.
To turn on the electric hotplates:
Turn the control knob of the relevant hotplate clockwise to the desired power setting (see the instructions supplied with the hob).
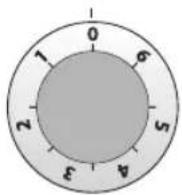
IMPORTANT:
- When using the hotplates for the first time, set the knobs to 6 and allow them to operate for approx. 3 minutes in order to eliminate odours, placing a pot with an appropriate diameter and half full of water on each.
- Do not leave the hot plates turned on when they are empty.
- Use pots and pans specifically designed for electric hobs, particularly those with multiple layer flat-bottoms.
- Use pans whose bottom diameter is equal to that of the hotplates, or slightly larger.
FUNCTION DESCRIPTION TABLE
| FUNCTION DESCRIPTION | ||
| O | OFF - | |
| - | LAMP To switch on the oven light. | |
|  | CONVENTIONAL | Function suitable for cooking any type of dish on one shelf. Preheat the oven to the required temperature and place the food in it when the set temperature is reached. It is advisable to use the second or third shelf for cooking. This function is also suitable for cooking frozen convenience foods; follow the instructions on the food packaging. |
|  | CONVECTION BAKE | To bake cakes with liquid filling (sweet or savoury) on a single level. This function is ideal also for cooking on two levels. If necessary, switch the positions of the dishes to cook food more evenly. |
|  | GRILL | To grill steak, kebabs and sausages, to cook vegetables au gratin and to toast bread. Preheat the oven for 3-5 min. During cooking the oven door must remain closed. When cooking meat, pour a little water into the drip tray (on the first level) to reduce smoke and fat spatters. Ideally the meat should be turned during cooking. |
|  | TURBOGRILL | To grill large joints of meat (roast beef and other roast meats). The oven door must be kept closed during the cooking cycle. When cooking meat, it is advisable to pour water in the drip-tray placed on the first level. This will reduce smoke and spattering of fat. Turn the meat during grilling. |
|  | DEFROSTING | This function can be used to speed up the thawing of food at room temperature. The food should be placed in the oven in its wrapping to avoid it from drying out. |
COOKING TABLE
| Recipe Function Preheating Shelf | (from bottom) | Temperature (°C) | Time (min) | Accessories | ||
| Leavened cakes | Yes | 2 | 160-180 | 35-55 | Wire shelf + cake tin | |
| Biscuits/Tartlets | Yes | 3 | 170-180 | 15-40 | Baking tray | |
| Choux buns | Yes | 3 | 180 | 30-40 | Baking tray | |
| Vols-au-vent / Puff pastry crackers | Yes | 3 | 180-200 | 20-30 | Baking tray | |
| Meringues | Yes | 3 | 90 | 120-130 | Baking tray | |
| Lamb / Veal / Beef / Pork | Yes | 2 | 190-200 | 90-110 | Drip tray or wire shelf + pyrex dish | |
| Chicken / Rabbit / Duck | Yes | 2 | 190-200 | 65-85 | Drip tray or wire shelf + pyrex dish | |
| Turkey / Goose | Yes | 2 | 190-200 | 140-180 | Drip tray or wire shelf + pyrex dish | |
| Baked fish / en papillote (fillet, whole) | Yes | 2 | 180-200 | 50-60 | Drip tray or wire shelf + pyrex dish | |
| Lasagne / Baked pasta / Cannelloni / Flans | Yes | 2 | 190-200 | 45-55 | Wire shelf + pyrex dish | |
| Bread / Focaccia | Yes | 2 | 190-230 | 15-50 | Drip tray or baking tray | |
| Pizza | Yes | 2 | 230-250 | 7-20 | Drip tray or baking tray | |
| Toast | Yes | 4 | 200 | 2-5 | Wire shelf | |
| Vegetable gratin | Yes | 3 | 200 | 15-20 | Wire shelf + pyrex dish | |
| Grilled fish fillets and steaks | Yes | 3 | 200 | 30-40 | Wire shelf + pyrex dish | |
| Sausages / Kebabs / Spare ribs / Hamburgers | Yes4 200 | 30-50 | Grill + drip tray with water on 1st shelf, turn halfway through cooking | |||
| Filled pies (cheesecake, strudel, apple pie) | Yes | 1 | 180-200 | 50-60 | Drip tray or wire shelf + pyrex dish | |
| Meat & potato pies (vegetable pie, quiche lorraine) | Yes | 1 | 180-200 | 35-55 | Wire shelf + cake tin | |
| Stuffed vegetables (tomatoes, peppers, courgettes, aubergines) | Yes | 2 | 180-200 | 40-60 | Wire shelf + pyrex dish | |
| Meat & potato pies (vegetable pie, quiche lorraine) | Yes | 1/3 | 180-190 | 45-55 | Grill +pan, switch levels halfway through cooking | |
| Pizzas/Focaccia | Yes | 1/3 | 230-250 | 12-30 | Baking tray+drip tray, switch levels halfway through cooking | |
| Recipe | Function | Preheating | Shelf (from bottom) | Temperature (℃) | Time (min) | Accessories |
| Biscuits/Tartlets | - | 1/3 | 170-180 | 20-40 | Baking tray+drip tray, switch levels halfway through cooking | |
| Choux pastry | - | 1/3 | 180 | 35-45 | Baking tray+drip tray, switch levels halfway through cooking | |
| Vols-au-vent / Puff pastry crackers | - | 1/3 | 180-200 | 20-40 | Baking tray+drip tray, switch levels halfway through cooking | |
| Roast chicken - 2 200 55-65 | Grill + drip tray with water on 1st level | |||||
| Roast potatoes | - | 3 | 200 | 45-55 | Drip tray | |
| Roast Beef underdone | - | 3 | 200 | 30-40 | Grill + drip tray with water on 1st level | |
| Leg of lamb/Knuckle | - | 2 | 200 | 55-70 | Grill + drip tray |
N.B.: cooking times and temperatures are approximate for 4 portions.
How to read the cooking table
The table indicates the best function to use for any given food, to be cooked on one or more shelves at the same time. Cooking times start from the moment food is placed in the oven, excluding pre-heating (where required). Cooking temperatures and times are purely for guidance and will depend on the amount of food and type of accessory used. Use the lowest recommended values to begin with and, if the food is not cooked enough, then move on to higher values. Use the accessories supplied and preferably dark coloured metal cake tins and oven trays. You can also use pans and accessories in pyrex or stoneware, but bear in mind that cooking times will be slightly longer. To obtain best results, follow the advice given in the cooking table for the choice of accessories (supplied) to be placed on the various shelves. When cooking food that contains lots of water, preheat the oven.
Cooking different foods at the same time
Using the "CONVECTION BAKE" function (if present), you can cook different foods which require the same cooking temperature at the same time (for example: fish and vegetables), using different shelves. Remove the food which requires less cooking time and leave food which requires longer cooking time in the oven.
Desserts
Cook delicate desserts with the conventional function on one shelf only. Use dark coloured metal cake tins and always position them on the wire shelf supplied. To cook on more than one shelf, select the forced air function and stagger the position of the cake tins on the shelves, aiding optimum circulation of the hot air.
To check whether a raising cake is cooked, insert a wooden toothpick into the centre of the cake. If the toothpick comes out clean, the cake is ready.
- If using non-stick cake tins, do not butter the edges as the cake may not rise evenly around the edges.
If the cake "sinks" during cooking, set a lower temperature the next time, perhaps reducing the amount of liquid in the mixture and mixing more gently.
- For sweets with moist fillings (cheesecake or fruit pies) use the "CONVECTION BAKE" function (if present). If the base of the cake is soggy, lower the shelf and sprinkle the bottom of the cake with bread crumbs or biscuit crumbs before adding the filling.
Meat
Use any kind of oven tray or pyrex dish suited to the size of the piece of meat being cooked. For roast joints, it is best to add some stock to the bottom of the pan, basting the meat during cooking for added flavour. When the roast is ready, let it rest in the oven for another 10-15 minutes, or wrap it in aluminium foil.
- When you want to grill meat, choose cuts with an even thickness all over in order to achieve uniform cooking results. Very thick pieces of meat require longer cooking times. To avoid the meat from burning on the outside, lower the position of the wire shelf, keeping the food farther away from the grill. Turn the meat two thirds of the way through cooking.
To collect the cooking juices it is advisable to place a drip-tray with half a litre of water directly under the grill on which the meat is placed. Top-up when necessary.
Turnspit (only in some models)
Use this accessory to evenly roast large pieces of meat and poultry. Place the meat on the spit rod, tying it with string if chicken, and check that it is secure before inserting the rod in the seat located on the front wall of the oven and resting it on the respective support. To avoid smoke and to collect cooking juices, it is advisable to place a drip-tray with half a litre of water on the first level. The rod has a plastic handle which must be removed before starting to cook, and used at the end of cooking to avoid burns when taking the food out of the oven.
Pizza
Lightly grease the trays to ensure the pizza has a crispy base. Scatter the mozzarella over the pizza two thirds of the way through cooking.
Rising function (present only in specific models)
It is always best to cover the dough with a damp cloth before placing it in the oven. Dough proving time with this function is reduced by approximately one third compared to proving at room temperature (20 - 25^) . Proving time for a 1Kg batch of pizza dough is around one hour.
INSTRUCTIONS IMPORTANTES SUR LA SECURITE
VOTRE SECURITE ET CELLE D'AUTRUI EST TRES IMPORTANTE
DECLARATION DE CONFORMITE (C)
ACCESSIONS COMPATIBLES
GUIDA RICERCA GUASTI
Tukovy filter (Obr.7)
BbHnHa yacHa yphhata
BHMMAHVE:Ja He Ce H3non3BAT DeTepreHTn, KOHTo CbIbPkaT KOpO3NBHN XHMKaH Nn a6pa3NBH NouchTaBau npenapatn. Ako HAKo OT Te3n npodukTN BnE3e CnyaHBO KOnTAKT CypeA, NouchTeTe He3a6abHc CBna
IouHCTe IOBbpxHOCTne CBnJxHa Kbpna. Ako ypeDa e MHOro MpbceH, npnbabeTe BbB BoaTa HraKoIko KaKN Ippenapat 3a MHe He Ha YHHN. POncyuTe Cbc cyxa Kbpna.
BbtpewhoctHa yphhata
BHIMAHNE: He n3noI3BaTe a6pa3nBHN r6bHnn Hm MetaHn CTbprAkn Hn Tc 3a TbpKaHe. C BpeMeTo, Te Morat da pa3pywAt emaHnpaHata NOBbpxHOCTNCTbKlOTo Ha BpTuKkata Ha yphata.
CneBcKa ynoTpe6a, octabeTe fypHata Da ce oxnaIu CnEe TOBa a noUcHTe, 3a npEINoHTaHe, OkaTo e Bce OSe TOnla, C cen Da ce OTcpaHn HaTpynanata ce MbpcoTna HNETHa oCTaTbUg NTxpaHa (Hanp. xpaHa C BVCOKO 3axapHo CbDbpXaHHe).
-Излбайтмаркови поуктуан заочьдайточно Иструкцпштел на погибдггл.
IouncTeTe CbKnTo Ha BpaTuKkata C noDxOJaT TeueH MnaHe H npenapat. BpaTuKaTa Ha fypHaTa MoKe Ce CBaI, 3a Da ce yneChn NouCtBaHeTo (BHX POnDbPJKA).
- TopHnT haPBeBATEHa rpnna (BnK NIOIbPkKA), Moke da ce cBaNa HADOny (cAmo npn HAKO MOdenu), 3a da ce nouchTu TabaHa Ha cyphata.
3A6EJIEXKA: no BpeMe Ha npoIbJnxIeHNO roTBeHe Ha XpaHn CBnCOKcBdbpKaHne Ha BOa (HaNP. Nua, 3eJeHuyn n T.H.), MoKe da ce 06pa3yBa KOHNeh3aT NO BbTpewHata CtpaHa Ha BpaTHuKhata N OKONo yNtBtHeHneTo. Korato fypHaTa e cTydeHa, noNuCTe BbTpewHata CTpHaHa BA BpaTuKhata C KbpNa HIN r6a.
PnHaadneXHoCTn:
CneynoTpe6a,naHnCHeTpnaHnEJNcHIOCTME BbB BODa C npOdyKT 3a MneHe, KaTO rN nIinaTe Cpbkauu 3a cyPha, aKo Ca BCE OSe Opeu.
- OCTaTbUHe OT XpHa MoRt Da Ce IpemaxHaT, KaTo I3NoI3BaTe YeTka Nn rB6a.
Nochte 3aHaTa CTeHa KaTaNtHnHHe CTpaHHn NaHeHn Ha fypHaTa (aKo NMa TaKnBa):
BHIMAHHE: He n3noi3BaIte KOp03uBn Hnn a6pa3uBn DeTepreHt, rpy6u YeTkn, Tb6n 3a TeHxepn Hnn cnpoe 3a fypHa, KOnto Morat da nobpeyrt kataiHTuHaTa NOBbpxHoc T Da pa3pyuAT camOnOuNCTBaUITE ce CBOICTBa.
BkIouTe Fyphata npa3Ha cakTNbnpaHa FyHKun 3a roTBeHe C bENTnAtoP npn 200^ 3a OKono eINH ac
CneToBaOCTaBeTe ypeDa Da ce OxnaIIN, PpeDu DaOTCTpaHIne C r6bA, KaKbBTO N da e OCTaTbK OT XpaHa.
PONDbPZKA

PPEyIINPEXJEHVE
-ⅢnOJI3BaIe 3aIHTHn pKABU.
- Ybepete ce, Ye cyphatae ctydeha, npedn n3BbpbbaHTo Ha cnEHNTE onepaun.
-13KIOUeTe eEnKToP03aXpaHbAHeto, npEi Da npEiPnMeTe DeICTBn no nOoDpBxKaTa.
CBAJIAREH A BPATNUKATA
3a da cbaInte BpaTmUkKaTa:
- 0TBopete do kpaBpaTnukkata Ha cyphhata.
- IOBUNHHTe OOraHUYNTENHHTe NOCTHeta HaNHTte NnN36VtAte HAnpeI.Do CNIPAHe HpEmecTbAHeto MM (Φm1,1).
- 3aTbOpeTe BpAtnuKaTa JOKbIeTo MoKe Ja CTrHRe (A). NOBUNrHeTe Ra HArOpE (B) n a 3aBbPteTe (C). DOKaTO ce ocBo6oDn (D) (Φur.2).
3a da noCTaBnTe OTHOBo BpaTuKkata:
- NocTabeTe NaHTnte Ha TEXHNTe MeCTa.
- OTBOPeTe JIo KpaI BpTaNtUkKaTHa H yPHaTa.
- IOHIXETOHOBODBeTe OPAHUNTEHNIOCTHTA.
4.3aTbOpeTe BpataTa.
Our.1 Our.2
IPEMECTBAHE HA TOPEH HAPPBATEJ (CAMO 3A HRAKOM MODEJI)
1.CBaIepeWetKInTeHaNbPbxauHtHeCTpaHnUHTne pNHaadNEXHOCTn (MnT.3).
2.ИЗдьрайтЕпКо habьн HarpeВateЯ (ФИR.4)и ro cBAJeTe HADONY (ФИR.5).
3. 3a da noctabnte HargbaTeI OTHOBo, NOBUNHHeTe ro Iro N3dbpaIte NeKbM Ce6e Cn, KaTO ce yBepHTe, Ye ToI ce 6LOknpa Ha cTpaHUnHInTe onOpN.

Φn.r.3Φn.r.4Φn.r.5
CMRAHAKPYWKATAHAΦYPHATA
3a da cMeHnte 3aHaTa KpyuKa (ako mTaKaBa):
1.ИЗклочеура от eелктрохаразнванeto.
2. Pa3BnTe KanaeTo Ha Kpykata (ΦIr. 6) n CmEHeTe Kpykata (3a Tnna Bx 3abeneKka) n 3aBnTe OTHOBo Ha Macto Kaaneto Ha Kpykata (ΦIr. 7).
3.CbbpKeTe OTHOBO cyphata KbmeEkeTpueckata Mpeka.
Φn.6 Φn.7
3A6EJIEXKA:
-Изнорзайтсамкрушик25-40W/230V тиE-14,T300°C.
-KpyuKHTe ce npednaat B CepBn3nta 3a noDlbpxka.
BHIMAHVE:
- He n3non3BaIte yphata, 6e3 da cTe noCTaBnH Ha MxCTo KanaYeTo Ha KpyKkaT.
3aBbPTeTe KOnuTeHa Cb0TBeHTa NIO ONo NOCKa Ha YacOBHnKOBaTa CTpeNka Ha XeJaHaTa HAcToPoiKa 3a MoUHOCT (BX. INCTpykUNTE, PneIOCTaBeHN 3aeJHO C NIOUaTa 3a roTBeHe).
BHIMAHVE:
Pn npbBTO n3nonBaHe Ha KOtIOHnTe, 3aBpTeTe KOnyeteHa NIOXeHne 6 nI NOCTabe Ta pa6OT OKO. 3 MNHyTu 3a npemaxBaHe Ha MUPIN3MITE, KaTo NoCTABnTE Bbpy BCEKN OT T8x CbD cN0xOJaU dNaMeTbp, HAnoONBuHa NbNeH CBOda.
Kotnohnte He Tpa6Ba da pa60Tat 63 cBbpxy tax.
- 3n0n3BaBaiTe TeHxepen TuraHn CneuaHNO n3pa6oTeHN 3a eNeKtpueeCKn PIOuN, HnA-HBeVe Te3N C MHOroCIOHn POLOKO hHO.
-ДиamMeTbpbT Ha OCHOBaTa Ha Cbda Tpa6Ba Da e paBeH UIIM MaJIko NO-ToJAM OT DuaMeTbpa Ha eNeKTPuYeCKn KOTNoH.
TABLIUCA C OINUCAHNE HA ΦYHKLUNTE
| Функция ONICAHWE | ||
| O | OFF- | |
| Крашka Влобчане | Бане на осветлино на Фурнатa. | |
| Коньенцюhalno Поче KOHBEKQUHNO Поче | Функциа т e похODЯЗ 3a neuehe Na BCSKAKBW BWDOBЯ STY RA e EDIN paФT. 3a rpeiTe npedBapitelno Φурнata do Желада ТЕМпeРaТурa и поставETхранATA B HeY, KORATO e NOCTMHRATA JezELAHATA TEmpePATypa. Прелорчы с da ce иЗПОЛЗВАВTOPИТ IILI TPEITNAT PaФT 3a rotBeHe. Ta3n Φункциа t e sbIIO noDxODЯЗ 3a rotBeHe na 3ampaZEHxpaHn; Следва Te INCHTPUKQUHNTe Ha onakOBKaTa H xpaHnA. | |
| КоньенцюHNO Поче | За п ue�е Na TopTN C TeuHa Пльнka (Сладки Или coLEHn XpaHn) Na edINO HnBO. Ta3n Φункциа t e sbIIO noDxODЯЗ 3a rotBeHe na Дve HnBa. Прелорчы д a ce smeHЯ noLOXeHnTo Ha xpaHnTe, 3a da ce noIpyHn IO-XOMOREHNO I3ПИЧAnE, aKO e Heo6xOIMO. | |
| Грил | За п injOTBAHne Ha nbpxJOLI, shIIshYeTA, NaideHniZI, zelenchukov BGPeTeHn I 3a npeiNuHaNe Ha xIa6. 3a rpeiTe прдВарITeHNo ΦурнATA B noDyJIgHeNe Ha 3-5 MInH. ПО ВрЕMa Na cheyHTo, BparuKATA Na phypHATA Trp6Ba Da OCTaHne ЗАТВореHa. Korato NeueTe MeCo, HanleIte MaNKo BOda B TabaT a 3a c6bIpaHne Ha kaneUa Ma3HnHa (NoCTABeHa Na pIpbTO HnBO), 3a da ce HamaII NIMa I ppckite OT Ma3HnHa. Прелорчы ce MeCOTO da ce obpBuIa NO ВрЕMa Na peUeHne. | |
| ТуБОГРИ | За п injOTBAHne Ha roIeMn Napceta Meco (poCTbIφ, neueHo). ПО ВрЕMa Na cheyHHe BparuKATA Na phypHATA Trp6Ba Da OCTaHne ЗАТВореHa. Korato NeueTe MeCo, ce пeRoperbUvBa d a HanleIte MaNKo BOda B TabaT a 3a c6bIpaHne Ha kaneUa Ma3HnHa, пocstabEsHa Na pIpbTO HnBO. Toba duce HamaII Dmua I ppckite OT Ma3HnHa. 06bprHete MeCOTO NO ВрЕMa Na peUeHne. | |
| РAZMPA3ЯBAH | Та3n Φункция може д aбьde ИЗПОЛЗВаHa 3a 6bP3O pa3Mpa3ЯВaHne Ha xpaHa pri Na StaIHa TempePATypa. XpaHata Trp6Ba Da се сIoJx B bB ΦурнATA B co6CTBENATA N onakOBkA, 3a da ce nI36eHne nI3CbXBAHne. | |
TAbIuA 3A PNeUHe
| Peçentа Фунckия Пedingаритello | Заграхе | Рафт(OTDOЛ) | Tempepaтура(℃) | Вре'me(Mин.) | Принадлесноу | ||||||
| Торг. замесен c мая | Дa | 2 | 160-180 | 35-55 | Сkapа + Формп 3a Торта/Кекс | ||||||
| Биckвити/Флан | Дa | 3 | 170-180 | 15-40 | Тава 3a Сладкиш | ||||||
| Бине | Дa | 3 | 180 | 30-40 | Тава 3a Сладкиш | ||||||
| Vols-au-vent /Сoleнки OT ронл bo tectо | Дa | 3 | 180-200 | 20-30 | Тава 3a Сладкиш | ||||||
| Челувки | Дa | 3 | 90 | 120-130 | Тава 3a Сладкиш | ||||||
| Аг_neшко /Телешко / Говедо /Свинско | Дa 2 190-200 | 90-1 | 10 | Тава 3a Сыбраве на мазнина ил skар + "піPECк" Тава | |||||||
| Плile/Заек/Патиca | Дa | 2 | 190-200 | 65-85 | Тава 3a Сыбраве на мазнина ил skар + "піPECк" Тава | ||||||
| Пуиka / Гьда | Дa | 2 | 190-200 | 140-180 | Тава 3a Сыбраве на мазнина ил skар + "піPECк" Тава | ||||||
| Риба на Фурна / Риба обвita в Харта за Фурна (фиме, сюда) | Дa 2 180-200 | 50-60 | Тава 3a Сыбраве на мазнина ил skар + "піPECк" Тава | ||||||||
| Пазаня / Поста на Фурна / Канелони /Флан | Дa | 2 | 190-200 | 45-55 | Сkapа + "піPECк" Тава | ||||||
| Хлебета / Фокача | Дa | 2 | 190-230 | 15-50 | Тава 3a Сыбраве на мазнина ил тава 3a Сладкиш | ||||||
| Пица | Дa | 2 | 230-250 | 7-20 | Тава 3a Сыбраве на мазнина ил тава 3a Сладкиш | ||||||
| Тост | Дa | 4 | 200 | 2-5 | Сkapa | ||||||
| Зелеников orbетен | Дa | 3 | 200 | 15-20 | Сkapa + "піPECк" Тава | ||||||
| Риба на скара Ф莉и и риба на парчerta | Дa 3 200 30-40Сkapa + "піPECк" Тава | ||||||||||
| Надени / Кебаниета / Реб耗费 / Хamбурири | Дa 4 200 30-50 | Трип + Тава 3a Сыбраве на мазнина с Bodа на 1-bv рafт, obьнete等相关ities on the study of the study of the study of the study of the study of the study of the study of the study of the study of the study of the study of the study of the study of the study of the study of the study of the study of the study of the study of the study of the study of the study of the study of the study of the study of the study of the study of the study of the study of the study of the study of the study of the study of the study of Tonti Cпльник (чимские, чужden, п lodова торта) | Дa 1 180-200 | 50-60 | Трип + Тава 3a Сыбраве на мазнина ил skар + "піPECк" Тава | ||||||
| Месо & картофен пай (зелеников пай, киш) | Дa | 1 | 180-200 | 35-55 | Сkapa + Формп 3a Торtega/Кекс | ||||||
| Пьлени Зеленици (домати, чужки, Тickersчки, патаджан) | Дa | 2 | 180-200 | 40-60 | Сkapa + "піPECк" Тава | ||||||
| Месо & картофен пай (зелеников пай, киш) | Дa | 1/3 | 180-190 | 45-55 | Трип + Тоган, сmedete Невата等相关ities on the study of the study of the study of the study of the study of the study of the study of the study of the study of the study of the study of the study of the study of the study of the study of the study of the study of the study of the study of the study of the study of the study of the study of the study of the study of the study of the study of the study of the study of the study of the study of the study of Tonti Chelikov (чимские, чужden, патаджан) | Дa |
ACCESORII COMPATIBLE
(pentru accesorile furnizate impreunacu cuptorul, consultata fisa tehnica)
VAZNE SIGURNOSNE UPUTE
VAŠA SIGURNOST I SIGURNOST DRUGIH VRLO JE VAŽNA
Ovaj priručnik i sam urežaj priskrbljuju važna sigurnosna upozorenja koja morate pročitati i stalno ih se pridžavati.

Ovo je simbol opasnosti koji se odnosi na sigurnost, a upozorava korisnike na mogucu opasnost za njih i druge osobe.
Svim sigurnosnim upozorenjima prethodi simbol opasnosti i sljedecci pojmovi:

OPASNOST

UPOZORENJE
Ukazuje na opasnu situaciju koja bi, aka je ne izbjegnete, mogla prouzroci tesi kuz ozieledu.
Ukazuje na opasnu situaciju koja bi, aka je ne izbjegnete, mogla prouzroci teseku ozljedu.
Sva sigurnosna upozorenja daju specifiche detailje o postojcoj mogucoj opasnosti iPokazuju kako smanjiti opasnost od ozljeda, stete i elektricnog udara koji mogur rezultirati uslije nepravilne uporabe uredaja. Pažljivo se pridržavaje sljedecih uputa:
- Uredaj morate iskopcati iz elektricnog napajanja prije vr'senja bilo kakvih radova postavljanja.
Postavljanje i odzavanje mora vriti kualificirani tehnicar, prema uputama proizvoda i sukladno lokalm odredbama na snazi. Nemojte popravljati n pamjenjivati bilo koji dio uredaja, osim ak se to izricito ne navodi u korisnickom piručniku.
-Uzemljenje aparata zakonski je obavezno. - Elektricni kabel mora biti dovoljno dug kako bi se urežaj, nakon smjestanja u element, moglo prikljuciti na elektricnu uticnicu.
Kako bi postavljanbe bilo u skladu s propisima o sigurnosti na snazi, treba koristiti rastavnu sklopku sa zašitom na svim polovima i minimalnim razmakom izmedukontakata od 3 mm.
Nemojte koristiti visestruke utikače ili produzne kabele. - Nemojte povlačiti elektrčni kabel kako bi iskopčali urežaj.
- Nakon postavljanja, elektriche komponente ne smiju biti dostupne korisniku.
Nemojte dirati uredaj vlaznim dijelovima tijela niti rukovati njime aksteosi.
Namjena uredaja je iskluzivo uporaba u domacinstvu za pripremu jela. Ne dopušta se drugacija uporaba (npr.: grijanje prostorija). Proizvodac otklanja svaku odgovornost za neprikladno koriistenje ili za pogresno podesavanje upravljacih poluga.
Zabranjuje se uporaba ovog uredaja osobama (uklučujuci djecu) sa smanjenim fizickim, osjetnim ili mentalnim sposobnostima, odnosno bez iskustva i znanja, osim ak o u korištenje uredaja ne uputi osoba odgovorna za njihovu sigurnost.
Dijelovi uredaja na dohvatu mogu se jakzagrijati tijekom uporabe. Maloj djeci nepoupustaje pristup i nadgledajte ih, kakbiste osigurali da se ne igraju s uredajem.
Za vrijeme i nakon uporabe nemojte dodirivati grijae ni unutarnje povrsine ureda - opasnost od opekotina. Nemojte dopustiti da uredaj dode u dodir s odjecom ili drugim zapaljivim materijalima, sve dok se svi dijelovi nisu dovolnno ohladili.
Budite oprezni prilikom otvaranja vrata ureda na kraju pecenja i pustite da vruci zrak ili para postupno izadu promise nogo sto pristupite pecnici. Kad su vrata ureda zatvorena, vruci zrak se odvodi kroz otvor iznad upvljacke ploce. Nemoje zaepljivati ventilacjske otvore. - Prilikom vadenja posuda i dodatnog pribora koristite rukavice za pećnicu i pazite da ne dodirnete grijace.
- Nemojte stavljati zapaljve materijale u uredaj ni blizu njega: ak se uredaj slucajno ukljuci, mogao bi se zapaliti.
Nemojte podgrijavati ni peci u uredaju namirnice u zatvorenim staklenkama ili posudama. Pritisak koji se unjima razvija mogao bi prouzroctiti eksploziju staklenke i ošetiti uredaj.
Nemojte koristiti posude od sintetičkih materijala. - Pregrijano ulje i masnoća se lako zapale. Budno pratite pečenje namirnica s puno masnoće i ulja.
-Urejnikad nemojte ostavljati bez nadzora prilikom isusivanja hrane.
Ako prilikom pecenjera jela koristite alkoholna pica (npr. rum, konjak, vino), imajte na umu da alkohol na visokim temperaturama isparava. Postoji, dakle, opasnost da ce se pare koje oslobada alkohol zapaliti kad stupe u dodir s elektricnim grijaem.
Rashodovanie kuçanskih aparata
- Ovaj uredj je proizveden od materijala koje se moze reciklarati ili ponovno iskoristiti. Pridržavajte se lokalnih propisa za zbrinjavanje otpada. Prije rashodovanja, odrezite elektrici kabel.
Radi podrobnijh informacija o postupanju, spašavanju i reciklaranju elektrichnih kučanskih aparata, obratite se nadležnom mjesnom uredu, sluzbi za sakupljanje komunalng opada ili trgovini u kojoj ste uredjakupili.
POSTAVLJANJE
Nakon uklanjanja ambalaže s pećnice, provjerite da nijeDoslo do ostecenja za vrijeme prijevoza te da se vrata pećnice dobro zatvaraju. U slučaju problema, obratite se prodavaču ili njablžoj Sluzbi za tehnicku pomoć. Kako bist e izbegli ostecenja, uklonite ploču od pjenastog polistirena ispod pećnice tek u trenutku postavljanja.
PRIPREMA ELEMENTA ZA UGRADBU
- Kuhinjski elementi koji su u izravnom dodiru s pećnicom moraju biti otporni na toplinu (min. 90^ ).
Izvrsite sve radove piljenja prije namestanja pecnice u elementi pazljivo uklonite sve strugotine i piljevinu. - Nakon postavljanja, dno pećnice visne smije biti dostupno.
Za ispravan rad uredaja, nemojte zacepljivati minimalni razmak izmedu radne povrsine igornjeg ruba pecnice.
ELEKTRICNO SPAJANJE
Provjerite odgovara li napon navenen na natpisnoj pločici uredaja naponu elektrčne mreže. Natpisna pločica se nalazi na prednjem rubu pečnice (vidi se kad su vrata otvorena).
Zamjenu elektricnog kabela (tip kabela označen na neljepnic spoja) mora izvršiti kvalificirani elektricar. Obratite se ovlăstenom servisu.
MEDUSPAJANJE PLOCE ZAKUHANJE I PEÇNICE
VAZNO: nemojte priključivati pećnicu na elektricnu mrežu prije nego sto dovrsite spajanje. Prije spajanja pećnica na elektricnu mrežu, provjerite da li se model ploce za kuhanje navodi medu onima nabrojenim na dostavljenom listiću moguci h kombinacija ploca za kuhanje/pećnica. Spojite konektore ploce za kuhanje na konektore pećnice kako je prikazano na uputama za postavljanje, provjerite odgovaraju li boje i jesu li utori na konektorima poravnati. Izvrsite spajanje gurajuči konektore do kraja hoda i pazeci da jezičak odskoči. Odvjte maticu vijka za uzemljenje koji se nalazi u gornjemPokrov pećnice i umetnite Žuto/zeenu Žicu, a podlošku ostavite na mjectu. Čvsto ponovno zategnite maticu vijka za uzemljenje.
VAZNO: Ako stezajke plec zau khanje ne odgovaraju spoju i bojama utika c na pecnici, zatrazte adapter, sifra AMC 873, koji je dostupu u Sluzbi za tehnicku pomo.
OPCE PREPORUKE
Prijepurorabe:
- uklonite zašitne komade kartona, zašitnu foliju i naljepnice s dodatnog pribora.
Izvadite dodatni pribor iz pećnice i zagrijte je na 200^ otprilike sat vremena, kako bi nestao miris i dimovi od izolirajućeg materijala i zašitnog maziva.
Zavrijjeme uporabe:
Nemojte stavjati teške predmete na vrata, jer ih mogu ošetiti.
- Nemojte se hvatati za vrata niti vjesati ista za ručku.
- Nemojte prekrivati dno pećnice aluminijskom folijom.
- Nikad ne ulijevajte vodu izravno u vrucu pećnicu; takse moze ošetiti emajl.
- Nemojtve vuci po dnu pecnice posude i kalupe, jer takse moze osetiti emajl.
- Uvjerite se da elektrichi n kabeli drugih uredaja ne dodiruju vruce dijelove pecnice i da se ne uklijeste u njenim vratima.
- Izbjugavajte izlaganje pećnice atmosferskim prilikama.
PREPORUKE ZA OČUVANJE OKOLIŠA

Zbrinjavanje ambalažnog materijala
Materijal koristen za ambalažu moze se 100%-no reciklirati i oznacen je simbolom recikliranja (3). Različite dijelove ambalaže dakle ne smijete napustati u okolini, već zbriniti sukladno odredbama lokalnih vlasti.