GE 1650 - Drill Güde - Free user manual and instructions
Find the device manual for free GE 1650 Güde in PDF.
User questions about GE 1650 Güde
0 question about this device. Answer the ones you know or ask your own.
Ask a new question about this device
Download the instructions for your Drill in PDF format for free! Find your manual GE 1650 - Güde and take your electronic device back in hand. On this page are published all the documents necessary for the use of your device. GE 1650 by Güde.
USER MANUAL GE 1650 Güde
natural_image
Icon of an open book inside a black circle (no text or symbols)DE GB FR DK
NL NO SE CZ
SK IT HU HR
SI BG RO RS
BA
CE


natural_image
Black and white photo of a push-type manual oil drill with a spiral drill bit (no visible text or symbols)# 94137
Güde GmbH & Co. KG
Birkichstraße 6
D-74549 Wolpertshausen
www.guede.com
Güde Scandinavia A/S
Engelsholmvej 33
DK-8900 Randers
www.guede.com
Güde CZCH, s.r.o.
Počernická 120
CZ-36005 Karlovy Vary
www.guede.com
GÜDE Slovakia s.r.o
Podtúreň-Roveň 208
SK-033 01 Liptovský Hrádok
www.guede.com
Güde Hungary Kft.
Kossuth L. út 72
H-84020 Zirc
www.guede.com
| DE | Lesen Sie bitte diese Bedienungsanleitung sorgfältig durch, bevor Sie das Gerät in Betrieb nehmen. | Seite5-10 |
| GB | Kindly read this instruction manual carefully before putting the unit in operation. | Page11-16 |
| FR | Avant de mettre l'appareil en marche, lisez attentivement cette notice, s'il vous plaît. | Page17-22 |
| DK | Læs venligst denne betjeningsvejledning før De begynder at bruge maskinen. | Side23-28 |
| NL | Vóór ingebruikneming van het apparaat deze gebruiksaanwijzing aandachtig doorlezen. | Pagina29-34 |
| NO | Vennligst les nøye gjennom denne bruksanvisningen før du benytter apparatet. | Side35-40 |
| SE | Innan du sätter igång maskinen, läs noga dessa bruksanvisningsinstruktioner. | Sida41-46 |
| CZ | Dříve než uvedete prístroj do provozu, pročtěte si prosím pečlivě tento návod k obsluze. | Strana47-52 |
| SK | Skôr než uvediete prístroj do prevádzky, prečítajte si prosím dôkladne tento návod na obsluhu. | Strana53-58 |
| IT | Prima di mettere l'apparecchio in esercizio, leggere attentamente il presente Manuale d’Uso, per favore. | Pagina59-64 |
| HU | Mielótt a gépet üzembe helyezik, olvassák el figyelmesen a használati utasítást. | Oldal65-70 |
| HR | Prije prvog stavljanja stroja u rad neophodno je pročitati sve informacije i upute navedene u Naputku za uporabu. | Strana71-76 |
| SI | Pred uvedbo naprave v pogon, natančno preberite priloženo navodilo za uporabo. | Stran77-82 |
| BG | Преди да въведете уреда в действие, моля прочетете старателно това упътване за обслужване. | Страница83-89 |
| RO | Înainte de a pune aparatul în funcțiune, citiți vă rog cu atenție aceste instrucțiuni de deservire. | Pagina90-95 |
| BA | Prije prvog uključivanja mašine u radni proces, obavezno je potrebno, da se pročitaju sve informacije i upustva koja su navedena u Upustvu za upotrebu. | Strana96-104 |
A.V. 2
Reprint, even partial, requires permission. Technical changes reserved.
natural_image
Two technical diagrams: one showing a spiral drill bit labeled 1, the other a Gude-branded tool labeled 2 (no text or symbols on the devices themselves)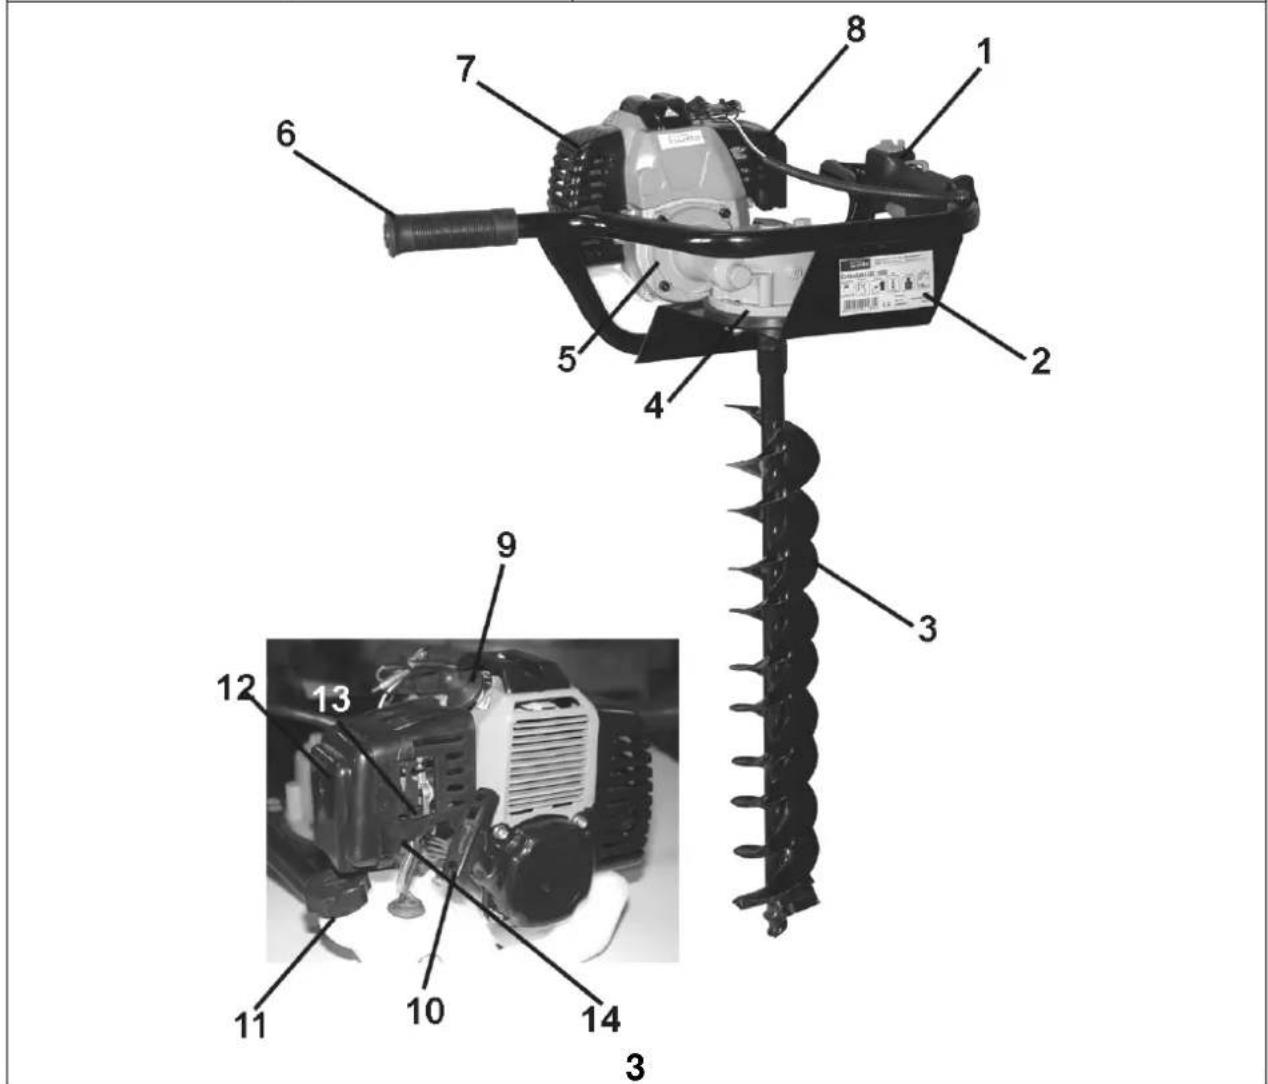
text_image
Technical diagram of a mechanical power tool with numbered parts and close-up inset photo of the component.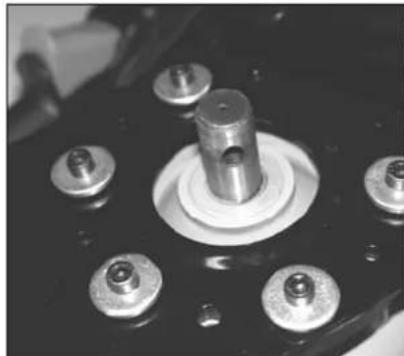
natural_image
Close-up of a mechanical component with multiple metallic bolts and a central shaft (no visible text or symbols)4

natural_image
Close-up of a hand operating a mechanical component with a tool, no visible text or symbols5
natural_image
Close-up of a mechanical assembly with a central rotating component and multiple bolted components (no visible text or symbols)6

text_image
1 2 3 47

natural_image
Close-up of a hand holding a black handheld device with a white scroll wheel (no visible text or symbols)8
Gerät
Erdbohrer GE 1650
Bohrer: 100mm x 800mm
Tankinhalt: 1,2 | Mix 1:25
Bohrer: 100mm x 800mm
Tankinhalt: 1,2 l Mix 1:25
natural_image
Two black-and-white photos: one showing a spiral drill bit labeled 1, the other a Dude-branded machine labeled 2 (no text or symbols on parts)
text_image
Technical diagram of a mechanical power tool with numbered parts and close-up insets for detailed assembly details.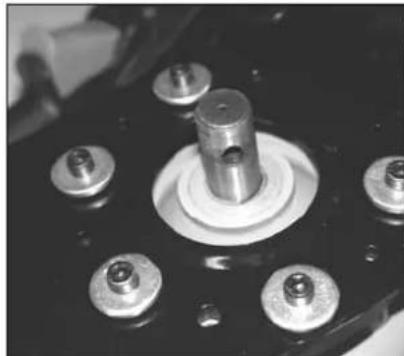
natural_image
Close-up of a mechanical component with multiple bolts and a central shaft (no visible text or symbols)4

natural_image
Close-up of a hand adjusting a mechanical component with a tool (no visible text or symbols)5

natural_image
Close-up of a mechanical assembly with a central shaft and multiple bolts (no visible text or symbols)6

text_image
1 2 3 47

natural_image
Close-up of a hand holding a black handheld device with a white scroll wheel (no visible text or symbols)8
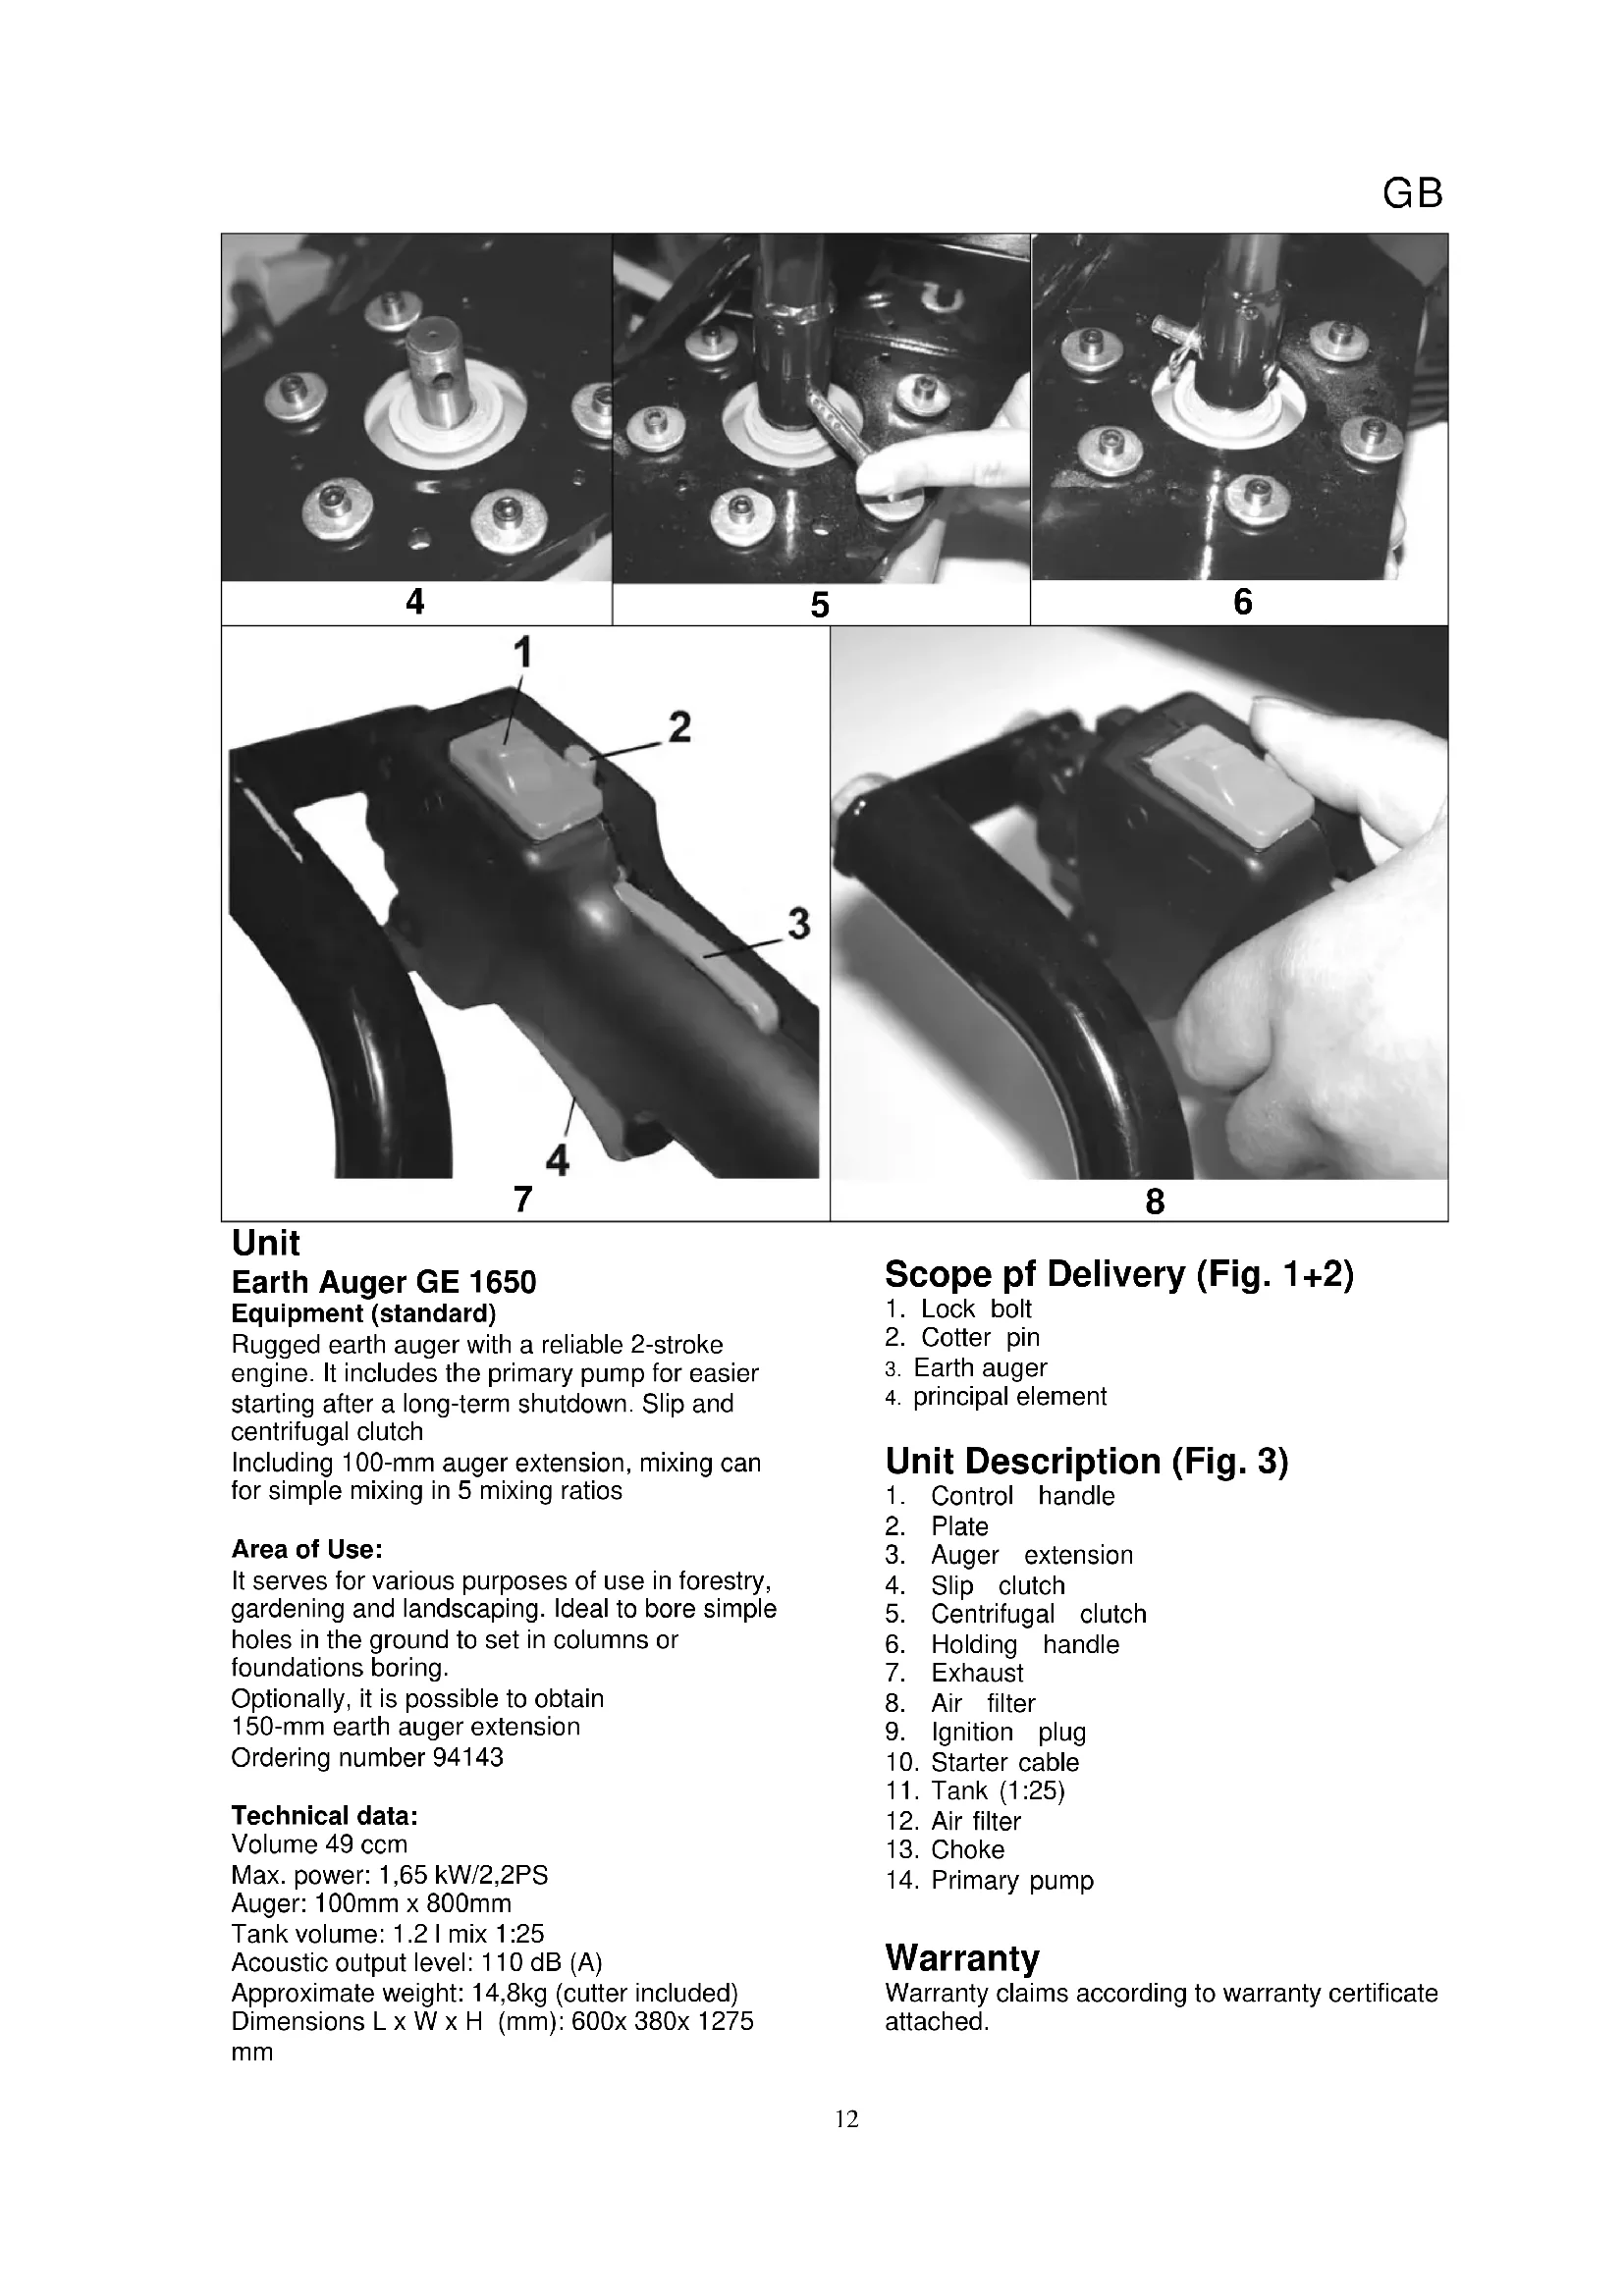
Unit
Earth Auger GE 1650
Equipment (standard)
Rugged earth auger with a reliable 2-stroke engine. It includes the primary pump for easier starting after a long-term shutdown. Slip and centrifugal clutch
Including 100-mm auger extension, mixing can for simple mixing in 5 mixing ratios
Area of Use:
It serves for various purposes of use in forestry, gardening and landscaping. Ideal to bore simple holes in the ground to set in columns or foundations boring.
Optionally, it is possible to obtain
150-mm earth auger extension
Ordering number 94143
Technical data:
Volume 49 ccm
Max. power: 1,65 kW/2,2PS
Auger: 100mm x 800mm
Tank volume: 1.2 l mix 1:25
Acoustic output level: 110 dB (A)
Approximate weight: 14,8kg (cutter included)
Dimensions L x W x H (mm): 600x 380x 1275 mm
Scope pf Delivery (Fig. 1+2)
- Lock bolt
- Cotter pin
- Earth auger
- principal element
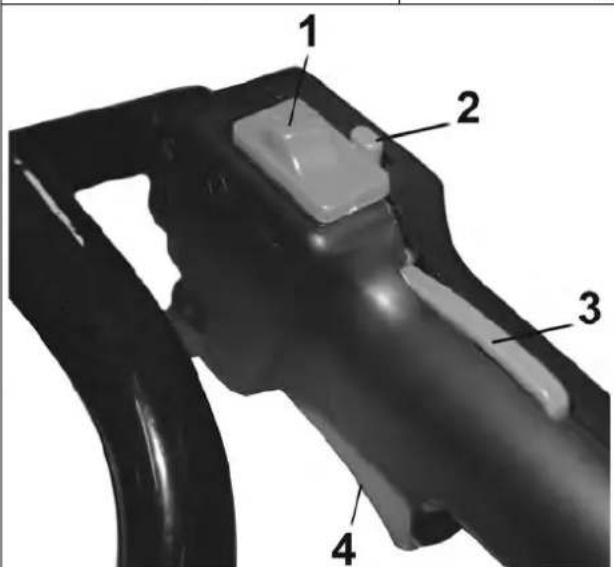
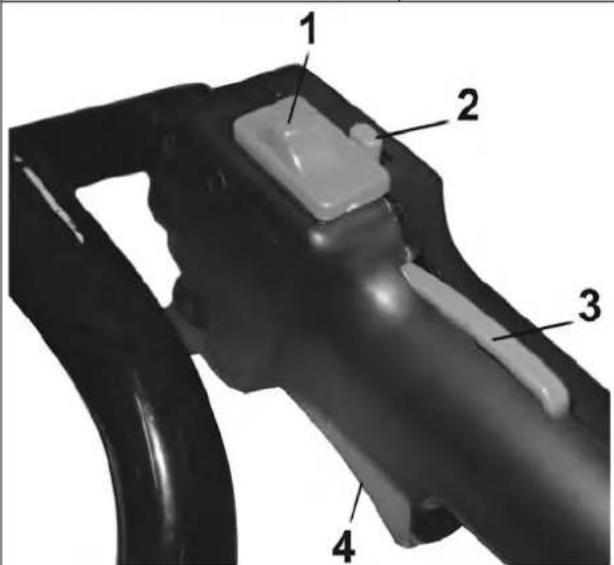
Unit Description (Fig. 3)
- Control handle
- Plate
- Auger extension
- Slip clutch
- Centrifugal clutch
- Holding handle
- Exhaust
- Air filter
- Ignition plug
- Starter cable
- Tank (1:25)
- Air filter
- Choke
- Primary pump
Warranty
Warranty claims according to warranty certificate attached.
General Safety Instructions
Read the instructions for use thoroughly before the initial operation of the machine. If any doubts regarding the connection and operation arise, consult the manufacturer (servicing department).
Observe the instructions shown below carefully to guarantee the high degree of safety.
Caution!
- The working site must be clean and tidy. Messy workplace increases the risk of accidents and injuries.
- Do not let any unauthorised persons approach the machine. The visitors and viewers, primarily the children, the ill and infirm persons should not have any access to the working area and kept at a safe distance.
- Make provision for the tools storage. The machines not in current use should be kept in a dry place, elevated or locked where practicable so that any access to them is prevented
- Always use a correct tool for the job to be done. E.g. avoid using small tools and accessories for work that should be actually done with a heavy tool. Use the tools only for the purposes they were designed for. Keep the tools clean and sharp.
- Pay attention to adequate clothing. Do not wear loose-fitting clothes and jewels. They can be caught by moving parts of the machine. When working, use work gloves and non-skid work shoes. Long hair should be protected appropriately.
- Use personal protection equipment. Wear goggles, gloves and ear protectors. Always wear tight-fitting gloves for the auger replacement.
- Be particular about your balance and sure footing. Never lean forward or sideward too much when trying to reach something .
- Be attentive any time. Mind what you are doing. Use common sense. Do not use the unit when feeling tired,
- Remove socket wrench etc. Any wrenches etc. used for replacement of a tool should be removed before the machine is switched on.
- Watch out for any damaged parts. Inspect the machine before use. Are any parts damaged? Ask yourself seriously when detecting slight damage whether the machine will work perfectly and safely despite that. Watch out for proper aligning and adjustment of any moving parts. Do the parts fit one in another properly? Are the part damaged? Is everything installed as appropriate? Are any other prerequisites of proper working in
place? Damaged protective devices etc. must be repaired or replaced by authorised entities unless the operation manual expressly says otherwise. Any defective switches must be replaced at an authorised servicing centre.
- Use approved parts only. Use only identical spare parts for maintenance and repairs. Request advice of an authorised servicing centre for this purpose.
- Warning! Use of accessories and extensions other than expressly recommended in this operating manual may result in threat to persons and property.
Initial Operation Safety Instructions
- Always switch the engine off before adjustment and maintenance of the unit.
- Be careful not to trip in the area of the earth auger.
- The person working with the unit should not be disturbed.
- Use only perfect augers, i.e. well sharpened and free of any cracks, breaches, deformations etc. Defective augers should be immediately replaced.
- The unit protection devices are not allowed to be removed or disabled in any manner.
- The defective or damaged protection devices should be replaced immediately.
- Should anybody be disturbing you while you work with the auger, act ponderously until you manage to adapt your attention to the new situation?
- Do not overload the unit for it not to slow down and to overheat.
- Adjustment, measurement and cleaning the unit is only allowed to be done with the engine switched off and the ignition plug pulled out
- Any safety and protection devices have to be fitted back at appropriate place after repair of maintenance.
- Knowledge of injury prevention effective on a specific site and any other safety rules of general recognition is a prerequisite
- Before using the auger you should check on safety devices. Make sure that the parts seemingly slightly damaged work as appropriate.
- Make sure that all the movable parts work perfectly. Particularly check for any damaged and stuck parts. Any components have to be fitted in correctly and meet the condition of perfect functioning.
- Unless otherwise stated in this instruction manual, the damaged parts and safety devices have to be repaired or replaced in an authorised servicing centre.
- Have the damaged switched replaced in an authorised servicing centre.

Caution
The earth auger starts turning only after pushing the gas lever. If the gas is in off position, the auger does not turn.
Emergency Action
Apply the first aid adequate to the injury and get qualified medical assistance as quickly as possible. Protect the injured person from more accidents and calm him/her down.
Meaning of Symbols
Symbols shown below are used throughout this manual and/or on the unit:
Product Safety:
 | |
| Product compliance with respective EU standards | The unit is equipped with protection insulation |
Bans
 | |
| Product compliance with respective EU standards | No reaching in rotating parts if |
Precautions:
 | |
| Warning/Caution Beware if | hazardous voltage |
Commands:
 | |
| Wear goggles Use ear protectors | |
 | |
| Read operating manual before use | Wear a hard hat |
 | |
| Wear protection gloves | |
Environment Protection:
 | ||
| Wastes to be disposed of in a professional manner not to harm the environment. | Cardboard packaging to be collected for recycling. | |
 | |
| Faulty and/or disposed ofelectrical/electronic appliances tobe collected by authorised salvageplaces. | Green Dot –Duales SystemDeutschland AG |
Packaging
 | |
| Protect from moisture Keep Up | |
Technical Data:
 | |
| Volume Engine power | |
 | |
 | |
 (trans) (trans) |  |
| Acoustic output level Weight | |
Assigned Use
It serves for various purposes of use in forestry, gardening and landscaping. Ideal to bore simple holes in the ground to set in columns or foundations boring.
Definition of terms
- Primary Pump
To make starting easy after a longer shutdown of the auger.
- Slip Clutch
The slip clutch is a structural part of general mechanics. It connects two shafts by action of force until the defined torque to be transferred is reached
- Centrifugal Clutch
Centrifugal clutch is a clutch on which a connection by action of force is formed while the weight moves outside at the increasing speed, in result of which a contact with the inner wall of the clutch body is formed (the clutch cone) serving at the same tine as an outlet.
- Choke Starter throttle (choke) is a structural part of the spark-ignition engines enabling directed restriction of the air flowing into the carburettor.
Residual Hazards and Protective Action
Mechanical Residual Hazards Catching, winding
The spiral auger may catch and drawn in cables, wires and garments.
Always wear tight-fitting clothing and safety shoes, do not wear jewels protect your hair with a hairnet.
In result of sudden stop of the auger, the handgrips may strike the operator Hold the handgrips well and wear protection clothes.
Electrical Residual Hazards
Direct electrical contact
An electrical shock may occur at contact with the ignition plug socket while the engine is running. Do not touch the ignition plug socket while the engine is running.
Thermal Residual Hazards Burns, frostbites
Contact with the exhaust may result in burns. Let the unit cool down.
Noise Hazards
Frequent/long work with the unit without ear protectors may result in hearing impairment Always wear ear protectors
Vibration Hazard
Vibration of the body
Prolonged work with the unit may bring about injuries.
Have regular breaks
Material and Other Substances Hazards
Contact, aspiration
Flue gases may be health hazardous
Use the machine outdoors only.
Fire and Explosion
The unit is driven by a combustible fuel mix that may get ignited, e.g. at refuelling.
The unit may be used outdoors only.
Human Factors Neglect
Negligent Use of PPE
Operating the unit without appropriate personal protection equipment may result in severe internal and external injuries.
Always wear the required protection clothing and work considerably.
Insufficient local lighting
Insufficient local lighting represents considerable safety hazard.
Always provide for sufficient lighting when working with the unit.
Other Hazards
Thrown away articles and splashes At boring, parts of the auger or mechanical articles may injure your eyes.
Always wear goggles when working with the unit.
Disposal
Disposal instructions are given by pictographs on the unit or packaging. For meaning of individual symbols refer to chapter "Symbols on Unit."
Operator Requirements
The operator shall read the instruction manual carefully before using the unit.
Qualification
No special qualification is required for use of the unit except for detailed direction by a professional.
Minimum Age
Only persons above 16 years of age are allowed to work with the unit.
Exempted from the provision is the use of the juvenile trainees if they work in the course of their professional training with an aim to obtain the skill under trainer supervision
Training
Use of the unit requires adequate lesson by a professional or the use of the manual only. Special training is not required.
Technical Data
Volume: 49
Max. output: 1,65 kW/2,2PS
Auger: 100mm x 800mm
Tank volume: 1,2 l Mix 1:25
Wight (auger incl) 14,8kg
Dimensions L x W x H mm: 600x 380x 1275 mm
EAN: 4015671 94137 4
Ordering No. 94137
Transportation and Storage
- The unit has to be cleaned thoroughly for long-term storage.
- Protect the earth auger with a plastic sheet, cardboard etc. against the weather effects.
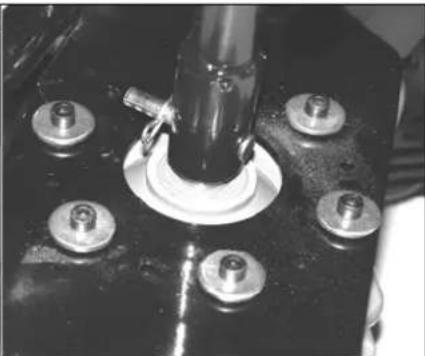
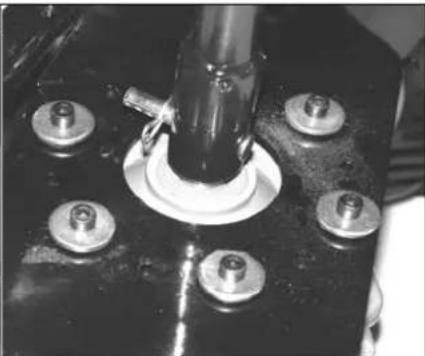
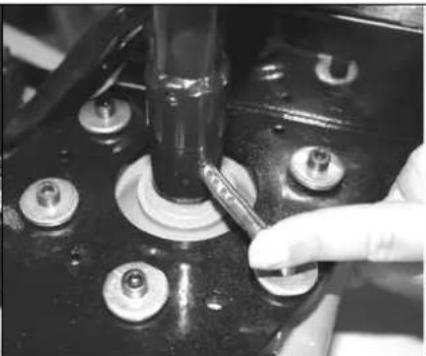
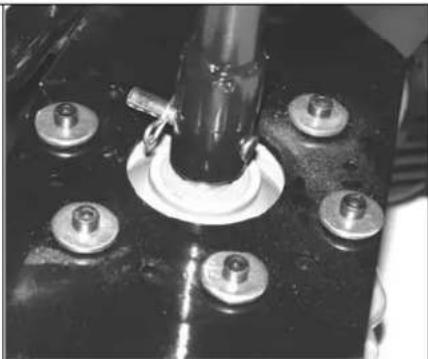
Assembly and Initial Operation (fig. 4+5+6)
Put the main element (fig. 4) bottom up. Now, it is easy to fit the auger in. Put the auger extension (fig. 5) on the bracket and secure the auger with
a lock bolt and a cotter pin contained in the delivery.
Check the earth auger for firm settling before every work.
Now, put the main element in vertical position again.
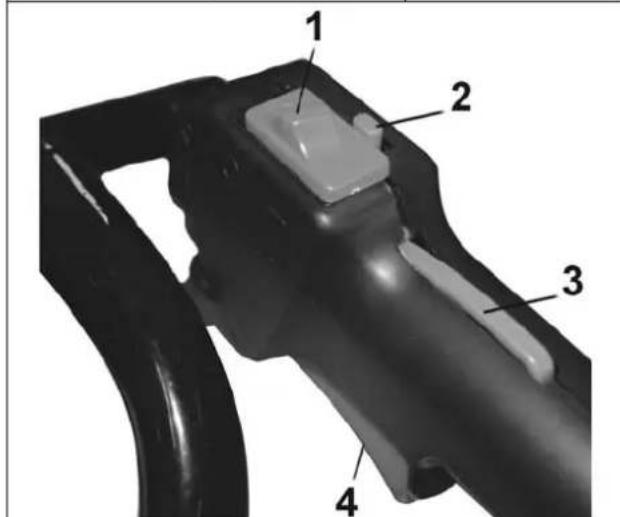
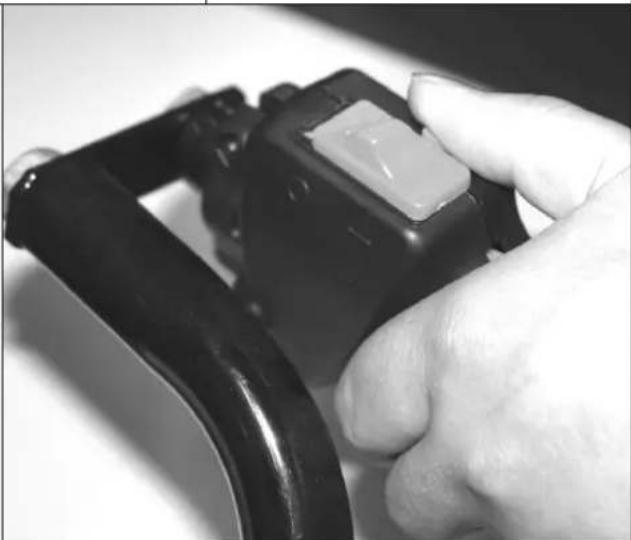
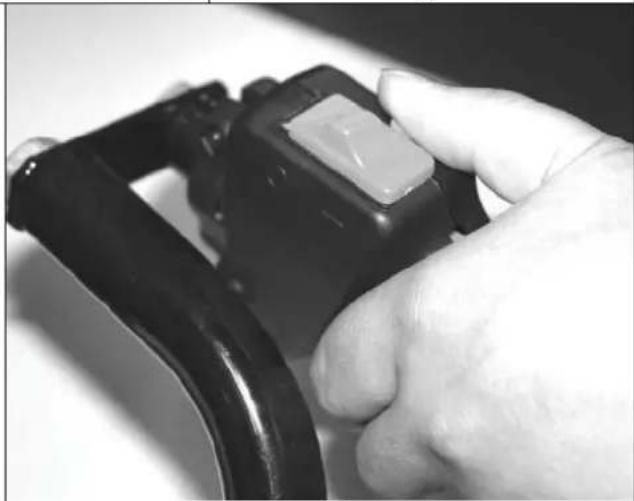
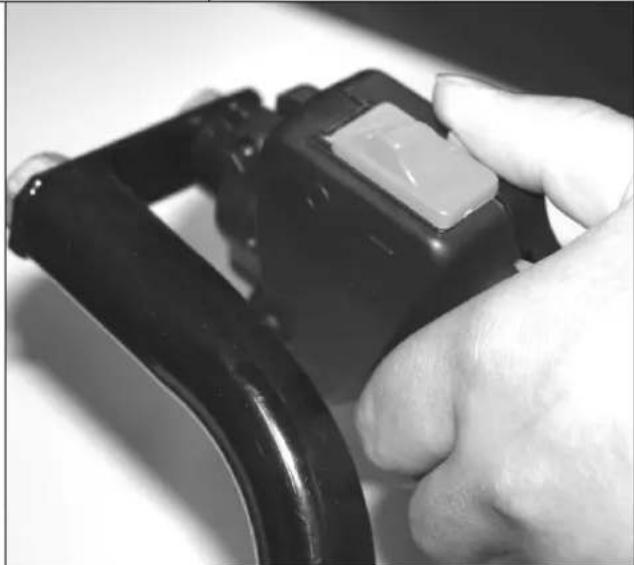
Operation (fig. 7+8)
Starting the auger
- To start the auger, switch the choke (fig. 3/13) in the „Off“ position.
- Only for the cold start, put the choke lever in the „On“ position.
Switching the machine on/off
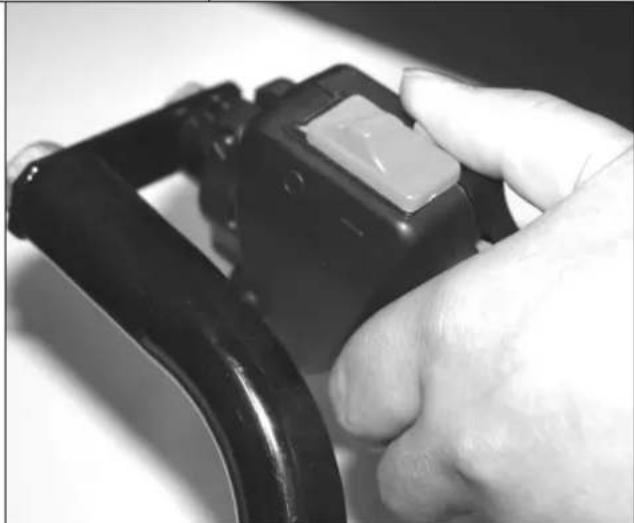
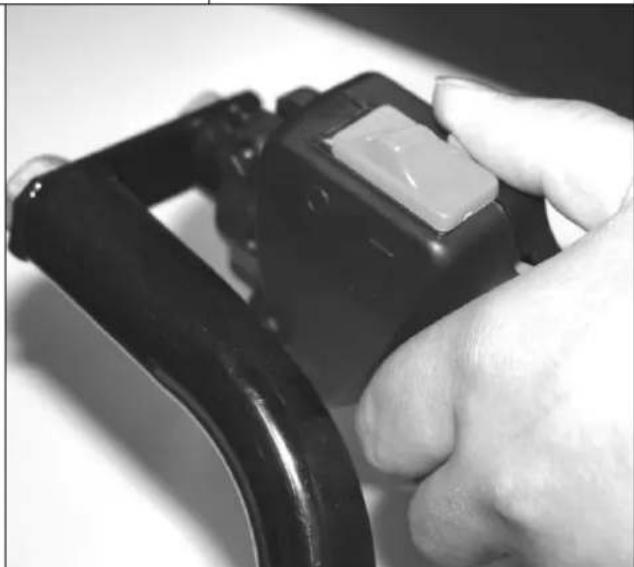
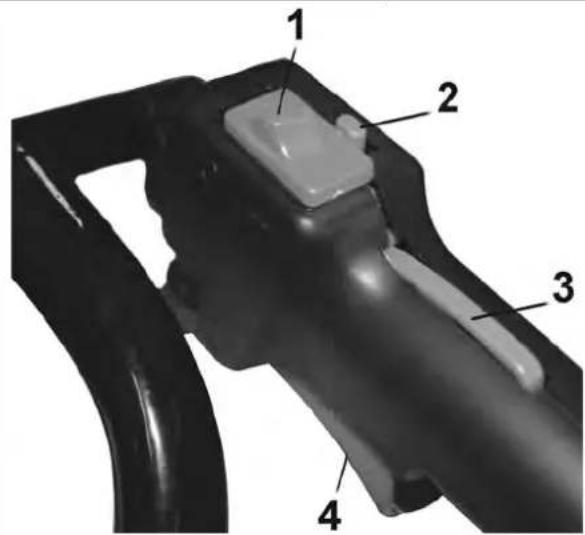
- To switch the machine on, press the on an off switch at the same time (fig. 7/3 a 4) and lock them with the locking pin (fig. 7/2) - fig. 8
- Compress the primary pump 3 - 4 times and pull the cable afterwards.
- To switch off, push the Stop knob (fig. 7/1) in position „Stop“
Operator Safety Instructions
- All the safety and protection devices have to be fitted in place appropriately.
- Earth auger should turn freely
- Before putting the machine in operation make sure that the auger is settled properly and the movable parts are free.
-
Warning! If in doubt, consult the auger assembly with an expert from an authorised servicing centre.
-
Use the unit only after having read the operating manual carefully.
- Observe all the safety instructions contained in the manual.
- Be responsible to the others
Step-by-step instructions
- Make sure that your footing on the workplace is stable.
- Switch the unit on.
- Do the required works with the earth auger.
- Caution! Having made a hole, the earth auger has to be switch off in a following working position for transportation
- Clean the auger after the work done.
Troubles-Causes- Troubleshooting
The engine will not start
- Empty tank
-
The engine flooded
-
Fouled ignition plug (remainders of carbons on electrodes) Too large distance between the electrodes
- Polluted carburettor, the carburettor jets
- Defective ignition plug socket, defective ignition cable.
- No ignition sparkle. Wait for 5-10 min. and switch on again.
- Compress the primary pump 3 – 4 times.
The engine is not performing to the full
- Fouled ignition plugs (remnants of carbons on electrodes). Excessive distance between the electrodes
- Fouled carburettor, carburettor nozzles
- Polluted air filter r
- Exhaust. Jammed cylinder outlet duct
- Leaky sealing ring on the crankcase
- Worn cylinder, piston rings
- Wrong fuel mixture (too much oil)
- Poor ignition.
- The choke on.
The engine is impossible to switch off
- Pale grey ignition plug with traces of scorch (fusible pearls)
- Remainders of carbon in combustion area
Inspections and Maintenance
Notice: The instructions below are applicable to normal conditions of use under aggravated conditions and prolonged work; the interval should be shortened as appropriate.
Check and care regularly:
- Having finished a job, check and clean the entire machine.
- Use a wet cloth to clean the plastic parts. Do not use detergents, solvents and pointed tools.
- Clean the air pollution if it is strongly fouled r.
- Replace the ignition plug if necessary.
- Remove the stuck dust from the vents and movable parts after every use with a soft brush or a paintbrush.
Oil the movable metal parts regularly.
Always switch the auger off before maintenance and repairs
Auger Replacement (Fig. 4+5+6)
Caution! Always switch the unit off!
Put the main element (fig. 4) bottom up. Now, it is easy to fit the auger in. Put the auger extension (fig. 5) on the bracket and secure the auger with a lock bolt and a cotter pin contained in the delivery (fig.3/1+2)
Check the earth auger for firm settling before every work.
Now, put the main element in vertical position again.
Inspections and Maintenance Safety Instructions
Only a unit maintained and cared for regularly may be a satisfactory aid. Insufficient maintenance and care may result in unforeseen accidents and injuries
Inspections and Maintenance Safety Instructions
Before any work start up
Check the gas lever.
Before any work start up
Check the whole unit visually.
Before any work start up
Check the auger settling
After every use
Check on the whole unit and clean it.
Regularly
Check on the tightness of all the screws. They may go loose by vibrations with time

natural_image
Close-up of a mechanical component with multiple bolts and a central shaft (no visible text or symbols)4

natural_image
Close-up of a hand adjusting a mechanical component with a tool (no visible text or symbols)5

natural_image
Close-up of a mechanical assembly with a central shaft and multiple bolts (no visible text or symbols)6

text_image
1 2 3 47

natural_image
Close-up of a hand holding a black handheld device with a white scroll wheel (no visible text or symbols)8
Appareil
Tarière GE 1650
Contact, inspiration
natural_image
Close-up of a mechanical component with multiple bolts and a central shaft (no visible text or symbols)4

natural_image
Close-up of a hand adjusting a mechanical component with a tool (no visible text or symbols)5

natural_image
Close-up of a mechanical assembly with a central shaft and multiple bolts (no visible text or symbols)6

text_image
1 2 3 47

natural_image
Close-up of a hand holding a black handheld device with a white scroll wheel (no visible text or symbols)8
Maskine
Jordbor GE 1650
Udstyr (serie)
Robust jordbor med pålidelig 2-takts motor.
natural_image
Close-up of mechanical components including a central shaft and multiple bolts (no visible text or symbols)4

natural_image
Close-up of a hand adjusting a mechanical component with a tool (no visible text or symbols)5

natural_image
Close-up of a mechanical assembly with a central shaft and multiple bolts (no visible text or symbols)6
text_image
Technical diagram of a mechanical component with numbered parts labeled 1 to 47
natural_image
Close-up of a hand holding a black handheld device with a white square button (no visible text or symbols)8
Machine
Grondboor GE 1650
Uitrusting (seriematig)
natural_image
Close-up of a mechanical component with multiple bolts and a central shaft (no visible text or symbols)4

natural_image
Close-up of a hand adjusting a mechanical component with a tool (no visible text or symbols)5
natural_image
Close-up of a mechanical assembly with a central shaft and multiple bolts (no visible text or symbols)6

text_image
1 2 3 47

natural_image
Close-up of a hand holding a black handheld device with a white scroll wheel (no visible text or symbols)8
Apparat
Jordbor GE 1650
Utrustning (seriemessig)
natural_image
Close-up of a mechanical component with multiple bolts and a central shaft (no visible text or symbols)4

natural_image
Close-up of a hand adjusting a mechanical component with a tool (no visible text or symbols)5

natural_image
Close-up of a mechanical assembly with a central shaft and multiple bolts (no visible text or symbols)6

text_image
1 2 3 47
natural_image
Close-up of a hand holding a black handheld device with a white scroll wheel (no visible text or symbols)8
Maskin
Jordborr GE 1650
Utrustning (serie)
natural_image
Close-up of a mechanical component with multiple bolts and a central shaft (no visible text or symbols)4

natural_image
Close-up of a hand adjusting a mechanical component with a tool (no visible text or symbols)5

natural_image
Close-up of a mechanical assembly with a central shaft and multiple bolts (no visible text or symbols)6

text_image
1 2 3 47

natural_image
Close-up of a hand holding a black handheld device with a white scroll wheel (no visible text or symbols)8
Přístroj
Zemní vrták GE 1650
Vybavení (sériové)
natural_image
Close-up of a mechanical component with multiple bolts and a central shaft (no visible text or symbols)4

natural_image
Close-up of a hand adjusting a mechanical component with a tool (no visible text or symbols)5

natural_image
Close-up of a mechanical assembly with a central shaft and multiple bolts (no visible text or symbols)6
text_image
Technical diagram of a mechanical component with numbered parts labeled 1, 2, 3, and 47
natural_image
Close-up of a hand holding a black plastic device with a white scroll wheel (no visible text or symbols)8
Prístroj
Zemný vrták GE 1650
Vybavenie (sériové)
natural_image
Close-up of mechanical components including a central shaft and multiple bolts (no visible text or symbols)4
natural_image
Close-up of a hand adjusting a mechanical component with a tool (no visible text or symbols)5

natural_image
Close-up of a mechanical assembly with a central shaft and multiple bolts (no visible text or symbols)6

text_image
1 2 3 47

natural_image
Close-up of a hand holding a black handheld device with a white scroll wheel (no visible text or symbols)8
Apparecchio
Trivellatrice GE 1650
Manuale step by step
natural_image
Close-up of a mechanical component with multiple bolts and a central shaft (no visible text or symbols)4

natural_image
Close-up of a hand adjusting a mechanical component with a tool (no visible text or symbols)5

natural_image
Close-up of a mechanical assembly with a central shaft and multiple bolts (no visible text or symbols)6
text_image
1 2 3 47

natural_image
Close-up of a hand holding a black handheld device with a white scroll wheel (no visible text or symbols)8
Készülék
Földfúró GE1650
natural_image
Close-up of a mechanical component with multiple bolts and a central shaft (no visible text or symbols)4

natural_image
Close-up of a hand adjusting a mechanical component with a tool (no visible text or symbols)5

natural_image
Close-up of a mechanical assembly with a central shaft and multiple bolts (no visible text or symbols)6

text_image
1 2 3 47

natural_image
Close-up of a hand holding a black handheld device with a white scroll wheel (no visible text or symbols)8
Uređaj
Bušilica za zemlju GE 1650
Oprema (serijska)
Robusna bušilica za zemlju s pouzdanim dvotaktnim motorom. S primarnom crpkom za jednostavan start i pri dugotrajnijem mirovanju, kliznom i centrifugalnom spojnicom.
natural_image
Close-up of a mechanical component with multiple bolts and a central shaft (no visible text or symbols)4

natural_image
Close-up of a hand adjusting a mechanical component with a tool (no visible text or symbols)5

natural_image
Close-up of a mechanical assembly with a central shaft and multiple bolts (no visible text or symbols)6

text_image
1 2 3 47

natural_image
Close-up of a hand holding a black handheld device with a white scroll, no visible text or symbols8
Naprava
Sveder za vrtanje v zemljo GE 1650
Serijska oprema
natural_image
Close-up of a mechanical component with multiple bolts and a central shaft (no visible text or symbols)4

natural_image
Close-up of a hand adjusting a mechanical component with a tool (no visible text or symbols)5
natural_image
Close-up of a mechanical assembly with a central shaft and multiple bolts (no visible text or symbols)6

text_image
1 2 3 47
natural_image
Close-up of a hand holding a black handheld device with a white sticker (no visible text or symbols)8
Уред
natural_image
Close-up of mechanical components including a central shaft and multiple bolts (no visible text or symbols)4

natural_image
Close-up of a hand adjusting a mechanical component with a tool (no visible text or symbols)5

natural_image
Close-up of a mechanical assembly with a central shaft and multiple bolts (no visible text or symbols)6
text_image
1 2 3 47
natural_image
Close-up of a hand holding a black handheld device with a white scroll wheel (no visible text or symbols)8
Maşina
Nivel acustic: 110 dB (A)
Greutate cca.: 14,8 kg (cu burghiu)
Nivel acustic: 110 dB (A)
Greutate cca.: 14,8kg (cu burghiu)
natural_image
Close-up of a mechanical component with multiple bolts and a central shaft (no visible text or symbols)4

natural_image
Close-up of a hand adjusting a mechanical component with a tool (no visible text or symbols)5

natural_image
Close-up of a mechanical assembly with a central shaft and multiple bolts (no visible text or symbols)6

text_image
1 2 3 47

natural_image
Close-up of a hand holding a black handheld device with a white scroll wheel (no visible text or symbols)8
Uređaj
Bušilica za zemlju GE 1650
Oprema (serijska)
Masivna bušilica za zemlju s pouzdanim dvotaktnim motorom. S primarnom pumpom za jednostavan start i pri dugotrajnijem mirovanju, kliznom i centrifugalnom spojnicom.