SE 2016 Q - Saw STIGA - Free user manual and instructions
Find the device manual for free SE 2016 Q STIGA in PDF.

| Product type | Electric chain saw |
| Brand | Stiga |
| Model | SE 2016 Q |
| Motor power | 2000 W |
| Guide bar length | 40 cm |
| Cutting length | 38.5 cm |
| Chain speed | 14 m/s |
| Weight | 5.30 kg |
| Supply voltage | 230-240 V ~ |
| Frequency | 50 Hz |
| Oil tank capacity | 130 ml |
| Sound pressure level | 95.1 dB(A) |
| Sound power level | 93.3 dB(A) |
| Vibrations (main value) | 4.916 m/s² |
| Vibration measurement uncertainty | 1.5 m/s² |
| Electrical protection | Double insulation |
| Chain brake | Yes, manual and automatic (kickback) |
| Starting system | Switch with safety push button |
| Chain pitch | 3/8" |
| Guide groove width | 0.050" (1.3 mm) |
| Guide length supplied | 16" / 40 cm |
| Included accessories | Guide bar, chain, hand guard, assembly key |
| Warranty (domestic use) | 24 months |
| Warranty (professional use) | 12 months |
| Routine maintenance | Cleaning vents, checking oil level, chain tension |
| Chain sharpening | Recommended by a professional |
Frequently Asked Questions - SE 2016 Q STIGA
User questions about SE 2016 Q STIGA
0 question about this device. Answer the ones you know or ask your own.
Ask a new question about this device
Download the instructions for your Saw in PDF format for free! Find your manual SE 2016 Q - STIGA and take your electronic device back in hand. On this page are published all the documents necessary for the use of your device. SE 2016 Q by STIGA.
USER MANUAL SE 2016 Q STIGA
natural_image
Technical line drawing of a mechanical component with no visible text or symbols

natural_image
Line drawing of a hand using a chainsaw to lift a tree stump (no text or symbols)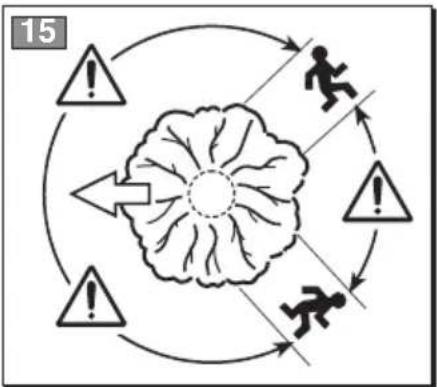
flowchart
graph TD
    A["Warning Symbol"] --> B["Circle"]
    B --> C["Warning Symbol"]
    C --> D["Running Action"]
    D --> E["Warning Symbol"]
    E --> F["Warning Symbol"]
    F --> G["Warning Symbol"]
    G --> H["Warning Symbol"]
    H --> I["Warning Symbol"]
    I --> J["Warning Symbol"]
    J --> K["Warning Symbol"]
    K --> L["Warning Symbol"]
    L --> M["Warning Symbol"]
    M --> N["Warning Symbol"]
    N --> O["Warning Symbol"]
    O --> P["Warning Symbol"]
    P --> Q["Warning Symbol"]
    Q --> R["Warning Symbol"]
    R --> S["Warning Symbol"]
    S --> T["Warning Symbol"]
    T --> U["Warning Symbol"]
    U --> V["Warning Symbol"]
    V --> W["Warning Symbol"]
    W --> X["Warning Symbol"]
    X --> Y["Warning Symbol"]
    Y --> Z["Warning Symbol"]

natural_image
Simple line drawing of a wooden log being struck by two arrows labeled '①' and '②', with a coin partially visible below (no text or symbols on the diagram itself)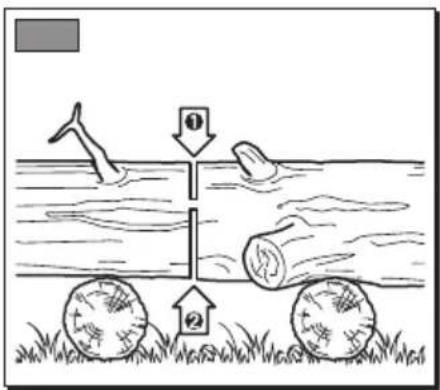
natural_image
Illustration of hands using a tool to cut a piece of material, no text or symbols visible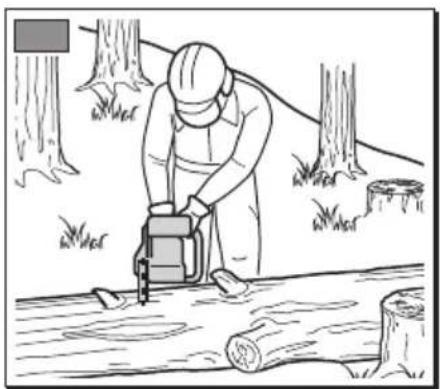
natural_image
Illustration of a person using a power tool in a forest setting with tree stumps (no text or symbols)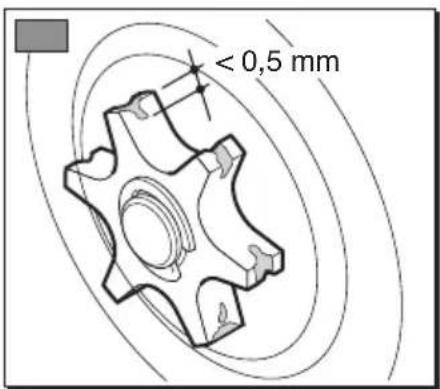
natural_image
Illustration of hands using a tool to cut a saw, with an inset showing the process (no text or symbols)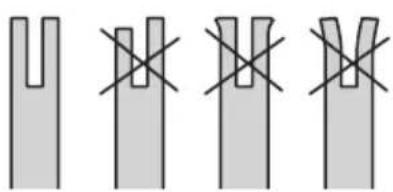
natural_image
Four identical gray structural diagrams with cross marks, no text or symbols presentGentile Cliente,
thank you for choosing one of our products. We hope that you will be completely satisfied with this r and that it fully meets your expectations. This manual has been compiled in order to provide you with the information you need to get acquainted with the machine and use it safely and efficiently. Don't fo that it is an integral part of the machine, so keep it handy so that it can be consulted when necessary pass it on to a further user if you resell or loan the machine.
Your new machine has been designed and manufactured in pursuance with current regulations, and is and reliable if used in compliance with the instructions provided in this manual (proper use). Using the machine in any other way, or non-compliance with the safety specifications relative to use, maintenance repair is considered "improper use" which will invalidate the warranty, relieve the manufacturer from all abilities, and the user will consequently be liable for all and any damage or injury to himself or others
For this electric tool, the company provides the end user - independently from the retailer's obligations resulting from the purchasing contract - with the following warranties:
The warranty period is 24 months beginning from the hand-over of the device which has to be proved, the original purchasing document. For commercial use and use for rent, the warranty period is reduced to 12 months. Wearing parts and defects caused by the use of not fitting accessories, repair with parts are no original parts of the manufacturer, use of force, strokes and breaking as well as mischievous (loading of the motor are excluded from this warranty. Warranty replacement does only include defective parts, not complete devices. Warranty repair shall exclusively be carried out by authorized service partners or by the company's customer service. In the case of any intervention of not authorized personnel, the warranty will be held void.
All postage or delivery costs as well as any other subsequent expenses will be borne by the customer
Since we regular improve our products, you may find slight differences between your machine and the scriptions contained in this manual. Modifications can be made to the machine without notice and with the obligation to update the manual, although the essential safety and function characteristics will remain unaltered. In case of any doubts, please contact your dealer. And now enjoy your work!
TABLE OF CONTENTS
- Identification of the main components 2
- Symbols 3
- Safety warnings 4
- Machine assembly 6
- Preparing to work 7
- How to start - Stop the engine 8
- Using the machine 9
- Maintenance and storage 13
- Troubleshooting 13
- Accessories 14
1. IDENTIFICATION OF MAIN COMPONENTS
MAIN COMPONENTS
- Power unit
- Spiked bumper
- Front hand guard
- Front handgrip
- Rear handgrip
- Chain catcher
- Bar
- Chain
- Bar cover
- Identification plate
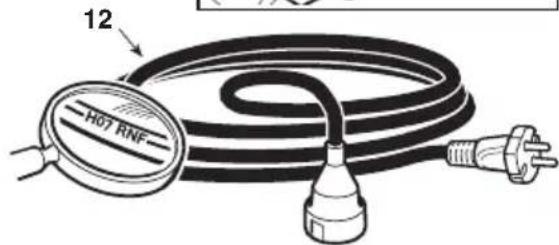
- Power cable
- Extension lead (not supplied)
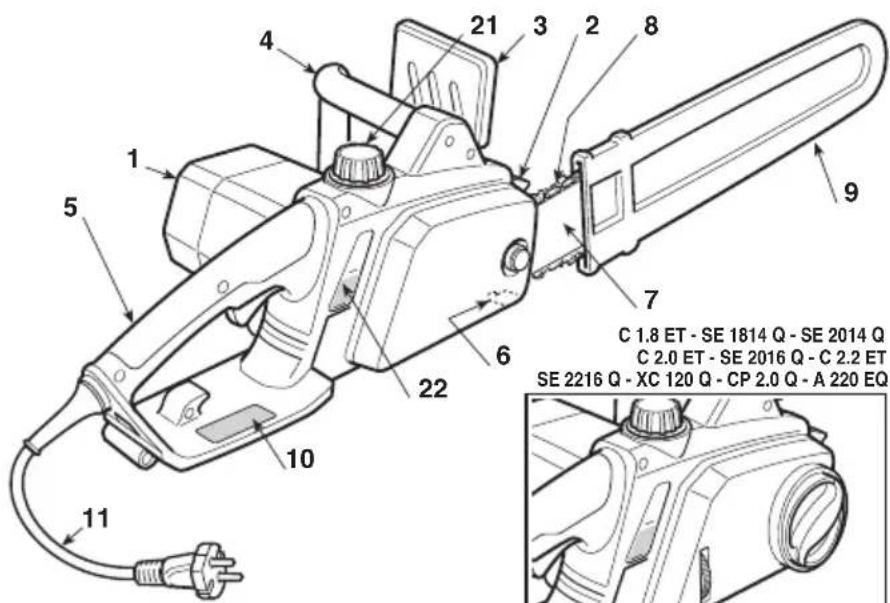
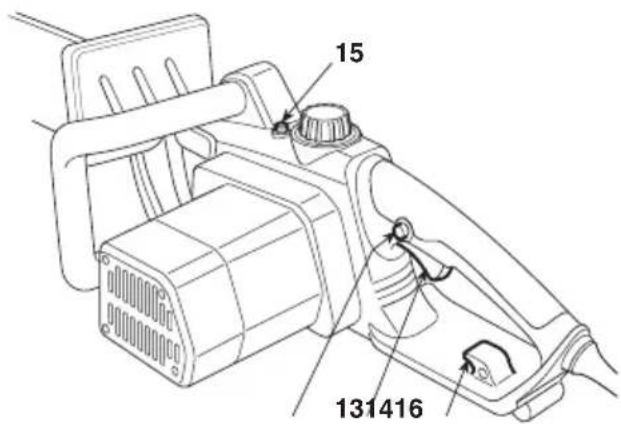
CONTROLS AND FILLING POINTS
- Trigger switch
- Safety button
- Reset button (Only for C 2.2 E/ET SE 2216 / 2216 Q - A 220 EQ)
-
Extension lead connection
-
Chain oil tank cap
-
Chain oil gauge
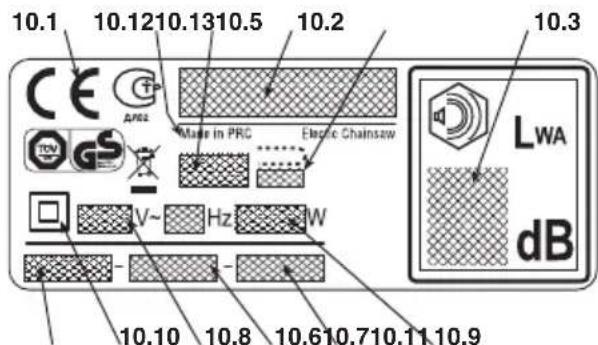
IDENTIFICATION PLATE
10.1) Conformity marking in accordance with Directive 2006/42/EC
10.2) Name and address of the manufacturer
10.3) Acoustic output level LWA in accordance with directive 2000/14/EC
10.5) Machine model
10.6) Serial number
10.7) Year of manufacture
10.8) Power supply frequency and voltage
10.9) Engine power
10.10) Dual insulation
10.11) Article Code
10.12) Manufacturing country
10.13) Maximum permitted length of the bar. Do not use longer bars.
Do not dispose of electrical equipment together with household waste material. In observance of European Directive 2002/96/EC on waste electrical and electronic equipment and its implementation in accordance with national law, electric equipment that have reached the end of their life must be collected separately and returned to an environmentally compatible recycling facility. If electrical appliances are disposed of in landfills or dumps, hazardous substances can leak into the groundwater and get into the foodchain, damaging your health and well-being. For further information on the disposal of this product, contact your dealer or a domestic waste collection Service.
| Maximum noise and vibration levels [1] Model | A 180 EC 1.8 E • C 1.8 ET SE 1814 SE 1814 Q | SE 2014 SE 2014 Q | A 200 E • XC 120 CP 2.0 Q C 2.0 E • C 2.0 SE 2016 SE 2016 Q | Q A 220 EQ C 2.2 E • C 2.2 E ET | |
| Operator ear noise pressure level (EN ISO 22868) | dB(A) | 9 4.3 | 95.1 | 95.1 | 96.1 |
| - Measurement uncertainty (2006/42/EC - EN 27574) | dB(A) | 3 3 3 | 3 | ||
| Measured acoustic output level (EN ISO 22868) dB(A) 92.8 | 93.3 93.3 | 94.1 | |||
| - Measurement uncertainty (2006/42/EC - EN 27574) dB(A) | 3 3 3 3 | ||||
| Vibration level (ISO 22867) m/sec | ^2 | 4.686 4.9 | 16 4.916 5. | 285 | |
| - Measurement uncertainty (2006/42/EC - EN 12096) m/sec | ^2 | 1.5 1.5 | 1.5 1.5 | ||
| TECHNICAL SPECIFICATIONS | |||||
| Voltage | V~ | 230 - 240 | 230 - 240 | 230 - 240 | 230 - 240 |
| Power frequency | Hz | 50 | 50 | 50 | 50 |
| Overload protection | A | 16 | 16 | 16 | 16 |
| Motor power | W 1800 2000 | 2000 | 2200 | ||
| Bar length | cm | 35 | 35 | 40 | 40 |
| Cutting length | cm | 33.5 33 | 5 38.5 38.5 | ||
| Chain speed | m/sec | 14 | 14 | 14 | 14 |
| Weight | kg | 5.00 5.05 | 5.30 5.42 | ||
| Oil | ml | 130 | 130 | 130 | 130 |
[1]
Notice:
The vibration value indicated was determined with a standardized tool and can be used to make comparisons with other electric equipment as well as temporary estimates of the load through the vibrations.
WARNING!
The vibration value may vary according to the usage of the machine and its fitted equipment, and be higher than the one indicated. Safety measures must be established to protect the user and must be based on the load estimate generated by the vibrations in real usage conditions. In this regard, all the operational cycle phases must be taken into consideration, such as switching off or idle running.
2. SYMBOLS


1) If you are using the machine every day in nor5) Wear strong working gloves.
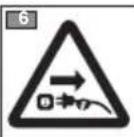
mal conditions, you can be exposed to a noise 6) Unplug the chain-saw immediately if the cable level of 85 dB (A) or higher. Wear safety glasses (or extension lead) is cut or damaged.
and hearing protection.
2) Warning!
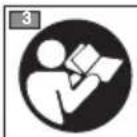
3) Read the instruction manual before using the machine.
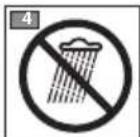
4) Do not leave the machine in the rain (or in damp conditions).
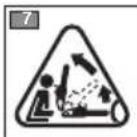
7) Beware of kickback! Kickback is the rapid and uncontrollable backward motion of the machine in the direction of the operator.
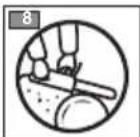
8) Hold the machine fast with both hands to control the machine and reduce the risk of kickback.
EXPLANATORY SYMBOLS ON THE MACHINE (if present)
11
12

13

14
15

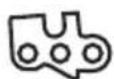
11) Direction in which the chain is mounted
12) Chain brake
13) Direction in which the chain runs
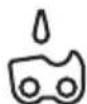
14) Chain oil tank
15) Chain tension
3. SAFETY WARNINGS
HOW TO READ THE MANUAL
Certain paragraphs in the manual contain particularly significant information and are marked with various levels of highlighting with the following meaning: 3)
NOTE
or
IMPORTANT
These give details or further informa-
tion on what has already been said, in the aim to prevent damage to the machine.

WARNING!
Non-observance will result in the
risk of injury to oneself or others.

DANGER!
Non-observance will result in the
risk of serious injury or death to oneself or others.
GENERAL POWER TOOL SAFETY WARNINGS

WARNING!
Read all safety warnings and all
instructions. Failure to follow the warnings and instructions may result in electric shock, fire and/or serious injury.
Save all warnings and instructions for future reference. The term "power tool" in the warnings refers to your mains-operated (corded) power tool.
1) Work area safety
a) Keep work area clean and well lit. Dirty or cluttered areas invite accidents.
b) Do not operate power tools in explosive atmospheres, 4 such as in the presence of flammable liquids, gases or dust. Power tools create sparks which may ignite the dust a) fumes.
c) Keep children and bystanders away while operating a power tool. Distractions can cause you to lose control.
2) Electrical safety
a) Power tool plugs must match the outlet. Never modify the plug in any way. Do not use any adapter plugs with earthed (grounded) power tools. Unmodified plugs and matching outlets will reduce risk of electric shock.
b) Avoid body contact with earthed or grounded surfaces, such as pipes, radiators, ranges and refrigerators. There is an increased risk of electric shock if your body is earthed or grounded.
c) Do not expose power tools to rain or wet conditions. Water entering a power tool will increase the risk of electric shock.
d) Do not abuse the cord. Never use the cord for carrying, pulling or unplugging the power tool. Keep cord away from heat, oil, sharp edges or moving parts. Damaged entangled cords increase the risk of electric shock.
e) When operating a power tool outdoors, use an extension cord suitable for outdoor use. Use of a cord suitable for outdoor use reduces the risk of electric shock.
f) If operating a power tool in a damp location is unavoidable, use a residual current device (RCD) protected supply. Use of an RCD reduces the risk of electric shock.
3) Personal safety
a) Stay alert, watch what you are doing and use common sense when operating a power tool. Do not use a power tool while you are tired or under the influence of drugs, alcohol or medication. A moment of inattention while operating power tools may result in serious personal injury.
b) Wear protective clothing. Always wear protective goggles. Using personal protective equipment such as dust mask, non-skid safety shoes, safety helmets or hearing protectors will reduce personal injuries.
c) Prevent unintentional starting. Ensure the switch is in the «off»-position before connecting to power source, picking up or carrying the tool. Carrying power tools with your finger on the switch or energising power tools that have the switch «ON» invites accidents.
d) Remove any adjusting key or wrench before turning the power tool on. A wrench or a key left attached to a rotating part of the power tool may result in personal injury.
e) Do not overreach. Keep proper footing and balance at all times. This enables better control of the power tool in unexpected situations.
Dress properly. Do not wear loose clothing or jewellery. Keep your hair, clothing and gloves away from moving parts. Loose clothes, jewellery or long hair can be caught in moving parts.
g) If devices are provided for the connection of dust extraction and collection facilities, ensure these are connected and properly used. Use of dust collection can reduce dust-related hazards.
Power tool use and care
Do not force the power tool. Use the correct power tool for your application. The correct power tool will do the job better and safer at the rate for which it was designed.
b) Do not use the power tool if the switch does not turn it on and off. Any power tool that cannot be controlled with the switch is dangerous and must be repaired.
c) Disconnect the plug from the power source before making any adjustments, changing accessories, or storing power tools. Such preventive safety measures reduce the risk of starting the power tool accidentally.
d) Store idle power tools out of the reach of children and do not allow persons unfamiliar with the power tool or these instructions to operate the power tool. Power tools are dangerous in the hands of untrained users.
e) Maintain power tools. Check for misalignment or binding of moving parts, breakage of parts and any other condition that may affect the power tool's operation. If damaged, have the power tool repaired before use.
g, Many accidents are caused by poorly maintained power tools.
Keep cutting tools sharp and clean. Properly maintained cutting tools with sharp cutting edges are less likely to bind and are easier to control.
Use the power tool, accessories and tool bits etc. in accordance with these instructions, taking into account
the working conditions and the work to be performed. Tip contact in some cases may cause a sudden reverse reaction, Use of the power tool for operations different from those in-kicking the guide bar up and back towards the operator.
tended could result in a hazardous situation.
Pinching the saw chain along the top of the guide bar may push the guide bar rapidly back towards the operator.
5) Service
Either of these reactions may cause you to loose control of the
a) Have your power tool serviced by a qualified repair per-aw which could result in serious personal injury. Do not rely ex-son using only identical replacement parts. This will en-clusively upon the safety devices built into your saw.
sure that the safety of the power tool is maintained.
As a chain saw user, you should take several steps to keep your cutting jobs free from accident or injury.
CHAIN SAW SAFETY WARNINGS:
Kickback is the result of tool misuse and/or incorrect operating procedures or conditions and can be avoided by taking proper
- Keep all parts of the body away from the saw chain with the chain saw is operating. Before you start the chain saw, make sure the saw chain is not contacting anything. A moment of inattention while operating chain saws cause entanglement of your clothing or body with the saw chain.
herecautions as given below:
- Always hold the chain saw with your right hand on the rear handle and your left hand on the front handle. Hold-saw. ing the chain saw with a reversed hand configuration increases. Do not overreach and do not cut above shoulder height. the risk of personal injury and should never be done. This helps prevent unintended tip contact and enables better
- Wear safety glasses and hearing protection. Further protective equipment for head, hands, legs and feet is recommended. Adequate protective clothing will reduce personal injury by flying debris or accidental contact with the same chain.
- Maintain a firm grip, with thumbs and fingers encircling the chain saw handles, with both hands on the saw and position your body and arm to allow you to resist kickback forces. Kickback forces can be controlled by the oper-
ator, if proper precautions are taken. Do not let go of the chain - saw.
esDo not overreach and do not cut above shoulder height.
This helps prevent unintended tip contact and enables better control of the chain saw in unexpected situations.
- Only use replacement bars and chains specified by the manufacturer. Incorrect replacement bars and chains may cause chain breakage and/or kickback.
- Follow the manufacturer's sharpening and maintenance
- Do not operate a chain saw in a tree. Operation of a chain instructions for the saw chain. Decreasing the depth gauge saw while up in a tree may result in personal injury. height can lead to increased kickback.
• Always keep proper footing and operate the chain saw only when standing on fixed, secure and level surface.
- Techniques for using the electric chain-saw
Slippery or unstable surfaces such as ladders may cause a loss of balance or control of the chain saw.
- When cutting a limb that is under tension be alert for Always observe the safety regulations and use the most suitable spring back. When the tension in the wood fibres is released, using techniques (see chapter 7 for instructions and examples). the spring loaded limb may strike the operator and/or throw the chain saw out of control. Arrange the power cable so that it does not get tangled in
- Use extreme caution when cutting brush and saplings.
Arrange the power cable so that it does not get tangled in branches or other obstacles.
The slender material may catch the saw chain and be whipped toward you or pull you off balance.
- Carry the chain saw by the front handle with the chain • Safe carrying of the saw saw switched off and away from your body. When trans-
porting or storing the chain saw always fit the guide bar. Whenever the machine is to be handled or transported you cover. Proper handling of the chain saw will reduce the likelimust:
hood of accidental contact with the moving saw chain.
- turn off the engine, wait for the chain to stop and unplug the machine from the mains;
- Follow instructions for lubricating, chain tensioning and
- mount the bar cover;
changing accessories. Improperly tensioned or lubricated
- only hold the machine using the handgrips and position the bar
chain may either break or increase the chance for kickback
in the opposite direction to that used during operation.
- Keep handles dry, clean, and free from oil and grease.
Greasy, oily handles are slippery causing loss of control.
- Cut wood only. Do not use chain saw for purposes not when using a vehicle to transport the machine, position it so that tended. For example: do not use chain saw for cutting it can cause no danger to persons and fasten it firmly. plastic, masonry or non-wood building materials. Use of
the chain saw for operations different than intended could re
- Recommendation for the first-time users
sult in a hazardous situation.
CAUSES AND OPERATOR PREVENTION OF KICKBACK:
Kickback may occur when the nose or tip of the guide bar touches an object, or when the wood closes in and pinches saw chain in the cut.
Before felling or delimbing for the first time, make sure:
- you have been specifically trained to use this type of equipment;
- you have carefully read the safety regulations and user instructions contained in this manual;
- you practise first on logs on the ground or attached to trestles,
the in order to get familiar with the machine and the most suitable cutting techniques.
4. MACHINE ASSEMBLY
PACKAGING CONTENTS
The packaging contains:
- power unit,
- bar,
- chain,
- bar cover,
- bag containing equipment and documents.
IMPORTANT
The machine is supplied with the bar and chain dismantled and the oil tank empty.

WARNING!
Unpacking and completing the assembly should be done on a flat and stable surface, with enough space for machine handling and its packaging, always making use of suitable equipment.
Disposal of the packaging should be done in accordance with the local regulations in force.
- Mount the bar (2) by inserting the stud bolt in the groove and push it towards the back of the machine body and wind the chain around the drive sprocket (Fig. 3).
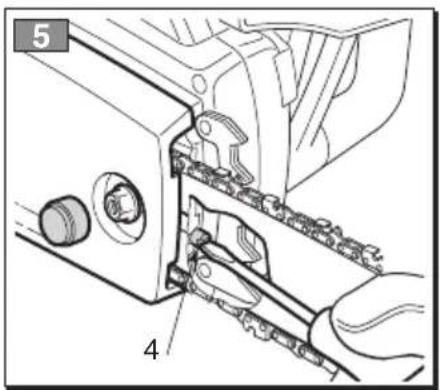
- Check that the chain tension adjuster pin (3) is fitted properly in the hole on the bar (Fig. 4); if it is n't, turn the chain tension adjuster screw (4) using a screwdriver until the pin is completely inserted (Fig. 5).
- Fit the guard back on without tightening the nut (1).
- Turn the chain tension adjuster screw (4) to adjust the chain tension (Fig. 5).
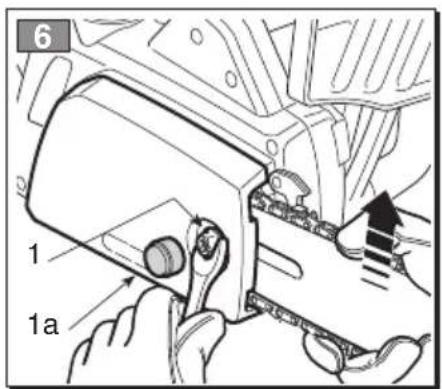
- Raise the bar and tighten the guard nut (1) securely using the supplied wrench, then replace the rubber protection (1a) (Fig. 6).
BAR AND CHAIN MOUNTING

WARNING!
Always wear heavy-duty gloves when handling the bar and chain. Mount the bar and chain very carefully so as not to impair the safety and efficiency of the machine. If in doubt, contact your dealer.
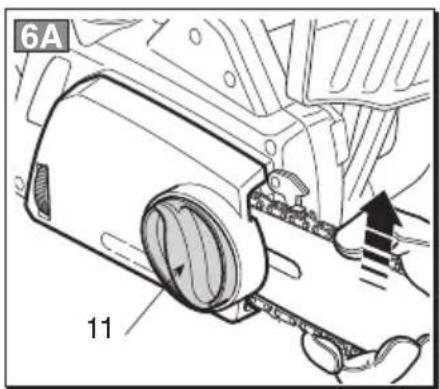
- MACHINES WITH QUICK CHAIN TENSION ADJUSTER
- Unscrew the handle (11) and remove the guard to get to the drive sprocket and the point where the bar is fitted (Fig. 1a).
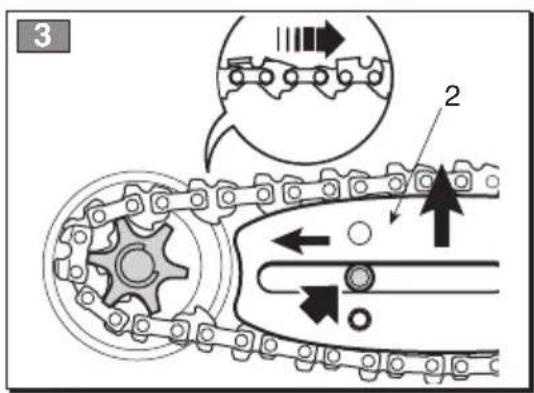
- Mount the chain in the right direction on the bar. If the tip of the bar has a nose sprocket, make sure the drive links are correctly inserted in the sprocket rims (Fig. 2).
Before fitting the bar, make sure the chain brake is not engaged; this is done by pulling the front hand guard right back towards the body of the machine.
Mount the bar (2) by inserting the stud bolt in the groove and push it towards the back of the machine body and wind the chain around the drive sprocket (Fig. 3).

WARNING!
Make sure the machine is not plugged into the mains socket.
- Fit the guard back on without tightening the handle (11). Check that the chain tension adjuster pin (3) is fitted properly in the hole on the bar (Fig. 4); if it isn't, turn the chain tension adjuster ring-nut (12) until the pin is completely inserted (Fig. 5a).
• MACHINES WITH STANDARD CHAIN TENSION ADJUSTER
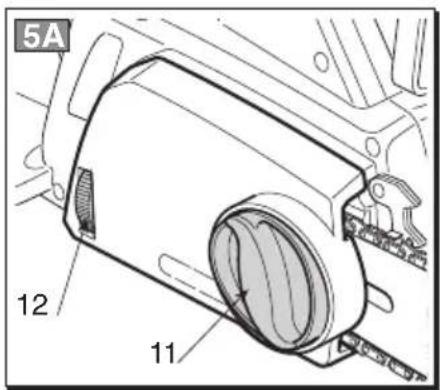
- Turn the ring-nut (12) to obtain the desired chain tension level (Fig. 5a).
- Remove the rubber protection (1a), unscrew the nut (1) and remove the guard to get to the drive sprocket and the point where the bar is fitted (Fig. 1).
- Mount the chain in the right direction on the bar. If the tip of the bar has a nose sprocket, make sure the drive links are correctly inserted in the sprocket rims (Fig. 2).
eRaise the bar and tighten the handle (11) securely (Fig. 6a).
5. PREPARING TO WORK
1. CHECKING THE MACHINE

WARNING!
Make sure the machine is
not plugged into the mains socket.
Before starting work please:
- MACHINES WITH QUICK CHAIN TENSION ADJUSTER
- Loosen the handle (11). (Fig. 5a).
- Turn the ring-nut (12) to obtain the desired chain tension level (Fig. 5a).
- Raise the bar and tighten the handle (11) securely (Fig. 6a).
- check that the mains frequency and voltage is the same as the rating data on the "identification plate" (see chap. 1 - 10.8);
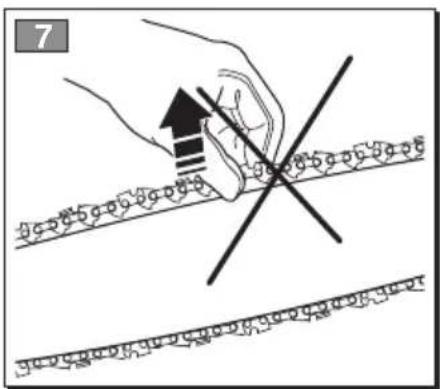
The tension is correct when the drive links do not
- ccheck that all the screws on the machine and slip out of the chain guides if you hold the chain in the bar are tightly fastened; the middle of the bar (Fig. 7).
- check that the chain is tensioned correctly, sharp and there are no signs of any damage; Lo
- check that handgrips and protection devices are the safety button. Using a screwdriver, run the clean and dry, correctly mounted and well fas-chain along the guides to check that it moves tened to the machine; smoothly.
- check that the chain brake is working efficiently;
- check that the trigger switch and the safety button should move freely without forcing and return automatically and rapidly back to their neutral position;
- check that the trigger switch must remain locked this machine is equipped with a double braking until the safety button is pressed; system that intervenes in two situations:
- make sure the cooling air vents are not clogged up with sawdust or debris; a)
- check that the power cable and extension lead are not damaged;
- check that the chain's oil level is not below the «MIN» level mark and top up to 1 cm from the of the filler if necessary.
pQ-CHECKING THE CHAIN BRAKE
a) When the switch lever is released, a brake is automatically activated that slows and stops chain movement, in order to prevent the risk of the injury should the chain continue to turn after it. The rhas been switched off.
2. CHECKING THE CHAIN TENSION

WARNING!
Make sure the machine is
not plugged into the mains socket.
b) In the event of a kickback while working, following an irregular contact of the tip of the bar, with a brusque upward movement that causes the hand to strike the front guard. In this case, the brake blocks chain movement and must be released manually in order to disengage it.
• MACHINES WITH STANDARD CHAIN TENSION ADJUSTER
This brake can be operated manually by pushing the front guard forward. To release the brake, pull the front guard towards the handgrip until you hear
- Loosen the guard nut, using the wrench (Fig. 5). click.
- Turn the chain tension adjuster screw (4) to adjust the chain tension (Fig. 5).
- Raise the bar and tighten the guard nut secure to check that the brake works efficiently, proceed using the wrench (Fig. 6). as follows:
- Start the engine by holding the front handgrip
The tension is correct when the drive links do not and push the front hand guard forwards with slip out of the chain guides if you hold the chain in your thumb (towards the bar).
the middle of the bar (Fig. 7).
Loosen the brake by pressing both the switch the safety button. Using a screwdriver, run the chain along the guides to check that it moves smoothly.
- When the brake is engaged, release the trigger and switch.
The chain must stop as soon as the brake is engaged.
WARNING!
Do not use the machine if
the chain brake does not function correctly and have it inspected by your dealer.
4. CHAIN LUBRICANT
IMPORTANT
Only use chain-saw oil or ad-
hesive oil for chain-saws. Do not use oil containing impurities, to avoid clogging the tank filter and permanently damaging the oiler.
IMPORTANT
The chain lubricating oil is
bio-degradable. The use of mineral oil or engine oil can have a serious impact on the environment.
It is essential that you use good quality oil to lub cate the cutting parts effectively.
Used or poor quality oil does not guarantee good lubrication and reduces the duration of the chain and bar.
IMPORTANT
Before each machine use,
the oil level should be checked and topped up to 1 cm from the rim of the filler. The oil level must not drop below the «MIN» level mark.
5. ELECTRICAL CONNECTIONS
DANGER!
Electricity and moisture
are not compatible.
- Always handle and connect electric cables in dry conditions.
- Keep electric sockets or cables away from wet and damp areas (e.g. puddles or wet ground).
The quality of the extension leads must be no less than H07RN-F or H07VV-F, with a minimum section of 1.5 mm ^2 and a recommended maximum length of 30 m.
To avoid overheating, do not keep the extension lead rolled up during use.

DANGER!
The permanent connec-
tion of any electrical equipment to the mains of a building must be installed by a qualified electrician in conformity with the regulations in force. Incorrect wiring can cause serious injury and even death.

DANGER!
Supply power to the ma-
chine using a differential switch (RCD - Residual Current Device) with a tripping current of max. 30 mA.
IMPORTANT
To prevent power supply
outages:
- make sure that the electric system's overall capacity is adequate;
- connect the machine to a mains socket with sufficient amperage;
- avoid simultaneous use of other electrical appliances with high power consumption.
6. HOW TO START - STOP THE ENGINE
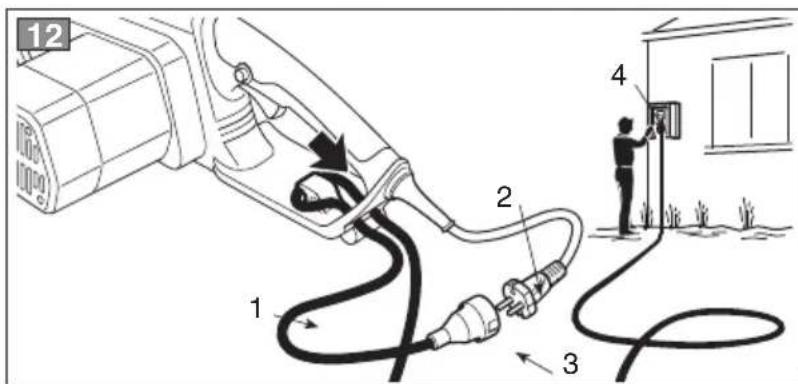
STARTING THE ENGINE (Fig. 12)
Before starting the engine:
- Fasten the extension lead (1) to the cable clan on the rear handgrip.
- FIRST connect the power cable plug (2) to the extension lead (3) and THEN plug the extension lead into the mains socket (4).
- Take off the bar cover.
-
Make sure the bar is not touching the ground any other object
-
Press the safety button (6) and then the switch (7).
NOTE
When you release the
switch, the safety button is also released and the engine stops.
WARNING!
The chain may take one
second to come to a stop after the engine is switched off.
or
STOPPING THE ENGINE
To start the engine (Fig. 12):
- Disengage the chain brake (5) by pulling the front hand guard towards the front handgrip.
- Hold the chain-saw firmly with both hands.
To stop the engine:
- Release the switch (7).
- FIRST unplug the extension lead (3) from the mains socket (4) and THEN disconnect the power cable (2) of the machine from the extension lead (3).
7. USING THE MACHINE
WARNING!
For personal safety and
that of others:
1) Do not use the machine without reading the instructions carefully. Become acquainted with the controls and the proper use of the machine. Learn how to stop the engine quickly.
2) Only use the machine for the purpose for which it was designed, that is for "felling, bucking and delimbing trees with dimensions suitable for the length of the bar" or wooden objects with the same characteristics. Any other use, such as using accessories not specified in this manual, may be hazardous and also damage the machine. Examples of improper use may include, but are not limited to:
- trimming hedges;
- intaglio carving;
- sectioning pallets, crates and various packing materials;
- sectioning furniture or other materials with nails, screws or other metal components;
- butchering meat;
- using the machine to lift, move or split objects;
- using the machine while fastened to fixed supports.
3) Keep in mind that the operator or user is responsible for accidents or hazards occurring to other people or their property.
4) Always wear suitable clothing when using the machine. Your dealer can provide you with all the information on the most suitable accident-prevention devices to guarantee your safety. Wear anti-vibration gloves. All the above-mentioned precautions do not however guarantee the prevention of certain risks – i.e. Raynaud's phenomenon or Carpal tunnel syndrome. For operators who use this machine for prolonged periods, it is therefore recommended to have periodic check-ups on the hands and fingers. If any of the above mentioned symptoms should appear, please contact a physician immediately.
5) Mow only in daylight or good artificial light. 6) Take utmost care when working near metal fences
7) Keep the chain away from the electric cable. Use the cable clamp to prevent the extension lead from disconnecting accidentally. Make sure it is connected to the socket without being forced. Never touch a live electric cable if it is poorly insulated. If
the extension lead gets damaged during use, do not touch the cable and unplug the extension lead immediately.
8) Take care not to hit the bar hard against foreign objects or flying debris caused by the movement of the chain.
9) Stop the engine and unplug the machine from the mains:
- whenever you leave the machine unattended;
– before cleaning, checking or servicing the machine; - after striking a foreign object. Inspect the machine for any damage and make repairs before restarting it again;
- if the machine begins to abnormally vibrate (Immediate look for the cause of the vibrations and take for necessary controls at a Specialised Centre).
- when the machine is not in use.
IMPORTANT
Always remember that an incorrectly used electric chain-saw may disturb others and have a serious impact on the environment.
To respect people and the environment:
- Avoid using the machine in environments or at times of the day when it may disturb others.
- Scrupulously comply with local regulations and provisions for the disposal of waste materials after sawing.
- Scrupulously comply with local regulations and provisions for the disposal of oils, damaged parts or any elements which have a strong impact on the environment.
- A certain amount of chain lubricating oil is released into the environment when the machine is running, so only use biodegradable oils made specifically for this use.
- To avoid the risk of fire, do not leave the machine with the engine hot on leaves or dry grass.
WARNING!
It takes specific training to use the machine for felling and delimbing.
1. CHECKS DURING WORK
- Checking the chain tension
The chain tends to stretch gradually as you so you need to check its tension frequently.
IMPORTANT
During the first period of use
(or after replacing the chain), it must be checked more frequently due to settling of the chain.

WARNING!
Never work with the chain
loose, as it can be hazardous if the chain slips out of its guides.
2. DIRECTIONS FOR USE AND CUTTING TECHNIQUES
Before felling or delimbing for the first time, practise sawing logs on the ground or on trestles, so that you can get familiar with the machine and the most suitable sawing techniques.

WARNING!
Always hold the machine
with both hands when sawing.

WARNING!
Stop the engine immedia-
tely if the chain stops during sawing. Beware of kickback, which can occur if the bar con-
To adjust the chain tension, follow the instructions: tacts an obstacle. in Chapter 5.2.
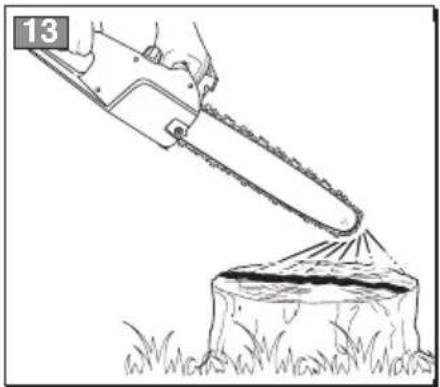
- Checking the oil delivery
IMPORTANT
Never use the machine with-
out lubrication! You can check the oil level in the tank through the transparent gauge. Make sure you fill up the oil tank every time you use the machine.

WARNING!
Make sure the bar and the
chain are in place when you check the oil delivery.
Start the engine and check if the chain oil is delivered as shown in the figure (Fig. 13).
- Shutdown whilst working (Only for C 2.2 E/ET - SE 2216 / 2216 Q - A 220 EQ)
Your chain saw is designed with an overload protection with circuit breaker. If the chain saw is clogged (e.g. blocking of the cutting means, chain teeth jammed, overload cutting) during the cutting operation, the overload circuit breaker will cut the mains power supply automatically to protect your M chain saw.
IMPORTANT
The circuit breaker will be
activated when the cutting current is over 35-40A, and it can be reset manually by pressing the reset button (1.15) 30 seconds after it has cooled completely.
- Felling a tree
- When bucking and felling operations are being performed by two or more persons at the same time, the felling operations should be separated from the bucking operation by a distance of at least twice the height of the tree being felled. Trees should not be felled in a manner that would endanger any person, strike any utility line or cause any property damage. If the tree does make contact with any utility line, the company should be notified immediately.
- The chain saw operator should keep on the up-hill side of the terrain as the tree is likely to roll slide downhill after it is felled.
- An escape path should be planned and cleared as necessary before cuts are started. The e- li- scape path should extend back and diagonally to the rear of the expected line of fall as illustrated in Figure 15.
- Before felling is started, consider the natural lean of the tree, the location of larger branches and the wind direction to judge which way the tree will fall.
Q) Remove dirt, stones, loose bark, nails, staples and wire from the tree.
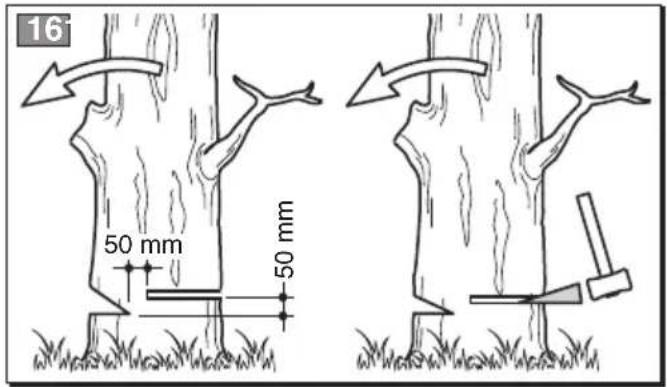
- Notching undercut
Make the notch 1/3 the diameter of the tree, perpendicular to the direction of falls as illustrated in Figure 16.
Make the lower horizontal notching cut first.
his will help to avoid pinching either the saw chain or the guide bar when the second notch is being made.
- Felling back cut
- Make the felling back cut at least 50 mm higher than the horizontal notching cut as illustrated in Figure 16. Keep the felling back cut parallel to the horizontal notching cut. Make the felling back cut so enough wood is left to act as a hinge. -T hinge wood keeps the tree from twisting and falling in the wrong direction. Do not cut through the hinge.
- As the felling gets close to the hinge, the tree should begin to fall. If there is any chance that tree may not fall in desired direction or it may rock back and bind the saw chain, stop cutting before the felling back cut is complete and use wedges of wood, plastic or aluminium to open the cut and drop the tree along the desired line of fall.
- When the tree begins to fall remove the chain saw from the cut, stop the motor, put the chain saw down, then use the retreat path planned. B alert for overhead limbs falling and watch your footing.
- When the log is supported on both ends, as illustrated in Figure 18C, cut 1/3 the diameter from the top (overbuck). Then make the finished cut by underbucking the lower 2/3 to meet the first cut.
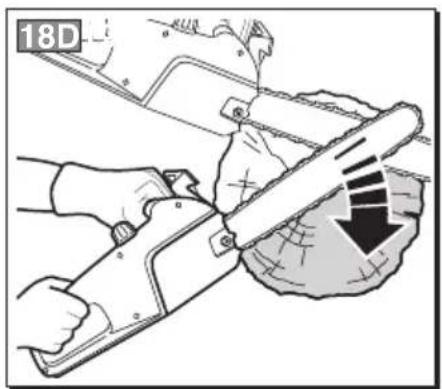
He is easier to saw a log using the spiked bumper (Figure 18D).
- Dig the spiked bumper into the log and use it as a pivot. Cut with an arched motion to make the bar penetrate the wood.
- Repeat several times if necessary, changing the point where you plant the spiked bumper.
When bucking on a slope always stand on the uphill side of the log, as illustrated in Figure 19. When "cutting through", to maintain complete control release the cutting pressure near the end of the cut without relaxing your grip on the chain saw handles. Don't let the chain contact the ground.
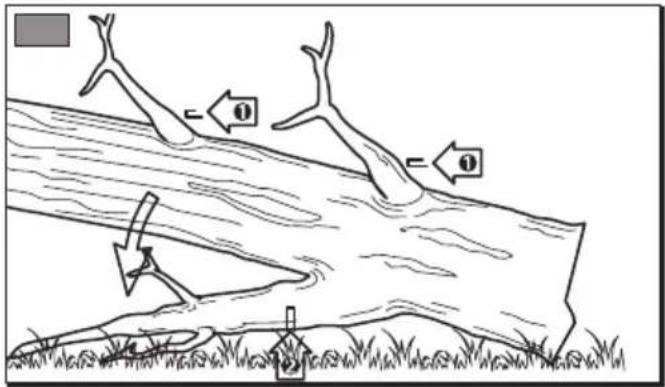
- Limbing a tree
After completing the cut, wait for the saw chain to stop before you move the chain saw. Always stop the motor before moving from tree to tree.
Limbing is removing the branches from a fallen tree. When limbing leave larger lower limbs to support the log off the ground. Remove the small limbs
in one cut as illustrated in Figure 17. Branches under tension should be cut from the bottom up to avoid binding the chain saw.
WARNING!
Be careful of where the
branches are lying on the ground, the risk of them being under tension, the direction the branch may go during cutting and the risk of the tree being unstable after the branch has been cut.
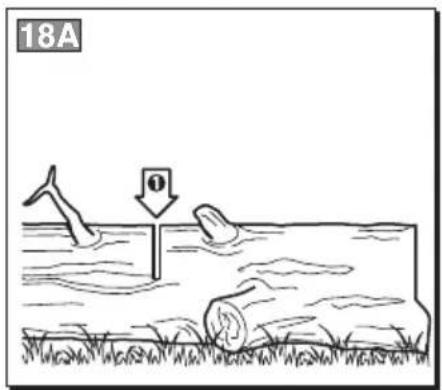
- Bucking a log
Bucking is cutting a log into lengths. It is important to make sure your footing is firm and your weight is evenly distributed on both feet. When possible, the log should be raised and supported by the use of limbs, logs or chocks. Follow the simple direc-bef-tions for easy cutting.
- When the log is supported along its entire len as illustrated in Figure 18A, it is cut from the (overbuck).
- When the log is supported on one end, as illustrated in Figure 18B, cut 1/3 the diameter from the underside (underbuck). Then make the finished cut by overbucking to meet the first cut.
When you have finished your work:
- Switch off the engine as indicated above (Chap. 6).
- Wait for the chain to stop and allow the machine to cool.
- Remove any traces of sawdust or oil deposits from the chain.
- If there is excessive dirt or resin build-up, disassemble the chain and place it in a container with a specific cleanser. Then rinse it with clean water and treat it with a suitable anticorrosive spray, before reassembling on the machine.
- Fit the bar cover before reassembling the machine.
WARNING!
Allow the engine to cool
-before storing in any enclosure.
To reduce fire hazards, clean the machine thoroughly to get rid of any sawdust, branches, leaves or excess grease, never leave containers with the cut debris inside the storage area.
8. MAINTENANCE AND STORAGE
WARNING!
For your safety and that
of others:
- Correct maintenance is essential to maintain the original efficiency and safety of the machine over time.
- Keep all nuts, bolts and screws tight to be sure the equipment is in safe working condition.
- Never use the machine with worn or damaged parts. Damaged parts are to be replaced and never repaired.
- Only use original spare parts. Parts that are not of the same quality can seriously damage the equipment and compromise safety.
WARNING!
During maintenance oper-
ations:
- Unplug the machine from the mains.
- Use protective gloves when handling the bar and chain.
- Keep the bar protection devices on, except when intervening directly on the bar or the chain.
- Never dispose of oils or other polluting materials in unauthorised places.
Regularly check the condition of the chain catcher and replace it if it gets damaged.
5. NUTS AND SCREWS
Periodically check that all the nuts and screws are securely tightened and the handgrips are tightly fastened.
6. SHARPENING THE CHAIN
WARNING!
WARNING! To ensure that the chain-saw works safely and efficiently, it is essential that the cutting components are well-sharpened. Any work on the chain and bar requires specific skills and special tools in order to do the work properly. For safety purposes, we recommend you contact your Dealer.
Sharpening is necessary when:
• The sawdust looks like dust.
• Cutting becomes more difficult.
- The cut is not straight.
• Vibrations increase.
A specialized centre will sharpen the chain using the right tools to ensure minimum removal of material and even sharpness on all the cutting edges.
1. ENGINE COOLING
To avoid overheating and damage to the engine, Replace the chain whenever:
ways keep the cooling air vents clean and free of sawdust and debris.
2. CHAIN BRAKE
Regularly check the efficiency of the chain brake.
3. CHAIN SPROCKET (Fig. 20)
- The length of the cutting edges reduces to 5 mm or less;
- There is too much play between the links and the rivets.
7. EMPTYING AND FLUSHING THE OIL TANK
(Only if organic oil is used for the chain)
Regularly check the condition of the sprocket and The use of some types of organic oil may cause de replace it when wear exceeds 0.5 mm. posits or fouling after a certain period of use.
Do not mount a new chain with a worn sprocket I ^th this happens, before leaving the machine un-vice-versa. used for a long period of time:
– disassemble the chain and the bar;
- empty the oil tank;
4. CHAIN CATCHER
This is an important safety device that restrains the chain if it breaks or degrooves.
- pour a specific liquid cleanser in the tank, to about half the maximum level;
- close the tank cap and operate the machine ur9. ELECTRIC CABLES til all the cleanser runs out.
Remember to fill with oil, before using the machine! WARNING! Check the condition of the electric cables regularly and replace them if they are worn or their insulation looks damaged.
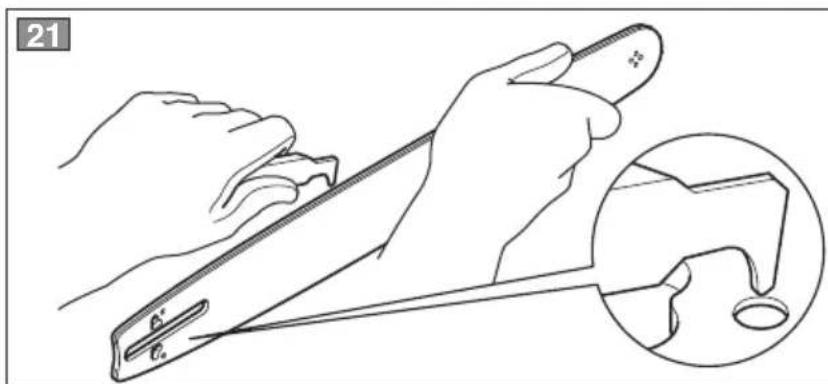
8. BAR MAINTENANCE (Fig. 21)
If the machine's power cable is damaged, it can only be replaced with an original spare part by your
To avoid asymmetrical wear on the bar, make su-dealer or an authorised service centre. it is turned over periodically.
To keep the bar in perfect working order, proceed 10. EXTRAORDINARY MAINTENANCE as follows:
- Grease the bearings on the nose sprocket (if present) with the syringe.
- Clean the bar groove with the scraper.
- Clean the lubrication holes.
- With a flat file, remove burr from the edges andlate the warranty. level off the guides.
All maintenance operations not foreseen in this manual must be performed exclusively by your dealer.
All and any operations performed in unauthorised centres or by unqualified persons will totally inval-
Replace the bar whenever:
11. STORAGE
- the groove is not as deep as the height of the
drive links (which must never touch the bottom)The machine must be stored in a dry place away - the inside of the guide is worn enough to make from the elements and with the bar cover correctly the chain lean to one side. fitted.
9. TROUBLESHOOTING
IMPORTANT
Carefully reading the infor-
mation in this Manual provides good machine notions and the guide allows you to identify and face the most common operating situations. For any other difficulty or problem, please contact an Authorised Service Centre.
• The machine does not start:
- make sure there is current in the socket;
- check that the power cable and extension lead are intact.
• The chain does not turn:
- make sure that the front guard is positioned facing backwards.
• The oil does not flow:
- make sure there is oil in the tank and flush it if necessary (8.7).
- Sparks form:
- contact your Dealer for an inspection of the motor and brushes.
10. ACCESSORIES
The table contains a list of all possible combinations between bar and chain, indicating those which may be used on each machine, marked with the symbol “*”.
chain are actions made solely by the user, the latter assumes responsibility for damages of why kind due to such actions. When in doubt or if lacking knowledge of the specificity of each bar or chain, contact your retailer or specialised gardening centre.

WARNING!
In consideration that the
selection, application and usage of bar and
Bar and chain combinations
| Pitch BAR CHAIN Model | ||||||||
| Inches | LengthInches / cm | GroovewidthInches / mm | Code Code | A 180 EC 1.8 E • C 1.8 ET1814SE 1814 Q | SESE 2014SE 2014 Q | A 200 E • XC 120CP 2.0 QC 2.0 E • C 2.0 ETSE 2016 • SE 2016 | Q A 220 EQC 2.2 E • C 2.2 ETS E 2216Q SE 2216 Q | |
| 3/8" | 14" / 35 cm | 0,050" / 1,3 mm | 118800388/0 | 4113703 | * | * | ||
| 3/8" | 16" / 40 cm | 0,050" / 1,3 mm | 118800389/0 | 4113706 | * | * | ||
Cher Client,
9. PROBLEMAS E SOLUÇÕES
IMPORTANTE
INNEHÅLLSFÖRTECKNING
3. AFLSUTNING AF ARBEJDET
INNHOLDET I EMBALLASJEN
Maskinens emballasje inneholder:
2. KONTROLL MED KJEDETS SPENNING
8. VEDLIKEHOLD OG LAGRING
ADVARSEL!
1. KONTROLY, KTERÉ JE TŘEBA PROVÁDĚT BĚHEM PRACOVNÍ ČINNOSTI
5. PASIRUOŠIMAS DARBUI
1. PRIETAISO PATIKRINIMAS

DÈMESIO!
Isitikinti, jog prietaisas
néra ijungtas i elektros lizda.
Prieš pradedant darba reikia: