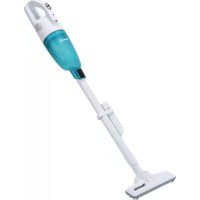
DRC200 - Cordless vacuum MAKITA - Free user manual and instructions
Find the device manual for free DRC200 MAKITA in PDF.
User questions about DRC200 MAKITA
0 question about this device. Answer the ones you know or ask your own.
Ask a new question about this device
Download the instructions for your Cordless vacuum in PDF format for free! Find your manual DRC200 - MAKITA and take your electronic device back in hand. On this page are published all the documents necessary for the use of your device. DRC200 by MAKITA.
USER MANUAL DRC200 MAKITA
text_image
Created with nitro® PDE® professi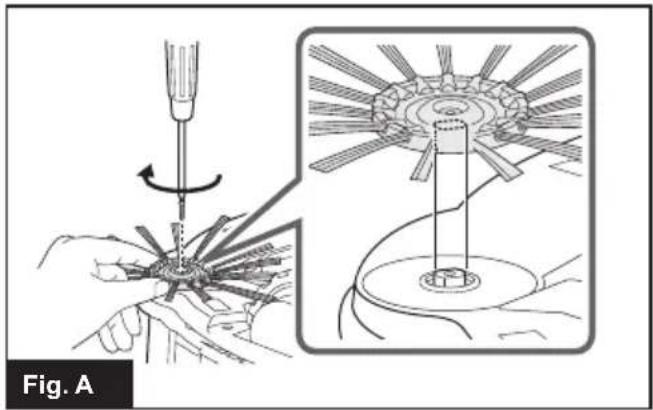
natural_image
Illustration of a screwdriver being adjusted for a mechanical component, shown in two views (top: circular gear with rotating edge, bottom: flat base with central hub)
text_image
1 Fig. D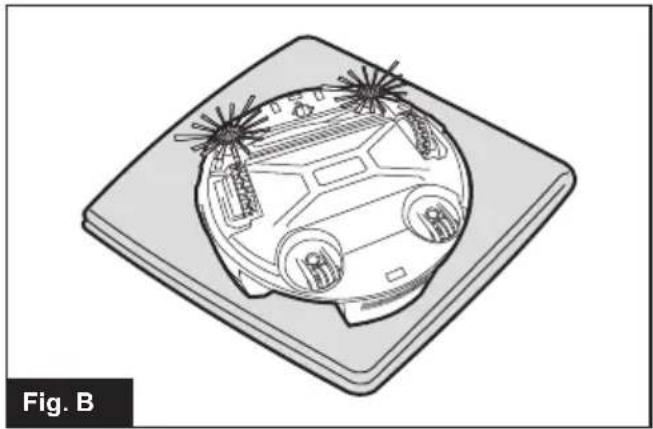
natural_image
Isometric line drawing of a car on a flat surface, no text or symbols present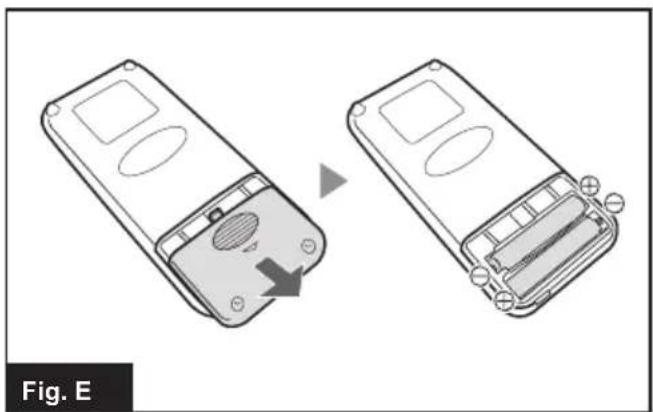
natural_image
Two views of a remote control device showing internal components and battery structure (no text or symbols)
text_image
1 2 3 Fig. C
text_image
1234 12 5 6 7 8 11 10 9Fig. F
text_image
1 2 3 4 5 6 7 Makita Fig. G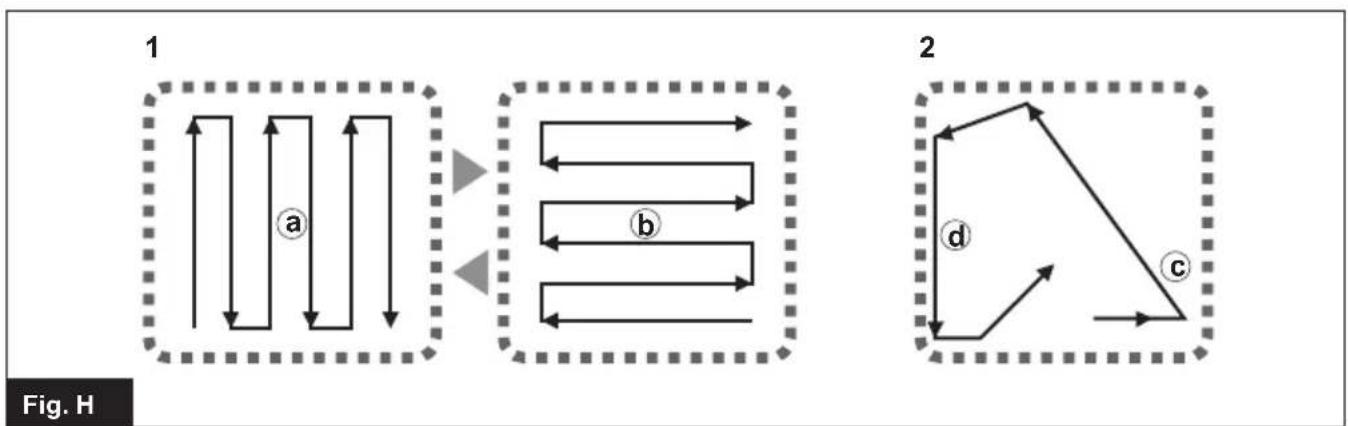
flowchart
graph TD
    subgraph Diagram1
        A1["1"] --> B1["a"]
        B1 --> C1
        C1 --> D1
        D1 --> E1
        E1 --> F1
        F1 --> G1
        G1 --> H1
        H1 --> I1
        I1 --> J1
        J1 --> K1
        K1 --> L1
        L1 --> M1
        M1 --> N1
        N1 --> O1
        O1 --> P1
        P1 --> Q1
        Q1 --> R1
        R1 --> S1
        S1 --> T1
        T1 --> U1
        U1 --> V1
        V1 --> W1
        W1 --> X1
        X1 --> Y1
        Y1 --> Z1
    end

    subgraph Diagram2
        A2["2"] --> B2["d"]
        B2 --> C2["c"]
        C2 --> D2
        D2 --> E2
        E2 --> F2
        F2 --> G2
        G2 --> H2
        H2 --> I2
        I2 --> J2
        J2 --> K2
        K2 --> L2
        L2 --> M2
        M2 --> N2
        N2 --> O2
        O2 --> P2
        P2 --> Q2
        Q2 --> R2
        R2 --> S2
        S2 --> T2
        T2 --> U2
        U2 --> V2
        V2 --> W2
        W2 --> X2
        X2 --> Y2
        Y2 --> Z2
    end
text_image
1 2 Created v Fig. Initro ^PDF professional
natural_image
Technical line drawing of a mechanical device with two views (labeled 1 and Fig. J), showing internal components without any text or symbols.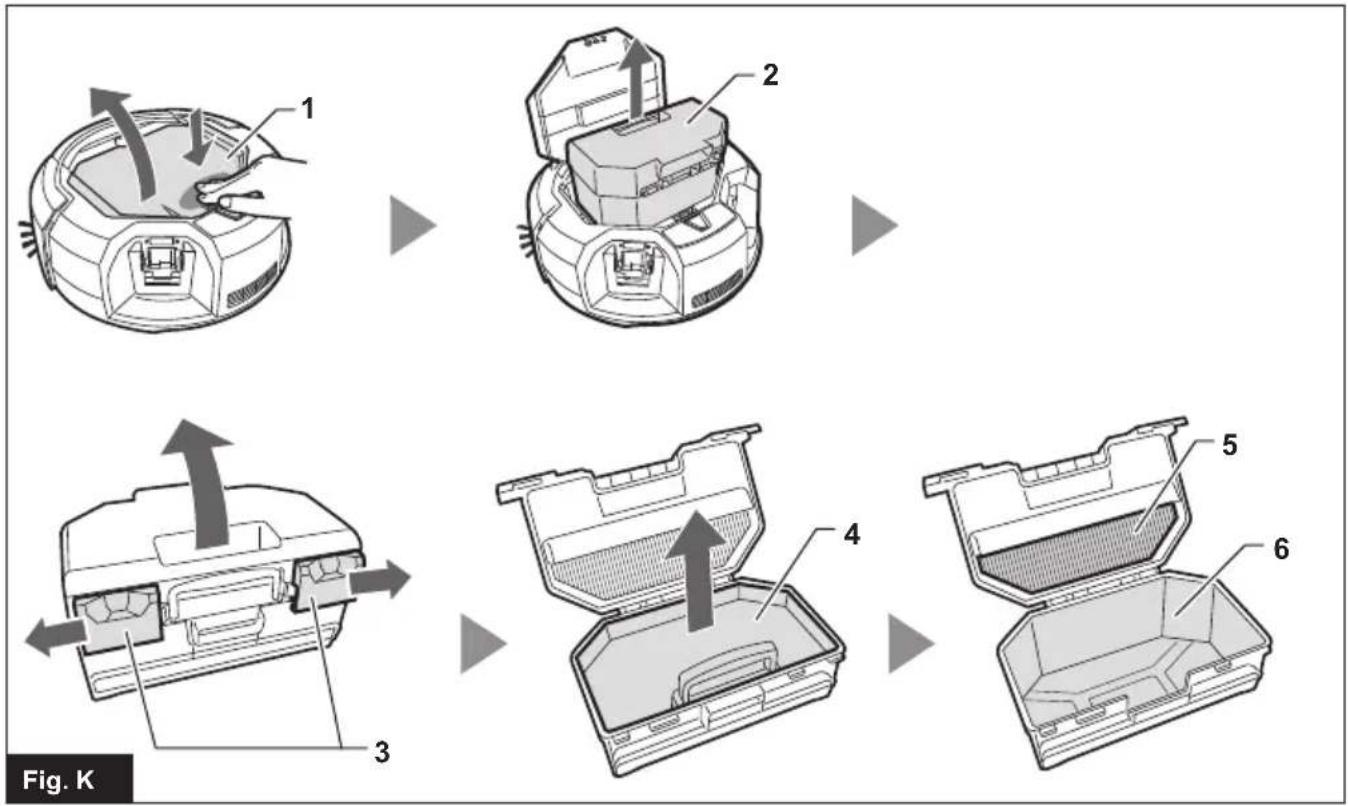
flowchart
graph TD
    A["1: Body part"] --> B["2: Top body part"]
    B --> C["3: Body part with arrows indicating assembly direction"]
    C --> D["4: Cover and lid structure"]
    D --> E["5: Final packaging with internal mesh"]
    E --> F["6: Final container with internal mesh"]
    style A fill:#f9f,stroke:#333
    style B fill:#ccf,stroke:#333
    style C fill:#cfc,stroke:#333
    style D fill:#fcc,stroke:#333
    style E fill:#cff,stroke:#333
    style F fill:#ffc,stroke:#333

text_image
1 2 Created withFig. L
text_image
Fig. M 1 2 3 4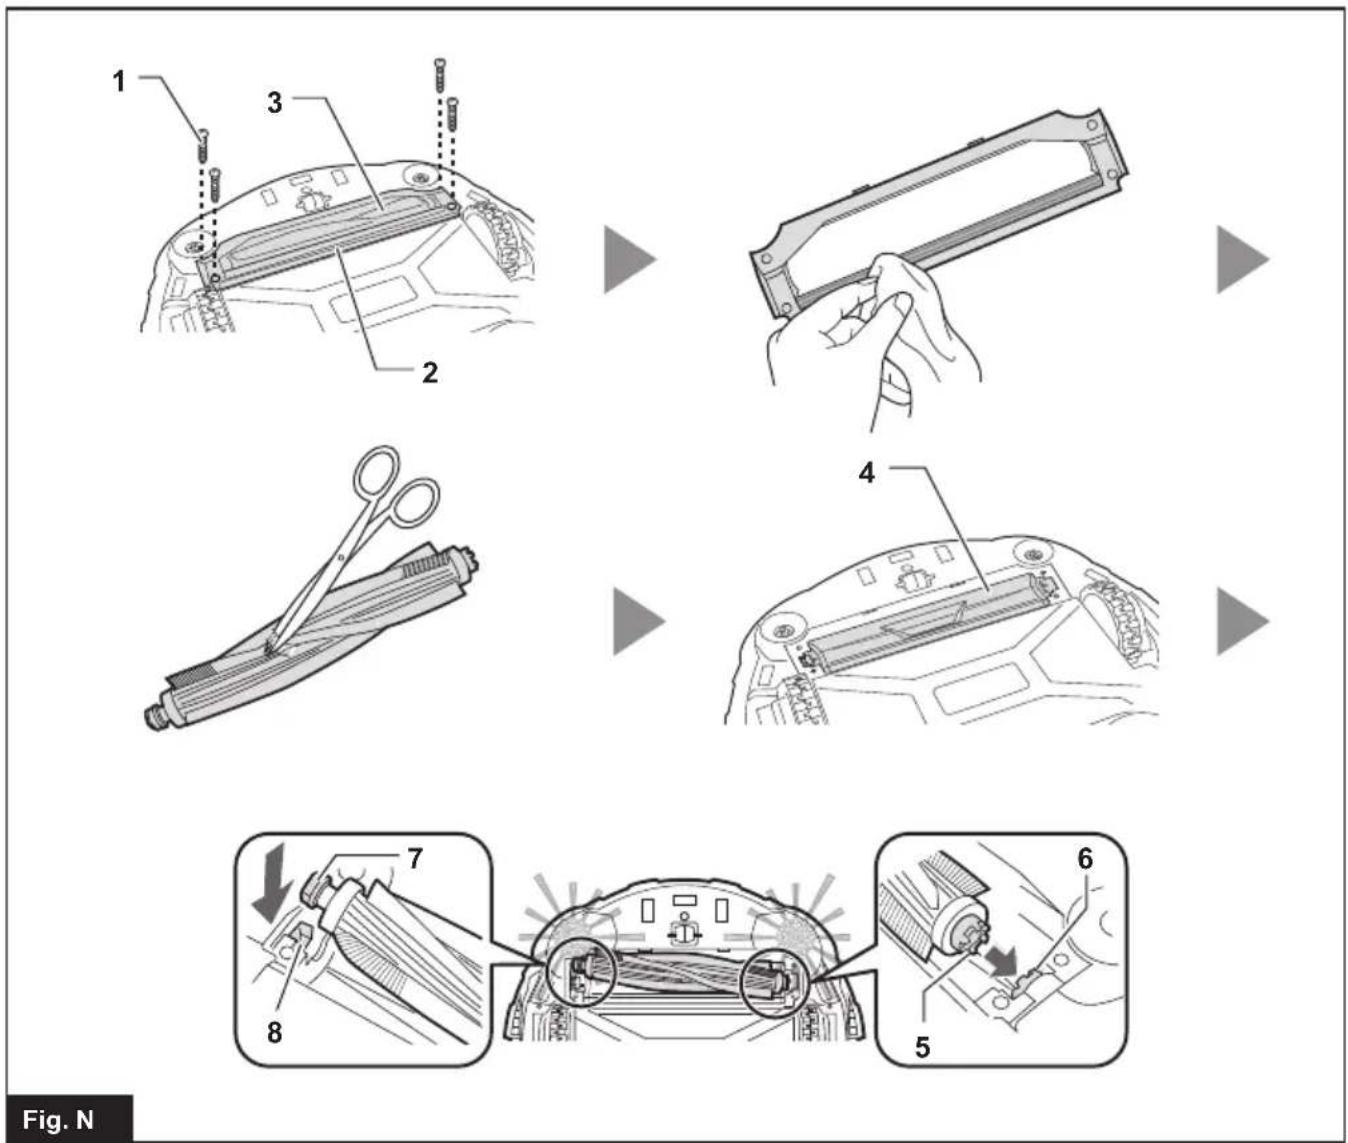
text_image
1 2 3 4 5 6 7 8 Fig. N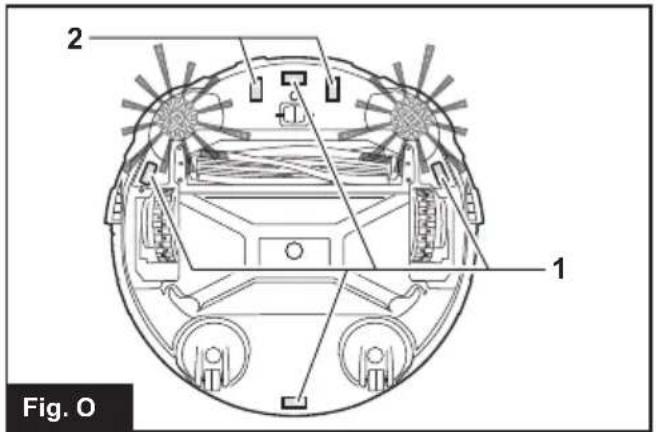
text_image
2 1 Fig. O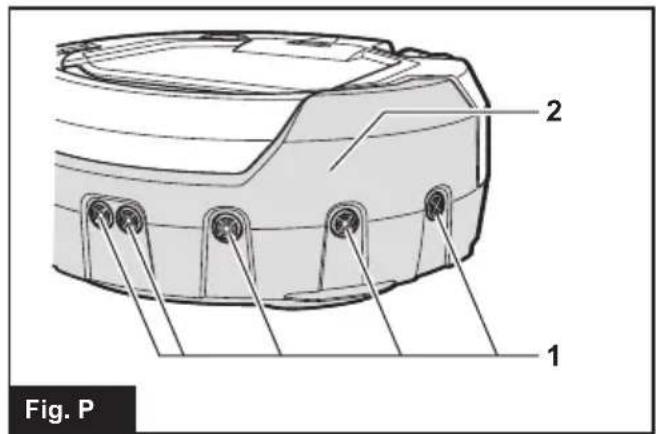
text_image
2 1 Fig. P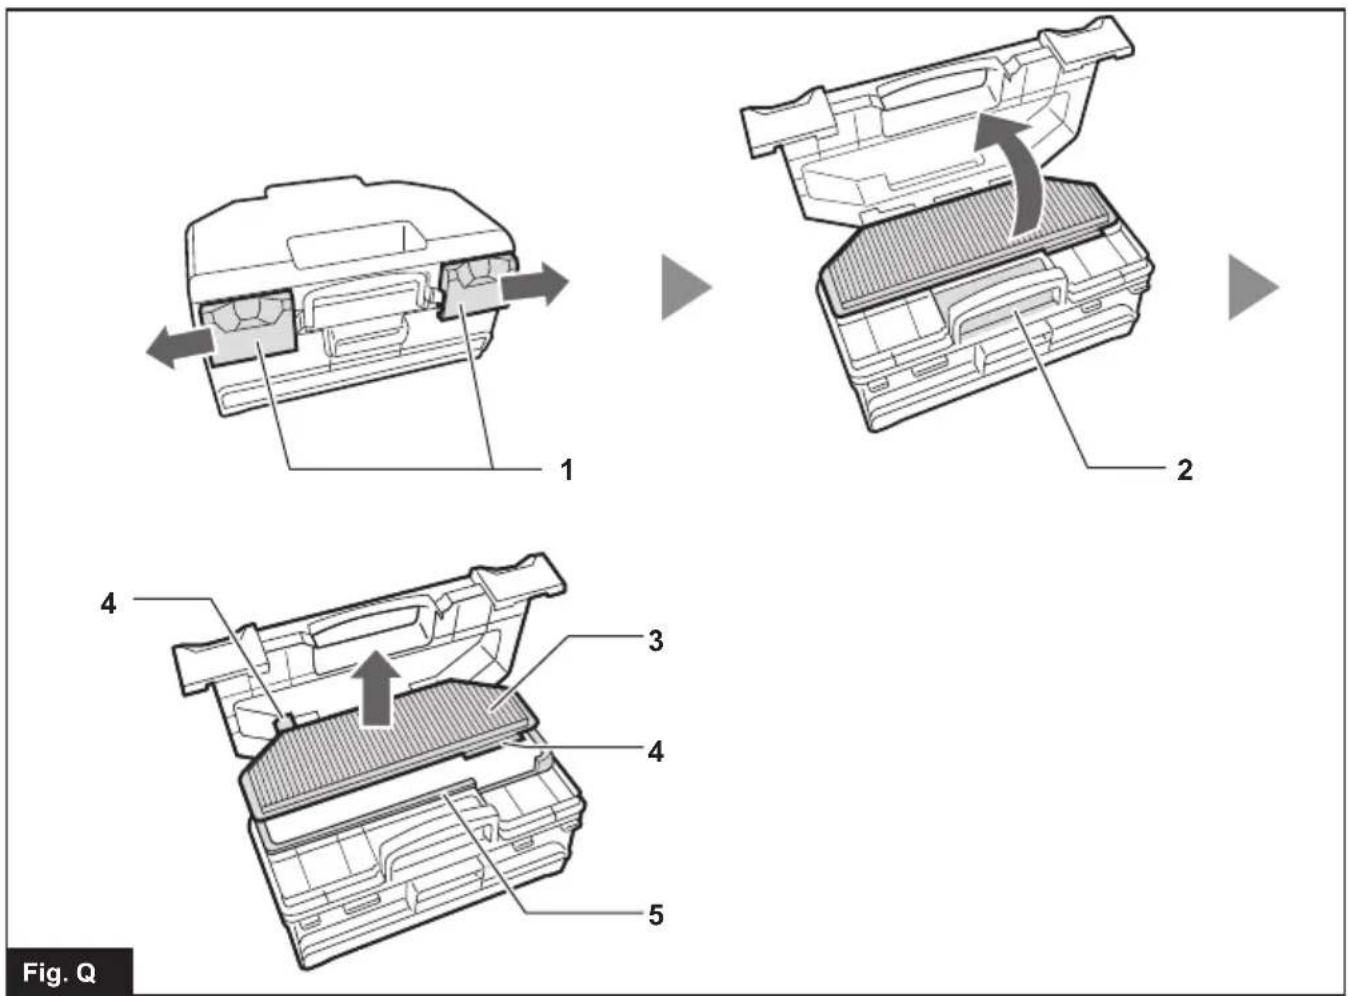
text_image
Fig. Q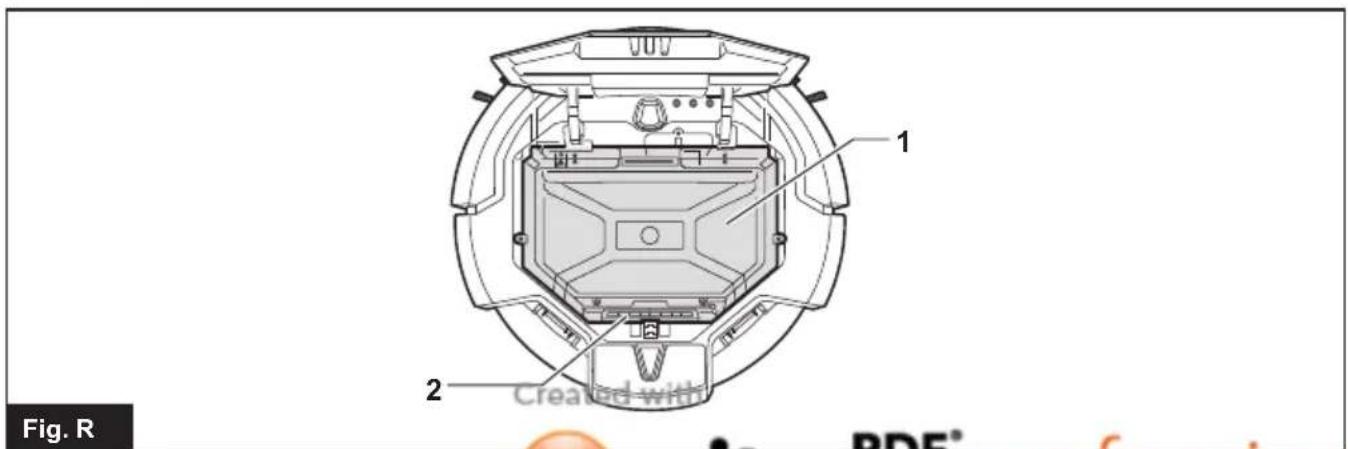
text_image
Fig. R 1 2 Created with PDF®ENGLISH (Original instructions)
WARNING: This machine is not intended for use by persons (including children) with reduced physical, sensory or mental capabilities, or lack of experience and knowledge. Children should be supervised to ensure that they do not play with the appliance.
SPECIFICATIONS
| Standard battery cartridge | BL1815N, BL1820, BL1820B, BL1830, BL1840, BL1840B, BL1850, BL1850B, BL1860B |
| Battery life(using optional lithium ion batteries) | Approx. 120 min. using two BL1830s (18 V, 3 Ah ea.) |
| Approx. 200 min. using two BL1850s (18 V, 5 Ah ea.) | |
| Bin capacity 2.5 L | |
| Dimensions (w/l/h)(incl. BL1830 batteries) | Approx. 460 x 460 x 180 mm |
| Weight (incl. two BL1830 batteries) | Approx. 7.8 kg |
- The specifications here are subject to change without notice, due to our continuing program of research and development.
• Specifications may differ from country to country.
Symbols

Read instruction manual.
Only for EU countries
Do not dispose of electric equipment or battery pack together with household waste material!
In observance of the European Directives, on Waste Electric and Electronic Equipment and Batteries and Accumulators and Waste Batteries and Accumulators and their implementation in accordance with national laws, electric equipment and batteries and battery pack(s) that have reached the end of their life must be collected separately and returned to an environmentally compatible recycling facility.

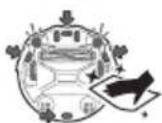
Do not step or put objects on the Robotic Cleaner.
Do not use the Robotic Cleaner near an open flame or flammable and/or dangerous materials.
Clean the cliff sensors on the bottom face if they are dirty or wet.
EC declaration of conformity
For European countries only
The EC declaration of conformity is included as Annex A to this instruction manual.
SAFETY PRECAUTIONS
WARNING
Do not use the Robotic Cleaner near or vacuum up inflammable substances.
This may result in explosion or fire.
• Kerosene, gasoline, incense, candles
- Benzine, thinner
- Cigarette butts
- Toner or other combustible substances
- Carpet cleaner or other foamy substances
Do not use the Robotic Cleaner in wet locations, locations that may become wet, or locations with high temperatures and humidity. Also, do not vacuum up water.
This may result in electric shock, short-circuit, fire, deformation or malfunction.
• Kitchens and other areas where water is used
- Bathrooms
- Shower rooms
- Attics, etc.
Do not touch the Robotic Cleaner with wet hands. This may result in electric shock.
Do not use the Robotic Cleaner around stoves or other heating equipment.
This may result in electric shock, short-circuit, fire, deformation or malfunction.
Intended use
This is the Robotic Cleaner intended for cleafloors. The remote controller connects to the Cleaner by wireless (2.4 GHz ZigBee).

nitro ^PDF professional
download the free trial online at nitropdf.com/professional
Do not use the Robotic Cleaner in the following types of locations.
This may result in electric shock or injury.
- Near infants or persons with reduced physical, sensory or mental capabilities, or lacking in the necessary experience and knowledge
- Near animals
- Near large numbers of people or highly trafficked areas
Do not allow unsupervised children or persons who are unable to express their will or operate the Robotic Cleaner by themselves to use the Robotic Cleaner.
This may result in electric shock or injury.
Discontinue operation immediately in the event of an abnormality or malfunction such as the following.
Failure to observe this instruction may result in smoke, fire or electric shock.
- The Robotic Cleaner will not operate even though it is turned ON.
- The Robotic Cleaner is deformed or abnormally hot.
- The Robotic Cleaner stops sometimes during operation.
- The Robotic Cleaner makes abnormal noises during operation.
- The Robotic Cleaner gives off a burnt smell.
Turn OFF the Robotic Cleaner in locations where use is prohibited.
Failure to observe this instruction may cause medical equipment to operate improperly.
Be sure to follow the instructions of each medical institution when using equipment that emits radio waves inside medical institutions.
Do not use the Robotic Cleaner in narrow and unenclosed high locations.
This may cause the Robotic Cleaner to fall from the area, resulting in injury or malfunction.
- Stairs
- On top of a table, shelf, dresser, refrigerator, etc.
- Mezzanines, lofts, floors with a direct drop onto stairwells or entranceways, etc.
- Locations with an incline of 10^ or more
Do not expose the Robotic Cleaner to direct sunlight or infrared rays.
Improper operation due to a sensor error may cause the Robotic Cleaner to fall, resulting in injury or malfunction.
- Halogen heaters
- Remote controls or sensors, etc.
- Sun rays entering through frosted glass
Move any objects that may cause an accident in the event of contact with the Robotic Cleaner.
Failure to observe this instruction may result in injury due to objects tipping over or falling.
- Lit candles, vases, etc.
• Electronics with controls located around the same height as the Robotic Cleaner.
Do not cover the Robotic Cleaner.
This may result in fire due to overheating.
Do not ride or place heavy objects on the Robotic Cleaner. Do not apply strong physical shocks.
This may result in injury, damage or malfunction. In particular, pay close attention to children around the Robotic Cleaner.
Never modify the Robotic Cleaner.
This may result in fire, electric shock or injury. Consult the dealer where you purchased the Robotic Cleaner for repairs.
Do not block or insert metallic or easily combustible foreign object into the suction or exhaust openings.
Also, do not use the Robotic Cleaner around objects that may block the suction opening.
This may result in electric shock, fire or malfunction.
Do not heat or expose the Robotic Cleaner to fire or leave it in a hot location such as near a fire or stove, exposed to direct sunlight, or inside a vehicle under the blazing sun.
This may result in short-circuit, fire, or cause the battery to leak fluid or burst.
Do not wash or expose the Robotic Cleaner\* to water or detergents.
This may result in electric shock, short-circuit or fire.
* Excluding the main brush, bottom plate, side brushes, dust box and filter
Do not touch the drive wheels or insert hands or feet under the Robotic Cleaner during operation.
This may result in injury.
In particular, pay close attention to children around the Robotic Cleaner.
Do not block or insert foreign matter into the Robotic Cleaner's sensors.
This may result in operational failure, injury due to the Robotic Cleaner falling as a result of improper operation, or malfunction.
Do not attach tape to the sensors or wheels. Do not alter the bumper or wheel shapes or press the bumper with excessive force.
This may result in operational failure, injury due to the Robotic Cleaner falling as a result of improper operation, or malfunction.
Periodically clean each sensor.
Failure to observe this instruction may result in operational failure, injury due to the Robotic Cleaner falling as a result of improper operation, or malfunction.
Do not use boundary tape (sold separately) that is dirty, peeling or torn.
This may result in injury due to the Robotic Cleaner falling as a result of operational failure.

CAUTION
Do not use the Robotic Cleaner in the following locations.
This may cause other equipment to operate improperly.
• Inside a hospital or around medical equipment
- Inside an airplane
- Around electronic equipment that requires precision control or uses weak signals.
Be sure to keep the Robotic Cleaner and the remote control more than 15 cm away from implantable cardiac pacemakers and defibrillators.
Failure to observe this instruction may result in malfunction of the medical devices.
Do not insert foreign matter into the gaps and openings.
This may result in electric shock or injury.
Be careful not to get your fingers caught when cleaning the Robotic Cleaner.
This may result in injury.
Be sure to read this INSTRUCTION MANUAL thoroughly before using the Robotic Cleaner.
Failure to observe this instruction may result in injury or malfunction.
NOTICE
Immediately discontinue use of the battery cartridge if an unpleasant odor, battery leakage, abnormal heating, deformation, or discoloration is observed.
Failure to observe this instruction may result in malfunction.
Do not use the Robotic Cleaner outdoors or in locations where it may wander outdoors.
This may result in malfunction.
Do not use the Robotic Cleaner in the following locations.
This may result in malfunction.
- Locations where cooking oil particles or other oil components are suspended in the air
- Locations where aerosol sprays or chemical products are used, such as barber shops, beauty salons, and dry cleaning shops
- Dusty locations
Do not use the Robotic Cleaner in the following locations.
This may damage floor coverings or scratch floor surfaces.
- Locations with easily damaged floor coverings (sheepskin, felt materials, etc.)
• Unfinished wood or marble floors - Freshly waxed floors
Do not use the Robotic Cleaner on floor coverings with a long pile length (7 mm or more).
This may result in damage to the floor coverings or cause the Robotic Cleaner to malfunction.
Do not use the Robotic Cleaner on hard, uneven floor surfaces such as concrete floors, etc.
This may result in increased brush and wheel wear.
Do not use the Robotic Cleaner if the brushes or wheels are worn.
This may result in scratched floor surfaces.
Discontinue operation and consult the dealer where you purchased the Robotic Cleaner.
Remove any sandy dirt adhering to the main brush, side brushes and wheels.
Failure to observe this instruction may result in scratched floor surfaces.
Do not vacuum up the following items.
This may scratch or clog the inside of the Robotic Cleaner or result in malfunction.
• Liquids or wet garbage
- Chemicals or oils
- Pet excrement
• Large amounts of sand or powder
• Sharp objects (glass, blades, pins, etc.)
• Large paper or vinyl garbage
- Cord or string
Clean the filter after vacuuming up fine powder (plaster, cement, chalk, etc.).
Failure to observe this instruction may result in malfunction.
Do not use the Robotic Cleaner if the filter is clogged or the sensors are soiled.
This may result in malfunction.
Do not oil the rotating brush or other moving parts.
This may result in plastic cracking.
SAVE THESE INSTRUCTIONS.
Battery tool use and care
- Recharge only with the charger specified by the manufacturer. A charger that is suitable for one type of battery pack may create the risk of fire when used with another battery pack.
- Use power tools only with specifically designated battery packs. Use of any other battery pack may create the risk of injury or fire.
- When (the) battery pack is not in use, keep it away from paper clips, coins, keys, nails, screws and other small metal objects that can make a connection from one terminal to another.
- Under extreme conditions, liquid may be ejected from the battery; avoid contact. If accidental contact occurs, flush with water.
Important safety instructions for the battery cartridge
-
Before using the battery cartridge, read all instructions and precautionary markings on (1) the battery charger, (2) the battery, and (3) product using the battery.
-
Do not disassemble the battery cartridge.
Created with

nitroPDF
professional
download the free trial online at nitropdf.com/professional
- If operating time has become significantly shorter than usual, stop operating immediately. It may result in a risk of overheating, possible burns and even an explosion.
- If electrolyte gets into your eyes, rinse them out with clear water and seek medical attention right away. It may result in loss of your eyesight.
- Do not short-circuit the battery cartridge:
(1) Do not touch the terminals with any conductive material.
(2) Avoid storing the battery cartridge in a container with other metal objects such as nails, coins, etc.
(3) Do not expose the battery cartridge to water or rain.
A battery short-circuit can cause a large current flow, overheating, possible burns and even a breakdown.
- Do not store the Robotic Cleaner and battery cartridge in any location where the temperature may reach or exceed 50°C (122°F).
- Do not incinerate the battery cartridge even if it is severely damaged or is completely worn out. The battery cartridge can explode in a fire.
- Be careful not to drop or strike the battery cartridge.
- Do not use a damaged battery cartridge.
- Follow your local regulations relating to the disposal of battery cartridges.
SAVE THESE INSTRUCTIONS.
CAUTION: Only use genuine Makita batteries. Using non-genuine Makita batteries, or batteries that have been altered, may result in the battery bursting causing fires, personal injury and damage. It will also void the Makita warranty for the Makita tool and charger.
Tips for maintaining maximum battery life
- Charge the battery cartridge before it becomes completely discharged. Always stop operation and charge the battery cartridge when you notice less tool power.
- Never recharge a fully charged battery cartridge. Overcharging shortens the battery service life.
- Charge the battery cartridge within a room temperature range of 10^ C - 40^ C ( 50^ F - 104^ F). Let a hot battery cartridge cool down before charging it.
- It is recommended that you charge the battery cartridge before storing it for a long period (more than six months).
Tool/battery cartridge protection system
The Robotic Cleaner is equipped with a tool/battery cartridge protection system that automatically cuts OFF the power to the motor to extend the life cycle of the Robotic Cleaner and the battery cartridges. The Robotic Cleaner automatically stops under the following conditions.
Overload
When the Robotic Cleaner is overloaded and an abnormally high current is drawn, the Robotic Cleaner automatically stops without any indication.
To restart the Robotic Cleaner, turn the power OFF, eliminate the cause of the overload, and then turn the power back ON.
Overheating
When the Robotic Cleaner overheats, the ⚠ lamp flashes 5 or 7 times for each sequence and the Robotic Cleaner automatically stops.
In this case, leave the Robotic Cleaner to cool down before turning the power back ON.
Overdischarge
When the remaining battery level becomes low, the Robotic Cleaner automatically stops and does not respond to any switch operations.
In this case, remove and recharge the battery cartridges.
BUTTONS AND INDICATORS
You can find details of the parts by searching for the figure number corresponding to each part in this document (e.g. search for "Fig. F-8" for the ⏻ POWER button).
Robotic Cleaner (Fig. F)
- Pilot lamp
- ⚠ Troubleshooting lamp
- Filter maintenance lamp
- Brush maintenance lamp
- ■■■ Battery indicators (for the right-hand and left-hand battery cartridges)
- Timer button and lamps
- Cruise mode button and lamps
: Pattern mode
X : Random mode - ⏻ POWER (start/stop) button
- Buzzer button and lamp
- ✗ Vacuum button and lamp
- ◆ Boundary sensor button and lamp
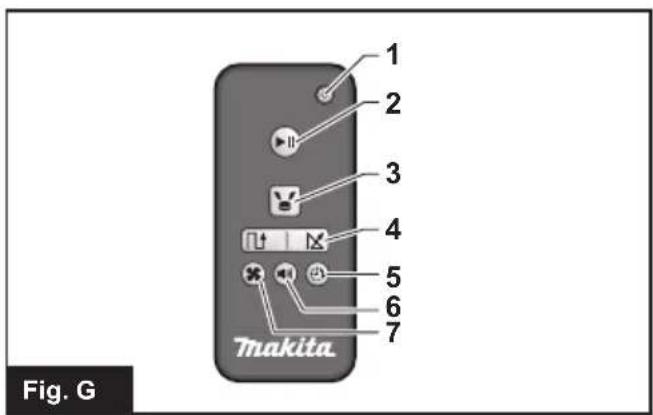
Remote control (Fig. G)
-
POWER OFF button
-
▶|| Start/Stop button
-
Location beacon button
-
☐ / ☒ Cruise mode buttons

- 10/12 Cruise phone buttons nitroPDF professional
download the free trial online at nitropdf.com/professional
- Timer button
- Buzzer button
- ✕ Vacuum button
PRIOR TO USE
Assembly and battery installation
⚠️CAUTION: Always be sure to turn OFF the Robotic Cleaner before carrying out any work on the Robotic Cleaner.
Supplied accessories
Check that the items in the following list are included in the package.
• Size AAA (LR03) batteries (x2)
- Side brushes (x4, incl. two spare brushes)
- Screws for side brush installation (x4)
• Boundary tape (15 m x1)
• Instruction Manual (x1)
- Quick start guide (x1)
- Notes on use (x1)
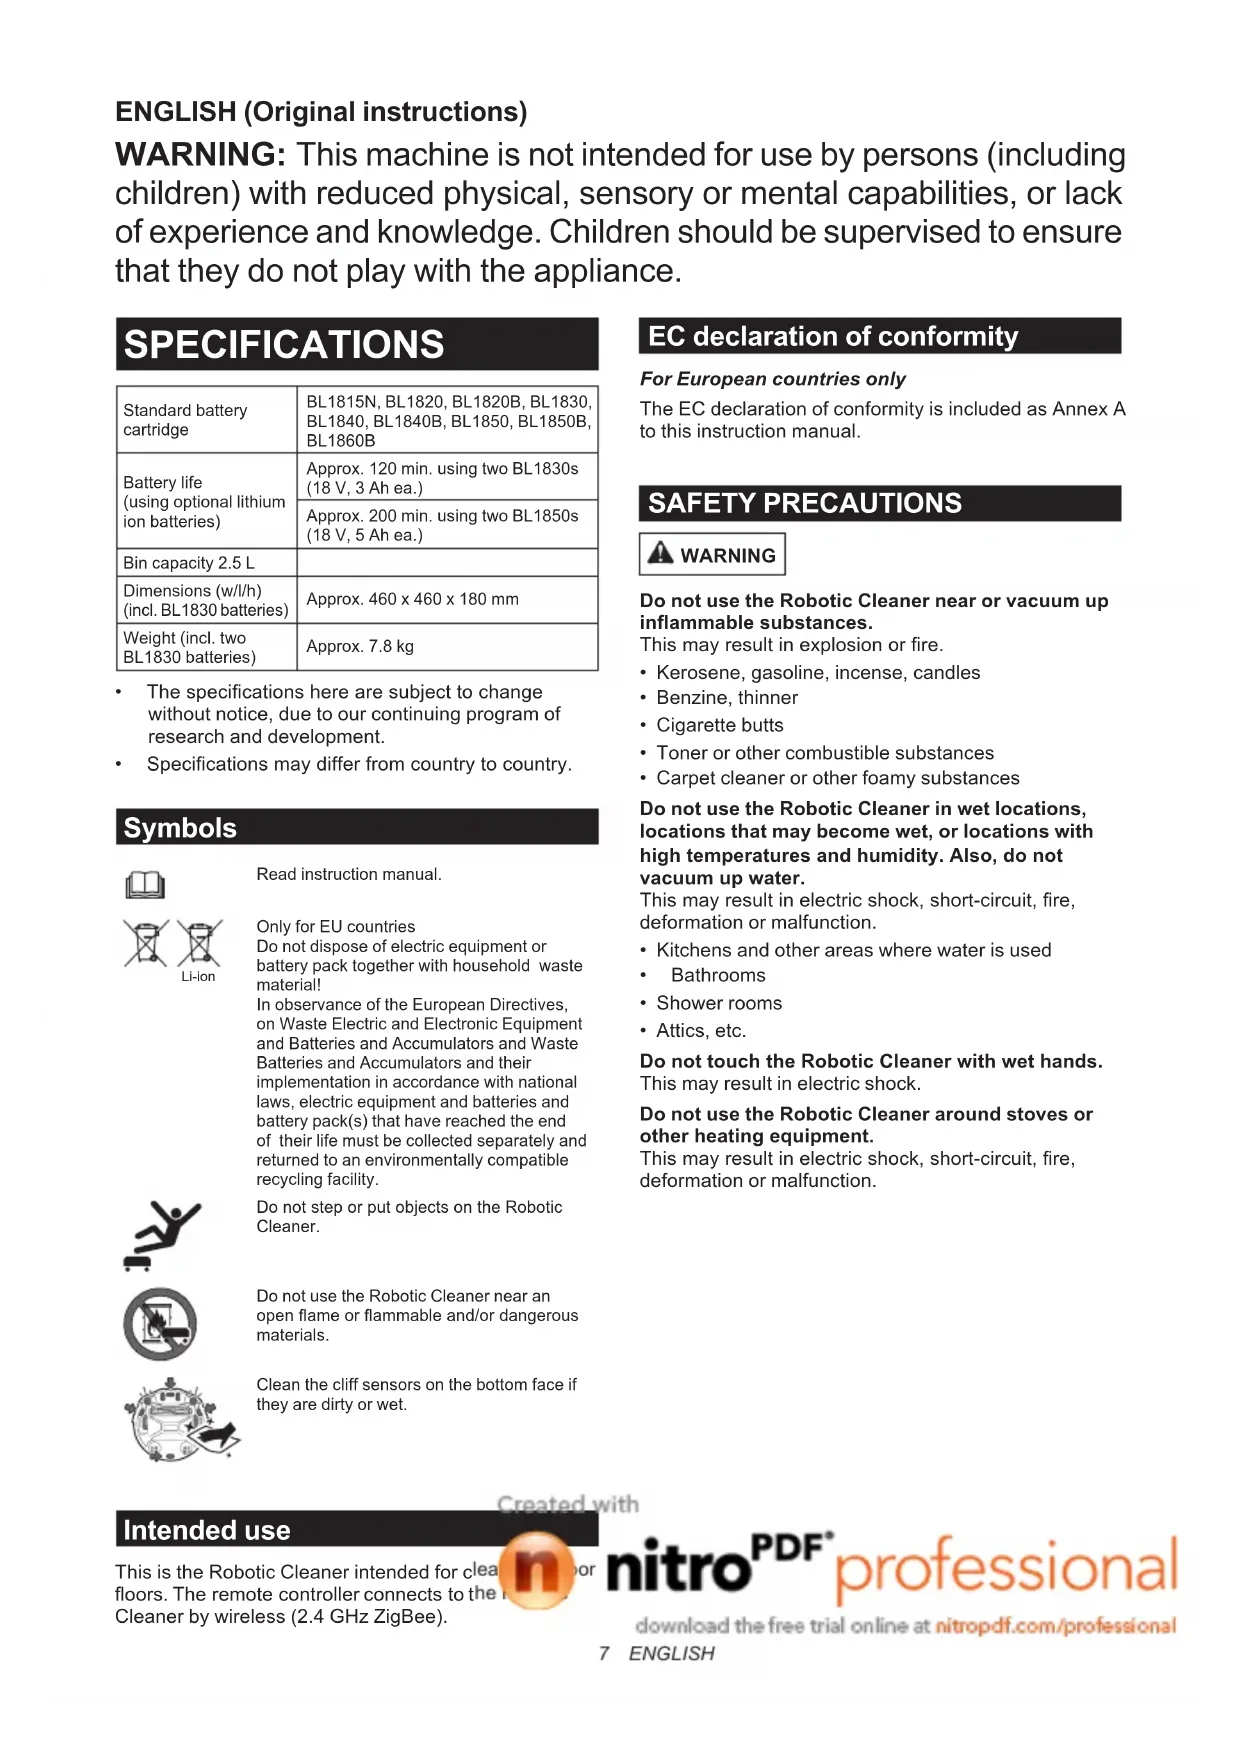
Installing the side brushes (Fig. A)
Install the side brushes on both sides of the bottom front of the Robotic Cleaner.
NOTICE: Before work, be sure to spread a rug or other cushioning material on the floor to prevent damage to the floor and Robotic Cleaner (Fig. B).
- Place the side brush on the rotating shaft head on the Robotic Cleaner with the groove of the brush fitted to the shaft head.
- Secure the side brush using the supplied screw.
NOTICE: Make sure that the Robotic Cleaner is operated with the side brushes installed.
Installing the battery cartridges
Align the groove (Fig. C-2) on the battery cartridge with the tongue (Fig. C-3) on the battery dock and slip it into place. Insert it all the way until it locks in place with a small click.
If you can see the red indicator (Fig. C-1) on the upper side of the release button, the battery cartridge is not completely locked.
CAUTION: Care must be taken in installing the battery cartridges so that fingers are not caught between the dock and the battery cartridge.
The Robotic Cleaner operates with only one battery cartridge installed on either of the battery dock.
To remove the battery cartridge, slide it from the battery dock while pressing the release button (Fig. D-1) on the cartridge.
Installing batteries in the remote control (Fig. E)
Slide off the battery compartment lid, and insert two AAA size (LR03) batteries, taking care to align correctly the polarity (+/-).
NOTICE: Do not use new and old batteries together, nor use different types of battery together.
NOTICE: Remove the batteries, if the remote control is not going to be used for a long time.
⚠️ CAUTION: If the skin or eyes come into contact with electrolyte leaking from the batteries, immediately flush with water.
Pairing the Robotic Cleaner and the remote control
The Robotic Cleaner comes already paired with the remote control. However, the pairing process must be performed again if you replace the remote control.
-
Press and hold the 🎨 Timer (Fig. F-6) and 🍒 Cruise mode (Fig. F-7) buttons simultaneously on the Robotic Cleaner until the buzzer beeps twice.
-
Press and hold the ⏻ Timer (Fig. G-5) and ⚙ Location beacon (Fig. G-3) buttons simultaneously on the remote control until the buzzer beeps once.
If pairing fails and the buzzer beeps 5 times, retry pairing again.
Organizing rooms
To ensure smooth cruising
- Shut the doors to the room. If the difference in the level of the door threshold is small enough that the Robotic Cleaner can pass over it without problem, the door can also be left open so that the Robotic Cleaner continues and cleans the adjoining room.
- Place obstacles in front of easily damaged furniture, etc.
- Place obstacles to prevent the Robotic Cleaner from entering locations where it may become stuck, such as under low shelves.
- Move tall, thin and unstable objects and other easily tipped over objects to another room.
- Lock the wheels of carts or other objects, or move them to another room.
- Arrange electrical cords along the walls.
- Move cushions, books or other objects that may impede the Robotic Cleaner from cruising to another room.
- Raise the parts of curtains or other objects that droop onto the floor.
- Move any floor coverings with easily pulled-out strands or differences in level and floor coverings that are thin and slide easily to another room.
- Fold any floor covering tassels beneath the floor coverings.
-
Put away any small or expensive objects that may be easily vacuumed up.
-
Put away any cords, belts, strings, thin papers, or plastic bags, lying on the floor.
- Retract any retractable floor power sockets.
- Cover any gratings dividing floor sections with boards, etc. as the Robotic Cleaner may detect them as boundaries and fail to move across them.
Preventing the Robotic Cleaner from falling
- If the cleaning area contains a flight of stairs or other section where the Robotic Cleaner may fall down, in order to keep the Robotic Cleaner out of the section, place objects with a height of 15 cm or taller and that are heavy enough to withstand the impact of the Robotic Cleaner in front of the section.
- Block sunlight and infrared rays with curtains. (The Robotic Cleaner may fall to a lower level when backing up to avoid sunlight or infrared rays.)
- Close aluminum sash doors. (The Robotic Cleaner may not detect the difference in level between the aluminum sash rail and the floor and may fall out of the door.)
- Move any floor coverings near differences in level to another room. (The Robotic Cleaner may not detect the difference and may fall.)
NOTE
- Do not use the Robotic Cleaner near or to vacuum up flammable substances. (It may result in explosion or fire.)
- Do not use the Robotic Cleaner in wet locations, locations that may become wet, or locations with high temperature and humidity. Also, do not vacuum up water. (This may result in electric shock, short-circuit, fire, deformation or malfunction.)
- Do not use the Robotic Cleaner in locations where the distance from the wall to a difference in level is approx. 1 m or less. (In rare cases the Robotic Cleaner may fall while backing up.)
- Do not use the Robotic Cleaner in areas where barriers that the Robotic Cleaner cannot climb over are located in the vicinities of walls or obstacles. The Robotic Cleaner may get stuck on the barrier while moving backward to avoid the wall or the obstacle.
- Deactivate any home security systems, etc. (The Robotic Cleaner may be mistakenly detected as an intruder.)
- The Robotic Cleaner may not avoid differences in level of 5.5 cm or less.
- Noise may appear on TV screens during operation. (This is not a malfunction of the television.)
- Do not leave the Robotic Cleaner for long periods with the battery cartridge installed. (The battery electrolyte may leak.)
- Do not turn the Robotic Cleaner upside down with the battery cartridge installed. (A button may be pressed, resulting in unintended operation.)
OPERATION
The Robotic Cleaner cruises around on the floor according to the preset cruising mode, avoiding obstacles using ultrasonic sensors (Fig. P-1), and captures dust and dirt and other debris on the route using the side brushes, main brush, and vacuum fan. However, the sensors may not detect an obstacle in some situations. If your Robotic Cleaner hits an obstacle, the Robotic Cleaner's bumper (Fig. P-2) absorbs impact and changes the direction of travel.
NOTE: There may be cases where the Robotic Cleaner could not pass over the barriers at the height of up to 1.5 cm, even though the Robotic Cleaner is designed to pass over such barriers.
NOTE: The Robotic Cleaner may avoid an area where is colored in black, having black wood-grain patterns, or an area made of glass.
NOTE: After a cleaning cycle is completed, some dust and dirt may remain under certain conditions.
NOTE: Wireless communication may be interrupted or blocked under the following conditions:
• Inside structures built with reinforced concrete or metallic building materials
- When the Robotic Cleaner is behind an obstacle
- Near radio communication equipment that uses the same frequency band
- Near devices that generate electromagnetic fields (microwave ovens, etc.) or static electricity, or that cause radio wave interference
Basic operations
⚠️ CAUTION: Always make sure that the Robotic Cleaner is turned OFF before adjusting or checking any function on the Robotic Cleaner.
NOTICE: If dew condensation has occurred, turn OFF the Robotic Cleaner and wait until the Robotic Cleaner dries up, before restarting operation.
NOTICE: All settings are not cleared when the Robotic Cleaner is turned OFF. Be sure to confirm that the settings are right by the lamps (Figs. F-6, 7, 9, 11) on the Robotic Cleaner to prevent unexpected operation.
- Press the POWER button (Fig. F-8) on the Robotic Cleaner.
The Robotic Cleaner enters standby mode and the 🐘 Battery indicator (Fig. F-5) lights up. (For details, see "Battery indicator on the Robotic Cleaner" below.)
-
Press the 📄 Cruise mode button (Fig. F-7) on the Robotic Cleaner repeatedly to select mode, or press the ⏻ or ✗ Cruise mode button (Fig. G-4) on the remote control. The selected mode lamp lights up. (For details, see "Cruise mode" below.)
-
Press the POWER button (Fig. F-8) on the Robotic Cleaner or the Start/Stop button (Fig. G-2) on the remote control to start cleaning.
The pilot lamp (Fig. F-1) flashes and the buzzer beeps while cleaning.
To pause the cleaning operation, perform step 3 again.
To resume the cleaning operation, perform step 3 again.
To turn OFF the Robotic Cleaner, press and hold the ⏻ POWER button (Fig. F-8) on the Robotic Cleaner until all indicators turn OFF, or press the ⏻ POWER OFF button (Fig. G-1) on the remote control.
⚠️CAUTION: Do not get a close look at the pilot lamp light, or avoid the light getting in your eyes. Doing so may harm your eyes.
Battery indicator on the Robotic Cleaner
The battery indicator located on the corresponding battery cartridge side lights up and indicates the remaining power of the battery cartridge.
NOTICE: The table below provides a rough indication of the remaining battery power. The remaining amount may vary depending on the conditions of use and the room temperature.
 | 50% or more |
 | Between 20% and 50% |
 | 20% or lower |
 | Empty/No battery cartridge installed |
 | Battery error |
Battery indicator on the battery cartridge
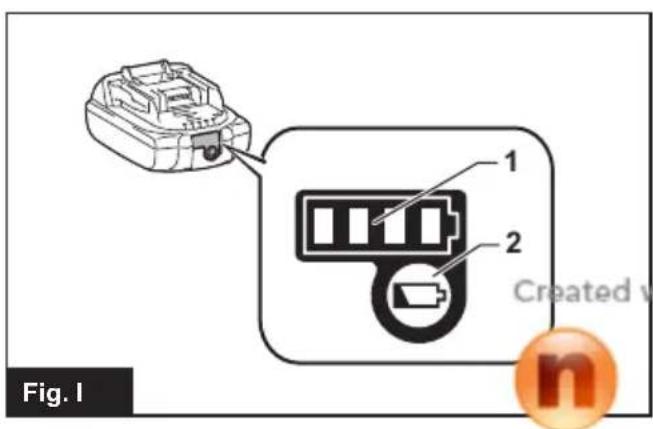
The remaining power can also be checked using the battery indicator (Fig. I-1) on battery cartridges with model numbers ending in the letter "B."
Remove the battery cartridge and press the ▶ button (Fig. I-2).
NOTICE: The table below provides a rough indication of the remaining battery power. The remaining amount may vary depending on the conditions of use and the room temperature.
 | 75% or more |
 | Between 50% and 75% (incl. 50%) |
 | Between 25% and 50% |
 | 25% or lower |
 | Empty |
 | Battery error |
Cruise mode
| Pattern mode | Application: Large floors with less obstacles such as in a well-organized warehouse and long gallery. Description (Fig. H-1): The Robotic Cleaner repeats a cycle of vertical (a) and horizontal (b) travels.* |
| Random mode | Application: Floors with many obstacles such as in an office. Description (Fig. H-2): The Robotic Cleaner repeats a cycle of bouncing off (c) and along-the-wall (d) travels. |
* Depending on the conditions encountered, the actual trail of the Robotic Cleaner may differ from this chart.
NOTE: The Robotic Cleaner could not clean a narrow area where the Robotic Cleaner could not travel or where is out of the reach of the side brush.
NOTE: After a cleaning cycle is over, some dust may remain on the floor in some conditions.
Sleep mode
If the Robotic Cleaner is left as it is for approx. 5 minutes in standby mode, the Robotic Cleaner automatically enters sleep mode to save the batteries, and the pilot lamp (Fig. F-1) slowly flashes. The Robotic Cleaner also enters sleep mode when the auto-on timer has been activated.
To return to standby mode, perform step 3 in "Basic operations."
NOTICE: Changes of settings and starting of cleaning operations are not possible in this mode.
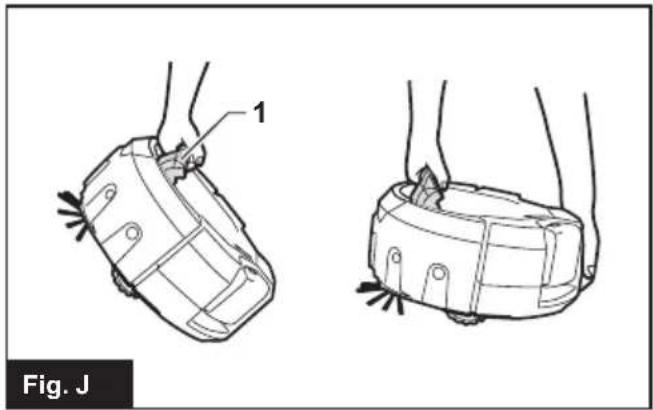
Carrying the Robotic Cleaner
⚠️ CAUTION: Before carrying the Robotic Cleaner, be sure to turn OFF the Robotic Cleaner.
CAUTION: Care must be taken that your hand never be caught between the handle and the Robotic Cleaner's body.
Grip the handle (Fig. J-1).
NOTICE: If you support the rear bottom of the Robotic Cleaner with another hand, care must be taken so as not to lift that side too much as the dust and dirt in the Robotic Cleaner drop out of the main brush opening.
NOTICE: Do not haul the Robotic Cleaner.
with

nitro ^PDF professional
download the free trial online at nitropdf.com/professional
Emptying the bin
Empty the bin after every use to keep the Robotic Cleaner operating at peak performance.
- Press and hold the ⏻ POWER button (Fig. F-8) on the Robotic Cleaner until all indicators turn OFF, or press the ⏻ POWER OFF button (Fig. G-1) on the remote control to turn OFF the Robotic Cleaner.
- Press and release the top lid (Fig. K-1) to unlock it, and then fully open the lid.
- Take out the dust box (Fig. K-2).
- Undo both locks (Fig. K-3), and open the dust box lid.
- Take out and empty the upper bin (Fig. K-4).
- Remove small clumps of dust from the filter (Fig. K-5) and empty the lower bin (Fig. K-6).
- Replace the dust box in the Robotic Cleaner in the reverse sequence.
Advanced operations
The following features can be set only when the Robotic Cleaner is in standby mode (see step 1 in "Basic operations").
Saving power
The Robotic Cleaner can capture most visible dust without using the vacuum fan. If fine dust does not need to be removed, turning OFF the vacuum fan saves the battery power to prolong the operating time of the Robotic Cleaner.
In standby mode, press the ✗ Vacuum button on the Robotic Cleaner (Fig. F-10) or on the remote control (Fig. G-7) to turn OFF the Vacuum lamp (Fig. F-10).
To turn ON the vacuum fan, press the ✗ Vacuum button on the Robotic Cleaner (Fig. F-10) or on the remote control (Fig. G-7). The lamp lights up again.
NOTICE: This setting is not possible in sleep mode with the auto-on timer activated.
NOTICE: In cases where the vacuum fan is turned OFF, the Filter maintenance lamp (Fig. F-3) does not light even if the filter is full of dirt.
Adjusting the buzzer volume
Three levels of buzzer volume including mute can be selected.
In standby mode, repeatedly press the 📄 Buzzer button on the Robotic Cleaner (Fig. F-9) or on the remote control (Fig. G-6). Each time you press the button, the buzzer beeps in the following order: at high volume (the lamp lights up), at low volume (the lamp lights up), and then no sound (the lamp goes off).
NOTICE: This setting is not possible in sleep mode with the auto-on timer activated.
Locating the Robotic Cleaner
This feature is useful for locating the Robotic Cleaner which may be out of sight on a large floor with desks, cabinets, and other fixtures.
Press the Location beacon button on the remote control (Fig. G-3) while the Robotic Cleaner is in standby or sleep mode. The buzzer beeps for approx. 10 seconds and the pilot lamp flashes.
To stop the buzzer and flashing, press the Location beacon button again.
NOTE: There may be cases where the Robotic Cleaner does not respond because the Robotic Cleaner is out of range of the remote control. The problem can be resolved by pressing the Location beacon button while you are moving around the floor.
Using the auto-on timer
This feature enables the Robotic Cleaner to start cleaning automatically after the specified time. As the setting is cleared once the auto-timed cleaning is completed, perform the following procedure to reactivate the auto-on timer.
- In standby mode, repeatedly press the ⏻ Timer button on the Robotic Cleaner (Fig. F-6) or on the remote control (Fig. G-5). Each time you press the button, the setting changes in the following order:
| Lamp status Cleaning starts | |
 | after 1 hour. |
 | after 3 hours. |
 | after 5 hours. |
 | Auto-on timer is disengaged. |
- Press the POWER button (Fig. F-8) on the Robotic Cleaner to activate the auto-on timer. The Robotic Cleaner enters sleep mode.
To clear the timer in standby mode, press and hold the ⏻ POWER button (Fig. F-8) on the Robotic Cleaner until all indicators go off, or press the ⏻ POWER OFF button (Fig. G-1) on the remote control.
NOTICE: If the status of both right and left battery indicators is ☐ or ☐, the auto-on timer may not activate and cleaning may not start automatically.
NOTICE: Changes of settings or starting of cleaning operations are not possible in this mode.
NOTICE: The auto-on timer setting is cleared if the batteries are completely discharged.
Confining the Robotic Cleaner to a particular area
Boundary tape (Fig. L-1) and the boundary-sensing feature that employs infrared sensors, enable the Robotic Cleaner to avoid the following areas (Fig. L-2):
- An area that is divided into sections because the entire floor is so large that the Robotic Cleaner cannot clean the floor at a time
- An area where fragile articles are present that the Robotic Cleaner could damage
- An area full of goods and fixtures, barriers, or of an intricate shape, resulting in the Robotic Cleaner getting stuck
- An area in the vicinity of a staircase
- An area with a low barrier that the Robotic Cleaner can climb over and fall down to a lower floor, or that the Robotic Cleaner will get stuck on
Preparations
- Select an even and smooth surface on the floor where you plan to place the boundary tape, and then clean the surface.
- Place the boundary tape so that the side with the short bars is adjacent to the cleaning area and there are no air bubbles between the tape and the floor.
NOTICE: Be sure to use only genuine boundary tape. Using a tape other than the genuine article might risk malfunctioning of the boundary-sensing feature.
NOTICE: Do not place the boundary tape on uneven surfaces that may cause erroneous detection or on surfaces where the tape may become soiled or damaged.
NOTICE: Be aware that some adhesive agent may remain on floors, or the floor may be damaged when you remove the boundary tape.
NOTICE: Keep the boundary tapes clean and check if any positions torn or ripped. If the tape is damaged, replace it.
WARNING: Do not place the boundary tape in any area where an accident occurs resulting from the Robotic Cleaner entering the area or the Robotic Cleaner falling down from the area. In such a case, place objects whose height is 15 cm or higher and that are heavy enough to withstand the impact of the Robotic Cleaner, in place of the boundary tapes.
Operations
In standby mode, press the ◆ Boundary sensor button (Fig. F-11) on the Robotic Cleaner to activate the boundary sensor (Fig. O-2).
The lamp (Fig. F-11) lights up.
To deactivate the boundary sensor, press the ➕ Boundary sensor button again.
NOTICE: This setting is not possible in sleep mode with the auto-on timer activated.
MAINTENANCE
CAUTION: Always make sure that both battery cartridges are removed before attempting to perform inspection or maintenance.
NOTICE: Be sure to take out the dust box before turning over the Robotic Cleaner to prevent dust and dirt from dropping out of the main brush opening.
NOTICE: Be sure to spread a rug or other cushioning material on the floor to prevent damage to the floor and the Robotic Cleaner (Fig. B).
NOTICE: Never use hot water (higher than 40^ C ( 104^ F)), gasoline, benzine, thinner, alcohol or the like. Discoloration, deformation, or cracks may result.
To maintain product SAFETY and RELIABILITY, repairs, any other maintenance, or adjustment should be performed by Makita Authorized or Factory Service Centers, always using Makita replacement parts.
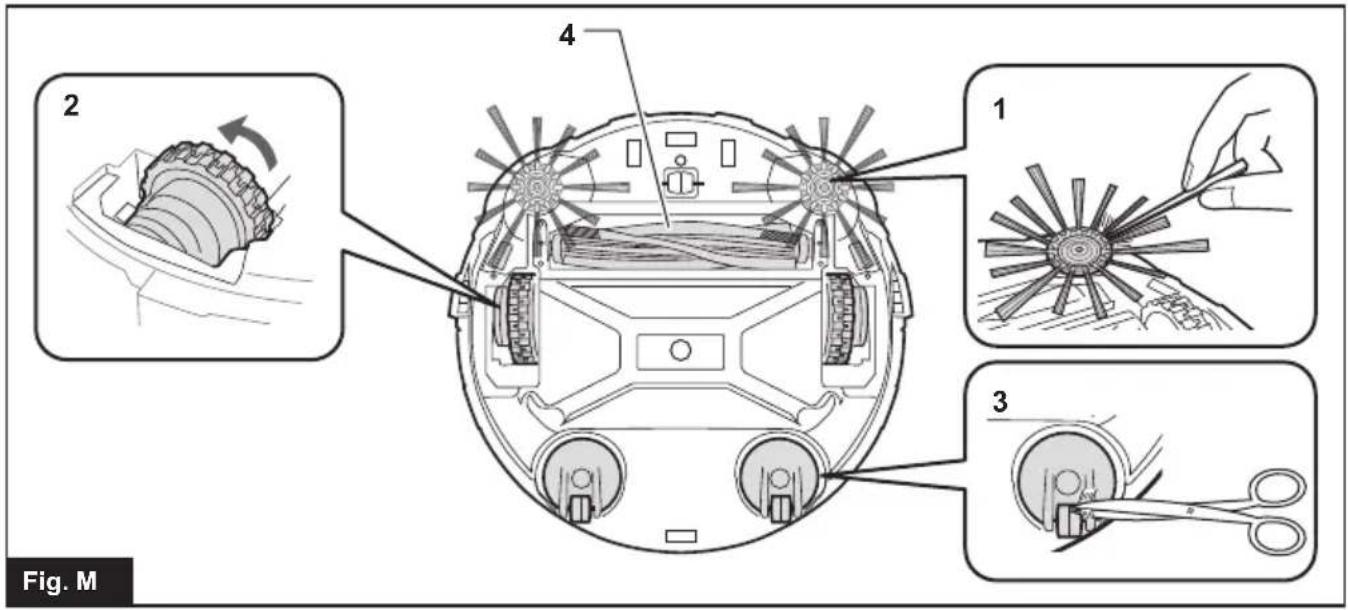
Cleaning the side brushes (Figs. A, M-1)
- Threads and hairs tangled in the bristles of the side brushes may cause the brush to stop rotating. Remove them using tweezers or similar tools.
- If the bristles are deformed or missing, replace with the spare brush (see “Installing the side brushes” for details).
Cleaning the wheels
- Remove threads and hairs from the drive wheels (Fig. M-2) using tools such as tweezers and scissors. Turning the wheel facilitates the cleaning.
- Remove threads and hairs from the swivel wheels (Fig. M-3) using tweezers, scissors, or similar tools.
NOTICE: Care must be taken so that fingers are not caught between the wheels and the Robotic Cleaner body.
Cleaning the main brush
Removing the side brushes (see "Installing the side brushes" for details) facilitates the following work.
- Remove four screws (Fig. N-1), and then the bottom plate (Fig. N-2) and main brush (Fig. N-3).
- Wipe the bottom plate (Fig. N-2) with a cloth slightly moistened with mild detergent or wash the plate in water if necessary.
-
Remove threads and hairs from the main brush (Fig. N-3) using scissors and wash the main brush in water if necessary.
-
Wipe the inside of the vacuum vent (Fig. N-4) with a cloth slightly moistened with mild detergent.
- To replace the main brush, align the protruding portion (Fig. N-5) on the right end of the main brush with the indentation on the right shaft bush (Fig. N-6), and then insert the main brush to join them together.
- Insert the left square end of the main brush (Fig. N-7) into the left square shaft bush (Fig. N-8).
- Replace the bottom plate in the reverse sequence.
NOTE: When the side brushes remain attached to the body of the Robotic Cleaner, manually rotating the side brush facilitates attachment of the bottom plate without pinching the bristles of the side brushes between the plate and body of the Robotic Cleaner.
Cleaning the sensors
- Clean the cliff sensors (Fig. O-1) and boundary sensors (Fig. O-2) using a clean, dry cotton applicator.
- Clean the ultrasonic sensors (Fig. P-1) using another vacuum cleaner set in gentle suction mode. A total of 8 sensors are located on the front and both sides of the bumper (Fig. P-2).
Cleaning the filter and dust box
NOTICE: To avoid damaging the upper dust box lid, do not open or close it forcibly.
- Undo both locks (Fig. Q-1) and lift the upper dust box lid while holding the whifter maintenance mark (Fig. Q-2) to open the filter compartment.
- Take out the filter (Fig. Q-3) and tap it against the garbage bag or on a waste sheet spread on an even surface to shake off the dust and dirt.
NOTICE: Do not scrub or squash the filter, nor use a pointed object to clean the filter.
- Wash the filter if the suction power of the Robotic Cleaner becomes weak.
NOTICE: If the filter smells, soak the filter in a diluted solution of household bleach (10 milliliters of bleach per 1 liter of water) for approx. 3 hours before washing the filter in running water.
- Wash the dust box.
- Dry the filter (if you have washed it) and the dust box for 1 day in a well-ventilated place to prevent unpleasant odor or malfunctions.
NOTICE: Do not dry the wet filter using a hair dryer or other heat source.
- Replace the filter in the dust box in the reverse sequence.
NOTICE: When you replace the filter in the compartment, make sure that the tabs (Fig. Q-4) on the filter are fitted to the cut in the edge of the filter holder (Fig. Q-5).
Cleaning the body
- Wipe the Robotic Cleaner's exterior with a cloth slightly moistened with mild detergent.
- Press and release the top lid (Fig. K-1) to unlock, and then fully open the lid.
- Take out the dust box (Fig. K-2).
- Wipe the Robotic Cleaner's interior (Fig. R-1) including the vent grill (Fig. R-2) with a cloth slightly moistened with mild detergent.
RESTORING THE ROBOTIC CLEANER
When the Robotic Cleaner cannot continue to operate under such conditions as drive wheel hanging down or running out of battery power, the Robotic Cleaner will stop cleaning and tell you something is wrong by the following lamps and buzzers.
-
Troubleshooting lamp (Fig. F-2)
• Filter maintenance lamp (Fig. F-3)
• Brush maintenance lamp (Fig. F-4)
• Timer lamps (Fig. F-6)
• Buzzer lamp (Fig. F-9)
• ✗ Vacuum lamp (Fig. F-10)
• Boundary sensor lamp (Fig. F-11) -
Identify the problem using the following table.
- Resolve the problem.
- Press the ⏻ POWER button (Fig. F-8) on the Robotic Cleaner or the ▶ Start/Stop button (Fig. G-2) on the remote control to enter standby mode. The error indication stops and the Robotic Cleaner is ready for cleaning.
NOTICE: If the error occurs again, turn OFF and ON the Robotic Cleaner.
NOTICE: If the problem persists after the remedial action is complete, consult your nearest Makita Service Center.
| Indication Cause/Remedy | |
| lamp flashes once, twice, or 6 times for each sequence | The drive wheel is hanging down.The Robotic Cleaner has gotten stuck on a barrier.The Robotic Cleaner has been exposed to direct sunlight.The Robotic Cleaner has stopped on a black floor.Move the Robotic Cleaner away from the area.If the error occurs again, clean the cliff sensors (Fig. O-1). |
| lamp flashes 3 times for each sequence | A bumper sensor error has occurred.Push the bumper (Fig. P-2) 10 times. |
| lamp flashes4 times for each sequence | Threads and hairs are tangled with the drive wheels.Remove them from the drive wheels (Fig. M-2).The Robotic Cleaner passed through a confined area where its top surface was pushed down.This is not a malfunction. |
| lamp flashes 5 or 7 times for each sequence | The Robotic Cleaner has overheated.Turn the Robotic Cleaner OFF, remove the battery cartridge(s), and wait for an hour. Use the Robotic Cleaner only at room temperatures not exceeding 40^ ( 104^ ). |
| and lamps flash once for each sequence | The dust box or the filter has not been installed.Install the dust box or the filter. |
| and all lamps flash once for each sequence | The remaining battery charge was not enough (or) to start cleaning.Fully charge the battery cartridges. |
| and lamps light up | Threads and hairs are tangled in the drive wheels.Remove them from the drive wheels (Fig. M-2).The Robotic Cleaner passed through a confined area where its top surface was pushed down.This is not a malfunction. |
| and lamps light up | A sensor error has occurred.Turn the Robotic Cleaner OFF and then ON. |
| and lamps light up | An error has occurred in the Robotic Cleaner.Turn the Robotic Cleaner OFF and then ON. |
| lamp flashes once for each sequence | Threads and hairs are tangled in the side brushes and main brush.Remove them from the brushes (Figs. A, N-3). |
| lamp lights up | The dust box is full of dust and dirt or the filter is clogged.Empty the dust box (Fig. K-2) and clean the filter (Fig. K-5). |
TROUBLESHOOTING
NOTE: If the problem persists after the remedial action is taken, consult your nearest Makita Service Center.
| SymptomCause/Remedy | |
| The lamps do not light up when you press the button.The Robotic Cleaner does not operate when you press the button on the Robotic Cleaner or the remote control. | → Install the battery cartridges correctly.→ Fully charge the battery cartridges.→ Press the button to turn the Robotic Cleaner ON. |
| The Robotic Cleaner does not operate. | → If the Troubleshooting lamp, Filter maintenance lamp, or Brush maintenance lamp lights up or flashes, see “RESTORING THE ROBOTIC CLEANER” to resolve the problem.→ If the pilot lamp flashes slowly, press and hold the POWER button on the Robotic Cleaner until all indicators go off, or press the POWER OFF button on the remote control to clear the timer. |
| The Robotic Cleaner starts operation automatically. | • The auto-on timer has been activated. |
| The Robotic Cleaner stops operation during cleaning. | → Turn the Robotic Cleaner OFF, and then remove any cords, strings, etc. from the drive wheels.→ If the Robotic Cleaner has gotten stuck on a barrier or other obstacle, move the Robotic Cleaner to a different location. |
| The cruising speed is not constant. | • If an obstacle is detected, the Robotic Cleaner will slow down as it takes time to calculate a traveling direction. This is not a malfunction of the Robotic Cleaner. |
| The Robotic Cleaner does not travel straight forward. | → Turn the Robotic Cleaner OFF, and then remove any foreign objects tangled in the drive wheels.→ Clean the ultrasonic sensors. |
| The Robotic Cleaner is hitting obstacles more frequently than before. | → Clean the ultrasonic sensors. |
| The Robotic Cleaner falls down stairs or to a lower floor. | → Clean the cliff sensors.• The Robotic Cleaner may not avoid differences in level of 5.5 cm or less. This is not a malfunction of the Robotic Cleaner. |
| The operating sound is louder than usual. | → Empty the dust box and clean the filter, the side brushes, and the main brush. |
| The suction power is not strong enough to capture dust and dirt. | → Empty the dust box and clean the filter.→ Press the ✕Vacuum button on the Robotic Cleaner or on the remote control to turn ON the vacuum fan. |
| The side brushes fall off. | → Install the side brushes correctly (Fig. A). |
| The side brushes do not rotate or rotate with difficulty. | → Clean the side brushes and the main brush.→ Install the main brush and the plate correctly (Fig. N). |
| The exhaust air smells. | → Empty the dust box and clean the filter. |
| The remote control does not work. | → Install the remote control batteries correctly (Fig. E).→ Replace the batteries with new ones.→ Press the POWER button on the Robotic Cleaner to turn it ON.→ Move closer to the Robotic Cleaner or remove obstacles between the Robotic Cleaner and the remote control.→ Stop using the Robotic Cleaner near or move it away from equipment that uses radio frequencies in the 2.4 GHz band (kitchen microwaves, Bluetooth devices, Wi-Fi devices, etc.).→ Turn the Robotic Cleaner OFF and then ON. |
| The auto-on timer does not work. | → Use fully charged battery cartridges.→ Reactivate the auto-on timer. |
OPTIONAL ACCESSORIES
⚠️CAUTION: These accessories or attachments are recommended for use with your Makita tool specified in this manual. The use of any other accessories or attachments might present a risk of injury to persons. Only use the accessory or attachment for its stated purpose.
- Boundary tape
- Side brush
- Main brush
- Bottom plate
- Filter
- Makita genuine battery and charger
NOTE: Some items in the list may be included in the tool package as standard accessories. They may differ from country to country.
REFERENCE INFORMATION
Makita Corporation and its subsidiaries, affiliates, and distributors may use Usage Information for the purpose of after-sales services such as maintenance and repair. Usage Information consists of number of operations, distribution load, error information, operational status, and/or maintenance record of the power tool.
FRANÇAIS (Instructions originales)
nitroPDF ^® professional
download the free trial online at nitropdf.com/professional
ATTENTION
download the free trial online at nitropdf.com/professional
nitroPDF ^® professional
download the free trial online at nitropdf.com/professional
download the free trial online at nitropdf.com/professional
Nettoyage des roues
download the free trial online at nitropdf.com/professional
nitro ^PDF professional
download the free trial online at nitropdf.com/professional
download the free trial online at nitropdf.com/professional
download the free trial online at nitropdf.com/professional
nitro ^1 professional
download the free trial online at nitropdf.com/professional
TASTEN UND ANZEIGEN
download the free trial online at nitropdf.com/professional
nitroPDF ^® professional
download the free trial online at nitropdf.com/professional
download the free trial online at nitropdf.com/professional
Stoßfängers (Abb. P-2) professional
download the free trial online at nitropdf.com/professional
download the free trial online at nitropdf.com/professional
download the free trial online at nitropdf.com/professional
download the free trial online at nitropdf.com/professional
nitro ^PDF professional
download the free trial online at nitropdf.com/professional
Sovraccarico
download the free trial online at nitropdf.com/professional
download the free trial online at nitropdf.com/professional
download the free trial online at nitropdf.com/professional
Pulizia dei sensori
download the free trial online at nitropdf.com/professional
download the free trial online at nitropdf.com/professional
nitro ^PDF professional
download the free trial online at nitropdf.com/professional
Uitschakelknop
▶II Start/stop-knop
Gefwars-zoekknop
4. 18/12 Cruisemodusknoppen
download the free trial online at nitropdf.com/professional
download the free trial online at nitropdf.com/professional
download the free trial online at nitropdf.com/professional
nitro ^PDF professional
download the free trial online at nitropdf.com/professional
nitro ^PDF professional
download the free trial online at nitropdf.com/professional
download the free trial online at nitropdf.com/professional
OPTIONELE ACCESSOIRES
nitro ^PDF professional
download the free trial online at nitropdf.com/professional
download the free trial online at nitropdf.com/professional
download the free trial online at nitropdf.com/professional
download the free trial online at nitropdf.com/professional
nitro ^PDF professional
download the free trial online at nitropdf.com/professional
MANTENIMIENTO
nitroPDF ^® professional
download the free trial online at nitropdf.com/professional
download the free trial online at nitropdf.com/professional
nitroPDF professional
download the free trial online at nitropdf.com/professional
nitroPDF professional
download the free trial online at nitropdf.com/professional
download the free trial online at nitropdf.com/professional
download the free trial online at nitropdf.com/professional
download the free trial online at nitropdf.com/professional
download the free trial online at nitropdf.com/professional
nitroPDF ^® professional
download the free trial online at nitropdf.com/professional
Betjeninger
download the free trial online at nitropdf.com/professional
nitro ^PDF professional
download the free trial online at nitropdf.com/professional
download the free trial online at nitropdf.com/professional
download the free trial online at nitropdf.com/professional
download the free trial online at nitropdf.com/professional
download the free trial online at nitropdf.com/professional
download the free trial online at nitropdf.com/professional
nitroPDF ^® professional
download the free trial online at nitropdf.com/professional
nitroPDF® professional
download the free trial online at nitropdf.com/professional
download the free trial online at nitropdf.com/professional

PRECAUÇÃO
download the free trial online at nitropdf.com/professional
download the free trial online at nitropdf.com/professional
Instalar as pilhas no controlo remoto (Fig. E)
nitro ^PDF professional
download the free trial online at nitropdf.com/professional
download the free trial online at nitropdf.com/professional
nitro ^PDF professional
download the free trial online at nitropdf.com/professional
MANUTENÇÃO
Limpar as escovas laterais (Figs. A, M-1)
download the free trial online at nitropdf.com/professional
download the free trial online at nitropdf.com/professional
nitro ^PDF professional
download the free trial online at nitropdf.com/professional
download the free trial online at nitropdf.com/professional
download the free trial online at nitropdf.com/professional
download the free trial online at nitropdf.com/professional
download the free trial online at nitropdf.com/professional
nitroPDF professional
download the free trial online at nitropdf.com/professional
nitro ^PDF professional
download the free trial online at nitropdf.com/professional
nitroPDF ^® professional
download the free trial online at nitropdf.com/professional
إفراغpcsة
download the free trial online at nitropdf.com/professional
العمليات الأساسية
nitroPDF® professional
download the free trial online at nitropdf.com/professional
download the free trial online at nitropdf.com/professional
at nitropdf.com/professional
download the free trial online at nitropdf.com/professional
download the free trial online at nitropdf.com/professional
تميز کردن سنسورها
gnitroPDF professional
download the free trial online at nitropdf.com/professional
download the free trial online at nitropdf.com/professional
download the free trial online at nitropdf.com/professional
Garobrvcı RWbatsikw ard calt amadeh bkar shde w nshangr
download the free trial online at nitropdf.com/professional
download the free trial online at nitropdf.com/professional
download the free trial online at nitropdf.com/professional
download the free trial online at nitropdf.com/professional
download the free trial online at nitropdf.com/professional
简体中文(原版说明书)
nitro ^PDF professional
download the free trial online at nitropdf.com/professional
nitroPDF professional
download the free trial online at nitropdf.com/professional
扫地机器人(图F)
download the free trial online at nitropdf.com/professional
nitro ^PDF professional
download the free trial online at nitropdf.com/professional
操作
nitro ^PDF professional
download the free trial online at nitropdf.com/professional
nitro ^PDF professional
download the free trial online at nitropdf.com/professional
Makita Europe N.V.
Jan-Baptist Vinkstraat 2, 3070 Kortenberg, Belgium
Makita Corporation
3-11-8, Sumiyoshi-cho, Anjo, Aichi 446-8502 Japan
Created with
DRC200-13L-0316