Robot Striker Mini - Vacuum Cleaner TAURUS - Free user manual and instructions
Find the device manual for free Robot Striker Mini TAURUS in PDF.
| Product type | Robot vacuum cleaner |
| Brand | Taurus |
| Model | Robot Striker Mini |
| Power supply | Rechargeable battery, mains adapter |
| Charging time | Approximately 4 hours |
| Battery life | Varies depending on use, until battery runs out |
| Indicator lights | Battery charging/full (green) and low battery (red) |
| Sensors | Front sensor, anti-drop sensors (adjustable sensitivity) |
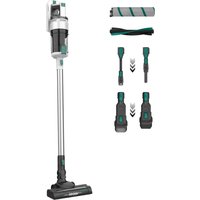
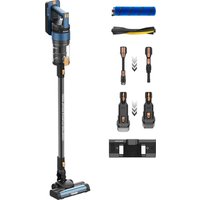
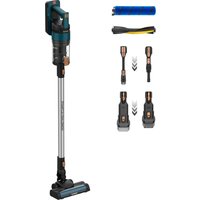
| Side brushes | Yes, removable and replaceable |
| Mop function | Yes, with removable mop holder |
| Dustbin | With filter, manual emptying |
| Filter | Recommended to change every 3 months |
| Maintenance and cleaning | Empty the dustbin after each use, clean the electrical device with a damp cloth, do not immerse |
| Safety | Do not use on carpets with mop, do not expose to water, handle battery with care |
| Spare parts available | Filters, side brushes, mop, battery |
| Intended use | Household use only |
Frequently Asked Questions - Robot Striker Mini TAURUS
User questions about Robot Striker Mini TAURUS
0 question about this device. Answer the ones you know or ask your own.
Ask a new question about this device
Download the instructions for your Vacuum Cleaner in PDF format for free! Find your manual Robot Striker Mini - TAURUS and take your electronic device back in hand. On this page are published all the documents necessary for the use of your device. Robot Striker Mini by TAURUS.
USER MANUAL Robot Striker Mini TAURUS
Automatic vacuum-cleaner
Aspirateur Robot
Staubsauger-Roboter
Robot aspirapolvere
Robo aspirador
Robot stofzuiger
Odkurzacz
ΣΚΟΥΝΑ ΦΟμπότ
Pobot-ntbilecoc
Robot aspirator
PpaxocmykaKa po6oT


Espanol
Robot aspirador Striker Mini

Distinguido paciente:
Many thanks for choosing to purchase a TAURUS brand product.
Thanks to its technology, design and operation and the fact that it exceeds the strictest quality standards, a fully satisfactory use and long product life can be assured.
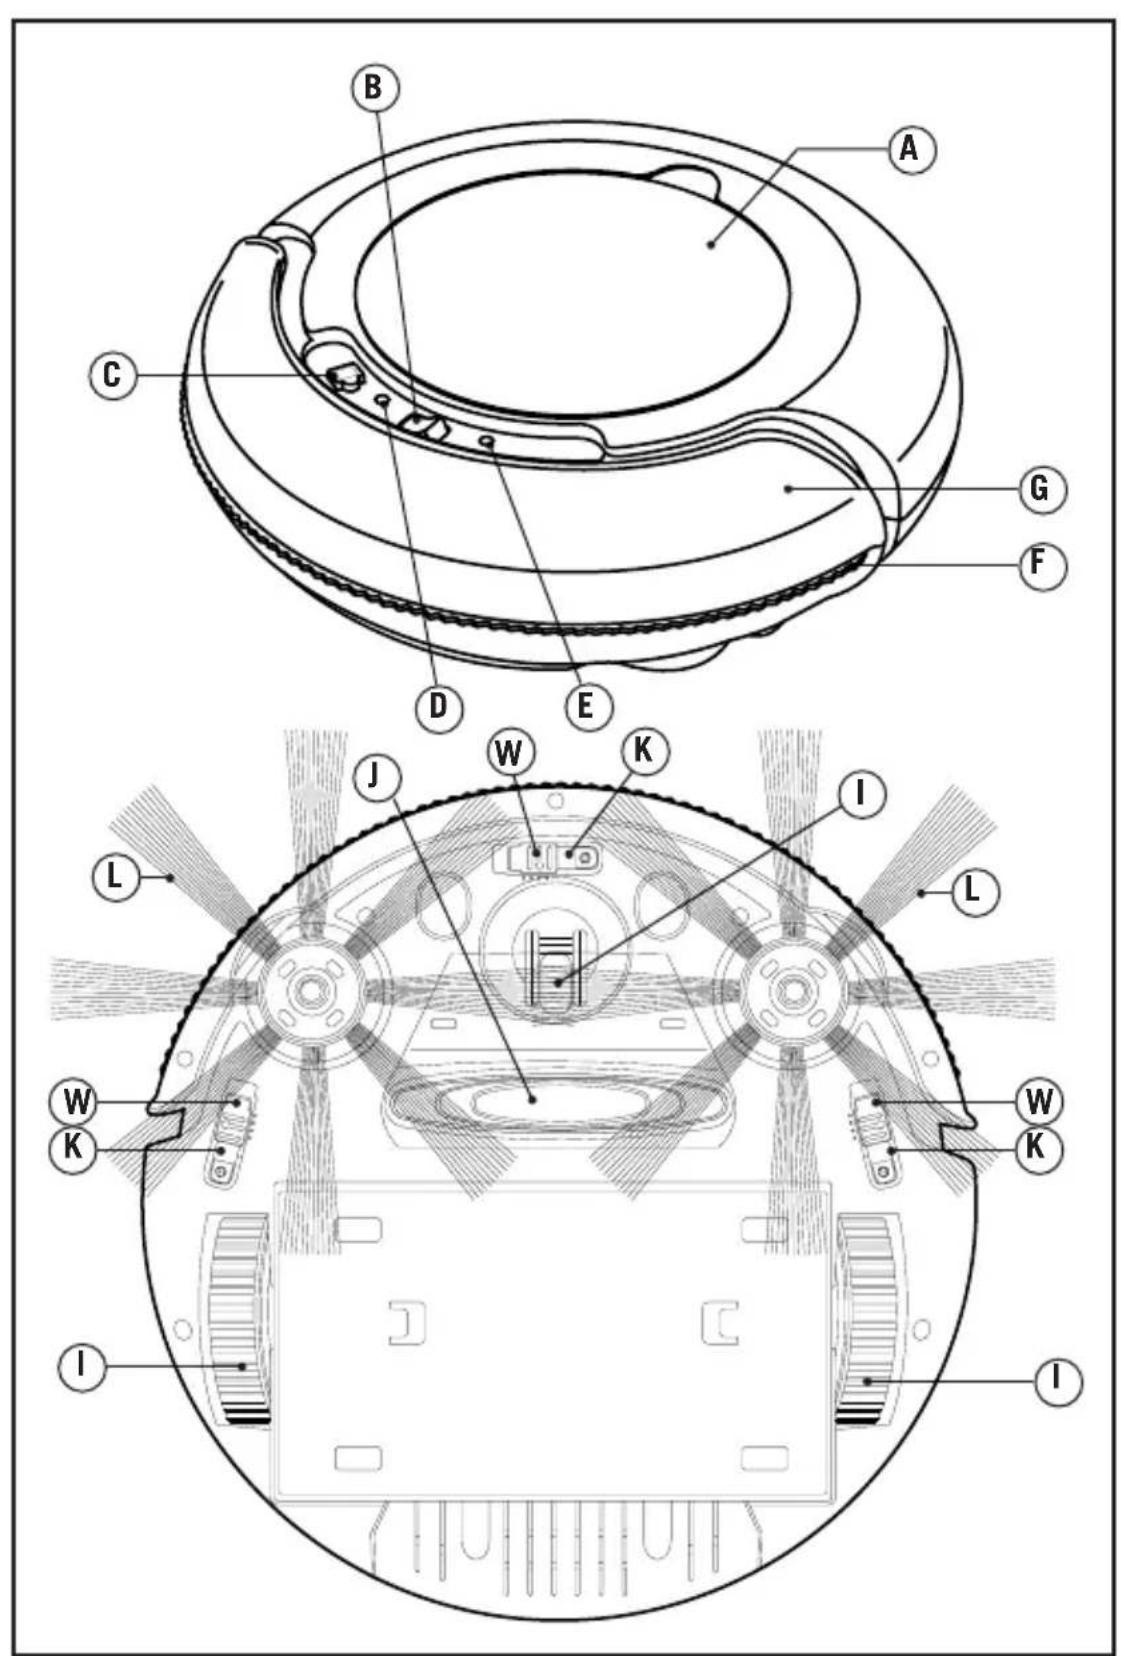
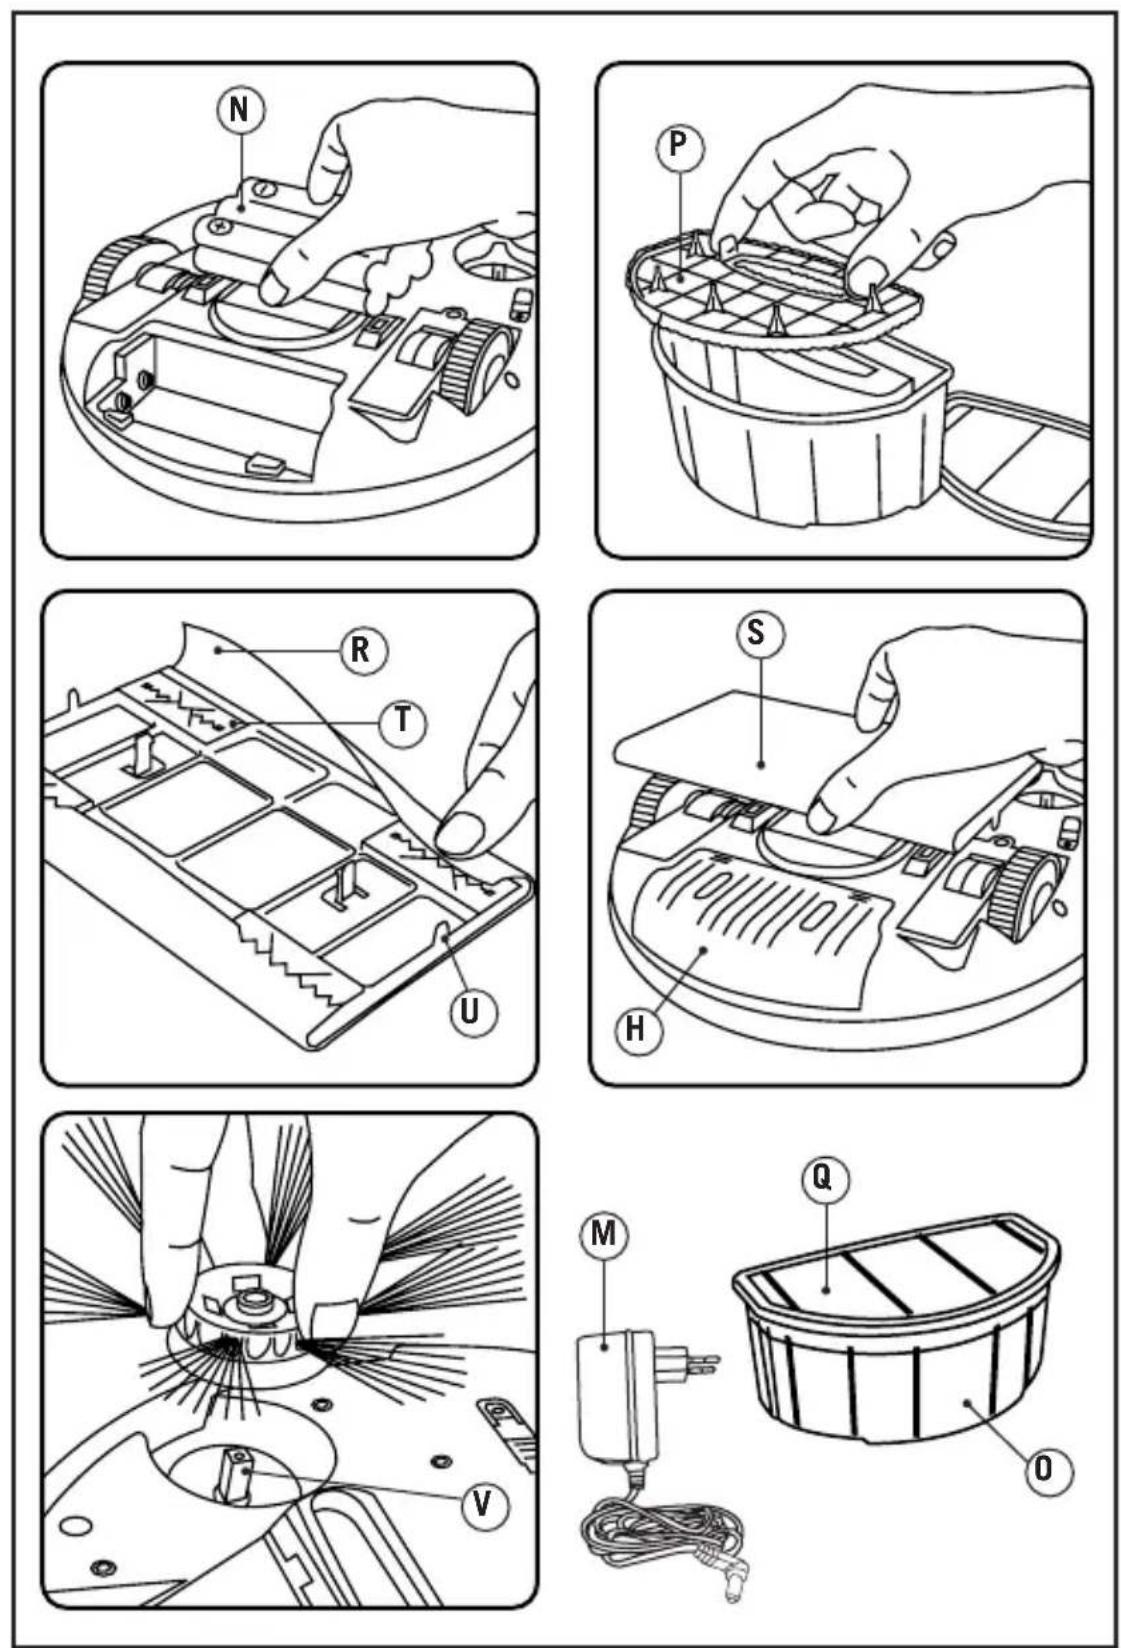
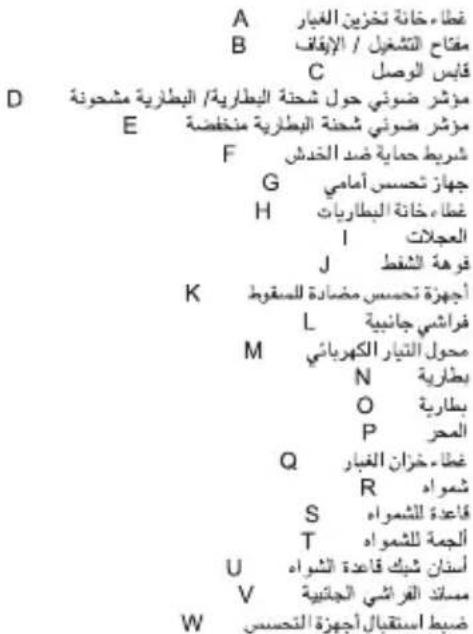
Description
A Lid of the dust box compartment
B On/off switch
C Power point
D Battery charging/battery charged indicator lamp
E Battery low indicator lamp
F Anti-scratching protection strip
G Front sensor
H Lid of the battery compartment
I Wheels
J Suction nozzle
K Antifall sensor
L Side brushes
M Electrical current adaptor
N Battery
O Dust box
P Filter
Q Dust box lid
R Mop
S Platform for the mops
T Couplings for the mops
U Mop platform coupling teeth
V Side brushes holder
W Fall sensors sensitivity adjustment

Safety advice and warnings
- Read these instructions carefully before switching on the appliance and keep them for future reference. Failure to follow and observe these instructions may result in an accident. Failure to follow and observe these instructions may result in an accident.
Electric safety:
-
Do not use the appliance if the cable or plug is damaged.
-
Ensure that the voltage indicated on the nameplate matches the mains voltage before plugging in the appliance.
-
Ensure that the voltage indicated on the charger rating label matches the mains voltage before plugging in the charger.
-
The appliance's plug must fit into the mains socket properly. Do not alter the plug. Do not use plug adaptors.
-
Only use the appliance with the specific electric base / connector, supplied with the appliance.
-
Do not use or store the appliance outdoors.
-
Do not use the appliance near bathtubs, showers or swimming pools.
-
Do not force the electrical wire.
Never use the electric wire to lift up, carry or unplug the appliance.
-
Do not force the electrical wire. Do not force the power cord. Never use the power cord to lift up, carry or unplug the battery charger.
-
Do not touch the plug with wet


hands.
Personal safety:
- Avoid all contact with the liquid that could be released from the battery. In case of contact with eyes, wash them thoroughly and seek medical advice. The liquid spilled from the battery may cause irritation or burns.
Use and care:
-
Fully unroll the appliance's power cable before each use.
-
Do not use the appliance if the accessories or parts are not fastened together properly.
-
Do not use the appliance if the on/off switch does not work.
-
Do not move the appliance while in use.
-
Do not force the appliance's work capacity.
-
Remove the batteries from the appliance if you are not going to use it for some time.
-
Disconnect the battery charger from the mains when not in use and before undertaking any cleaning task.
-
This appliance is for household use only, not professional or industrial use.
-
This appliance is not a toy. Children should be supervised to ensure that they do not play with the appliance.
-
This appliance is intended for adult use. Ensure that this product is not used by the disabled, children or people unused to its handling.
-
This appliance should be stored out of reach of children and/or the disabled.
-
Never vacuum hot or sharp objects (cigarette butts, ash, nails, etc.).
-
Do not open the battery/ies under any circumstances whatsoever.
- Do not short-circuit the battery terminals as this may cause an explosion or fire.
- The battery/ies should be stored at a temperature of below 40^ .
- Recharge the battery/ies only with the charger supplied by the manufacturer. A charger that is suitable for one type of battery may cause explosion or fire hazard when used with other battery/ies.
- Use the device only with the battery/ies for which has been specifically designed. The use of any other battery/ies can cause an explosion or fire hazard.
Service:
- Make sure that the appliance is serviced only by specialist personnel, and that only original spare parts or accessories are used to replace existing parts/accessories.
- Any misuse or failure to follow the instructions for use renders the guarantee and the manufacturer's liability null and void.
Installation
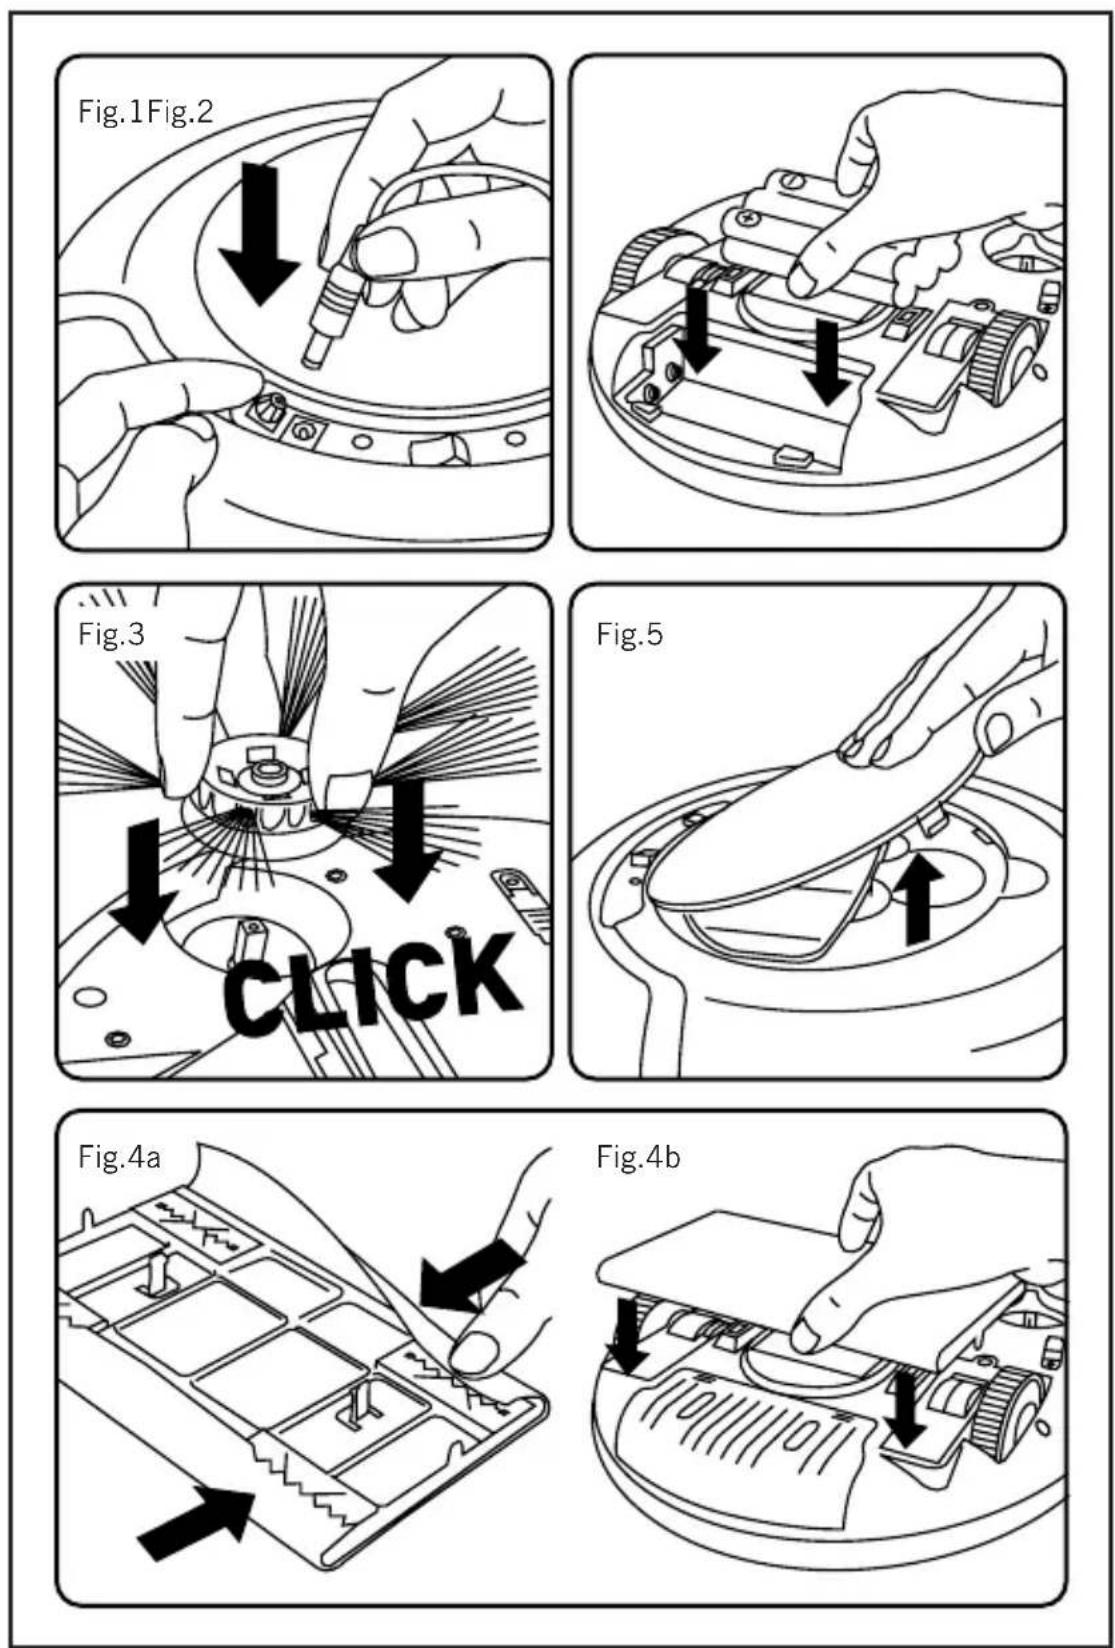
Charging the battery
CAUTION: The new battery does not come completely charged and must be charged up to the maximum before using the appliance for the first time.
- Charge the battery at room temperature between 4 and 40^
- Plug the charger into the mains. Fig.1
- During charging, the battery charging/battery full indicator lamp will
pulse. Once the battery is completely charged, the battery charging/battery charged indicator lamp will remain green (D).
- Approximately 4 hours are needed for a complete charge of the battery. Never attempt to over-charge the battery.
Assembling the battery/s
- CAUTION: During the handling of batteries, do not touch both poles at the same time, as this will provoke the partial discharge of the stocked energy therefore affecting longevity.
- Make sure the on/off switch is in the "0" position before installing the batteries.
- Remove the cover of the battery compartment.
- Put the battery in its compartment, respecting the polarity (Fig. 2).
- Close the cover of the battery compartment.
Assembling the side brushes:
- Place the side brush on the side brushes holder.
- Press until you hear a click. (Fig.3)
Assembling the mop:
- Insert the edges of the mop into the coupling clamps in the base for the mop. (Fig. 4a)
- Adjust the mop holder in the couplings of the robot body (Fig.4b)
- Remove the mop holder if you are going to use the robot without mop.

Instructions for use
Before use:
- Before using this product for the first time, it is important to make a full charge of batteries.
Use:
- Turn the appliance on using the on/off switch.
-
The appliance will begin to function automatically until its batteries run out.
-
While the appliance is operating the battery charging/battery charged and battery low indicator lamps will alternate.
-
When the batteries are low, the red battery low indicator lamp will light up.
- Remove the platform for mops before using the robot on rugs or carpets.
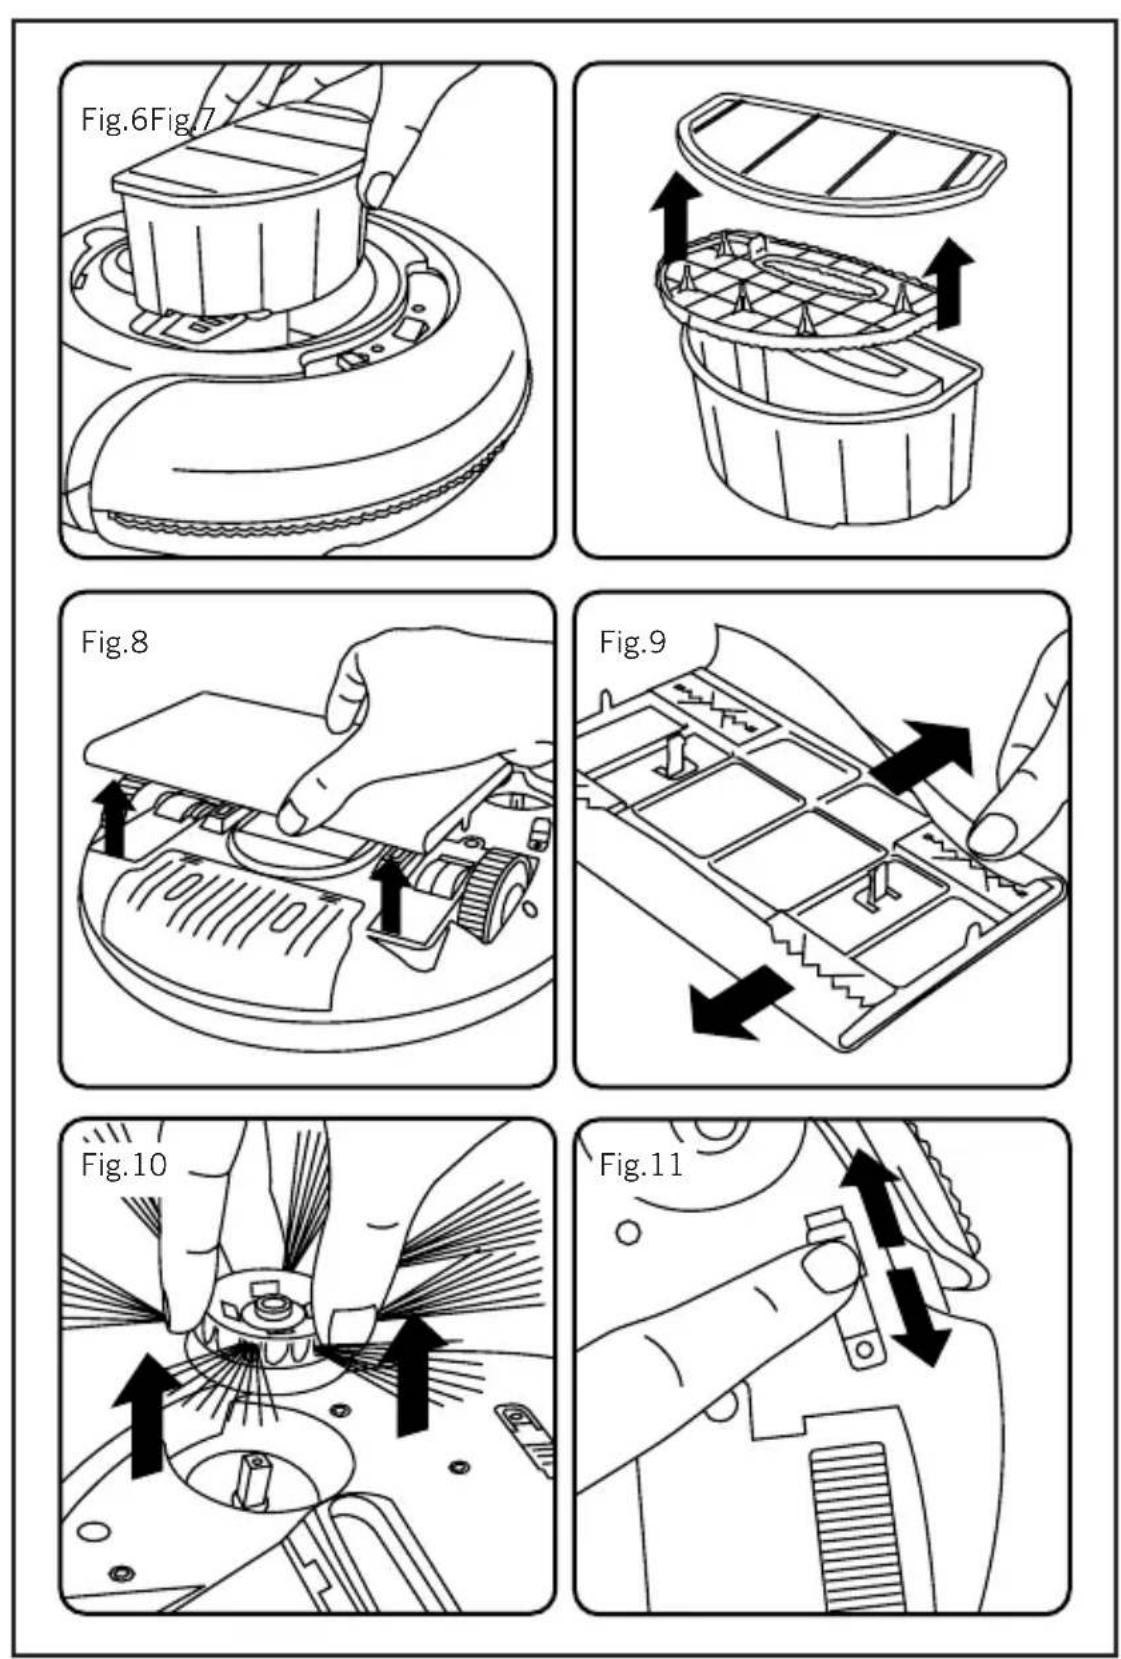
- When using the robot on a dark surface, set the height sensors at Position 2 or 3. (Fig.11)
Once you have finished using the appliance:
- Turn the appliance off, using the on/off switch.

Cleaning
- Disconnect the appliance from the mains and let it cool before undertaking any cleaning task.
- Disconnect the charger from the mains and let it cool before undertaking any cleaning task.
-
Remove the battery before starting any cleaning operation.
-
Clean the equipment with a damp cloth with a few drops of washing-up liquid and then dry.
- Do not use solvents, or products with an acid or base pH such as bleach, or abrasive products, for cleaning the appliance.
- Do not let water or any other liquid get into the air vents to avoid damage to the inner parts of the appliance.
- Do not submerge the appliance in water or any other liquid, or place it under a running tap.
- Never submerge the connector in water or any other liquid or place it under running water.
Emptying the dust box:
- Empty the dust box each time after use.
- Open the lid of the dust box. Fig.5
- Disconnect the dust box from the appliance. (Fig.6)
- Open the dust box emptying lid and empty its contents into a suitable rubbish bin (Fig.7)
- Check the condition of the dust box filter and replace it.
- Close the lid of the dust box.
- Attach the dust box to the appliance.
Changing the filters:
- It is recommended that the dust box filter should be changed every three months.
- To remove filters:
- Open the lid of the dust box. (Fig. 5)
- Disconnect the dust box from the appliance.
- Open the dust box emptying lid and remove the dust box filter from its
bracket. (Fig.7)
- To reassemble the filter, proceed with the above instructions, in reverse order.
Changing mops:
- To remove the mop.
- Remove the mop holder by carefully pressing the teeth which secure it and pulling the holder (Fig.8)
- Pull the mop until it disengages from the couplings which secure it (Fig.9)
- To install mops, proceed with the above instructions in reverse order.
Changing side brushes:
- To remove the side brushes.
- Pull the bristles of the brush until it disengages from the side brush assembly. (Fig.10)
- To install side brushes, proceed with the above instructions in reverse order.
Supplies:
- Supplies can be acquired from distributors and authorised establishments (such as filters, etc.) for your appliance model.
- Always use original supplies, designed specifically for your appliance model.

Anomalies and repair
| PROBLEM PROBABLE | CAUSE SOLUTION | ||
| 1 The low battery indicator lamp is lit. | 1. The battery is low. 2. The appliance has been lifted from the floor. | 1. Recharge the battery. | |
| 2 The appliance has not started. | 1. The on/off button is in the “0” position. 2. The dust box filter is badly fitted. | 1. Operate the robot's on/off button. 2. Fit the dust box filter correctly. | |
| 3 The battery charged indicator continues to pulse after 48 hours of charging. | During the charging process, the current has been cut off, so the appliance has not been charged properly. | Repeat the charging process. | |
| 4 The side brushes are deformed. | They are deformed due to use. | Remove the side brushes and soak them in hot water to recover their initial shape. | |
| 5 The appliance does not start functioning. | 1. The battery is incorrectly fitted. 2. The battery charge level is too low. | 1. Fit the battery correctly. 2. Charge the batteries of the appliance. | |
| 6 The appliance goes in circles and never in a straight line. | There may be problems with the wheels. | Contact our customer service department to repair them. | |
| 7 The autonomy is lower than normal. | The battery has not completely recovered / charged. | 1. Repeat the charging process. 2. This can be normal during the first times of use. 3. Change the battery for a new one. | |

8 The appliance moves backwards after switching it on
The appliance is on a coloured surface (low reflection of the light against the surface)
Adjust the height sensors to Position 2 or 3 (Fig.10)
- In case of breakdown call the customer service telephone number indicated in the guarantee sheet. Do not attempt to disassemble or repair the appliance yourself as this may be dangerous.
- If the connection to the mains has been damaged, it must be replaced and you should proceed as you would in the case of damage.
This symbol means that the product may include a battery or batteries; the user must remove them
before disposing of the product. Remember that batteries must be disposed of in duly authorised containers. Do not dispose of them in fire.

For EU product versions and/or in case that it is requested in your country: Ecology and recyclability of the product
- The materials of which the packaging of this appliance consists are included in a collection, classification and recycling system. Should you wish to dispose of them, use the appropriate public containers for each type of material.
- The product does not contain concentrations of substances that could be considered harmful to the environment
How to remove the batteries from the interior of the device:
CAUTION: It is important that the batteries are fully discharged prior to its withdrawal from the apparatus.

To remove the batteries, once the life of the appliance, proceed as follows:
- Remove the cover of the battery compartment.
- Remove the battery from its casing.
- Close the cover of the battery compartment.
This symbol means that in case you wish to dispose of the product once its working life has ended, take it to an authorised waste agent for the selective collection of
waste electrical and electronic equipment (WEEE)
This appliance complies with Directive 2006/95/EC on Low Voltage and Directive 2004/108/EC on Electromagnetic Compatibility.
Français
Aspirateur Robot
Striker Mini

Cher Client,
V Support brosses laterales
B Interru tture on/off
C Presa di corrente
H Deksel batterijcompartment
I Wielen
J Zuigmond
K Anti-valsensoren
L Zijborstels
M Elektrische stroomadapter
N Batterij
O Stofreservoir
P Filter
Q Deksel stofreservoir
R Stofdoek
S Poetsdoekhouser
Ybaxaembln nokynaTeJIb:
Blaogapm Bac 3a To, yTo Bbl octahOBnI IN CBOB BbI6Op Ha pO6OTn3npOBaHHOM NbIeOCce MapKn TAURUS dJa DomaHero nCIOJIb3OBaHH. IprimeHne nepeoBbIX TEXHOJOrn, COBpeMeHHbIN dN3aH, fYHKcNoHaJIbHoCTb, a TaKHe co6JIoJeHne cTpornx Tpe6OBaHn K KaueCTBy rapaHTnpyOT Bam npOdoJIkHTeJIbHyIO kKcnIyaTaunIO np6Opa.
OnncanHe
A KpbiHa oTdeJeHnIy
IbIe6OpHnKa
B KhoNka BHL/BblKl
C Pa3bem 3JIeKTPnuEeCKo rITaHn
D CBeTOBoI INdIKaTOP 3aprJa
aKNMyJToPA》/“aKKymJToP
3apRHe
E CBeTOBoI INdIKaTOP Hn3Kn
ypOBeHb 3apra aKKymJToPa
F OnorcbiBaIOuIy 6ampep dIy
3aUHTbI OT capaHH
G NpePdHi DaTuNK
H KpbiHaOTceKa dIy
aKNMyJToPa
1 KoIeca
J HaCaHa dJIy BCaCbIBaHHn IbIiN
K ONTueeCKne daTuHK
L BoKOBbIe 5eTHN
M 3JIeKTPnuEeCKn aAdanTeP
N AKKymJToPbI
O PbIe6OpHnK
P PnlTp
Q KpbiHa nblc6OpHnKa
R Tkahb dIy BlaXHoN y6OpKn
S HacaHa dIy BlaXHoN y6OpKn
T 3aHmbl TkaHn dIy BlaXHoN
y6OpKn
U KpeJeHHbIe 3y6bI hacaKn dI
BlaXHoN y6OpKn
V KpeJIeHnI 6OkoBbIX uTeOK
W HaCTpOHTb yPOBeHb
yUBCTBHTeJIbHOCTn ONTNUeCKHX
DaTHNKOB

PekomeHdaunm Mepbl 6e3onachoctn
-перетем КАнnotьсяпьлесCOM,ВНIMATEЛБИО пpoчтITEДаHHу ИСТPyKцИ NO COxpaHЯITEee B TeueHne BCErO cPoKa Jn3HN npnbopa.HecobIoDeHne HOpM 6e30IacHOCTN MoKeT pINBeCTN K HeCchaTHOMy ClyuAIO.
PekomeHdaunno
3eKtpo6e3onacHOCTn
-He pa3pe7aetcnaNoIb3OBaTb
np6opB Cnyae NOBpeKdEnn
UHypa nn BnIKn 3eKTPoNTaHnA.
- Ipeep nOdkluoyehnem np6opa
K 3eKtpnueeckOn CETn y6eHTecb
B TOM, YTO HApJxKeHne B Hei
COOTBeTCTByET HApJxKeHnIO,
yKa3aHHOMy Ha Kopnyce.
-BnIka 3apndHoro ycToPoNCTBa
doJHKHa COOTBeTCTBOBaTb CTaHdApTy
PO3eTOK, KOToPBi NcNoJIb3yeTcN B
BaWeM perNoHe. He peKomeHdyETcra
NCIOJIb3OBaTb aAdantepbl NImMeHrTa
tTBkoBOH KONTAKT.
- IcNoJIb3yInTe ycToPoNCTBO
TOJIbKO Co CPeuJaIbHOH OCHOBOH
/ 3JeKTPnueeCkHM CoEINHITeJEM,
IOCTABJIReMbIMN Bmecte C


Pnupopom.
-He nCnoJb3yIte Hne XpaHnTe np6Op Ha yIuIe.
-He nCnoB3yIte np6op pIOM c BaHHo,dywem nn 6accenHOM.
-При ВьИКluЧЕнnpибopaиЗ
po3eTKH He DepraIte 3a shHyp.
Bo3bMntecb pyKoJ 3a BnIky n
aKKpaTHO BbIHbTe ee,прдepЖИ
po3eTKy dpyroJ pyKoJ. He
noДнHMaIte И He nepemeuaIte
PpNi6Op 3a shHyp 3JIeKTpOpiNTaHnJ.
-He TporaTe Bnky 3JIeKTPoPOnTaHnM OKpbIMn pyKaAMN.
PekomeHdaunnoJnHou 6e3oNaCHOCTN
-ИЗбeraTe KOHTaTc CЖИДКОCTbIO, KOTopaЯ MoKET npOJIntbCSr n3 aKKymyIaTopa.Прп nonaDaHn B rIa3a HemeДleHNO npOMoITe INx BOIoN I O6paTInTeCb K BpaCy. AKKymyIaTOpHЯЖИДKOCTb Bbl3BaET pa3dpaXKeHne N OXKOrn.
PekomeHdaun no 6e3oNaChocTn dnn3HN 3dOpOBb
- Ppeed nodkluoyehm y6eHTecbB TOM, uTo wHyp 3JeKtpoNTaHnIPOJHOCTbIO paCnpaBHeN.
-He nCnoB3yIte np6Op,ecInero aKceccyapbl nnPacXoHbIeMaTePnAJIbI He npncOeINHeHbIDOLHHbIM 6pa3OM.
-He nCnoJb3yIte np6op,ecn y Hero HeNCpRaBHa KhoNka BKJI/ BblKJI.
-Исpoь3унTe pykU/NДЯТраHCnOpTnPoBKNиперemeшенnyпрбopa.
-HeΦopcnpyTe pa6oyuMOuHocTb np6opa.
-ИЗВLEКИТЕи3прИбopaбаТAPEйКИ
nHn aKkymyIaTOp,ecnBbI nHaHpyeTe He nCNoB3OBaTb erO B TeueHne dInTeJIbHOro npomEkyTka BpeMeHN.
- BbIKIouaTe 3apJHoe yCTpoNCTBO n3 po3eTHn,ecn OHO He hCNoJIb3yeTcra,nn npEKeJe Yem npNCTyNtB K eRo OOnCTHe.
-ДанньпрборпразнэзаунИСКЛЮЧТЕЛБНОДЯДOMaшHERO ИСПОЛБЗOBAHЯ. He pa3peшаETcI NCПОЛБЗOBaTb eRo B ПРOMыIJeHHbIX IJI KOMМерчecнxцELX.
-Даньи пибор-he ngpyka. He octabnIte ero 6e3 npncMoTpa B MecTaX,doCTynbIXdЯDeTei.
-Данньnpиборпpeнha3нayehДЯИСПОЛБ3OBaHINHSCJIIOHTeIbHOB3PocIbIMNIOdbMn.HeNo3BOJnyTeIuam,He3HaKOMbIMCpHUNaMnero pa6Otbl,HeDeecnocO6HbIMIIOdAmNDETAMcMOCTOReIbHOIOLb3OBaTbcr npi6Opom.
-XpaHnTe npnbop B MeCTax, HeoctyHbIX IJIa DeTeN / HJIN HeDeecnocO6hBIX NU. - HnKoRda He co6upaTe nbIeCOCOM ropaune nn peKyuane npedMeTbI (cHrapetHbIe OHypkn, nepeI, rBO3dN n T.I.).
-3anpeaaetcraOTKpbIBaTb aKKymyIaTOP/-bl.
-He co3daBaIte KopoTko 3aMbHaHm MeJdy NOpArpHbIMN KOHcAmn aKHyMylAToPa/-OB, TaKaK 3TO MOKeT CtaTb PnpuHOn BO3rOpaHn Hn B3pbBa.
-XpaHnTe aKymyIaTOp/-bi B MeCTax, rDe TempePaTypa He npebblaae T 40^ n He Hnke 4^
-3apnKa aKHyMylTopa/-OB DOJIHHa OcyIeCTBJIaTbCra TOnbKO C NOMOuH 3apJdHOrO yCTPOiCTBa,
noCTaBnREMO npOn3BOJNTeJIem. 3apAnHoe yctpoNcTBo, noDxOJaUeE dIa OndHO rTnA aKHyMylrTOPOB, MoKET CTaTB npuHOB BO3rOpAHn Hn B3pIBa pR nCNoJb3OBaHN C dpYrIM TINOM aKHMyJrTOpa/-OB.
-ИсплььуITE TOько akHyMaJIrTOp/-bl, cneциаJIbHo pa3pa60TaHHbI/-eДЯ daHOrO npi6opa.ПрIMeHHe NpyrOro/-nx akHyMaJIrTOp/-OB MoXeT CTaTb pruHnOH BO3rOpAHN HII B3pbIbA.
TexHnueckoe 06cnykBaHne
-Texnueckoe 6cnykuaHne
npnbopa doJHKHO OcyuaceCTBnTbCn
cneunaHnCTamn. Pn
Heo6xOIMOCHT3aMeHbI pAcXoHbIX
MaTePnaIOB / 3aNaChbIX YacteN
y6eHTecb B IN X IOdJIHHOCTN.
-JIO6OE HECOTBECTBYUoee
HCNoJIb3OBaHHe np6Opa Nn
HEco6JIIODeHHe IHCTpyKcNl NO
3KcNlyaTaun OCBO6OJaOT
PpOn3BOIDteJIr OT rapaHTnHbIX
06raTeJIbCTB No peMOHTy, a TaKHe
CHImaOT OTBETCTBeHHOCTb C
n3rTOBNTeJI.
C6opka
3apkaakkymyIaTOPOB
BHHMaHHe:HObIaKKymyJrTop 3apJxH He nOJIHoCTbIO. IpePe IepBbIM NcNoJIb3OBAHNem pN6Opa Heo6XoIMO NOJIHoCTbIO 3apAHTb aKMyJrTOp.
- 3apKaHTe aKHyMylTOp npn TempeType ot 4 do 40^
-ПОДКЛЮЧИТЕ yCTPОИСТВО ДЯЗAPДКИ aKKyMЛТОРВ K CETNэLEKТРОПNTAHNY (Pnc.1)
-BoBpeM3apAdk6yJeT
3aRopatbCBeTOBnHnKATOp 3apKa aKymyIaTopa》 /“aKymyIaTOp 3apJHeN”。 PocLe OKOHuaHn 3apJKn CBETOBo INdIKaTOp 3apJKa aKymyIaTopa》/“aKymyIaTOp 3apJKeH”3aRopNTc3eJIeHbIM CBeTom (D).
-ДяплногиЗapядн Heo6xOdmo ot 4 yacob. He cneуet 3apjaKaTb aKKyMylrTopbldoIbwe yka3aHHoro BpeMeHn.
YcTaHOBka aKKymyIaTopa/OB
-BHIMaHHe:OcUeCTBJIpa3JIuHbIe MaHnIyJIaCIN cAKHyMylTOpOM,He KacaiTeCbODHOBpeMeHHo ero nolapHO3apJKeHHbIX KOHcOB,TaK Ka3a ChET HaKoJIeHHOH HeepRnBO3HNKHeP a3pId,KOTopblcOKpaauet cPOk ero pa60tbl.
- PpOBepbTe, YTO nepeKJIIOUaTeIb «NyCK/OCTaHOBka» yCTaHOBJIeH B N03nIcIO «O», npEJde Yem npNCtYnITb K yCTaHOBKe aKKymJIrTOPOB.
-CHNIMTe KpbIshky OTceHa dJa aHHyMylTopa/OB. - BCTaBbTe aKHyMylAToP/bI B OTCeH, co6JIIOdA NOJrphOcTb (Pnc. 2).
- CHNMMTe KpbIshKy OTCeKaДЯ aKKyMnyTopa/OB.
YcTaHOBka 6OKOBbIX 5eTOK
- YCTaHOBInTe 6OKOByIO UeTKy B KpeIJIeHne IJRA 6OKOBbIX UeTOK. CJIerKa HaKMnTe Do UeJIuKa (Pnc.3).
yctaHObKa TkaHn IJI BnaXHoI y6OpKn
- BcTabbTe Kpa TKaHn DlaBnaKHO
y6opKn B 3aKHMbI HacaKn dJa
TKaHn (Pnc.4a).
-YcTaHOBnTe HacaKn dJa BlaJHKHO
y6opKn B KpeJIeHnKoPnyCa
nbJIecOca (Pnc.4b).ChIMnTe
HaCAHy, ecn nbIeoc6ydet
NCNoJIb3OBaTbc8e3 TKAHn dJa
BlaJKHoY6OpKn.

Hctpkqno 3KcNpyatau HpeepBbIM nCnOJIb30BaHHeM -PeepnepBbIM nCnOJIb30BaHHeM np6opap Heo6xOdmo NOJHOCTbIO 3aApIHT bAkhymyIaTOP.
3Kcnnyataua
-BKJIIOUHTe np6Op,HaJHAB KHOINKy BKNBbIKI.
-Прибор начнаet pa60TaTb aBTOMaTnueckn И Функционует, NOKa He 3aKaHnVBaetc4Зapd aKKyMylrTopa.
-BoBpempa60TbI np6bopa nooepedno 3aropaoTcBcTeOBbie HndnKaTOpbl «3apraHa aKHyMylAToPa》/«aKHyMylAToP nIoHocTbIO 3apRKeH> N «HN3Kn ypoBeHb 3apra da AkHyMylAToPa>.
-HordaB aKKymyIaTope ocTaeTcMaI0 3apra, 3aropaeTcKpaChbIMCBETOBH INdHaTOp Hn3KHyPOBEHb 3apra aKKymyIaTope).
- CHNMTe HacaHy dIy BlaXHOY6OpHNpeepnCNoJIb3OBAHHeMNbIlecoCa Ha KOBpax NIN KOBPOBbIXNOKpbITnX.
-Приинсповьани пибopa на TeMHои NOBepxHOCTN yCTaHOBHTe DaTUnNперета BbICOTbl B no3nucu 2 nIIN 3. (Pnc.11)
Pocne kaxdoRo nCnoJb3ObaHn
-BbIKIOUHTe npI6Op c nOMOuKhoNKn BHL/BblHJ.

UncTkau yxOa
-
BbIKIOUHTe npnbop n3 po3eTHn IOJNTecb, NOKa OH NpIHOCTbIO OCTbIHET, IpEKeJe Yem PpNCTyNTbK YNCtke.
-
BbIKIOUHTe 3apAHOe yCTPOINCTBO n3 PO3ETH N DOXHTecb, NOKA OHO NOIHOCTbIO OCTbIHET, PpeJHe Yem PPNTyNTb K YNCTKe.
-Перед чисков пибopa n3BLeKeHTe n3 Hero aKKyMyJrTop.
- PpOtpnTe KOpnyc npnbopa BlaJHNo TpIPOuKoN C He6OJIbUHM KOJIueCTBOM MOIOUeRO CpEaCTBa N 3aTEM TuaTeJIbHO IpocyWnte.
-He nCnoJb3yIte paCTbOpnteJI, OKnCnJIouIe, XLoPHbIe IIN a6pa3NtBhIe BeIecTBA dJa YnCTKn np6opa.
-He donyckaIte nonadaHna BODbI INn DpyrNx HndKoCTeB BEHTINLAIOHHble OTBepCTnnp6opa, NOcHOBky 3TO MOKeT pNBecTN K NOBpeJdeHNIO eRO BHYTpEHnX pa6OuNX qAcTei.
-
Hn B Koem Cnyaee He norpykaHTe npnbop B Body nn DpyruKnndKoCTb, He NOMEuaTe erO nOd KpaH C BDOJ.
-
Hn B KOem Cnyae He norpykaIte COeHNHTeNbHbI Ka6eJIb B BOy IIN Dpyryo XnIDKocTb, He NOMEaITe erO NOk KpaH C BODOn.
OuNCTka nblIec6OpHnKa
-Heo6xOdHMo OUnuTaB nIe6bOpHNK NocLe KaJDoRo HcNoJIb3OBaHn Ipn6opa.
-OTkpOte KpbIshky OTdeJeHnA JIA
nbile6bOpHnka(Pnc.5).
- BbHbTe ⅢnHaHr n3 OTBepCTnA dIy BxOda Bo3dyxa (Pnc.6).
-OTKpOInTe KpbIshKy nbIeSc6OpHNka, CHMnTe nBbTp N BbITpaXHnTe COepHHmoe B MyCopHbIN KOHTeHep (Pnc.7). - PpOBePbTe COCToHHe FnIbTpapnbIeC6OpHnKa n CHOba yCTaHOBnteero.
- 3aKpoIe KpbIuKy NbIeSc6OpHnKa.
- BbHbTe ⅢaHaH n3 OTBepCTnA DnBxOda BO3dyxa.
3aMeHaΦnJIbTpOB
- PekomeHnyetc3aMeHrTbФnIbTp nbile6cbOpHnKaKdBiE TpN Meca.
-ДЯИЗВLEЕнЯФильТра: - OTKpoTe KpbIkwky OTdelenHnA nIbIe6OpHnKa (Pnc.5).
- BbHbTe IJIaHr n3 OTBepCTnA dIb BXOda BO3dYxa.
-OTKpoTe KpbIshKy nbIeScbOpHnHa n CHIMTeΦnIbTp(Pnc.7)
-Дя yctahOBKn ΦиьТpa BbINOJIHHTe yka3aHHbIe BblIe DeIcTBnB O6paTHOM NOPdKe.
3aMeHa TkaHn DJIaBnaXHoH
y6opkn
-ДЯСЯТЯТКАнДЯВlaЖноуборк:
- CHMITE HacaHy dIy BlaXHOY6OpKn. AkkypaTHo HaKMITE HaKpeeHbIe 3y6cIy I CJIerKa NotAHHTe HacaHy (Pnc.8).
-NotAHnTe TkAhb DJIaXHOYbOpKn, nOHa OHa He BblJeT N33aXHMOB (Pnc.9).
-Дя yctaHOBKN TkaHn DJI BlaJHNOY6OpKn BbINOHNTE nepeuNCleHHbIe BblIe DeiCTBnB O6paTHOM NOPdKe.
3aMeHa 6OKOBbIX UeTOK
-ДЯСНТЯбOKOBbIXUeTOK:
-NotaHnTe 3a uetHy uetKn, yTo6bI CHrTb 6OKOByU uETKy BmecTe C KpeJIeHnEM (Pnc.10).
-Дя yctaHOBKn 6OKOBbIX ΚeTOK BblONHnTe npeuNCJIeHHbIe BblIe DeiCTBnB O6paTHOM NOPdKe.
Akceccyapbl
-Bce Heo6xoDnMbIe Ira BaWero nblncocaaKceccyapbl (HnlbTpbl n np.) Bbl moKeTe npno6peCTn B OΦuNaJIbHbIX MaRa3INhAx IN cepBnCHbIX ceHTpax.
-нспьзуг Te Tolyko NODINHbIe
aKCECCyapbl, cneuaNbHO
pa3pa60TaHHbIe dIЯ daHHoMоJIeN
PnIb6opa.

HeNcnpaBHOCTn n cnocobInx ycTpaHEnH

-Hn cam npnbop, Hn ero ynaKOBka He coDepeKaT BeuecTB, npeCtBaJIIOx ONaCHOCTb dJa OKpyKaIOse cpebl.
-ДаньсIMBOJ O3HauaET,чTO NO OKOHuaHnI N0Je3HOJ KIN3Hn np6bopa CJIeDyET nepeDaTb eRO B NyHKT npHemaOTcLyKHBux 3JIeKTPnueCnX n3JIeKTPoHHbIX np6bOpB (RAEE) nII B pyKn npedCTaBHTeJIa COOTBeTCTByIOUeOpraHn3aun.

-ДаньсIMBOJ O3HauaET,чTo np6Op MOKeT COePKaTb 6aTapeKn nIi
aKMyJTopb.I3BLeKeIte nx,
IpeJe Yem nepeDaTb np6Op Ha
yTHn3aUIO. NOMHnte,yTO
6aTapei / aKKMyJTopbI CJeDyET
NOMeCTNTb B CneuaJIbHbie
KOHTeHepbl.HNKOrda He 6pocaiTe
IX B OROHb.
Kak n3BnkeKaTb aKKymyIaTOPbI n3 np6opa:
BnImaHne: PpeKHe qem npncTyuNTb K n3BLeueHHIO aKHymyIaTOpOB n3 np6opa, y6eHTecb B TOM, qTO OHN pONHOCTbIO pa3paIINcB.
IIN3BNeueHnAkkymyJrTOPOB n3 OTCnyXNBwero np6opa BbINOHNHe CNeDyUOuNe DeiCTBn:
-СнHMITEКрblИКу OТсЕкДлЯKHуMЛТopa/-OB.
-ИЗВЛЕКИТе aKKуМУЛТОп n3 OТсЕКа.
- 3aKpOInTe KpbIshky OToCeHa dJa aKHymyJIrTopa/-OB.
Ipi6Op n3rOToBJIeH B COOTBeTCTBnC Tpe6OBaHHaMn IInpeKTHbbl2006/95/EC O Hn3KOM HaPpJKeHNn IInpeKTHbbl 2004/108/EC o63JIeKTPomarHHTHOJ COBMecTmOCtN3JIeKTPnueChNX pIn6OpOB.
Romană
Robot aspirator Striker Mini

Stimate client,
Va multumim ca ati ales un produs electrocasnic marca TAURUS. Designul,performantele si tehnolo acestui aparat,cat si controalele stricte in ceea ce privesto calitatea in timpul procesului de fabricatie, v vor furniza satisfactii depline pentru multi ani.
Descrierea
A Capac al compartmentului deposite praf
B Buton de pornography / opire
C Priza de conectare
D Beculet, incarcare baterie/ baterie plina
E Beculet baterie descarcata
F Banda protectie antizgáriere
G Senzor frontal
H Capac al compartmentului bateriei
I Roti
J Duză aspirare
K Senzori anti-cadere
L Perii laterale
M Adaptor curent electric
N Baterie
O Deposit de praf
P Filtru
Q Capac deposit de praf
R Aspirator
S Platfma pentru aspiratoare
T Bride pentru aspiratoare
U Dinti de prindere platfma aspi-rator
V Suport perii laterale
W Ajustati sensibilitate senzori cadre

Sfaturi si avertizari privind sigurant
CneuaJIHNOKHTeHepn HNKORA He
Tp6Ba da ce XbpyT BOrbH.
Kak da oTcpanm 6aTeepnnte ot BbTpewHocTTa Ha ypea:
PNEyNPEHKeHHeHne:BaXHo e
6aTePnnte da ca HanbIHO n3ToeHn, npEn Da rO nCTpaHnTe OTypea.
3a da oTcpanHTe 6aTeepnHTe, cNei KaTO eKcPiOaTaUHOHHrT XHBOT Ha ypeDa n3Teue, npoceHnpaTe KaKTo cJeBa:
-OTcTaHeteKanaKaHa
pa3npedeelenHeTo 3a 6aTeepnTa/ 6aTeepnTe.
-OTcTpaHete6aTeepnraToHTHeHOTopa3npedeJeHne.
- 3aTbopeTe HaHOBO KaNaKa Ha
pa3npedeelenHeTo 3a 6aTepeyTa.
To3n ypeD OTROBapr Ha n3ncBaHnraTa
Ha DnpeKtNb 2006/95/EC 3a
HnCko HnpeKeHne n DnpeKtNb
2004/108/EC 3a eJeKtpomarHnTHa
CbBmecTmOcT.


y 1
2011 2011
:j 1 j 2 3 4 5 6 7 8 9 10 11 12
EC/2004/108 95


Soc Jn 100
:
y
(10a)
g 1
11111j
(.)
20 20
1,2,3 , 4,5,6 , 8,9

jaiy jaiy jaiy jaiy jaiy jaiy jaiy jaiy jaiy jaiy jaiy jaiy jaiy jaiy jaiy jaiy jaiy jaiy jaiy jaiy jaiy jaiy jaiy jaiy jaiy jaiy jaiy jaiy jaiy jaiy jaiy jaiy jaiy jaiy jaliy jaliy jaliy jaliy jaliy jaliy jaliy jaliy jaliy jaliy
= x = 2 x = 3 x
(5)(20 1
.
(7j0j) 1
a 1000
a1 = 23,an + 1 = an - an - 1
- ( x + 2) ( x + 3) = 4
(8jj) 10
(9)jj()


101 111
Jus Jus Jus Jus Jus Jus Jus Jus Jus Jus Jus Jus Jus Jus Jus Jus Jus Jus Jus Jus Jus Jus Jus Jus Jus Jus Jus Jus Jus Jus Jus Jus Jus Jus Jus Jus Jus Jus Jus Jus Jus Jus Jus Jus Jus Jus Jus Jus Jus Jus Jus
J 1 J 1 1 1 1 1 1 1 1 1 1 1 1 1 1 1 1 1 1 1 1 1 1 1 1 1 1 1 1 1 1 1 1 1 1 1 1 1 1 1 1 1
C
(D)
0000 1
1
12 12
i 1


:


在 Rt ABD 中:

J 1

taurus


taurus
Avda. Barcelona, s/n
E 25790 Oliana
Spain
Net weight: 1,2 Kg
Gross weight: 1,9 Kg