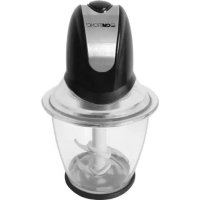
HMS 3152 - Mixer CLATRONIC - Free user manual and instructions
Find the device manual for free HMS 3152 CLATRONIC in PDF.

| Product Type | Hand mixer with integrated kitchen scale |
| Brand | Clatronic |
| Model | HMS 3152 |
| Power supply | 220-240 V, 50/60 Hz |
| Power | 300 W |
| Protection class | II |
| Net weight | 2.4 kg |
| Scale power supply | DC 3 V (CR2032 battery) |
| Weighing capacity | 5 g - 5 kg (0.35 oz - 175 oz) |
| Number of speeds | 5 positions + Turbo function |
| Maximum operating time (except Turbo) | 3 minutes |
| Turbo operating time | 1 minute maximum |
| Included accessories | Whisk, dough hook, bowl, stand, integrated scale |
| Maximum dough capacity | 1 kg |
| Main functions | Mixing, kneading, whisking, weighing, tare function, accessory ejection |
| Care and cleaning | Clean the exterior with a damp cloth; accessories and bowl hand wash; do not immerse the appliance |
| Safety | Stop and unplug before changing accessories; do not leave unattended; overload protection |
| Warranty | 24 months (proof of purchase required) |
Frequently Asked Questions - HMS 3152 CLATRONIC
User questions about HMS 3152 CLATRONIC
0 question about this device. Answer the ones you know or ask your own.
Ask a new question about this device
Download the instructions for your Mixer in PDF format for free! Find your manual HMS 3152 - CLATRONIC and take your electronic device back in hand. On this page are published all the documents necessary for the use of your device. HMS 3152 by CLATRONIC.
USER MANUAL HMS 3152 CLATRONIC
Overview of the Components.. 3
Instruction Manual. 32
Technical Data Page 35
Guarantee
FRANÇAIS
JEZYK POLSKI
Sommaire
D-47906 Kempen/Germany

Usage:
Usage:
1. Use the function to read a text from a text file.
2. Use the function to write a text from a text file.
3. Use the function to read a text from a text file.
AVVISO:
General Safety Instructions
Read the operating instructions carefully before putting the appliance into operation and keep the instructions including the warranty, the receipt and, if possible, the box with the internal packing. If you give this device to other people, please also pass on the operating instructions.
- The appliance is designed exclusively for private use and for the envisaged purpose. This appliance is not fit for commercial use. Do not use it outdoors. Keep it away from sources of heat, direct sunlight, humidity (never dip it into any liquid) and sharp edges. Do not use the appliance with wet hands. If the appliance is humid or wet, unplug it immediately.
- When cleaning or putting it away, switch off the appliance and always pull out the plug from the socket (pull on the plug, not the cable) if the appliance is not being used and remove the attached accessories.
- Do not operate the machine without supervision. If you should leave the workplace, always switch the machine off or remove the plug from the socket (pull the plug itself, not the lead).
- Check the appliance and the cable for damage on a regular basis. Do not use the appliance if it is damaged.
- Do not try to repair the appliance on your own. Always contact an authorized technician. To avoid the exposure to danger, always have a faulty cable be replaced only by the manufacturer, by our customer service or by a qualified person and with a cable of the same type.
- Use only original spare parts.
- Pay careful attention to the following "Special Safety Instructions".
Children and Frail Individuals
- In order to ensure your children's safety, please keep all packaging (plastic bags, boxes, polystyrene etc.) out of their reach.
Caution! Do not allow small children to play with the foil as there is a danger of suffocation!
- In order to protect children or frail individuals from the hazards of electrical equipment, please ensure that this device is only used under supervision. This device is not a toy. Do not allow small children to play with it.
Symbols in these Instructions for Use
Important information for your safety is specially marked. It is essential to comply with these instructions in order to avoid accidents and prevent damage to the machine:
WARNING:
This warns you of dangers to your health and indicates possible injury risks.
CAUTION:
This refers to possible hazards to the machine or other objects.
NOTE: This highlights tips and information.
Special Safety Instructions for this Machine
Hand mixer set
- Do not touch any moving parts of the machine and always wait for it to stop.
- During operation, objects such as spoons, dough scrapers or your hands must never touch the rotating whisks or dough hooks! Caution - risk of injury!
- Before changing the attachments, the appliance must be disconnected from the mains!
- In order to avoid splashing, always insert the rods fully into the food being mixed before you switch the mixer on.
- Only mix or whisk food with this machine.
- Do not operate the mixer for more than 3 minutes! Then let it cool down for approximately 10 minutes before using it again!
- The device is only designed for small quantities! You should therefore only fit the maximum quantities stated in the table into a container!
- Do not insert the appliance plug without installing the necessary attachments.
- Do not carry or lift the appliance during use. Always switch it off first and pull out the plug. Carry the appliance always with both hands!
Kitchen Scales
- Please do not immerse your kitchen scales in water.
- The kitchen scales are designed for a maximum weight of 5 kg.
- Protect this measuring device against direct sunlight, high temperatures, humidity and dust.
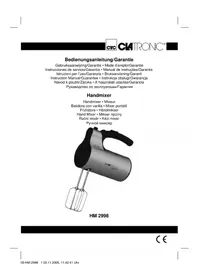
Overview of the Components
| 1 ⇔ EJECT button | |
| 2 | TURBO button |
| 3 | 5-position switch |
| 4 | Mixer |
5 Movable upper section
6 Button to unlock the mixer
7 Button for raising/lowering the upper section
| 8 | Mixing | bowl |
| 9 | Mixer | stand |
| 10 | Beater | |
| 11 | Kneading | hook |
| 12 | Opening for the marked kneading hook | |
| 13 | Kitchen Scales | |
| 14 | Weighing | surface |
| 15 | Mode button | |
| 16 | TARE (Tare) button | |
| 17 | ON/OFF (On/Off) button | |
| 18 | LCD display |
Unpacking the appliance
-
Remove the appliance from the box and all the enclosed accessories.
-
Do not through the packaging away, but keep it together with the inner packing and the warranty documents for the whole life of the warranty.
- Place the appliance on smooth, level and stable work surface.
- Do not insert the appliance plug without installing the necessary attachments.
- In order to remove any contamination from the production line please clean the mixing bowl (8) and other accessories before initial use in a soapy water solution.
- Dry well all the parts after washing.
- You can also use the mixer (4) and the mixing bowl (8) without the mixer stand (9).
Instructions for Use
Always choose a utensil and a speed according to the following table:
| Product/Type of Preparation | Max. Quantity | Utensil Level | Max Ope- rating Time | |
| Heavy dough (e.g. yeast dough) | 500 g | kneader hook | 1 -3 2 min. | |
| Cake mixture, Dres- sings, Desserts | 750 g beater 2 -5 3 | min. | ||
| Sponge mixture, waer mixture, Cream | 750 g beater | 1 -5 or turbo | 3 min. 1 min. | |
- With heavy mixtures, do not operate the machine for more than 2 minutes, and then allow it to cool down for a further 10 minutes.
- Depending on the consistency of the mixture it is necessary to remove the mixture from the edge of the mixing bowl and place it back on the kneading attachments. The device must be turned off.
TURBO Switch (2)
In order to switch the device to the maximum speed for a short time press the TURBO button.

CAUTION: Do not use this function for more than 1 minute!

WARNING:
- During operation no objects such as spoons, the dough scraper or your hands should touch the rotating whisks or dough hook!
- Danger of injury!
- Do not press the button (7) during operation.
Assembly
- Please ensure that the speed switch (3) is turned to .0".
-
Place the mixer stand on a smooth and fl at surface or on the weighing surface. The suction feet hold the mixer fi rmly in place. Place the hand mixer (4) on the upper section of the mixer stand (9). Please check that it is fi rmly installed; the mixer must lock into place.
-
In order to lift the upper section, press the button (7) and fold the upper section towards the back. Assemble the desired attachment (10, 11) by inserting the upper end into the openings provided on the arm.
-
The dough hook with the disc washer on the shaft can only be inserted through the larger opening (12).
-
The whisks can be inserted into any openings. Please ensure that the attachment locks into place. Place the mixing bowl in the recess.
-
Weigh the ingredients with the integrated kitchen scales. Now fi II in your ingredients.
- Do not overfi II the device; the maximum quantity of ingredients is 1kg
- Lower the arm by means of the button (7).
Electrical Connection
- Unwind the mains lead completely.
- Insert the mains plug into a properly installed 230V / 50Hz safety power socket.
Using the Machine
- Please ensure that the speed switch (3) is turned to .0".
- Insert the kneading hook or whisk into the food to be mixed. Set the desired speed with the speed switch (3). Begin at a low speed (level 1-2) and then increase this if necessary. Clean the edge now and then with a dough scraper.
- After you have finished kneading / mixing, move the switch (3) back to the 0^次 position as soon as the mixture or a ball of dough has formed. Then remove the mains plug.
- The inserted tool can be removed by pressing the eject button (1).
- Press the button (7) and raise the upper section.
- When the dough is ready it can be released with a dough scraper and removed from the mixing bowl.
- Remove the mixing bowl. Press the button (6) to take off the mixer.
- Clean the parts as described under "Cleaning".
Releasing the kneading hook / beater
In order to release the hook, press the EJECT button (1).
I NOTE:
The hooks can only be removed if the speed switch (3) is in the 0^ position.
Kitchen Scales
Battery Compartment (on the back of the scales)
The battery in the battery compartment has been secured for transport with a foil. This prolongs the life of the battery.
Please remove this foil to prepare the scales for initial use.
Inserting the batteries
The battery is a long-life lithium cell. If the letters "Low" appear in the display this means that the batteries need replacing as follows:
- Open the battery compartment on the back of the scales. Remove the battery.
- Replace the battery with a cell of the same type „CR 2032". Please ensure the correct polarity (the side with the type designation CR 2032 is facing upwards)!
- Close the battery compartment again.
- If the device is not used for a prolonged period of time, please take the batteries out in order to prevent leakage of battery acid.
CAUTION:
Batteries are not to be disposed of together with domestic wastes. Disposse of the used batteries at the relevant collection bin or at your dealer's.
WARNING:
Do not expose the batteries to high temperatures or direct sunlight. Never throw batteries into the fire. There is a danger of explosion!
Notes on Handling Batteries
- Keep batteries away from children. They are not a toy!
- Never throw batteries into a fire or immerse in water.
- When inserting a battery, ensure the correct polarity.
- Do not open the batteries by force.
- Avoid contact with metallic objects. (Rings, nails, screws et cetera.) There is a danger of short-circuiting!
- As a result of a short-circuit batteries may heat up considerably or even catch fire. This may result in burns.
- For your own safety the battery poles should be covered with adhesive strips during transport.
- If a battery leaks do not rub the liquid into your eyes or mucous membranes. If hands come into contact with the liquid they should be washed thoroughly and eyes rinsed out with clear water; if symptoms persist please consult a doctor.
Germany:
- As a consumer you are required by law to return used (rechargeable) batteries.
- You can return your old (rechargeable) batteries free of charge where they were bought, as well as at the local public collection points in your town.
The following symbols are to be found on (rechargeable) batteries containing harmful substances:
Pb = contains lead
Cd = contains cadmium
Hg = contains mercury
Li = contains lithium
Use
I NOTE:
The kitchen scales can also be used when the device is not being used.
Weighing Function
- Press the ON/OFF (17) button to switch the device on. 888.8" appears in the display at first; this then changes to 0g or 0.0oz (see ,MODE" section).
- Fill/place the items to be weighed on to the weighing surface or into the mixing bowl. If further ingredients are placed on the weighing surface the weights are added together.
- Place the mixing bowl or the entire device on to the weighing surface and then press the TARE button; the display is set to 0g (0.0oz). Wait until the display remains steady on 0g or 0.0oz.
NOTE:
- If something is placed or fi lled on to the weighing surface or into the mixing bowl before 0^ (0.0) appears in the display, the letters Err appear in the display.
- If the vessel is filled, only the weight of the ingredient is shown.
MODE
Press the Mode button (15) to select between grams (g) or ounces (oz). The selected unit is indicated by an arrow in the display.
Weigh-in Function (TARA)
- If you would like to weigh further ingredients for example, use the weigh-in function.
- Press the TARE button to set the display to 0g (0.0oz). Now add a further ingredient on to the weighing surface or into the mixing bowl. The actual weight of the second ingredient is now shown in the display. Repeat this procedure if necessary.
- If the scales are not being used they switch off automatically after approx. 6 minutes in order to prolong the battery life, or you can press the ON/OFF button (17).
Handle the balance with care. It is a precision measuring instrument. Do not place a greater weight on the scales than their maximum measuring range.
Do not load the appliance with more than 5kg / 5000g (Vessel and ingredients) to avoid damaging the device.
If the letters Err^a appear, the weight is above 5 kg.
Cleaning
- Before cleaning the equipment, always remove the mains plug from the socket.
Only a damp cloth should be used for cleaning the outside of the machine. - Under no circumstances should the device be immersed in water for cleaning.
- Never use abrasive detergents!
- Removable parts that have come into contact with dough (kneading attachments and mixing bowl) can be cleaned by hand.
Noise development
The sound pressure level in the ear of an operator (LpA) was measured according to DIN EN ISO 3744.
Sound pressure level detected: 77 dB(A) (no limit)
Technical Data
Model: HMS 3152
Power supply: 220-240 V, 50/60 Hz
Power consumption: 300 W
Protection class: II
Short operation time:
Level 1-5:
Turbo operation: 1
Net weight: 2,4 kg
Power supply
Kitchen Scales: DC 3 V (CR 2032)
Min./max.weight load: 5g-5000 g (0.35oz-175oz)
This device has been tested according to all relevant current CE guidelines, such as electromagnetic compatibility and low voltage directives, and has been constructed in accordance with the latest safety regulations.
Subject to technical changes without prior notice!
Guarantee
The device supplied by our Company is covered by a 24 month guarantee starting on the date of purchase (receipt).
During the life of the guarantee any fault of the device or its accessories ascribable to material or manufacturing defects will be eliminated free of charge by repairing or, at our discretion, by replacing it. The guarantee services do not entail an extension of the life of the guarantee nor do they give rise to any right to a new guarantee!
Proof of the guarantee is provided by the proof of purchase. Without proof of purchase no free replacement or repair will be carried out.
If you wish to make a claim under the guarantee please return the entire machine in the original packaging to your dealer together with the receipt.
Defects to consumables or parts subject to wearing as well as cleaning, maintenance or the replacement of said parts are not covered by the guarantee and hence are to be paid!
The guarantee lapses in case of unauthorized tampering.
After the expiry of the guarantee
After the expiry of the guarantee repairs can be carried by the competent dealer or repair service against the payment of the ensuing costs.

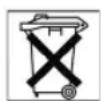
Meaning of the "Dustbin" Symbol
Protect our environment: do not dispose of electrical equipment in the domestic waste.
Please return any electrical equipment that you will no longer use to the collection points provided for their disposal.
This helps avoid the potential effects of incorrect disposal on the environment and human health.
This will contribute to the recycling and other forms of reutilisation of electrical and electronic equipment.
minformation concerning where the equipment can be disposed of canine obtained from your local authority.
Yka3bIbaeHa BO3MOxHHyO ONaCHOCTb IIN3DeJIIN N DpyrNX OKpyJauOUX INpeDMETOB.
I I PIMEYAHNE: Jaet coBeTbI INHOpMaUHO.
Mepb6e3oNaChOCTn npna6oTe c MmKcepom
PyuHOn MMKcep c npHaJdJIeX-HocTAMN
He npikacaiTeb K DnBkyuimcnaCTaHm npH6opa, Bcerda JNITE NOHNO OCTaHOBKN BpaueHNA.
Bo Bpemra pabotb MmKepa Hn B Koem cnyae He npkacaItecb kakmm-Nbo npedMetamn, Hanpimep loKKoN, CKpe6kOM nn pykAMn, BpaauOxxCyacteN, KaK B36BaJIKN INN CMEcHTeBHOr KpIXoA!OnacHocTb nJpyehn TpaBMbl!
- PeneC mEnOH npHnAdNExKHOte o6raTeIbHo BbIKIOHTe np6Op nOTKIOHTe eO tCtN.
YTO6bI npedTbpaTb pa36pb3rBaHne, norgykaTe MHKcepHbIe naOuchnpeD BKJIoucHEm NOnHOCTbIO B CMECb.
-ИспόньзутemeMHKcepTOJIbKOДЯПИЗББIXIPOДУKTOB.
He pa6oTaIe c np6opom 6oJee 3 MnHyT!pepei NOBTOpHbIM BkJIIOUeHHEm DaIte eMy npHM.10 MmHyT OCTbITb!
MnKceC KcHCTpynpoBaH nI pyriTOBHeHMaJIeHbKHX npu! ITo 30I npUHe He HAnONHte cocSyD BblE MaKcIMaHbHO DOnyCTmOro 3HaueHn, PpBeDEHHOro TBabnue!
- He BKNHouaTe pnpbOp B Cetb DO NOJIHOro MOHTaJa BCEx PnHaJdJeKHOCTe.
3anpeaetcnoBIMatbHnnepeHOCTb np6op BO Bpemero paoTb, chayana BkiHouHTe eru BBHbTe cETeByIO BNky. NpehoCtne np6op ToIbKO DByMn pykam!
Becbi KxyOHHbI
- Hn B koem cnyuae He norgykaite Becebl Bvody.
BecpaacnTaHbHa B3BeuHBaHne npOyKToB Do 5 Kf.
3aunuataHe 3MepTeIbHbI np6Op OT DeIeCTBnI pRABix COJIHeUHbIX LyueH, BblCOKHX TEMpeApTy, BlaXHOCTN I bIIM.
O63op detae np6opa
1 EJECT KhoNka Kncatop
2 Khonka
TURBO
35-nctyneHauTbI nepeKlnouateJIb
4 MmKcep
5Повьнжнв Верхнгдетаь
6 KhoNka Dnpa36IokpOBk MmKcepa
7 KhoHpa dIra onyckHaNRA/ NOdHrTnBepxHeu qactn 8
9 PndTaBka nIa MmKcepa 10

B Becb BCTabHeHa DIOLOBEuHnIHTHeBa 6aTapeKa.EcIn BO BpEm3KcNlPyataun Ha IINCnEe NOBHTCa COoBSeHne "Low", UTo O3Naayet 6aTaepKn ocA6n, To NoctynaTe CNeyHOuIM 06pa3OM:
- OTKpoIte OTCEK 6aTapeeK, HAXOJIAuINcHa O6paTHoI CTOpOHe BEcoB. BbTaUHTE 6aTapeuKn.
- 3aMeHnTe 6aTapeNky Ha paBHO3NaHyIO TnIa ,CR 2032 CoBIOdaIe IpaBnIbHyIO NIOJIrPHoCTb (CTopoHa c MapKupOBKO CR 2032 cmOTpNT BBepx)!
- 3akpoTe OTCEK DnI 6aTaapeek 06paTHO.
- Ecn 3neKtpnpn6p OIOJIoe BpEMr He NcONb3yETB BbHbTe 6BaTapeMn H3 Hero, YTO6bl IpeIOTBpaNTb "BbITEKAHHe" UeIoOnn HnX.
BHIMAHHE:
He bIbOpacbIbAaTe 6aTapeKn B DomaunHm Mycop. POnkanyIcTa cAnTe Otpa6oTahHbIe 6aTapeKn Ha CneuHaBbIyNHTNKT pInHema NIN B TropOByTOUky.
TPEJYTPEJKDEHNE:
He noDBepraTe 6aTapeKn CINbHOMy HarpeBy nnn Bo3deIcTBIO npMbIX COINeHuBx IyuEi. HIKoRda He 6pocaiTe 6aTapeKn B OOrh. CyIecCTByET OnaCHOctb B3pbBa!
Texnka 6e0nacnoBn B o6paueHH C 6aTapeHkamn
XpaHnTe 6aTaapeiKn IoJaIbIe O T dTei. 3To He HrpyuKn!
- Hn B koem cnyae He 6pocaite 6atapeuKn B oroHb nIn BODy.
BCTaBnA 6batapeK, CneDnte 3a npabHbHO nOJIpHocTbO.
- He BcKpbBaIte 6aTapeKn.
He donyckaite KOthakta 6aataeek C metanlueckmnpedmetam.(Kolba, rbo3dn, wypnybI nT.n.) OnacchoctbKOPOTKOro 3ambikaHn!
KopotKoe 3ambikaHne MOKeT npBecTu K CnblHOMy HarpBaHNO 6aTapeuHK N daKe K ee BocPiameHeHHo. B pe3yIbTate MOHNO nOlyuHTb OXKOrn.
BueJx 630nacHocn peKOMeHnyETc 3aKnEeBaTb noIIOca 6atapeek IINKOJIeHTOn Ha BpemXpaHeHnI nepeBo3Kn.
EcnbatapeKb BITEkna, HN B KOem cnyae He donyckaIte nopaHn JIKIOcTN B Ia3a Hn HApyrrne cIn3ncIbe 06oJouKn. B cnyae KONTAKTA NOMt pyKn, nponolockatb Ira3a YHCTOIN BOIO, ecn CmIMTOMbl He HCue3HyT - OpaTnBcR K BpaY.
RepMaHr:
Bcem nOtpe6nteJAM 3aKOH npEINncbIaBcT cdaBaTb 6paTHo Otpa60TaHHbIe 6atapeKeKn/AKKyMylrTOpbI
CTapbIe 6aTapeKn/AKKMyNlAToPbI MoKHO 6ecnIaTHO CdaTb TaM, TRe OH N6blN KynPiHbI, a TaKKe B O6IeCTBeHHbIX NyHKnx PnHema IIO MeCTy XHTeJIbCTBa.
3n 3NaHn HaHeceHb Ha 6aTapeKn/AKKymyTOpbl, coepKaune BpeHhie BeuecCTBa:

Pb = COeApHnT CBnHeu
Cd = copejNt KaDmN
Hg = coideprknt ptyb
Li = cOdepeKHTIJIITNI
Popraok pa60tbi
I PIPMEUYAHNE:
Bb moke Te nonb3oBaTcK KyxOHbIMn BecAMn TaKke TOrda, KOrDa Bb He noIb3yeTeCb camm npH6opom.
PekHM B3BeWbAHn
- HAnMMTe KONKy ON/OFF (17), YTObI BKJIIOUHTb BEcbl. Ha DnCnJIeE NOBnHETcR Chaana,888.8", 3aTeM NOKa3aHne N3MeHReTcHa 0g nIN, COOTBeTCTBEHHO, Ha 0.0oz (CMOTPnTe pa3dEn "MODE").
- HacbIbTe/YIOKHe B3BeWbHaBEmbIe npOyKTbI Ha IOBepXHOCTb BEcOB IIN B CMEcHTeJIbHyIO MmCKy. IOKa3AHn BEca OTo6paKaHOTcHa INdIKaTOpe. IObaBLeHne DaJIbHeMIXnpOyKTOB yBEniHbAeT NOKa3AHn BEca.
- TocTaBte CmecntelbHyIO MNCky HIN BeCb np6Op Ha NOBepxHOCTb BEcOB N HAIXMITE 3aTEM KONKY TARE, NOKa3aTeIb 6yET yCTaHABJIbATbCR B NIOJOKeHHe 0g (0.0oz).TIOJOKdTE, NOKa NOKa3aTeIb He BCTaHET B NIOJOKeHHe 0g INN 0.0oz.
I PIPMEYAHHE:
Hacbntbe/ynoknteyto-HnybHa nobepxhoctb BEcOB HIN B CMECNTBHyIO MNCKY, PpeKHe QEM NOKa3aTeIb ykaKeT0" (0.0),ecnBbl 3To cdaeTe No3Ke,Ha Dncnnee NOBNTC Err".
Tenepb HanoHnHTe COcyd,Ha HnDnKaTope OTo6pa3HTC TOnbKO Bec B3BeWnBaEMoTO npOdykTa.
MODE
HaKIMaHa KhoNky Mode (15), BbIepeIte peKHM rpaMMOB (g) nIn yHcui (OZ). BbIbpaHHa eDHHua 6yDet NOKa3aHa Ha dncPiee npn NOMoU CTpeKN.
Iotpe6nemar moohocb: 300 BaTT
Klacc 3aunrbl:
IHTepBaJIbHbIpeKIMpaOToBt:
Chopoctb 1-5: 3 MH.
Pekim Turbo: 1 MInH.
Bec HeTo: 2,4 K
3JIeKtpoNTaHHe-
BecbkyxOHHbIe: DC 3 V (CR 2032)
MnH./MaKc.BecOBaHaRpy3ka:.....5r-5000r(0.35oz-175oz)
3To n3dJIeHHe npoJIo BCE Heo6xOaIMbIe I aKTyaJIbHbIe npOBepKn, npEaINcAHHbIe dIpeKTHBoI CE, K npM. Ha 52
3NEKTPOMARHHTHYO COBMECTMNOCTbN COOTBETCTBHe Tpe6oBaHnM K Hn3KOBOJbTHOH TEXHKe, OHO 6blIO TaKKe CCKHOpyuPObaHo N IOCTPOEHO C yyeTOM IocneHnx Tpe6oBaHn N IO TexHKe 6e3ONaCHOCTH.
Mbl octabnem 3a coboi npabo Ha texhueckne n3mehenia!
TapaHTnHoe 063aTeJbCTBO
TapaHnHbI cpoK h TeppntOpn Pocnncko Fepaunu yctahabnBaetcnoHMOUhIMn npedCTaBtEnAMM.
KaccobbyuekRBnEraTcRgapaHmHbIM TaHOH. Be3 HeRo HEBO3MOKeH 6eJIaTHbI peMOHT HIN 3ameHa N3dEInr.
B cnyae BO3HKNHOBHNNI npITeH3n no rapaHTN, npebBHTe 13deJIne B NOHIOKOMJIeKTAuIN, C OPHHaHbHOJ ynaOBKO IN KACCObBM YeKOM TOPOBOI TOKe, pOdaBwe 3To H3dJIeNE.
IepeKtby n3haWnBaembix npHnAaJNKeKHOCTe NIN TpyuNXcI
TeTale, a TaKHe YnCTKa, TexOcLyNKBaHne NIN 3aMeHa
TpUxNCr DeTale He NoJaAOT NOI rapaHTIO, IN OoTOMy
npOBoARTCs 3a OTdJeBHyO ONlary!
TapaHTN TepaETc npB BckpyTN H3dJIIN NOCTOPOHHIMNIIaMNI.
Pocne rapaHTM
Iocne OKOHaHn cpoKa rapaHTnn,peMOHT n3denn npOn3BODNTcra 3a ONnATy, COOTBEcTByOuLmM MaCTepCKMN nnnyHKtAmn cepBnCHOrO 06ClyKnBaHN.

CAtRONICINTERNATIONAL GMBH
D-47906 Kempen/Germany · Industriering Ost 40 Internet: http://www.clatronic.de · email: info@clatronic.de