Fidelity 160 - Phone TOPCOM - Free user manual and instructions
Find the device manual for free Fidelity 160 TOPCOM in PDF.
User questions about Fidelity 160 TOPCOM
0 question about this device. Answer the ones you know or ask your own.
Ask a new question about this device
Download the instructions for your Phone in PDF format for free! Find your manual Fidelity 160 - TOPCOM and take your electronic device back in hand. On this page are published all the documents necessary for the use of your device. Fidelity 160 by TOPCOM.
USER MANUAL Fidelity 160 TOPCOM
DECLARATION OF CONFORMITY
We, TTS Nv, Grauwweer 17, 3001 Heverlee, Belgium, declare that our product :
Product name: TOPCOM
Model type: Fidelity 160
is in conformity with the essential requirements of the R&TTE directive 1999/5/EC and carries the CE mark accordingly.
Supplementary information:
The product complies with the requirements of
Low Voltage Directive 73/23/EEC
EMC Directive 89/336/EEC
-EN60950
-EN55022
-EN55024
Date: 09/09/2002.
Place: Heverlee, Belgium
Name: Verheyden Geert
Function: Technical Director

European contact: TTS Nv, R&D department, Research Park, Grauwmeyer 17, 3001
Heverlee, Belgium. Tel: +32 16 398920, Fax: +32 16 398939
GBThe features described in this manual are published with reservation to modifications.
NL De in deze handleiding beschreven mogelikheden worden gepubliceerd onder Voorbehoud van wijzigingen.
FLes possiblties decrites dans ce manuel sont publiees sous reserve de modifications.
Die in dieser Bedienungsanleitung umschriebenen Mochlichkeiten, werden vorbehaltlich Änderungen publiziert.
S Funktionema denna bruskanvising publicceras med reservation for andringar.
DK Vi forbeholder os retten til aendringer af de specifikationer, der er beskrevet i donne brugsanvisinng.
- Put batteries in the battery compartment to activate the display :
- Open the battery compartment at the bottom of the unit.
- Insert 4 AA batteries (1,5V).
-
Close the battery compartment.
-
Connect one end of the line cord to the telephone line wall socket and the other end to the bottom of the phone.
Note: Instead of using batteries, you can also use an adapter (DC 9V/300 mA)).(adapter not
included), this adapter needs to be compliant to the CE standard EN60950
The memories remain saved, even without batteries or electricity supply (flash memory) !
Never change batteries when the telephone line is connected!
2B BUTTONS/LED
1 'Handsfree'indicator
2 New Calls' indicator
3 Memory button
4 Direct Memory button 1 M1
5 Direct Memory button 2 M2
6 Direct Memory button M3
7 Direct Memory button M4
8 Direct Memory button M5
9 Voice Mail button VM
10. Handsfree button
11 Alphanumeric buttons
12 Scroll switch (
13 Phone Book button
14 Set button
15 Menu button
16 Flash R
17 Erase/Mute-button
18 Redial / Pause button
19 Dial back button
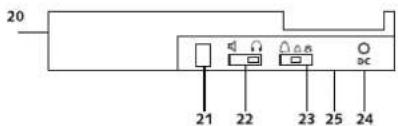
20 Volume Switch
21 Headset connection (optional)
22 Headset/Handsfree selection switch (optional)
23 Ring volume switch
24 Adapter input
25 Telephone line input
3 DISPLAY/LED
3.1 Standard display information
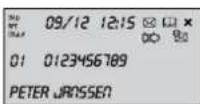
Display information Description
12:15 Time indication (24h format)
09/12 Date indication (day/month)
You received new messages in the telephone network mailbox
0123456189 Caller's telephone number
PETER JARSSEN Caller's name
NEW You received a new call
01 - The number of the call in the Call list, when shown together with 'CALL#' on the display
- Repeated call counter, when shown together with 'RPT' on the display
四
图
The battery is almost empty
Phone Book entry indication
m = 311
2 LED Indicators
LED
中
Description
Handsfree or Semi-Handsfree ON
Blinks once = new call received in the Call list.
Blinks twice = new voice mail message received.
ENGLISH
4 OPERATION
4.1 Setting the language of the display text
You can select the desired language as follows:
-
Press the Menu button, the standard language is displayed.
-
Use the Scroll switch to select the language.
-
Press the Menu button to confirm your setting and to go to the next setting (4.2 Setting the Date and Time) or press the Phone Book button to exit the menu.
4.2 Setting the Date and Time
When you have a subscription to the Caller ID service and your telephone provider sends the date and time together with the telephone number, the phone's clock will be set automatically. It is also possible to set the clock manually:
After setting the language, you will enter the setting of the Date and Time.
- Enter the day, the month and the time (24h format) by means of the alphanumeric buttons.
- Press the Menu button to confirm and to go the next setting (4.3. Setting the Dial Prefix) or press the Phone Book button to exit the menu.
4.3. Setting the Dial Prefix
When you dial out a telephone number from the Call list, the programmed prefix will be added in front of the telephone number. This function is useful when you have a PABX where you have to dial a prefix to take the external line. After setting the date and time, you will enter the setting of the Dial Prefix.
Enter the desired prefix by means of the numerical buttons (wrongly entered digits can be erased by means of the Erase button).
- Press the Menu button to confirm and to go to the next setting (4.4. Telephone reset) or press the Phone Book button to exit the menu.
4.4. Telephone reset
If you want to bring the telephone back in its initial status, it is possible to reset the telephone. When you reset your telephone, all stored information will be lost.
After setting the Dial Prefix, you will enter the Reset setting.
- Press the Erase button to confirm
- "CLEAR ALL" appears on the display.
- Press the Erase button to confirm or press the Phone Book button to leave the menu.
Warning : When you reset the unit all memory numbers and Call list numbers will be erased!
5 MAKING A PHONE CALL
There are 2 ways to make a phone call :
- Enter the telephone number. If needed, you can erase the last digits by pressing the Erase button. Pick up the handset or press the Handsfree button After 3 seconds, the phone number will be dialled automatically.
- Pick up the receiver or press the Handsfree button . Enter the telephone number.
Note: The call duration timer is shown on the 3rd line of the display [h:mm:ss].
5.1 Last number radial
The Fidelity 160 saves the 5 last dialled telephone numbers in the memory with indication of the call duration, the date and the time. Press the Redial button to scroll through the Redial memory. When the desired number appears on the display, there are two ways to call back:
-
Press the Call Back button . The unit will take the external line in handsfree mode and the desired number will be dialled automatically.
-
Pick up the receiver or press the Handsfree button . The number will be dialled automatically after 3 seconds.
Note: The Redial button can also be used as a Pause button while entering a telephone number! The letter 'P' appears on the display on the location where you have added a pause of 3 sec.
4 Topcom Fidelity 160
ENGLISH
5.2 Deactivating the microphone (mute)
It is possible to deactivate the microphone during a conversation by pressing the Erase/Mute button. You can now talk freely without the caller hearing you. MUTE appears on the display when the microphone is deactivated. Press the Erase/Mute button again if you want to resume your conversation.
5.3 Ringer volume
When you receive a phone call, the unit will ring. The ring volume can be adjusted by means of the Ring Volume switch at the back of the phone (Hi-Lo-, Off-).
5.4 Flash Key
Press the Flash button (R) to use certain services as 'Call Waiting' (if this service is provided by your telephone company); or to transfer phone calls when you are using a telephone exchange (PABX).
5.5 Headset operations (optional)
If the handset connection and switch are available at the back of the phone, you can choose whether you want to use a headset or the handsfree function.
-
When you use a headset, plug it into the headset connection and put the switch on. Press the Handsfree button to make a phone call.
-
When you use the handsfree function, put the switch on. Press the Handsfree button to make a phone call.
6 CALLER ID
6.1 General information
When you have a subscription to the Caller ID service from you telephone provider, the caller's phone number will appear on the display. Depending on the telephone network, the caller's name will also be shown on the display. If your telephone company doesn't send the name, but you saved the telephone number with the name in the Phone Book or in the direct/indirect memory, the programmed name will be shown on the display (name tagging function).
During an incoming call, the following information can appear on the display:
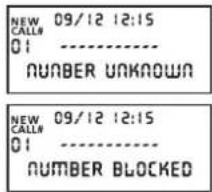
NUMBER UNKNOWN
You have a subscription to the Caller ID service but the caller's number is not available (for ex. international calls).

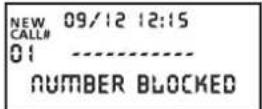
NUMBER BLOCKED
You have a subscription to the Caller ID service but the caller's number is a private number.
6.2 Call list
The Fidelity 160 has a Call List in which you can save at least 199 incoming telephone numbers with name. The phone numbers you have received more than once, will also be saved with indication of the repeat call counter (max 7). Every incoming number is saved in the Call List with indication of date and time.
In standby mode the number of new received and total calls is shown on the display, for ex.:
09/12 12:15
-03--10NEWTOTAL
- NEW 03 - You received 3 new calls in the Call List.
TOTAL 10 - There are 10 calls in total in the Call List: 3 new and 7 old (already checked) calls.
Topcom Fidelity 1605
ENGLISH
6.2.1 Scrolling through the Call List
You can scroll through the Call list by means of the Scroll switch (
When you have reached the beginning/end of the list, "TOP/END" appears on the display. Every time a new call comes in, "NEW" is shown on the display. The number of the incoming call is shown under the indication "CALL#" on the display. The highest number is the last call received. Number 1 is the oldest call.
6.2.2 Erasing numbers from the Call List
a) Erasing one number
- Select the call you wish to erase by means of the Scroll switch.
- Press the Erase button once. "CLEAR?" appears on the display.
- Press the Erase button once again to confirm or use the Scroll switch to scroll through the rest of the Call List.
b) Erasing the entire Call List
- Enter the Call List, press and hold the Erase button until "CLEAR ALL?" appears on the display.
- Press the Erase button once again to confirm or use the Scroll switch to scroll through the rest of the Call List.
6.2.3 Calling a number from the Call List
- Select the desired telephone number with the Scroll switch. ( )
- Press the Call Back button and the number will be dialled automatically in handsfree mode. Pick up the handset if you want to communicate over the handset.
6.3 Voice mail
!! This function only works if your telephone company sends the Voice Mail signals together with the Caller ID information !!!
When the Fidelity 160 has received a voice mail message, the Voice Mail symbol appears on the display. As soon as you have listened to the messages in the mailbox, the symbol disappears.
6.4 E-mail notification
!!! This function only works if your email service provider sends an email warning, by calling your number when there is a new email!!!
When you have received a new email message, your ISP will call your telephone using a special number. This call means you have received new email messages. If you program this number, with a special name, in the Phone Book, the Fidelity 160 will recognize this number and will show the following symbol on the display:
To set the ISP notification number:
- Press the Set button when the unit is in standby mode.
- Enter the telephone number from your ISP (the number that will call you when there is an email message).
- Press the Set button again.
- Press the numerical button '0' four times until '@' appears on the display.
- Press the Set button again to save the ISP phone number and the name '@' in the
Phone Book.
7 PHONE BOOK
You can store up to 99 names (max. 15 characters) and numbers (max. 22 digits) in the Phone Book of the Fidelity 160.
7.1. Use of the alphanumeric keypad
Use the alphanumeric keypad to enter text. To select a letter, press the corresponding button. For ex. if you press numerical button '5', the first character (J) will be shown on the display. Press multiple times if you want to select another character under this button.
Press button '2' twice to select the letter 'B'. If you want to select 'A' as well as 'B', press
button '2' once to select 'A', wait for 2 seconds until the cursor has moved to the next location and press then button '2'.
twice to select B
Wrongly entered characters can be erased by pressing the Erase button 2You can move the cursor by using the
Scroll switch. The character in front of the cursor will be erased.
ENGLISH
Available Characters
Press these buttons to get the following characters:
[1]Space.1?!,()
[2]ABC2AAAAAAE@BC
[3]DEF3EEE
[4]GH14/1111
[5]JKL5
[6]MNO6N0O0O
[7]PQRS7B\$
[8]TUV8UUU
[9] WXYZ9
[0] 0 + - @ & / % $£
门
[#]#
7.2 Adding a number to the Phone Book
- Press the Set button when the unit is in standby mode. "ENTER NUMBER" appears on the display.
- Enter the desired telephone number and press the Set button.
- Enter the name by means of the alphanumeric keypad and press the Set button to confirm.
7.3 Saving a number from the Call list in the Phone Book
- Select the desired call from the Call list with the Scroll switch. ( )
- Press the Set button. The number is shown on the display.
- Modify the number if necessary or press the Set button to confirm. The name is shown on the display (if sent by the Caller-ID).
- Modify or add the name if necessary and press the Set button to confirm. The number and name are saved in the Phone Book.
7.4 Selecting and calling a number from the Phone Book by name
- Press the Phone Book button.
- Enter one or more characters of the desired name by means of the alphanumeric keypad.
Search for the name in the Phone Book by using the Scroll switch . The first name that
begins with this character, appears on the display. When there is no name with this
character available, the next name of the alphabetical list will be shown on the display. - Use the Scroll switch to search for a name
- When the desired name is shown on the display, pick up the handset and the number will be dialled automatically.
7.5 Changing a number and name from the Phone Book
- Select the desired number from the Phone Book by name as mentioned in 7.4.
- Press the Set button. The number is shown on the display.
- Change the number if necessary or press the Set button to confirm. The name appears on the display.
- Change the name if necessary or press the Set button to confirm. The number and name
are saved in the Phone Book.
7.6 Erasing a number and name from the Phone Book
- Select the desired number from the Phone Book by name as mentioned in 7.4.
- Press the Erase button. "CLEAR?" appears on the display.
- Press the Erase button again to confirm or another button to exit the menu.
8 MEMORY NUMBERS
You can program 6 Direct (M1-M5 and Voice Mail) and 10 Indirect (0-9) memory numbers (number: max 22 digits, name: max. 15 characters). These memory numbers can be dialled : by pressing M1-M5 or VM (one button) or the Memory button 0...9 (two buttons).
Under the Voice Mail button VM you can program the Voice Mail number. If you press this
button, the unit goes to handsfree mode and the Voice Mail number will be dialled automatically.
8.1 Programming Direct and Indirect memory numbers
- Press the Set button in standby mode. "ENTER NUMBER" appears on the display.
- Enter the desired telephone number and press the Set button to confirm.
- Enter the desired name
- Press the Direct Memory button (M1-M5 or VM) to save it in the direct memory; or press the Memory button , followed by the Indirect Memory number (0-9) to save it in the indirect memory.
ENGLISH
8.2 Saving a number from the Call List as a Direct/Indirect Memory number
- Select the desired call with the Scroll switch
- Press the Set button. The number is shown on the display.
- Change the number if necessary or press the Set button to confirm.
The name appears on the display if it was sent together with the number. - Change the name if necessary.
- Press the desired Direct Memory button (M1-M5 or VM) if you wish to save the number in the direct memory; or press the Memory button followed by the Indirect Memory number (0-9) if you prefer to save the number in the indirect memory.
8.3 Calling a Direct/Indirect Memory number
- Press the desired Direct Memory button (M1-M5 or VM) or press the Memory button followed by the Indirect Memory number (0-9) to call a number.
- Pick up the handset or press the Handsfree button and the number will be dialled automatically.
Note: If the Voice Mall button (VM) is pressed, the number will be dialled automatically in handsfree mode.
8.4 Changing a number or name in the Direct/Indirect Memory
- Select the desired telephone number in the Direct/Indirect Memory.
- Press the Set button. The desired number appears on the display.
- Change the number if necessary or press the Set button to confirm. The name appears on the display.
- Change the name if necessary.
- Press the desired Direct Memory button (M1-M5 or VM) if you wish to save the number in the direct memory; or press the Memory button followed by the Indirect Memory number (0-9) if you prefer to save the number in the indirect memory.
Note: The Voice Mail button VM can not be changed, only overwritten !! (see 8.1).
8.5 Erasing a number or name from the Direct/Indirect Memory
a) Erasing a direct memory number (M1-M5 or VM)
Press the Set button followed by the desired Memory button M1-M5 or VM.
b) Erasing an indirect memory number (0-9)
Press the Set button followed by the Memory button and the corresponding memory number 0-9.
9 WARRANTY
This equipment comes with a 24-month warranty. The warranty will be honoured on presentation of the original bill or receipt, provided the date of purchase and the unit type are indicated.
- During the time of the warranty Topcom will repair free of charge any defects caused by material or manufacturing faults. Topcom will at its own discretion fulfil its warranty obligations by either repairing or exchanging the faulty equipment.
Any warranty claims will be invalidated as a result of intervention by the buyer or unqualified third parties.
- Damage caused by inexpert treatment or operation, and damage resulting from the use of non-original parts or accessories not recommended by Topcom is not covered by the warranty.
The warranty does not cover damage caused by outside factors, such as lightning, water and fire, nor does it apply if the unit numbers on the equipment have been changed, removed or rendered illegible.
Note: Please do not forget to enclose your receipt if you return the equipment.
TECHNICAL DATA
Dialling options:DTMF(tone)
Batteries: 4 x 1.2V, AA
Ambient temperature: +5 °C to +45 °C
Permitted relative air humidity: 25 to 85%
Power supply base adapter: 220/230V, 50 Hz
8 Topcom Fidelity 160
1 INSTALLATIE
[2] ABC 2 A A A A A A E @ B C
[3]DEF3EEE
[4]GH14/1111
[5]JKL5
[6]MNO6NooOo
[7]PQRS7BS
[8] TUV8UUU
[9] WXYZ9
[0] 0+-@&/%$£
[
[#] #
Batteries: 4 x 1.2V, AA
non-rechargeables
[2] ABC 2 AAA AAE @ BC
[3]DEF3EEEE
[4]GH14/111
[5]JKL5
[6] MNO6N0O0O0
[7]PQRS7BS
[T]TUV8UUU
[9] WXYZ9
[0] 0+--@&/%/\(£
[ ]
[#] #
NUMBER UNKNOWN (AΓNΩΣTOE APIOMOΣ)
EXEET Eyyapei ayn umpeia avaywpianc knaeew, alaa 1ev iival diaeoioc o apiouvtoc (n.x. yia dieveic knaoeic).
NUMBER BLOCKED (ANOKPYHAPIOMOY)
ExTe Eyypaepi Otnv unnpoia avaywpioc knoeov, aaaa o apioo tou kaolouvtoc ivai anoppntos.
6.2 AioTa knaeewv
To Fidelity 160 exi ma iota knaeov stnvoia npoeite va anoekoeetouaxotov 199
Eepouevoc apuouc nlepwou paiz e ovopata.
Oi aepoiovou ou Exe Taepoc ano poe, enioan oonkeovotai eevEEN tou eptn enavaepoynuic max 7. Kae iepxoevc opuoc anohtkueetai otia knoewv eevoe nnc npounviac kwaoc.
Topcom Fidelity 160 71
ENHNIKA
Tn aeitoupyia avauovicepaivcetai oyno oovn oipuoc twv vewkaiTwv ouvoikw knaeew, n.x.
-NEW 03 -Adbetae 3 vesc knaoeic otn aiota knaoeov.
- TOTAL 10 - Ynapxouv ouvoiaka 10 knaeic otai Kaeew:
3 vεεc kal 7 naλaiεc (hδη ελεγμενεc) kλησεις.
6.2.1 Metaxivnon eo aon Aia T Knaewv
Mnopeite va metakivntheite oan thiaota knaoeov e to diakottn metakivnonc
Otau aoe tyn apxh/teao ts nac, oioac, oyn oboyn epaivcetai to nuva "TOP/END" (Apxh/teao).
Kaθε φρα που λαμβανετε μι αν εληση, στην οθονη εμφανίζεται το μήνυμα “NEW” (Nεα).
O apiouo ts cioepxoevnc kionc eapavzetai katw ano thv evdsEg "CALL#" otny oboyn.
O apiouoc otnykopn evai n teauia knon nou abaate.
O apiOoC 1 eivn naaiotepn kIhnon.
6.2.2 Aiaypaopn apiouv ano tn aiota knaeswv
a) Dyaepn Evoc apuou
-EnleEte nV kAnon nou 0eIeTe va diaypaes e to diaKontn metakivnonc.
- NIEOTe μa qopaTo nAnkpto diaypaoh . Tyn oov npavicietai To mnuja "CLEAR?"
(△iaypaqh)
-PIeTE KAI nALI To nAHTPO DIAypaHc YEA EINBEEaIOWn HxpoaONoHote To dAOKOTN MEtakivnonyia va tAKivthe Meo aOnv unOaOnn AIOTa kAnoeWv.
β)△aypaqnoaknpns ntiag knoewv
-Mneite otn liota knoewv, note kal kpatnote nieoEvTo nAnktpo diaypapcpe
εμφανισει στην οθόνη το μήνυμα “CLEAR ALL?”
- Ieote kal naI to nAnktpo diaypaphc y enBebaiown nponpoonoinote to dakott
μetakivnnc yia va μetakivnθeite meo atyn untoaon nlaota knaeeov.
6.2.3 KAn apiOou ano Tn aiTa KaNaewv
- Eπλεξε to ειθμητο apiθμο με to διακόπη μετακίνησς
- PiaTe To nAnKtpo eniToPpOnc kAnOnc yVa KAnThei autouata o apioos e aeitoupyia aoiktns
ouvoiaac.Eav 0eEte va uhoTe anoTo akouotiko KepaIc, oNKwTe to aouotiko.
6.3 Tnλεφωνπτις !!!
H Aetoupyia autn ioxue mvo eav n etaipia npoxic nepovikuv unpeiwv aoc otelve onmuata nepovwni qci ie ts nnpopopiecs avaywipions knaoev !!!
OtauFidelity 160 abetaeva mnuu maepwnt, oynovn eapavzetai to oumbol nepwnt I
Molacakouotae ta unvuaata tou nAeawntto ouBoLoI eApavicetai.
6.4 EIsooinan nAektpovikou tauxpoeiou
H Aetoupya autn 1oxe i movo ev n etaipia npoxns unnpoeivn ktpovkou taupopoeiou ca
otalevi iEidonoiaeic nEeKtpovikou toxubpoeiou, kaiwvtac tov apioo oac otav exte veo
it's nice talking to you.
visit our website
www.topcom.net