USER MANUAL SDBS 2400 A1 SILVERCREST
text_image
PDF ONLINE
www.lidl-service.com

natural_image
White and black steam iron with visible branding and mounting base (no text or symbols on the device itself)
STEAM GENERATOR IRON / DAMPFBÜGELSTATION / CENTRALE VAPEUR SDBSB 3000 A1
GB IE
STEAM GENERATOR IRON
Operating instructions
FR BE
CENTRALE VAPEUR
Mode d'emploi
CZ
NAPAŘOVACÍ ŽEHLIČKA S PARNÍ STANICÍ
Návod k obsluze
SK
PARNÁ ŽEHLIACA STANICA
Návod na obsluhu
DK
STRYGEJERN MED DAMPSTATION
PARNA LIKALNA POSTAJA
Navodila za uporabo
GB IE
Before reading, unfold the page containing the illustrations and familiarise yourself with all functions of the device.
DE AT CH
GB/IE Operating instructions Page 1
Information about these operating instructions....2
Copyright 2
Proper use....2
Warnings 2
Safety 3
Technical specifications ....7
Appliance description 8
Symbols on the appliance 8
Package contents and transport inspection 9
Setting up and connecting 9
Requirements for the set-up location 9
Electrical connection 9
Handling and operation 10
Before first use 10
Filling the water tank....11
Ironing without steam 12
Steam ironing 14
Vertical steam ironing 15
Topping up the water 16
Automatic switch-off 17
Cleaning and maintenance....17
Cleaning the appliance 17
Descaling the appliance 18
Descaling the soleplate 19
Troubleshooting 20
Transport....21
Storage 22
Disposal 23
Disposal of the device 23
Disposal of the packaging 23
Congratulations on the purchase of your new device.
You have selected a high-quality product. The operating instructions are part of this product. They contain important information about safety, usage and disposal. Before using the product, please familiarise yourself with all operating and safety instructions. Use the product only as described and for the specified range of applications. Please also pass these operating instructions on to any future owner.
Copyright
This documentation is protected by copyright.
Any copying or reproduction, including in the form of extracts, or any reproduction of images (even in a modified state), is permitted only with the written authorisation of the manufacturer.
Proper use
This appliance is intended for the dry ironing or steam ironing of all types of clothing, curtains and fabrics (including hanging). The appliance is not intended for any other purpose, nor for use beyond the scope described. The appliance is not intended for use in commercial or industrial environments.
Claims of any kind for damage resulting from misuse, incompetent repairs, unauthorised modification or the use of unauthorised replacement parts will not be accepted. The operator bears sole liability.
Warnings
The following warnings are used in these operating instructions:

DANGER
A warning notice at this hazard level indicates an imminently hazardous situation.
If the hazardous situation is not avoided, it could result in death or serious physical injury.
▶ Follow the instructions in this warning to prevent a fatality or serious personal injury.

WARNING
A warning at this hazard level indicates a potentially hazardous situation.
Failure to avoid this hazardous situation could result in injuries.
▶ Follow the instructions in this warning notice to prevent injuries.
CAUTION
A warning at this hazard level indicates a risk of property damage.
Failure to avoid this situation could result in property damage.
▶ Follow the instructions on this warning label to prevent property damage.
NOTE
▶ A note provides additional information that makes handling the appliance easier for you.
Safety
This section contains important safety instructions for handling the device.
This device complies with the statutory safety regulations. Improper use may result in personal injury and property damage.
Basic safety instructions
To ensure safe operation of the appliance, follow the safety guidelines set out below:
■ The appliance may not be used if it has fallen down, if it shows visible damage or is leaking.
■ To prevent accidents, have defective plugs and/or power cables replaced immediately by an authorised specialist, our Customer Service or a similarly qualified person.
This appliance may be used by children aged 8 years old and over and by persons with reduced physical, sensory or mental capacity or lack of experience and/or knowledge if they are supervised, or have been instructed in the safe use of the appliance and have understood the potential risks. Do not allow children to play with the appliance. Cleaning and user maintenance may not be carried out by children unless they are supervised.
■ Do not allow children to play with the appliance.
■ All repairs to the appliance must be carried out by authorised specialist companies or by the Customer Service department. Improper repairs may put the user at risk. They will also invalidate any warranty claims.
■ Repairs to the device during the warranty period may only be carried out by a customer service department authorised by the manufacturer. Otherwise, no warranty claims will be held for any subsequent damages.
■ Defective components must always be replaced with original replacement parts. Compliance with safety requirements can only be guaranteed if original replacement parts are used.
■ Do not place any objects on the appliance, especially not on the connecting hose between the base station and the iron.
■ Do not operate or place the appliance close to an open flame (e.g. candles).

RISK OF ELECTRICAL SHOCK!
The appliance should only be connected to correctly installed and earthed mains power sockets. Ensure that the rating for your local power supply corresponds with the details on the rating plate of the appliance.
- Arrange for customer service to repair or replace connecting cables and/or appliances that are not functioning properly or have been damaged.
▶ Stop using the appliance if the anti-kink protection on the power cable is damaged!
The steam iron and its connecting hose must be kept out of reach of children younger than eight years old while switched on or cooling down.
▶ Never immerse the appliance in water. Wipe it only with a slightly damp cloth.
▶ Do not expose the appliance to rain, and never use it in a humid or wet environment.
▶ Always hold the plug when handling the power cable and never pull on the cable itself.
▶ Never touch the power cable or the plug with wet hands.
▶ Do not place the appliance itself or furniture etc. on the power cable and ensure that it is not jammed.
▶ Ensure that the power cable never becomes wet or moist during operation.
- Do not open the appliance housing or attempt to repair or modify the appliance. Opening the housing and/or making unauthorised modifications increases the risk of a potentially fatal electric shock and will invalidate the warranty.

RISK OF ELECTRICAL SHOCK!
- Protect the device from water droplets or spray. Do not place any vessels containing liquid (e.g. flower vases) on or near the appliance.
▶ Always pull the plug out of the power socket after completing ironing and before cleaning the appliance.
▶ Always pull the plug out of the power socket before filling the water tank with water.

WARNING! RISK OF INJURY!
▶ Always put the iron on the stand of the base station. Pull the plug from the mains socket if you take a break from ironing.
- Pressurised filling, descaling, rinsing or test openings must not be opened during use.

RISK OF SCALDING OR BURNING!
Caution, hot surfaces!
▶ While the iron is turned on and for a few minutes after the power is turned off, the soleplate remains very hot. Never touch the soleplate!
▶ When the steam iron is hot, hold it only by the handle.
▶ Children should be supervised to ensure that they do not play with the appliance.
▶ Do not aim the steam jet at people or animals.
▶ Never iron or steam clothes or other fabrics while they are being worn or held by others.
CAUTION! PROPERTY DAMAGE!
▶ Never leave the steam iron unattended while it is connected to the mains power supply.
▶ Never use water containing carbon dioxide in the appliance.
▶ Do not operate the appliance without water, otherwise the pump could burn out.
▶ Ensure that neither the power cable or the connection hose come into contact with the hot soleplate.
- Do not scratch the soleplate. Avoid contact between the soleplate and metal parts such as buttons or zips.
▶ Operate the steam iron and the base station only on a stable, flat and level surface.
NOTE
▶ No user action is required to switch the product between 50 and 60 Hz. The product switches automatically to either 50 or 60 Hz.
Technical specifications
| Steam iron station |
| Power supply 220-240 V | ~ (AC), 50-60 Hz |
| Power consumption 2520-3000 W | |
| Max. fill level of the water tank 1.8 l | |
| Steam production 📋 | (Max.) approx. 140 g/min. ± 15% |
| Heating time (steam ironing) approx. 3 minutes |
| Boiler pressure 7 bar | |
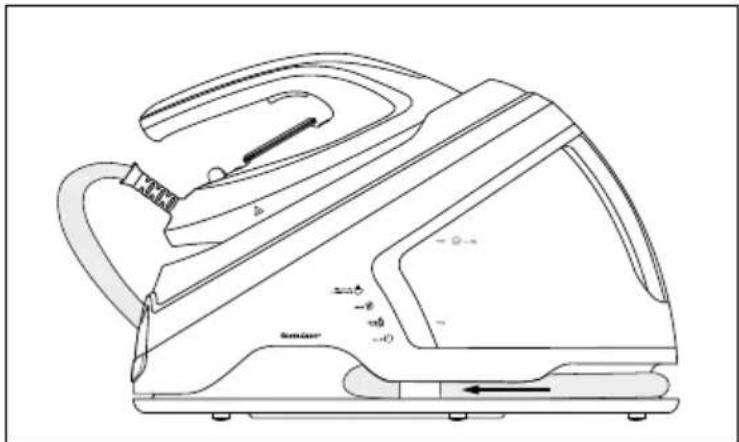
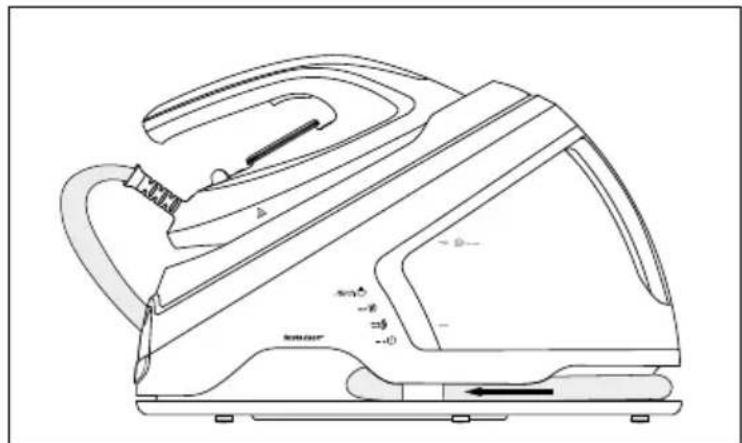
Appliance description
(See fold-out page for illustrations)
① Heat-up indicator lamp
② Steam button
③ Temperature control
4 Lock switch
5 Connecting hose
6 Stand
⑦ Steam chamber closure (underside)
8 Soleplate
9 Filler opening
10 Water tank
⑪ Cleaning brush
12 Water tank control lamp
13 On/Off button
14 On/Off control lamp
⑮ clean clean control lamp
16 Steam control lamp: high
⑰ Steam control lamp: medium
18 Steam control lamp: low
19 + button (increase steam intensity)
20 — button (decrease steam intensity)
Symbols on the appliance
| Symbol Meaning | |
 | Continuous steam volume (140 g/min) |
 | Power output (3000 W) |
 | Ceramic-coated soleplate |
 | Automatic switch-off |
Package contents and transport inspection
The appliance is supplied with the following components as a standard:
- Steam iron station
- Cleaning brush
- Velcro tape (for fastening the power cable)
- Operating instructions
NOTE
▶ Check the package for completeness and signs of visible damage.
▶ If the delivery is incomplete or damage has occurred as a result of defective packaging or during transport, contact the Service hotline (see section Service).
Remove all parts of the appliance and the operating instructions from the box.
◆ Removal packaging material and protective film.

DANGER
▶ Do not allow children to play with packaging materials. There is a risk of suffocation.
Setting up and connecting
Requirements for the set-up location
The work service on which you place the base station must be stable, flat and heat-resistant.
Electrical connection
Insert the mains cable plug into a properly connected and earthed mains power socket supplying the voltage specified in the section Technical data.
Handling and operation
This section provides you with important information on handling and using the appliance.
Before first use
NOTE
▶ Note that you must release the transport lock on the appliance before using it for the first time (see also section Transport). To do so, move the lock switch ④ on the iron in the direction of the open lock symbol ⚙. The iron can now be removed from the stand ⑥.
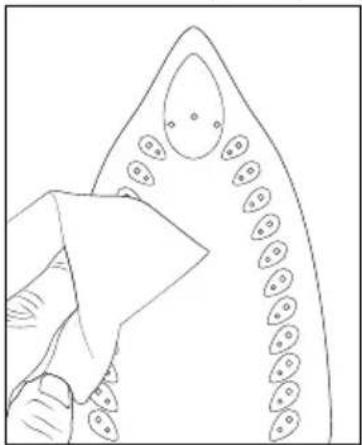
◆ Clean the soleplate⑧ using a damp cloth (see fig. 1).
natural_image
Line drawing of a hand holding a triangular object with circular elements, no text or symbols present
Fig. 1
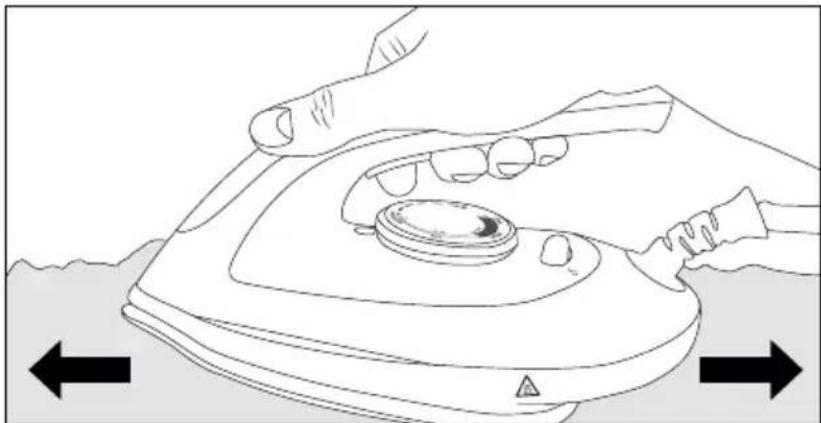
To remove any production residues, iron several times over an old, clean cloth (see fig. 2).

natural_image
Line drawing of hands using a power iron to press down a circular component, with directional arrows indicating movement (no text or symbols)
Fig. 2
Filling the water tank
NOTE
Use only tap water or distilled water.
If the mains water in your location is rated as hard, it is recommended that you mix the mains water with some distilled water. Otherwise, limescale deposits can adversely affect the appliance functions.
Mix tap water with distilled water as described in the table below:
| Water hardness | Ratio of distilled water to tap water |
| very soft/soft - | |
| medium 1:1 | |
| hard 2:1 | |
| very hard 3:1 | |
Ask your local water utility about the water hardness in your area. Do not add water with any additives (such as starch, perfume, softeners or other chemicals) to the water tank ⑩. These could damage the appliance as residues can form in the steam chamber. The residues could contaminate the clothing if they come out of the steam outlets.
1) Remove the plug from the mains power socket if it is plugged in.
2) Pull the water tank ⑩ by the handle out of the base station (see fig. 3).

text_image
Technical diagram showing a mechanical component with labeled parts and an arrow indicating direction, including 'SINSE CRUZ' annotation.
Fig. 3
3) Fill the water tank ⑩ through the filler opening ⑨ up to at least the MIN marking with water. Do not fill above the MAX marking in the water tank ⑩ (see fig. 4).
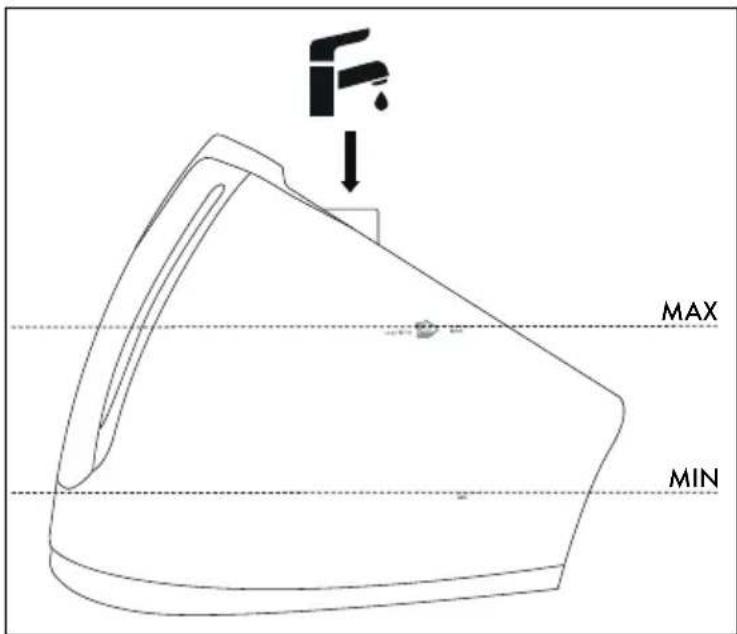
text_image
F
MAX
MIN
Fig. 4
4) Push the water tank ⑩ back into the base station until it clicks audibly into place.
NOTE
▶ Do not tip or swing the steam iron station when the water tank is full. Otherwise the water can flow out of the filler opening 9.
Ironing without steam
CAUTION! PROPERTY DAMAGE!
▶ Check the care instructions on the labels in garments to see if they are suitable for being ironed and at which temperature setting.
If the clothing care instructions forbid ironing, the garment may not be ironed. Ignoring this warning could lead to permanent damage to the clothing item.
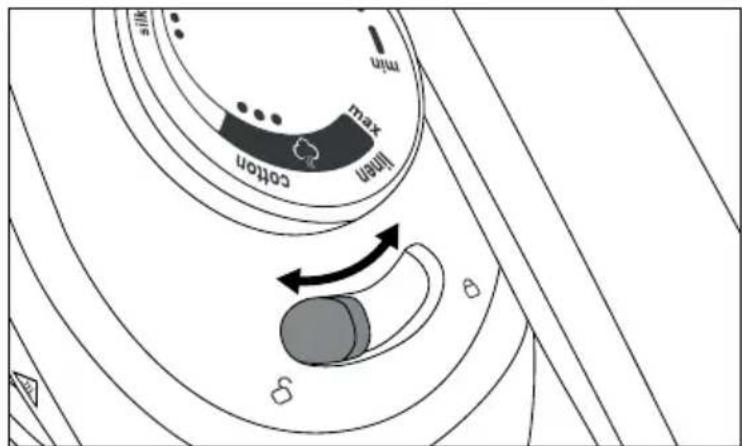
NOTE
Always set the temperature control ③ to the lowest level min before switching the appliance on. The symbols on the temperature control ③ correspond to the following settings (see also fig. 5):
| Temperature control symbol 3 | Material | Temperature (approx.) |
| Synthetics | 70-120°C |
| Silk 100-1 | 60°C |
| Cotton/linen 140-210°C |
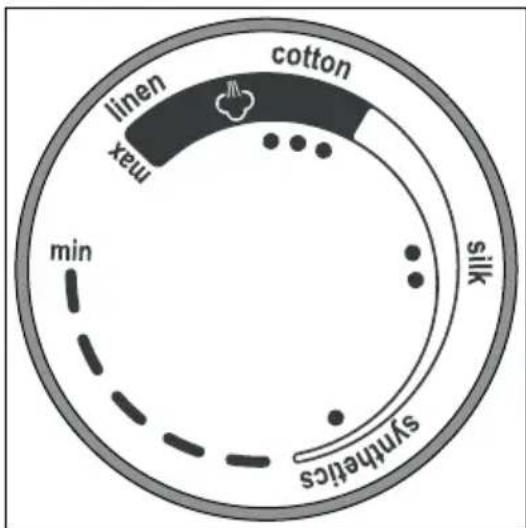
text_image
cotton
linen
max
min
silk
synthetics
Fig. 5
1) Insert the plug into a mains power socket.
2) Press the On/Off button 13 to switch on the appliance. The On/Off control lamp 14 lights up blue and the steam control lamp low 18 flashes blue (see fig. 6).
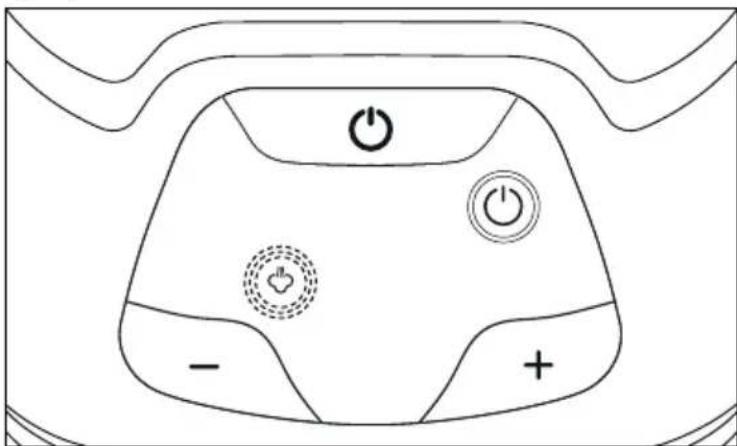
text_image
Diagram of a device control panel with power and minus signs, featuring icons for battery, switch, and display.
Fig. 6
3) Turn the temperature control ③ to set the required ironing temperature (see fig. 7).
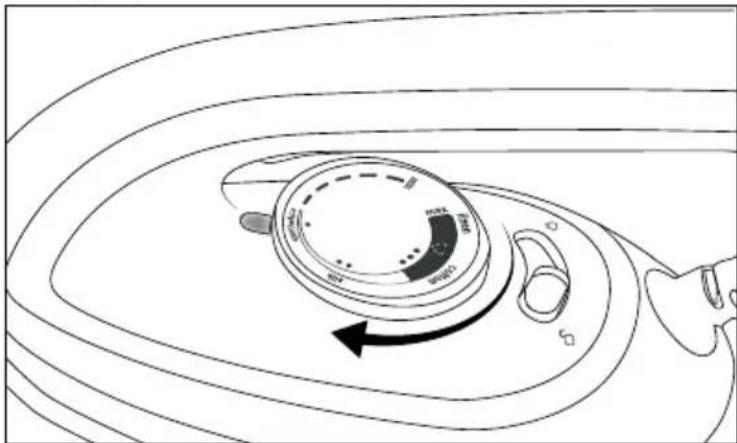
natural_image
Diagram of a rotary dial with curved arrows indicating rotation, no text or symbols present
Fig. 7
4) The heat-up indicator lamp ① lights up during heating. As soon as the heat-up indicator lamp ① goes out, the set temperature has been reached and you can start ironing.
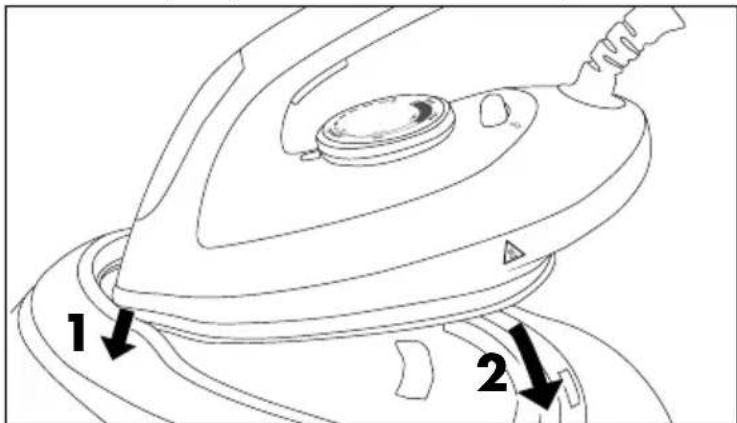
5) After ironing, place the iron on the stand ⑥ of the base station. First guide the tip of the iron under the edge at the front of the stand ⑥ and then place the iron completely onto the stand ⑥ (see fig. 8).
text_image
1
2
Fig. 8
6) Set the temperature control ③ to min.
7) Press the On/Off button 13 for about 2 seconds to switch on the appliance. The On/Off control lamp 14 and the steam control lamp low 18 go out.
8) Pull the plug out of the mains socket.
Steam ironing
1) Press the On/Off button ⑬ to switch on the appliance. The On/Off control lamp ⑭ lights up blue and the steam control lamp low ⑮ flashes blue.
2) Turn the temperature control ③ to the desired ironing temperature. The temperature control ③ must be set within the ●●● range to produce steam.
3) The heat-up indicator lamp ① lights up during heating. As soon as the set temperature has been reached, the heat-up indicator lamp ① goes out.
4) Press the + 19 or the - button 20 to set the desired steam strength:
- If the steam control lamp high ⑯ lights up, a large quantity of steam is produced.
- If the steam control lamp medium ⑰ lights up, a medium quantity of steam is produced.
- If the steam control lamp low 18 lights up, only a small quantity of steam is produced.
As soon as the steam control lamp high ⑯/medium ⑰/low ⑱ (depending on the setting) lights up constantly, you can start steam ironing.
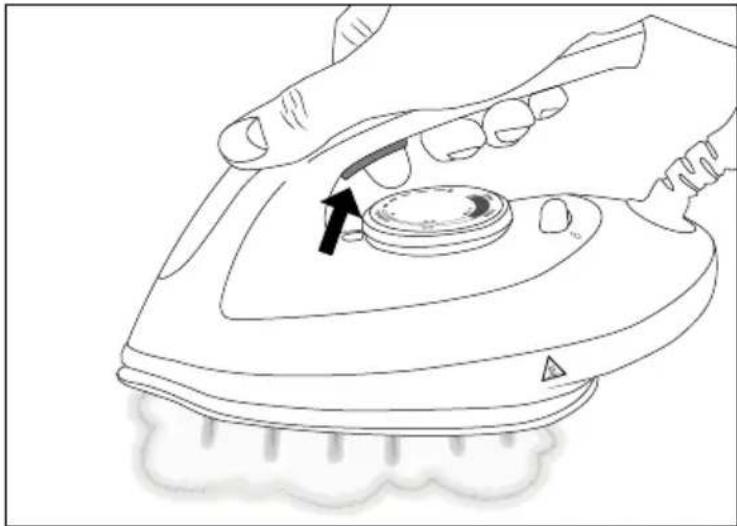
5) While ironing, press and hold the steam button ② to continuously spray steam from the soleplate ⑧ onto the items being ironed (see fig. 9).
6) Release the steam button ② to stop producing steam.
natural_image
Line drawing of a hand using a power iron to press a circular component, with an arrow indicating the press direction (no text or symbols present)
Fig. 9
NOTE
▶ When you press the steam button ②, it can take a few seconds until steam comes out of the soleplate ⑧.
7) After ironing, place the iron on the stand ⑥ of the base station and set the temperature control ③ to min.
8) Press the On/Off button 13 for about 2 seconds to switch on the appliance. The On/Off control lamp 14 and the steam control lamp high 16/medium 17/low 18 (depending on the setting) go out.
9) Pull the plug out of the mains socket.
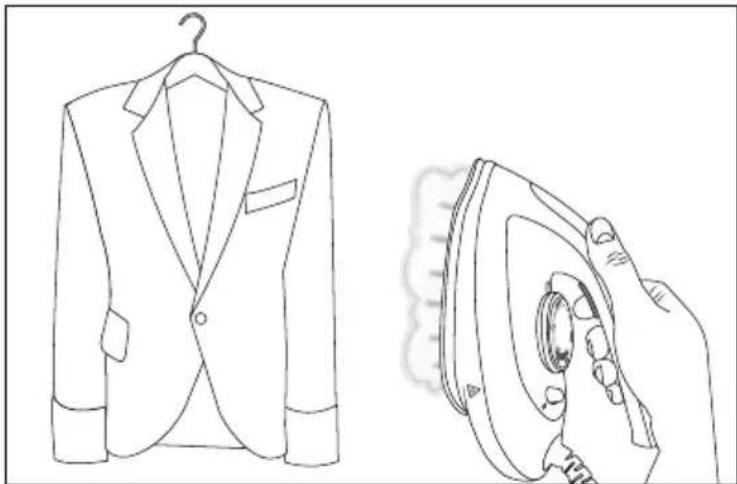
Vertical steam ironing
1) Hang the piece of fabric you want to iron on a clothes hanger hanging from a heat-resistant surface.
2) Press the On/Off button ⑬ to switch on the appliance. The On/Off control lamp ⑭ lights up blue and the steam control lamp low ⑱ flashes blue.
3) Turn the temperature control ③ to the desired ironing temperature. The temperature control ③ must be set within the ●●● range to produce steam. Wait until the heat-up indicator lamp ① goes out.
4) Press the +⑲ or the - button ⑳ to set the desired steam strength:
- If the steam control lamp high ⑯ lights up, a large quantity of steam is produced.
- If the steam control lamp medium ⑰ lights up, a medium quantity of steam is produced.
- If the steam control lamp low ⑱ lights up, only a small quantity of steam is produced.
As soon as the steam control lamp high 16/medium 17/low 18 (depending on the setting) lights up constantly, you can start steam ironing.
5) Hold the steam iron in a vertical position and press the steam button ② (see fig. 10).
natural_image
Line drawing of a suit jacket and its iron, showing front and side views (no text or symbols)
Fig. 10
6) Touch the fabric lightly with the soleplate 8 and steam it to remove creases.
7) Release the steam button ② to stop producing steam.
Topping up the water
NOTE
As soon as the water in the water tank ⑩ is too low, the water tank control lamp ⑫ lights up red.
The water tank control lamp 12 goes out as soon as there is enough water in the water tank 10.
1) Put the iron down on the stand ⑥ on the base station.
2) Refill the water as described in the section Filling the water tank.
Automatic switch-off
The appliance is equipped with an automatic switch-off for safety reasons and to save energy. This causes the appliance to automatically switch to standby mode if it is not used for 10 minutes.
If the appliance is not used for 10 minutes, you will hear a beep and the On/Off control lamp ⑭ flashes blue. Al of the other control lamps go out. The appliance stops heating up automatically.
To deactivate the automatic switch-off, press the On/Off button ^13 . The On/Off control lamp ^14 lights up blue and the steam control lamp low ^18 flashes blue. The appliance heats up again.
NOTE
The automatic switch-off is not intended as a substitute for removing the plug from the mains power! It is merely intended to reduce the fire hazard if you forget to switch off the appliance.
Cleaning and maintenance
WARNING!
▶ Always pull out the plug before cleaning the appliance.
▶ Allow the appliance to cool down completely if necessary.
▶ Never immerse the appliance in water to clean it.
CAUTION! PROPERTY DAMAGE!
▶ To avoid irreparable damage to the device, ensure that no moisture can penetrate the device during cleaning.
▶ Do not use aggressive scouring cleaners or solvents, or a wire brush or other abrasive objects to clean the surfaces.
Cleaning the appliance
◆ Clean the iron surfaces and the base station using only a soft, slightly moist cloth.
- Clean the soleplate ^8 with a soft, damp cloth. Make sure that the soleplate ^8 is not scratched.
Put the iron down on the stand⑥ and pull the water tank ⑩ out of the base station. Pour the residual water in the water tank ⑩ into a basin.
◆ The appliance must be completely dry before further use.
Descaling the appliance

WARNING!
▶ Never open the appliance's steam chamber during use or when the appliance is switched on. There is a risk of injury!
NOTE
After a steam output time of approx. 100 minutes, clean control lamp ⑮ on the appliance lights up. Descale the appliance as soon as the clean control lamp ⑮ lights up.
▶ Use only distilled water to descale the appliance.
1) Remove the plug from the power socket and ensure that the appliance has cooled down completely.
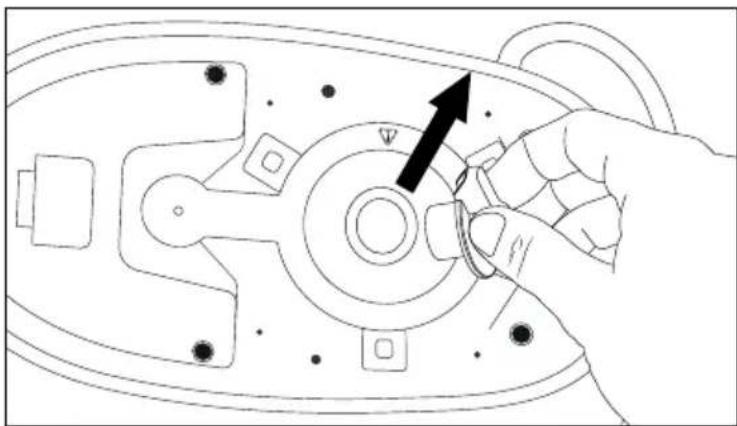
2) Pull the water tank ⑩ out of the base station. Turn over the base station so that the underside is facing upwards.
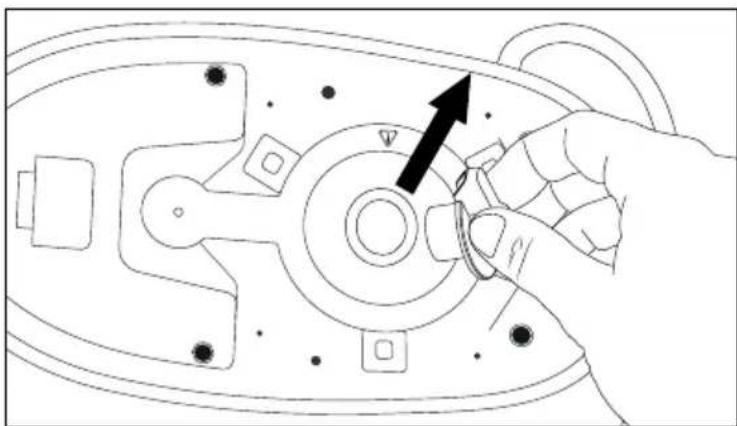
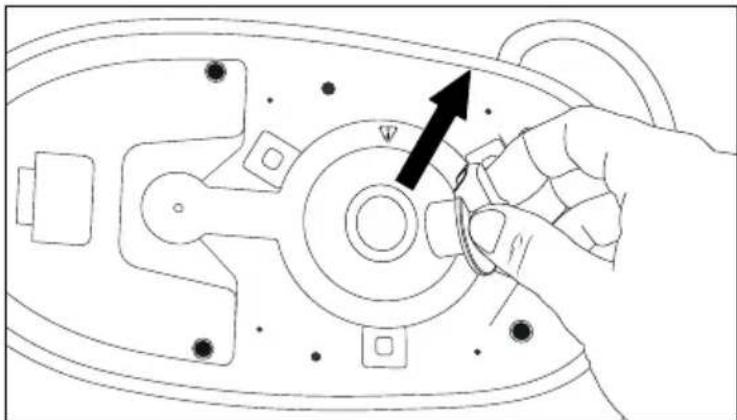
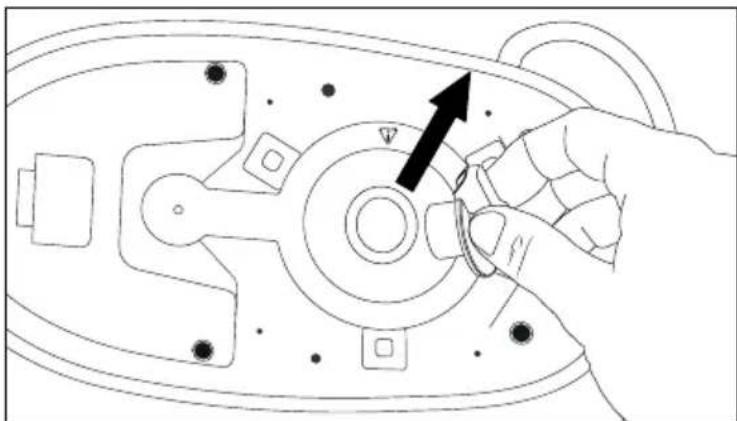
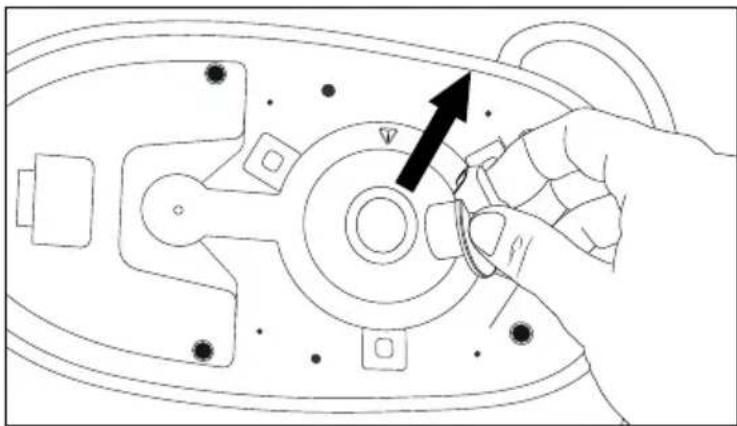
3) Unscrew the steam chamber closure ⑦ anticlockwise and pull the steam chamber closure ⑦ out of the opening (see fig. 11 and fig. 12).
natural_image
Top-down schematic of a mechanical or electrical component with no visible text, numbers, or symbols.
Fig. 11

natural_image
Line drawing of a hand adjusting a mechanical component with an arrow indicating direction (no text or symbols present)
Fig. 12
4) Add around 500 ml of distilled water into the steam chamber.
5) Swing the base station slightly back and forth to loosen limescale deposits in the steam chamber.
6) Empty the water from the steam chamber into the sink.
7) Screw in the steam chamber closure ⑦ clockwise.
8) Turn over the base station and push the water tank 10 back into the base station until it clicks audibly into place.
NOTE
The appliance automatically detects the descaling process. After descaling, the clean control lamp ⑮ no longer lights up the next time the appliance is used.
Descaling the soleplate
NOTE
▶ Limescale deposits can form in the openings of the soleplate ^8 of the iron over time. Remove this limescale as soon as the clean control lamp ^15 lights up.
1) Remove the plug from the power socket and ensure that the appliance has cooled down completely.
2) Use the supplied cleaning brush ⑪ to remove the limescale deposits in the openings of the soleplate ⑧ (see fig. 13).
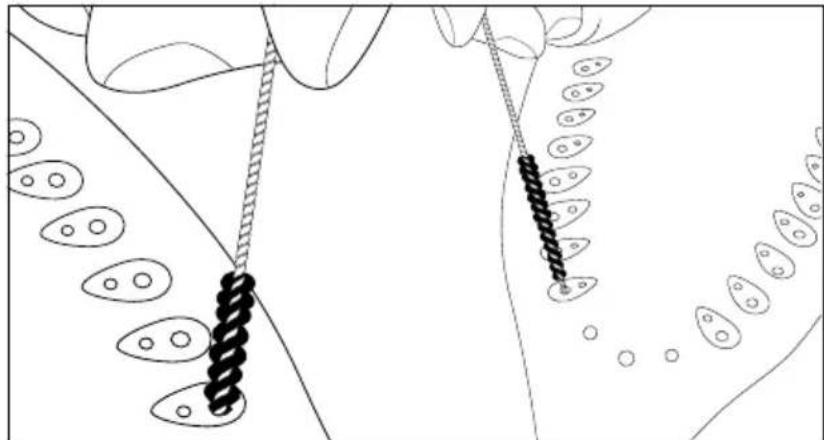
natural_image
Illustration of hands manipulating a chain with chains attached to a surface, surrounded by oval shapes (no text or symbols)
Fig. 13
3) Insert the plug into a mains power socket and switch on the appliance. Wait until the heat-up indicator lamp ① goes out.
4) Hold the steam iron horizontally over a bowl or the sink. Press the steam button ② for about 1 minute to remove limescale residue from the soleplate ⑧
5) Press and hold the On/Off button 13 for approx. 2 seconds to switch off the appliance. Allow the appliance to cool down completely.
6) Wipe off the soleplate ⑧ afterwards with a soft, damp cloth.
Troubleshooting
| Fault Possible cause Remedy | |
| The appliance is not working. | Fault with the power supply. Check | whether the plug is firmly inserted into the power socket. |
| The appliance is not switched on. | Switch on the appliance using the On/Off button 13. |
| The appliance produces no/too little steam. | There is not enough water in the water tank 10. | Fill the water tank with water 10. |
| The appliance is not sufficiently hot. | Wait until the heat-up indicator lamp 1 goes out. |
| The temperature control 3 is set in the range ● to ● ●. | Set a temperature suitable for steam ironing (setting range ● ● ●). |
| The steam unit has not been used for a long time or is being used for the first time. | Hold the steam button 2 down a little longer. The steam takes a little time until it comes out of the sole of the iron 8. |
| Steam generation is impaired by limescale deposits in the appliance (steam chamber/sole-plate 8). | Descale the appliance (see section Descaling the appliance/ Descaling the soleplate). |
| Water drips out of the soleplate 8. | If steam ironing is paused briefly, the cooling steam condenses in the connecting hose 5. This can lead to drips. | This is normal. Hold the iron over a collecting cloth or container and press the steam button 2. Steam will discharge from the sole of the iron 8 instead of water after a few seconds. Then you can continue ironing. |
| The set temperature is too low for steam ironing. | Set a temperature suitable for steam ironing (setting range ● ● ●). |
| Wet patches occur on the items being ironed. | Such areas can be caused by steam condensing on the ironing board. | Wipe the wetness from the ironing board and iron the wet patches dry (without steam). |
NOTE
▶ If you are unable to resolve the problem by taking any of the above-mentioned steps, please contact the service department (see section Service).
Transport
CAUTION! PROPERTY DAMAGE!
▶ Always use the lock switch④ when transporting the appliance. This prevents the iron from slipping off the stand ⑥ and falling down.
When transporting the appliance, always hold it by the handle on the iron, never by the handle on the water tank ⑩. The water tank ⑩ could detach from the base station and the appliance could fall down and be damaged.
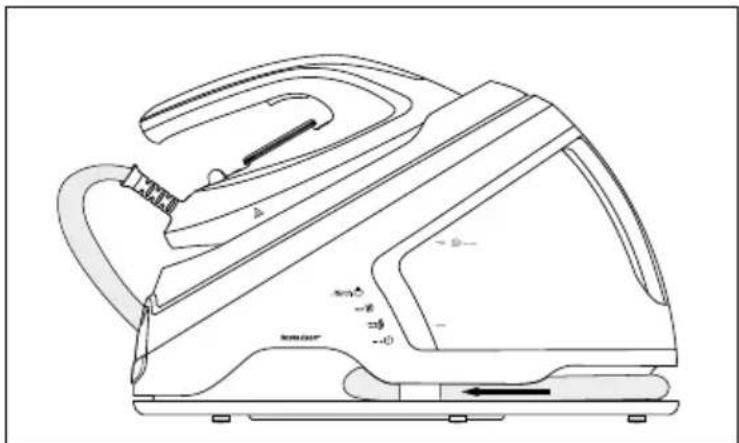
Before transporting the appliance, move the lock switch ④ on the iron in the direction of the open lock symbol (see fig. 14). The iron is firmly locked onto the stand ⑥ and cannot fall down.
♦ Push the lock switch ^4 in the direction of the open lock symbol ☐ to release the lock (see fig. 14).
text_image
min
max
knot
knot
knot
Fig. 14
Storage
- Clean the appliance as described in the section Cleaning the appliance.
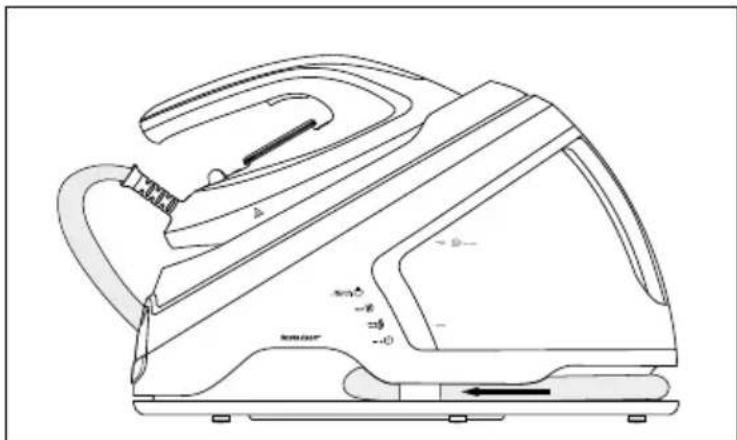
◆ Fold the connecting hose⑤ in the middle and push it into the recess in the base station (see fig. 15 and fig. 16).

natural_image
Line drawing of a steam iron with labeled parts and motion arrows indicating airflow (no text or symbols beyond basic labels)
Fig. 15

natural_image
Line drawing of a steam iron with handle and side panel, no text or symbols present
Fig. 16
◆ Wind up the power cable and fasten it with the Velcro tape supplied.
◆ Store the appliance in a dry and clean location.
Disposal
Disposal of the device
Never dispose of the appliance in your normal domestic waste. This product is subject to the provisions of the European WEEE (Waste Electrical and Electronic Equipment) Directive 2012/19/EU.
Dispose of the appliance via an approved disposal company or your municipal waste facility. Please comply with all applicable regulations. Please contact your waste disposal facility if you are in any doubt.

Your local community or municipal authorities can provide information on how to dispose of the worn-out product.

The product is recyclable, subject to extended producer responsibility and is collected separately.
Disposal of the packaging

The packaging materials have been selected for their environmental friendliness and ease of disposal and are therefore recyclable. Dispose of packaging materials that are no longer needed in accordance with applicable local regulations.
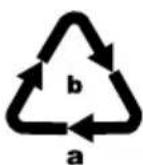
Dispose of the packaging in an environmentally friendly manner. Observe the labels on the different packaging materials and separate them as needed. The packaging material is labelled with abbreviations (a) and numbers (b) with the following meanings:
1-7: plastics,
20-22: paper and cardboard,
80-98: composites.
This appliance has a 3-year warranty valid from the date of purchase. If this product has any faults, you, the buyer, have certain statutory rights. Your statutory rights are not restricted in any way by the warranty described below.
Warranty conditions
The warranty period starts on the date of purchase. Please keep your receipt in a safe place. This will be required as proof of purchase.
If any material or manufacturing fault occurs within three years of the date of purchase of the product, we will either repair or replace the product for you or refund the purchase price (at our discretion). This warranty service requires that you present the defective appliance and the proof of purchase (receipt) within the three-year warranty period, along with a brief written description of the fault and of when it occurred.
If the defect is covered by the warranty, your product will either be repaired or replaced by us. The repair or replacement of a product does not signify the beginning of a new warranty period.
Warranty period and statutory claims for defects
The warranty period is not prolonged by repairs effected under the warranty. This also applies to replaced and repaired components. Any damage and defects present at the time of purchase must be reported immediately after unpacking. Repairs carried out after expiry of the warranty period shall be subject to a fee.
Scope of the warranty
This appliance has been manufactured in accordance with strict quality guidelines and inspected meticulously prior to delivery.
The warranty covers material faults or production faults. The warranty does not extend to product parts subject to normal wear and tear or to fragile parts which could be considered as consumable parts such as switches, batteries or parts made of glass.
The warranty does not apply if the product has been damaged, improperly used or improperly maintained. The directions in the operating instructions for the product regarding proper use of the product are to be strictly followed. Uses and actions that are discouraged in the operating instructions or which are warned against must be avoided.
This product is intended solely for private use and not for commercial purposes. The warranty shall be deemed void in cases of misuse or improper handling, use of force and modifications / repairs which have not been carried out by one of our authorised Service centres.
Warranty claim procedure
To ensure quick processing of your case, please observe the following instructions:
■ Please have the till receipt and the item number (IAN) 368342_2101 available as proof of purchase.
■ You will find the item number on the type plate on the product, an engraving on the product, on the front page of the operating instructions (below left) or on the sticker on the rear or bottom of the product.
If functional or other defects occur, please contact the service department listed either by telephone or by e-mail.
■ You can return a defective product to us free of charge to the service address that will be provided to you. Ensure that you enclose the proof of purchase (till receipt) and information about what the defect is and when it occurred.
You can download these instructions along with many other manuals, product videos and installation software at www.lidl-service.com.
This QR code will take you directly to the Lidl service page (www.lidl-service.com) where you can open your operating instructions by entering the item number (IAN) 368342_2101.
Service
GB Service Great Britain
Tel.: 0800 404 7657
E-Mail: kompernass@lidl.co.uk
IE ServiceIreland
Tel.: 1800 101010
E-Mail: kompernass@lidl.ie
IAN 368342_2101
Importer
Please note that the following address is not the service address. Please use the service address provided in the operating instructions.
KOMPERNASS HANDELS GMBH
BURGSTRASSE 21
44867 BOCHUM
GERMANY
www.kompernass.com
Inhaltsverzeichnis
Einführung 28
natural_image
Line drawing of a fish head with patterned lobes and a hand holding a cloth (no text or symbols)
Abb. 1
natural_image
Line drawing of hands using a power iron to press down a circular component, with directional arrows indicating motion (no text or symbols)
Abb. 2
Wassertank befüllen
HINWEIS
text_image
Technical diagram of a mechanical component with labeled parts and an arrow indicating direction
Abb. 3
text_image
F
MAX
MIN
Abb. 4
text_image
Diagram of a device control panel with power and minus signs, featuring icons for battery, switch, and display.
Abb. 6
natural_image
Diagram of a rotary dial with curved arrows indicating rotation, no text or symbols present
Abb. 7
natural_image
Line drawing of a hand using an iron on a steam iron, with a black arrow indicating the press or adjustment point (no text or symbols present)
Abb. 9
HINWEIS
natural_image
Line drawing of a suit jacket and its iron, showing front and side views (no text or symbols)
Abb. 10
natural_image
Top-down schematic of a mechanical or electrical component with no visible text, numbers, or symbols.
Abb. 11
natural_image
Line drawing of a hand turning a button on a mechanical component (no text or symbols)
Abb. 12
natural_image
Diagram showing two hands manipulating a chain of black beads with circular patterns, no text or symbols present
Abb. 13
natural_image
Line drawing of a steam iron with labeled parts and motion arrows indicating airflow (no text or symbols beyond basic labels)
Abb. 15

natural_image
Line drawing of a steam iron with handle and side panel, no text or symbols present
Abb. 16
KOMPERNASS HANDELS GMBH
BURGSTRASSE 21
44867 BOCHUM
DEUTSCHLAND
www.kompernass.com
Sommaire
Introduction 54
Installation et raccordement....61
Installation et raccordement
natural_image
Line drawing of a fish head with patterned lobes and a hand holding a cloth (no text or symbols)
Fig. 1
natural_image
Line drawing of hands using a power iron to press down a circular component, with directional arrows indicating motion (no text or symbols)
Fig. 2
text_image
Technical diagram showing a hand pressing down on a device component with labeled parts and an arrow indicating left motion.
Fig. 3
text_image
F
MAX
MIN
Fig. 4
text_image
Diagram of a device control panel with power and minus signs, featuring icons for battery, switch, and display.
Fig. 6
natural_image
Diagram of a rotary dial with curved arrows indicating rotation, no text or symbols present
Fig. 7
natural_image
Line drawing of a hand using an iron on a steam iron, with a black arrow indicating the cutting point (no text or symbols present)
Fig. 9
REMARQUE
natural_image
Line drawing of a suit jacket and its iron, showing front and side views (no text or symbols)
Fig. 10
natural_image
Top-down schematic of a mechanical or electrical component with no visible text, numbers, or symbols.
Fig. 11

natural_image
Line drawing of a hand adjusting a mechanical component with an arrow indicating direction (no text or symbols)
Fig. 12
natural_image
Diagram showing two hands manipulating a chain of black-and-white oval objects on a curved surface, with additional oval shapes and dots (no text or symbols)
Fig. 13
natural_image
Line drawing of a steam iron with labeled parts and motion arrows indicating airflow (no text or symbols beyond basic labels)
Fig. 15
natural_image
Line drawing of a steam iron with handle and side panel, no text or symbols present
Fig. 16
KOMPERNASS HANDELS GMBH
BURGSTRASSE 21
44867 BOCHUM
ALLEMAGNE
www.kompernass.com
Inhoud
Inleiding 84
WAARSCHUWING! LETSELGEVAAR!
natural_image
Line drawing of a hand holding a cloth next to a teardrop-shaped object with circular indentations (no text or symbols)
Afb. 1
natural_image
Line drawing of a hand pressing down on a mechanical device with directional arrows indicating movement (no text or symbols)
Afb. 2
Waterreservoir vullen
OPMERKING
text_image
Technical diagram showing a mechanical component with labeled parts and an arrow indicating direction, including 'SewenColor' label.
Afb. 3
text_image
F
MAX
MIN
Afb. 4
text_image
Diagram of a device control panel with power and minus signs, featuring icons for battery, switch, and display.
Afb. 6
natural_image
Diagram of a rotary dial with curved arrows indicating rotation, no text or symbols present
Afb. 7
natural_image
Line drawing of a hand using an iron on a steam iron, with a black arrow indicating the press or adjustment point (no text or symbols present)
Afb. 9
OPMERKING
natural_image
Line drawing of a suit jacket and its side view showing ironing iron (no text or symbols)
Afb. 10
natural_image
Top-down schematic of a mechanical or electrical component with no visible text, numbers, or symbols.
Afb. 11

natural_image
Hand holding a small mechanical component with an arrow indicating direction (no text or symbols present)
Afb. 12
natural_image
Diagram showing two hands manipulating a chain of black-and-white oval objects, with no text or symbols present.
Afb. 13
natural_image
Line drawing of a steam iron with labeled parts and motion arrows indicating airflow (no text or symbols beyond basic labels)
Afb. 15

natural_image
Line drawing of a steam iron with handle and side panel, no text or symbols present
Afb. 16
KOMPERNASS HANDELS GMBH
BURGSTRASSE 21
44867 BOCHUM
DUITSLAND
www.kompernass.com
Obsah
Úvod....110
natural_image
Line drawing of a hand holding a cloth next to a leaf-like structure with circular indentations (no text or symbols)
Obr. 1
natural_image
Line drawing of hands using a power iron to press or install a component, with directional arrows indicating movement (no text or symbols)
Obr. 2
text_image
Technical diagram showing a mechanical component with labeled parts and an arrow indicating direction, including 'SINSE CRUZ' annotation.
Obr. 3
text_image
F
MAX
MIN
Obr. 4
text_image
Diagram of a device control panel with power and minus signs, including a circular indicator and plus/minus symbols.
Obr. 6
natural_image
Diagram of a rotary dial with control knob and directional arrow (no text or symbols)
Obr. 7
natural_image
Line drawing of a hand using a power iron to press a circular component, with an arrow indicating the press direction (no text or symbols present)
Obr. 9
UPOZORNĚNÍ
natural_image
Line drawing of a suit jacket and its iron, showing front and side views (no text or symbols)
Obr. 10
natural_image
Top-down schematic of a mechanical or electrical component with no visible text, numbers, or symbols.
Obr. 11

natural_image
Line drawing of a hand adjusting a mechanical component with an arrow indicating direction (no text or symbols present)
Obr. 12
natural_image
Diagram showing two hands manipulating a coiled string and interacting with oval-shaped objects (no text or symbols)
Obr. 13
natural_image
Line drawing of a steam iron with labeled parts and motion arrows indicating airflow (no text or symbols beyond basic labels)
Obr. 15

natural_image
Line drawing of a steam iron with labeled parts and motion indicators (no text or symbols)
Obr. 16
KOMPERNASS HANDELS GMBH
BURGSTRASSE 21
44867 BOCHUM
NĚMECKO
www.kompernass.com
Spis treści
W step 136
natural_image
Line drawing of a hand holding a cloth next to a leaf-like object with circular indentations (no text or symbols)
Rys. 1
natural_image
Line drawing of hands using a power iron to press a circular component, with directional arrows indicating movement (no text or symbols)
Rys. 2
text_image
Technical diagram of a mechanical component with labeled parts and an arrow indicating direction
Rys. 3
text_image
F
MAX
MIN
Rys. 4
text_image
Diagram of a device control panel with power and minus signs, featuring icons for battery, switch, and display.
Rys. 6
natural_image
Diagram of a rotary dial with curved arrows indicating rotation, no text or symbols present
Rys. 7
natural_image
Line drawing of a hand using a steam iron to press a circular component, with an arrow indicating the press direction (no text or symbols present)
Rys. 9
WSKAZÓWKA
natural_image
Line drawing of a suit jacket and its iron, showing front and side views (no text or symbols)
Rys. 10
natural_image
Top-down schematic of a mechanical or electrical component with no visible text, numbers, or symbols.
Rys. 11
natural_image
Line drawing of a hand adjusting a mechanical component with an arrow indicating direction (no text or symbols present)
Rys. 12
natural_image
Illustration of hands manipulating a chain with circular elements, showing structural details (no text or symbols)
Rys. 13
natural_image
Line drawing of a steam iron with labeled parts and motion arrows indicating airflow (no text or symbols beyond basic labels)
Rys. 15
natural_image
Line drawing of a steam iron with handle and side panel (no text or symbols)
Rys. 16
KOMPERNASS HANDELS GMBH
BURGSTRASSE 21
44867 BOCHUM
NIEMCY
www.kompernass.com
Obsah
Úvod 162
natural_image
Line drawing of a leaf with internal oval structures and a cloth partially covering the tip (no text or symbols)
Obr. 1
natural_image
Line drawing of hands using a power iron to press or install a component, with directional arrows indicating movement (no text or symbols)
Obr. 2
text_image
Technical diagram showing a mechanical component with labeled parts and an arrow indicating direction, including 'SINSE CRUZ' annotation.
Obr. 3
text_image
F
MAX
MIN
Obr. 4
text_image
Diagram of a device control panel with power and minus signs, including a circular indicator and plus/minus symbols.
Obr. 6
natural_image
Diagram of a rotary dial with control knob and directional arrow (no text or symbols)
Obr. 7
natural_image
Line drawing of a hand using an iron on a steam iron, with a black arrow pointing to the center (no text or symbols)
Obr. 9
UPOZORNENIE
natural_image
Line drawing of a suit jacket and its iron, showing front and side views (no text or symbols)
Obr. 10
natural_image
Top-down schematic of a mechanical or electrical component with no visible text, numbers, or symbols.
Obr. 11
natural_image
Line drawing of a hand turning a button on a mechanical component (no text or symbols)
Obr. 12
4) Do parnej komory nalejte cca 500 ml destilovanej vody.
natural_image
Illustration of hands manipulating a chain with chains attached to a surface, surrounded by oval shapes (no text or symbols)
Obr. 13
natural_image
Line drawing of a steam iron with labeled parts and motion arrows indicating airflow (no text or symbols beyond basic labels)
Obr. 15

natural_image
Line drawing of a steam iron with labeled parts and motion indicators (no text or symbols)
Obr. 16
KOMPERNASS HANDELS GMBH
BURGSTRASSE 21
44867 BOCHUM
NEMECKO
www.kompernass.com
Índice
Introducción 188
natural_image
Line drawing of a hand holding a cloth next to a leafy object with circular indentations (no text or symbols)
Fig. 1
natural_image
Line drawing of a hand pressing down on a mechanical component with directional arrows indicating movement (no text or symbols)
Fig. 2
text_image
Technical diagram of a mechanical component with labeled parts and an arrow indicating direction
Fig. 3
text_image
F
MAX
MIN
Fig. 4
text_image
Diagram of a device control panel with power and minus signs, featuring icons for battery, switch, and display.
Fig. 6
natural_image
Diagram of a rotary dial with curved arrows indicating rotation, no text or symbols present
Fig. 7
natural_image
Line drawing of a hand using an iron on a steam iron, with a black arrow indicating the press or adjustment point (no text or symbols present)
Fig. 9
INDICACIÓN
natural_image
Line drawing of a suit jacket and its side view showing ironing iron (no text or symbols)
Fig. 10
natural_image
Top-down schematic of a mechanical or electrical component with no visible text, numbers, or symbols.
Fig. 11

natural_image
Line drawing of a hand adjusting a mechanical component with an arrow indicating direction (no text or symbols)
Fig. 12
natural_image
Diagram showing two hands manipulating a chain of black-and-white oval objects, with no text or symbols present.
Fig. 13
natural_image
Line drawing of a steam iron with labeled parts and motion arrows indicating airflow (no text or symbols beyond basic labels)
Fig. 15
natural_image
Line drawing of a steam iron with labeled parts and motion indicators (no text or symbols)
Fig. 16
KOMPERNASS HANDELS GMBH
BURGSTRASSE 21
44867 BOCHUM
ALEMANIA
www.kompernass.com
Indholdsfortegnelse
Introduktion....214
natural_image
Line drawing of a hand holding a cloth over a leaf-like object with circular indentations (no text or symbols)
Fig. 1
natural_image
Line drawing of hands using a power iron to press or install a component, with directional arrows indicating movement (no text or symbols)
Fig. 2
text_image
Technical diagram showing a mechanical component with labeled parts and an arrow indicating direction, including 'SINSE CRUIT' annotation.
Fig. 3
text_image
F
MAX
MIN
Fig. 4
text_image
Diagram of a device control panel with power and minus signs, including a circular indicator and plus/minus symbols.
Fig. 6
natural_image
Diagram of a rotary dial with a black arrow indicating clockwise motion (no text or symbols)
Fig. 7
natural_image
Line drawing of a hand using a power iron to press a circular component, with an arrow indicating the press direction (no text or symbols present)
Fig. 9
BEMARK
natural_image
Line drawing of a suit jacket and its iron, showing front and side views (no text or symbols)
Fig. 10
natural_image
Top-down schematic of a mechanical or electrical component with no visible text, numbers, or symbols.
Fig. 11
natural_image
Line drawing of a hand turning a button on a mechanical component (no text or symbols)
Fig. 12
natural_image
Diagram showing two hands manipulating a chain of black-and-white oval objects, with no text or symbols present.
Fig. 13
natural_image
Line drawing of a steam iron with labeled parts and motion arrows (no text or symbols)
Fig. 15

natural_image
Line drawing of a steam iron with labeled parts and motion indicators (no text or symbols)
Fig. 16
KOMPERNASS HANDELS GMBH
BURGSTRASSE 21
44867 BOCHUM
TYSKLAND
www.kompernass.com
Indice
Introduzione 240
natural_image
Line drawing of a hand holding a cloth next to a leafy plant (no text or symbols)
Fig. 1
natural_image
Line drawing of hands using a power iron to press a circular component, with directional arrows indicating movement (no text or symbols)
Fig. 2
text_image
Technical diagram showing a hand pressing a component with directional arrow and labeled parts, including 'SINHCM' and symbols like '###'.
Fig. 3
text_image
F
MAX
MIN
Fig. 4
text_image
Diagram of a device control panel with power and minus signs, featuring icons for battery, switch, and display.
Fig. 6
natural_image
Diagram of a rotary dial with curved arrows indicating rotation, no text or symbols present
Fig. 7
natural_image
Line drawing of a hand using an iron on a steam iron, with a black arrow indicating the press or adjustment point (no text or symbols present)
Fig. 9
NOTA
natural_image
Line drawing of a suit jacket and its iron, showing front and side views (no text or symbols)
Fig. 10
natural_image
Top-down schematic of a mechanical or electrical component with no visible text, numbers, or symbols.
Fig. 11

natural_image
Line drawing of a hand adjusting a mechanical component with an arrow indicating direction (no text or symbols)
Fig. 12
natural_image
Illustration of hands manipulating a chain with coiled wires and oval shapes (no text or symbols)
Fig. 13
natural_image
Line drawing of a steam iron with labeled parts and motion arrows (no text or symbols)
Fig. 15

natural_image
Line drawing of a steam iron with labeled parts and motion indicators (no text or symbols)
Fig. 16
KOMPERNASS HANDELS GMBH
BURGSTRASSE 21
44867 BOCHUM
GERMANIA
www.kompernass.com
Tartalomjegyzék
Bevezető 266
natural_image
Line drawing of a hand holding a cloth next to a leafy plant (no text or symbols)
- ábra
natural_image
Line drawing of hands using a power iron to press a circular component, with directional arrows indicating movement (no text or symbols)
- ábra
text_image
Technical diagram showing a hand pressing a component labeled 'S###' with directional arrow and control buttons
- ábra
text_image
F
MAX
MIN
- ábra
text_image
Diagram of a device control panel with power and minus signs, featuring icons for battery, switch, and display.
- ábra
natural_image
Diagram of a rotary dial with curved arrows indicating rotation, no text or symbols present
- ábra
natural_image
Line drawing of a hand using an iron on a steam iron, with a black arrow indicating the press or adjustment point (no text or symbols present)
- ábra
TUDNIVALÓ
natural_image
Line drawing of a suit jacket and its iron, showing front and side views (no text or symbols)
- ábra
natural_image
Top-down schematic of a mechanical or electrical component with no visible text, numbers, or symbols.
- ábra
natural_image
Line drawing of a hand adjusting a mechanical component with an arrow indicating direction (no text or symbols present)
- ábra
natural_image
Diagram showing two hands manipulating a chain of black-and-white oval objects, with no text or symbols present.
- ábra
natural_image
Line drawing of a steam iron with labeled parts and motion arrows indicating airflow (no text or symbols beyond basic labels)
- ábra

natural_image
Line drawing of a steam iron with labeled parts and motion indicators (no text or symbols)
- ábra
KOMPERNASS HANDELS GMBH
BURGSTRASSE 21
44867 BOCHUM
NÉMETORSZÁG
www.kompernass.com
Kazalo
Uvod 292
Informacije o teh navodilih za uporabo 292
natural_image
Line drawing of a leaf with internal oval structures and a hand holding a cloth (no text or symbols)
Slika 1
♦ Morebitne proizvodne ostanke odstranite z nekajkratnim likanjem po stari, čisti krpi (glejte sliko 2).
natural_image
Line drawing of hands using a power iron to press down a surface, with directional arrows indicating movement (no text or symbols)
Slika 2
Polnjenje posode za vodo
OPOMBA
Uporabljajte samo vodo iz vodovoda ali destilirano vodo.
text_image
Technical diagram of a mechanical component with labeled parts and an arrow indicating direction
Slika 3
text_image
F
MAX
MIN
Slika 4
4) Posodo za vodo 10 potisnite nazaj v osnovno postajo, tako da se slišno zaskoči.
OPOMBA
text_image
Diagram of a device control panel with power and minus signs, featuring icons for battery, switch, and display.
Slika 6
3) Zavrtite gumb za temperaturo ③ in nastavite želeno temperaturo likanja (glejte sliko 7).

natural_image
Diagram of a rotary dial with curved arrows indicating rotation, no text or symbols present
Slika 7
natural_image
Line drawing of a hand using a power iron to press a circular component, with an arrow indicating the press direction (no text or symbols present)
Slika 9
OPOMBA
natural_image
Line drawing of a suit jacket and its iron, showing front and side views (no text or symbols)
Slika 10
6) Tkanine se narahlo dotaknite z likalno površino ⑧ in vklopite dovajanje pare, da odstranite gube.
7) Dovajanje pare ustavite tako, da tipko za paro ② spustite.
Dolivanje vode
OPOMBA
natural_image
Top-down schematic of a mechanical or electrical component with no visible text, numbers, or symbols.
Slika 11

natural_image
Line drawing of a hand holding a mechanical component with an arrow indicating direction (no text or symbols)
Slika 12
4) V parno komoro dolijte pribl. 500 ml destilirane vode.
natural_image
Illustration of hands manipulating a chain with beads, showing motion and movement patterns (no text or symbols)
Slika 13
3) Električni vtič vtaknite v električno vtičnico in vklopite napravo. Počakajte, dokler lučka za segrevanje ① ne ugasne.
4) Parni likalnik držite nad posodo ali umivalnik. Tipko za paro ② držite pritisnjeno pribl. 1 minuto, da odstranite ostanke vodnega kamna iz likalne površine ⑧.
5) Za izklop naprave za pribl. 2 sekundi pridržite tipko za vklop/izklop 13. Počakajte, da se naprava popolnoma ohladi.
6) Potem likalno površino ⑧ očistite z mehko, vlažno krpo.
Odpravljanje napak
natural_image
Line drawing of a steam iron with internal components and motion arrows indicating airflow (no text or symbols)
Slika 15
text_image
Technical line drawing of a steam iron with Chinese annotations indicating part dimensions and parts.
Slika 16
KOMPERNASS HANDELS GMBH
BURGSTRASSE 21
44867 BOCHUM
NEMČIJA
www.kompernass.com
Pooblaščeni serviser
SI
ServisSlovenija
Tel.: 080 080 917
E-Mail: kompernass@lidl.si
IAN 368342_2101
Garancijski list
KOMPERNASS HANDELS GMBH
BURGSTRASSE 21
44867 BOCHUM
GERMANY
www.kompernass.com
Last Information Update · Stand der Informationen · Version des informations
Stand van de informatie · Stav informací · Stan informacji · Stav informácií
Estado de las informaciones · Tilstand af information · Versione delle informazioni