
IAN 277706 - Iron SILVERCREST - Free user manual and instructions
Find the device manual for free IAN 277706 SILVERCREST in PDF.


| Product Type | Ironing Station (Steam Generator) |
| Brand | SilverCrest |
| Model Number | IAN 277706 |
| Voltage | 220 – 240 V ~ / 50/60 Hz |
| Power Consumption | 2000 – 2400 W |
| Water Tank Capacity | 2 L |
| Steam Output (max) | Approx. 90 g/min +/- 10% |
| Heating Time (steam ironing) | Approx. 2 minutes |
| Boiler Pressure | 3 bar |
| Functions | Dry ironing, steam ironing, vertical steam ironing, adjustable steam strength (eco/max), continuous steam via button |
| Temperature Settings | Min (synthetics, silk 70-120°C), ● (wool 100-160°C), ●● (cotton/linen 140-210°C) |
| Limescale Protection | Replaceable limescale filter with anti-calc indicator and RESET button |
| Safety Features | Auto shut-off (pull plug during breaks), overheat protection, cool-touch handle, non-slip base, child safety lock (supervised use) |
| Iron Soleplate Material | Not specified (likely stainless steel or non-stick; estimated ceramic or stainless steel) |
| Hose Length | Not specified (estimated approx. 1.5 m) |
| Power Cable Length | Not specified (estimated approx. 1.8 m) |
| Weight | Not specified (estimated approx. 3.5 kg) |
| Dimensions (L x W x H) | Not specified (estimated approx. 35 x 25 x 30 cm) |
| Cleaning and Maintenance | Wipe with damp cloth, descale via filter replacement, empty water tank, do not immerse |
| Accessories Included | Base station, iron, connecting hose, velcro tape for cable, operating instructions |
| Warranty | 3 years from date of purchase, subject to conditions |
Frequently Asked Questions - IAN 277706 SILVERCREST
User questions about IAN 277706 SILVERCREST
0 question about this device. Answer the ones you know or ask your own.
Ask a new question about this device
Download the instructions for your Iron in PDF format for free! Find your manual IAN 277706 - SILVERCREST and take your electronic device back in hand. On this page are published all the documents necessary for the use of your device. IAN 277706 by SILVERCREST.
USER MANUAL IAN 277706 SILVERCREST
Operating instructions
PT
FERRO COM CALDEIRA
Before reading, unfold the page containing the illustrations and familiarise yourself with all functions of the device.
DE AT CH
GB / MT Operating instructions Page 45
natural_image
Line drawing of a steam iron with attached tubing and directional arrows indicating motion (no text or symbols)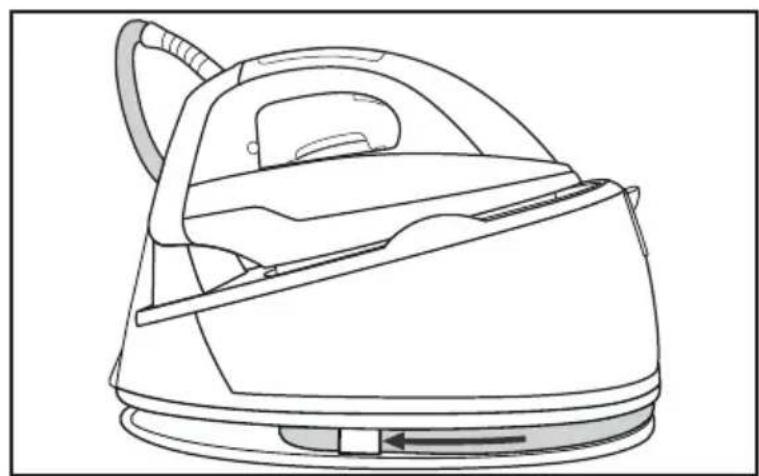
natural_image
Line drawing of a steam iron with handle and side panel, showing internal components (no text or symbols)KOMPERNASS HANDELS GMBH
BURGSTRASSE 21
44867 BOCHUM
GERMANY
www.kompernass.com
NOTA
natural_image
Line drawing of a steam iron with attached tubing and scroll, showing motion arrows (no text or symbols)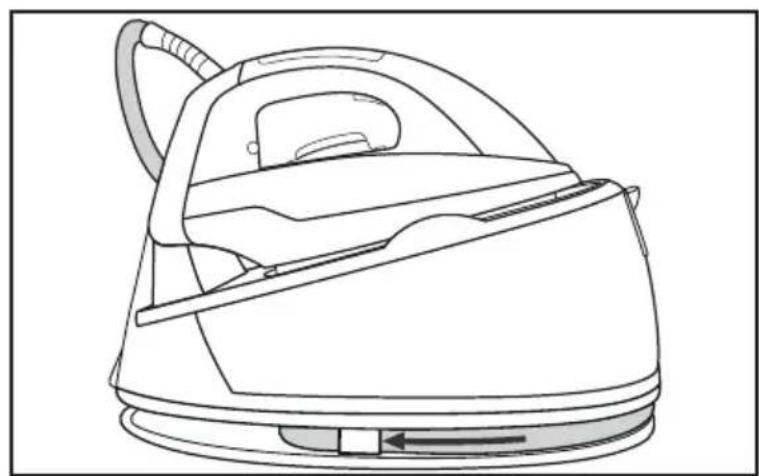
natural_image
Line drawing of a steam iron with handle and side panel, showing internal components (no text or symbols)KOMPERNASS HANDELS GMBH
BURGSTRASSE 21
44867 BOCHUM
GERMANY
www.kompernass.com
natural_image
White plastic cylindrical trash bin with a small outlet, isolated on white background (no text or symbols)NOTA
Information about these operating instructions 46
Copyright 46
Proper use....46
Warnings 46
Safety 47
Basic safety instructions 47
Technical details 51
Operating elements 52
Setting up and connecting 53
Safety information 53
Package contents and transport inspection 53
Unpacking 53
Disposal of the packaging 54
Set-up location requirements....54
Electrical connection 54
Handling and use 55
Before first use 55
Cleaning and maintenance 59
Safety information 59
Replacing the limescale filter 59
Cleaning the appliance 60
Troubleshooting....61
Storage/disposal 62
Storage 62
Disposal of the appliance 62
Ordering replacement parts 65
Introduction
Information about these operating instructions
Congratulations on the purchase of your new appliance.
You have selected a high-quality product. The operating instructions are part of this product. They contain important information about safety, usage and disposal. Before using the product, please familiarise yourself with all operating and safety instructions. Use the product only as described and for the range of applications specified. Please also pass these operating instructions on to any future owner.
Copyright
This documentation is protected by copyright.
Any copying or reproduction, including in the form of extracts, or any reproduction of images (even in a modified state), is permitted only with the written authorisation of the manufacturer.
Proper use
This appliance is only intended for the dry ironing or steam ironing of all types of clothing, curtains and fabrics (including hanging). The appliance is not intended for any other purpose, nor for use beyond the scope described. The appliance is not intended for use in commercial or industrial environments.
The manufacturer accepts no responsibility for damage caused by failure to observe these instructions, improper use or repairs, unauthorised modifications or the use of unapproved replacement parts. The operator bears sole liability.
Warnings
The following types of warning are used in these operating instructions:

DANGER
A warning notice at this hazard level indicates an imminently hazardous situation.
If the hazardous situation is not avoided, it could result in death or serious physical injury.
▶ Follow the instructions in this warning notice to avoid the risk of death or serious injury.
WARNING
A warning at this hazard level indicates a potentially hazardous situation.
Failure to avoid this hazardous situation could result in injury.
▶ Follow the instructions in this warning notice to prevent injury.
CAUTION
A warning notice at this hazard level indicates a risk of material damage.
Failure to avoid this situation could result in material damage.
▶ Follow the instructions in this warning notice to prevent material damage.
NOTE
▶ A note provides additional information, which will assist you in using the appliance.
Safety
This section contains important safety instructions for using the appliance.
This appliance complies with statutory safety regulations. Improper use may result in personal injury and property damage.
Basic safety instructions
To ensure safe operation of the appliance, follow the safety guidelines set out below:
■ The appliance may not be used if it has fallen down, if it shows visible damage or is leaking.
■ To prevent accidents, have defective plugs and/or power cables replaced immediately by an authorised specialist technician or our Customer Service department.
This appliance may be used by children aged 8 years or more and by persons with reduced physical, sensory or mental capabilities or lack of experience and/or knowledge if they are supervised, or have been instructed in the safe use of the appliance and have understood the potential risks. Do not allow children to play with the appliance. Cleaning and user maintenance may not be carried out by children unless they are supervised.
■ Do not allow children to play with the appliance.
■ All repairs must be carried out by authorised specialist companies or by the Customer Service department. Improper repairs may put the user at risk. It will also invalidate any warranty claims.
■ Repairs to the appliance during the warranty period may only be carried out by a customer service department authorised by the manufacturer. Otherwise, no warranty claims will be held for any subsequent damages.
■ Defective components must always be replaced with original replacement parts. Compliance with safety requirements can only be guaranteed if original replacement parts are used.
■ Do not place any objects on the appliance, especially not on the connecting hose between the base station and the iron.
■ Do not operate or place the appliance close to an open flame (e.g. candles).

RISK OF ELECTRICAL SHOCK!
The appliance should only be connected to correctly installed and earthed mains power sockets. Ensure that the rating for your local power supply corresponds with the details on the rating plate of the appliance.
- Arrange for customer service to repair or replace connecting cables and/or appliances that are not functioning properly or have been damaged.
- Stop using the appliance if the anti-kink protection on the power cable is damaged!
The steam iron and its connecting hose must be kept out of reach of children younger than eight years old while switched on or cooling down.
▶ Never immerse the appliance in water. Wipe it only with a slightly damp cloth.
▶ Do not expose the appliance to rain, and never use it in a humid or wet environment.
▶ Always hold the plug when handling the power cable and never pull on the cable itself.
▶ Never touch the power cable or the plug with wet hands.
▶ Do not place the appliance itself or furniture etc. on the power cable and ensure that it is not jammed.
- Ensure that the power cable never becomes wet or moist during operation.
▶ Do not open the appliance housing or attempt to repair or modify the appliance. If the housing is opened or improper modifications are made, you run the risk of receiving a potentially fatal electric shock and the warranty will be void.

RISK OF ELECTRICAL SHOCK!
- Protect the appliance from drips or splashes of water. Do not place any vessels containing liquid (e.g. flower vases) on or near the appliance.
▶ Always pull the plug out of the power socket after completing ironing and before cleaning the appliance.
▶ You must always pull the plug out of the power socket before filling the water tank with water.

WARNING! RISK OF INJURY!
▶ Always place the iron on the base station placement area. Pull the plug out of the power socket if you take a break during ironing.

RISK OF SCALDING OR BURNING!
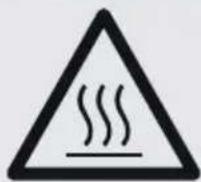
Caution, hot surfaces!
The iron remains very hot while switched on and also a few minutes after being switched off. Never touch the iron sole of the iron!
▶ When the steam iron is hot, hold it only by the handle.
▶ Children should be supervised to ensure that they do not play with the appliance.
▶ Never aim the hot steam at persons or animals.
▶ Never iron or steam clothing or other fabrics which are being held by other people or are being worn.
CAUTION PROPERTY DAMAGE
A warning notice at this hazard level indicates a risk of material damage.
Failure to avoid this situation could result in material damage.
▶ Never leave the steam iron unattended while it is connected to the mains power supply.
▶ Never use water containing carbon dioxide in the appliance.
▶ Do not operate the appliance without water, otherwise the pump could burn out.
▶ Ensure that neither the power cable or the connection hose come into contact with the hot sole of the iron.
▶ Do not scratch the sole of the iron. Avoid contact between the sole of the iron and metal parts such as buttons or zips.
▶ Operate the steam iron and the base station only on a stable, flat and level surface.
Technical details
| Ironing station | |
| Voltage supply 220 – 240 V | ~ / 50/60 Hz |
| Power consumption 2000 – 2400 W | |
| Max. water tank filling capacity 2 l | |
Steam production  | (max.) approx. 90 g/min. +/- 10% |
| Heating time (steam ironing) [3CCS] | approx. 2 minutes |
| Boiler pressure 3 bar | |
Operating elements
(See fold-out page for illustrations)
Figure A:
① Steam button
② Temperature control
③ Heat-up indicator lamp
4 Connecting hose
⑤ Placement area
6 Sole of the iron
Figure B:
7 Shaft cover
8 Limescale filter
9 Water tank filler cap
10 Water tank
Figure C:
⑪ "eco" steam indicator lamp
⑫ "max" steam indicator lamp
⑬ "anti calc" indicator lamp
14 RESET button
15 On/Off Button
16 Steam strength button

Setting up and connecting
Safety information
WARNING
While using the appliance, there is a risk of injury and/or damage to property!
To avoid risks, observe the following safety instructions:
▶ Do not allow children to play with packaging materials. There is risk of suffocation.
▶ Please follow the instructions regarding the electrical connection of the appliance to avoid damage to property.
Package contents and transport inspection
The appliance is supplied with the following components as a standard:
- Steam Generator
- Velcro tape for fastening the mains cable
- Operating instructions
NOTE
▶ Check the package for completeness and signs of visible damage.
▶ If the delivery is incomplete or damage has occurred as a result of defective packaging or during transport, contact the Service hotline (see section Service).
Unpacking
◆ Remove all parts of the appliance and the operating instructions from the box.
◆ Removal packaging material and protective film.
Disposal of the packaging
The packaging protects the appliance from damage during transport. The packaging materials have been selected for their environmental friendliness and ease of disposal, and are therefore recyclable.
Returning the packaging to the material cycle conserves raw materials and reduces the amount of waste that is generated. Dispose of packaging materials that are no longer needed in accordance with applicable local regulations.
NOTE
▶ If possible, keep the original appliance packaging for the entire duration of the warranty period so that the appliance can be packaged properly for return shipment in the event of a warranty claim.
Set-up location requirements
The work service on which you place the base station must be stable, flat and heat-resistant.
Electrical connection
Insert the power cable plug into a properly connected and earthed mains power socket which supplies the voltage stated in the "Technical data" section.
Handling and use
This section provides you with important information on handling and using the appliance.
Before first use
Clean the sole of the iron ⑥ using a slightly moist cloth.
◆ To remove any leftover production residues, iron an old, clean cloth a few times.
Filling the water tank
NOTE
Use only tap water or distilled water.
If the mains water in your location is rated as hard, it is recommended that you mix the mains water with some distilled water. Otherwise limescale deposits can adversely affect the appliance functions.
Mix the tap water with distilled water in accordance with the following table:
| Water hardness | Ratio of distilled water to tap water |
| very soft/soft - | |
| medium 1:1 | |
| hard 2:1 | |
| very hard 3:1 |
Do not add water with any additives (such as starch, perfume, softeners or other chemicals) to the water tank ⑩. The appliance could be damaged, since residues can form in the steam chamber. These residues can soil the goods being ironed if they are deposited through the steam openings.
1) Remove the power plug from the mains power socket if the appliance is plugged in.
2) Open the water tank filler cap ⑨.
This is marked with the symbol:
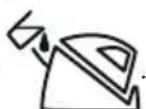
3) Fill the water tank ⑩. Do not fill above the MAX marking in the water tank ⑪.
4) Close the water tank filler cap ⑨.
NOTE
Do not tip or swivel the steam station when the water tank ⑩ is full. If you do, water may be discharged from the filler opening.
5) Insert the plug into a mains power socket.
Ironing without steam
NOTE
Always set the temperature control ② to the lowest level (min) before switching the appliance on. The symbols on the temperature control ② correspond to the following settings:
| Symbol Material | Temperature (approx.) |
min - 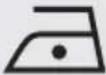 | Synthetics 70 - 120 °C |
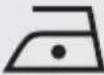 | Silk 70 - 120 °C |
 | Wool 100 - 160 °C |
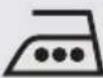 (- max) (- max)  | Cotton/linen 140 - 210 °C |
1) Press the On/Off button ⑮ to turn the appliance on. The indicator lamp integrated in the On/Off button ⑮ lights up and the "max" steam indicator lamp ⑫ flashes.
2) Rotate the temperature control ② to set the required ironing temperature.
3) The heat-up indicator lamp ③ lights up during heating. As soon as the heat-up indicator lamp ③ goes out, the set temperature has been reached and you can start ironing.
4) Put the iron down on the base station placement area ⑤ after ironing. Set the temperature control ② to "min".
5) Press the On/Off button ⑮ to turn the appliance off. The indicator lamp integrated in the On/Off button ⑮ and the "max" steam indicator lamp ⑫ go out.
6) Pull out the plug from the mains socket.
Steam ironing
1) Press the On/Off button ⑮ to turn the appliance on. The indicator lamp integrated in the On/Off button ⑮ lights up and the "max" steam indicator lamp ⑫ flashes.
2) Turn the temperature control ② to set the required ironing temperature. The temperature control ② must be set to a minimum of 🌐 to produce steam.
3) The heat-up indicator lamp ③ lights up during heating. As soon as the heat-up indicator lamp ③ goes out, the set temperature has been reached.
4) Press the steam strength ⑯ button to set the required steam strength:
- If the "max" steam indicator lamp 12 is lit up, a lot of steam will be produced.
- If the "eco" indicator lamp ⑪ is lit up, less steam will be produced.
As soon as the "eco" ⑪ or "max" ⑫ indicator lamps light up continuously (depending on the setting) you can start steam ironing.
5) While you are ironing, you can now press and hold the steam button ① to continuously spray steam onto the goods to be ironed from the sole of the iron ⑥. Release the steam button ① to stop producing steam.
NOTE
When you press the steam button ①, it can take a few seconds until steam is issued from the sole of the iron ⑥.
6) Put the iron down on the base station placement area ⑤ after ironing. Set the temperature control ② to "min".
7) Press the On/Off button ⑮ to turn the appliance off. The indicator lamp integrated in the On/Off button ⑮ and the "eco" ⑪ or "max" ⑫ steam indicator lamps (depending on setting) will go out.
8) Disconnect the plug from the mains socket.


Vertical steam ironing
1) Hang the fabric to be ironed on a clothes hanger which is hung against a heat-resistant surface. 2) Rotate the temperature control ② to set the required ironing temperature. The temperature control ② must be set to a minimum of 🌐 to produce steam.
3) Wait until the heat-up indicator lamp ③ goes out.
4) Press the steam strength button 16 to set the required steam strength: - If the "max" steam indicator lamp 12 is lit up, a lot of steam will be produced. - If the "eco" indicator lamp 11 is lit up, less steam will be produced.
As soon as the "eco" ⑪ or "max" ⑫ indicator lamps light up continuously (depending on the setting) you can start steam ironing.
5) Hold the steam iron in a vertical position and press the steam button ①.
6) Touch the fabric lightly with the sole of the iron ⑥ and steam it to remove creases.
7) Release the steam button ① to stop producing steam.
Refilling with water
You can refill the appliance with water while it is switched on.
1) Put the iron down on the base station placement area ⑤. 2) Refill the water tank as described in the section "Filling the water tank".
Cleaning and maintenance
Safety information

WARNING! RISK OF FATAL ELECTRIC SHOCK!
Risk of bodily injury when cleaning the appliance!
To avoid risks, observe the following safety instructions:
▶ Before cleaning the appliance, always pull the plug out of the mains power socket.
▶ Allow the appliance to cool down completely if necessary.
▶ Never immerse the appliance in water to clean it.
CAUTION
Damage to the appliance!
▶ To avoid irreparable damage to the appliance, ensure that no moisture penetrates it during cleaning.
▶ Do not use abrasive or chemical cleaners, wire brushes or other abrasive objects to clean the appliance's surfaces.
Replacing the limescale filter
NOTES
Note the following information when handling the limescale filter 8:

Not suitable for consumption/drinking!

Keep the limescale filter 8 out of the reach of children.

Store the spare limescale filter in a cool, dry location.
The appliance will notify you when the limescale filter ⑧ needs replacing:
As soon as the "anti calc" indicator lamp 📋 lights up, the limescale filter ⑧ must be replaced.
The service life of the limescale filter ⑧ can vary considerably depending on the water hardness.
NOTE
If the appliance is used regularly, it is advisable to always have a replacement limescale filter available. This means that you can replace the limescale filter 8
immediately as soon as the "anti calc" indicator lamp

⑬ lights up.
You can order new limescale filters ⑧ from our service department (see section Ordering replacement parts).
1) Switch the appliance off using the On/Off button ⑮ and allow it to cool down.
2) Remove the power plug from the mains power socket.
3) Remove the iron from the base station and put it to one side.
4) Open the shaft cover ⑦.
5) Pull the limescale filter ⑧ upwards out of the limescale filter shaft.
6) Place the new limescale filter ⑧ in the limescale filter shaft and press it down until it is firmly seated.
7) Close the shaft cover ⑦.
8) Insert the plug into a mains power socket and switch on the appliance using the On/Off switch 15.
9) Press the "RESET" button 14 for about 3 seconds. The "anti calc" indicator lamp 13 goes out.
You have now completed replacement of the limescale filter 8.
Cleaning the appliance
- Clean the iron surfaces and the base station using only a soft, slightly moist cloth.
Clean the sole of the iron 6 with a soft moist cloth. Ensure that the sole of the iron 6 is not scratched.
Pour the residual water in the water tank ⑩ into a basin. To do this, put the iron down to one side and open the water tank filler cap ⑨.
◆ The appliance must be completely dry before further use.
Troubleshooting
WARNING
Repairs to electrical appliances should only be carried out by specialists trained by the manufacturer. Improper repairs can cause considerable risks to users and damage to the appliance.
| Fault Possible cause Remedy | ||
| The appliance is not working. | Voltage supply error. Ensure that the plug is firmly inserted into the power socket. | |
| The appliance is not switched on. Switch the appliance on using the On/Off button 15. | ||
| There is not enough water in the water tank 10. | Fill the water tank with water 10. | |
| The appliance has not heated up sufficiently. | Wait until the temperature indicator lamp goes out. | |
| The appliance does not produce any/produces too little steam. | The temperature control 2 has been set in the - range. | Turn the control until a temperature in the range has been set. |
| The steam unit has not been used for a long time or is being used for the first time. | Press and hold down the steam button. The steam takes a little time until it discharges from the sole of the iron 6. | |
| Water drips out of the sole of the iron 6. | If steam ironing is paused briefly, the cooling steam condenses in the connecting hose 4. This leads to drip formation. | This is normal. Hold the iron over a collecting cloth or container and press the steam button 1. Steam will discharge from the sole of the iron instead of water after a few seconds. You can now continue ironing. |
| The temperature you have set is too low for steam ironing. | Set a temperature suitable for steam ironing (setting range ). | |
| Wet areas occur on the goods being ironed. | Such areas can be caused by steam condensing on the ironing board. | First, wipe any wet areas off the ironing board and then iron the wet areas on the fabric dry without steam. |
NOTE
▶ If you are unable to resolve the problem by taking any of the aforementioned steps, please contact the service department.
Storage/disposal
Storage
■ Clean the appliance as described above.
Fold the connecting hose ④ in middle and push it into the recess in the appliance:
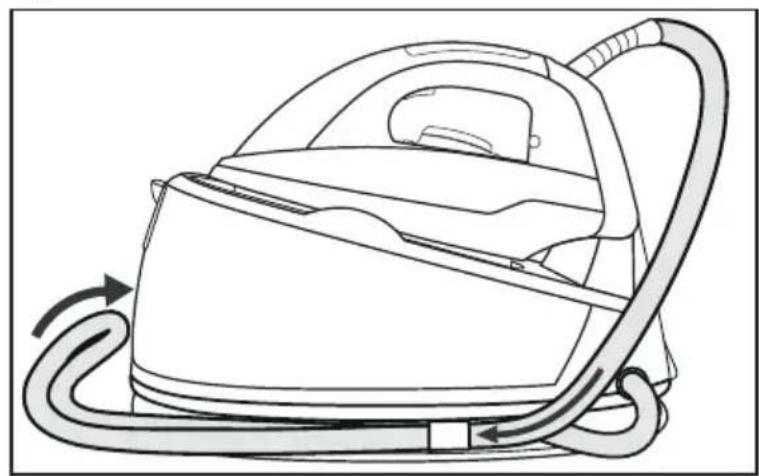
natural_image
Line drawing of a steam iron with attached tubing and directional arrows indicating motion (no text or symbols)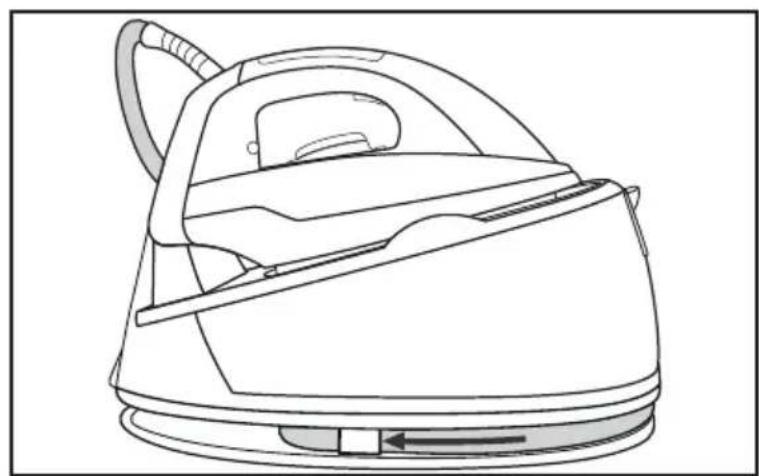
natural_image
Line drawing of a steam iron with handle and side panel, showing internal components (no text or symbols)■ Wind the mains cable up and fasten it with the Velcro tape supplied.
■ Store the appliance in a dry and clean location.
Disposal of the appliance
Never dispose of the appliance in your normal domestic waste. This product is subject to the provisions of European Directive 2012/19/EU-WEEE (Waste Electrical and Electronic Equipment).
Dispose of the appliance via an approved disposal company or your municipal waste facility. Please comply with all applicable regulations. Please contact your waste disposal centre if you are in any doubt.
This appliance is provided with a 3-year warranty valid from the date of purchase. In the event that this product has any faults, you, the buyer, have certain statutory rights. Your statutory rights are not restricted in any way by the warranty described below.
Warranty conditions
The warranty period starts on the date of purchase. Please keep your original receipt in a safe place. This document will be required as proof of purchase.
If any material or production fault occurs within three years of the date of purchase of the product, we will either repair or replace the product for you at our discretion. This warranty service is dependent on you presenting the defective appliance and the proof of purchase (receipt) and a short written description of what the fault is and when it happened.
If the defect is covered by the warranty, your product will either be repaired or replaced by us. The repair or replacement of a product does not signify the beginning of a new warranty period.
Warranty period and statutory claims for defects
The warranty period is not prolonged by repairs effected under the warranty. This also applies to replaced and repaired components. Any damage and defects, present at the time of purchase, must be reported immediately after unpacking. Repairs carried out after expiry of the warranty period shall be subject to a fee.
Scope of the warranty
This appliance has been manufactured according to strict quality guidelines and inspected meticulously prior to delivery.
The warranty covers material faults or production faults. The warranty does not extend to product parts subject to normal wear and tear or to fragile parts such as switches, batteries, baking moulds or parts made of glass.
The warranty does not apply if the product has been damaged, improperly used or improperly maintained. The directions in the operating instructions for the product regarding proper use of the product are to be strictly followed. Uses and actions which are discouraged in the operating instructions or which are warned against must be avoided.
This product is intended solely for private use and not for commercial purposes. The warranty shall be deemed void in cases of misuse or improper handling, use of force and modifications/repairs which have not been carried out by one of our authorised service centres.
Warranty claim procedure
To ensure quick processing of your case, please observe the following instructions:
■ Please have the receipt and item number (e.g. IAN 12345) available as proof of purchase.
■ You will find the item number on the type plate, an engraving, on the front page of the instructions (below left) or as a sticker on the rear or bottom of the appliance.
If functional errors or other defects occur, please contact the service department listed below, either by telephone or by e-mail.
■ You can return a defective product to us free of charge to the service address that will be provided to you. Ensure that you enclose the proof of purchase (receipt) and information about what the defect is and when it occurred.
You can download these instructions along with many other manuals, product videos and software on www.lidl-service.com.
Service
GB Service Great Britain
Tel.: 0871 5000 720 (£ 0.10/Min.)
E-Mail: kompernass@lidl.co.uk
MT Service Malta
Tel.: 80062230
E-Mail: kompernass@lidl.com.mt
IAN 277706
Importer
Please note that the following address is not the service address. Please use the service address provided in the operating instructions.
KOMPERNASS HANDELS GMBH
BURGSTRASSE 21
44867 BOCHUM
GERMANY
www.kompernass.com
Ordering replacement parts
You can order the following replacement parts for product SDBS 2400 A1:
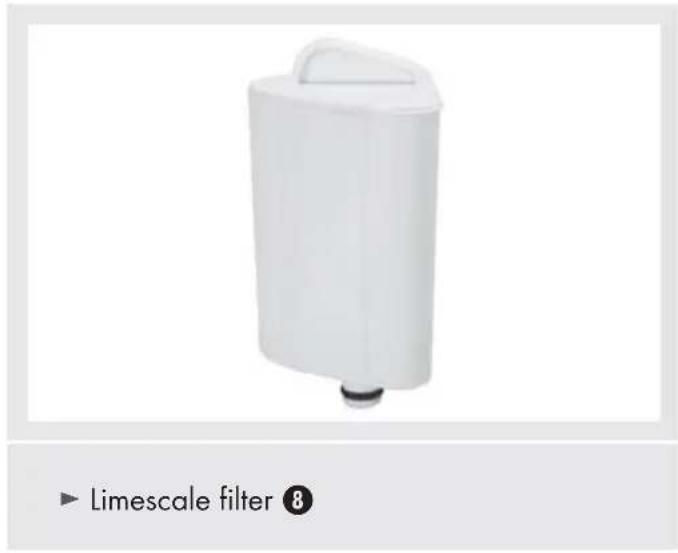
Order the replacement parts via the service hotline (see section "Service") or simply visit our website at www.kompernass.com.
NOTE
▶ Have the IAN number of the appliance ready (can be found on the cover of these operating instructions) when you place your order.
Inhaltsverzeichnis
Einführung 68
natural_image
Line drawing of a steam iron with attached tubing and directional arrows indicating motion (no text or symbols)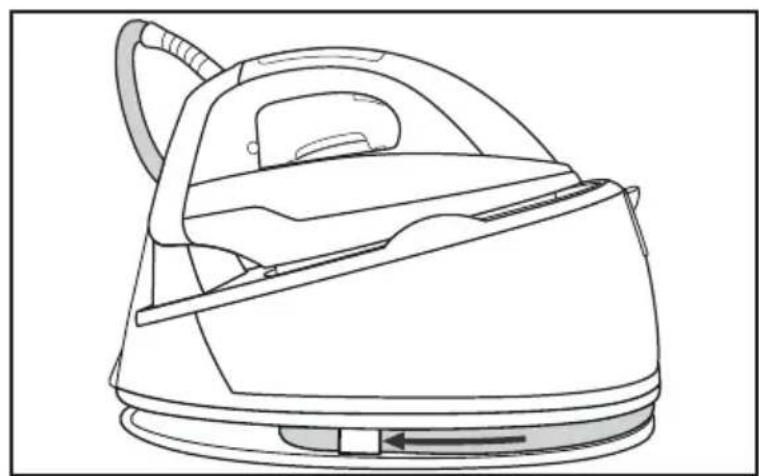
natural_image
Line drawing of a steam iron with handle and side panel, showing internal components (no text or symbols)KOMPERNASS HANDELS GMBH
BURGSTRASSE 21
44867 BOCHUM
GERMANY
www.kompernass.com
natural_image
White Kalkfilter plastic container with a black outlet, shown without any text or symbols on the device itself.HINWEIS
KOMPERNASS HANDELS GMBH
BURGSTRASSE 21
44867 BOCHUM
DEUTSCHLAND / GERMANY
www.kompernass.com
- FERRO COM CALDEIRA
- DE AT CH
- NOTA
- Safety 47
- Technical details 51
- Operating elements 52
- Setting up and connecting 53
- Handling and use 55
- Cleaning and maintenance 59
- Troubleshooting....61
- Storage/disposal 62
- Ordering replacement parts 65
- Introduction
- Information about these operating instructions
- Copyright
- Proper use
- Warnings
- DANGER
- A warning notice at this hazard level indicates an imminently hazardous situation.
- WARNING
- A warning at this hazard level indicates a potentially hazardous situation.
- CAUTION
- A warning notice at this hazard level indicates a risk of material damage.
- NOTE
- Safety
- Basic safety instructions
- RISK OF ELECTRICAL SHOCK!
- WARNING! RISK OF INJURY!
- RISK OF SCALDING OR BURNING!
- Caution, hot surfaces!
- CAUTION PROPERTY DAMAGE
- Operating elements
- (See fold-out page for illustrations)
- Figure A:
- Figure B:
- Figure C:
- Setting up and connecting
- Safety information
- While using the appliance, there is a risk of injury and/or damage to property!
- Package contents and transport inspection
- Unpacking
- Disposal of the packaging
- Set-up location requirements
- Electrical connection
- Handling and use
- Before first use
- Filling the water tank
- Ironing without steam
- Steam ironing
- Vertical steam ironing
- Refilling with water
- Cleaning and maintenance
- WARNING! RISK OF FATAL ELECTRIC SHOCK!
- Risk of bodily injury when cleaning the appliance!
- Damage to the appliance!
- Replacing the limescale filter
- NOTES
- Cleaning the appliance
- Troubleshooting
- Storage/disposal
- Storage
- Disposal of the appliance
- Warranty conditions
- Warranty period and statutory claims for defects
- Scope of the warranty
- Warranty claim procedure
- Service
- Importer
- Ordering replacement parts
- Inhaltsverzeichnis
- Einführung 68
- HINWEIS
Brand : SILVERCREST
Model : IAN 277706
Category : Iron