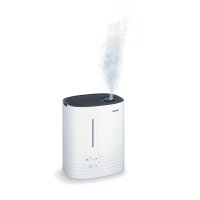
LB 60 - Humidifier BEURER - Free user manual and instructions
Find the device manual for free LB 60 BEURER in PDF.
| Product Type | Humidifier |
| Brand | Beurer |
| Model | LB 60 |
| Power Supply | Mains (standard voltage) |
| Operating Principle | Evaporation with heating |
| Humidity Setting | 20% to 90% RH |
| Water Capacity | Two removable tanks (autonomy approx. 24 h) |
| Light Indicators | Green (on), red (tank empty) |
| Auto Shut-off | Yes, when water runs out |
| Aroma Tank | Integrated for essential oils and herbs |
| Anti-scale Filter | Yes, removable (ref. 066.98) |
| Cleaning and Descaling | Regular with white vinegar or descaling agent |
| Safety | Shut off when water level low, hot steam, child safety locks |
| Dimensions | Approximately 28 x 18 x 32 cm (estimate) |
| Weight | Approximately 2.5 kg (estimate) |
Frequently Asked Questions - LB 60 BEURER
User questions about LB 60 BEURER
0 question about this device. Answer the ones you know or ask your own.
Ask a new question about this device
Download the instructions for your Humidifier in PDF format for free! Find your manual LB 60 - BEURER and take your electronic device back in hand. On this page are published all the documents necessary for the use of your device. LB 60 by BEURER.
USER MANUAL LB 60 BEURER
We are pleased that you have decided in favor of a product from our range. Our name stands for high quality and exhaustively tested products from the areas of warmth, blood pressure, body temperature, weight, gentle therapy, massage and air. In order to have long term satisfaction from your product, please study these instructions carefully and in detail. Keep them for later use and make them available to other users.
Yours sincerely
Your Beurer Team
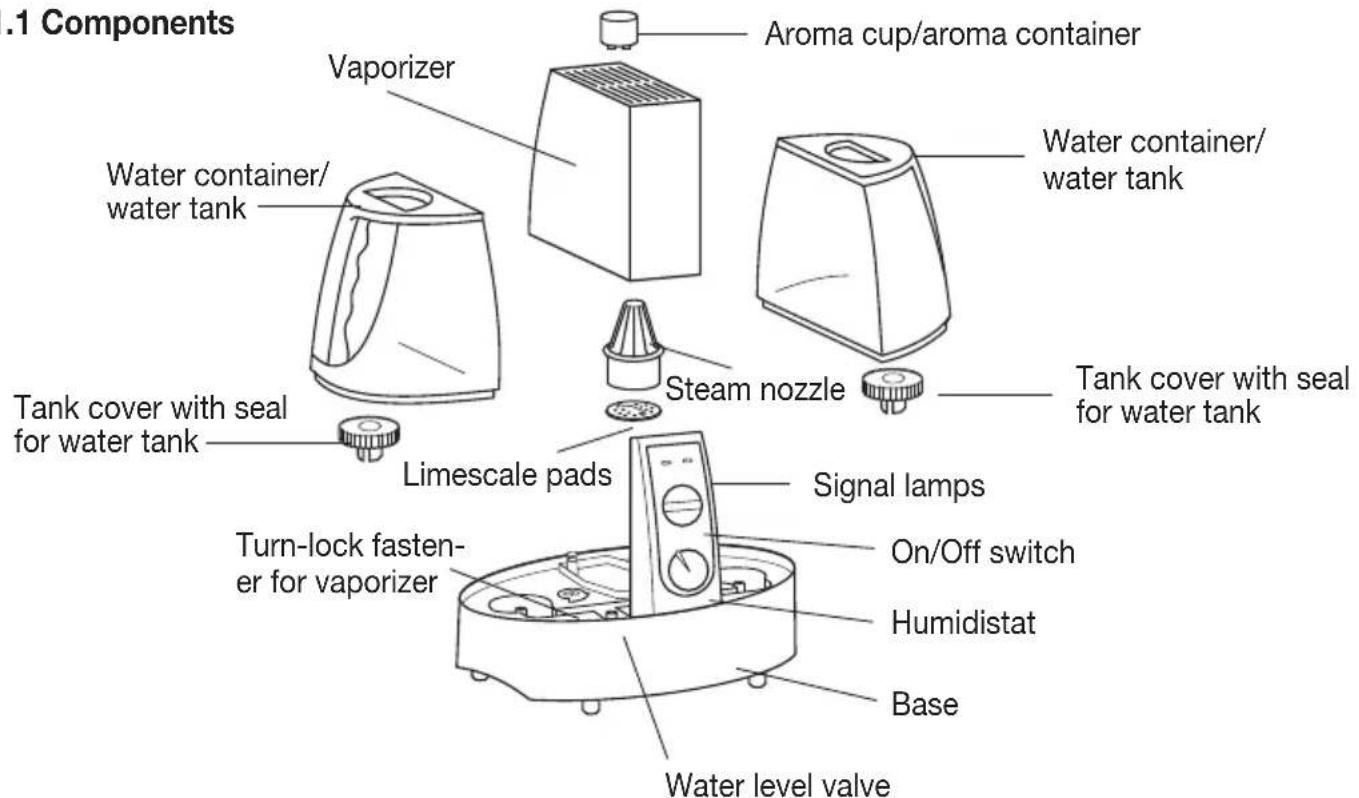
1.Description
1.1 Components
1.2 Control panel
1.2.1 Signal lamps
-
Green: Humidifier switched on
-
Red: Water tank must be replenished
1.2.2 ON/OFF switch
You switch on the humidifier by pressing the button. The green signal lamp lights when the humidifier is switched on.
1.2.3 Humidistat
This regulator allows you to control your selected relative air humidity.
If you want lower air humidity, turn the regulator to the left in the direction of Esmaller drops', for higher humidity to the right in the direction of Elarger drops'.
The relative air humidity can thereby be set between ca. 20% and 90% . You can thus set the relative air humidity according to your personal sensitivity.

2. Important notes
Read the instruction manual carefully and make it available to other users in order to avoid damage or injury.
- The humidifier must not be operated without water tanks.
- CAUTION: As there are high temperatures in this humidifier, take the appropriate precautionary measures, particularly in the presence of children, and place the humidifier in a location inaccessible to children.
- Position the humidifier so that the air ventilation slots are not directed towards a wall. The outgoing moisture could damage the wall, particularly wallpaper.
- Ensure that the humidifier is not too close to sources of heat such as ovens, heating radiators or direct sunlight.
- Use the humidifier only in closed rooms.
- Do not keep petrol or other easily flammable substances close to the humidifier.
- Fill the tank only with clean and cold tap water or distilled water.
- Ensure that the tank cover with seal on the underside of the tank is tightly closed before starting up the humidifier.
- Do not block the water level valve/float switch in the base.
- Do not add fragrances to the water (only to the aroma container). Please ensure that all detergents are carefully removed after cleaning the humidifier before starting it up again.
- Please note that plastic is not compatible with essential oils, since these can cause deformation of the plastic. If you want to use essential oils or fragrances, you should consult the manufacturer of the fragrances concerning their compatibility with plastic. The fragrance container is made of polypropylene (PP).
- Avoid contact with hot surfaces.
CAUTION: The outgoing steam is hot: DANGER OF SCALDING!
- Place the humidifier only on firm, flat and water-insensitive surfaces.
- On no account hold your hands or face over the vaporizer during operation.
- Do not attempt to remove the vaporizer, steam nozzle or limescale pad during operation or within 15 minutes after switching off and unplugging. These parts should be removed only for cleaning purposes.
- This humidifier must be operated only with the voltage stated on the nameplate.
- Ensure that your hands are dry when you operate the humidifier.
- Check the cable for damage before starting up the humidifier.
- Position the cable so that it cannot wrap around the humidifier.
- Do not tilt, move or empty the humidifier when it is switched on or connected to the power supply.
- If you want to move the humidifier to a different location, first switch it off, unplug the power plug and remove the water tank.
- Ensure that no water enters the inside of the humidifier or reaches the cable or connector.
- Always switch the humidifier off when the tanks are empty or when you are not using the humidifier.
- If you do not use the humidifier for a lengthy period, always unplug the power plug and clean the humidifier.
- Always unplug the power plug before cleaning.
- Clean the humidifier only in the way prescribed.
- Repairs to electrical appliances must be undertaken only by skilled persons. Improper repairs can represent a considerable risk to the user.
- Improper use or use not in accordance with this instruction manual can result in a fire or other risk!
3. Operation
3.1 Start-up
This appliance is used for the humidification of environmental air.
- First remove all packaging materials and transport locking devices.
- Place the humidifier on a firm, flat and water-insensitive surface.
- Ensure that there is a limescale pad in the vaporizer cup (see Section „3.4 Limescale pad"). To do this, remove both water tanks in turn, unlock the vaporizer by turning the turn-lock fastener outwards and remove the vaporizer. You can disengage and remove the steam nozzle by forcefully turning it anticlockwise. Now place a limescale pad in the vaporizer cup so that it is spread out flat. Reassemble the humidifier in reverse order and ensure that the steam nozzle and vaporizer are securely locked.
- Fill the tanks as described in 3.2 and place them both on the humidifier. Water can now enter the base and into the vaporizer cup according to the „bird drinking principle“, and only as much water flows which is equal to the amount vaporized.
- Plug the power plug firmly into the socket outlet.
- Switch on the humidifier - the signal lamps may flicker just for a moment. Turn the humidistat to the right until you hear a slight click. The humidity detected in the room by the humidifier is exceeded with this click. It takes only a few minutes for the humidifier to heat up and start operating.
- When the water tanks are empty - this will be the case after approx. 24 hours operation - the red signal lamp lights and the humidifier stops.
- If the water level drops below the minimum during operation, the heater will switch off and the red lamp will light up.
- The humidifier will operate as long as there is water in one of the two tanks or in the base. In some circumstances, the tanks will not empty equally quickly! The humidifier can be operated with either one or both tanks.
3.2 Filling the water tanks
- First switch off the humidifier and unplug it.
- Remove the tanks and open the tank covers. Fill the tanks with cold tap water. Then firmly screw on the tank covers again anticlockwise. Ensure that the seal is fitted and closes tightly.
- Now carefully fit the tanks on the humidifier and ensure that they fit correctly, otherwise the humidifier cannot operate properly.
3.3 Using the aroma container
The aroma container allows you to release aromatic, herbal and other fragrances into the air.
- Switch off the humidifier and allow the case and vaporizer to cool down.
- Carefully fill the container with the substance selected. The container should not be filled higher than half full.
- Now carefully place the container in the middle of the air ventilation grid of the vaporizer.
After use, remove the container and clean it of residues using warm water.
3.4 Limescale pad
Because this humidifier operates according to the vaporizer principle, none of the particles in the water reach the respiratory air; they are trapped and remain in the vaporizer cup. The minerals contained in the water accumulate on the large surface of the pad - chiefly limescale. The limescale is easily removed from the humidifier with the pad and deposits are reduced. The humidifier also operates without pads, but more frequent cleaning will then be required.
During operation, the water becomes very hot. If you want to remove the pad, first let the water cool down or use tongs.
The life of a pad will depend on the hardness of the water with which the humidifier is operated. In regions with average hardness, the pad should be changed after about 3 weeks of continuous operation. Spare limescale pads can be obtained under Article No. 066.98 from the service address or from your dealer.
To check when the pad should be changed, first allow the water to cool and then remove the pad. If it is hard and no longer flexible, it must be exchanged. A further sign that the pad must be changed
are limescale deposits on the inner sides of the vaporizer cup. If the pad decomposes after a time, operate the humidifier in future without pads. This will usually be the case with very soft water.
4. Cleaning and maintenance
Water contains limestone and other particles. Even when using pads, these are deposited in the vaporizer cup, thereby impairing the performance of the humidifier. Furthermore, a very wide variety of germs can accumulate in the water, particularly on all surfaces in contact with water.
For these reasons, regular cleaning is essential if you want to enjoy lasting benefits from your humidifier. Please note that more frequent cleaning will be necessary when using very hard water.
- Switch off and unplug the humidifier prior to cleaning.
- Remove the water tanks and empty them. Wait at least 15 minutes after switching off until the hot water in the humidifier has cooled down. Remove the vaporizer and the steam nozzle as described under 3.1 Start-up.
- To descale the humidifier, you must first empty the water from the base by taking hold of the humidifier with both hands and tipping the water SIDEWAYS out of the base. On no account allow water to run onto the control panel, power cord, case openings or in the inner openings of the control panel and never hold the humidifier under a running water tap!
- Add enough descalant (e.g. soft vinegar) into the base to cover all water-carrying parts (in particular the vaporizer cup and inlet pipe). Allow the descalant liquid about 20-30 mins. to take effect. When descending, also comply with the descalant manufacturer's instructions.
- Tilt the humidifier SIDEWAYS again thereby removing the descalant liquid. Then fill the reservoir and the vaporizer cup with clean, warm water to flush out the vinegar residue. Remove all deposits in the bases possibly using an old toothbrush. Empty the humidifier again by tipping it sideways.
If there are still deposits left in the vaporizer cup, remove these with a metal scraper. Do not use any metal blades on plastic parts.
Always ensure that no water enters the inside of the humidifier or other apertures or runs onto cables or connectors!!!
- To clean the water tank, dissolve a teaspoon of household chlorine in approx. 4 liters of water. Always comply with the manufacturer's instructions when desinfect. Allow the solution about 20 mins. to take effect and move the tank every couple of minutes to wet all the surfaces.
Then empty the tank completely and rinse it out very thoroughly until there is no longer any chlorine odour. Fill the tanks with fresh, cold water and place them on the humidifier again. - Never use petrol, kerosene, window cleaning agent, scouring agent, furniture polish, thinners or other solvents to clean your humidifier.
- The water reservoirs and tanks should be emptied and rinsed out daily and refilled with fresh tap water.
- To clean the surfaces, it is best to use water with a mild detergent and a damp cloth. Wipe over once with clear water and then dry off the humidifier.
- As soon as the humidifier is clean and dry, exchange the pad if this is necessary. Fit the steam nozzle and turn it clockwise until it engages. Fit the vaporizer and turn the turn-lock fasteners inwards.
- If deposits have formed on the valves of the tank covers, clean these carefully with a soft brush.
5. Storage
If you do not want to use your humidifier for a lengthy period, e.g. during the summer months, it is particularly important to comply with the following instructions.
- Clean the humidifier carefully as described under 4.
- Ensure that the water is removed completely from the tank and from all water reservoirs.
- Dry the humidifier thoroughly.
- Unscrew the tank cover to ventilate the tank.
- Pack your humidifier in its original carton and store it in a cool, dry place.
6. Troubleshooting
| Fault | Possible Cause | Remedy |
| - No vaporization | ·The water tanks are empty ·Water tanks are not properly seated on the case ·The humidity value set is achieved ·Despite the tank in place, no water in the vaporizer cup | ΕFill the water tanks ΕPlace the tanks correctly ΕSet the regulator to a higher humidityt ΕInlet pipe to the vaporizer cup blocked, e.g. by scale. Remove the blockage. |
| - Water runs out | ·Tank cover missing or not correctly closed ·Seal missing or incorrectly fitted | ΕScrew on the tank cover firmly ΕFit the seal tightly |
| - Inadequate flow of steam | ·Scale deposits in the vaporizer cup | ΕClean the humidifier |
| - Red signal lamp lit | ·Water level below the water level valve in the base ·Valve in the tank cover is coated with a film of dirt ·Scale deposits in the vaporizer cup ·Water level valve blocked | ΕFill the water tanks ΕClean the valve ΕClean the humidifier ΕUnblock the valve |
7. Disposal
Please dispose of the device in accordance with the directive 2002/96/EG - WEEE (Waste Electrical and Electronic Equipment). If you have any queries, please refer to the local authorities responsible for waste disposal.

FRANÇAIS
Chere client, cher client,
1.2.2 Interruptor principal
1.2.2 NepeekJIOuataIb BKJ./BbIKJ.
HaxaTne 3ToI KJIaBnI OcyeCTBnETCB KJIIOueHne yCTpoiCTBa. Korda yCTpOoiCTBO BKJIIOUeHO, rOpNT 3eJeha KoHTpOJIbHa JAMNa.
1.2.3 PerylTop BnaXHoCTn
3TmperyJrTOPOMOXHO 3aDaTbKeJaemyo OTHOCHTeBHyIO BJaXHOCTb BO3dyxa.
Ecnn Tpe6yetc noHnHexeHHa BnaXHOCTb BO3dyxa, TO nobepnTe peryIaTOp BneBO ,B HappaBHeHHrMaJIeHbKne KaIIN";ДЯ yBeJIuHcEHNAJXHOCTn BpaaATe perIyIaTOp BnpaBO ,B HappaBHeHHrBoJIbShne KaIIN".
Blaorapn 3Tomy Bbl mokeye yctaHaBnBaTb OTHocnteHHyo BnaXHOCTb BO3dyxa B daana3OHe OT ca. 20 do 90% , o6ceueHBan dIe Ce6MaKcImaHbHKOmfopt.

2. Bazhble yka3aHnA
UTo6bI N36ExaTb BO3MOXHbIX HEnpnaTHOCTe, BHIMaTeNbHO IpOHTaHTe DaHHoe pyKOBOdCTBO NO IcNoJIb3OBaHmIO N daHTe BO3MOxHocTb dpyrIM NoJb3OBaTeJAM N3yHTb erO.
He pa3pewaetcncnoIb3ObaHne yBnaXHTeJIa BO3dyxa 6e3 emKoCTn dJIra BObl.
BHIMAHHE! B daHOM yBnaXnTeJe BO3dyxa IMeOTc 3JeMeHTbI, HarpeTbe DO BbICOKOf TemepaTypbI. Po3tomy peKoMeHdyETcA CO6JIIOaTb ONpeJedHbIe MEPbI ppeOCTOpOXHOCTN,OC6eHBO B npCytCTBn DeTeY. YCTaHaBnBaIte yBnaXnTeJIb TaK, YTO6bl dEtN He MOJIIN IMeTbdoCTyn K Hemy!
- UcTpoIcTBo DOJXHO 6bITb NOMEeHOr TAK, YTO6bl OTBepCTnA DnB BbIXOda BO3dyXa He 6bln HappaBHeHbI HenocpeIcTBeHHo Ha CTeHy. BbIXOaIuBnaXhBn BO3dyx MoKet NobpeIITb CTehbl, Oco6eHHO o60n.
He yctaHaBnBaIte np6op B6Jn3n nCTOuHnKOB TeIIa, TaKx KaK neu, paNaTOpbl; He noDbepraTe ero DeiCTBnIO npMbIX cONHeuHbIX Jyuei. - IcnoJb3yIte yBnaXHnTeJIb B03dYxa TOJIbKO B 3aKpbITbIX NOMueHnIX.
- 3anpeuaetcxaHHTb B6n3n np60pa 6eHmH ndpyrrne JERKO BOCnnaMeHaOuieecr MaTePnaJIbI.
-ДяЗANOненЯ EMKOCTN NcnoB3yIte TOnbKO ChCTUO IN XoJIoHHyIO BODY I3 BOJOpBODa IIN DnCTNIIIpOBaHHyIO BODY. - Ipeed Naayom nCnoB3OBaHn npnbopa y6eNTecb, YTO KpbIka emKoCTN C yNIOTHHeM, pacNoLoXeHHa Ha HxHHe CTOpOHe EMKOCTN, HAdExHO 3aKpbIta.
CleIte 3a Tem, UTo6bI BeHTnB yPoBHa BOdbI NONJIaBKOBbI NepeKIOUaTeIb B OCHOBaHIM He OKa3aJIncb 3a6JIOKIpOBAHHbIMN.
He onyckaetc doabneHne apomatn3aTOPOB B BODy (ToIbKO B CTaKaHnK DnApOMaTHaTopa). Iocne uNCTKN yCTpOHTBA npeD HOBbIM eRO 3anycKom TuaTeNbHO ydaJIInTe BCE 6e3 NCKJIIOUeHnY ChCTAUNe CpeDCTBa. - YUHTTE, UTO NnactMacca MoKET DeOpMnPoBaTbC NOB Bo3DeIcTBnEM 3nnpCoepXaux Macen. Ecnn ecTb JxenaHne nCnoJb3OBaTb 3nnpCoepXaunme Macna nn apOMaTHaTOPbl, TO Heo6xoDnMo BbIChNTb C n3rOToBnteJeM apOMaTHaTOPa erO COBMeCTmOCt b C daHHoN PnactMaCCo. CtaKaHnK DnA apOMaTHaTOPa n3rOToBJIeH n3 noINnpOnJIeHa (PP).
- I36eraTe KOHTaKTa C ropyMn NOBepxHOCTMn. BHIMAHIE! BbIXoJauN nap Harpet Do BbICOKo TeMnpaTypb: ONACHOCTb OXORA!
Pa3pe7aetcyaTaHaBnBaTb yBnaXHntb BO3dyxa TOIbKO Ha TBepyIO IIOCKyIO NOBepxHOCTb, HEOBCpnnmHByIO K BO3deNCTBIO BOIbl.
Kateropnueckn 3anpeaetc nomeaatb pykn n luo BO Bpemra p60tb np6opa nepeBbIXoHbIM OTBepCTnEM ncapntelbHO CTOnKn.
He nbItaIteCb ChrTb NcnapnteBHyIO CToiKy, HakoHeuHKn DnB BbIXoDa npa nn PhnBtp BO BpeMa paobTb nnn B TeueHne 15 MNHT noCne BbIKIOueHn I N3BNeueHn BNKn n3 po3ETKn. Ha3BaHHbIe Detanl pa3peShaetc CHImaTb TOnbKO dNOr ONUCTKn.
PaccMaTpuBaemoe yCTPOINCTBO DOnyCKaETCnCNOJb30BaTb TOJIbKO C HApRJaKeHHeM, yKa3aHHbIM Ha 3aBOIDCKo Ta6NHyKe. - CneiTe 3a TeM, TTo6bI Baun pyKn 6bln cyxmm npn o6cnykBaHnn npnbopa.
- Ipeed hauanom nCnoB3ObaHn np60pa npOBepbTe KaebI, HeT Jn Ha HEm NOBpeKdHn.
- PpOBeIte Ka6eJIb TaK, YTo6bl npIbOp He MoR OnpOKnHyTbcra.
- Do tex nop, noka npnbop BKIOUeH nn noDCoeINHeH K cETn, 3aIpeuaTcHaKIOHrB erO, nepemueaTb nn onyctOuTaB.
- Ecn Tpe6yeTcnapeHecn np6op Ha npyroe MeCTO, To Hao ChauaJa BbIKIOHTb erO, n3BneB BuNKy n3 po3ETKn IN CHrTB EMKoCTN C BOdoN.
- CneiTe 3a Tem, UTo6bI B0Da He nonaBHyTpB np6oPa, a TaKxe Ha Ka6eNb HnHa BnKy.
BcAkn pa3, KOrda BOda 3aKaHnBaetc nn en cnn np6op boone He nCnoJb3yeTc, erO Heo6xOIMO BblKJIIOuHaTb. - Ecnn np6op He nCnOJb3yETcB TeueHne dIITeJIbHoro BpeMeHN, To Heo6XODIMO Bcerda N3BJeKaTb BuNKy n3 po3ETKN OuNtcaTb np6op.
-пегдлобочистковытackивайт eрstkn ceTeByIO BnIky.
OuicTka npibopa dOnkHa npoBOntbcra ToIbko B COOTBeTCTBnC PpeDncaHnMn.
Pemont 3neKtpo06OpdyOBAHn pa3pewaeTc npOBOuNTb TOnbKO CnIaMn CneuaJIncTOB. HeaJnxkauee npOBeHeHne pEmonta MoXet Co3daTb 3NaHTeJIbHyIO OAnCHOCT b IIN JNoJIb3OBaTeJIa - Пи Надлесашем И, COOTBETCTBEHNO, пOTиВОрeчашем ДанHOMу pyKOBODCTBY ИСПОЛьЗОВИМ BO3нИкайт, КрOME почero, onaCHOCTb NOЖ.apa!
3. Pa6ota
3.1 Haayano pa6oTbI
PpeDCTaBHeHHe 3decb yctpoiCtBO npEHa3HaueHo IyYbIaxHHeHnBaO3dyxA B NOMeJeHN.
- Hauana Heo6xOIMo CHrTb BCE 3nEMeHTbl ynaKOBKn TpaHcnpTupOBKn.
-
YCTaHOBNTe yBnaxHnTeJIb BO3dYxa Ha TBepdyIO I NIOCKyIO NOBepxHOCTb, HEBOcnpNIMMByIO K BO3DeIcTBNIo BOIbl.
-
Y6eIntecb, yTO B Icnapnte Ne CToNT FInbTp (cM. pa3dJe r3.4. FInbTp" ).ДЯ 3TOrO HAno CHATb NocneIOBATEbHO OBe EMKOCTN DnA BOdBi, ChrTb KpeJIeHne IcnapnteIbHOJ CToIKN (DnA 3TOrO BpaaHTe NOBOPOTHbIe 3amKn HApyKy), NocNE Yero ydaIITb IcnapnteIbHyIO CToIKY. NOBepHnTe npOTNB acBOiC TpeKN C YcINnEM HAKOHeuHK DnA BixOJa napa N CHIMITE erO. TeNep MoXHO BnDeTb B Icnapnte Ne Pnocko pacNoLoXeHHbI FInbTp. Co6epTe yCTpoiCTBO B o6paTHOM nOpAKe; o6paTNe BHNMaHHe Ha HAdexKHOCTb YCTaHOBKn HAKOHeuHK dNra BixOJa napa N IcnapnteJIbHOJ CToIKN.
3aONHnTE EMKOCIN B COOTBETCTBUN C ONUCAHNEM B pa3dene 3.2 n yctahOBnTe Hx Ha npnbop. Teepb BOda nO pINHcNpy rcoo6uauuXcR COcyIDOB" MOXET NOCTyNaT B HNXHIO UacTh (OCHOBaHne) IN B Icnapntel, pnuem noCTynatb Byet POBHO CTOnbKO, cKOLbKO IcnapreTcR.
BcTaBbTe HaIexKHO cTeByIO BnIKy B po3eTKy.
BknHouHTe np6Op; BO3MOxHO, YTO npn 3OM MmHyT KOHTpOJbHbIe JAmNbl. NOBepHInTe peryJrToP BnaxHoCTn BO3Dyxa BnpaBO TaK, YTO6bl ycblwaT bIerKn IeEnQK. 3TO 3NaHT, YTO yCTaHO BnaxHocTn, npeBbIaIOoee BnaxHoCTb B NOMeHNN, KOTopA ONpeDeJeHa np6Opom. DnI nporpeBa yCTpoiCTBa Hauana erO pa60bl Tpe6yeTcR HeCKoJIbKO MNHT.
Korda Boda B EMKoCTn 3akaHunBaeTcra (3To npOncxoDnT, KaK npaBnIO, nocJe 24 YacOB pa60TbI), 3aropaeTcKaPachA KoHTpOlbHnJaMna, n np6Op npEkpauaet pa60Ty. - Ecnn B npocece pa60tby ypoBHeB BObl NOHJXaeTcA Do yCTaHOBJeHHOrO MNHMMyMa, To HArpeBaTeIbHbI 3JIeMeHT BblKIOUaETCa, I 3aRopaETc KaPcHa KOTpOlbHa JAmna.
- YCTPOINCTBO pa60taeT Do Tex nop, NOKa IMeETcB ODa B ODHON 3 DBYX EMKOCTeH NIN B OCHOBAHN. B 3aBNCIMOCTn OT KOHKpeTHbIX ycNOBn pa60tI ONyCToWeHne ObENx EMKOCT MoKET pON3OHTn HeODHOBPMeHHO! YCTPOINCTBO MOXHO INCNoB3OBaTB C ODHON NIN OBeIMN EMKOCTAMN.
3.2 3aOpJHHeHne EMKocTn BDoO
- BbIKIIOUHTe cHauJa yCTpOJCTBO n BBITaUHTe BNJKy n3 po3ETKn.
- CHIMITE EMKOCIN OTKPOITe KpbIiKy. 3aONHInTe INX XOLOHOBODOPOBODHO BDOJ. YCTAHOBITE IIOTHO KpbIiKy, 3aBNHTINB ee npOTnB yacOBn CTpeJIKN. ObpaTIne BHIMAHne Ha HAnuHne yNtNOTHeHN H NaEXHOCTb eTo yCTaHOBKn.
- IomeCTIe EMKOCn CHOBa Ha yCTpOcTBo; ObaTnte BHMaHne Ha npaBnIbHOCTb NOcaKn, T.K. INaYe yBnaXHnTeNb BO3dyxa He CMOxet npaBnIbHo pa60TaTb.
3.3 IcnoIb3ObaHne cTaKaHnka c apomatn3aTopoM
Pn NOMOu CtaKaHUnka C apOMaTn3aTopom MOxHO Do6aBnTb B BO3DyX apOMaTnueckne, pactnteHbIe, IekapCTBeHHbIe INHbIe DuynCTbIe BeIecCTBa.
BbIKIOHTe yCTPOINCTBO n DaIte BO3MOXHOCTb OCTbITb KOpNcy u NcnapTeJbHOI cTOnKe.
Octopoxho 3aONHnTe cTaKaHnK HxHbIM BeueCTBOM. He dOnyckaetca 3aONHeHne 3Toro cTaKaHnka 6oJee Yem HanoNobHy.
OcToPOxHO nOmeCTnTE cTaKaHnK B cepeAnHe peWeTKn BbIXoDa BO3DyXa Ha nCnapTeJbHo CTOnKe.
- Iocne nCnoJIb3OBaHnI CHIMNTE CTAKAHNK IN POMOHTe ERO TENIOB ODO, YTObI ydaJIITb OCTaTKN BeueCTBa.
3.4ΦnIbTp
IockoJIbky 3TOT yBnaJHnTeJIb BO3dUxpa6OtaET NO npHnCnpy nCnapeHn,TO qactuIb, HaxoJaIeCeB B BoJe, He IOnaJaOT B BO3dUx, KOTOpbIMMbIBdxAem. OHN yNaBnBaIOCTcN OCTaOTcB N CnpAITeJIe. CoepXaIeCeB B BoJe MInHepaJIbI (B nepByK OuepeDb, INBeCTHk) cKaJIbNAIoTcR Ha NOBepXHOCTN fIbTpA. BlaorApra 3ToMy n3BeCTHk MoKeT 6bITb JERKO ydaJIeH BMeCTe C fINbTpOM, YTO yMeNbHaet OTLOKeHnHa np6ope. Pp6Op MoKeT pa6OtaTb N 6e3 3TOrO fInbTpA, YTO BJIeHT TOnbKO Heo6xoDmOcTB bOlee UactO OYNCTKI.
Ipi pa6ote BOda CnIbHO HarpeBaetc. Ecn Tpe6yeTc n3BneYbΦnlbTp, To hao DoXdaTbcra, noka BOda OCTbIHET, INN NCNoJIb3OBAt b HnCTpyMeH (INHcET, PNOCKORY6cbl N.T.I.).
Cpok cnjxkbI qnIbTp a3aBucnt OT cTepeHn JecTKoCTn nCnoJIb3yEmoB OdbI. B pernohax C BOdo CpeDHeJ XeCTKoCTn Heo6xoDmO 3aMeHrTb qnlbTp npimepHo uepe3 HeJeI HnepepbIBHO pa60bl.
3anachbIe pNJIbTpbl MoXHO npNoobpeCTn B cepBnCHo cnyX6e nn y BaUero dInepa; pNJIbTp nMeet apTNUKJIbHbI HOMep 066.98.
YTo6bI BbIaHHTb, Tpe6yETcI IIN 3aMeHa cInbTpA, DaIte BOe OCTbITb IN 3BLeKeNTe cInbTp. EcII IN OH XecTKn I 60Jee He rHeTcA, To eO Heo6xOdmo 3aMeHHTb. Eue ODNHM npu3HaKOM Heo6xOdmoCTn
3aMeHbIΦnIbTpRa ABnEeTcNIOBHeHne N3BeCTKOBbIX OTNOXeHn Ha BHyTppeHHe CTOpOHe NCnApNTJI. EcInΦnIbTpYepe3 HeKOTOpoe Bpempa60bI pa3BaUNcR,TO peKOMeHdyETcNcNoB3oBaTb DaJee yCTpoiCTBO 6e3 Hero.3To qaSe BCero npOnCxOdnt npn pa60Te C OueHb MmKoB BOdoi.
4.Чистка и ухов
Boda copejxnt n3BeCTnK n npyIe qactnCb. HeCMOTpHa nCNoIb3OBAHne cnilbtpa, OHN BCE xe OceAIOB HncnapTeNe n yxyduaOT npoIN3BOIDTeJIbHOCTb yCTpoINCTBa. Kpome TOrO, B BoDE mory CKanIIBaTcM NKPOOPraHn3Mb pa3nUHoro poDa, B qACTHOCTn, Ha NOBepXHOCTx, COpnkacaIOuIXsc C BOOn. PoTOMy Heo6xoJIMO peYJARPHo npOBODHT b ONUCTKY pnp6op, ecn Bbl JeNaete npodntb BO3MOXHOCTb HacnaXdaTbc erO pa60ToI. YUTTE, YTO TaKHe ONUCTKn HAno npOBODNTb Yaue, ecnn IcNOJb3yeTcR BODa C BBICOKO CTENHbIO XECTKOCTN.
1.передочиков Вьклочиные рпбор и Вьтаunte ВИКУ n3 po3etkn.
2. CHIMNTE EMKOCTN DnRA BOBn IN CNeIte N3 HnX BODy. IOnOxDnTe He MeHee 15 MNHyT NOcNe BbIKIOUeHnra, YTO6bI BOa B KOpNyCe OCTbJna. CHIMNTE NCnapNTeNbHyIO CTOnKy nHaKOHeuHK dJI BbIXoDa npa TaK, KaK ONnCaHO B pa3dene r3.1. Haayano pa6Otbl".
3.ДЯ ydaJIeHnHaKINnI3 npi6opa Hado Chaayala ydaJIITb BODy, HaxoJauOcB OCHOBAHn. Bo3bMnte dIra 3TOrO yCTpoIcTB O6eIMn pykAmn I BblIpeChnte BODy n3 OCHOBAHn B CTOPOHY. He donyckaIte Hn B KOem clyuae nonadHn BODbl Ha naHeNb ynpabLeHn, Ha CeTeBOI Ka6eJIb, OTBePCTnR KOpNyCa IIIN BO BVHTpeHNHe OTBePCTnR NaHeN ynpabLHeHn! HnkOrDa He IIOCTaBnIte YCTpoIcTB NOI CTpyIO BODbl n3 KpaHa!
4. 3aJeIe B OCHOBAHne CToBko CpeDCTBa DnY ydaJIeHnHaKnII (HaIpIMep, 6bIy YKcyc), YTO6bl BCE YaCTN, COpnKacAoUmeCn BOIOB (B YactHOCTN, NcnapTeN b NODBOObl), 6bln NOJHOCTbIO nOKpbITbI IM. OctabTe 3Ty XnIDKOCTb BO3dEInCTBOBaTb Ha OTLOXKeHn npImepHO Ha 20-30 MmHyT. B XOe IPOueCCA Co6IouDAITE TaKke YKa3aHn IN3rOTOBtEN 3TOrO CpeDCTBa DnY ydaJIeHn HaKnII.
5IIOJXNTe CHOBA yCTPOINCTBO HABOK n TAKIM o6pa3OM CJIeTKe XnIDKOCTb. 3aJIeTIe TENepB B EMKOCTH n B INCnAPITeJIb YnCTyIO TEINyIO BDOy, UTObI yDAInITb OCTATKN YKCycA. CHIMITE BCE OCAJDeHnB OCHOBAHm npi NOMOUI POBHOJ 3y6H0J uETKn. CHOBA cJIeTIe B CTOPOHy CODEPKMOp E pN6bopa. EcII B INCnAPITeNE eIe 6yDet OCTaBaTbcHn KaINb, CHIMITE ee MeTAJIInueCKM CKpe6kOM. He NCNOJB3yIte MEaJIInueCKNe Ie3BnHa PnACTMaCCOBbIX DeTALAX. IocToHHo CJIeDInTe 3a TEM, UTObI BOJa HE IOnaJa BHyTpB pN6bopa IIn B Dpyrne OTBepCTnA, a TaKxHe Na Ka6Bel IIn Ha BVInKy.
6.ДЯчSTKN EMKOCTeДЯ BOdI pactBOpTE yaHyIO JIOKky 6bITOBORO XLOPA npIMepHO B 4 IHTpAX BOdbI.Пи уdaJIeHnHaKINn CO6JIIOJaTe B KaKDom Cnyae yka3aHnN N3ROTOBNTeN. OCTaBBte pactBOP BO3DeiCTBOBaTb Ha OTIOXeHnN npIMepHO Ha 20 MInHT, DBrAra EMKOCTb Chepe3 KaKDbIe HECKoBko MNHT, YTObI CMAuHBaIncB BCE NOBepxHOCTN. CneIte pactBOP n3 EMKOCTe IN TuaTeNbHO IN npOMOIte, YTObI He OCTaNoCb 3anaxa XlOpa. 3aONHIne EMKOCn CBexKe XONOHOBODOn IN yCTaHOBnTE IN CHOBA Ha KOpNyc.
7. Дя чстки увлaxнтелу BO3dуха Кaterорпеск 3anpeшaeTс ИСПОь30ВаТь 6eH3nH, KepocinCpeДCTBA Дя мойк CTekOЛ, abpa3иBьгie ChSTЯше cpeДСТВa, Me6eЛьну ПОПИТуР, pa3бabNTeINIINи INьпспгБИ.
8. Emkocn dna BOdbi CneNyET KaKdbi DeHb ONyCTOwATb, IpombIBaTb N 3aONHrTB CBExeB BOOnpOBoHOB NOI.
9. Дя чстки NOВерховсей луше BCERO ИСПОЛБЗОВаТь BODу C МЯrkIM чостацIM СретсВOM И Влжни.TkaHB. Посlete 3TORO наdo odHOKpaTHO помыть пибор чостоВODои BBICUWItб erO.
10. Pocne ouncTk n cyuKn npnbopa 3ameHnTe qnlbTp, ecnn Tpe6yeTc. YctaHOBnTe HaKOHeYNK dN BbIXOda npa n NOBepHnTe ero no yacoBOI cTpeLKe, yTO6bl OH 3aueJIKNHyIcR. YCTaHOBnTe IcnapnteJbHyIO CTOnky n 3aKpyTnTE IOBOPOThIbe 3AMKn BHyTpB.
11. Ecnn Ha BeHTnJx KpbIuKn EMKoCTn 6pa3OBaJIncb OTIOXKeHnA, TO OCTOPOXHO CHIMNTe INX MArKOJ IETKOJ.
5. XpaHeHne
Ecn npednonaraetc He nCnoB30BaTb yBnaXHnTeNb BO3dyxa B TeueHne dInTeNbHO BPemHn, HapnMep, B IeTHne MecauI, To BaXHo CO6JIIOCTn PnpBeDeHHbIe HHXe YKa3aHn.
TtataTeNbHO BbIcHCTnTE yBnaXHnTeJIb, KaK OINcaHO B pa3dJe 4.
- Y6eIntecb, yTO BCA BOda ydaJeHa n3 BCEX emKoCTeN.
TuaTeNbHO BbicyuHnTe npnbOp.
- BbInHTnte KpbIuKy eMKoCTn, YTObI eMKoCTb npOBeTpBaJacb.
- YnakyuTe yBnaJxHnTeIb BO3dyxa B erO nCxOndHyo Kopo6ky u xpaHnTe B npoxlaHOM cyxom MeCTe.
- Понск и устараенье Нениравност