LB 50 - Humidifier BEURER - Free user manual and instructions
Find the device manual for free LB 50 BEURER in PDF.
User questions about LB 50 BEURER
0 question about this device. Answer the ones you know or ask your own.
Ask a new question about this device
Download the instructions for your Humidifier in PDF format for free! Find your manual LB 50 - BEURER and take your electronic device back in hand. On this page are published all the documents necessary for the use of your device. LB 50 by BEURER.
USER MANUAL LB 50 BEURER
natural_image
White cylindrical water heater with control panel and ventilation grille (no visible text or symbols)1 Getting to know your appliance ... 11
2 Safety information....12
3 Appliance description....13
Humidifier 13
Control panel 13
4 Start-up....14
5 Operation ....15
6 Care 16
Overview 16
Before cleaning and descaling ..... 17
Cleaning the appliance .... 17
Descaling the appliance .... 18
After cleaning and descaling ..... 18
Cleaning the air filter 18
7 in the event of problems......19
8 Technical details....19
9 Benefits of humidification .....20
1 GETTING TO KNOW YOUR APPLIANCE
Instrument functions
This electric humidifier is used for hygienic, odourless and bacteria-free humidification of living and work areas for private use. Besides the evaporator system recommended by doctors, your humidifier has the following additional functions:
- Choice of two evaporation rates: 150 ml/h and 400 ml/h
- Removable water tank
Volume 5 litres
• Straightforward control panel
• Overheating protection - Automatic switch-off function when tank is empty. Fan continues running in order to cool system (safeguard against running dry)
• Water level indicator - Green indicator illuminated: appliance in operation
- Red indicator illuminated: empty water tank
Explanation of symbols
The symbols in the instructions for use denote the following:
 | WARNINGWarning of possible risks of injury or health hazards |
 | IMPORTANTSafety information about possible damage to appliance/accessories |
 | Important information |
Read the instructions for use carefully. Failure to observe the following information can cause injuries or damage to property. Keep the instructions carefully and also make them accessible to other users. Always pass on these instructions together with the appliance.

WARNING: Electric shock
- Never pull the plug out of the wall socket by the power cable [14] or with wet hands.
- If you wish to install the appliance anywhere else, first switch it off, pull out the power plug [14] and let it cool down.
- The appliance should not be tilted, moved or emptied while it is switched on or connected to the mains.

WARNING: Fire hazard
There is a risk of fire if used incorrectly or if not used according to these operating instructions!

WARNING: Danger of scalding
The exiting steam is hot!
- Never hold your hands or face over the rotary steam nozzle during operation [2].
- Avoid contact with hot surfaces.
- Never try to remove the steam tower [3], steam nozzle [2] or pad [4] during operation or within 15 minutes of switching off and unplugging the appliance from the mains. These parts may only be removed for cleaning purposes.
- As there are high temperatures inside this air humidifier, please take appropriate precautions, especially in the presence of children, and install the appliance in a location inaccessible to children.
Storage and care

IMPORTANT
- Only clean the appliance in the manner specified.
- Make sure that no water gets inside the appliance or onto the cable [14] or mains plug.
- Always switch off the appliance if the tank [8] is empty or the appliance is not in use.
- If you are not going to use the appliance for some time, pull out the plug [14] from the mains and clean the appliance.
- Make sure that the appliance is not too close to heat sources such as ovens, radiators or direct sunlight.
- Do not store petrol or any other highly flammable substances near the appliance.
Repair

WARNING
Repairs to electrical appliances may only be carried out by specially trained persons. Incorrect repairs can lead to considerable danger for the user. In the event of repairs, please contact customer service or an authorised dealer.
Disposal

IMPORTANT
Follow local regulations regarding disposal of materials. The appliance should be disposed of according to Regulation 2002/96/EC-WEEE (Waste Electrical and Electronic Equipment). In case of queries, contact the municipal authorities responsible for waste disposal in your area.
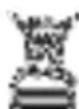
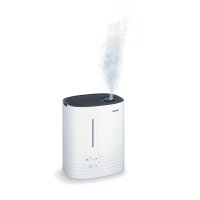
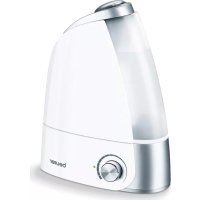
Humidifier
1 Cover
2 Steam nozzle
3 Steam tower
4 Pad
(beneath the steam tower in the hot water chamber)
5 Hot water chamber
(beneath the steam tower, not illustrated)
6 Humidifier casing
7 Water tank handles
8 Water tank, volume 5 litres
9 Tank catch, with valve
10 Water level indicator
11 Air filter flap (back of appliance)
12 Black air filter (back of appliance)
13 Control panel (see diagram below)
14 Cable with mains plug (back of appliance)
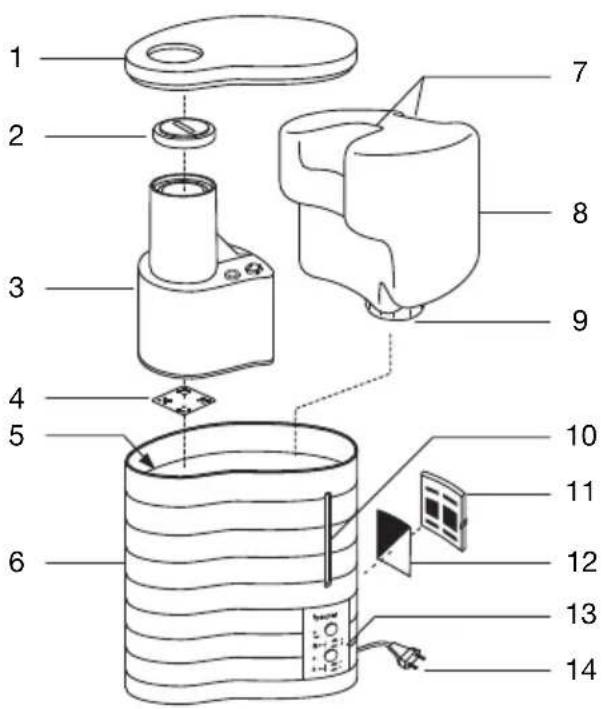
Control panel
A Red indicator illuminated when water tank is empty
B Green indicator illuminated when humidifier is switched on
C Steam button for regulating humidity
- Button depressed: 400 ml/h (maximum steam)
- Button released: 150 ml/h (minimum steam)
D ON/OFF button for switching humidifier on and off
- Button depressed: Appliance is switched on
- Button released: Appliance is switched off
Unpacking
- Check contents: If any parts are missing, please contact your authorized dealer.
- Remove all packaging and transport locks.
Clean before using for the first time
For reasons of hygiene, we recommend rinsing the humidifier, water tank and pad [4] thoroughly with cold water before using for the first time. Proceed as described in Chapter 6 'Care', in the section on 'Cleaning the Appliance', page 17.
Humidifier placement

Caution
Place the appliance so that the steam nozzle is not pointing directly at a wall. The exiting moisture might otherwise cause damage to walls, particularly to wallpaper.
- Place the humidifier on a firm, even, water-resistant surface.
- Position the mains cable [14] so that the appliance cannot be knocked over.
Connecting mains cable

WARNING
- Before putting the appliance into operation, make sure that the cable [14] is not damaged. Never operate the appliance if the mains cable is damaged.
- The appliance may only be operated with the voltage indicated on the rating plate.
Connect your humidifier to the mains by plugging the mains plug [14] into the wall socket.
Filling the tank
Before using the appliance for the first time, the tank must be filled. See Chapter 5 'Operation', in the section on 'Filling the Tank' (page 15).
5
OPERATION
| 1 | Filling the tankFill the tank when putting the appliance into operation for the first time or if the red indicator [A] is illuminated, indicating that the water level is too low. IMPORTANTOnly ever use fresh tap water to fill the tank.Never put any additives into the water.Make sure that the tank catch with seal on the base of the water tank is tightly fastened before putting the appliance into operation.〉 Remove the cover [1] from the humidifier.〉 Pull the water tank out of the humidifier using the handles [7]. Unscrew the tank catch [9] from the tank.〉 Rinse out the water tank with clean water.〉 Fill the water tank with cold tap water.〉 Screw the tank catch onto the water tank. Place the water tank in the humidifier.〉 Place the cover [1] on top of the humidifier. IMPORTANTOnly ever use fresh tap water to fill the tank.Never put any additives into the water.Make sure that the tank catch with seal on the base of the water tank is tightly fastened before putting the appliance into operation.〉 Remove the cover [1] from the humidifier.〉 Pull the water tank out of the humidifier using the handles [7]. Unscrew the tank catch [9] from the tank.〉 Rinse out the water tank with clean water.〉 Fill the water tank with cold tap water.〉 Screw the tank catch onto the water tank. Place the water tank in the humidifier.〉 Place the cover [1] on top of the humidifier. | |
| 2 | Switching on the appliance IMPORTANTNever switch on the humidifier without the water tank or steam tower [3].〉 Press the ON/OFF button [D] in order to switch on the humidifier. The green indicator [B] is illuminated.〉 Before the steam starts exiting: Rotate the steam nozzle [2] so that the steam exits in the required direction.After a few minutes, the appliance starts to give off steam. The green indicator [B] is illuminated while the appliance is switched on and connected to the mains. IMPORTANTNever switch on the humidifier without the water tank or steam tower [3].〉 Press the ON/OFF button [D] in order to switch on the humidifier. The green indicator [B] is illuminated.〉 Before the steam starts exiting: Rotate the steam nozzle [2] so that the steam exits in the required direction.After a few minutes, the appliance starts to give off steam. The green indicator [B] is illuminated while the appliance is switched on and connected to the mains. | |
| 3 | Selecting the amount of steam〉 Select the amount of steam using the steam button [C]Level 1: minimum steam (approx. 150 ml/h)Level II: maximum steam (approx. 400 ml/h)After a few minutes, the appliance alters the amount of steam generated. | |
| 4 | Switching off the appliance The appliance is suitable for continuous operation. We recommend, however, that it is not operated for any length of time without supervision (night operation).The appliance has an automatic switch-off function when the tank is empty.〉 Press the ON/OFF button [D] in order to switch off the appliance. The green indicator light [B] goes out. The appliance is suitable for continuous operation. We recommend, however, that it is not operated for any length of time without supervision (night operation).The appliance has an automatic switch-off function when the tank is empty.〉 Press the ON/OFF button [D] in order to switch off the appliance. The green indicator light [B] goes out. | |
Overview
Your humidifier should be cleaned and descaled regularly in order to ensure that residue from the water such as limescale does not accumulate in the appliance. Only if the humidifier is carefully maintained can we guarantee maximum steam output, hygiene and a long service life. The following table lists all the measures necessary:

WARNING
Before you clean or descale your humidifier:
- be absolutely sure to pull out the plug [14] from the wall socket.
- wait until the appliance has entirely cooled down

IMPORTANT
Never clean the humidifier or individual parts in the dishwasher.
| When to do what | ... to which part | ... how? |
| Once a week | Inside appliance See Chapter 6 in the section on 'Cleaning the appliance', page 17 | |
| • Cover [1]• Steam nozzle [2] and steam tower [3]• Tank and tank catch | ||
| Outside of casing [6} | ||
| Depending on soiling, but at least once a week | Pad [4] See Chapter 6 in the section on 'Cleaning the appliance', page 17 | |
| Depending on water hardness, but at the latest after each humid season | Pad [4] See Chapter 6 in the section on 'Cleaning the appliance', page 18 | |
| Every week Black air filter | [12] See Chapter 6 in the section on 'Cleaning the air filter', page 18 | |
| With a water hardness up to II (7 to 14° dH), we recommend cleaning the appliance every week. The appliance must be cleaned, at the very latest, if the hotwater chamber is covered with a layer of limescale. | Instrument See Chapter 6 in the section on 'Descaling the appliance', page 18 | |
Before cleaning and descaling
| 1 | Unplug the appliance〉Switch off the appliance with the ON/OFF button [D]. The green indicator light [B] goes out.〉Pull the plug [14] out from the wall socket and wait at least 15 minutes until the humidifier has entirely cooled. |
| 2 | Disassemble the appliance〉Remove the cover [1] from the humidifier.〉Pull the water tank out of the humidifier using the handles [7]. Unscrew the tank catch [9] from the tank.〉Pull up the steam tower [3] out of the humidifier. Remove the steam nozzle [2] from the steam tower [3].〉Remove the pad [4] from the hotwater chamber. |
Cleaning the appliance
| 1 | Clean the inside and outside of the appliance WARNINGElectrical parts must never come into contact with water.Never hold the appliance under running water or immerse in water.> If there is any water left in the appliance, pour it away. To do this, hold the appliance with both hands and tip the water out from the side of the base unit.Rinse out the inside of the appliance thoroughly with clean water.Wipe the outside of the humidifier casing [6] with a damp cloth and mild cleaning agent. WARNINGElectrical parts must never come into contact with water.Never hold the appliance under running water or immerse in water.> If there is any water left in the appliance, pour it away. To do this, hold the appliance with both hands and tip the water out from the side of the base unit.Rinse out the inside of the appliance thoroughly with clean water.Wipe the outside of the humidifier casing [6] with a damp cloth and mild cleaning agent. | |
| 2 | Clean individual partsWash the pad [4] with clean water. You can remove stubborn limescale by first putting the pad [4] in a weak vinegar solution. If the pad [4] is hard and rigid, it must be replaced (see next section 3 'Changing the pad').> Clean the following individual parts of the appliance thoroughly with washing-up liquid and warm water. Any residue from cleaning agents should be thoroughly removed.Tank [8] and tank catch [9]When cleaning the tank catch [9], do not damage the valve.Steam tower [3] and steam nozzle [2]Cover [1] | |
| 3 | Changing the pad Pads are obtainable from the service address or from the authorised dealer.Remove the worn pad [4] from the hotwater chamber. Dispose of the pad in the household refuse. Pads are obtainable from the service address or from the authorised dealer.Remove the worn pad [4] from the hotwater chamber. Dispose of the pad in the household refuse. | |
| > If there is any water left in the appliance, pour it out.> Use a new pad [4].> Wash out the new pad [4] with clean water and put in the hotwater chamber. | ||
Descaling the appliance
| 1 | Descale the humidifier | |
 | Never try to remove any limescale deposit with pointed or sharp objects. This might damage the humidifier or cause it to leak.You should also note the manufacturer's advice for the descaling agent which you are using. | |
| > Use a standard commercial descaling agent.> Fill the hotwater chamber up to the brim with descaling solution.> Leave the descaling solution to work until the limescale has dissolved. | ||
| 2 | > Pour away the descaling solution. Tip the appliance sideways to remove the descaling solution.> Rinse out the appliance thoroughly with clean water. | |
After cleaning and descaling
| 1 | Insert the pad〉 Put the cleaned pad or replacement pad [4] into the hotwater chamber. |
| 2 | Assemble the appliance〉 Put the steam tower [3] back into the humidifier. Press the steam nozzle [2] into the opening at the top of the steam tower [3].〉 Screw the tank catch [9] onto the water tank [8]. Place the water tank [8] in the humidifier.〉 Place the cover [1] on top of the humidifier. |
Cleaning the air filter
We recommend cleaning the air filter every week.
| 1 | 〉Turn the humidifier so that the air filter flap [11] at the back of the appliance is facing you. Undo the catch on the flap and remove the air filter flap [11].〉Remove the black air filter [12] and rinse it thoroughly with clean water. |
| 2 | 〉Once the filter is dry you can reassemble the air filter. Insert the black air filter [12] inside the air filter flap [11].〉Insert the two small hooks of the air filter flap [11] into the right of the air filter opening. Press the filter flap firmly until it clicks into place. |
7 IN THE EVENT OF PROBLEMS
| Problem | Cause | Remedy |
| No steam exiting | Appliance not connected to power | Insert the plug [14] into the mains and switch on the appliance. |
| Water tank [8] empty. Replenish water. | ||
| Water tank [8] not fitted correctly. Fit | tank properly. | |
| Appliance leaking | Water tank [8] leaking. Replace tank. | |
| Water tank [8] not shut properly. Fasten the catch properly. | ||
| Steam tower [3] not installed or not installed correctly. | Install steam tower [3] properly. | |
| Delay in steam output | Very cold water in tank. Use warmer | water. |
| Appliance heavily scaled. Descale the appliance. | ||
| Red indicator [A] illuminated | Water tank [8] empty. Replenish water. | |
| Valve on tank catch [9] is covered with dirt. | Clean the valve. | |
| Appliance heavily scaled. Descale the appliance. | ||
| Water tank [8] not shut properly. Close the catch properly. | ||
| Water tank [8] not fitted correctly. Fit | tank properly. | |
If the problem persists, please contact customer service.
8 TECHNICAL DETAILS
| Rated output 380 W | |
| Nominal voltage 230 V / 50 Hz | |
| Water tank volume approx. 5 litres | |
| Evaporation rate | Level 1: 150 ml/hLevel II: 400 ml/h |
| Overheating protection | Through thermostat |
| Safeguard against running dry | If there is not enough water in the heater unit, the appliance switches off automatically. The appliance has a sensor which detects the water level. |
| Switching | 2-stage |
| Weight | 2.8 kg |
| Dimensions (W / H / D) | 235 / 315 / 280 mm |
| Connection | Fixed cable, approx. 2 m in length |
Optimal indoor air humidity should be 50 – 55%. Particularly during the heating period, humidity is often well below this recommended level. This is due to heat-insulated walls and windows which only allow minimum exchange of outside and inside air. Natural regulation of humidity through 'ventilation by opening windows and doors' is discouraged by high heating costs, windows that cannot be opened and inclement weather conditions.
As air 'seeks' a specific ideal humidity content, it is advisable to provide air with artificial humidity. This can help prevent air from drawing its humidity from other sources such as plants, furniture, paper and also from human skin and mucous membrane.
In concrete terms, artificial air humidification can help prevent the following health problems which may occur as a result of a reduced oxygen supply.
• Tension, tiredness, poor concentration
- Susceptibility to infections, coughs and sneezes
- Dry skin, eczema from skin drying out
Properly dosed artificial air humidification also binds dust and prevents drying damage to equipment (wood, paper, etc.), musical instruments and plants.
You can measure your room humidity with a humidistat. Humidity depends on room temperature:
18°C corresponds to a relative humidity of 50 %
20°C corresponds to a relative humidity of 45 %
22°C corresponds to a relative humidity of 40 %
It is advisable to start operating the humidifier right at the start of the heating period. The existing humidity inside the room and in the furniture can then be kept constant. During the first few weeks of the heating period, the appliance should be used in such a way that you achieve at least 50%
Note that with this humidifier, it also possible to over-humidify the room, e.g. if
- you operate the appliance at a high setting
- the humidity that is generated cannot escape from the room
- the air is already very humid It is best to check humidity with a hygrostat.
FRANÇAIS Sommaire
Fourniture
Panneau de commande
Panel de manejo
Pannello di comando
Панель управления
Pole obsługi
POSTEPOWANIE W RAZIE PROBLEMÓW