
Optima 2.0 - Iron SOLAC - Free user manual and instructions
Find the device manual for free Optima 2.0 SOLAC in PDF.
| Product type | Clothes iron |
| Brand | Solac |
| Model | Optima 2.0 |
| Power supply | 220-240 V, 50-60 Hz, 10 A (grounded plug) |
| Power | Approx. 2400 W |
| Water tank capacity | Approx. 300 ml |
| Soleplate | Metallic (stainless steel or non-stick aluminum) |
| Main functions | Adjustable steam, super steam, spray, vertical steam, dry ironing |
| Anti-scale system | Integrated resin filter (anti-limescale system) |
| Anti-drip system | Yes |
| Self-cleaning function | Yes |
| Heating indicator light | Yes (lights during heating, turns off when temperature is reached) |
| Temperature setting | 5 positions (synthetic, silk/wool, cotton/linen, max) |
| Steam flow adjustment | 3 positions (dry, medium, maximum) |
| Power cord length | Approx. 1.8 m |
| Care and cleaning | Clean soleplate with eco-friendly clay-based product; external parts with a damp cloth and soap; monthly self-cleaning function |
| Safety | Unplug before filling or cleaning; do not use if cord is damaged; caution with hot surfaces; do not leave unattended |
| Repairability | Have repaired by an authorized service; do not disassemble yourself |
| General information | Certification: EU directives (low voltage, electromagnetic compatibility, RoHS, ecodesign) |
| Dimensions (L x W x H) | Approx. 30 x 15 x 15 cm |
| Weight | Approx. 1.5 kg |
Frequently Asked Questions - Optima 2.0 SOLAC
User questions about Optima 2.0 SOLAC
0 question about this device. Answer the ones you know or ask your own.
Ask a new question about this device
Download the instructions for your Iron in PDF format for free! Find your manual Optima 2.0 - SOLAC and take your electronic device back in hand. On this page are published all the documents necessary for the use of your device. Optima 2.0 by SOLAC.
USER MANUAL Optima 2.0 SOLAC
Solac is a registered Trade Mark

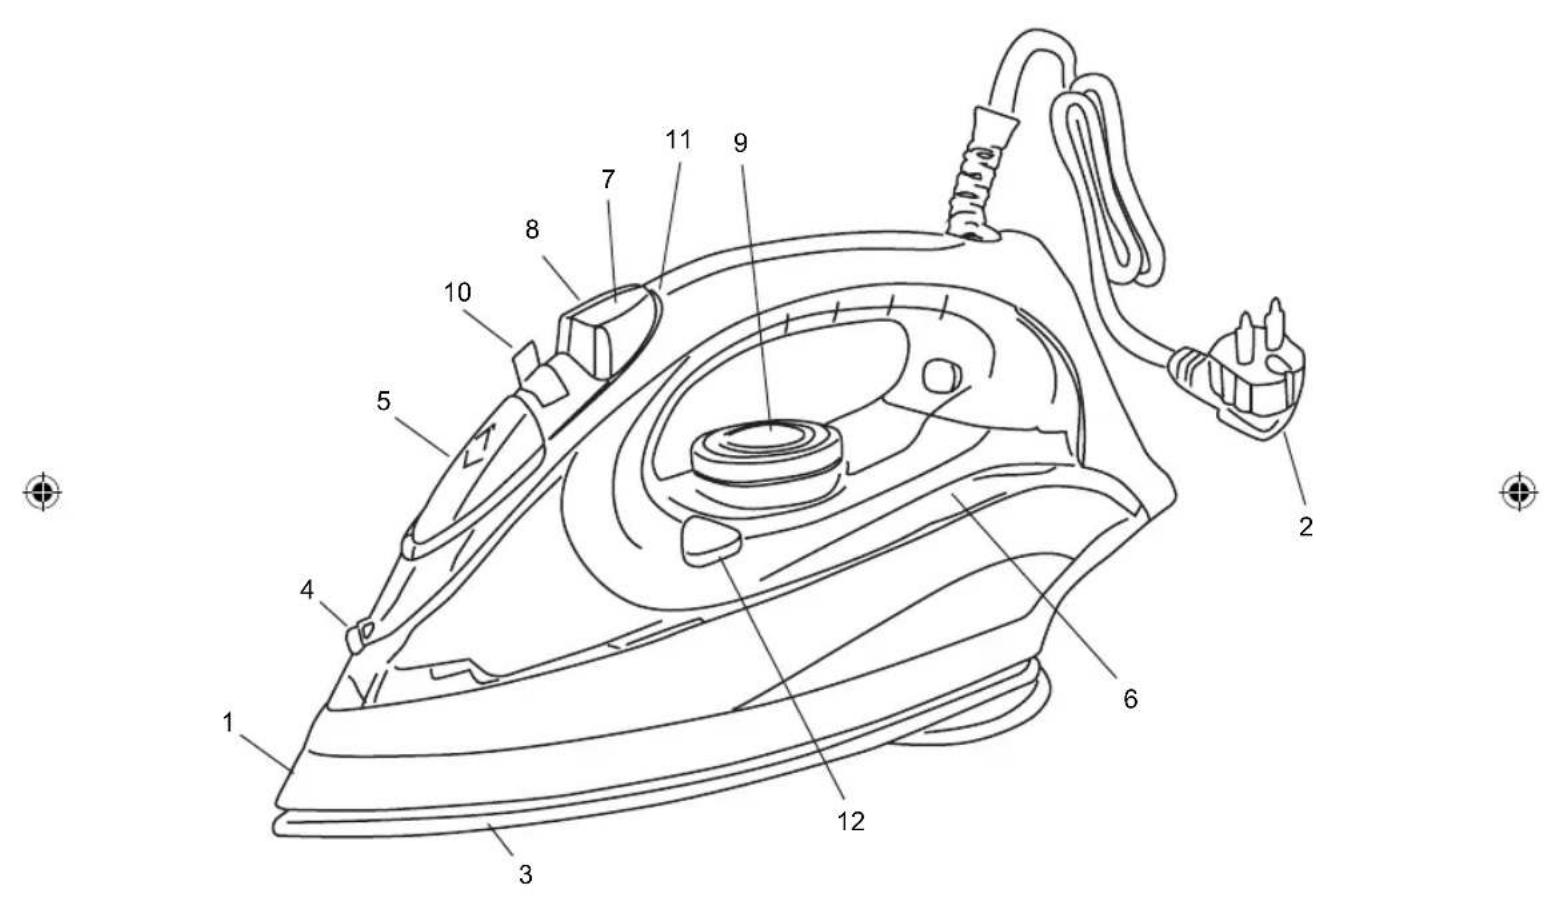

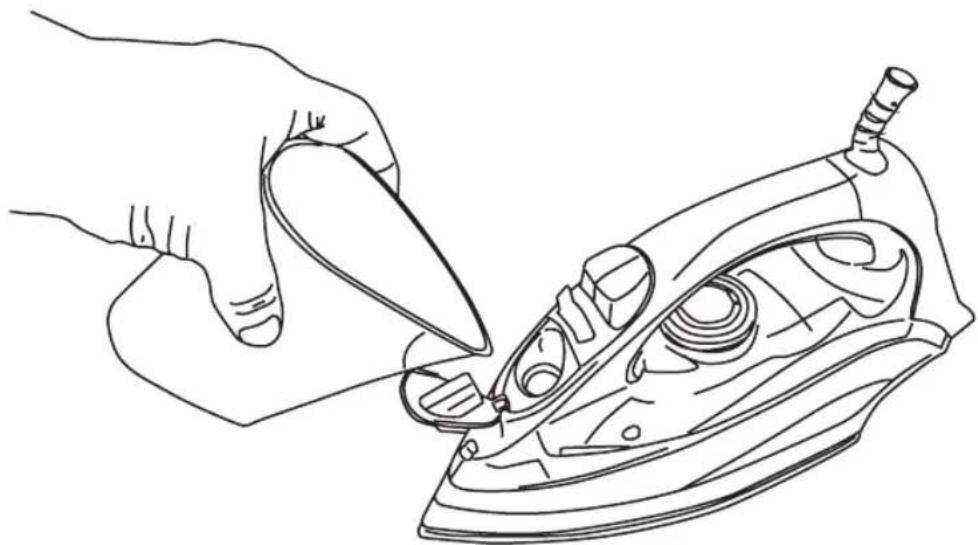
Fig 1.


ESPANOL ES
SAFETY ADVICE AND WARNINGS
Clean all the parts of the product that will be in contact with food, as indicated in the cleaning section, before use.
This appliance can not be used by children. Keep the appliance and its cord out of reach of children.
This appliance can be used by people with reduced physical, sensory or mental capabilities or lack of experience and knowledge if they have been given supervision or instruction concerning use of the appliance in a safe way and understand the hazards involved.
This appliance is not a toy. Children should be supervised to ensure that they do not play with the appliance.
- Always switch off the appliance and disconnect from supply if it is left unattended and before changing accessories or approaching parts that move in use, assembling, disassembling and cleaning.
- Do not use the appliance if the rotating sieve is damaged or the protective cap is damaged or cracked.
- If the connection is damaged it must be replaced. Take the
appliance to an authorized Technical Assistance Service. Do not try to dismantle or repair without assistance, as this may be dangerous.
The temperature of the accessible surfaces may be high when the appliance is in use.
Unplug the appliance from the mains before refilling the water tank.
- Ensure that the voltage indicated on the nameplate matches the mains voltage before plugging in the appliance.
- Connect the appliance to a base with an earth socketwithstanding a minimum of 10 amperes.
- The appliance's plug must fit into the mains socket properly. Do not alter the plug. Do not use plug adaptors.
- Keep the working area clean and well lit. Cluttered and dark areas invite accidents.
- The appliance should be used and kept over a flat and stable surface.
- Do not use the appliance if the cable or plug is damaged.
- If any of the appliance casings breaks, immediately disconnect the appliance from the mains to prevent the possibility of an electric shock.
- Do not use the appliance if it has fallen on the floor, if there are visible signs of damage or if it has a leak.
- Never use the electric wire to lift up, carry or unplug the appliance.
- Do not wrap the cable around the appliance.
- Ensure that the electric cable does not get trapped or tangled
- The power cord must be regularly examined for signs of damage and if damaged, the appliance must not be used.
- Do not use or store the appliance outdoors.
- Do not touch the plug with wet hands.
- Do not allow the connection cable to hang or to come into contact with the appliance's hot surfaces.
- Check the state of the power cord. Damaged

EN
or tangled cables increase the risk of electric shock.
- Do not use the appliance if the cable or plug is damaged.
- If any of the appliance casings breaks, immediately disconnect the appliance from the mains to prevent the possibility of an electric shock.
- Do not touch metal parts or the body when it is operating, as it may cause serious burns.
- Fully unroll the appliance's power cable before each use.
- Disconnect the appliance from the mains when not in use and before undertaking any cleaning task.
- Do not store or transport the appliance if it is still hot.
- Turn the thermostat control to the minimum (MIN) setting. This does not mean that the iron is switched off permanently.
- Any misuse or failure to follow the instructions for use renders the guarantee and the manufacturer's liability null and void.

-
IMPORTANT: When you want to dispose of the appliance, NEVER throw it in the rubbish. Instead, go to your closest CLEAN POINT or waste collection centre for subsequent treatment. In this way, you will be contributing to looking after the environment.
-
Before disposing of your used appliance, you should make it visibly unserviceable and have it disposed of according to current national legislation.
- Ask your Distributor, Town Council or Local Authority for detailed information.
MAIN COMPONENTS
1 Main body
2 Power cord
3 Metal soleplate
4 Spray outlet
5 Water filler opening
6 Water tank
7 Spray button
8 Supersteam button
9 Temperature selector
10 Steam selector
11 Temperature pilot light
12 Self clean
BEFORE STARTING TO IRON
Due to the high levels of mains water hardness in most areas, Solac recommends that you always use demineralised water for ironing. In this way, you will guarantee that your iron remains in optimal condition for a longer period of time.
1 Do not use decalcifying agents or descending products in the water tank. Do not use scented water or ironing water either. These products damage the interior of the steam generation system.
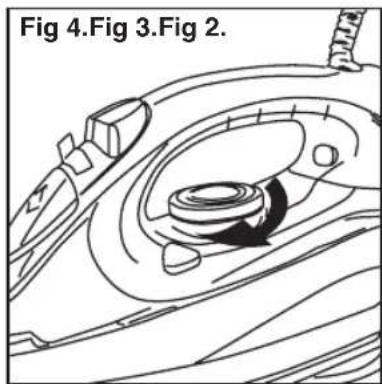
1 With the iron unplugged from the mains, rotate the steam selector (10) to the closed position (fig. 2).
2 Open the water filler opening (5). Fill the water tank without exceeding the maximum level, using the water beaker provided (12) and keeping the iron in the vertical position (Fig. 1). When the tank is full, close the cap..
When filling the tank, make sure that the water does not overflow from the water filler opening.
3 Check whether the garment to be ironed has a label indicating the ironing tempera.
We recommend you classify the garments according to their required ironing temperature and begin with the garments ironed on the lowest temperature(·)
SYNTHETIC FIBRES, minimum temperature (·) SILK, WOOL, medium temperature (· · ·)
COTTON, high temperature ( )
LINEN, MAX temperature
NOTE: Ironing delicate garments at a temperature higher than necessary spoils the fabric and causes burnt residue to stick to the soleplate.
If you have any doubts about the temperature to use for a given garment, perform a test on a part, which will not be visible, beginning with the lowest temperature settings
USE
This appliance has been designed exclusively for ironing clothes. Do not use it for any other purpose.
Completely remove all the elements use for transportation and packaging.
If the appliance is hot, handle it with care and do not touch the metal soleplate..
Never leave the iron in a horizontal position when the soleplate is hot. Rest it on its rear


EN
end.
A Take care with the steam; do not aim it at people, animals or delicate objects.
Always iron on stable, solid and smooth surfaces.
For very delicate garments, place a cloth between the iron and the delicate garment to avoid potential markings from the soleplate..
1 Extend the cord completely and plug it into the mains. The temperature pilot light will turn on (11). Place the iron in the vertical position.
2 Select the desired operating temperature according to the garment you wish to iron (see "TEMPERATURE SELECTION (fig. 4)").
3 Select steam ironing (medium or maximum) or dry ironing as appropriate (see "STEAM SELECTION").
4 Hold the iron by the handle, and slide the soleplate over the garment to be ironed.
5 After using the iron, set the steam selector (10) to the closed position and the temperature selector (9) to position 0.
6 Unplug the power cord from the mains.
7 Empty the water tank (see "EMPTYING THE WATER TANK"). Wait until the iron is completely cold and store it in the vertical position in a safe place.
BEFORE FIRST USE
Before using it for the first time, use the appliance to iron an old cloth or clothing, to clean the system.
1 Set the temperature selector (9) to the Max position and wait a few minutes for the iron to reach the appropriate temperature (the temperature pilot light will go out).
2 Rotate the steam selector (10) until it is in the completely open position (fig. 3): steam will start to come out of the orifices in the soleplate.
3 Hold the iron by the handle and slide the soleplate over the old towel.
4 When the water tank is empty, no more steam will be produced. The iron is ready for use.
Do not worry if the iron gives off a little smoke when used for the first time. This will go away quickly.
TEMPERATURE SELECTION (fig. 4)
1 Turn the temperature selector (9) until it is in the desired position.
When changing the position of the temperatu
re selector (9), to either increase or reduce the temperature, several minutes must pass before the iron reaches the selected temperature.
When the selected temperature is reached, the pilot light will go out (11).
STEAM SELECTION
To obtain steam, set the temperature selector (9) between the levels and Max, depending on the garment to be ironed.
The iron has 3 steam positions (dry ironing, medium steam flow or maximum steam flow)
1 When the pilot light (11) goes out, indicating that the desired temperature has been reached, rotate the steam selector (10) until the desired steam flow is obtained (fig. 5).
EMPTYING THE WATER TANK
When you finish ironing, always empty the water from the tank.
1 Set the steam selector (10) to the closed position and the temperature selector (9) to the 0 position.
2 Unplug the plug from the mains.
3 Open the water filler opening (5) and place the iron face down over the sink, gentlyshaking it to completely empty the tank.
4 Wait until the iron is completely cold and store it in the vertical position in a safe place.
IRONING RECOMMENDATIONS
STEAM IRONING
For professional ironing results, we recommend you steam iron garments first and then dry iron them.
SUPERSTEAM
If you want more steam while ironing, press the button (8) two or three times, aim the supersteam at the desired area of the garment and pass the iron soleplate over it to dry it. Thus is useful for eliminating wrinkles.
The supersteam may not be released on the first occasions. This is normal. Press the push-button a couple of times. Once the supersteam circuit has been primed, the jet of steam will be released
We recommend pressing the control at 5-second intervals.
VERTICAL STEAM
This allows you to remove creases from delicate garments without having to put them on the ironing board: jackets, overcoats, curtains,
EN
etc.
1 Fill the water tank as explained in the "BEFORE STARTING TO IRON" section.
2 Place the garment on a hanger, well away from other garments, people, animals, etc.
Do not discharge steam onto a garment hanging in the wardrobe or on a person.
3 Set the steam control (10) to the closed position and the temperature selector (9) to the Max position.
4. Bring the iron close to the garment, in the vertical position, (between 15 and 30~cm ) and press the supersteam button (8) once only. Do not position the iron too close to the garment, because you could damage it.
5. Wait a few seconds before pressing the button (8) again, so as not to damage the garment. Most wrinkles can be eliminated with three sprays of tea.
DRY IRONING
1 If there is water in the tank, turn the steam selector (10) to the closed position (fig. 2).
2 Plug in the iron and set the temperature selector (9) to the desired position.
The pilot light (11) will go off when the temperature is reached.
IRONING WITH SPRAY
Spray can be obtained by pressing the corresponding button (7) when dry ironing or ironing with steam. The iron is at any temperature level
- Press the spray button (7) as many times as you want to use this function. 3D soleplate:
- Ceramic soleplate with active tip, equipped with a metal body ideal for professional ironing of shirt collars, pockets, trouser creases, etc. Caution. The skirt is an active area of the soleplate, so it will be hot while ironing.
- 3D Ironing is a way to help with ironing, use it to iron delicate areas like shirt cuffs, pockets or skirt and trouser hems. Do not make direct contact with the skin, and wait for the iron to cool down completely before touching it.
OTHER FUNCTIONS
ANTI-LIMESCALE SYSTEM
This iron has an innovative built-in anti-limescale system, consisting of a resin filter that retains the limescale substances from the water, so these cannot reach the steam chamber of the soleplate, thus extending the life of the iron.
The existence of this anti-limescale system does not mean that the recommendations about water hardness mentioned in the "BEFORE STARTING TO IRON" section can be ignored.
ANTI-DRIP SYSTEM
The iron incorporates an anti-drip system that prevents the iron from dripping, even when it is switched ofa.
STORAGE AND CLEANING
Clean the appliance after using it for the first time, immediately after each use and after a long time without use.
SOLEPLATE
1 Disconnect the iron and allow the soleplate to cool down.
Use clay-based, environmentally friendly products to clean the solep.
EXTERNAL PART
1 To clean the external part of your iron, use a cloth dampened with soapy water.
1 Do not use solvents or abrasive products to clean your iron, as these could damage some of the plastic parts and/or remove some of the marks.
2 Store your iron in a vertical position, coiling the cord around the base and pressing the cable into the fixing clip.
Although the power cord is fitted with a 360^ swivel piece, NEVER FORCE this cord when coiling it around the appliance on the first turn.
SELF-CLEANING
It is advisable to carry out the self-cleaning operation about once a month, depending on the frequency of use and the hardness of the water used
1 Ensure that the tank is half filled with water.
2 Place the iron in the vertical position.
3 Plug in the iron and turn the temperature selector (9) to the Max position.
4 Wait for the pilot light to go off (11) indicating that the desired temperature has been reached.
5 Turn the temperature selector (9) to the 0 position and unplug the iron from the mains.
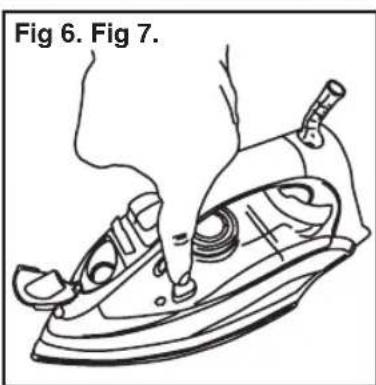
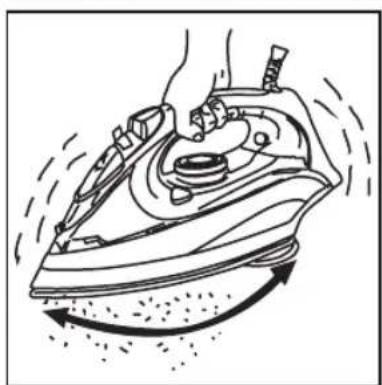
6 Place the iron in the horizontal position over a sink or an appropriate container and press the selfclean button (12), keeping the iron in thisposition and swinging it gently from side to side. Steam and water willcome out from the holes in the iron, flushing out dirt and impuri

EN
ties.
Swing the iron gently from side to side. Steam and water will come out of the holes in the iron, flushing out dirt and impurities (fig. 6-7).
A Be careful when performing this operation, as the water and steam are very hot and can cause burns.
7 Place the iron in the vertical position and wait for it to cool completely.
8. Wipe the soleplate with a damp cloth.
Remember that damage caused by the effects of limescale is not covered in the warranty.
This symbol means that it is important to read the operating instructions.
This symbols means that user must to con
sult instructions thoroughly before use.

This symbol indicates that the appliance should not be covered.

This symbol indicates that the surface may heat up during use.
This appliance complies with Directive 2014/35/EU on Low Voltage, Directive 2014/30/EU on Electromagnetic Compatibility, Directive 2011/65/EU on the restrictions of the use of certain hazardous substances in electrical and electronic equipment and Directive 2009/125/EC on the eco-design requirements for energy-related products.


FRANÇAIS FR
CONSEILS ET MESURES DE SECURITÉ
VOLBA TEPLEOTY (fig. 4)
VEMISJA PA RY W PIONIE
VOLBA TEPLEOTY (fig. 4)
ZEHLENIE S FUNKCIOU KROPENIA
EXTRA GOZ (super steam)
CbBETN UYKA3AHN 3A B630nACHOCT
Ipei Da n3noJ3BaTe en. ypea 3a nbpBn nbT, NOUcTeTe BCNUKu qactN, KOHTO Ca B KOHTaKT C XpaHITeHNITE npOdyKTN, CNeDBAIKN yNBtBAHnTA oT pa3dEe "NouchTbaHe".
3a6paHbBa ce ynoTpe6bata Ha anapata ot deua.ДрькTe ypeda n HeROBnT Ka6eI daJeU OT DoCTbNa Ha deua.
HaCTOJNT anapat MoKe Da 6bIe I3PON3BaH OT IINa C OrpaHnueHn FIn3NueCKn, CETNBn INn YMCTBeHn CNO6HOCTn, INn OT IINa 6e3 ONIT NIO3HaHnR, HO npu YCIOBHe, Ye nM e OCNrpyen CbOTBeTHn Ha3Op N O6yHeHne 3a 6e3ONaCha yNoTpe6a Ha ypeDa, a CbIo npn ycIOBHe, Ye pa3bnpa T CBbp3aHHTcTOBa ONaCHOCTn.
To3n ypei He e nrrpaqka. DeaTa cIeDbA da ce HAMnpaT noi HaI3Op, TaKa Ye da He nrpaT c anapaTa.
I3KIOUByTe ypeDa OT mpeXaTa, KOraTo He e B yNoTpe6a, KaKTo N npEi N OoHCTBaHe, MOHTaJ, 3apeXdaHe nIi CmHa Ha npHaJIeXHOCTnte
3a6paHЯBa ce n3noJ3BaHeTo Ha anapata B clyuAn, KOraTO BbptAto Ce CNTo e NOBpeDeH, NIn KOraTO 3aunTHnT KaJaK e NOBpeDeH NIn NMa NyKHaTInH.
Ako Bpb3KaTa KbM MpeXaTa e NOBpeDeHa, CJIeDBA He3a6aBHO da 6bIe NODMeHHe. YpeIbT cJIeDBA Da ce 3aHece B yPbIhOMoUeH CepBn3 3a TEXHnueCKa NOpIpbKka.C cel n36yRBaHe Ha Ipon3WeCTBn, MOJr He IoppaBnTe nn pa3rlo6BaYte ypeDa.
TEmnepaTypata Ha IOCTbHNTe NOBbpxHOCTM MOKe Da e NOBnWeHa, KOraTo ypeDbTe B pa6oTeH peXIM.
I3KIOUeTe ypeDa ot eI. MpeXaTAppeiHaHaHbJIHnTe pe3epBoapa C BODa.
-Ппеди BKЛЮУBAне Ha урета КьМ МрекаТа, NOДСИгуретe ce, Ye NOCOчEHNT Ha Tabелкata BOлтax C XapaKТерпCTИКИTe CBВпадa C BOлтжа Ha МрекаТа.
AnapaTbT cneDbA da ce BkIIOUyBa KbM KOHTaKT 3a HanpeXeHHe, C Bb3MOxHOCT Da noHacn Hn-MaIKo 10 amNepa TOK.
- UeNcEnbT Ha ypeDa TpA6Ba Da cBbnaaC eNeKtpnueckn KaHTaKT. Hnkora He npomeHnTe BnDa Ha uenceHa. He n3NoJ3BaIte aanTOpN KbM uenceNa.
-Пдьркайтpe pa6OTHTo MHTO chCTO ndo6pe ocBeteHo. Pa3XBpIaHnTe n TbMHN MeCTa MoRat Da IOBeDat DO 3JONONYKn.
- YpeIbT cIeIbBa Ia ce I3nOJIb3Ba I NOCTaBA Bbpxy paBHa I CTaBUNHa NOBbpxHOCT.
B HnkaKbB cnyaH He n3noJ3BaIe ypeJa C

BG
NOBpeDen KOHTaKT UJn EneKtpuYeCKn uHyp.
Ako HANKO qact OT KOPnyca Ha anapata ce NOBpeDN, He3a6abHO ro N3KNIOyTe OT MpeKaTa, 3a Da N36BerHete OnaCHOCT OT eNEKTPnueckn ynap.
3a6paheHa eynoTpe6ata Ha anapaTa, aKo CbIHT e naJa IIN aKO IMa JBHn npN3HaCu 3a DeΦeKTn, INn npN HauNyHe Ha Teu.
He IbpnaTe eJekTpueeckn Ka6en Haypeja.B HnkaKbB cnyaH He n3non3BaIteeJekTpueeckn WHyp 3a NOBduraHe, npehacHne nn N3KJIIOUcBAHe Ha anapaTa.
- He nabuBaIte eIeKtpnueckn Ka6en Okono ypeHa.
- EneKtpnuecknT Ka6eH He Tpr6Ba Da 6bde npntnchat nn npeBnat.
-Поверяваite nepnoДично CBcToHneTo
на 3axpanBaшин Ka6eN. He n3poJn3BaIte
урEDA,aco 3a6eJexKITE cIeN ot nobpeNi.
- He n3noJ3BaIte nHe cBxpaHbAte ypeJa Ha oTKpIto.
He nnaite enceela 3a BkHouBahe BmpexkaTcBnaxn npue.

26KHO!! Пиббракуbaне на урета, HNKORA He ro n3xbpnaite B KoФata 3a 6oknyk.Отhe- cete ro b ha-n-6n3knr IYHKT 3A CbBnPAHE Na bTOpuHn cyPobHn. NTo3n HaunH, Bne ue cnOMorHeTe 3a ona3BaHe Ha OKoHaTa cpea.
Ipei Da ce ocbo6oNTe ot cTapn en. ypei, Tp86Ba da ro HnpaBnte BnIMo HeN3noJ3BaEMJaRan3XbPnITeHaMeCTaTa, npedBnDEHn 3a CENTa OT DeNCTBaOTo B cTpaHaT Bu 3akOHoDaeTcBO. NOnckaiTe noJnp6ha INΦopMaun No To3N Bbnpoc OT Baunn DnCTpn6yTop, Osuchna nn MeCTHa aMmHnCTpaun.
OCHOBHNI KOMNOHEHTN
1 Kopnyc
2 3axpaHbau Ka6eI
3 MeTaNHa nNoa
4 OTBOP3a npbckaHe
5 OTbOp 3a nblHeHe Ha B0da
6 Pe3epBoap 3a BOda
7 ByToH 3a npbckaHe
8 ByToH 3a CnHa npa
9 Perynatop Ha Temnepaypata
10 Perynatop Ha napa
11 CBeTInHeH INDnKaToP 3a TemnepaTypaTa
12 CamonoyntBaHe
PPEIN DA 3ANOCHETA TIA DNTE
Iopadn BnCOKaTa TBbpOCT Ha BOdaT A KaHaJI3aUIOHHaTa MpeXa B NOBeYeTo MeCTa, Solac npenOpbYBa BnHarN da Ce H3NoJ3Ba DeMInHepaJI3UnpaHa BOJa 3a rJaHe. ITO3n HauIN ce rapaHTnpa, Ye KOTNA tJe OCTaHE B ONTMaHNO CbCTOARHne 3a N-DbIbI nepNO OT BpeMe.
1 He n3no3BaTe DeKaunHnpa an areHTn nn npdykTN 3a OTcpanHahe Ha KOJIeHN KAMbK B pe3epBoapa 3a BOda. He n3no3BaTe n apomTuNpHa BOda nIb BOda 3a rJaHe. Te3n npdykTN yBpeXdAT BbTpueHOCTTa Ha cNCTeMaTa 3a o6pa3yBaHe Ha npapa.
1ПиИЗКЛЮЧЕHAOTeEKeKTpUpeCKaTAMpeKaIOTnH,3aBbPTeTeperylaTopaHanapaTa(10)do3aTBOpEHONoJoxKeHne(ΦIr..2).
2 OtBopete OTbopa 3a IIbIHeHe c B0da (5). HanbIHeTe pe3epBoapac B0da 6e3 da npebuwaBate MaKcImMaHOTo HnBO, KaTO n3noJI3BaTe npedocTaBeHaT a MeH3ypa (12) n IbpxKeTe IOtnra T BvB BeptNkaHOn noJoxEHe (Φur. 1). Korato pe3epBoapbT ce HAnbIHN, 3aTbOpete Kanaykata.
Pn HnblBaHe Ha pe3epBoapa, BHImaBaiTe BOaTa Da He n3Tnua OT OTbopa 3a PblHeHe.
3 Поверета Ддп OблЕКЛоТ, КоЕТ се ГадиTe, Има ETИКET C ИДИКацИЯ 3a TemпepаТураТа на ГадеHe.
IpnopbVbme BN da NOpeKdaTe 6nEknata cnopei Heo6xOdmata 3a T8X TemnepaTypa 3a rJaDeHe n Da 3anOyBaTe C 6nEknata, KOUTo Ce rJaTn npn HauHnCKaTa TEMnepaTypa (·)
CNUHTETUHNBIAKHA,MHIMMAJIHa
TeMnepaTypa ()
KONPIHA, B'JIHAA, cpeHa TeMnepaTpya (")
aaiy iayi yaiy aaiy ayaiy aaiy aaiy aaiy aaiy aaiy aaiy aaiy aaiy aaiy aaiy aaiy aaiy aaiy aaiy aaiy aaiy aaiy aaiy aaiy aaiy aaiy aaiy aaiy aaiy aaiy aaiy aaiy aaiy aaiy aaiy aaiy aaiy aaiy aaliy aaliy aaliy aaliy aaliy aaliy aaliy aaliy aaliy aaliy aaliy aaliy aaliy aaliy aaliy aaliy aaliy aaliy aaliy aaliy aaliy aaliy aaliy aaliy aaliy aaliy aaliy aaliy aaliy aaliy aaliy aaliy aaliy aaliy
AR
#
auii i jinj gui
aill pae j. Jaiuall g aall gaaal y baoi jaoa Jia 10000000000000000000000000000
g
Jus 151
a 1
iiill g kll g gaiill laii
gaa 4a g aal gl alal g aal jal jal jai
jog.iaaiiaaiiaiaiaiaiaiaiaiaiaiaiaiaiaiaiaiaiaiaiaiaiaiaiaiaiaiaiaiaiaiaiaiaiaiaiaiaiaiaiaiaiaiaiaiaiaiaiaiaiaiaiaiaiaiaiaiaia
sliy 4xu! 456 Uglv y jolzall gai
clai jia jia jia jia jia jia jia jia jia jia jia jia jia

Jgai jia jia jia jia jia jia jia jia jia jia jia jia jia jia jia jia jia jia jia jia jia jia jia jia jia jia jia jia jia jia jia jia jia jia jia jia jia jia jia jia jia jia
y
iuiu jiuie jiu yjuyu y
Jalll Jaiinl lly, ilill jaiy, ilill cale ne liy aubii sny
gall 1 gll jieell baiy y po
y
Jaaiaa aaii 1
y 1
y
a 1
A
gga a d gai jao aiiaai i jai guaiy
jll jyS1 jll lI JlS1 yJnJL S


sOlac
what we do, we do well
Espanol / ES
English / EN
Français / FR
Deutsch / DE
Portugues / PT
Italiano / IT
Nederlands / NL
Cesky/CS
Polski / PL
Slovenský / SK
Magyar/HU
6bIrapcK/BG
Româna / RO

Model: PV2013
Rated Power: 220-240V~
50Hz
2200-2600W
www.solac.com


- ESPANOL ES
- SAFETY ADVICE AND WARNINGS
- EN
- MAIN COMPONENTS
- BEFORE STARTING TO IRON
- USE
- BEFORE FIRST USE
- TEMPERATURE SELECTION (fig. 4)
- STEAM SELECTION
- EMPTYING THE WATER TANK
- IRONING RECOMMENDATIONS
- STEAM IRONING
- SUPERSTEAM
- VERTICAL STEAM
- DRY IRONING
- IRONING WITH SPRAY
- OTHER FUNCTIONS
- ANTI-LIMESCALE SYSTEM
- ANTI-DRIP SYSTEM
- STORAGE AND CLEANING
- SOLEPLATE
- EXTERNAL PART
- SELF-CLEANING
- FRANÇAIS FR
- CONSEILS ET MESURES DE SECURITÉ
- VOLBA TEPLEOTY (fig. 4)
- VEMISJA PA RY W PIONIE
- ZEHLENIE S FUNKCIOU KROPENIA
- EXTRA GOZ (super steam)
- CbBETN UYKA3AHN 3A B630nACHOCT
- BG
- OCHOBHNI KOMNOHEHTN
- PPEIN DA 3ANOCHETA TIA DNTE
- AR
- #
- sOlac
Brand : SOLAC
Model : Optima 2.0
Category : Iron