
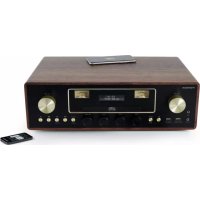
DS120CD - Hi-Fi System THOMSON - Free user manual and instructions
Find the device manual for free DS120CD THOMSON in PDF.
| Product Type | Hi-Fi System |
| Brand | Thomson |
| Model | DS120CD |
| Power Supply | 230 V, 50 Hz |
| Power Consumption | 10 W max |
| Audio Output Power | 5 W x 2 (RMS) |
| Speaker Impedance | 8 ohms |
| Signal-to-Noise Ratio | 86 dB |
| Total Harmonic Distortion | 0.5% (1 kHz, 1 W) |
| Frequency Response | 100 Hz - 20 kHz |
| Bluetooth Frequency Bands | 2402 - 2480 MHz |
| FM Range | 88.8 - 108.00 MHz |
| DAB Range | 174.928 - 239.200 MHz |
| Line Input Sensitivity | 775 mV |
| Ports and Connectors | USB (5V/1A charging), SD card slot, 3.5 mm line input, DAB/FM antenna |
| Disc Player | CD, CD-R/RW |
| Supported Audio Formats | Audio CD, MP3 (via USB/SD) |
| Radio | DAB+ and FM with RDS |
| Wireless Connectivity | Bluetooth |
| Clock and Alarm Functions | Clock, snooze alarm, sleep timer |
| Equalizer | Built-in with presets |
| Included Accessories | Remote control (AAA batteries not included), indoor antenna, line-in cable, manual |
| Care and Cleaning | Clean with a soft, dry cloth. Do not use solvents. |
| Safety | Do not expose to moisture, do not open the casing, unplug during storms |
| General Information | Made in China by Bigben Interactive. Support: support.thomson@bigben.fr |
Frequently Asked Questions - DS120CD THOMSON
User questions about DS120CD THOMSON
0 question about this device. Answer the ones you know or ask your own.
Ask a new question about this device
Download the instructions for your Hi-Fi System in PDF format for free! Find your manual DS120CD - THOMSON and take your electronic device back in hand. On this page are published all the documents necessary for the use of your device. DS120CD by THOMSON.
USER MANUAL DS120CD THOMSON
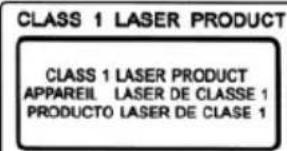
CLASS 1 LASER PRODUCT
CLASS 1 LASER PRODUCT APPAREL LASER DE CLASSE 1 PRODUCTO LASER DE CLASE 1
This product contains a low power laser device.

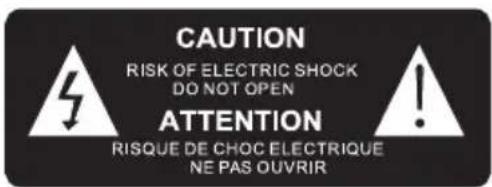
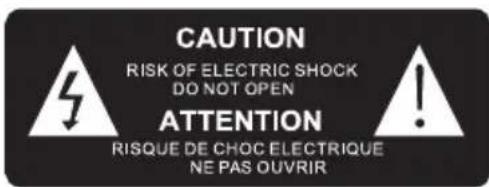
CAUTION
RISK OF ELECTRIC SHOCK DO NOT OPEN
ATTENTION
RISQUE DE CHOC ELECTRIQUE NE PAS OUVRIN

EN : https://www/bigben-interactive.co.uk/support/
IT: https://www/bigbeninteractive.it/supporto-technico/
OTHER LANGUAGES: https://www/bigbeninteractive.com/support/
OPERATING THIS UNIT AND RETAIN FOR
FUTURE REFERENCE
Safety and Notice
Read and understand all instructions before you use this product. If damage is caused by failure to follow the instructions, the warranty does not apply.
Safety
Warning
- Never remove the casing of this apparatus.
- Never lubricate any part of this apparatus.
- Never place this apparatus on other electrical equipment.
- Keep this apparatus away from direct sunlight, naked Fames or heat.
- Never look into the laser beam inside this apparatus.
- Ensure that you always have easy access to the power cord, plug or adaptor to disconnect this apparatus from the power.

- Read and keep these instructions.
- Heed all warnings.
- Follow all instructions.
- Do not use this apparatus near water.
- Clean only with dry cloth.
- Do not block any ventilation openings. Install in accordance with the manufacturer's instructions.
- Do not install near any heat sources such as radiators, heat registers, stoves, or other apparatus (including amplifiers) that produce heat.
- Protect the power cord from being walked on or pinched, particularly at plugs, convenience receptacles, and the Point where they exit from the apparatus.
- Only use attachments/accessories specified by the manufacturer.
- Unplug this apparatus during lightning storms or when unused for long periods of time.
- Refer all servicing to qualified service personnel. Servicing is required when the apparatus has been damaged in anyway, such as power-supply cord or plug is damaged, liquid has been spilled or objects have fallen into the apparatus, apparatus has been exposed to rain or moisture, does not operate normally, or has been dropped.
- Apparatus shall not be exposed to dripping or splashing.
- Do not place any sources of danger on the apparatus (e.g. liquid filled objects, lighted candles).
- Where the MAINS plug or an appliance coupler is used as the disconnect device, the disconnect device shall remain readily operable.
- Make sure there is enough free space around the product for ventilation.
- Batteries (battery pack or batteries installed) shall not be exposed to excessive heat such as sunshine, fire or the like.
Care for your product
- Always unplug the appliance when not in use and before cleaning.
- Do not play music at excessive volume levels as damage to hearing and or the equipment may occur.
- Do not use this unit in wet or damp conditions.
- Always disconnect the unit from the mains power supply before cleaning. Clean the appliance with a soft, damp, lint free cloth. Do not use abrasives or harsh cleaners.
Care of the environment

Your product contains batteries covered by the European Directive 2006/66/EC,
When this crossed-out wheeled bin symbol is attached to a product it means that the product is covered by the European Directive 2002/96/EC. Please inform yourself about the local separate collection system for electrical and electronic products. Please act according to your local rules and do not dispose of your old products with your normal household waste. Correct disposal of your old product helps to prevent potential negative consequences for the environment and human health.
Compliance

This product complies with the radio interference requirements of the Europe Community.
The lightning symbol inside an equilateral triangle warns the user of the presence inside the product of uninsulated hazardous electric voltages powerful enough to represent an electrocution risk.
What's in the box
Check and identify the contents of your package:
1 main unit
1 indoor antenna
1 remote control
1 line-in cable
1 user manual
Getting Started
- Remove the appliance from the box.
- Remove any packaging from the product.
- Place the packaging inside the box and either or dispose of safe.
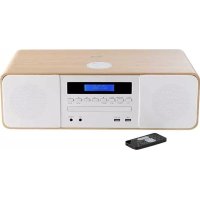
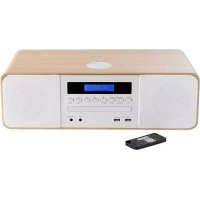
Description of Parts
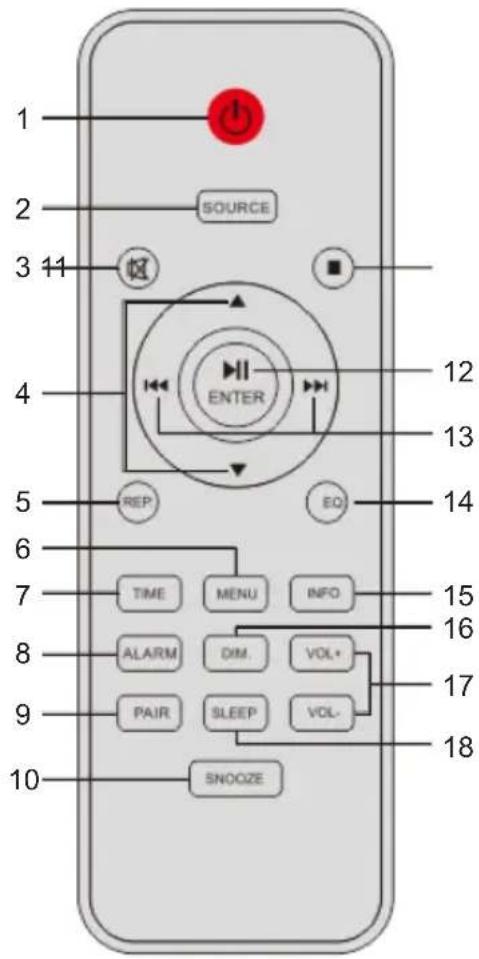
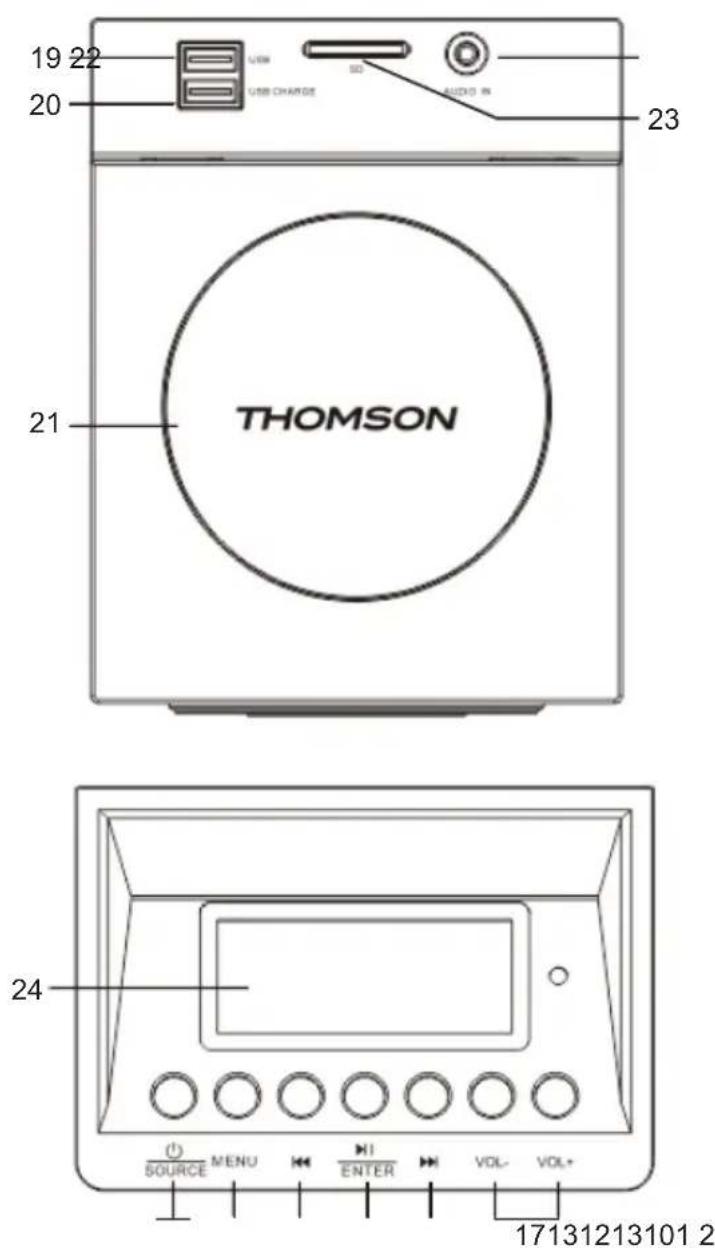
- Standby/Power on switch
Press to switch the unit from ON to standby model or vice versa. In standby mode, the unit still consumes a small amount of power.
- Select the audio source: DAB-FM-CD-USB-CARD-BT-LINE
- Mute the sound
To cancel, press the button again.
- Select option
- Repeat the disc
- Menu
- Select the time setup
- Select the alarm setup
- Select Bluetooth pairing with device
- Snooze
- Stop playback
-
Play the disc or pause playback Select or confirm the option
-
Skip to the next track or previous track
Tune to a radio station
Press and hold the button to search within a track / USB file / SD file
- Select the EQ setup
- Info button
- Dimmer for brightness setting
- Adjust the volume level
- Select the sleep timer setup
- USB
- USB Charge
- CD tray
- Audio in jack
- SD port
- LCD display
Power
CAUTION

- Risk of product damager! Make sure that the power voltage corresponds to the voltage printed on the back label.
- Risk of electric shock! When you unplug the AC power cord always pull the plug from the socket. Never pull the cord.
- Before connecting the AC power cord, ensure you have completed all other connections.
Place the unit in the desired position and unravel the mains cable. Insert the cable into the supply socket and switch on if applicable.
Auto standby
When playing media from a connected device, the Tower automatically switches to standby if:
- No button is pressed for 10 minutes,
No audio from a connected device for 10 minutes.
Remote Control Setup
Requires 2 AAA batteries
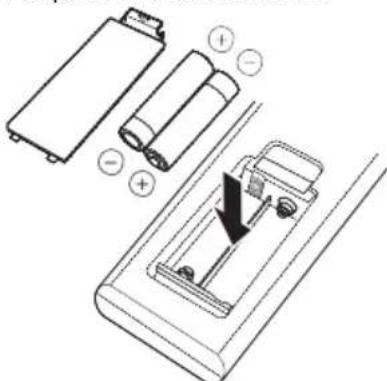
Use alkaline or manganese battery.
Install the battery so that the poles (+ and -) align with those in the remote control.
Close the battery compartment.
Note: Dispos of used batteries properly. Batteries contain chemical substances, so if you are not going to use the remote control for a long time, you should remove the battery.
ATTENTION: Danger of explosion if batteries are not inserted correctly
Clock and Timers
Setting the Clock
After the unit is plugged into a mains supply or following a mains power failure, the display will show "0:00" on the LCD display. The unit should be in standby mode to set the current clock.
- Press TIME button, and the digits for the display will blink.
- Long press the / button repeatedly until correct hour is set. Press ENTER to confirm the hour setting.
- The minute digits on the display will blink.
- Press the / button repeatedly until correct minute is set. Press ENTER to confirm the minute setting.
Setting Alarm
This unit may be used as an alarm clock. The Bluetooth device, USB device or FM radio is activated to play at a preset time.
- Press switch the unit to standby mode.
- Make sure that you have set the clock correctly.
- Press ALARM button in shutdown state; the display will flash ON to select the alarm setting function, and the display will blink.
- Press ENTER to confirm, and the time display will blink.
- Press repeatedly to set hour. Press ENTER to confirm.
- Press to set minute.
- Press ENTER to confirm, and then press / to select CD/DAB/FM/USB status. Press ENTER to confirm.
- The volume may be gradually adjusted from 0 to 20.
- Press ALARM button in shutdown state; the display will flash ON to select alarm setting mode, and the display will blink.
- Press to select OFF to cancel alarm.
Snoopze
- Press to make the alarm ring again in 9 minutes.
- Press to make the alarm ring again in 9 minutes, once the alarm rings again-.
- Press to reset snooze function.
Sleep Timer
- Press the SLEEP button, and the display will blink. Press the button until the display shows the number of minute you want to set. You can set 90/60/45/30/15 minutes.
- The display blinks three times to confirm, and then returns to the previous interface. If you want to cancel the sleep mode, press OFF; after blinking three times, the sleep mode will cancel.
Playing Media Files
Disc
Play a disc
- Press SOURCE repeatedly to select DISC source.
- Insert a disc with the printed side facing to the front.
- Play should start automatically; if not, press
- Press the VOL+/VOL - to adjust the volume.
Pause / resume play
During play, press pause/resume play
- During play, long press 1 2 button to fast forward/fast rewind
Skip to a track
For CD:
-
Press / to select another track.
-
Press the VOL+/VOL - to adjust the volume
For MP3 disc:
- Press to select an album or a folder.
- Press / select a track or a file.
- Press the VOL+/VOL - to adjust the volume.
USB/SD
Reduce the volume and connect the USB/SD device to the USB port or SD port.
Hold the main unit when connecting or disconnecting the USB device.
- Press [Source] repeatedly to select "USB" or "SD"; the USB or SD media will auto play.
- Press / to select the folder, press / to select track.
- Press VOL+VOL - to adjust the volume.
USB Charge
The USB Charge port output power is 5V/1A max.
Bluetooth®
You can connect and play an audio device wirelessly through Bluetooth®.
Setup
- Switch on the Bluetooth® feature of the device and put the device near the system.
-
Read the operation instructions of the device for details.
-
Press [SOURCE] repeatedly to select the Bluetooth mode; the "PAIRING" message blinks.
- Select "DS120DABCD" from the device's Bluetooth menu.
If prompted for a passkey, input "0000".
The device connects with this system automatically after pairing is complete.
The name of the connected device is shown for a few seconds.
- If this system is connected to a Bluetooth device, press and hold the [▶II] button to disconnect it, until the [NO BT] message is shown.
- Start playback on the device.
- Press [ ] to skip track.
- Press the [VOL+/VOL-] buttons or rotate the VOLUME knob to adjust the volume.
Audio-In
You can play from an external audio device such as an MP3 player through this unit.
Line-In Jack (Requires a 3.5mm Cable)
- Connect a 3.5mm cable to the line-in jack on the top panel. Connect the other end of the 3.5mm cable to an MP3 player or other audio device.
- Repeatedly press the [SOURCE] button to select Line-In Mode.
- Use the controls on the connected device to begin playing connected audio.
DAB Radio
Carefully extend the telescopic aerial.
Auto Scan
- Press the [SOURCE] to select "DAB MODE".
If this is the first time the unit has entered DAB Mode, it will automatically start an 'Auto Scan' to search for available stations. (Once DAB Mode has been used before, the unit will automatically select the previously played station)
- Press [ENTER] button to automatically start auto scan to search for available station.
During the scanning process, the lower line of the display shows a bar graph indicating the progress of the scan.

Manual Scan
- Press the [SOURCE] key on main unit to select "DAB MODE".
- Press the [▶] or [▶] button to select "Manual tune", press the [ENTER] button to enter the service menu.
- Press [ ] to tune in the desired channel. The graph will indicate the signal strength.
- Press [MENU] or [ ] to exit scan.
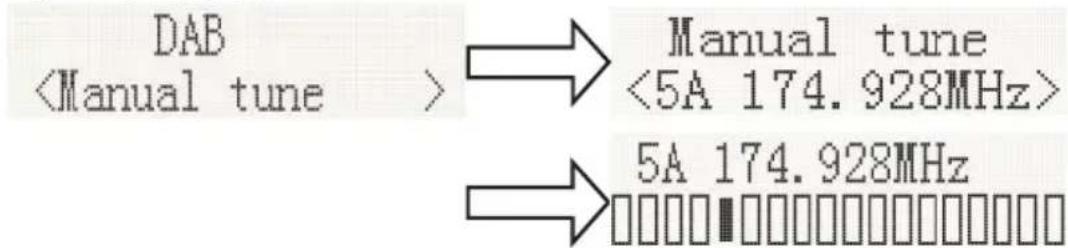
- If no stations are found, please ensure the aerial is extended and test the reception by doing another auto scan in a different location.
DRC(Dynamic Range Control)
Dynamic Range Control (also known as DRC) is a technology used to help make quieter sounds easier to hear in a noisy environment.
- In DAB mode, press the [▶] or [▶] button to select "DRC", press the [ENTER] button to display "*" to the top right.
- Press MENU to confirm the setting. The display will return to normal.
DRC OFF - DRC is switched off, broadcast DRC will be ignored.
DRC LOW - DRC level is set to 1/2 that sent by broadcaster.
DRC HIGH - DRC level is used as sent by broadcaster.
Prune (To Remove Stations That are Listed But Unavailable)
In DAB mode, press [ ] t display the "Prune" submenu, press ENTER button to select the Prune option.

System (DAB)
In DAB mode, press to show the "SYSTEM" submenu, press the ENTER button to go to the system setting submenu.
1. Language
Press [ENTER] to go to language selection; the default source language is English, the selected language will have **" displayed at the top right.
Users may choose between "Deutsch", "Italiano" and "Français".

2. Factory Reset
Press [ENTER] to go to factory reset. If you wish to perform the reset operation, push the or until "YES" is highlighted on the display and press. A full reset of your radio will be performed. All resets and station lists will be erased.

3. SW Version
Press [ENTER] to view DAB software version. Press Menu or▶. The display will return to normal.

*If there are no operations after 30 seconds, the display will return to normal.
Preset
1. Preset Recall
In DAB mode, press or select "Preset Recall", then press [ENTER] to tune to the station stored in preset memory.

Note: If you have not previously stored a preset station and the preset button is pressed, "Empty preset" will be displayed.
2. Preset Store
You may store your preferred DAB stations to the preset station memories. There are 20 memory presets in your radio. Presets are remembered by your radio in the event of a power failure.
The procedure for setting presets and using them to tune stations is the same for DAB modes: In DAB mode, select the desired wave band. Press [▲,▼] to view the stored stations, press or tune to the required station as previously described, and then press [ENTER] to select the desired preset number under which you will store the station. Press [ENTER] to confirm.

FM Radio
Carefully extend the telescopic aerial to its full length.
Auto Scan
- Press the [SOURCE] key to select "FM Mode".
- Long Press button, and your radio will scan and stop automatically when it finds a station of sufficient signal strength.
- After a few seconds, the display will update. The display will show the station frequency. If the signal is strong enough and the station signal contains RDS data, then the radio will display the station name.
- To find other stations, press and hold the ion as before.
- To scan the FM band in the opposite direction (high frequencies to low frequencies), press the button and hold for 2 seconds.
- When the waveband end is reached, your radio will recommence tuning from the opposite waveband end.

Manual Scan
- Press the [SOURCE] key on the main unit to select "FM Mode".
-
Select FM mode as previously described, if required.
-
Press or to tune to a station. Each press of the tuning button will change the frequency up or down by 50kHz
- When the waveband end is reached, the radio will recommence tuning from the opposite waveband end. If no stations are found, please ensure the aerial is extended and test the reception by doing another auto scan in a different location.
Menu
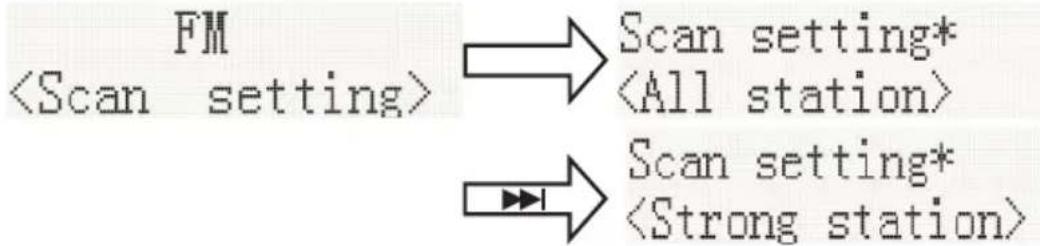
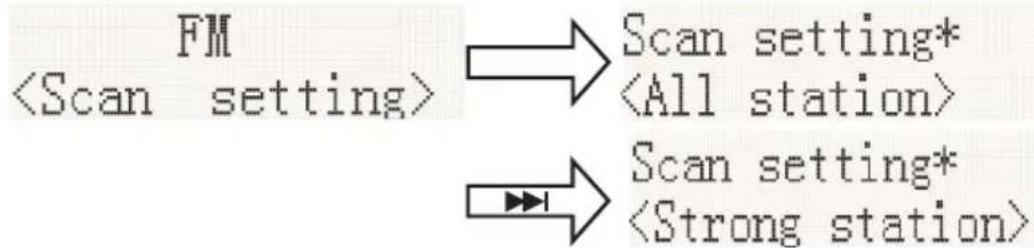
1. Scan Setting
In FM mode, press [MENU], enter the FM menu setting, then press to set [Scan setting], then press [ENTER] to select the sensitivity setting:
1.1. All stations: 15dB

1.2. Strong stations only: 19dB
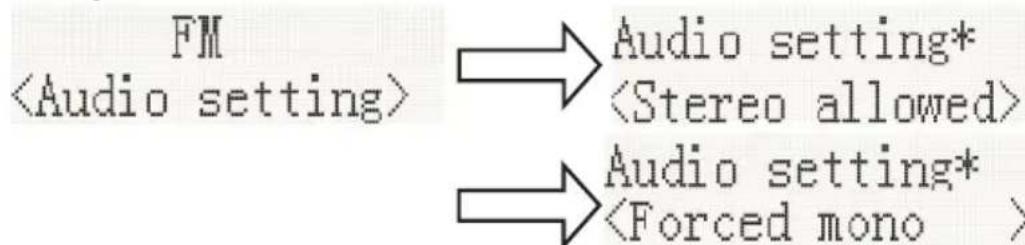
- Audio Setting
2.1. Stereo allowed:

2.2. Forced mono
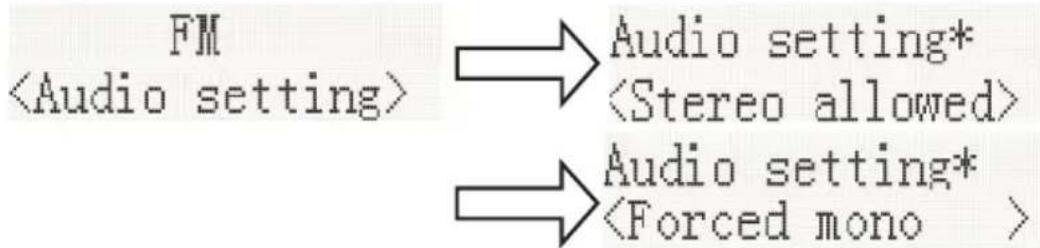
2.3. System (FM system), same DAB system setting.
3. PRESET:
3.1. Preset Recall (Choose the Station): Press [ENTER], tune to the station stored in preset memory.

3.2. Preset Recall (Choose the Station):
You may store your preferred FM stations to the preset station memories. There are 20 memory presets in your radio. Presets are remembered by your radio in the event of a power failure.
The procedure for setting presets and using them to tune stations is the same for DAB modes:
In FM mode, select the desired wave band. Press [▲,▼] to view the stored stations, press [← or →] to tune to the required station as previously described, and then press [ENTER] to select the preset number under which you will store the station. Press [ENTER] to confirm.

Technical Specifications:
Power supply: 230V 50Hz
Max. consumption: 10W
Input sensitivity: LINE IN 775MV
- Speakers impedance: 8 ohms
S/N (A): 86 dB
- THD (1kHz, 1W): 0.5%
Frequency response:100Hz-20KHz
- Bluetooth frequency band: 2402-2480MHz
FM frequency: 88.8-108.00MHz
DAB frequency: 174.928MHz-239.200MHz
Total music output: 5W X2
ABOUT THE DISKS
| Handling Do not touch the underside of disks. Hold disks by the edges to avoid leaving fingerprints on the surface. Any dust, fingerprints or scratches may cause a malfunction. Never affix a label or sticky tape to the disk. | |
| Storage Put disks back in their case after use. Never expose disks to direct sunlight or heat sources. Never leave disks inside a car parked in full sunlight. | |
| Cleaning Use a clean, soft, lint-free cloth to clean the disk, working from the centre outwards in a straight line. Do not use solvents such as petrol, thinners, commercially available cleaners or antistatic sprays for vinyl disks. |
Remarks:
Don't discard the electrical and electronic appliances in the regular waste disposal.
- Take them to a collection point.
Some components in these appliances may be hazardous to health and the environment.
In order to save energy when the unit has no sound output for a while, the unit will be switched to stand-by automatically. It can be switched ON by using the POWER selector again.
If there is an incoming call while DS120DABCD is connected to your cell phone for music playback, it will pause at once when you answer the call and resume after the call ended. (Sometimes it will pause after end the call, it depend on your cell phone.)
The Bluetooth® word, mark and logo are registered trademarks owned by Bluetooth SIG, Inc. and any use of such marks by Bigben Interactive is under license. Other trademarks and trade names are those of their respective owners.
THOMSON is a trademark of TECHNICOLOR SA or its affiliates used under license to Bigben Interactive.
The undersigned, Bigben Interactive declares that the radio equipment of the DS120DABCD type complies with the 2014/53/EU directive.
To download the full statement, please visit our website:
EN: https://www/bigben-interactive.co.uk/support/
DE:https://www/bigben-interactive.de/support/
ES : https://www/bigbeninteractive.es/asistencia-technica/
IT : https://www/bigbeninteractive.it/supporto-technico/
OTHER LANGUAGES: https://www/bigbeninteractive.com/support/
and the section <<declaration of conformity>> .
Manufactured by BIGBEN INTERACTIVE SA
396, Rue de la Voyette
CRT2-FRETIN
CS 90414
59814 LESQUIN Cedex - France
www/bigben.eu
Made in China


REACH

Fabricant: Bigben Interactive FRANCE
396, Rue de la Voyette, C.R.T. 2 Fretin, CS 90414-59814 LESQUIN Cedex, France
EN: https://www/bigben-interactive.co.uk/support/
DE: https://www/bigben-interactive.de/support/
ES: https://www/bigbeninteractive.es/asistencia-technical/
IT: https://www/bigbeninteractive.it/supporto-technico/
OTROS IDIOMAS: https://www/bigbeninteractive.com/support/
EN: https://www/bigben-interactive.co.uk/support/
DE: https://www/bigben-interactive.de/support/
ES: https://www/bigbeninteractive.es/asistencia-technical/
IT: https://www/bigbeninteractive.it/supporto-technico/
ALTRE LINGUE: https://www/bigbeninteractive.com/support/
This product contains a low power laser device.

EN: https://www/bigben-interactive.co.uk/support/
DE: https://www/bigben-interactive.de/support/
ES: https://www/bigbeninteractive.es/asistencia-technical/
IT: https://www/bigbeninteractive.it/supporto-technico/
OUTRAS LINGUAS: https://www/bigbeninteractive.com/support/
EN: https://www/bigben-interactive.co.uk/support/
IT https://www/bigbeninteractive.it/supporto-technico/
WEITERERE SPRACHEN: https://www/bigbeninteractive.com/support/
CLASS 1 LASER PRODUCT
CLASS 1 LASER PRODUCT APPAREIL LASER DE CLASSE 1 PRODUCTO LASER DE CLASE 1
This product contains a low power laser device.

CAUTION

RISK OF ELECTRIC SHOCK DO NOT OPEN
ATTENTION
RISQUE DE CHOC ELECTRIQUE NE PAS OUVRIR
EN: https://www/bigben-interactive.co.uk/support/
DE: https://www/bigben-interactive.de/support/
ES: https://www/bigbeninteractive.es/asistencia-technica/
IT: https://www/bigbeninteractive.it/supporto-technico/
OVERIGE TALEN: https://www/bigbeninteractive.com/support/
en de sectie <
This product contains a low power laser device.

EN: https://www/bigben-interactive.co.uk/support/
DE: https://www/bigben-interactive.de/support/
ES: https://www/bigbeninteractive.es/asistencia-technica/
IT: https://www/bigbeninteractive.it/supporto-technico/
ÖVRIGA SPRÄK: https://www/bigbeninteractive.com/support/
I DAB-tilstand trykkes pa [ ] aller [ ] for at f avist undermenuen "Prune",tryk pa knappen ENTER for at vaelge muligheden Oprydning.

System (DAB)
I DAB-tilstand trykkes på [←]ller [→]for at fā vist untermenuen "SYSTEM", tryk på knappen ENTER for at gā til systemindstillingens untermenu.
1. Sprog
Tryk på [ENTER] for at gå til valg af sprog; som standard er kildesproget engelsk, for det valgte sprog vises *** overst til høire.
- Indstilling for scanning
I FM-tilstand trykkes pa [MENU], gä ind i indstilling af FM, tryk derefter pa | << erler >> for at vælge [Scan setting] (indstilling for scanning), tryk derefter pa [ENTER] for indstilling af folsomhed:
1.1. Alle stationer: 15 dB

1.2. Kun kraftige stationer: 19 dB
- Lydindstilling
2.1. Stereo mulig:

2.2. Tvunget mono
2.3. Anlaeg (FM-system), samme DAB-systemindstilling.
- FORINDSTILLING:
3.1. Hent forindstillinger (vaelg stationen):
Tryk [ENTER], indstil den forudindstillede station gemt i hukommelsen.

3.2. Hent forindstillinger (vaelg stationen):
EN: https://www/bigben-interactive.co.uk/support/
DE: https://www/bigben-interactive.de/support/
ES: https://www/bigbeninteractive.es/asistencia-technica/
IT: https://www/bigbeninteractive.it/supporto-technico/
ANDRE SPROG: https://www/bigbeninteractive.com/support/
- Innstilling for skanning
2.3. System (FM-system) samme DAB-systeminnstilling.
- FORHÄNDSINNSTILLING:
EN: https://www/bigben-interactive.co.uk/support/
IT : https://www/bigbeninteractive.it/supporto-technico/
ANDRE SPRAK: https://www/bigbeninteractive.com/support/
og < < declaration of conformity>>.
Produsert av BIGBEN INTERACTIVE SA
396, Rue de la Voyette
CRT2-FRETIN
CS 90414
59814 LESQUIN Cedex - Frankrike
www/bigben.eu
ProdusertiKina


REACH

Fabricant: Bigben Interactive FRANCE
396, Rue de la Voyette, C.R.T. 2 Fretin, CS 90414-59814 LESQUIN Cedex, France
EN: https://www/bigben-interactive.co.uk/support/
DE: https://www/bigben-interactive.de/support/
ES: https://www/bigbeninteractive.es/asistencia-technica/
IT: https://www/bigbeninteractive.it/supporto-technico/
JINÉ JAZYKY: https://www/bigbeninteractive.com/support/
EN: https://www/bigben-interactive.co.uk/support/
DE: https://www/bigben-interactive.de/support/
ES: https://www/bigbeninteractive.es/asistencia-technica/
IT: https://www/bigbeninteractive.it/supporto-technico/
MÁS NYELVEK: https://www/bigbeninteractive.com/support/
EN: https://www/bigben-interactive.co.uk/support/
DE: https://www/bigben-interactive.de/support/
ES: https://www/bigbeninteractive.es/asistencia-technica/
IT: https://www/bigbeninteractive.it/supporto-technico/
POZOSTAŁE JEUZYKI: https://www/bigbeninteractive.com/support/
- CLASS 1 LASER PRODUCT
- CAUTION
- ATTENTION
- Safety and Notice
- Safety
- Warning
- Care for your product
- Care of the environment
- Compliance
- What's in the box
- Getting Started
- Description of Parts
- Power
- Auto standby
- Remote Control Setup
- Clock and Timers
- Setting the Clock
- Setting Alarm
- Snoopze
- Sleep Timer
- Playing Media Files
- Disc
- USB/SD
- USB Charge
- Bluetooth®
- Audio-In
- DAB Radio
- Auto Scan
- Manual Scan
- DRC(Dynamic Range Control)
- Prune (To Remove Stations That are Listed But Unavailable)
- System (DAB)
- Language
- Factory Reset
- SW Version
- Preset
- Preset Recall
- Preset Store
- FM Radio
- Menu
- Scan Setting
- PRESET:
- Preset Recall (Choose the Station):
- Technical Specifications:
- ABOUT THE DISKS
- Remarks:
- Sprog
Brand : THOMSON
Model : DS120CD
Category : Hi-Fi System