SoundPort Compact - Speaker LOEWE - Free user manual and instructions
Find the device manual for free SoundPort Compact LOEWE in PDF.
User questions about SoundPort Compact LOEWE
0 question about this device. Answer the ones you know or ask your own.
Ask a new question about this device
Download the instructions for your Speaker in PDF format for free! Find your manual SoundPort Compact - LOEWE and take your electronic device back in hand. On this page are published all the documents necessary for the use of your device. SoundPort Compact by LOEWE.
USER MANUAL SoundPort Compact LOEWE
Sound Port - Lightning Connector:
iPhone 5, iPhone 5c, iPhone 5s
Sound Port Compact - Lightning Connector:
iPhone 5, iPhone 5c, iPhone 5s
Sound Port Mini - Lightning Connector:
iPhone 5, iPhone 5c, iPhone 5s
iPod touch (5. Generation), iPod nano (7. Generation)
Sound Port Mini - USB:
iPhone, iPod touch, iPod nano
Assist 1 (MediaVision) 89900A11
Assist 1 (HomeCinema) 89900A12
Assist 1 (SoundVision) 89900A10
Assist 1 (MultiContr. II) 89900A09
Assist 2 (TV) 89950A23
Assist 2 (SoundBox) 89950A20
Assist 2 (AirSpeaker) 89950A22
Technische Daten
© 2012 CSR plc and its group companies.
The aptX® mark and the aptX logo are trade marks of CSR plc or one of its group companies and may be registered in one or more jurisdictions."

WELCOME! 32
For your safety 33
Operating controls 35
Connections 36
Start-up 37
Switching ON/OFF 38
Charging the audio source. 38
Source selection 39
Sound settings 40
Cable connection. 41
Lightning Connector 42
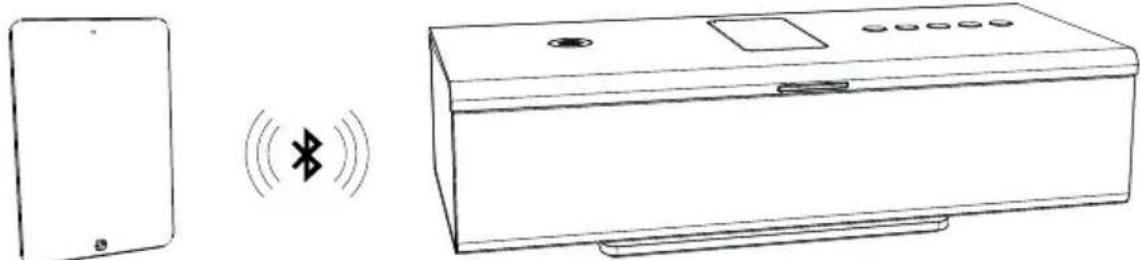
Bluetooth link 44
USB Audio 46
PC Audio. 47
Sync 48
Audio playback / Adjusting the volume 49
Handsfree function 50
Smart Standby mode and Standby mode 51
Accessories 52
Supported iDevices 54
Applicable remote control versions. 54
Technical Data. 55
Environmental protection 56
Declaration of conformity. 56
Legal information 57
Legal details 57
SoundPort / SoundPort Compact / SoundPort Mini
Operating instructions
WELCOME!
Thank you
for choosing a Loewe product!
Loewe stands for the highest standards of technology, design and ease of operation. This applies equally for TV, video, audio and accessories. Neither technology nor design is an end in itself, but both are intended to provide our customers with the best possible audio and visual experience. Our design is not influenced by short-term, fashionable trends. You have, after all, purchased a high-quality piece of equipment that you do not want to be tired of tomorrow or the day after.
Delivery specifications
- SoundPort or SoundPort Compact or SoundPort Mini
- Mains cable
Audio cable, 3.5mm jack
USB cable (type A-B)
This instruction manual
Performance
Connection options
Bluetooth 2.1 + EDR
Connectivity Easy Pairing (for connection with NFC-enabled devices)
Apple Lightning Connector
AUDIO IN (stereo audio input 3.5 mm jack)
USB A (USB streaming / charging of connected audio sources)
USB B (USB Speaker / Sync)
Headphone jack (3.5 mm stereo audio output)
Replay functions
Support of audio codecs (aptX, SBC)
Bluetooth handsfree equipment
About this instruction manual
The information in this manual refers to the Loewe products SoundPort (item no. 52227x00), SoundPort Compact (item no. 52228x00), SoundPort Mini (item no. 52229x00).
In the instruction manual the term SoundPort is used as a collective term for all three SoundPort device versions. In the event that differences in the use / operation of the device versions occur, each SoundPort device type is described separately.
In the instruction manual the term iDevices is used as a collective term for the Apple devices iPhone, iPad, iPad mini and iPod.
For best results regarding safety and the longevity of the set, we recommend you read the chapter "For your safety" (see page 33 before switching it on for the first time).
For your safety, and to avoid unnecessary damage to your unit, please read and follow the safety instructions below:
Intended use and ambient conditions
This unit is intended exclusively for playback of audio signals. It must not be used in rooms with a high level of humidity (e.g. bathroom, sauna) or a high dust concentration. The manufacturer's warranty is only valid for use in the specified permissible environment.
If the unit is used outdoors, make sure that it is protected from moisture (rain, dripping water and splashing water or dew). High humidity and dust concentrations lead to leakage currents in the device. This can result in a shock hazard by touching it or even fire.
If you have moved the unit out of the cold into a warm environment, leave it switched off for about an hour because of a possible formation of condensation.
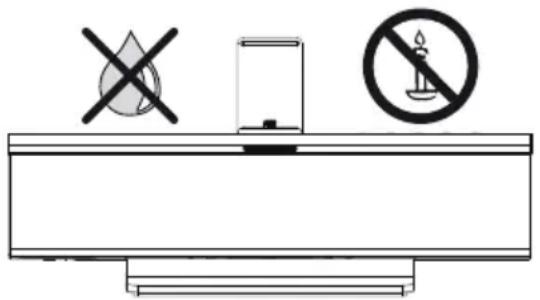
Do not place objects containing liquids on top of the unit. Protect the device against dripping and splashing water. Candles or naked flames must be kept away from the unit at all times to prevent it from catching fire.
Never place the device in a location where it is exposed to vibrations. This can lead to material overload.
Power supply
Incorrect voltages can damage the unit. This device may only be connected to a power supply with the voltage and frequency indicated on the type plate using the supplied mains cable. The mains plug of the unit must be easily accessible so that the device can be disconnected from the mains at any time. When unplugging the unit from the mains, pull at the connector body and not at the cable.
Lay the mains cable so that it cannot be damaged. The connecting cable may not be kinked or laid over sharp edges, stood on or exposed to chemicals; the latter also applies to the unit as a whole. A mains cable with damaged insulation can cause electric shocks and poses a fire risk.
Supervision
Do not allow children to use the device without supervision or to play in the immediate vicinity of the device. The device could tip over, be pushed off or pulled down from the stand surface and injure someone. Do not allow the switched-on device to run unattended.
SoundPort / SoundPort Compact / SoundPort Mini
Operating instructions
For your safety
Air circulation and high temperatures
Ensure that there is at least 3cm free space on the sides and above the set for air circulation, if the set is placed in a cabinet or on a shelf.
Like any electronic device, your unit requires air for cooling. Obstruction of the air circulation can cause fires.
Prevent metal items, needles, paper clips, liquids, wax, or similar items, from getting into the interior of the device through the openings of the device covers. Such objects can cause short circuits in the unit, which could possibly cause a fire.
If something should get into the interior of the set then immediately unplug the mains plug of the device and contact the field service for more information.
Set-up
Place the unit on an even, firm, horizontal surface. Particularly make sure that the set does not protrude to the front and laterally when placed in or on pieces of furniture.
Set up the device where it is not exposed to direct sunlight and where it is not exposed to additional heating by radiators.
Volume
Loud music can lead to ear damage. Avoid extreme volume especially over long periods. Make sure that the volume is turned down on the TV set or the TV set is turned off before you leave the room.
Thunder storms
In the event of a thunderstorm, pull out the mains plug and all connected cables from the device. A voltage surge caused by lightning conducted through the mains could damage the unit. The mains plug and all connected cables should also be pulled out during long periods of absence.
Repairs and accessories

Warning: Under no circumstances, do not open or remove the housing cover, otherwise you will come into contact with dangerous voltages or be exposed to other hazards. There are no parts inside the unit that can be repaired by the user. Have your device repaired or serviced by authorised technicians only.
Only use original accessories, if possible.
Cleaning and care
Switch off the device with the main switch prior to cleaning.
Clean the aluminium surface with a soft, slightly damp, clean and colour-neutral cloth only, without any aggressive or scouring cleaning agents.
You can remove any dust on the speaker surface by carefully using a vacuum cleaner if needs be.
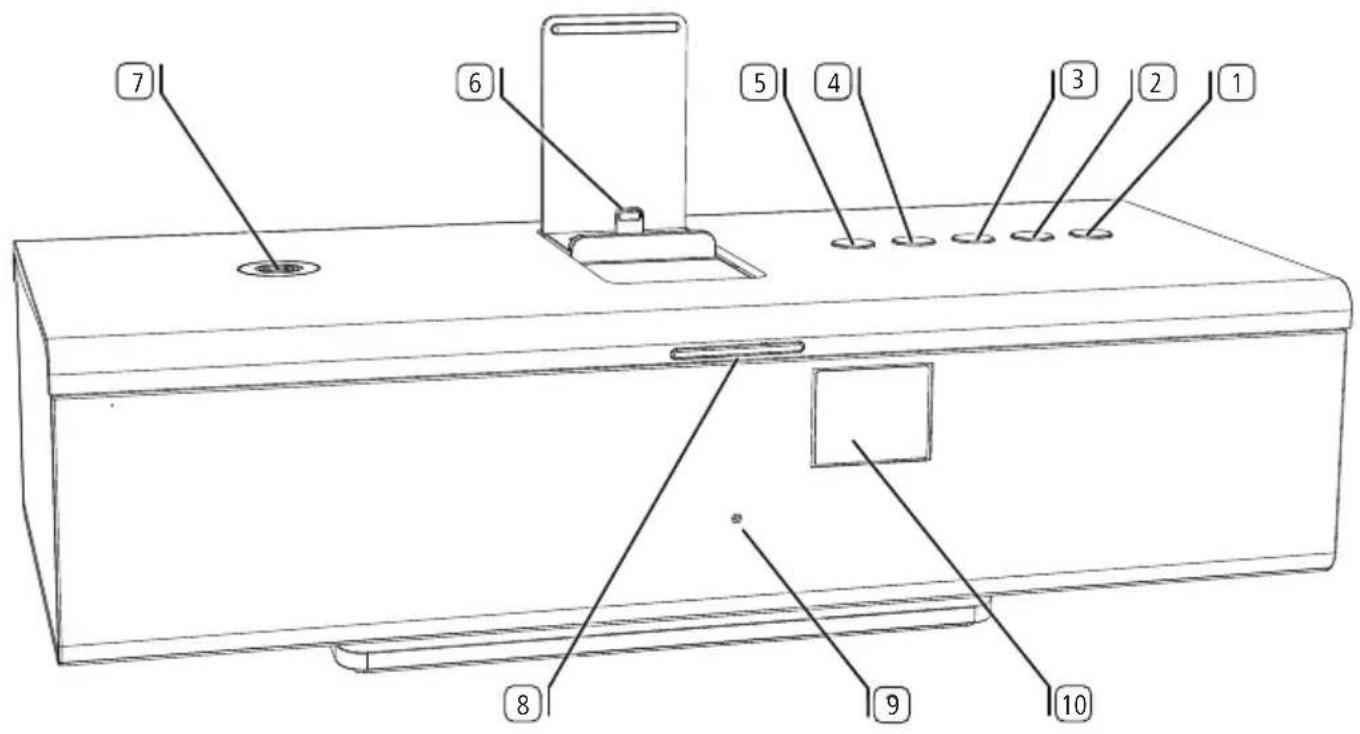
Key (Switching ON/OFF)
2 Key SRC (Source selection / Sound settings)
3 Key (Handsfree talking / Bluetooth link)
4KeyVolume+)
5 Key (Volume-)
6 Apple Lightning Connector (max. 2.1A)
7 Connectivity Easy Pairing Antenna (for connection with NFC-enabled devices)
8 LED display
9 Microphone for handsfree talking (hidden behind the speaker cover)
10 Infrared receiver (hidden behind the speaker cover)
SoundPort / SoundPort Compact / SoundPort Mini
Operating instructions
Connections
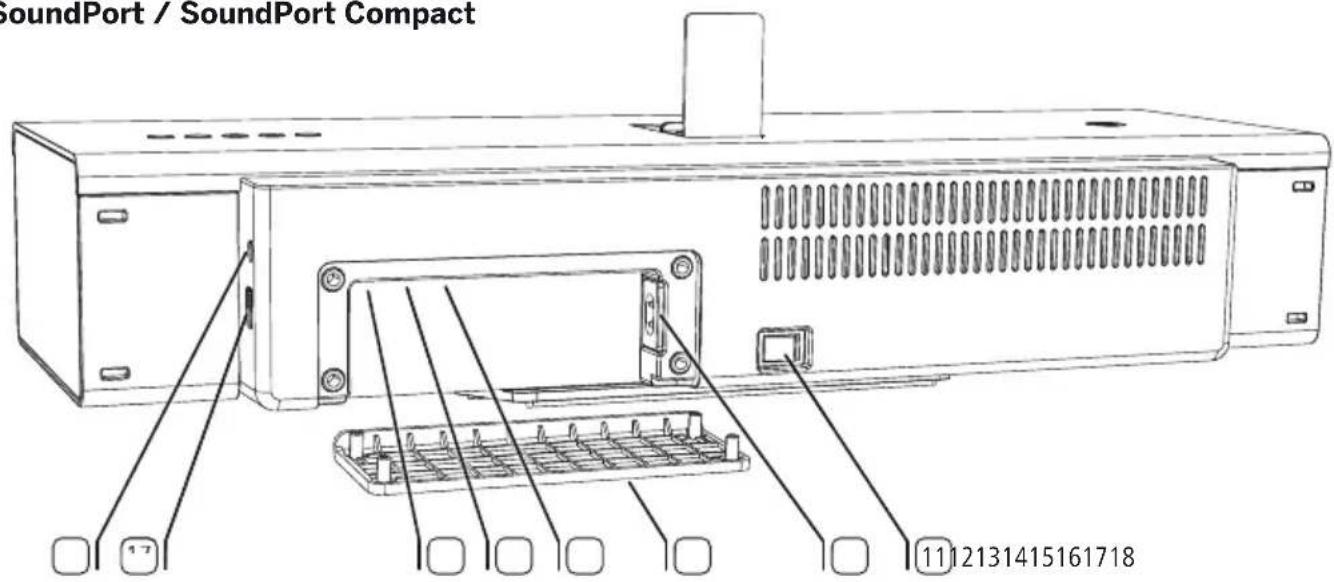
SoundPort / SoundPort Compact
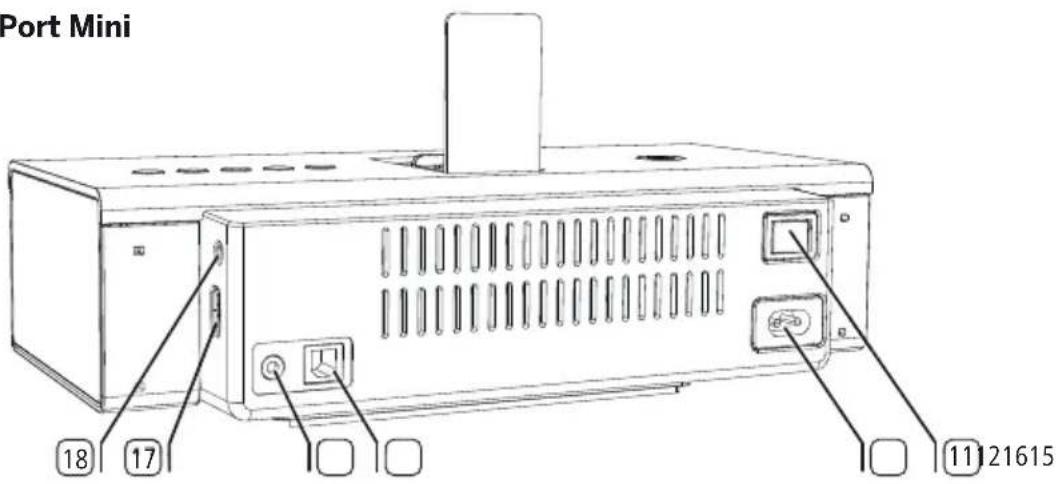
SoundPort Mini
11 Power switch
12 AC-IN (mains socket)
13 Cable cover (removable)
14 AUDIO IN (stereo audio input, 3.5 mm jack)
15 USBB connection
16 USB A connection
17 Headphone output (3.5 mm jack)
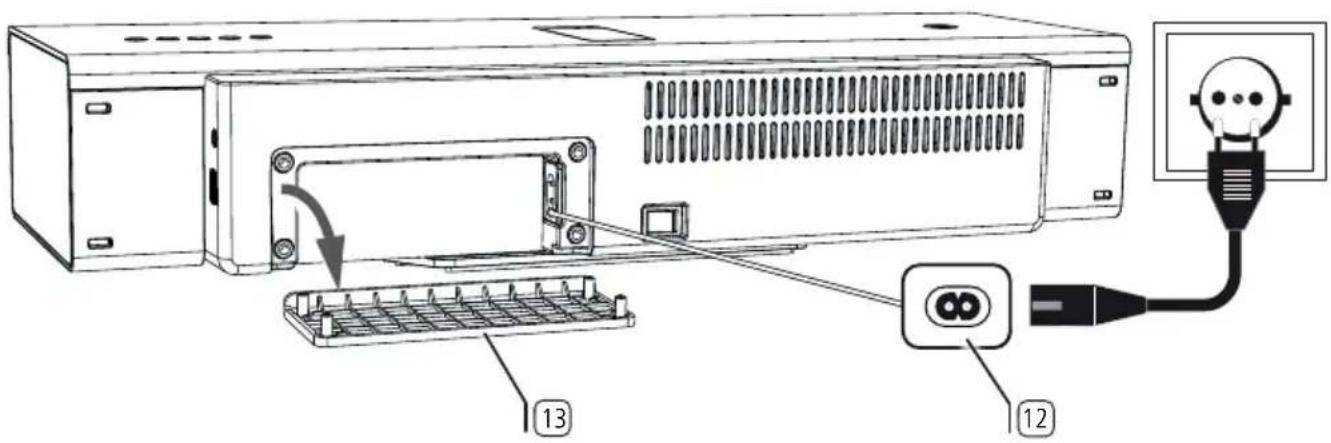
Connecting to the mains supply
Remove from SoundPort / SoundPort Compact the cable cover on the rear side of the device.
Plug the mains cable into the mains socket 12 and connect it to a 220-240 V 50/60 Hz socket.
SoundPort / SoundPort Compact
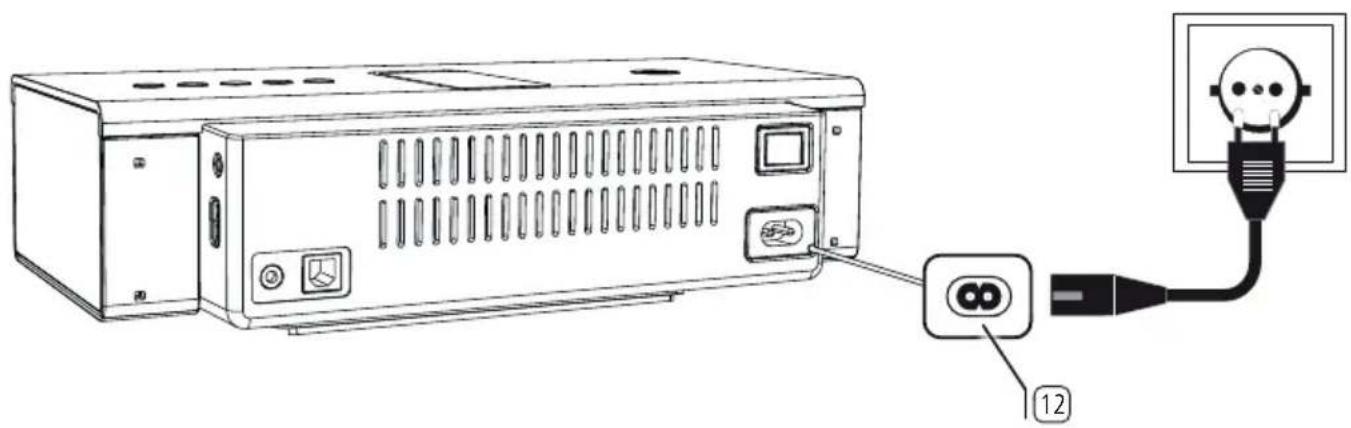
SoundPort Mini
SoundPort / SoundPort Compact / SoundPort Mini
Operating instructions
Switching ON/OFF
Charging the audio source
Switching on
When switched off, the LED display is dark.

Switch the power switch to position ON.
The SoundPort is in the Standby mode.
The middle two segments of the LED display light dimmed.

Press the ON/OFF key on the unit.
The LED display lights up green on the very first start (AUDIO IN source).
When switching on later, the last selected source remains active.
For the colours of the LED display for each source, see page 39.
After 10 minutes without music playback, receiving or sending a call, pressing a key on the SoundPort or on the Assist remote control (see page 52), connecting or disconnecting a device and running a sync process, the SoundPort will automatically switch to Smart Standby mode.
For further information on the energy modes see page 51.
Switching off

Press the ON/OFF key on the unit.
The SoundPort switches to the Standby mode.
The middle two segments of the LED display light dimmed.
After 4 hours in Smart Standby mode, the SoundPort automatically switches to the Standby mode.
For further information on the energy modes see page 51.
Charging the audio source
You may charge the battery of your audio source, e.g., a mobile phone, iPad, etc. via your SoundPort.
1 The power switch of the SoundPort must be switched on.
1 Only one device should be charged at the same time.
Charging of iDevices at the Lightning Connector:
Plug your iDevice with Lightning Connector on the Lightning Connector built-in in the SoundPort (see pages 42 and 43).
Charging of USB audio sources:
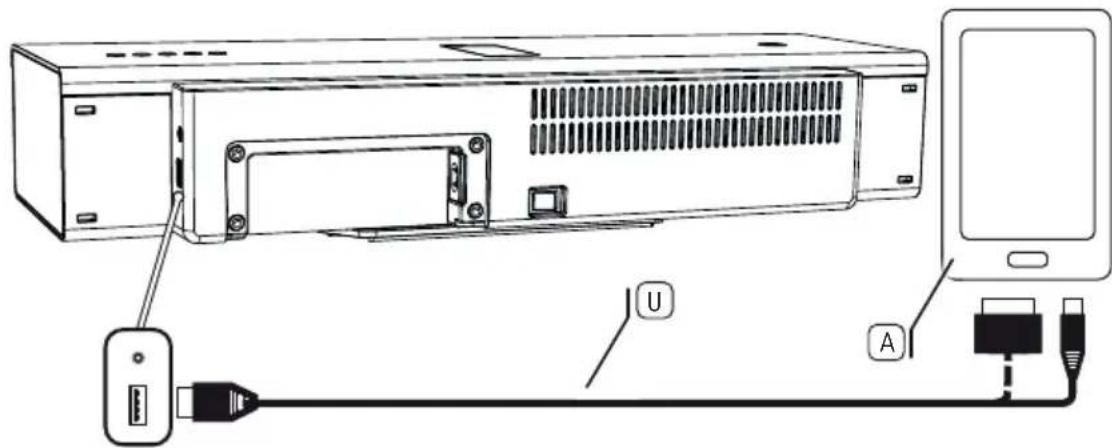
Connect the type A plug of the USB cable into the USB socket of the SoundPort. To do this, use a USB cable with type A plug suitable for your audio source (commercially available).
The connected device (Lightning/USB) is charged in both the operating and the Smart Standby mode of the SoundPort. The audio source will not be charged in Standby mode.
Source selection
The SoundPort offers several ways to connect and select audio sources. Each source is assigned a different colour on the LED display.
LED colours of the individual sources
AUDIO IN (green)
How to connect an audio source via a 3.5 mm stereo cable to the AUDIO IN port of the Soundport is described on page 41.
Apple Lightning Connector (violet)
How to connect iDevices to the Lightning Connector is described on page 42/43.
Bluetooth (blue)
How to link audio sources via Bluetooth / NFC is described on pages 44/45.
USB Audio (yellow)
How to connect audio sources to USB is described on page 46.
PC Audio (pink)
How to connect the SoundPort as a USB device is described on page 47.
Selection of the source

Each time you press the SRC key ② you go to the next source.
The sequence of the sources corresponds to the sequence of the LED colours described above.
Having selected the source, the SoundPort tries to establish a connection to the audio source via the selected port.
During the search, the LED display 8 flashes in the selected source colour (the maximum search time is 30 sec).
If successful, the LED display lights up in the selected source colour.
If the search was not successful the LED display lights up dimmed in the selected source colour (60% brightness).
Sound settings
With your SoundPort you have the possibility to select predefined sound settings for audio playback.
Selecting the sound settings

Press the SRC key on the SoundPort for a longer period (approx. 2 sec).
The LED display shows the last selected sound setting (e.g. classic).

Press the ^+ key4 or -key5 repeatedly until the desired sound is selected (e.g. flat).
If no key is pressed for a few seconds, the previously selected source will be indicated again.
LED display of the sound settings
1 LED display: presetting flat
2 LED displays: presetting voice
3 LED displays: presetting classic
4 LED displays: presetting pop
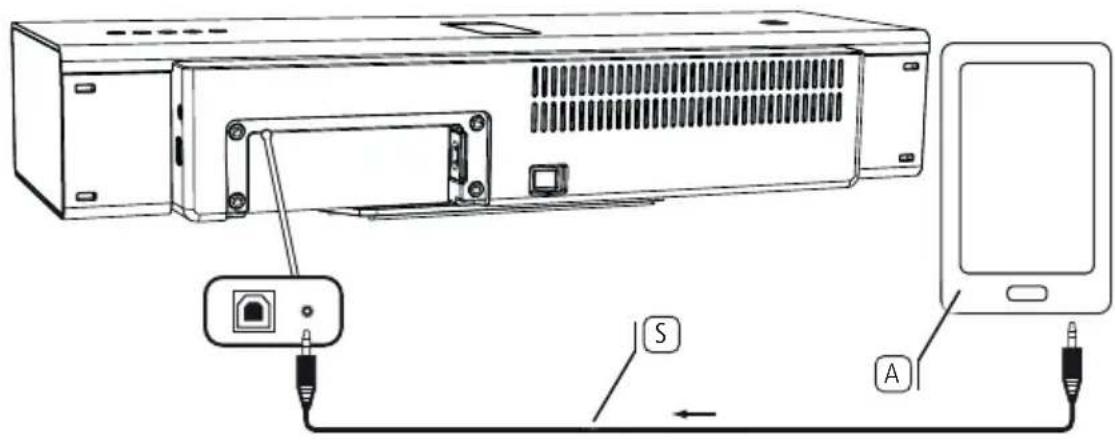
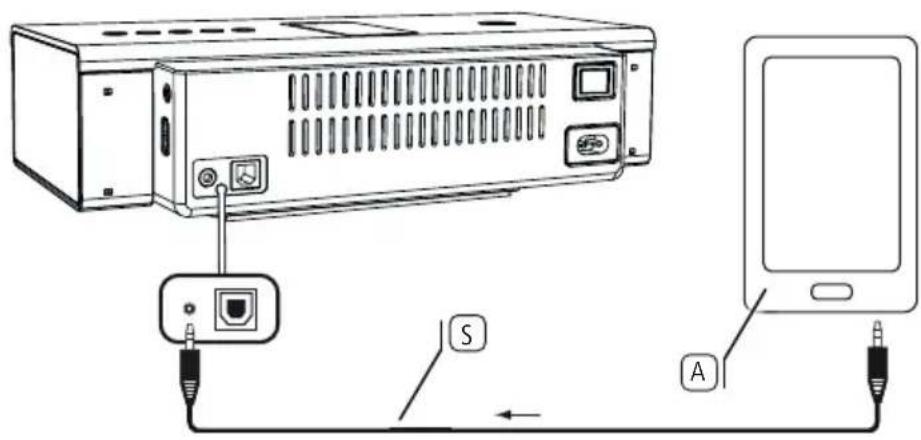
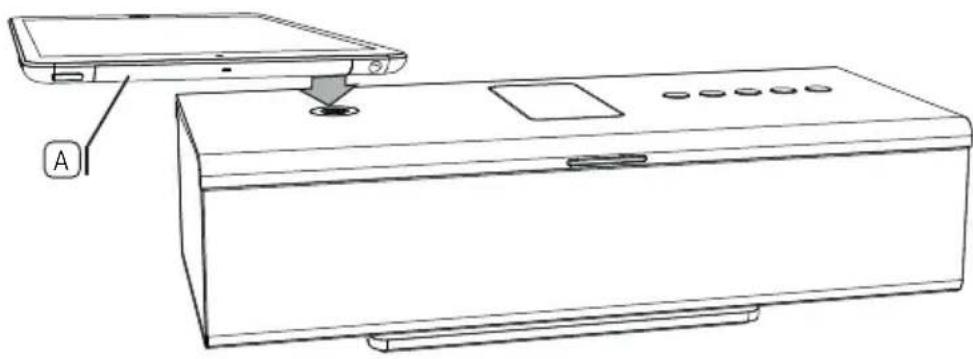
Connecting the audio source to AUDIO IN
You can connect your SoundPort to your audio source, e.g., mobile phone, music player, etc., using an audio cable (3.5 mm jack plug).
Connect the stereo audio input AUDIO IN14 of the SoundPort with the analogue stereo audio output of your audio sourceA.
To do so, use the supplied audio cable with 3.5 mm jack plug.
1 AUDIO IN has been selected as source (see page 39).
The audio signal (see page 49) is now replayed via the audio cable.
SoundPort / SoundPort Compact
SoundPort Mini
SoundPort / SoundPort Compact / SoundPort Mini
Operating instructions
Lightning Connector
Lightning Connector
Your SoundPort is equipped with an Apple Lightning Connector for iDevices1. Thus, you can replay any sound source (music, video, internet radio) from your iDevice with Lightning Connector via the speakers of the SoundPort.
The iDevice connected to the Lightning connector is charged during operation and also in the Smart Standby mode of the SoundPort (see page 38).
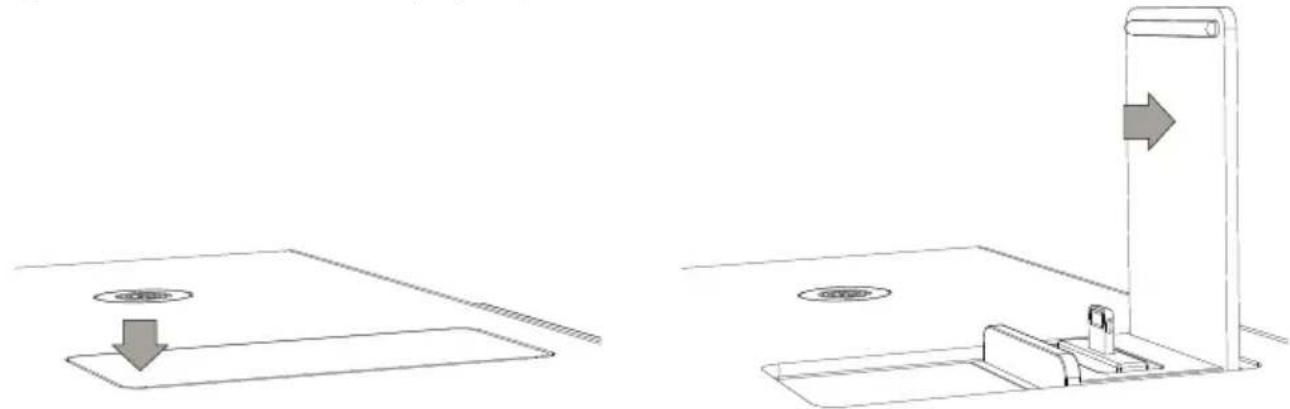
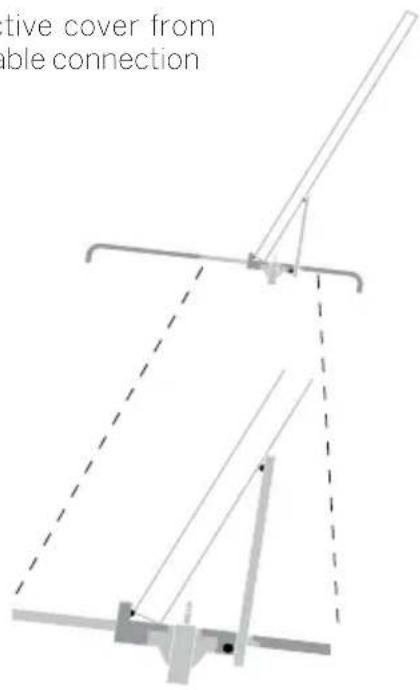
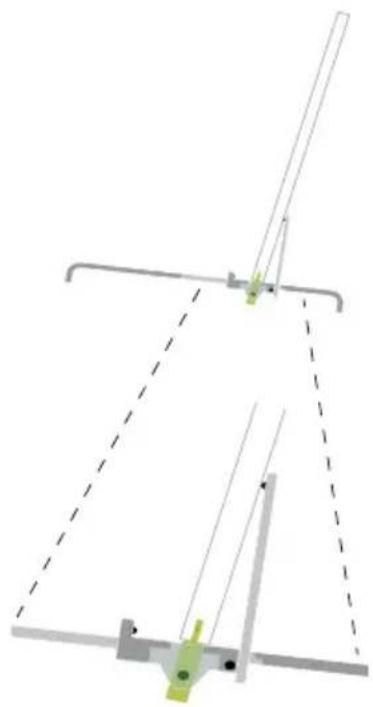
Opening the Lightning Connector
Press slightly on the top of the closed cover flap at its front. The Lightning Connector opens automatically when the lock is released.
To fix the holder push the opened cover flap to the rear in its locking position. Now you can use the Lightning Connector for iDevices (see page 43).
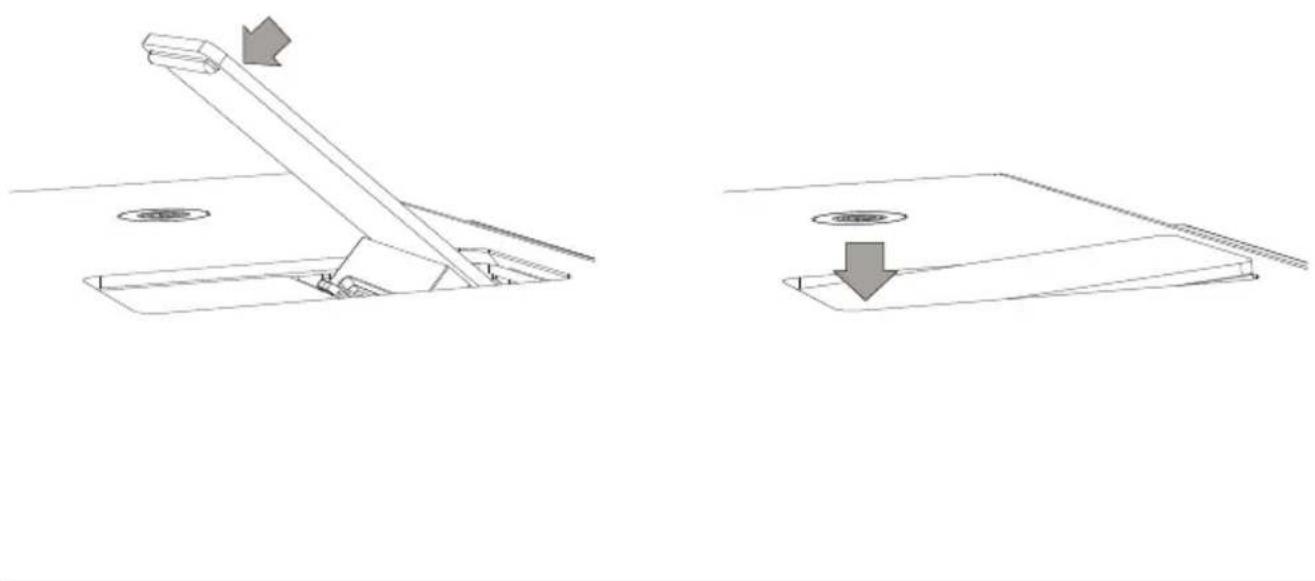
Closing the Lightning Connector
Press the opened cover flap from the locking position to the front. Close the cover by pushing it down beyond the closed end position. You will hear the engagement of the cover flap.
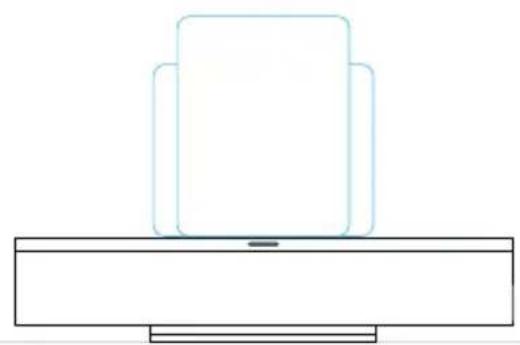
Connecting the audio source to the Lightning Connector
You can connect iDevices with Lightning Connector in vertical alignment with the built-in Lightning Connector. The iDevices can also be positioned horizontally. In this case, the connection is made via Bluetooth (see page 44) or via USB cable connection (see page 46).
If the iDevice is plugged into the Lightning Connector of the SoundPort, it is ready for audio playback (see page 49) or to sync with the PC / laptop (see page 48).
Below you will see which iDevice can be used on the SoundPort device variants (maximally with respect to size).
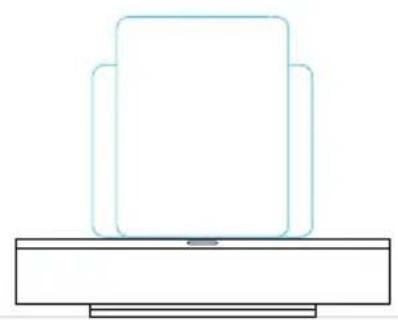
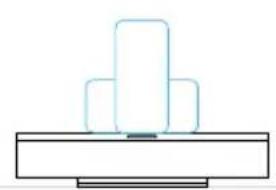
SoundPort SoundPort Compact SoundPort Mini
iPad vertical/horizontal iPad vertical/horizontal iPhone 5 / iPod touch
vertical/horizontal
Please remove any protective cover from your iDevice to ensure a reliable connection to the lightning connector.
iDevice stored in the cover flap of the Lightning Connector
iDevice plugged at the Lightning Connector
SoundPort / SoundPort Compact / SoundPort Mini
Operating instructions
Bluetooth link
Linking the audio source via Bluetooth
You can link your SoundPort to an audio source, e.g., smartphone, tablet PC, etc. using a wireless Bluetooth connection. The audio sources must support the Bluetooth A2DP protocol.
The distance between your SoundPort and the audio source must be no more than 10 m (line of sight).
The SoundPort stores the last 5 audio sources linked via Bluetooth. In this way, the link will be established more quickly when linking again. However, only one active link is possible at the same time. If a new audio source is added, the "oldest" stored audio source is deleted from the list of links.
Bluetooth has been selected as source (see page 39).

Press the key on the SoundPort for a longer period (approx. 3 sec). You hear a signal tone.
The LED display ⑧ flashes.
Enable the Bluetooth function of your audio source. If necessary, get help from the instruction manual of your audio source.
If necessary, confirm the Bluetooth Search function of the audio source.
Now, Bluetooth devices will be searched near the audio source.
Select SoundPort_xx. If a code is requested, enter 0000.
After the linking is completed you hear a signal tone.
The LED display lights up continuously, the SoundPort is now ready for audio playback (see page 49).
For some audio sources, the link must be explicitly enabled before music playback can be heard from the SoundPort.

When changing the source by pressing the SRC key ② the ongoing music playback is paused / stopped, but the link to the audio source remains.

When pressing the ON/OFF key① the SoundPort will be switched to the Standby mode. An ongoing music playback is paused / stopped, the link with the audio source is interrupted.
After switching the SoundPort on again using the ON/OFF key①, the SoundPort tries to relink to the audio source. In this state, the LED indicator⑧ flashes.
After successful linking the LED will light up permanently.
Linking the audio source via Connectivity Easy Pairing
It is especially simple to link your SoundPort to your audio source, e.g., smartphone, tablet PC, etc., when using the Connectivity Easy Pairing function (linking with NFC-enabled devices). For this purpose, the audio source must support the NFC function.
Enable the NFC function and the Bluetooth function of your audio source. If necessary, get help from the instruction manual of your audio source.
Find out the exact NFC detection area in the manual of your audio source.
The link via the Connectivity Easy Pairing function is permanently active for the SoundPort (exception: Standby mode). Therefore, you do not have to change manually to the Bluetooth source.
Hold the NFC detection area of your audio source in the direction of the Connectivity Easy Pairing antenna of the SoundPort.
If necessary, confirm the inquiry of your audio source that it can be coupled to the SoundPort. After the linking is completed you hear a signal tone.
The LED indicator lights up permanently.
Now, the SoundPort is linked to your audio source via Bluetooth and is ready for audio playback (see page 49).
For some audio sources, the link must be explicitly enabled before music playback can be heard from the SoundPort.
If another NFC-enabled audio source appears in the coupling area of the SoundPort, this is linked with the SoundPort. The existing link to the previous audio source is disconnected.
Connecting the audio source with USB cable
You can connect your SoundPort to your audio source, e.g., mobile phone, music player, etc., using a USB cable.
Connect the USB connector (type A) of the SoundPort with the audio source. Depending on your audio source use the appropriate USB cable.
Certain audio sources, e.g., Android smartphones have a micro-USB port; iDevices without Lightning Connector are connected via a 30-pin connector to the USB port of the SoundPort.
The audio source must support audio playback via USB (USB streaming).
USB Audio is selected as a source (see page 39).
The audio signal (see page 49) is now replayed via USB.
SoundPort / SoundPort Compact
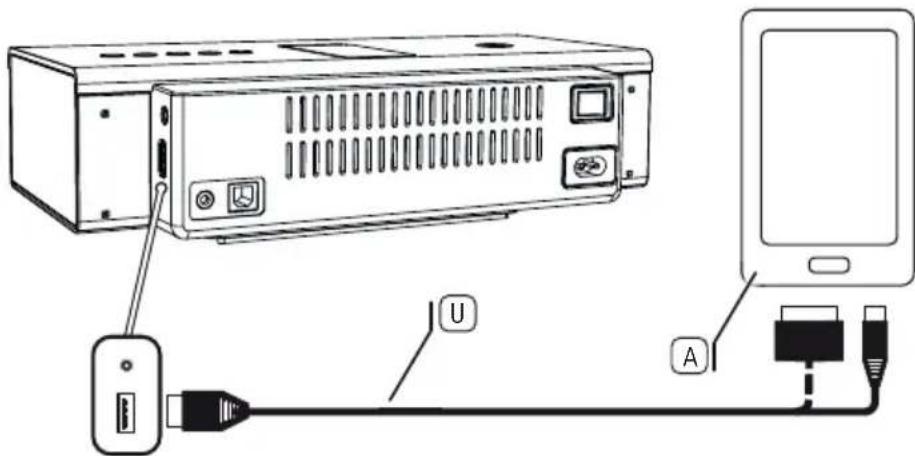
SoundPort Mini
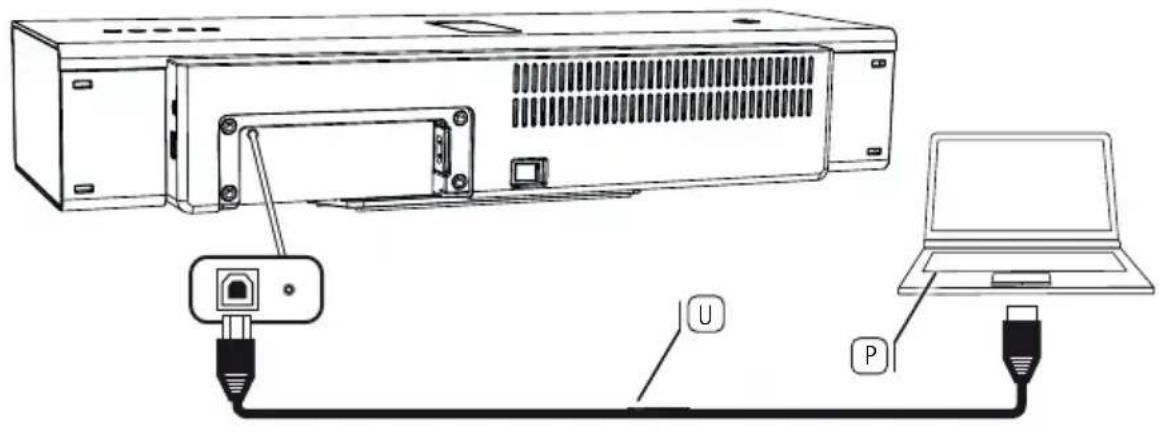
Connecting the SoundPort as USB device (PC Audio)
You can connect a PC/laptop to your SoundPort via a USB cable. The SoundPort logs on to the PC/laptop as a USB speaker and can then be used as a playback device to the PC/laptop.
Audio devices connected to the SoundPort via Lightning Connector can be synchronised with the PC/ laptop via the SoundPort (see page 48).
Connect the USB connector (B type) with a free USB port on your PC/laptop. To do so, use a USB cable type A-B.
PC Audio is selected as a source (see page 39).
The audio signal (see page 49) is now replayed via USB.
The function depends on the hardware and software package of the connected source, e.g. connection configuration, used driver, codecs and formats. Please refer also to the documentation for your source device and if necessary, update the driver or firmware.
SoundPort / SoundPort Compact
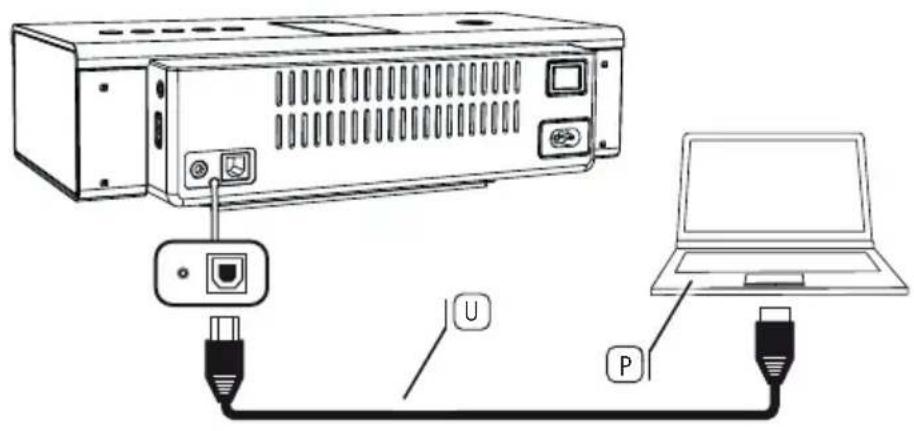
SoundPort Mini
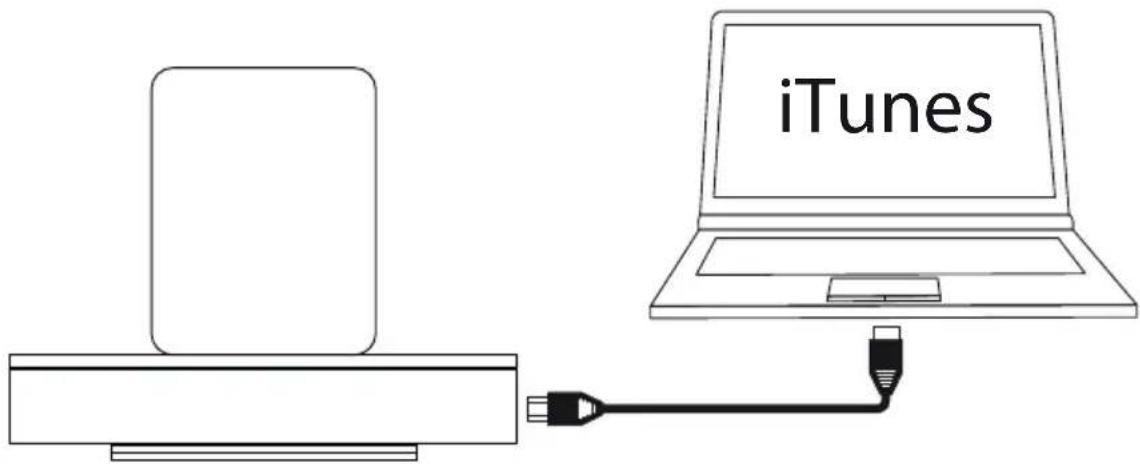
SoundPort - iTunes Sync
An iDevice device connected to the Lightning Connector of the SoundPort can be synchronised via the SoundPort with iTunes on your PC/laptop. The SoundPort serves as a connecting link between iDevice and PC/Laptop.
The functionality of this application depends on the PC, notebook, operating system, iTunes, Apple iOS and iDevice as well as on the respective software versions used.
The SoundPort is connected to the PC as a USB device (see page 47).
An iDevice is contacted on the Lightning Connector of the SoundPort (see page 43).
Apple Lightning Connector is selected as source (see page 39).
iTunes is installed on the PC/notesbook and the automatic synchronisation is enabled (for iTunes settings see the software documentation).

The LED display 8 indicates the Apple Lightning Connector as selected source.
Press the key on the SoundPort for a longer period (approx. 3 sec). to activate the Sync mode.

The LED display ⑧ flashes during the sync process from left to right.
1 Also note any possible notifications and messages of the operating system or from iTunes on your PC/notesbook.
During the sync process, no other functions (switching off, source selection, handsfree talking, volume change etc.) are possible with the SoundPort.

Press the key③ on the SoundPort for a longer period (approx. 3 sec) to end the Sync mode.
Audio playback
An audio source must be connected or linked with the SoundPort.
In the source selection this audio source must be selected (see page 39).

The LED display shows the selected source, e.g., USB Audio.
Start the audio playback on your audio source. The playback control (title selection, winding, etc.) is done via the player/app of the audio source.
Adjusting the volume
When using an audio cable connection (see page 41) adjust the volume of your audio source to a high level to avoid interfering noise. Adjust the desired volume on the SoundPort.
When connecting iDevices via Bluetooth (see page 44) the volume adjustment between iDevice and SoundPort is coupled, i.e. change in the volume of one of the devices alters the volume of the other one.
1 Loud music can lead to ear damage. Avoid extreme volume especially over long periods.
After 10 minutes without audio playback or key operation, SoundPort automatically switches to Smart Standby mode.

The LED display 8 indicates the selected source, e.g., Apple Lightning Connector.

Set the volume on the SoundPort using the keys +4 and -5

The volume can be adjusted in several steps1 which are represented visually by four LEDs of the LED indicator8.
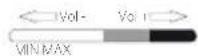
Pressing briefly the key +4 or -5 increases or decreases the volume by one step.
When keeping the ^+ or -key depressed you traverse the whole volume range.
The maximum volume is indicated by two flashes of all LEDs with full brightness.

If there is no volume change within three seconds, the LED display shows the colour of the selected source again.

Mute the SoundPort by pressing the + and - keys simultaneously. All four LEDs of the LED display ⑧ flash with full luminous intensity.
By pressing the + or - key the muting is cancelled. The LED display shows the previously selected source again.
Handsfree function
The SoundPort must be coupled and linked via Bluetooth (see page 44) or Connectivity Easy Pairing (see page 45) with your mobile phone.
1 Loud ambient noise impairs the quality of the handsfree function. Make sure that there is a quiet environment or abstain from using the handsfree function if there is no proper environment.
To achieve a high level of intelligibility between callers, speak only alternately. The distance between the caller and the SoundPort should be between 0.3 m and 1.2 m.
To accept an incoming call, the SoundPort must be switched on (see page 38) and Bluetooth must be selected as the source (see page 39).
The LED display 8 indicates Bluetooth as source.
In case of an incoming call, a ring tone sounds.
The LED display 8 flashes quickly in white. An audio playback will be paused in this case

Answer the incoming call by pressing the key on the SoundPort or the corresponding key on your mobile phone.
The LED display 8 lights up in white.
When speaking turn your face to the front of the SoundPort. The microphone is located in the centre of the speaker cover (see page 35).


Set the volume on the SoundPort to a medium level using the keys +4 and -5 (see also page 49).

Finish the telephone conversation by pressing again the key on the SoundPort or the corresponding key on your mobile phone.
The LED display 8 resumes to the colour of the last selected source again.
Smart Standby mode
The Smart Standby mode is automatically activated if the following happens at the SoundPort for the duration of 10 minutes:
- no music is played back.
- there is no incoming or outgoing call,
- no key is pressed at the SoundPort or on the Assist remote control (see page 52).
- no device is connected or disconnected and
- no sync is in progress.
In the Smart Standby mode, some circuit parts (DSP / amplifier, etc.) are switched off in order to save power in the SoundPort.
The sound port can be aroused from the Smart Standby mode in different ways:
- An iDevice is being connected to the Lightning Connector.
- A mobile device is being linked via Connectivity Easy pairing (NFC).
- Playback with a paired Bluetooth device continues (only if Bluetooth was active as a last source before the Smart Standby mode).
- Playback with a device at AUDIO IN is continued (only if AUDIO IN was active as a last source before the Smart Standby mode).
- One of the four SRC device keys ② Handsfree ③ + ④ oder - ⑤ is pressed.
- A linked Bluetooth device is logged off.
- A key of the Assist remote control unit (see page 52) is pressed.
1 Devices connected to Lightning / USB are also charged in Smart Standby mode of the SoundPort.
1 Pressing the ON/OFF key switches the SoundPort to the Standby mode (see below).
After 4 hours in Smart Standby mode, the SoundPort automatically switches to the Standby mode.
The power consumption in Smart Standby mode is higher than in the Standby mode (see Technical data on page 55).
Standby mode
Press the ON/Off key to switch the SoundPort to the Standby mode.
In Standby mode, the device can only be switched on again by the ON/OFF key ① on the SoundPort or by the ON/OFF key on the Assist remote control (see page 52)
In the Standby mode, no devices connected to Lightning/USB are charged.
The power consumption in Standby mode is lower than in Smart Standby mode (see Technical data on page 55).
SoundPort / SoundPort Compact / SoundPort Mini
Operating instructions
Accessories
Accessories
Inlays
With inlays available as accessories, you can customise your SoundPort to your needs. Ask your dealer for appropriate inlays for your SoundPort, SoundPort Compact and SoundPort Mini.
Remote control - Assist
With the optional accessory Assist system remote control you can control the functions of your SoundPort. If your Loewe device is supplied with the latest Assist, you can use your existing remote control (see list of different remote control units page 54).
The remote control must first be set for the operation of your SoundPort. The device keys (depending on remote control version) STB -VIDEO - AUDIO - DVD - REC - RADIO - SP can be set to control your SoundPort.

Press the required device key and the Stop key simultaneously for 5 sec until the corresponding LED display of the selected device key flashes twice.

Then enter the two-digit device code 31 for Soundport. The LED above the selected button flashes twice.
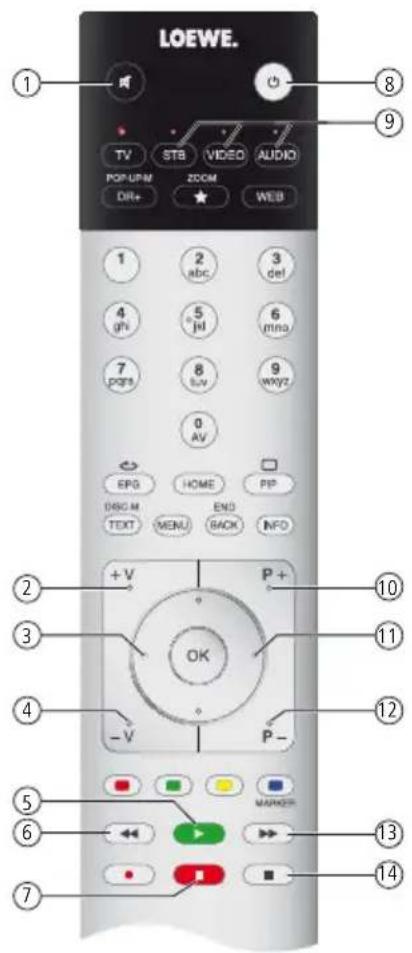
Key assignment
① Sound on/off
Volume +
③ Sound setting - (previous preset)
(4) Volume -
⑤ Playback
6 Previous title
⑦ Pause
On/Off
Setting of the device key for SoundPort (see above) / Switching to SoundPort operation
10 Source selection + (next audio device)
Sound setting ^+ (next preset)
(12) Source selection - (previous audio device)
(13) Next title
(14) Stop
Smart Audio App

Completely smart: The Loewe Smart Audio app. Experience music you have stored on your smartphone, now with the intuitive and high-end Loewe audio player. Available free of charge from the Apple App Store or Google Play Store.
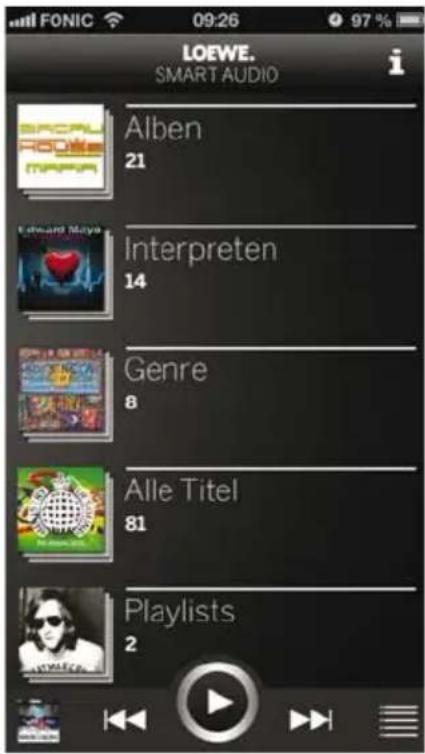
The home screen provides a structured overview of the locally stored music. At a glance, you can capture the content and with only a few operating steps it takes you to your favorite title.
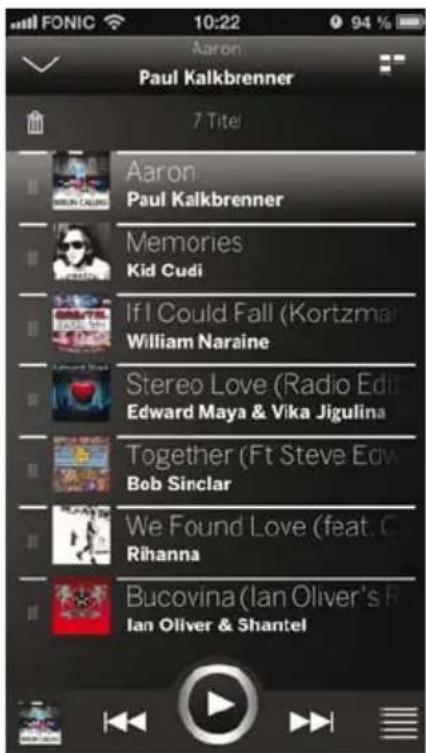
Automatically, all recently heard titles will be added to the playlist. This list can always and everywhere be reached by the list icon at the bottom right. In this list, titles can be deleted or moved. For this purpose, the trash icon or the left part of each list item is used.
The active areas do not only enable a jump into the playlist - with just one click you go to the home screen or the player.

The player always shows the currently playing song with all its control possibilities. With the AirPlay icon you can easily select all available speakers.
SoundPort / SoundPort Compact / SoundPort Mini
Operating instructions
Supported iDevices
Applicable remote control versions
Supported iDevices
As of 18 February, 2014.
Sound Port - Lightning Connector:
iPhone 5, iPhone 5c, iPhone 5s
iPad (4th generation), iPad mini, iPad mini with Retina display, iPad Air
iPod touch (5th generation), iPod nano (7th generation)
Sound Port - USB:
iPhone, iPod touch, iPod nano
Sound Port Compact - Lightning Connector:
iPhone 5, iPhone 5c, iPhone 5s
iPad (4th generation), iPad mini, iPad mini with Retina display, iPad Air
iPod touch (5th generation), iPod nano (7th generation)
Sound Port Compact - USB:
iPhone, iPod touch, iPod nano
Sound Port Mini - Lightning Connector:
iPhone 5, iPhone 5c, iPhone 5s
iPod touch (5th generation), iPod nano (7th generation)
Sound Port Mini - USB:
iPhone, iPod touch, iPod nano
Applicable remote control versions
The list includes the remote control versions that can be used to control the functions of the SoundPort.
How to set the remote control to operate the SoundPort, see page 52.
The availability of the device code 31 depends on the version of the remote control unit. The item number / version you can read in the battery compartment of the remote control.
Assist 1(TV) 89900A13/89900A14
Assist 1 (MediaVision) 89900A11
Assist 1 (HomeCinema) 89900A12
Assist 1 (SoundVision) 89900A10
Assist 1 (MultiContr. II) 89900A09
Assist 2 (TV) 89950A23
Assist 2 (SoundBox) 89950A20
Assist 2 (AirSpeaker) 89950A22
Technical Data
| SoundPort SoundPort Compact | SoundPort Mini | ||
| Item number 52227x00 52228x00 52229x00 | |||
| Operating temperature 5 °C ... 35 °C | |||
| Humidity 30 % ... 85 % (no condensation) | |||
| Dimensions (approx.) (W x H x D) 550 x 126 x 201 mm | 415 x 109 x 178 mm 280 | 0 x 91 x 153 mm | |
| Weight 5.5 kg 3.6 kg 1.9 kg | |||
| Mains voltage 220 - 240 V, 50/60 Hz | |||
| Power consumption: On mode (max. Audio output) | 103 W | 62 W | 48 W |
| On mode (1/8 Audio output) | 51 W | 40 W | 35 W |
| Smart Standby mode | 2.1 W | 2.1 W | 0.8 W |
| Standby mode | <= 0.5 W | <= 0.5 W | <= 0.5 W |
| USB A | 2.0, type A, charging function, maximum 2.1 A | ||
| USB B | PC Audio, iTunes Lightning Sync | ||
| Audio IN | 3.5mm jack, 1.0 Vrms, 10k Ohm | ||
| Headphone, 32-200 Ohm | |||
| Speakers | 2 tweeters, 15 W each | 2 broadband speakers, 20 W each | 2 broadband speakers, 8 W each |
| 2 broadband speakers, 20 W each | 1 woofer, 60 W | 1 woofer, 20 W | |
| Transmission range | 65 Hz to 20 kHz | ||
| Output power (sine / music): | 2 x 17 W + 1 x 50 W / 2 x 34 W + 1 x 100 W | 2 x 10 W + 1 x 20 W / 2 x 20 W + 1x 40 W | 2 x 6 W + 1 x 10 W / 2 x 12 W + 1 x 20 W |
| Volume levels | 48 | 24 | |
| Wireless transmission | Bluetooth 2.4 GHz, 10 m transmission range NFC | ||
| Bluetooth protocols | A2DP, 2.1+EDR, AVRCP 1.4, HS, HFP 1.6 (wideband speech), aptX-Decoder, AEC | ||
SoundPort / SoundPort Compact / SoundPort Mini
Operating instructions
Environmental protection
Declaration of conformity
Environmental protection
Cardboard box and packaging
In line with national regulations regarding the disposal of packaging materials, we pay a fee to authorised recyclers who collect packaging from dealers. Nevertheless, we recommend that you keep the original cardboard box and the rest of the packaging materials so that the device can, if necessary, be transported under the safest possible conditions.
The device

Attention: The EU Directive 2002/96/EC governs the proper return, handling and recycling of used electronic appliances. Old electronic devices must therefore be disposed of separately. Never dispose of this device in normal domestic waste! You can hand in your old unit free of charge at identified collection points or to your dealer if you buy a similar new unit.
Additional details about return (also for non EU countries) are available from your local municipal authorities.
Batteries

In accordance with the Battery Directive, used batteries should no longer be disposed of in the domestic waste. You can dispose of used batteries free of charge at the collection points in retail outlets. Your dealer will also have a collection point for used batteries.
Declaration of conformity

The set is CE marked and complies with EU directives. The complete Declaration of conformity can be downloaded from our website.
SoundPort / SoundPort Compact / SoundPort Mini
Operating instructions
Legal information
Legal details
Legal information
© 2012 CSR plc and its group companies.
The aptX® mark and the aptX logo are trade marks of CSR plc or one of its group companies and may be registered in one or more jurisdictions."

"Made for iPod", "Made for iPhone" and "Made for iPad" mean that an electronic accessory has been designed to connect specifically to iPod, iPhone or iPad, respectively, and has been certified by the developer to meet Apple performance standards. Apple is not responsible for the operation of this device or its compliance with safety and regulatory standards. Please note that the use of this accessory with iPod or iPhone may affect wireless performance.
iPod, iPhone, iPad, iPad mini and iTunes are registered trademarks of Apple Inc. in the USA and other countries.
SoundPort / SoundPort Compact:

SoundPort Mini:

Legal details
All rights including translation, technical modifications and errors reserved.
Assist 1 (MediaVision) 89900A11
Assist 1 (HomeCinema) 89900A12
Assist 1 (SoundVision) 89900A10
Assist 1 (MultiContr. II) 89900A09
Assist 2 (TV) 89950A23
Assist 2 (SoundBox) 89950A20
Assist 2 (AirSpeaker) 89950A22
© 2012 CSR plc and its group companies.
The aptX® mark and the aptX logo are trade marks of CSR plc or one of its group companies and may be registered in one or more jurisdictions."

Sound Port - Lightning Connector:
iPhone 5, iPhone 5c, iPhone 5s
Sound Port Compact - Lightning Connector:
iPhone 5, iPhone 5c, iPhone 5s
Sound Port Mini - Lightning Connector:
iPhone 5, iPhone 5c, iPhone 5s
Assist 1 (MediaVision) 89900A11
Assist 1 (HomeCinema) 89900A12
Assist 1 (SoundVision) 89900A10
Assist 1 (MultiContr. II) 89900A09
Assist 2 (TV) 89950A23
Assist 2 (SoundBox) 89950A20
Assist 2 (AirSpeaker) 89950A22
Specifiche tecniche
Sound Port - Lightning Connector:
iPhone 5, iPhone 5c, iPhone 5s
iPad (4^a generation), iPad mini, iPad mini con Retina Display, iPad Air
Sound Port Compact - Lightning Connector:
iPhone 5, iPhone 5c, iPhone 5s
iPad (4^a generation), iPad mini, iPad mini con Retina Display, iPad Air
Sound Port Mini - Lightning Connector:
iPhone 5, iPhone 5c, iPhone 5s
Assist 1 (MediaVision) 89900A11
Assist 1 (HomeCinema) 89900A12
Assist 1 (SoundVision) 89900A10
Assist 1 (MultiContr. II) 89900A09
Assist 2 (TV) 89950A23
Assist 2 (SoundBox) 89950A20
Assist 2 (AirSpeaker) 89950A22
Datasétnicos
| SoundPort SoundPort Compact | SoundPort Mini | ||
| Número de referencia 52227x00 | 52228x00 | 52229x00 | |
| Temperatura de funciona 5 °C ... 35 °C | |||
| Humedad 30 % ... 85% (sin condensation) | |||
| Dimensiones (AnxA1xPr) (aprox.) | 550 x 126 x 201 mm 4 | 15 x 109 x 178 mm 280 | x 91 x 153 mm |
| Peso 5,5 kg 3,6 kg 1,9 kg | |||
| AC-IN (tensión de red) 220 - 240 V, 50/60 Hz | |||
| Consumo de potencia: modo On (Potencia audio max.) | 103 W | 62 W | 48 W |
| modo On (Potencia audio 1/8) | 51 W | 40 W | 35 W |
| modo Smart Standby | 2.1 W | 2.1 W | 0,8 W |
| modo Standby | <= 0,5 W | <= 0,5 W | <= 0,5 W |
| USB A | 2.0, tipo A, función de性和,maximo 2,1 A | ||
| USB B | PC Audio, iTunes Lightning Sync | ||
| Audio IN: | Toma, conductor de 3,5 mm, 1.0 Vrms, 10 kOhm | ||
| ® | Auriculas, 32-200 Ohm | ||
| Altavoces | 2 altavoces de agudos, de 15 W cada uno | 2 altavoces de banda ancha, de 20 W cada uno | 2 altavoces de banda ancha, de 8 W cada uno |
| 2 altavoces de banda ancha, de 20 W cada uno | 1 altavoz para graves, de 60 W | 1 altavoz para graves, de 20 W | |
| 2 altavoces paraGRAVES, de 60 W cada uno | |||
| Rango de transmisión | 65 Hz - 20 kHz | ||
| Potencia de salute (seno / música) | 2 x 17 W + 1 x 50 W / 2 x 34 W + 1 x 100 W | 2 x 10 W + 1 x 20 W / 2 x 20 W + 1 x 40 W | 2 x 6 W + 1 x 10 W / 2 x 12 W + 1 x 20 W |
| Niveles de volumen | 48 | 24 | |
| Transmisión inalámbrica | Bluetooth 2,4 GHz, 10 m de alcance NFC | ||
| Protocolos Bluetooth | A2DP, 2.1+EDR, AVRCP 1.4, HS, HFP 1.6 (Wideband Speech), aptX-Decoder, AEC | ||
SoundPort / SoundPort Compact / SoundPort Mini
© 2012 CSR plc and its group companies.
The aptX® mark and the aptX logo are trade marks of CSR plc or one of its group companies and may be registered in one or more jurisdictions."

USB B (USB-speaker/Sync)
Sound Port - Lightning-connector:
iPhone 5, iPhone 5c, iPhone 5s
Sound Port Compact - Lightning-connector:
iPhone 5, iPhone 5c, iPhone 5s
Assist 1 (MediaVision) 89900A11
Assist 1 (HomeCinema) 89900A12
Assist 1 (SoundVision) 89900A10
Assist 1 (MultiContr. II) 89900A09
Assist 2 (TV) 89950A23
Assist 2 (SoundBox) 89950A20
Assist 2 (AirSpeaker) 89950A22
Technische gegevens
| SoundPort SoundPort Compact | SoundPort Mini | ||
| Artikelnummer 52227x00 52228 | 8x00 52229x00 | ||
| Bedrijftemperatuur 5 °C ... 35 °C | |||
| Relatieve luchtvochtigheid 30 % | ... 85% (geen condens) | ||
| Afmetingen (b x h x d) (ca.) 550 | x 126 x 201 mm 415 x 1 | 09 x 178 mm 280 x 91 x 153 mm | |
| Gewicht 5.5 kg 3.6 kg 1.9 kg | |||
| AC-IN (netspanning) 220 - 240 | volt, 50/60 Hz | ||
| Opgenomen vermogen: On-modus (Audiovermogen max.) | 103 W | 62 W | 48 W |
| On-modus (Audiovermogen 1/8) | 51 W | 40 W | 35 W |
| Smart Standby-modus | 2.1 W | 2.1 W | 0.8 W |
| Standby-modus | <= 0.5 W | <= 0.5 W | <= 0.5 W |
| USB A | 2.0, type A, oplaadfunctie, maximaal 2.1 A | ||
| USB B | PC Audio, iTunes Lightning Sync | ||
| Audio IN: | Aansluiting 3.5 mm stekker, 1.0 Vrms, 10 kOhm | ||
| © | Koptelefoon, 32-200 Ohm | ||
| Luidsprekers | 2 luidsprekers voor hoge tonen, ieder 15 W 2 breedband-luid-sprekers, ieder 20 W 2 woofers, ieder 60 W | 2 breedband-luid-sprekers, ieder 20 W 1 woofer, 60 W | 2 breedband-luid-sprekers, ieder 8 W 1 woofer, 20 W |
| Transmissiebereik | 65 Hz - 20 kHz | ||
| Uitgangsvermogen (sinus / muziek) | 2 x 17 W + 1 x 50 W / 2 x 34 W + 1 x 100 W | 2 x 10 W + 1 x 20 W / 2 x 20 W + 1 x 40 W | 2 x 6 W + 1 x 10 W / 2 x 12 W + 1 x 20 W |
| Luidsprekertrappen | 48 | 24 | |
| Draadloze transmissie | Bluetooth 2,4 GHz, 10 m bereik NFC | ||
| Bluetooth-protocol | A2DP, 2.1+EDR, AVRCP 1.4, HS, HFP 1.6 (Wideband Speech), aptX-Decoder, AEC | ||
SoundPort / SoundPort Compact / SoundPort Mini
Gebruiksaanwijzig
Milleubescherming
© 2012 CSR plc and its group companies.
The aptX® mark and the aptX logo are trade marks of CSR plc or one of its group companies and may be registered in one or more jurisdictions."

Sound Port - Lightning Connector:
iPhone 5, iPhone 5c, iPhone 5s
iPad (4. generation), iPad mini, iPad mini med Retina Display, iPad Air
iPod touch (5. generation), iPod nano (7. generation)
Sound Port - USB:
iPhone, iPod touch, iPod nano
Sound Port Compact - Lightning Connector:
iPhone 5, iPhone 5c, iPhone 5s
iPad (4. generation), iPad mini, iPad mini med Retina Display, iPad Air
iPod touch (5. generation), iPod nano (7. generation)
Sound Port Compact - USB:
iPhone, iPod touch, iPod nano
Sound Port Mini - Lightning Connector:
iPhone 5, iPhone 5c, iPhone 5s
iPod touch (5. generation), iPod nano (7. generation)
Sound Port Mini - USB:
iPhone, iPod touch, iPod nano
Anvendelige fjernbetjeningsvarianter
Assist 1 (MediaVision) 89900A11
Assist 1 (HomeCinema) 89900A12
Assist 1 (SoundVision) 89900A10
Assist 1 (MultiContr. II) 89900A09
Assist 2 (TV) 89950A23
Assist 2 (SoundBox) 89950A20
Assist 2 (AirSpeaker) 89950A22
Tekniske data
© 2012 CSR plc and its group companies.
The aptX® mark and the aptX logo are trade marks of CSR plc or one of its group companies and may be registered in one or more jurisdictions."

Sound Port - Lightning Connector:
iPhone 5, iPhone 5c, iPhone 5s
Sound Port Compact - Lightning Connector:
iPhone 5, iPhone 5c, iPhone 5s
Sound Port Mini - Lightning Connector:
iPhone 5, iPhone 5c, iPhone 5s
Assist 1 (MediaVision) 89900A11
Assist 1 (HomeCinema) 89900A12
Assist 1 (SoundVision) 89900A10
Assist 1 (MultiContr. II) 89900A09
Assist 2 (TV) 89950A23
Assist 2 (SoundBox) 89950A20
Assist 2 (AirSpeaker) 89950A22
Tekniset tiedot
© 2012 CSR plc and its group companies.
The aptX® mark and the aptX logo are trade marks of CSR plc or one of its group companies and may be registered in one or more jurisdictions."

Sound Port - Lightning Connector:
iPhone 5, iPhone 5c, iPhone 5s
iPad (4. Generation), iPad mini, iPad mini med Retina Display, iPad Air
iPod touch (5. Generation), iPod nano (7. Generation)
Sound Port - USB:
iPhone, iPod touch, iPod nano
Sound Port Compact - Lightning Connector:
iPhone 5, iPhone 5c, iPhone 5s
iPad (4. Generation), iPad mini, iPad mini med Retina Display, iPad Air
iPod touch (5. Generation), iPod nano (7. Generation)
Sound Port Compact - USB:
iPhone, iPod touch, iPod nano
Sound Port Mini - Lightning Connector:
iPhone 5, iPhone 5c, iPhone 5s
iPod touch (5. Generation), iPod nano (7. Generation)
Sound Port Mini - USB:
iPhone, iPod touch, iPod nano
Assist 1 (MediaVision) 89900A11
Assist 1 (HomeCinema) 89900A12
Assist 1 (SoundVision) 89900A10
Assist 1 (MultiContr. II) 89900A09
Assist 2 (TV) 89950A23
Assist 2 (SoundBox) 89950A20
Assist 2 (AirSpeaker) 89950A22
Tekniska data
| SoundPort SoundPort Compact | SoundPort Mini | ||
| Artikelnummer 52227x00 52228x00 52229x00 | |||
| Användningstemperatur 5 °C - 35 °C | |||
| Luftfuktigkeit 30 % ... 85 % (ingen kondensation) | |||
| Mätt (B x H x D) (ca.) 550 x 126 x 201 mm 415 x 109 x 178 mm 280 x 91 x 153 mm | |||
| Vikt 5,5 kg 3.6 kg 1,9 kg | |||
| AC-IN (natspanning) 220-240 volt, 50/60 Hz | |||
| Effektforbrukning: On-laget (Ljudeffekt max.) On-laget (Ljudeffekt 1/8) Smart Standby-laget Standby-laget | 103 W 51 W 2,1 W < = 0,5 W | 62 W 40 W 2,1 W < = 0,5 W | 48 W 35 W 0,8 W < = 0,5 W |
| USB A 2.0, typ A, laddningsfunktion, max. 2,1 A | |||
| USB B | PC audio, iTunes Lightning Sync | ||
| Audio IN: | 3,5 mm jackuttag, 1,0 Vrms, 10 kOhm | ||
| Hörlunar 32-200 Ohm | |||
| Högtalare | 2 tweeter högtalare á 15 W 2 bredbands-högtalare á 20 W 2 bashögtalare á 60 W | 2 bredbands-högtalare á 20 W 1 bashögtalare 60 W | 2 bredbands-högtalare á 8 W 1 bashögtalare 20 W |
| Överfüringsområde | 65 Hz - 20 kHz | ||
| Utgängseffekt (Sinus / musik) | 2 x 17 W + 1 x 50 W / 2 x 34 W + 1 x 100 W | 2 x 10 W + 1 x 20 W / 2 x 20 W + 1 x 40 W | 2 x 6 W + 1 x 10 W / 2 x 12 W + 1 x 20 W |
| Volym-nivåer | 48 | 24 | |
| Trådlös übermöring | Bluetooth 2,4 GHz, 10 m räckvidd NFC | ||
| Bluetooth-protokoll | A2DP, 2.1+EDR, AVRCP 1.4, HS, HFP 1.6 (Bredband Speech), aptX-Decoder, AEC | ||
SoundPort / SoundPort Compact / SoundPort Mini
Bruksanvising
Miljöskydd
Forsakran om overensstammelse
Miljöskydd
© 2012 CSR plc and its group companies.
The aptX® mark and the aptX logo are trade marks of CSR plc or one of its group companies and may be registered in one or more jurisdictions."

HB Austria electronic products
Vertriebs GmbH
Pfarrgasse 52
Guangdong MG Audio Development Co.Ltd
No.8 Jinghu Rd. Xinhua St. Huadu Reg.GZ,PRC
Tel+86-(0)20-22675666
Fax+86-(0)20-22675777
E-mail: service@loewe-mg.com
Xiamen Tenote Investment Co. Ltd
26F 3# Xinglin Bay Operation Center.
No.478 xinglinwan Avenue.
Jimei District, Xiamen, Fujian, PRC
Tel+86-4000881566
E-mail: service@loewe-tnt.com
CY
Hadjikyriakos & Sons Ltd.
121 Prodromos Str., P.O Box 21587
1511 Nicosia. Cyprus
Tel+357-22872111
Fax+357-22663391
E-mail: savvas@hadjikyriakos.com.cy
CZ
BaSys CS s.r.o.
Sodomkova1478/8
10200 Praha 10 - Hostivar,
Ceská republika
Tel +420 234 706 700
Fax+420234706701
1st Floor, 237A Kensington High St
London
W86SA,UK
Tel +44 - (0) 207 368 1100
Fax+44-(0)2073681101
E-mail: enquiries@loewe-uk.com
GR RO
Clear electronic entertainment Ltd
13 Noah Mozes St.
Agish Ravad Building
Tel Aviv 67442, Israel
Tel +972-3-6091100
Fax+972-3-6092200
E-mail: info@loewe.co.il
IND
MIHAUS.
Plot No.390, M.G.Road
Near Ghitorni Metro Station
Opp.Metro Pillar No.112
Ghitorni. New Delhi-110030, India
Tel. +91 11 64008851
Tel. +91 11 64008854
Fax+911147675615
E-Mail: corporate@mihaus.in
R
Pars Royal Taramesh
LOEWE Gallery
3 Shariati St. Opp, Soheil St.
P.O Box 1914965537
Tehran, Iran
Tel +98 21-22391661
E-Mail: info@taramcshgroup.com
JOR
ACCU-TECH Solutions Co.
1-Kharija Al-Ashja'i Street
Jabal AI-Weibdeh
P.O.Box 9668 Amman 11191, Jordan
Tel: +962-6-465-9985
Fax: +962-6-465-0119
E-Mail: info@accutech-solutions.net
KSA
LOEWE Show Room
Olaya Street, Near Kingdom Center
RIYADH. SAUDI ARABIA
P.O Box 92831Rivadh 11663
Tel+966-11-4640927
Fax+966-11-4640759
E-mail: hkkurkjian@gmail.com
LV EST
Kpartners, SIA
A.Caka iela 80
Riga, LV-1011, Latvia
Tel+371-67292959
Fax+371-67310568
E-mail: evgenii.bebnev@loewe.lv
LT
A Cappella Ltd.
Ausros Vartu 5, Pasazo skg.
01129 Vilnius, Lithuania
Tel +370-5212 2296
Fax+370-52626681
E-mail:info@loewe.It
M
Doneo Co. Ltd
34/36 Danny Cremona Street
Hamrun, HMR1514, Malta
Tel +356-21-22 5381
Fax+356-21-230735
E-mail: service@doneo.com.mrt
N
Premium Consumer Electronics as
Østre Kullerød 5
Building 3281st Floor Beirut.
Lebanon
Tel +9611446777/1587446
Fax+9611582446
E-mail: info@icontrol-lev.com
RUS
Service Center Loewe
Aptekarsky per.4 podjezd 5A
105005 Moscow, Russia
Te+7-4999404232(ext.454)
Fax+7-4957307801
E-mail: service@loewe-cis.ru
S
EET Europarts AB
Loewe Sweden
Box 4124
11 changj south street 3
03-01 builders centre
Singapore 486122
Tel +65-67452028
Fax+65-65467861
E-mail: service@atlas-sv.com
SK
BaSys SK, s.r.o.
Stará Vainorska 37/C
83104 Bratislava, Slovakia
Tel +4212 4910 6611
Fax+421249106633
E-mail: loewe@basys.sk
TR
ENKAY GROUP
SERVISPLUS MUSTERI HIZMET
LERI
P.O.Box 32836,Sheikh Zayed Road
Dubai, UAE
Tel+971-43431441
Fax +971-43437748
E-mail: service@dubaiaudio.com