2322 - Hi-fi system ELTA - Free user manual and instructions
Find the device manual for free 2322 ELTA in PDF.
User questions about 2322 ELTA
0 question about this device. Answer the ones you know or ask your own.
Ask a new question about this device
Download the instructions for your Hi-fi system in PDF format for free! Find your manual 2322 - ELTA and take your electronic device back in hand. On this page are published all the documents necessary for the use of your device. 2322 by ELTA.
USER MANUAL 2322 ELTA
KLASSE 1 LASER PRODUKT

VORSICHT!
The triangular symbol with the lightning ball warns the user to the presence of dangerous non-selected voltage on the inside of this device which may cause an electric shock.
WARNING
DANGER OF A HAZARDCUS ELECTRIC SHOCK. DO NOT OPEN
WARNING: TO REDUCE THE RISK OF AN ELECTRIC SHOCK. DO NOT REMOVE THE FRONT OR BACK COVER. INSIDE THE UNIT, THERE ARE NO PARTS THAT CAN BE REPAIRED OR ADJUSTED BY THE USER. PLEASE REFER TO QUALIFIED TECHNICIANS.

The triangular symbol with the exciarration highlights incoient points of which the user should refer to the manual regarding maintenance and repair.
SAFETY PRECAUTION
This appliance must be disconnected from the mains when not in use. Do not allow this appliance to be exposed to rain or moisture.
CAUTION : To reduce the risk of electric shock, do not remove cover (or back). No user-serviceable parts inside. Refer servicing to qualified service personnel.


CAUTION!
Invisible laser radiation when open and interlocks defeated. Avoid exposure to beam.
SAFETY INSTRUCTIONS
- READ INSTRUCTIONS - All the safety and operating instructions should be read before the appliance is operated.
- RETAIN INSTRUCTIONS - The safety and operating instruction should be retained for future reference
-
HEED WARNINGS - All warnings on the appliance and in the operating instructions should be adhered to
-
FOLLOW INSTRUCTIONS - All operating and use instructions should be followed.
- WATER AND MOISTURE - The appliance should not be used near water, for example, near a bathtub, washbowl, kitchen sink, laundry tub, swimming pool or in a wet basement.
- VENTILATION - The appliance should be situated so that its location or position does not interfere with its proper ventilation, for example, the appliance should not be situated on a bed, sofa, rug or similar surface that may block the ventilation openings; Do not place in built-in installation openings; such as a bookcase or cabinets that may impede the flow of air through the ventilation openings.
- HEAT - The appliance should be situated away from heat sources such as radiators, heat registers, stoves, or other appliance (including amplifiers) that produce heat.
- POWER SOURCES - The appliance should be connected to a power supply only of the type described in the operating instructions or as marked on the appliance.
- GROUNDING AND POLARISATION - Precautions should be taken to ensure that the grounding or polarisation means of the appliance are not defeated.
-
POWER CORD PROTECTION - Power supply cords should be routed so that they are not likely to be walked on or pinched by items placed upon or against them, paying particular attention to cords at plugs, convenience receptacles, and the point at which they exit from the appliance.
-
CLEANING - The appliance should be cleaned only as recommended by the manufacturer.
-
POWER LINES - An outdoor antenna should be located away from power lines.
-
NONUSE PERIODS - The power cord of the appliance should be unplugged from the outlet when the appliance is to be left unused for a long period of time.
-
OBJECT and LIQUID ENTRY - Care should be taken so that objects do not fall and liquids are not spilled into the enclosure through openings.
-
SERVICING - The user should not attempt to service the appliance beyond that described in the user's operating instructions. All other servicing should be referred to qualified service personnel.
-
DAMAGE REQUIRING SERVICE - The appliance should be serviced by qualified service personnel when:
A. The power-supply cord or plug has been damaged.
B. Objects have fallen into, or liquid has been spilled into the appliance enclosure.
C.The appliance has been exposed to rain.
D.The appliance has been dropped, or the enclosure damaged.
E. The appliance does not appear to operate normally or exhibits a marked change in performance
PREPARATION FOR USE
INSTALLATION
- Unpack all parts and remove protective material.
- Insert the batteries into the remote control transmitter.
- Do not connect the unit to the mains before checking the mains voltage and before all other connections have been made.
- Do not cover any vents and make sure that there is a space of several centimeters around the unit for ventilation.
CONNECTIONS
1) Connect left and right speaker to left and right speaker jacks.
2) Before connecting the unit to the mains, make sure that the AC voltage printed on the back plate is the same as the AC voltage from your wall outlet.
Bear in mind the following points since any dirt; scratches or warping of the disc can cause broken or intermittent sound and also noise.
- When holding the discs, take care not to touch the playing surface.
- Do not place discs in the following locations: Near a heating device or place where the temperature is high; In damp or dusty areas.
- Wipe away any fingerprints or dust on the playing surface of a disc using a soft cloth. Always wipe from the inside toward the outside of the disc.
LOADING THE DISC
- Press OPEN/CLOSE
- Insert a CD (printed side up) in the tray.
- Press OPEN/CLOSE to close the CD door.
The display shows the CD's total number of tracks.
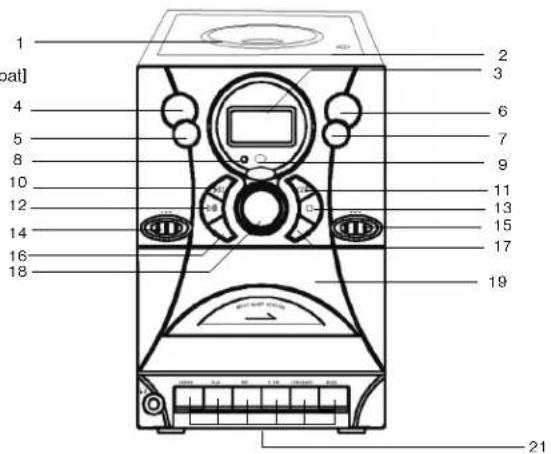
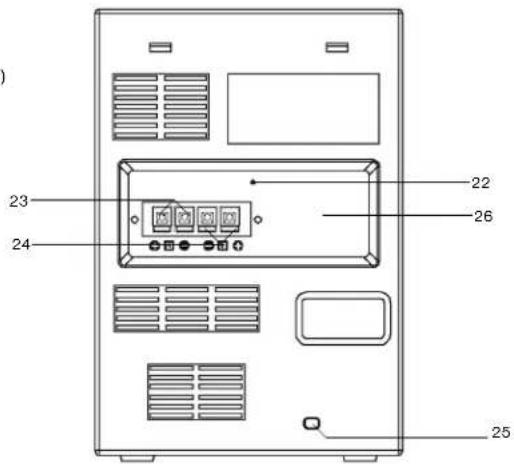
CONTROLS AND FEATURES
- CD DOOR
- CD DOOR OPEN/CLOSE
- LCD DISPLAY
- VOLUME UP
- VOLUME DOWN
- FOLDER BUTTON
7.X-BASS BUTTON - POWER INDICATOR
- REMOTE SENSOR
- SKIP BUTTON
- SKIP▶ BUTTON
- PLAY/PAUSE BUTTON
- STOP BUTTON
- FUNCTION SELECTOR (TAPE, CD/MP3, TUNER)
- BAND SELECTOR (AM, FM, FM ST.)
- MODE BUTTON (REPEAT, RANDOM)
17.PROGRAMM BUTTON
18.TUNINGBUTTON - CASSETTE DOOR
- PHONES JACK
- RECORD/PLAY DECK CONTROL
- FM ANT.WIRE
- SPEAKER LEFT
- SPEAKER RIGHT
- POWER CORD
- BEAT CUT


REMOTE CONTROL FUNCTIONS
Preparation before use
- Installing batteries in the remote control unit
- Remove the battery cover from the back of the remote control unit.
- Insert two "UM4/AAA" size batteries.
- Insert the batteries with the and terminals matching the indication inside the battery compartment.
- Replace the cover.
-
Battery replacement
-
When the remote control operation becomes unstable or the distance from which remote control is possible becomes shorter, replace the batteries with new ones.
Using the remote control unit
To use the remote unit, point at the REMOTE SENSOR and press the buttons gently and firmly. Remote control operation is possible within approximate 18ft(6m). However, since the remote control range is less when the unit is used at an angle, use directly in front of the REMOTE SENSOR, for maximum distance.
Do not expose the REMOTE SENSOR to strong light (direct sunlight or artificial lighting) and make sure that there are no obstacles between the REMOTE SENSOR and the remote control unit.
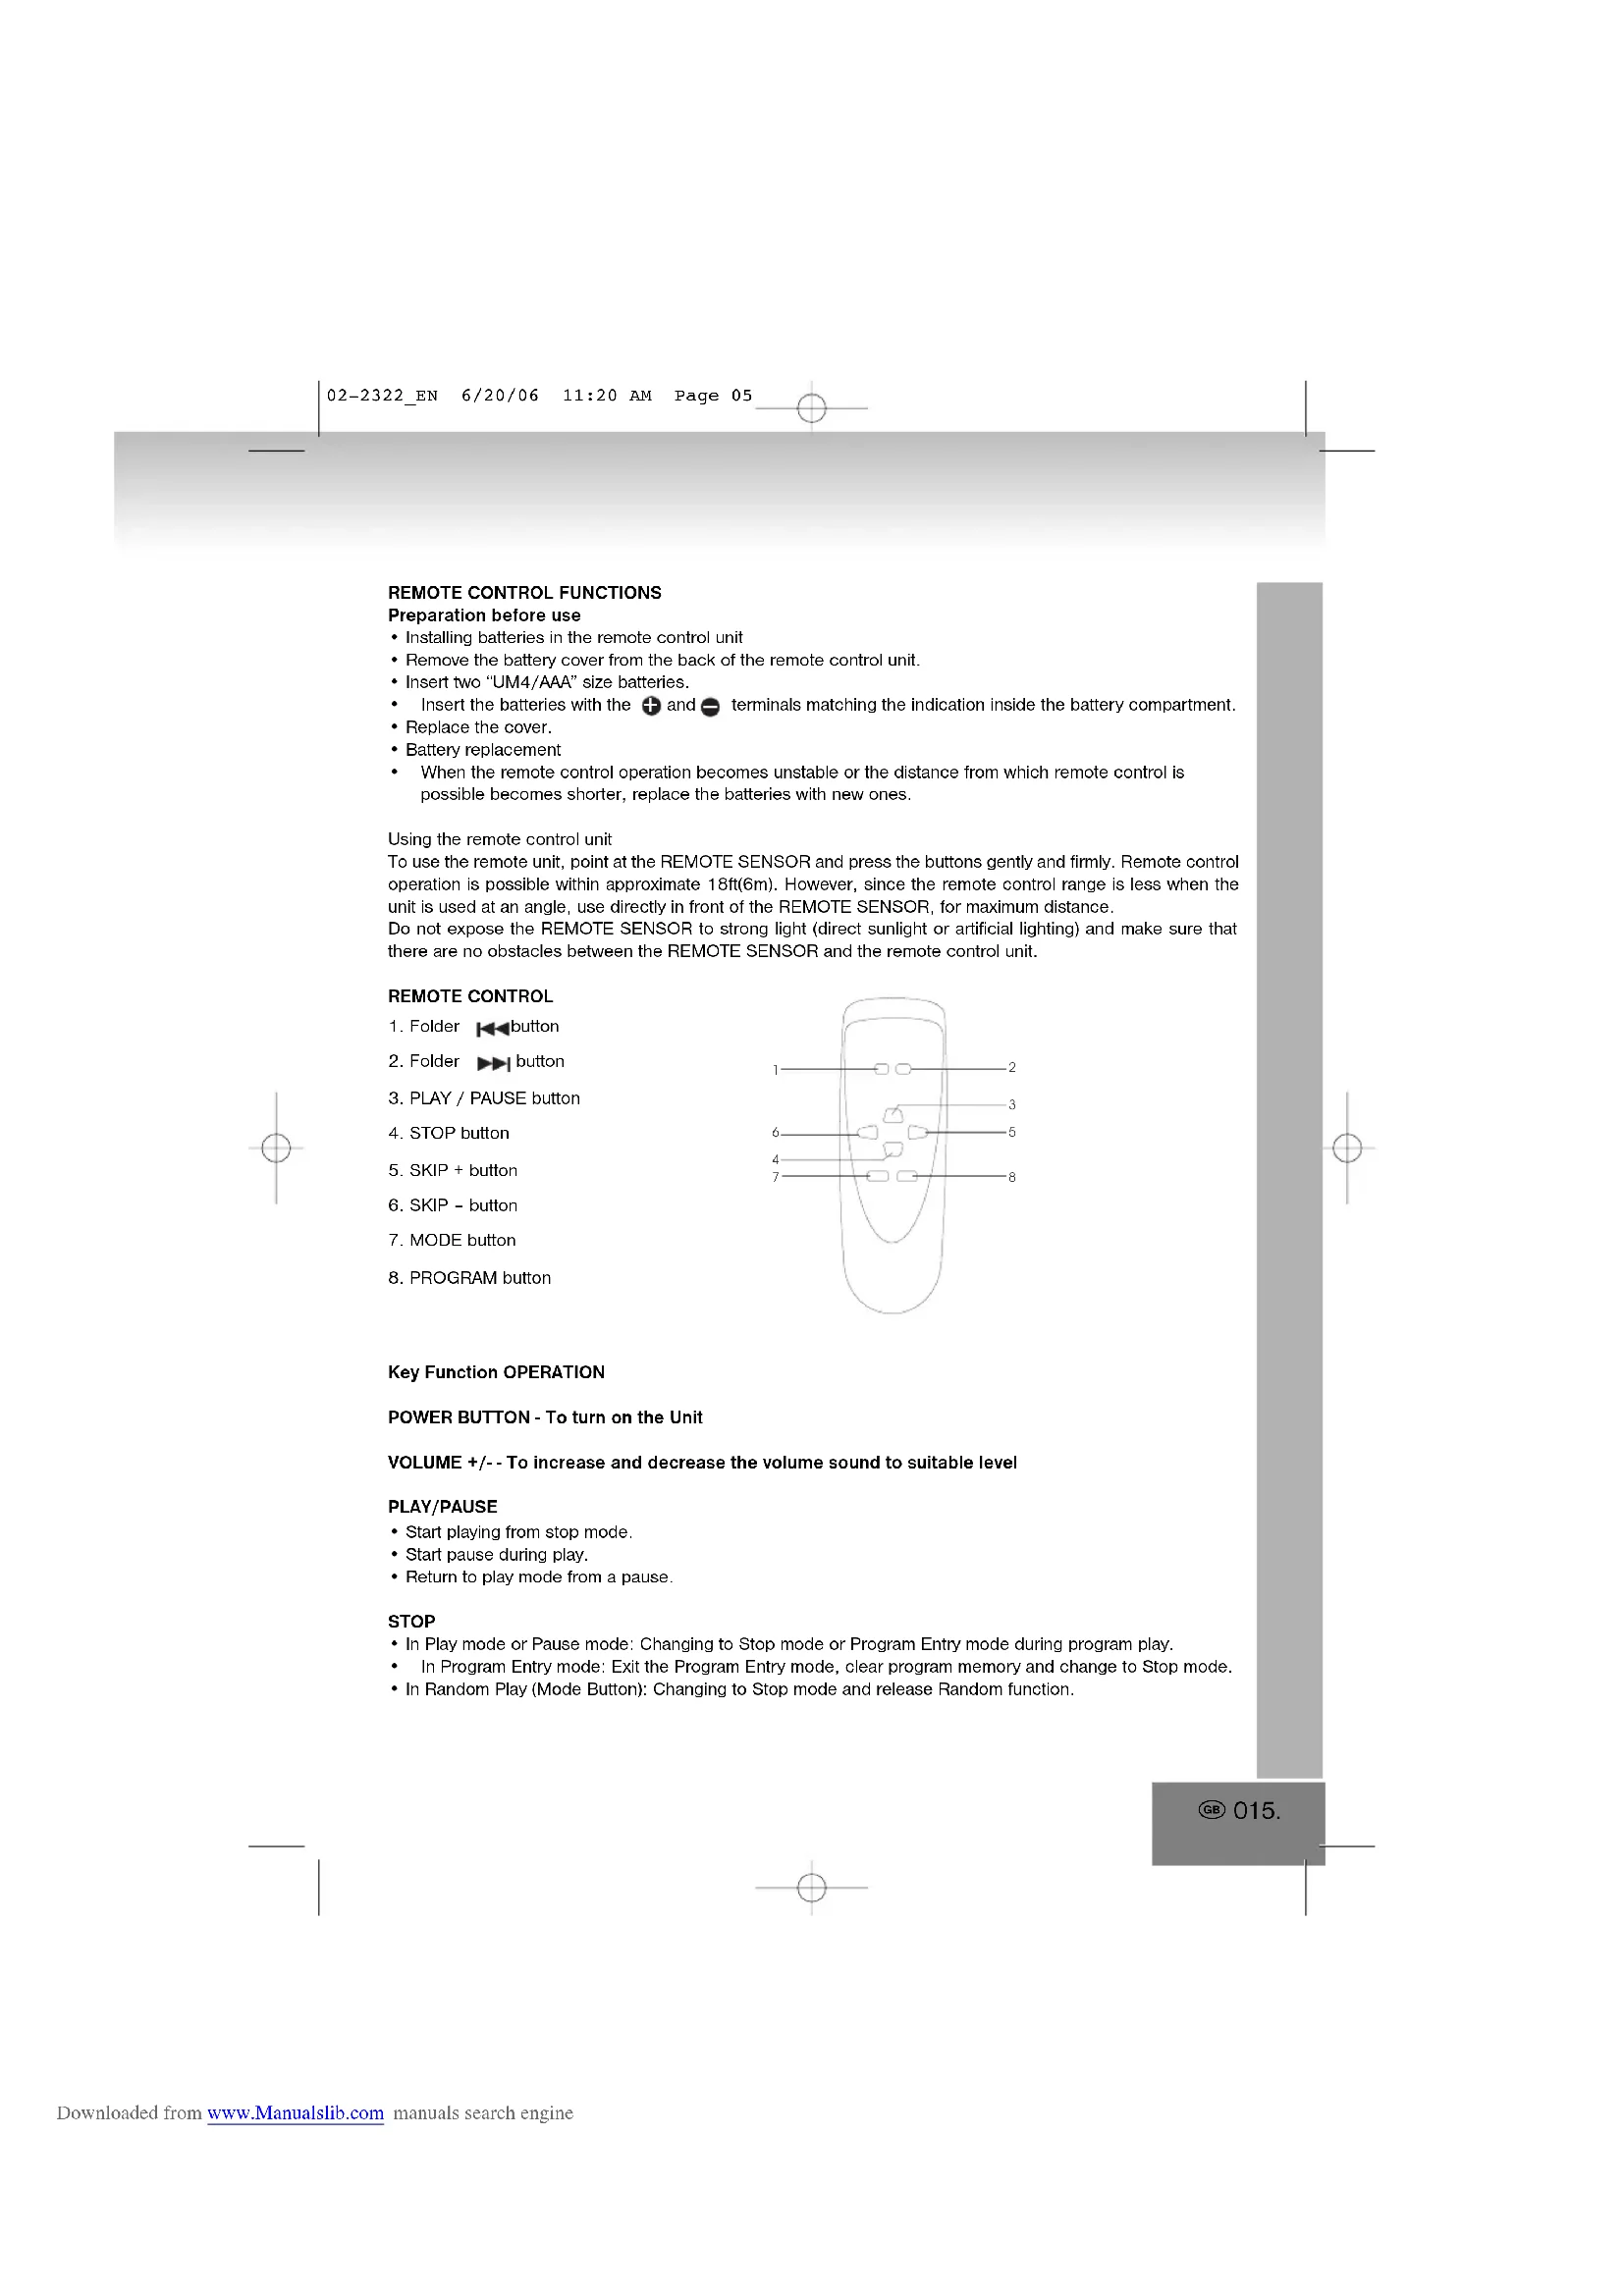
REMOTE CONTROL
- Folder button
- Folder button
- PLAY / PAUSE button
- STOP button
- SKIP + button
- SKIP - button
- MODE button
8.PROGRAM button
Key Function OPERATION
POWER BUTTON - To turn on the Unit
VOLUME + / - To increase and decrease the volume sound to suitable level
PLAY/PAUSE
- Start playing from stop mode.
- Start pause during play.
- Return to play mode from a pause.
STOP
- In Play mode or Pause mode: Changing to Stop mode or Program Entry mode during program play.
In Program Entry mode: Exit the Program Entry mode, clear program memory and change to Stop mode. - In Random Play (Mode Button): Changing to Stop mode and release Random function.
PROGRAM key [Function Explanation]
- If [PROGRAM] key is pressed during the CD stop mode, the system goes to the program mode. During the program mode, the track number and PROGRAM display will flash in the 500[ms] interval (Display 1).
- If [FF/SKIP+] / [FB/SKIP-] key is pressed, the system chooses the track number which it wants to register.
- If [PROGRAM] key is pressed after choosing a track number, the system keeps the track number, and goes to next program mode (Display 2).
- The system can hold 10 programs for CD Mode / 10 programs for MP3. After the system held 20 programs, it can't keep another song. During the system holding 20 programs, it can't keep other program. PROGRAM display and "P 01" will flash in the 500[ms] interval
- If [STOP] key is pressed during the program mode, the system removes the contents of the program, and cancels the program mode.
- If [PLAY/PAUSE] key is pressed during the system holding the program of more than one, it starts the program play. During the program play, Display shows PROGRAM is play (display 4).
- If [FF/SKIP+] / [FB/SKIP-] key is pressed during the program play, the system skips to next / previous program.
- If [STOP] key is pressed during the program play, the system stops the program play, and goes the stop mode. Until [STOP] key is pressed during the stop mode, the system keeps the contents of the program.
![ELTA 2322 - PROGRAM key [Function Explanation] - 1](/content/2026/02/380432/images/c619bc70b41136e98a8afee80549a99c2a21d32176e2bd793ae09dc39e76d3b7.jpg)
MODE key [Function Explanation]
CD Mode:
- If [MODE] key is pressed, the system changes the mode(as follows intention).
![ELTA 2322 - MODE key [Function Explanation] - 1](/content/2026/02/380432/images/040ee71416f226050d54fcc662f76d99d4f02a706cae5f78a16c68c8dcfdbf3e.jpg)
- During the repeat-1 mode, the system repeats the current track of the CD.
- During the repeat-all mode, if it reaches the end of the tune of the final track, it is usually returned to the head track.
- If whole track was finished during the random play mode or if [STOP] key is pressed during the random play mode, the system goes to the stop mode and cancels the random play mode.
- If [FF / SKIP + ] key is pressed during the random play mode, the system skips next at random. If [FF / SKIP + ] key is pressed on the tune of the final track, the system searches next lap at random.
- If [FB/SKIP-] key is pressed during the random play mode, the system searches the beginning of the current track, but doesn't skip track down.
MP3 Mode:
- If [MODE] key is pressed, the system changes the mode(as follows intention).

- During the repeat-1 mode, the system repeats the current track of the MP3
- During the repeat-folder mode, the system repeats the current folder track of the MP3
- During the repeat-all mode, if it reaches the end of the tune of the final track, it is usually returned to the head track.
- If whole track was finished during the random play mode or if [STOP] key is pressed during the random play mode, the system goes to the stop mode and cancels the random play mode.
- If [FF/SKIP+] key is pressed during the random play mode, the system skips next at random. If [FF/SKIP+] key is pressed on the tune of the final track, the system searches next lap at random.
- If [FB/SKIP-] key is pressed during the random play mode, the system searches the beginning of the current track, but doesn't skip track down.
MODE
CD: None Repeat 1 Repeat all Random None.
MP3: None Repeat 1 Repeat folder Random all Random None.
RANDOM
- Press RANDOM button to begin listening, all the tracks on the disc should be played randomly. Select the Random function and press the Mode button and selection Random to start random playback.
PROGRAMMING MP3
The MP3 player enable program 10 tracks in a sequence of your choice.
- Press PROGRAM button in stop mode the display will show "P01" and "PROGRAM" will be blinking.
- Press FF/SKIP+ and FB/SKIP- button to select the desired track to be programmed. or Press FOLDER DN and FOLDER UP button on the remote control to select the desired next folder's track to be programmed.
- Press PROGRAM button to entry memory.
- Continue to program, repeat steps 2 and 3.
- Press PLAY / PAUSE button on program mode to play the programmed tracks.
SKIP+
- Change the starting play track during stop mode, cyclic to the first track if it is in the last track.
- Skip to the next track during Normal Play, cyclic to the first track if it is in the last track.
- When Key is pushed more than 0.5sec, Fast-Forward is executed.
- Skip to the next programmed track during Program play, cyclic to the first programmed track.
- Skip to the next random track during Random play.
SKIP
- Change the starting play track during stop mode, cyclic to the last track if it is in the first track.
- Skip to the previous track during Normal play, cyclic to the last track if it in the first track.
- When key is pushed more than 0.5 sec, Fast - reverse is executed.
- Skip to the previous programmed track during Program play, cyclic to the first programmed track.
FOLDER
- When the system is STOP mode, For MP3, Skip up to next folder in increasing order and display folder number.
- When the system is PLAY mode, For MP3, Skip up to next folder number in increasing order, start play head track of the folder and display current folder and track number Press key once, current folder number is flashing for 3s, press key again folder up is executed.
FOLDER
- When the system is STOP mode, For MP3, Skip up to next folder in decreasing order and display folder number.
- When the system is PLAY mode, For MP3, Skip up to next folder number in decreasing order, start play head track of the folder and display current folder and track number Press key once, current folder number is flashing for 3s, press key again folder up is executed.
+/- = BASS
- Press the +/- BASS button and select the Bass Boost effect.
TAPE FUNCTION
Move to select TAPE FUNCTION
RECORD/PLAY DECK CONTROLS
RECORD;to start recording.
- PLAY: to start cassette playback.
- REWIND : to fast rewind the cassette.
F.FWD : to fast forward the cassette
- STOP/EJ: to stop and eject the cassette.
- PAUSE: to interrupt recording or playback
CASSETTE DECK
Before operating the cassette deck, make sure Function Selector is in the Tape mode.
PLAYBACK
- Set Function Selector to Tape mode.
- Press Eject button to open the cassette door
- Place the cassette tape into Deck, with the side to be played facing the window.
- Close cassette door and Press Play button to start playback.
- Playback stops when the tape reaches the end.
- Press Stop button if you want to stop playback before the end of the tape
- Push function button "RADIO", or "CD" to select the sound source.
- Place a blank tape into Deck
- Press PAUSE button first and then Press PLAY and RECORD buttons together.
- Play the selected sound source.
-
When recording, release PAUSE button
-
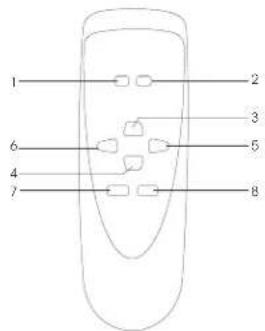
TAPE SLACK (Fig.1) Check and tighten slack tape before use with a pencil or similar tool. Slack tape may possibly break or get jammed in the mechanism.
- TO PREVENT ACCIDENTAL ERASURE (Fig.2) Use a screwdriver or other pointed tool to break off the plastic tabs.
- TO RECORD AGAIN (Fig.3) Cover the tab openings with cellophane tape.
RADIO OPERATION
TUNING
- Push function button "RADIO" to set unit to Radio mode. Radio Function Indicator will light up
- Select the tuning range with the BAND button.
- Rotate TUNING CONTROL to select the desired station.
NOTE:
When listening to FM broadcasts it is advisable to extend fully the wire FM antenna on the rear cover. When listening to AM broadcasts it is advisable to adjust the position of the helmet for optimum reception.
What is MP3?
MP3 is a short form for MPEG Audio Layer 3. MPEG refers to the Moving Pictures Experts Group. MP3s are digital audio files that have been shrunken down while still maintaining their original sound quality. MP3s are widely recognized as the most popular format for Storing and listening to music. The digital audio files stored on MP3 disc can be played on MP3 player. MP3 disc can have 150-200 songs in one CD.
Power Supply: AC
230V50Hz
Power Consumption : : 15 watts
Output Power (Per channel): 2 Watts X 2 RMS into 8 OHM
Radio Section : AM 525 - 1615 KHz
FM87.5-108MHz
Compact Disc Section
Frequency Response (-3dB): 60 - 16,000 Hz
Signal-to-noise Ratio : 60 dB
Harmonic Distortion : 0.4%
Compatible with : CD-DA, CD-R, CD-RW, MP3
Cassette section :
Tape speed: 4.75cm/sec.
Wow and Flutter: < 0
Frequency response : 100Hz - 6.3KHz
MORE INFORMATION

Beware of small pieces and batteries, do not swallow them. It may be hazardous to your health and lead into suffocation. Please, Make sure to keep small devices and batteries out of the reach of children.

Important advice regarding hearing protection
Caution:
You care for your hearing, and so do we.
Therefore, use caution while using this appliance.
Our recommendation: Avoid high volumes.
Children should be supervised while using headphones; make sure that the appliance is not set to high volume.
Caution!
High volumes may cause irreparable damage to children's ears.

NEVER let allow anyone, especially children, to put objects into the holes, slots or openings on this devise. This may lead into death due to electric shock. The device must only be opened by a qualified assistant.

Only use the appliance for its intended purpose.
This device may only be used in housings and business premises.

Please keep this instruction manual for further reference.

Instructions on environment protection
Do not dispose of this product in the usual household garbage at the end of its life cycle; hand it over at a collection point for the recycling of electrical and electronic appliances. The symbol on the product, the instructions for use or the packing will inform about the methods for disposal.
The materials are recyclable as mentioned in its marking. By recycling, material recycling or other forms of re-utilization of old appliances, you are making an important contribution to protect our environment.
Please inquire at the community administration for the authorized disposal location.

Do not obstruct the ventilation of the device. Make sure, that no curtains, newspapers, furniture or any other type of object are blocking the ventilation system of the apparatus. The ventilation system must be clear of objects at all times! Overheating may lead into serious damage of the device and reduce its performance and lifespan.

Heat and warmth
Do not expose the appliance to direct sunlight. Make sure that the appliance is not subject to direct heat sources such as heaters or open fire. Make sure that the ventilation slots of the appliance are not covered.

Moisture and cleaning
This appliance is not waterproof! Do not immerse player in water. Do not allow player to come in contact with water. If water gets inside the player it may cause serious damage. Do not use cleaning agents that contain alcohol, ammoniac, benzene or abrasives as these could damage the player. For cleaning, use a soft, moistened cloth.

PRODUIT LASER DE CLASSE 1
ATTENTION!
Section magnetophone:
Vitesse de lecture: 4.75 cm/sec.
Pleurage et distorsion: < 0.4%
Frequence:100Hz-6.3KHz
PLUS D'INFORMATIONS

Notre recommendations: Evitez les volumes forts.
Cavo energetico 2 Watts X 2 RMS in 8 OHM
(Per canale):
The Irregular symbol with the lightning bolt resembles the user to the presence of dangerous non-lapsided voltage on the inside of this device. The device is also used for the
WARNING
DANGER OF A HAZARDOUS ELECTRIC SHOCK. DO NOT OPEN
WARNING: TO REDUCE THE RISK OF AN ELECTRIC SHOCK, DO NOT REMOVE THE FRONT OR BACK COVER. INSIDE THE UNIT, THERE ARE NO PARTS THAT CAN BE REPAIRRED OR ADJUSTED BY THE USER. PLEASE REFER TO QUALIFIED TECHNICIAN

The triangular symbol with the exclamation highlights important points of which the user should refer to the manual regarding maintenance and repair.
Distortion harmonica 0.4%
Competivel com: CD-DA, CD-R, CD-RW, MP3
Secção do cassette:
"Wow and Flutter": < 0.4%
Cassettecompartment:
Bandsnelheid: 4.75 cm/sec.
'Gejengel': < 0.4%
2 Watts X 2 RMS into 8 OHM
AM 525-1615 KHz
FM87,5-108MHz
60-16,000 Hz
60 dB
0.4%
CD-DA, CD-R, CD-RW, MP3
4,75 cm/sec.
<0.4%
100 Hz - 6.3 KHz
DOPLNUJICINFORMACE

- CD KAPAGI
- CD KAPAGI OPEN/CLOSE [AC/Kapal]
- LCD EKRANI
- VOLUME UP [Ses yukari]
- VOLUME DOWN [Ses kismak]
- FOLDER [Dosya] TUSU
7.X-BASSTUSSU - POWER GÖSTERGESİ
- UZAKTAN KUMANDA
- SKIP [Atla] TUSU
- SKIP [Atla] TUSU
- PLAY/PAUSE TUSU
- STOP [Stop] TUSSU
- FUNCTION [slem] SEGIM TUSU (TAPE, CD/MP3, TUNER) [Tepy, CD/MP3, Radyo]
- BAND SEÇİMI (AM, FM, FM ST.)
- MODE [Mod] TU\(U (REPEAT, RANDOM) [Gerai, Rasgele]
17.PROGRAM TUSU - TUNING [Radyo] TU\(U
- KASET KAPAGI
- KULAKLIK GIRISI
- RECORD/PLAY [Kaynt/Calmak] CIHAZ KONTROLU
- FM ANT. KABLOSU
- HOPARLOR SOL
- HOPARLOR SAG
- ELEKTRIK KABLOSU
- BEAT CUT
UZAKTAN KUMANDA AYARLARI
Wow ve Flutter < 0.4%
Frekans araligi: 100 Hz - 6.3 KHz
Harici bilgiler