2309 - Hi-fi system ELTA - Free user manual and instructions
Find the device manual for free 2309 ELTA in PDF.
User questions about 2309 ELTA
0 question about this device. Answer the ones you know or ask your own.
Ask a new question about this device
Download the instructions for your Hi-fi system in PDF format for free! Find your manual 2309 - ELTA and take your electronic device back in hand. On this page are published all the documents necessary for the use of your device. 2309 by ELTA.
USER MANUAL 2309 ELTA
Design Stereo Music- Center with CD/MP3- Player
Design Stereo Music- Center with CD/MP3- Player
SAFETY INFORMATION

A triangle with a lightning symboldraws the user's attention todangerous voltagewithoutinsulation in the cabinet which maybe high enough to entail a risk ofelectric shock.
WARNING RISK OF ELECTRIC SHOCK DO NOT OPEN
CAUTION: TO REDUCETHE RISK OF ELECTRIC SHOCK. DO NOT REMOVE COVER (OR BACK). THERE ARE NO USER SERVICEABLE PART INSIDE. REFER SERVICING TO QUALIFIEDSERVICE PERSONNEL.

A triangle with an exclamation mark draws the user's attention to important instructions for use and maintenance in the accompanying manual, which should be studied.
FURTHER INFORMATION

Beware of small pieces and batteries, do not swallow them. It may be hazardous to your health and lead into suffocation. Please, Make sure to keep small devices and batteries out of the reach of children.

Important advice regarding hearing protection
Caution:
You care for your hearing, and so do we.
Therefore, use caution while using this appliance.
Our recommendation: Avoid high volumes
Children should be supervised while using headphones; make sure that the appliance is not set to
high volume.
Caution!
High volumes may cause irreparable damage to children's ears.

NEVER let allow anyone, especially children, to put objects into the holes, slots or openings on this devise. This may lead into death due to electric shock. The device must only be opened by a qualified assistant.

Only use the appliance for its intended purpose.
This device may only be used in housings and business premises.

Please keep this instruction manual for further reference.

Instructions on environment protection
Do not dispose of this product in the usual household garbage at the end of its life cycle; hand it over at a collection
point for the recycling of electrical and electronic appliances. The symbol on the product, the instructions for use
or the packing will inform about the methods for disposal.
The materials are recyclable as mentioned in its marking. By recycling, material recycling or other forms of reutilization of old appliances, you are making an important contribution to protect our environment.
Please inquire at the community administration for the authorized disposal location.

Do not obstruct the ventilation of the device. Make sure, that no curtains, newspapers, furniture or any other type of object are blocking the ventilation system of the apparatus. The ventilation system must be clear of objects at all times! Overheating may lead into serious damage of the device and reduce its performance and lifespan.

Heat and warmth
Do not expose the appliance to direct sunlight. Make sure that the appliance is not subject to direct heat sources such as heaters or open fire. Make sure that the ventilation slots of the appliance are not covered.

Moisture and cleaning
This appliance is not waterproof! Do not immerse player in water. Do not allow player to come in contact with water. If water gets inside the player it may cause serious damage. Do not use cleaning agents that contain alcohol, ammoniac, benzene or abrasives as these could damage the player. For cleaning, use a soft, moistened cloth.

Professional recycling
Batteries and packaging should not be disposed of in the trash. Batteries must be handed over to a collection centre for used batteries. Separating disposable packaging materials is ecologically friendly.
SAFETY INSTRUCTIONS
- READ INSTRUCTIONS - All the safety and operating instructions should be read before the appliance is operated.
- RETAIN INSTRUCTIONS - The safety and operating instruction should be retained for future reference.
- HEED WARNINGS - All warnings on the appliance and in the operating instructions should be adhered to.
- FOLLOW INSTRUCTIONS - All operating instructions should be followed.
- WATER AND MOISTURE - The appliance should not be used near water, for example, near a bathtub, washbowl, kitchen sink, laundry tub, swimming pool or in a wet basement.
- VENTILATION - The appliance should be situated so that its location or position does not interfere with its proper ventilation. Do not place on bed, sofa, rug or similar surface that may block the ventilation openings, in a built-in installation, such as a bookcase or cabinet that may impede the flow of air through the ventilation openings.
- HEAT - The appliance should be situated away from heat sources such as radiators, stoves, or other appliances (including amplifiers) that produce heat.
- POWER SOURCE - The appliance should be connected to power supply only of the type described in the operating instructions or as marked on the appliance.
- GROUNDING - Precautions should be taken to ensure that the grounding means of an appliance is not defeated.
- POWER CORD PROTECTION - Power supply cords should be routed so that they are not likely to be walked on or pinched by items placed upon or against them.
- POWER LINES - An outdoor antenna should be located away from power lines.
- OBJECT and LIQUID ENTRY - Care should be taken so that objects do not fall and liquids are not spilled into the enclosure through openings.
SAFETY INSTRUCTIONS
-
ESD WARNING - The display does not function properly or no reaction to operation of any the control may be due to the electrostatic discharge. Switch off and unplug the set. Reconnect after a few seconds.
-
DAMAGE REQUIRING SERVICE - The appliance should be serviced by qualified service personnel when;
a. The power-supply cord or plug has been damaged.
b. Objects have fallen into, or liquid has been spilled into the appliance enclosure.
c. The appliance has been exposed to rain.
d. The appliance has been dropped, or the enclosure damaged.
e. The appliance does not appear to operate normally
- SERVICING - The user should not attempt to service the appliance beyond that described in the user operating instructions. All other servicing should be referred to qualified service personnel.
Notes:
a. Dirty or scratched CD may cause a skipping problem. Clean or replace the CD.
b. If an error display or malfunction occurs, disconnect the AC cord and remove all the batteries. Then turn the power back on.
BEFORE OPERATION
Notes: CONCERNING COMPACT DISCS.
Since dirty, damaged or warped discs may damage the appliance, care should be taken of the followings items:
a. Usable compact discs. Use only compact disc with the mark shown below.
b. CD compact disc only with digital audio signals.

PREPARATION FOR USE
INSTALLATION
- Unpack all parts and remove protective material.
- Insert the batteries into the remote control transmitter.
- Do not connect the unit to the mains before checking the mains voltage and before all other connections have been made.
- Do not cover any vents and make sure that there is a space of several centimetres around the unit for ventilation.
CONNECTIONS
- Connect left and right speaker to left and right speaker jacks.
- Before connecting the unit to the mains, make sure that the AC voltage printed on the back plate is the same as the AC voltage from your wall outlet.
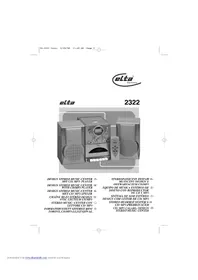
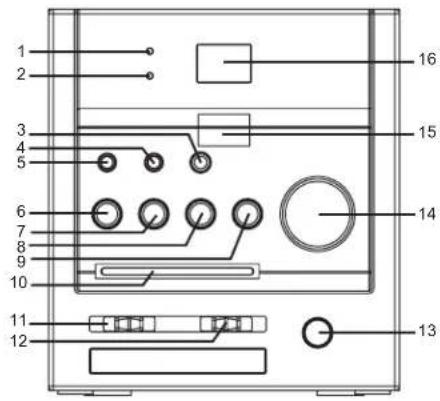
LOCATION OF CONTROLS
- POWER INDICATOR
- FM STEREO INDICATOR
- MODE
4.PROGRAM - ALBUM
- PLAY/PAUSE
- SKIP
- SKIP +
- STOP
- DIAL POINTER
- BAND SELECTOR
- FUNCTION SELECTOR
- VOLUME CONTROL
- TUNING CONTROL
- REMOTE SEN
16.LCD DISPLAY - SPEAKER JACKS (L/R)
- FM ANTENNA WIRE
19.AC CORD

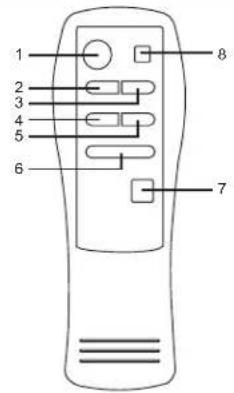
REMOTE CONTROL
- PLAY/PAUSE
- SKIP -
- SKIP +
4.PROGRAM - MODE
6.ALBUM UP - +10 TRACK
- STOP
BATTERY INSTALLATION
Insert 2 x "AAA" size batteries into the battery compartment. Be sure that the batteries are inserted correctly to avoid damage to the remote control. Always remove the batteries when the remote control will not be used for a long period of time, as this will cause leakage to the batteries and subsequently damage to your set.
Notes:
- Use batteries of the same type. Never use different types of batteries together.
- If the distance required between the remote control and the appliance decreases, the batteries are exhausted. In this case, replace the batteries with new ones.
SENSOR WINDOW OF THE RECEIVER
- Even if the remote control is operated within the effective range, its operation may be impossible if there are any obstacle between the appliance and the remote control.
- If the remote control is operated near other appliances which generate infrared rays, or if other remote control devices using infrared rays are used near the appliance, it may operate improperly.
RADIO OPERATION
GENERAL OPERATION
- Set the "FUNCTION" selector to "RADIO" mode.
- Select the desired band by using the "BAND" selector.
- Adjust radio frequency to your desired station by using the "TUNING" control.
- Adjust the "VOLUME" control to the desired level.
RADIO OPERATION
AM / FM / FM-STEREO RECEPTION
- Set the "BAND" selector for AM reception to AM mode.
- Set the "BAND" selector to FM mode for MONO reception.
- Set the "BAND" selector to FM ST. mode for FM STEREO reception. The stereo indicator lights up to show FM ST. mode.
FOR BETTER RECEPTION
FM - This appliance has a FM antenna located at the rear cabinet. This wire is completely unraveled and extended for better reception.
AM - This appliance is equipped with a built-in directional ferrite AM antenna. Rotate the appliance to get better reception.
Press to start playing CD / MP3 / WMA disc.
Press again to stop playing CD / MP3 / WMA operation temporarily
Press again to resume playback.
Press to go to the next track or back to the previous track.
Press and hold while playing until you find the point of the track.
Press to stop all CD / MP3 / WMA operations.
PLAYBACK
- Set the "FUNCTION" selector to "CD / MP3 / WMA" mode.
- Open the CD door and place a CD / MP3 / WMA disc with the label side upward in the CD compartment.
- Close the CD door.
- Focus search is performed if disc is inside.
For CD disc - Total number of tracks is read and appears on the display.
For MP3 disc - "MP3" appears on the display.
For WMA disc - "WMA" appears on the display.
- Press the "PLAY / PAUSE" button to start playing CD / MP3 / WMA disc.
- Adjust the "VOLUME" control to the desired level.
- Press the "PLAY / PAUSE" button again when you want to stop playback temporarily.
- Press the "STOP" button when finished.
Up to 20 tracks can be programmed for disc playback in any order.
Be sure to press the "STOP" button before use.
- Press the "PROGRAM" button on the remote control, the display will show "P01" and flash.
- Select the desired track by using the "SKIP +" or "SKIP -" button. (You may select the desired album by pressing the "ALBUM" button.)
- Press the "PROGRAM" button on the remote control again to confirm the desired track into the program, ming memory.
- Repeat step 2 and 3 to enter additional tracks into the programming memory.
- When all the desired tracks have been programmed, press the "PLAY / PAUSE / USB" button to play the disc in the order you have programmed.
- Press the "STOP" button twice to terminate the programmed playback.
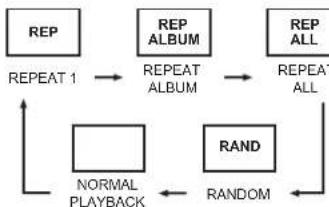
MODE
Press the "MODE" button before or during playing CD / MP3 / WMA disc, each press switches the mode function as follows:
1-REPEAT 1
2-REPEAT ALBUM (*MP3/WMA ONLY)
3 - REPEAT ALL
4-RANDOM
5-NORMAL PLAYBACK
SPECIFICATIONS
GENERAL
Power supply: AC 230V ~ 50Hz
Frequency range: AM 525 - 1615kHz FM 87.5 - 108MHz
(Specification subjects to be changed without notice.)
MODELE:2309