2444MP3 - Hi-fi system ELTA - Free user manual and instructions
Find the device manual for free 2444MP3 ELTA in PDF.
User questions about 2444MP3 ELTA
0 question about this device. Answer the ones you know or ask your own.
Ask a new question about this device
Download the instructions for your Hi-fi system in PDF format for free! Find your manual 2444MP3 - ELTA and take your electronic device back in hand. On this page are published all the documents necessary for the use of your device. 2444MP3 by ELTA.
USER MANUAL 2444MP3 ELTA
natural_image
Top-down view of a CD or DVD setup with two speakers, a central CD, and a remote control (no visible text or symbols)DESIGN MUSIC-CENTER ©
MIT VERTIKAL CD-PLAYER
UND PLL-TUNER
DESIGN MUSIC CENTER ©
WITH VERTICAL CD PLAYER
AND PLL TUNER
DESIGNOVÁ HUDEBNÍ VĚŽ S ©Z
VERTIKÁLNÍM CD PŘEHRÁVACEM
A PLL TUNEREM
DIKEY CD ÇALARLI VE PLL ⑬
TÜNERLI MÜZIK MERKEZI
MODEL 2444MP3
LASERPRODUKT DER KLASSE 1
CLASS 1 LASER PRODUCT
LUOKAN 1 LASERLAITE
KLASS 1 LASERAPPARAT
LASERSICHERHEIT
text_image
Technical diagram of a mechanical device with labeled parts 15 and 16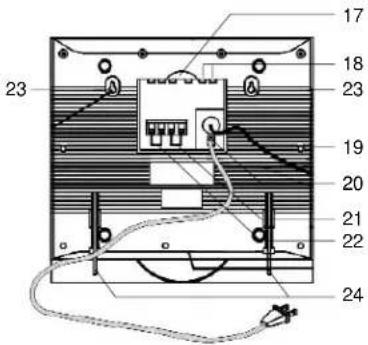
text_image
Technical diagram of an electronic device with numbered components and wiring connections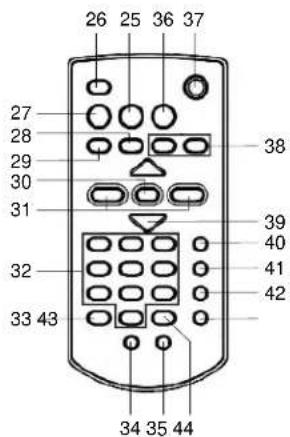
text_image
26 25 36 37 27 28 29 30 31 32 33 43 34 35 44 38 39 40 41 42natural_image
Diagram of a computer monitor with scroll arrows indicating rotation (no text or symbols)The triangular symbol with the lightning Bolt warns the user to the presence of dangerous non-isolated voltage on the inside of this device which may cause an electric shock.
WARNING
DANGER OF A HAZARDOUS ELECTRIC SHOCK. DO NOT OPEN
WARNING: TO REDUCE THE RISK OF AN ELECTRIC SHOCK, DO NOT REMOVE THE FRONT OR BACK COVER. INSIDE THE UNIT, THERE ARE NO PARTS THAT CAN BE REPAIRED OR ADJUSTED BY THE USER. PLEASE REFER TO QUALIFIED TECHNICIANS.

The triangular symbol with the exclamation highlights important points of which the user should refer to the manual regarding maintenance and repair.
PRECAUTIONS
Please take good note of the following instruction:
- The unit must be connected to the power voltage, which is the same as the local area. If not, there is a danger of "burning" the unit that causes a fire.
- Do not expose to the temperature higher than 35^ .
• A void installation near heaters or in areas subjected to direct sunlight. - Ensure good air circulation.
- Protect the unit from dust, moisture and water.
• A void strong magnetic fields, e.g. near TVs or speakers for other units.
• A void using strong chemical agents to clean. - Do not grease or oil components, running mechanisms, etc. The CD player is designed to be maintenance free.
• T ake the unit to approved service point for servicing.
WARNING
TO PREVENT FIRE OR SHOCK HAZARD. DO NOT EXPOSE THIS APPLIANCE TO RAIN OR MOISTURE.
DRIPPING WARNING
The product shall not be exposed to dripping or splashing and that no objects filled with liquids, such as vases, shall be placed on the product.
VENTILATION WARNING
The normal ventilation of the product shall not be impeded for intended use.
CAUTION
CLASS 1 LASER PRODUCT
Use of Controls or adjustments or performance of procedures other than those specified herein may result in hazardous radiation exposure.
CLASS 1 LASER PRODUCT LUOKAN 1 LASERLAITE KLASS 1 LASERAPPARAT
LASER SAFETY
This unit employs a laser. Only qualified service personnel should attempt repair.
DANGER: INVISIBLE LASER RADIATION WHEN OPEN AND INTERLOCK FAILED OR DEFEATED. AVOID DIRECT EXPOSURE TO BEAM. CAUTION: HAZARDOUS LASER RADIATION WHEN OPEN AND INTERLOCK DEFEATED.
WARNING
Read the instruction manual before you attempt to use the unit. Handle glass panels with care.
Consult your dealer or service personnel if you have questions about the installation, operation or safety of the unit.
Make sure unit is plugged into a 230V outlet. Using higher voltage outlets could cause the unit to malfunction or catch fire. Make sure all electrical connections (including extensions and inter connectors) are properly made.
Turn unit off before unplugging it from power source.
Do not expose to temperatures above 35 °C.
Do not place unit near heaters or in areas subjected to direct sunlight.
Place unit where there is good air circulation.
Protect unit from dust, moisture, water and other liquids.
Do not place unit near TVs, speakers and other objects that generate strong magnetic fields.
Do not clean with strong chemical agents.
Do not grease or oil components, running mechanisms, etc. CD player is designed to be maintenance-free.
Do not attempt to service this unit yourself. Take to an approved service center if repairs are necessary. Do not operate unit if it is not working normally or has been damaged in any way. Turn unit off, unplug it from the power source and consult service personnel.
Do not remove any fixed cover. This will increase the chance of electrical shock.
Do not leave unit unattended when in use.
Do not listen to headphones at high volumes.
Do not obstruct vents on unit.
Do not attempt to create your own stand for the unit. Use only the included stand.
Do not push object into any holes, slots or openings on unit.
Do not allow children to operate unit without adult supervision.
Erratic performance may occur if unit is used in rooms lit with fluorescent lights.
CAUTION - This CD player may be used only with the captioned manufacturer's stand. Use with other stand may result in instability causing possible injury.
Above all
- NEVER let anyone, especially children, push anything into holes, slots or any other openings in the case this could result in a fatal electric shock.
- NEVER guess or take chances with electrical equipment of any kind.
• It is better to be safe than sorry!
Note: If energy saving lamps (Fluorescent) are used in the Same room as the unit erratic operation may occur.
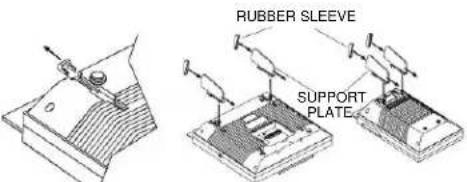
INSTALLATION
FOR TABLE TOP
- Put the main unit and the speaker on a piece of soft cloth, which for preventing scratches the unit front panel.
- Use your finger press on the decoration part, which are at the groove of the main unit rear cabinet and slide down to release away it from the groove.
- Insert the support plate into the groove.
- Slide up the support plate until it is locked.
- If you put your equipment on a glass table or a very smooth surface. The main unit and speaker box would be easy to move by hand pushing. You could insert the rubber sleeve to the bottom of the support plate.
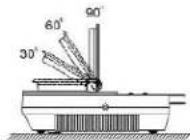
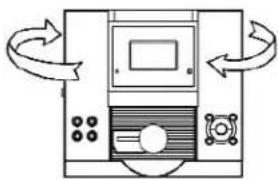
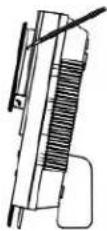
- This product is designed both for placing vertically and horizontally. Removing the support plate away for horizontal placing. The display can be rotated staying in 1 of 3 kind of viewing angle (30°, 60°, 90°) as you like.
text_image
RUBBER SLEEVE SUPPORT PLATESLIDE DOWN THE DECORATING PART TO REMOVE FROM MAIN UNIT REAR CABINET

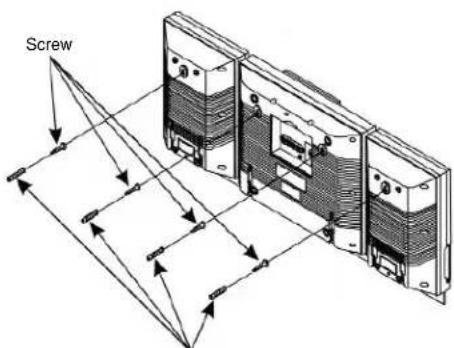
FOR WALL MOUNTING:
- Use the wall-mounting template supplied with unit to make anchor hole marks on the wall. Make sure the marks are leveled.
- Drill 3/16" holes on the marks.
- Insert the plastic anchor supplied with unit through the hole and tap it until it is flush with the wall.
- Inset the screw and tighten the screw 3mm sway from the wall.
- Hang the main unit and the speakers to the screw.
text_image
ScrewPlastic Anchor
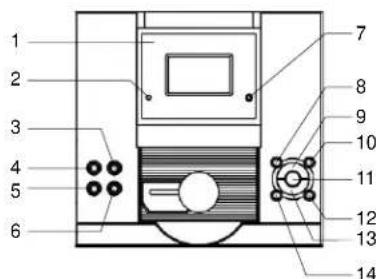
OPERATING ELEMENTS MAIN UNIT
- Display
- Power Indicator
- VOL Button
- POWER Button
- CD DOOR
OPEN/CLOSE Button
- VOL Button
- Remote Sensor
- EQ Button
- PLAY/PAUSE Button
- TUNER/BAND Button
- RANDOM Button
- SEARCH FUNING + Button
- STOP Button
- SEARCH FUNING - Button
- RESET Switch - Reset the unit with a sharp tip
- Headphone Jack
- Subwoofer Socket
- Aux Input Socket
- FM Antenna
- AC Power Cord
- Left Speaker Terminal
- Right Speaker Terminal
- Wall Mounting Hole
- Support Plate
REMOTE CONTROL
- MONO/ST / FIND Button
- MUTE Button
- BAND Button
- STOP Button
- PAY/PAUSE Button
- REPEAT Button
- << / >> TUNING Button
- Number 0-9 Button
- EQ Button
- PRESET - Button
- PRESET + Button
- FUNC Button
- Button ⏻
- Button
- VOL + / VOL - Button
- TIMER Button
- SLEEP Button
- RANDOM Button
- PROGRAM Button
- INTRO Button
text_image
1 2 3 4 5 6 7 8 9 10 11 12 13 14
text_image
15 16
text_image
Technical diagram of an electronic device with numbered components and wiring connections
text_image
26 25 36 37 27 28 29 30 31 32 33 34 35 44 38 39 40 41 42 43SETTING UP AND CONNECTING
REPLACING Remote Control BATTERY
- Turn over the remote control, and remove the battery door.
- Install 1 "CR2025" lithium battery according to the polarity diagram on the battery compartment.
- Close the battery door.
BATTERY PRECAUTIONS
Follow these precautions when using battery in this device.
- Use only the size and type of battery specified.
- Be sure to follow the correct polarity when installing the battery as indicated in the battery compartment. Reversed battery may cause damage to the device.
-
If the device is not to be used for a long period of time, remove the battery to prevent damage or injury from possible battery leakage.
-
Do not try to recharge battery, not intended to recharge; they can overheat and rupture. (Follow battery manufacturer's directions.)
Antenna
FM: Extend and move the FM Antenna Wire. If stereo broadcast received, the STEREO indicator will be displayed on the display (1). In case of Stereo stations with a bad reception (noise infested reception), we recommend to pres MONO/ST (25) button on remote control to MONO mode.
natural_image
Diagram of a computer monitor with scroll arrows indicating rotation (no text or symbols)AM: This unit is equipped with a built-in directional ferrite antenna, move and rotate the unit for best reception.
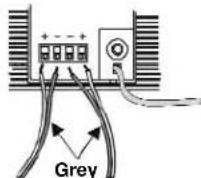
Speaker connection
To insert the speaker cables by pushing down the terminal lever of Left Speaker Terminal (21) and Right Speaker Terminal (22).
Please ensure the cables are connected into the speaker terminals with the correct polarities. Connect the left speaker to the terminals L and the right speaker to the terminals R.
Headphones connection
Headphones Jack (16) is for headphones (not included) with 8-32 Ohm impedance (3.5mm jack). Use corresponding adaptors (specialist shops) if you have different plugs. The speakers are automatically switched off when the headphones are being used.
CAUTION: Listening at high power for a long moment could damage users' ears.
LINE IN (AUX IN) connection
- Connect one end of a RCA plug signal wire (not included) to Aux Input Socket (18) and the other end of wire to your home equipment. Make sure the polarity of the right and the left channel is correct.
- Press the POWER (4, 37) to switch on the unit
- Press FUNC (36) repeatedly until display indicates "AUX".
- Play your home equipment.
GB 020.
SUBWOOFER connection
- Connect one end of a RCA plug signal wire (not included) to Subwoofer Socket (17) and the other end of wire to your subwoofer.
- Turn on the unit and your subwoofer.
- Play your home equipment.

Mains connection
This system is designed to operate on AC230V \~50Hz house current. Connecting this system to any other power supply could result in damage to the unit, which is not covered by your warranty. If this plug will not fit into your outlet, you should have your outlet changed by a qualified licensed electrician.
- Unwind the AC Power Cord on the main unit.
- Insert the plug into any convenient AC outlet.
As soon as the unit has been connected with the mains voltage, parts of the unit are in operation due to the standby function. To switch off the unit completely pull the mains plug.
CLOCK AND TIMER
CLOCK
- While unit is off (still plugged in), press PROGRAM (43) button over 3 seconds. ____ blinking on the Display (1).
- Press ◀◀◀ ▶▶(38) button repeatedly to select 12 or 24 hour format.
- Press PROGRAM (43) button to save and then hour two digit blinking on the Display (1).
- Press ◀◀◀ ▶▶(38) button repeatedly until correct hour selected
- Press PROGRAM (43) button to save hour and then minutes two digit blinking on the Display (1).
- Press ◀◀▶(38) button repeatedly until correct minute selected.
- Press PROGRAM (43) button to complete time setting. Digits will stop flashing and clock will start.
TIMER
Clock should be set before using timer.
- Press POWER (4, 37) button to turn "ON" the unit.
- Press and hold TIMER (40) button approx 2 seconds until "ON" light up and two hour digit blinking on the Display (1).
- Press ◀◀▶(38) button repeatedly to adjust hour.
- Press TIMER (40) button to save hour setting and minutes two digits blinking on the Display (1).
- Press ▶(38) button repeatedly to adjust minute.
- Press TIMER (40) button to confirm TIMER ON setting then "OFF" light up and two hour digit blinking on the Display (1).
- Repeat above step 3 \~ 5 accordingly.
- Press TIMER (40) button to confirm TIMER OFF setting and "TUNER" blinking on the Display (1).
- Press ◀◀◀ ▶▶(38) button repeatedly to select music source.
- Press TIMER (40) button to confirm TIMER ON music source.
- Press ◀◀▶(38) button repeatedly to adjust volume level.
- Press TIMER (40) button to confirm TIMER ON sound level and " 🔒" light up on the Display (1).
Note: To set TIMER function must adjust Digital Clock correctly.
The new setting will not save, if press PROGRAM (43) button over 10 seconds.
The timer function can be set the unit turn "ON" and turn "OFF" automatically in which time. To do so the time must be set correctly.
If the unit was kept on stand by mode, it will turn "ON" automatically for the programmed length of time at latest operating (CD or TUNER) mode. It is very important to ensure the alarm function is capable of operation.
I.E: For CD operation, the unit must be loaded compact disc.
Setting the SLEEP (automatic turn "OFF" time)
While turn "ON" the unit, the time after which to turn "OFF" the unit can be set from SLP- 90 → 80 → 70 → 60 → 50 → 40 → 30 → 20 → 10 minutes. Press SLEEP (41) button repeatedly until the desired time appears on the Display (1). The unit will turn "OFF" automatically after reach selected sleep time.
Note: If the CD playing time is shorted than your selected sleep time. The music will stop at the end of disc.
BASIC OPERATION
Turning on
Display will illuminate dimly when unit has been successfully plugged in and power is flowing. Press POWER (4, 37) to turn unit on. Power On indicator will light up. Press TUNER/BAND (10), or ▶ PLAY/PAUSE (9, 29) or press FUNC (36) button repeatedly to select TUNER, CD or AUX as the music source. Press POWER (4, 37) again to turn unit off.
Volume control
Press VOL + (3, 39) and VOL - (6, 39) button to adjust the volume level. Press MUTE (26) button to turn volume to 0. Press MUTE (26) again to resume.
EQ
Press EQ (8, 33) repeatedly to cycle through the equalizer presets. Presets are Pass, Classic, Rock, Pop and Jazz.
Changing display
When power is off, press TIMER (40) once to cycle through the following display options: Clock, Timer On setting, Timer Off setting, music source and volume level.
-
Press POWER (4, 37) to turn unit on.
-
Press TUNER/BAND (10) button repeatedly to select FM or AM radio mode. or
-
Press BAND (27) button on remote hand set to select AM or FM band.
-
Press TUNING+ (12) TUNING- (14) or << / >> TUNING (31) to select the desired station. For automatic tuning, press and hold TUNING+ (12) TUNING- (14) or << / >> TUNING (31) until you approach the desired station, then tap the buttons until you reach the station. For manual tuning, press TUNING+ (12) TUNING- (14) or << / >> TUNING (31) briefly and release. The tuner will skip to the next clear station.
ST/MONO
Repeatedly pressing the ST/MONO (25) button between stereo and mono reception. The stereo reception of a station in the FM band is indicated on the display. In case of stereo stations with a bad reception (noise infested reception) we recommend switching the tuner to mono reception.
Storing preset stations
- Tune radio to the desired station.
- Press PROGRAM (43).
- Press PRESET + (35) or PRESET - (34) repeatedly or press numerical buttons "0-9" (32) to select a preset station number.
- Press PROGRAM (43) to store the station.
- Repeat 1 - 4 steps to store additional stations. The unit memory is capable to store 10 stations for FM range and 10 stations for AM (MW) range.
Listening from a preset station
Press TÜNER/BAND (10) button repeatedly to select FM or AM radio mode or press BAND (27) button on remote hand set to select AM or FM band, then press PRESET + (35) or PRESET - (34) repeatedly or press numerical buttons "0-9" (32) to select the preset station.
CD PLAYER OPERATION
- Press POWER (4, 37) to turn the unit on. Press FUNC (36) repeatedly or ▶■PLAY/PAUSE (9, 29) to select CD mode.
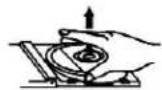
- Press CD DOOR OPEN/CLOSE (5) button to open the CD door. Insert the disc with unlabelled side facing to the unit. Press the center of the CD disc onto the black holder fitted with 3 retaining bearing until locked.
- Press CD DOOR OPEN/CLOSE (5) button to close door. The number of tracks and total playing time of the CD will appear on the Display (1).
Note: If no disc or damaged disc was loaded, NO DISC will show on the Display (1).
PLAY / PAUSE (9, 29) button
PLAY: Press once to start immediately.
PAUSE: Press once during playback to suspend and the elapse time blinking on the Display (1).
RESUME: Press once during pause, continuous playback and the elapse time stop blinking on the Display (1).
■ STOP (13, 28) - Press to stop CD play.
SKIP - (14, 38) and SKIP + (12, 38) - use to skip to desired track. Hold either button down to search through a particular track.
Press numerical 0 - 9 (32) buttons on the remote then press ▶ PLAY / PAUSE (9, 29) button to direct select a desired track playback.
REPEAT (30) button
REPEAT: Press once from beginning, current track continuous playback and RPT shown on the Display (1).
REPEAT ALL: Press twice from beginning, continuous playback preset disc and RPT ALL shown on the Display (1).
Disable: Press repeatedly until above indicator goes off on the Display (1).
RANDOM (11, 42) button
Enable: Press once to playback track not in sequence order and RANDOM indicate on the Display (1).
Disable: Press again to resume playback track in sequence order.
INTRO (44) button
Enable: Press once to introduce each track for 10 seconds and INTRO indicates on the Display (1).
Disable: Press again back to normal playback.
Programming CD
The CD player enables program 64 tracks in sequence of your choice.
-
Press PROGRAM (43) button at stop mode, MEMORY and 00 P - 01 indicate on the Display (1).
-
Press SKIP - (14, 38) and SKIP + (12, 38) button or press numerical buttons "0-9" (32) to select the desired track to be programmed.
-
Press PROGRAM (43) button to entry memory.
-
Continuous program, repeat steps 2 and 3 until memory is full.
-
Press ▶ PLAY / PAUSE (9, 29) button on program mode to play the programmed tracks.
Note: Program will be erasing automatically from first track when you entry over 64 tracks. Press PROGRAM (43) button repeatedly to check programmed tracks.
Clear the programmed tracks
- Press ■ STOP (13, 28) button once in program mode.
- Open the CD Door by pressing CD Door OPEN / CLOSE (5) button.
Note on CD-R/RW discs
- Because of non-standardized format definition / production of CD-R/RW, playback quality & performance are not guaranteed.
- It is not responsible for the playability of CD-R/RW in any case due to recording conditions such as PC performance, writing software, media ability and etc.
- Do not attach a seal or label to either side (the record able side or the labeled side) of a CD-R/RW disc. It may cause malfunction.
- Do not load an un-recorded CD-R/RW disc. It will take over 30 seconds to read the disc. The disc may be damaged if you try to open the disc compartment while reading the disc.
-
Press POWER (4, 37) to turn the unit on. Press FUNC (36) repeatedly or ▶PLAY/PAUSE (9, 29) to select CD mode.
-
Press CD DOOR OPEN/CLOSE (5) button to open the CD door. Insert the disc with unlabelled side facing to the unit. Press the center of the CD disc onto the black holder fitted with 3 retaining bearing until locked.
-
Press CD DOOR OPEN/CLOSE (5) button to close door. The number of tracks and total playing time of the CD will appear on the Display (1).
Note: If no disc or damaged disc was loaded, NO DISC will show on the Display (1).
▶ PLAY / PAUSE (9, 29) button
PLAY: Press once to start immediately.
PAUSE: Press once during playback to suspend and the elapse time blinking on the Display (1).
RESUME: Press once during pause, continuous playback and the elapse time stop blinking on the Display (1).
■ STOP (13, 28) - Press to stop CD play.
SKIP - (14, 38) and SKIP + (12, 38) - use to skip to desired track. Hold either button down to search through a particular track.
Press Numerical 0 - 9 (32) buttons on the remote then press ▶II PLAY / PAUSE (9, 29) button to direct select a desired track playback.
REPEAT (30) button
REPEAT 1: Press once from beginning, current track continuous playback and RPT shown on the Display (1).
REPEAT ALL: Press twice from beginning, continuous playback preset disc and RPT ALL shown on the Display (1).
REPEAT ALBUM: Press third times from beginning, continuously playback album and shown on the Display (1).
Disable: Press repeatedly until above indicator goes off on the Display (1).
RANDOM (11, 42) button
Enable: Press once to playback track not in sequence order and RANDOM indicate on the Display (1).
Disable: Press again to resume playback track in sequence order.
INTRO (44) button
Enable: Press once to introduce each track and INTRO indicates on the Display (1).
Disable: Press again back to normal playback.
PRESET + (35) button - Press each time to called ALBUM upward. PRESET - (34) button - Press each time to called ALBUM downward.
Programming MP3
The MP3 player enables program 64 tracks in sequence of your choice.
-
Press PROGRAM (43) button at stop mode. Album number 00 indicates on the Display (1) and blinks.
-
Press SKIP - (14, 38) and SKIP + (12, 38) button to select the desired album number to be programmed.
-
Press PROGRAM (43) button to save album number and track number 000 blinking on the Display (1).
-
Press SKIP - (14, 38) and SKIP + (12, 38) button to select the desired track of the album to be programmed.
-
Press PROGRAM (43) button to save and album number 00 blinking again on the Display (1).
-
Continuous program, repeat steps 2 - 5 until memory full.
-
Press ▶ II PLAY / PAUSE (9, 29) button on program mode to play the programmed tracks.
Note: Program will be erasing automatically from first track when you entry over 64 tracks. Press PROGRAM (43) button repeatedly to check programmed tracks.
Clear the programmed tracks
- Press ■ STOP (13, 28) button once in program mode.
- Open the CD Door by pressing CD Door OPEN / CLOSE (5) button.
Search by character
- Press FIND (25) button once 🔒 blinking and A shown on the Display (1).
- Press ◀ SKIP - (14, 38) and ▶ SKIP + (12, 38) button repeatedly to select desired character.
- Press and hold SKIP - (14, 38) and SKIP + (12, 38) button A becomes blinking.
- Press SKIP - (14, 38) and SKIP + (12, 38) button repeatedly again to select desired track name with the character A at the beginning.
- Press ▶ PLAY / PAUSE (9, 29) button to playback the selected track.
Note: The character list designed sequence from A \~ Z and 0 \~ 9 cyclical.
Search by album
- Press FIND (25) button twice from the beginning ALBUM shown on the Display (1).
- Press ◀ SKIP - (14, 38) and ▶ SKIP + (12, 38) button repeatedly to select desired album.
- Press ▶ II PLAY / PAUSE (9, 29) button to playback selected album first track.
Note on CD-R / RW Discs
- Because of non-standardized format definition / production of MP3 CD, playback quality & performance are not guaranteed.
- It is not responsible for the playability of MP3 in any case due to recording conditions such as PC performance, writing software, media ability and etc.
- Do not attach a seal or label to either side (the record able side or the labeled side) of a CD-R / RW disc. It may cause malfunction.
- Do not load an un-recorded CD-R / RW disc. It will take over 30 seconds to read the disc. The disc may be damaged if you try to open the CD Door while reading the disc.
CARE AND MAINTENANCE
- Treat the disc carefully. Handle the disc only by its edges. Never allow your fingers to contact with the shiny, unprinted side of the disc.
- Do not attach adhesive tape, stickers etc., to the disc label.
- Clean the disc periodically with soft, lint-free, dry cloth. Never use detergents or adhesive cleaners to clean the disc. If necessary, use to CD cleaning kit.
• If disc skips or gets stuck on a section of the disc, it is probably dirty or damaged (scratched). - When cleaning the disc, wipe in straight lines from the center of the disc to the edge of the disc. Never wipe in circular motions.
- To remove a disc from its storage case, press down on the center of the case and lift the disc outs, holding it carefully by the edges.
- Fingerprints and dust should be carefully wiped off the disc's recorded surface with a soft cloth. Unlike conventional records. Compact disc has no groove to collect dust and microscopic debris, so gently wiping with a piece of soft cloth should remove most particles.


TROUBLESHOOTING GUIDE
Should this unit exhibit a problem, check the following before seeking service.
| Symptom | Possible Cause | Solution |
| Radio | ||
| Noise or sound distorted on AM or FM broadcasts. | Station not tuned properly for AM or FM | Retune the AM or FM broadcast station. |
| FM: Wire antenna is not extended. | Extend FM Wire antenna. | |
| AM: The bar antenna is not positioned correctly. | Reposition the unit until best reception is obtained. | |
| FM STEREO does not appear on display. | You have tuned to a mono station or station too weak. | Select another FM station. |
| AM or FM, no sound. | Unit not at Tuner function AM or FM band. | Press Tuner / Band button to AM or FM. |
| Volume at minimum. | Increase Volume. | |
| Compact Disc Player | ||
| CD Player will not play. | Unit not in CD function mode. | Press CD Function button. |
| CD is not installed or installed incorrectly. | Insert CD with label side up. | |
| CD skips while playing. | Disc is dirty or scratched. | Wipe disc with cloth or use another disc. |
| Function inoperative and jammed | Built-in microcomputer hand up. | Use a sharp tip to press into the reset hole to reset the built-in microcomputer. |
| Display no indication or abnormal indication | Built-in microcomputer hand up. | Use a sharp tip to press into the reset hole to reset the built-in microcomputer. |
RESET
If this product does not operate properly, insert the tip of an unbent paperclip (or similar) into the opening to reset the display and memory as the figure shown below.
In case of malfunction due to electrostatic discharge, please reset the product (reconnection of power source may be required) to resume normal operation.
GB 027.
SPECIFICATIONS
Power source AC230V\~50Hz
DC 3V - 1 pc of "CR2025" lithium battery (included) or equivalent for remote handset
Power consumption AG-22 Watts
Dimension Unit 340 (W) x 151 (D) x 320 (H) mm (including support plate)
340 (W) x 102 (D) x 320 (H) mm (without support plate)
Speaker 200 (W) x 143 (D) x 320 (H) mm (including support plate)
200 (W) x 94 (D) x 320 (H) mm (without support plate)
Tuning range/sensitivity AM-530 \~ 1710 kHz/2000 μV/m

MORE INFORMATION


Caution:
You care for your hearing, and so do we.
Therefore, use caution while using this appliance.
Our recommendation: Avoid high volumes.
Children should be supervised while using headphones; make sure that the appliance is not set to high volume.
Caution!
High volumes may cause irreparable damage to children's ears.
GB 028.

NEVER let allow anyone, especially children, to put objects into the holes, slots or openings on this devise. This may lead into death due to electric shock. The device must only be opened by a qualified assistant.

Only use the appliance for its intended purpose. This device may only be used in housings and business premises.

Please keep this instruction manual for further reference.

Instructions on environment protection
Do not dispose of this product in the usual household garbage at the end of its life cycle; hand it over at a collection point for the recycling of electrical and electronic appliances. The symbol on the product, the instructions for use or the packing will inform about the methods for disposal.
The materials are recyclable as mentioned in its marking. By recycling, material recycling or other forms of re-utilization of old appliances, you are making an important contribution to protect our environment.
Please inquire at the community administration for the authorized disposal location.

Do not obstruct the ventilation of the device. Make sure, that no curtains, newspapers, furniture or any other type of object are blocking the ventilation system of the apparatus. The ventilation system must be clear of objects at all times! Overheating may lead into serious damage of the device and reduce its performance and lifespan.

Heat and warmth
Do not expose the appliance to direct sunlight. Make sure that the appliance is not subject to direct heat sources such as heaters or open fire. Make sure that the ventilation slots of the appliance are not covered.

Moisture and cleaning
This appliance is not waterproof! Do not immerse player in water. Do not allow player to come in contact with water. If water gets inside the player it may cause serious damage. Do not use cleaning agents that contain alcohol, ammoniac, benzene or abrasives as these could damage the player. For cleaning, use a soft, moistened cloth.
MODEL 2444MP3
CHAÎNE HI-FI DESIGN AVEC LECTEUR CD VERTICAL ET SYNTONISEUR PLL

RISQUE D'ELECTROCUTION. NE PAS OUVRIR
ATTENTION: AFIN DE REDUIRE LES RISQUES D'ELECTROCUTION, NE PAS RETIRER LE COUVERCLE (OU LE DOS), AUCUNE PIECE A L'INTERIEUR N'EST UTILE AU CONSOMMATEUR. POUR UN DEPANNAGE, SE REFERER AU PERSONNEL QUALIFIE.

SÉCURITÉ RELATIVE AU LASER
text_image
Labeled diagram of a device interior with numbered components for identification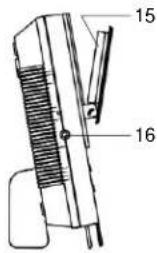
text_image
Technical diagram of a mechanical device with labeled parts 15 and 16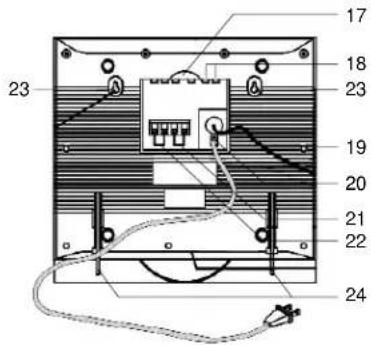
text_image
Technical diagram of an electronic device with numbered components and wiring connections
text_image
26 25 36 37 27 28 29 30 31 32 33 43 34 35 44 38 39 40 41 42MISE EN PLACE ET CONNEXION
natural_image
Diagram of a computer monitor with scroll arrows indicating rotation (no text or symbols)Bouton ▶ PLAY / PAUSE (9, 29)
Bouton ▶ PLAY / PAUSE (9, 29)
340 (L) x 102 (P) x 320 (H) mm (sans la plaque de support)
200 (L) x 94 (P) x 320 (H) mm (sans la plaque de support)
Portée Tuning/sensitivité AM-530 \~ 1710 kHz/2000 μV/m
FM 87.5 - 108MHz/18uV
Notre recommandations: Evitez les volumes forts.
text_image
Technical diagram of a mechanical device with labeled parts 15 and 16
text_image
Labeled diagram of an electronic device interior with numbered components and wiring connections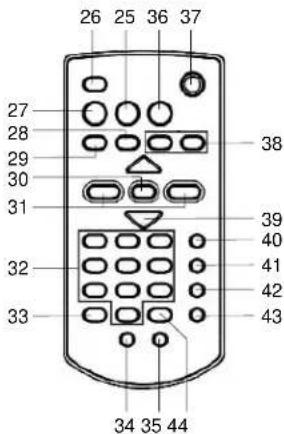
text_image
26 25 36 37 27 28 29 30 31 32 33 34 35 44 38 39 40 41 42 43natural_image
Diagram of a computer monitor with scroll arrows indicating rotation (no text or symbols)▶ PLAY / PAUSE (9, 29) gomb
▶ PLAY / PAUSE (9, 29) gomb
natural_image
Technical line drawings of a mechanical device with labeled angles (30°, 60°, 90°) and no visible text or symbols.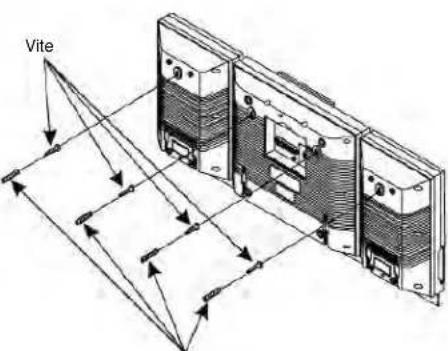
text_image
Vitetext_image
Labeled diagram of an electronic device interior with numbered components
text_image
26 25 36 37 27 28 29 30 31 32 33 43 34 35 44 38 39 40 41 42natural_image
Diagram of a computer monitor with scroll arrows indicating rotation (no text or symbols)Collegamento casse
natural_image
Technical line drawings of a mechanical device with labeled angles (30°, 60°, 90°) and no visible text or symbols.
text_image
TornilloTacos de plástico
E 074. E 074.
text_image
Technical diagram of an electronic device with numbered components and wiring connectionsCONTROL REMOTO
natural_image
Diagram of a computer monitor with scroll arrows indicating rotation (no text or symbols)natural_image
Technical line drawings of a mechanical device with two views (front and side), showing internal components and angular measurements (no text or symbols)PARA MONTAGEM EM PAREDES:
text_image
Technical diagram of a mechanical device with labeled parts 15 and 16
text_image
Technical diagram of an electronic device with numbered components and wiring, likely a display or control panel.
text_image
26 25 36 37 27 28 29 30 31 32 33 34 35 44 38 39 40 41 42 43MONTAGEM E CONEXÃO
natural_image
Diagram of a computer monitor with scroll arrows indicating rotation (no text or symbols)Para Cancelar as faixas programadas
Para cancelar as faixas programadas
text_image
Labeled diagram of an electronic device interior with numbered components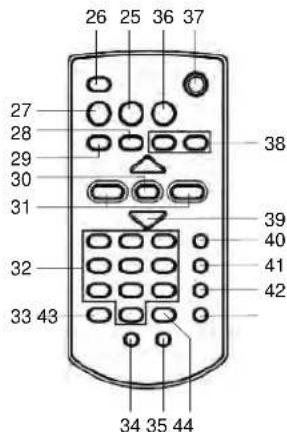
text_image
26 25 36 37 27 28 29 30 31 32 33 43 34 35 44 38 39 40 41 42PODŁACZENIE I USTAWIANIE
natural_image
Diagram of a computer monitor with scroll arrows indicating rotation (no text or symbols)DODATKOWE INFORMACJE

DRUPWATER WAARSCHUWING
VENTILATIE WAARSCHUWING
DIT IS EEN KLASSE 1 LASER PRODUCT
natural_image
Technical line drawings of a mechanical device with labeled angles (30°, 60°, 90°) and no visible text or symbols.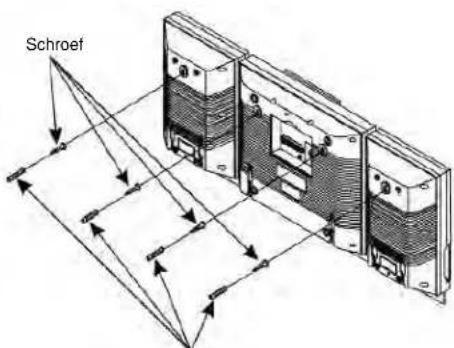
text_image
SchroefPlastic steun
NL 0116.
BEDIENINGSELEMENTEN HOOFDEENHEID
- Display
- Power indicateur
- VOL Toets
- POWER Toets
- CD DEUR
OPEN/CLOSE Toets
text_image
Labeled diagram of a device interior with numbered components for identification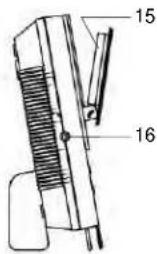
text_image
15 16
text_image
Technical diagram of an electronic device with numbered components and wiring, likely a display or control panel.AFSTANDBEDIENING
natural_image
Diagram of a computer monitor with scroll arrows indicating rotation (no text or symbols)Playback systeem-Vertical type CD mechanism
Frequentie 100 - 18,000 Hz
Power 2.5 Watt @ 10% THD per kanaal
Speaker impedantie 3.2 Ω
natural_image
Technical line drawings of a mechanical device with no visible text or symbols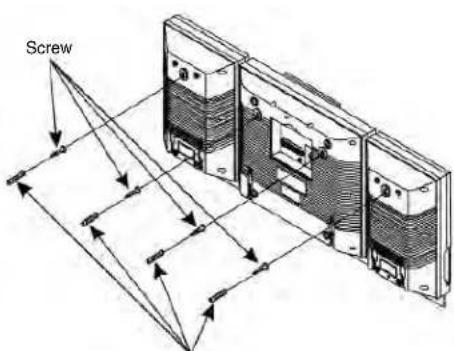
text_image
ScrewPlastic Anchor
OVLÁDÁNÍ
HLAVNÍ JEDNOTKA
text_image
Technical diagram of an electronic device rear panel with numbered components and wiring connections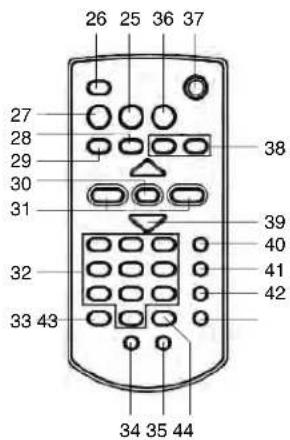
text_image
26 25 36 37 27 28 29 30 31 32 33 43 34 35 44 38 39 40 41 42NASTAVENÍ A PROPOJENÍ
natural_image
Diagram of a computer monitor with scroll arrows indicating rotation (no text or symbols)DOPLŇUJÍCÍ INFORMACE