2383 - Hi-fi system ELTA - Free user manual and instructions
Find the device manual for free 2383 ELTA in PDF.
User questions about 2383 ELTA
0 question about this device. Answer the ones you know or ask your own.
Ask a new question about this device
Download the instructions for your Hi-fi system in PDF format for free! Find your manual 2383 - ELTA and take your electronic device back in hand. On this page are published all the documents necessary for the use of your device. 2383 by ELTA.
USER MANUAL 2383 ELTA
natural_image
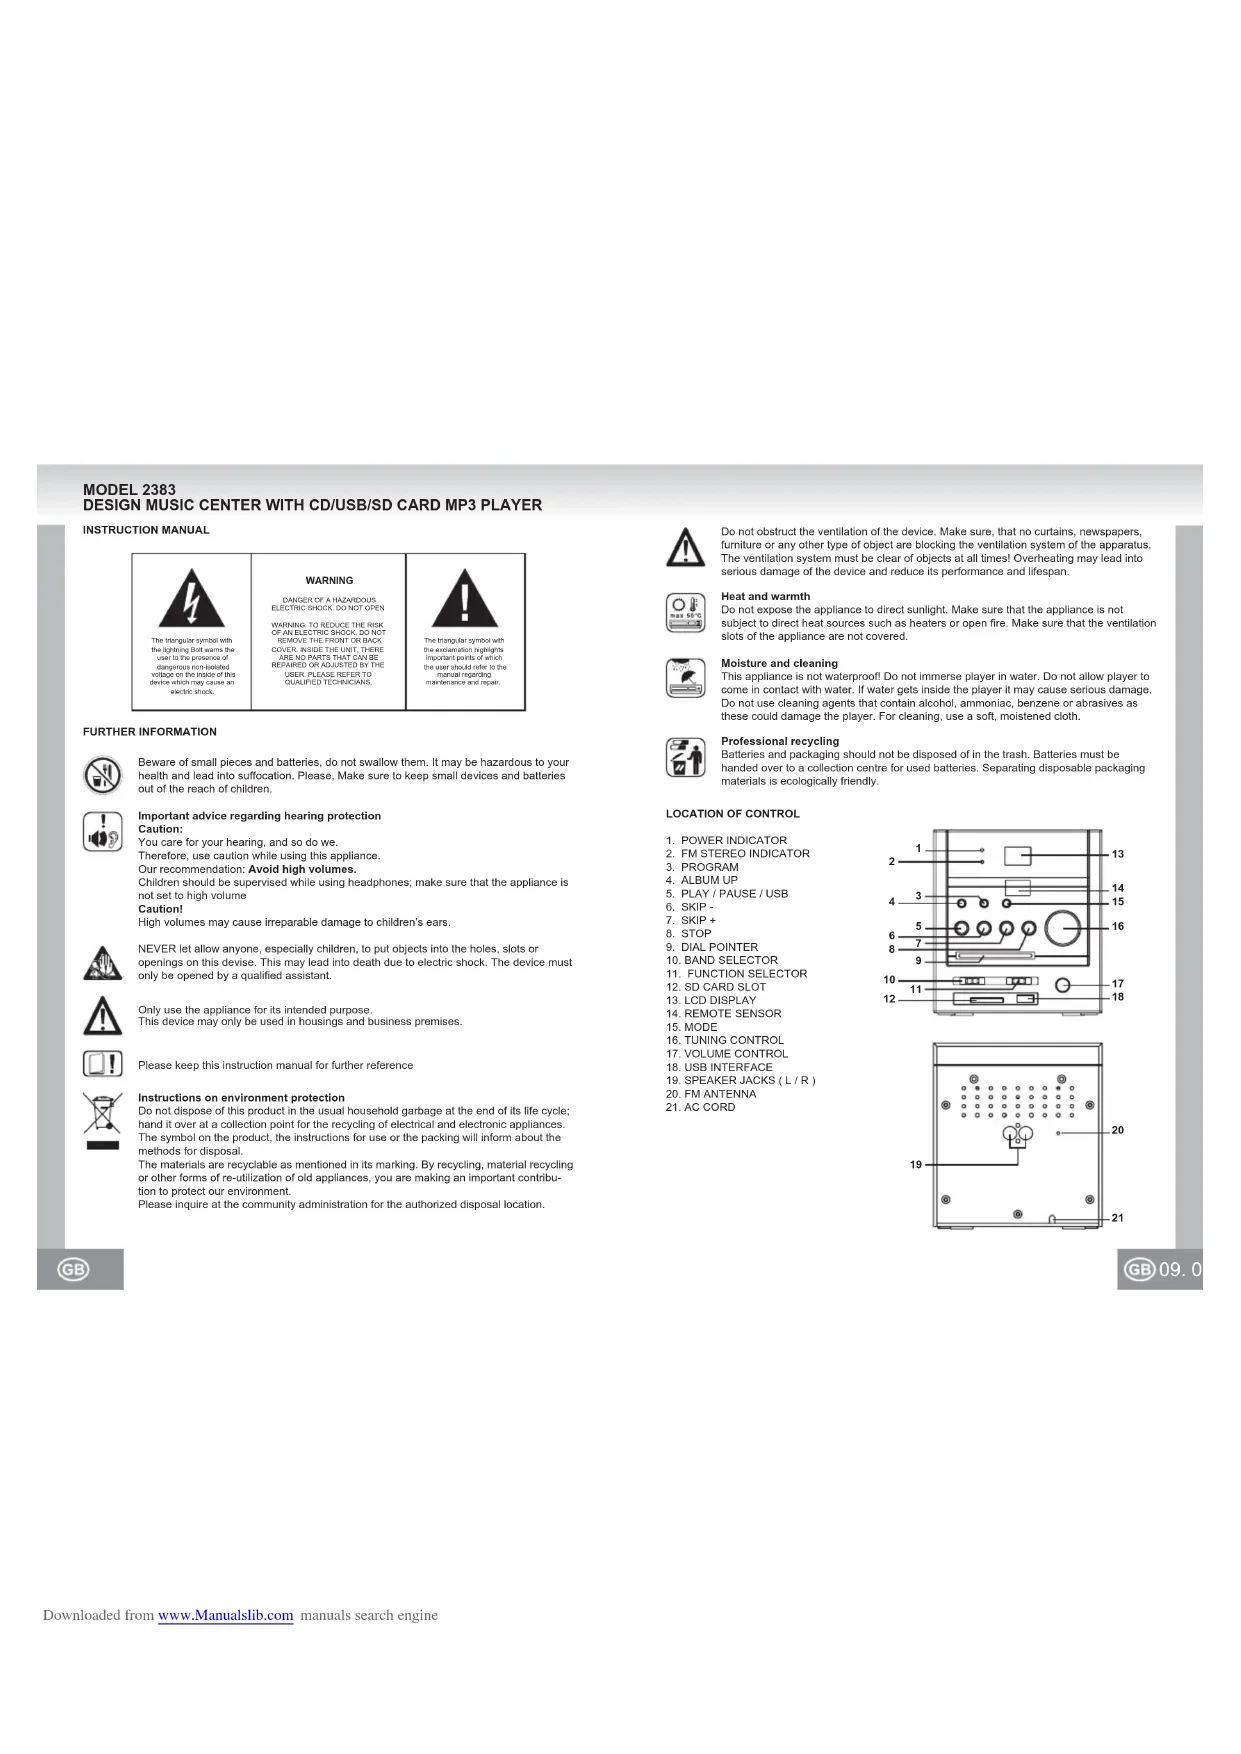
Exterior view of a desktop audio workstation with two speakers and a digital display unit (no visible text or labels)DESIGN MUSIC CENTER MIT CD/USB/SD-CARD MP3 PLAYER
CADENA MUSICAL DE DISEÑO CON REPRODUCTOR DE CD/USB/SD-CARD MP3
DESIGN MUSIC CENTER WITH
APARELHO DE MÚSICA DE DESIGN COM LEITOR DE CDS/USB/SD-CARD E MP3 PT
CHAINE HI-FI DESIGN AVEC LECTEUR
STYLIZOWANY ZESTAW MUZYCZNY Z ODTWARZACZEM MP3 NA CD/USB I KARTY SD PL
CD/USB/SD CARD, LECTEUR MP3
H DESIGN MUSIC CENTER MET CD/USB/SD-KAART MP3-SPELER NL
FORMATERVEZETT MINI TORONY, CD-S/USB-S/SD-KÁRTYÁS MP3 LEJÁTSZÓVAL
H DESIGN MUSIC CENTER MET CD/USB/SD-KAART MP3-SPELER NL
MUSIC CENTER CON LETTORE CD/USB/SD E DI SCHEDA MP3
CD/USB/CD-CARD MP3 ÇALARLI DESIGN MÜZIK MERKEZI TR
0701
MODELL 2383
DESIGN MUSIC CENTER MIT CD/USB/SD-CARD MP3 PLAYER
BEDIENUNGSANLEITUNG
FM / FM STEREO EMPFANG
PLAY / PAUSE / USB ▶
PLAY / PAUSE / USB ▶
text_image
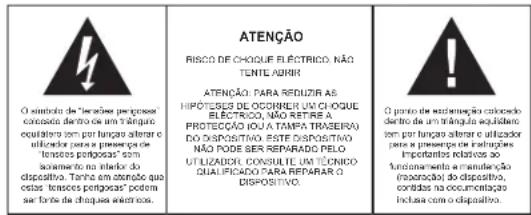
The triangular symbol with the lighting unit warns the user in the presence of dangerous non-isolated voltage on the intake of this device which may cause an electric shock. WARNING DANCER OF A HAZARDOUS ELECTRIC SHOCK, DO NOT OPEN WARNING: TO REDUCE THE RISK OF AN ELECTRIC SHOCK,DO NOT REMOVE THE FRONT OR BACK COVERS INSIDE THE UNIT, THERE ARE NO PARTS THAT CAN BE REPAIRED OR ADJUSTED BY THE USER. PLEASE REFER TO QUALIFIED TECHNICians. The triangular symbol with the examination highlights important points of which the user should refer to the measure regarding maintenance and repair.FURTHER INFORMATION

Beware of small pieces and batteries, do not swallow them. It may be hazardous to your health and lead into suffocation. Please, Make sure to keep small devices and batteries out of the reach of children.

Important advice regarding hearing protection Caution:
You care for your hearing, and so do we.
Therefore, use caution while using this appliance.
Our recommendation: Avoid high volumes.
Children should be supervised while using headphones; make sure that the appliance is not set to high volume
Caution!
High volumes may cause irreparable damage to children's ears.

NEVER let allow anyone, especially children, to put objects into the holes, slots or openings on this devise. This may lead into death due to electric shock. The device must only be opened by a qualified assistant.

Only use the appliance for its intended purpose.
This device may only be used in housings and business premises.

Please keep this instruction manual for further reference

Instructions on environment protection
Do not dispose of this product in the usual household garbage at the end of its life cycle; hand it over at a collection point for the recycling of electrical and electronic appliances. The symbol on the product, the instructions for use or the packing will inform about the methods for disposal.
The materials are recyclable as mentioned in its marking. By recycling, material recycling or other forms of re-utilization of old appliances, you are making an important contribution to protect our environment.
Please inquire at the community administration for the authorized disposal location.

Do not obstruct the ventilation of the device. Make sure, that no curtains, newspapers, furniture or any other type of object are blocking the ventilation system of the apparatus. The ventilation system must be clear of objects at all times! Overheating may lead into serious damage of the device and reduce its performance and lifespan.

Heat and warmth
Do not expose the appliance to direct sunlight. Make sure that the appliance is not subject to direct heat sources such as heaters or open fire. Make sure that the ventilation slots of the appliance are not covered.

Moisture and cleaning
This appliance is not waterproof! Do not immerse player in water. Do not allow player to come in contact with water. If water gets inside the player it may cause serious damage. Do not use cleaning agents that contain alcohol, ammoniac, benzene or abrasives as these could damage the player. For cleaning, use a soft, moistened cloth.

Professional recycling
Batteries and packaging should not be disposed of in the trash. Batteries must be handed over to a collection centre for used batteries. Separating disposable packaging materials is ecologically friendly.
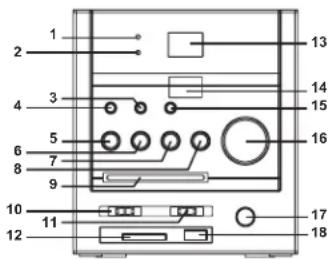
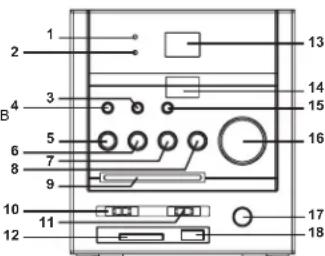
LOCATION OF CONTROL
-
POWER INDICATOR
-
FM STEREO INDICATOR
-
PROGRAM
-
ALBUM UP
-
PLAY / PAUSE / USB
-
SKIP
-
SKIP +
-
STOP
-
DIAL POINTER
-
BAND SELECTOR
-
FUNCTION SELECTOR
-
SD CARD SLOT
-
LCD DISPLAY
-
REMOTE SENSOR
-
MODE
-
TUNING CONTROL
-
VOLUME CONTROL
-
USB INTERFACE
-
SPEAKER JACKS (L/R)
-
FM ANTENNA
-
AC CORD
text_image
1 2 3 4 5 6 7 8 9 10 11 12 13 14 15 16 17 18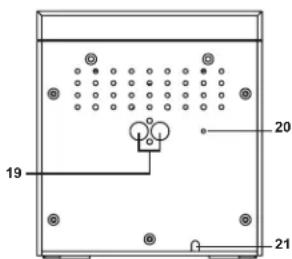
text_image
19 20 21PREPARATION FOR USE
INSTALLATION
- Unpack all parts and remove protective material.
- Insert the batteries into the remote control transmitter.
- Do not connect the unit to the mains before checking the mains voltage and before all other connections have been made.
- Do not cover any vents and make sure that there is a space of several centimetres around the unit for ventilation.
CONNECTIONS
1) Connect left and right speaker to left and right speaker jacks.
2) Before connecting the unit to the mains, make sure that the AC voltage printed on the back plate is the same as the AC voltage from your wall outlet.
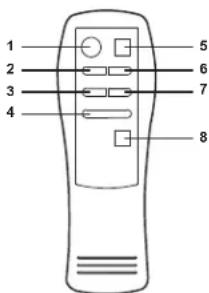
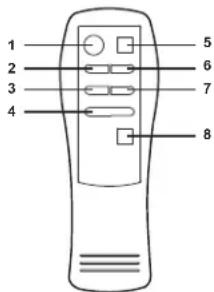
REMOTE CONTROL
- PLAY / PAUSE / USB
- SKIP -
- PROGRAM
- ALBUM UP
- STOP
- SKIP +
- MODE
- +10 TRACK
text_image
1 2 3 4 5 6 7 8BATTERY INSTALLATION
Insert 2 x "AAA" size batteries into the battery compartment. Be sure that the batteries are inserted correctly to avoid damage to the remote control. Always remove the batteries when the remote control will not be used for a long period of time, as this will cause leakage to the batteries and subsequently damage to your set.
Notes:
- Use batteries of the same type. Never use different types of batteries together.
- If the distance required between the remote control and the appliance decreases, the batteries are exhausted. In this case replace the batteries with new one.
SENSOR WINDOW OF THE RECEIVER
- Even if the remote control is operated within the effective range, its operation may be impossible if there are any obstacles between the appliance and the remote control.
- If the remote control is operated near other appliances which generate infrared rays, or if other remote control devices using infrared rays are used near the appliance, it may operate incorrectly.

RADIO OPERATION
GENERAL OPERATION
- Set the "FUNCTION" selector to "RADIO" mode.
- Select desired band by using the "BAND" selector.
- Adjust radio frequency to your desired station by using the "TUNING" control.
- Adjust the "VOLUME" control to the desired level.
FM / FM-STEREO RECEPTION
- Set the "BAND" selector to FM mode for MONO reception.
- Set the "BAND" selector to FM ST. mode for FM STEREO reception. The Stereo indicator light up to show FM ST. mode.
FOR BETTER RECEPTION
FM - This appliance has a FM antenna located at the rear cabinet. This wire is completely unraveled and extended for better reception.
AM - This appliance is equipped with a built-in directional ferrite AM antenna. Rotate the appliance to get better reception.
PLAY / PAUSE / USB ▶
Press to start playing CD / MP3 / WMA disc.
Press again to stop playing CD / MP3 / WMA operation temporarily.
Press again to resume playback.
Press to go to the next track or back to the previous track.
Press and hold while playing until you find the point of the sound.
STOP ■
Press to stop all CD / MP3 / WMA operation.
PLAYBACK
- Set the "FUNCTION" selector to "CD / MP3 / WMA / USB / SD" mode.
- Open the CD door and place a CD / MP3 / WMA disc with the label up in the CD compartment.
- Close the CD door.
- Focus search is performed if disc is inside.
For CD disc - Total number of tracks is read and appears on the display.
For WMA disc - "WMA" appears on the display.
For MP3 disc - "MP3" appears on the display. - Press the "PLAY / PAUSE / USB" button to start playing CD / MP3 / WMA disc.
- Adjust the "VOLUME" control to the desired level.
- Press the "PLAY / PAUSE / USB" button again when you want to stop playback temporarily.
- Press the "STOP" button when finished.

11.1
PROGRAM
Up to 20 tracks can be programmed for disc play in any order.
Be sure to press the "STOP" button before use
- Press the "PROGRAM" button, the display will show "P01" and flash.
- Select desired track by using the "SKIP +" or "SKIP -" button. (You may select a desired album by pressing "ALBUM UP" button.)
- Press the "PROGRAM" button again to confirm desired track into the program memory.
- Repeat step 2 and 3 to enter additional tracks into the program memory.
- When all the desired tracks have been programmed, press the "PLAY / PAUSE / USB" button to play the disc in the order you have programmed.
- Press the "STOP" button twice to terminate programmed playback.
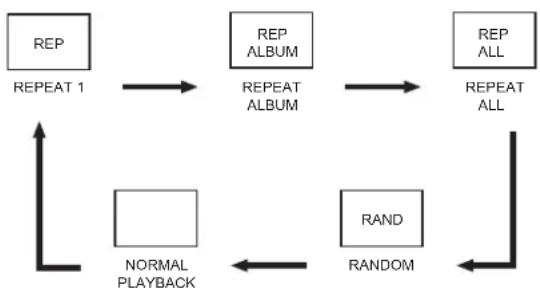
MODE
Press the "MODE" button before or during playing CD / MP3 / WMA disc, each press switches the mode function as follows:
1 - REPEAT 1
2 - REPEAT ALBUM (*MP3 / WMA ONLY)
3 - REPEAT ALL
4 - RANDOM
5 - NORMAL PLAYBACK
flowchart
graph TD
    A["REP"] --> B["REPEAT 1"]
    B --> C["REPEAT ALBUM"]
    C --> D["REPEAT ALL"]
    D --> E["RAND"]
    E --> F["NORMAL PLAYBACK"]
    F --> G["RANDOM"]
    G --> H["REPEAT ALL"]
USB / SD OPERATION
GENERAL OPERATION
PLAY / PAUSE / USB ▶
Press to start playing tracks from the USB / SD card.
Press again to stop playing USB / SD operation temporarily.
Press again to resume playback.
Press to go to the next track or back to the previous track.
Press and hold while playing until you find the point of the sound.
STOP ■
Press to stop all USB / SD operation.
PLAYBACK
- Plug or slot in USB / SD card device to the port. (Make sure no disc on disc tray)
- Set the "FUNCTION" selector to "CD / MP3 / WMA / USB / SD" mode.
- Press and hold the "PLAY / PAUSE / USB" button for a few seconds to entry USB / SD mode.
- Playback will start automatically from the first track
- Press the "STOP" button when finished.
- Press the "PLAY / PAUSE / USB" button again, playback will start from the first track.
PROGRAM, MODE
The operation of PROGRAM, MODE are as the same as that of CD / MP3 / WMA. Please refer to CD / MP3 OPERATION.
SPECIFICATIONS
GENERAL
Power supply : AC 230V \~ 50Hz
Frequency range : AM 525 - 1615kHz
: FM 87.5 - 108MHz
(Specification subjects to be changed without notice.)
MODELL 2383
CHAINE HI-FI DESIGN AVEC LECTEUR CD/USB/SD CARD, LECTEUR MP3
MANUELD'UTILISATION
- Establishment of the
PLUS D'INFORMATIONS

PLAY / PAUSE / USB ▶
PLAY / PAUSE / USB ▶
PLAY / PAUSE / USB ▶
PLAY / PAUSA / USB ▶
PROGRAMMAZIONE, MODE
PLAY / PAUSE / USB ▶
PLAY / PAUSE / USB ▶
MANUAL DE INSTRUÇÕES
PLAY / PAUSE / USB ▶
PLAY / PAUSE / USB ▶
PLAY / PAUSE / USB ▶
-
GÜÇ GÖSTERGESİ
-
FM STEREO GOSTERGESI
-
PROGRAM
-
ALBÜM AÇMA
-
PLAY(CALMA)/PAUSE(DURAKLAT)/USB
-
ATLAMA
-
ATLAMA +
8 DUR
-
KADRAN GÖSTERGESİ
-
BANT SEÇİCİ
-
FONKSION SECİCİ
-
SD KART DELIĞI
-
LCD EKRAN
-
UZAKLIK SENSÖRÜ
-
AYAR
-
DÜZENLEME KONTROLÜ
-
SES KONTROLÜ
-
USB ARAYÜZU
-
HOPARLÖR GİRİŞİ [L(SOL)/R(SAĞ)]
-
FM ANTENI
-
AC (ALTERNATİF GÜÇ) KABLOSU
text_image
1 2 3 4 5 6 7 8 9 10 11 12 13 14 15 16 17 18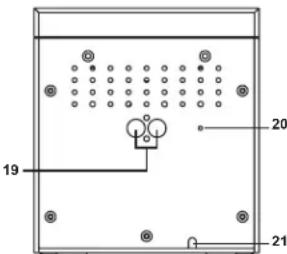
text_image
19 20 21
57.5
ÝLK KULLANIMDAN EVVEL
KURULUM
• TÜM AMBALAJLARÝ VE KORUMA KAPLAMALARÝNÝ ÇÝKARTÝNÝZ.
• UZAKTAN KUMANDAYA PILLERI YERLEPTIRINIZ.
• TÜM BAÖLANTÝLARÝ KONTROL ETMEDEN VE BAÖLANTÝLARÝ SAÖLAMADAN VE ELEKTRIK SEVIYESINI KONTROL ETMEDEN, CIHAZÝN ELEKTRIK BAÖLANTÝSYŃY KURMAYÝNÝZ.
• HAVALANDÝRMA DELIKLERINI KAPATMAYÝNÝZ. CIHAZÝN ÇEVRESINE BIR KAÇ SANTIM HAVALANDÝRMA MESAFESI BYRAKÝNÝZ.
BADLANTILAR
- SAĐ VE SOL HOPARLÖR BAÖLANTÝLARYŃY SAĐ VE SOL BAÖLANTÝ GIRIPLERINE TAKÝNÝZ.
- CIHAZYN ELEKTRIK BAÖLANTYSYNY KURMADAN EVVEL, CIHAZYN ARKASYNDA BULUNAN ETIKETTEKI ELEKTRIK SEVIYESINI KONTROL EDINIZ.
UZAKTAN KUMANDA
- PLAY (ÇALMA) /PAUSE (DURAKLAT) /USB
- ATLAMA -
- PROGRAM
- ALBÜM ACMA
- DUR
- ATLAMA +
- AYAR
- +10 PARCA