2382IP - Hi-fi system ELTA - Free user manual and instructions
Find the device manual for free 2382IP ELTA in PDF.
| Product type | Compact hi-fi system with CD player, radio, USB, SD card, iPod docking station |
| Power supply | AC 230V, 50Hz |
| Power consumption | 38 watts |
| AM radio | 525 - 1615 KHz |
| FM radio | 87.5 - 108 MHz |
| Compatible disc types | CD, CD-R, CD-RW, CD-DA, MP3 |
| CD frequency response | 60 - 16,000 Hz (-3dB) |
| CD signal-to-noise ratio | > 60 dB |
| CD harmonic distortion | < 0.3% |
| Memory card reader | Yes, MMC card slot |
| USB port | Yes |
| iPod docking station | Yes, dedicated port with charging |
| Headphone output | Jack sockets |
| Remote control | Yes, with UM4/AAA/R03 batteries |
| Audio functions | Preset equalizer (Classic, Rock, Pop, Jazz, etc.), random playback, repeat, track programming |
| RDS radio | Yes, station information display |
| Sleep function | Yes, sleep timer |
| CD anti-shock protection | ESP (10 seconds) |
| Auxiliary input | Yes, stereo jack socket |
| Antenna | Telescopic FM antenna |
| Cleaning | Soft, damp cloth, without harsh solvents |
| Operating temperature | Ambient temperature, avoid heat sources |
| Weight | Approx. 5 kg (estimate) |
| Dimensions (W x H x D) | Approx. 40 x 25 x 30 cm (estimate) |
Frequently Asked Questions - 2382IP ELTA
User questions about 2382IP ELTA
0 question about this device. Answer the ones you know or ask your own.
Ask a new question about this device
Download the instructions for your Hi-fi system in PDF format for free! Find your manual 2382IP - ELTA and take your electronic device back in hand. On this page are published all the documents necessary for the use of your device. 2382IP by ELTA.
USER MANUAL 2382IP ELTA
natural_image
Exterior view of a modern audio recording device with two speakers, a control panel, and a remote (no visible text or symbols)DESIGN MUSIC-CENTER MIT CD/USB/SD-CARD ① - MP3-PLAYER UND IPOD DOCKING STATION
DESIGN MUSIC CENTER WITH CD/USB/SD CARD ③B - MP3 PLAYER AND IPOD DOCKING STATION
CHAÎNE HI-FI DESIGN AVEC LECTEUR Ⓞ CD/USB/CARTE SD - MP3 ET STATION DE DOCKAGE IPOD
FORMATERVEZETT MINI HIFI TORONY Ⓤ CD/USB/SD-KARTYA, MP3 LEJATSZOVAL ÉS IPOD DOKKOLÓ ÁLLOMÁSSAL
MUSIC-CENTER CON LETTORE DI SCHEDA ① CD/USB/SD - MP3 E STAZIONE DOCKING IPOD
EQUIPO DE MÚSICA DE DISEÑO CON REPRODUCTOR DE CD/USB/MP3 TARJETA SD Y PLATAFORMA PARA IPOD
SISTEMA DE SOM DESIGN COM LEITOR DE CD/USB/SD/MP3 E IPOD DOCKING STATION
CENTRUM MUZYCZNE Z CD/USB/MP3 I PL CZYTNIKIEM KART SD ORAZ STACJA DOKUJĄCA IPOD
DESIGN MUSIC-CENTER MET Ⓜ CD/USB/SD-KAART - MP3-SPELER EN IPOD DOCKING STATION
MIKROSYSTÉM S CD/USB/ČTEČKOU 📄 KARET SD - MP3 PŘEHRÁVAČEM A IPOD DOCKING STATION
CD/USB/SD KARTLI MP3 ÇALARLI VE İPOD VERİ AKTARMA İSTASYONLU DESIGN MÜZİK MERKEZİ
MODEL 2382IP
DESIGN MUSIC-CENTER MIT CD/USB/SD-CARD - MP3-PLAYER UND IPOD DOCKING STATION
KLASSE 1 LASERPRODUKT

ACHTUNG!
text_image
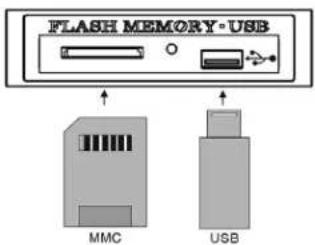
FLASH MEMORY-USB MMC USBRADIO/Bedienung
WARNING: To prevent fire or shock hazard, do not expose this appliance to rain or moisture.

The triangular symbol with the lightning Bolt warns the user to the presence of dangerous non-isolated voltage on the inside of this device which may cause an electric shock.
WARNING
DANGER OF A HAZARDOUS ELECTRIC SHOCK. DO NOT OPEN
WARNING: TO REDUCE THE RISK OF AN ELECTRIC SHOCK. DO NOT REMOVE THE FRONT OR BACK COVER. INSIDE THE UNIT. THERE ARE NO PARTS THAT CAN BE REPAIRED OR ADJUSTED BY THE USER. PLEASE REFER TO QUALIFIED TECHNICIANS.

The triangular symbol with the exclamation highlights important points of which the user should refer to the manual regarding maintenance and repair.
SAFETY PRECAUTION
This appliance must be disconnected from the mains when not in use. Do not allow this appliance to be exposed to rain or moisture.
CAUTION: To reduce the risk of electric shock, do not remove cover (or back). No user-serviceable parts inside. Refer servicing to qualified service personnel.
CLASS 1 LASER PRODUCT

CAUTION!
Invisible laser radiation when open and interlocks defeated. Avoid exposure to beam.
SAFETY INSTRUCTIONS
- READ INSTRUCTIONS - All the safety and operating instructions should be read before the appliance is operated.
- RETAIN INSTRUCTIONS - The safety and operating instruction should be retained for future reference.
- HEED WARNINGS - All warnings on the appliance and in the operating instructions should be adhered to .
- FOLLOW INSTRUCTIONS - All operating and use instructions should be followed.
- WATER AND MOISTURE - The appliance should not be used near water, for example, near a bathtub, washbowl, kitchen sink, laundry tub, swimming pool or in a wet basement.
- VENTILATION - The appliance should be situated so that its location or position does not interfere with its proper ventilation, for example; the appliance should not be situated on a bed, sofa, rug or similar surface that may block the ventilation openings; Do not place in built-in installation openings; such as a bookcase or cabinets that may impede the flow of air through the ventilation openings.
- HEAT - The appliance should be situated away from heat sources such as radiators, heat registers, stoves, or other appliance (including amplifiers) that produce heat.
- POWER SOURCES - The appliance should be connected to a power supply only of the type described in the operating instructions or as marked on the appliance.
- GROUNDING AND POLARISATION - Precautions should be taken to ensure that the grounding or polarisation means of the appliance are not defeated.
-
POWER CORD PROTECTION - Power supply cords should be routed so that they are not likely to be walked on or pinched by items placed upon or against them, paying particular attention to cords at plugs, convenience receptacles, and the point at which they exit from the appliance.
-
CLEANING - The appliance should be cleaned only as recommended by the manufacturer.
-
POWER LINES - An outdoor antenna should be located away from power lines.
-
NONUSE PERIODS - The power cord of the appliance should be unplugged from the outlet when the appliance is to be left unused for a long period of time.
-
OBJECT and LIQUID ENTRY - Care should be taken so that objects do not fall and liquids are not spilled into the enclosure through openings.
-
SERVICING - The user should not attempt to service the appliance beyond that described in the user's operating instructions. All other servicing should be referred to qualified service personnel.
-
DAMAGE REQUIRING SERVICE - The appliance should be serviced by qualified service personnel when:
A. The power-supply cord or plug has been damaged.
B. Objects have fallen into, or liquid has been spilled into the appliance enclosure.
C. The appliance has been exposed to rain.
D. The appliance has been dropped, or the enclosure damaged.
E. The appliance does not appear to operate normally or exhibits a marked change in performance
PREPARATION FOR USE
INSTALLATION
- Unpack all parts and remove protective material.
- Insert the batteries into the remote control transmitter.
- Do not connect the unit to the mains before checking the mains voltage and before all other connections have been made.
- Do not cover any vents and make sure that there is a space of several centimetres around the unit for ventilation.
CONNECTIONS
1) Connect left and right speaker to left and right speaker jacks.
2) Before connecting the unit to the mains, make sure that the AC voltage printed on the back plate is the same as the AC voltage from your wall outlet.
Bear in mind the following points as dirt; scratches or warping of the disc can cause broken or intermittent sound and also noise.
- When holding the discs, take care not to touch the playing surface.
- Do not place discs in the following locations:
Near a heating device or place where the temperature is high; In damp or dusty areas.
- Wipe away any fingerprints or dust on the playing surface of a disc using a soft cloth. Always wipe from the inside toward the outside of the disc.
LOADING THE DISC
- Press OPEN/CLOSE
- Insert a disc (printed side up) in the tray.
- Press OPEN/CLOSE to close the tray.
The display shows the discs total number of tracks.
CONTROLS AND FEATURES
-
STANDBY/ON button
-
LCD DISPLAY
-
FUNCTION button
-
REMOTE SENSOR
-
VOLUME+ button
-
VOLUME-button
-
MMC Card slot
-
TUNER/BAND button
-
PRESET EQ button
-
MEM/CLK-ADJ button
-
CD DOOR
-
HEADPHONE JACK
-
CD DOOR OPEN/CLOSE button
-
PLAY/PAUSE button
-
SKIP/TUNING button
-
SKIP/TUNING button
-
MMC Card and USB indicator
- USB Socket
- STOP button
- ALBUM/MEMORY CH. + button
- ALBUM/MEMORY CH. - button
- Random button
- FM antenna
- Speaker output
- Power cord
- I-POD SOCKET DOOR
- I-POD SOCKET
- AUX Right INPUT
- AUX Left INPUT
text_image
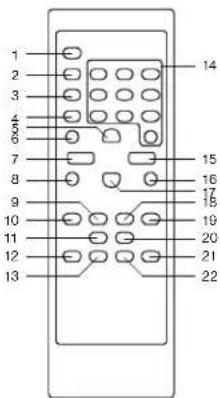
4 1 3 8 2 5 9 14 22 16 6 12 27 26 13 20 21 7 19 10 17 15 18 11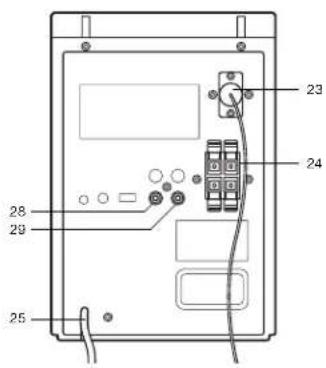
text_image
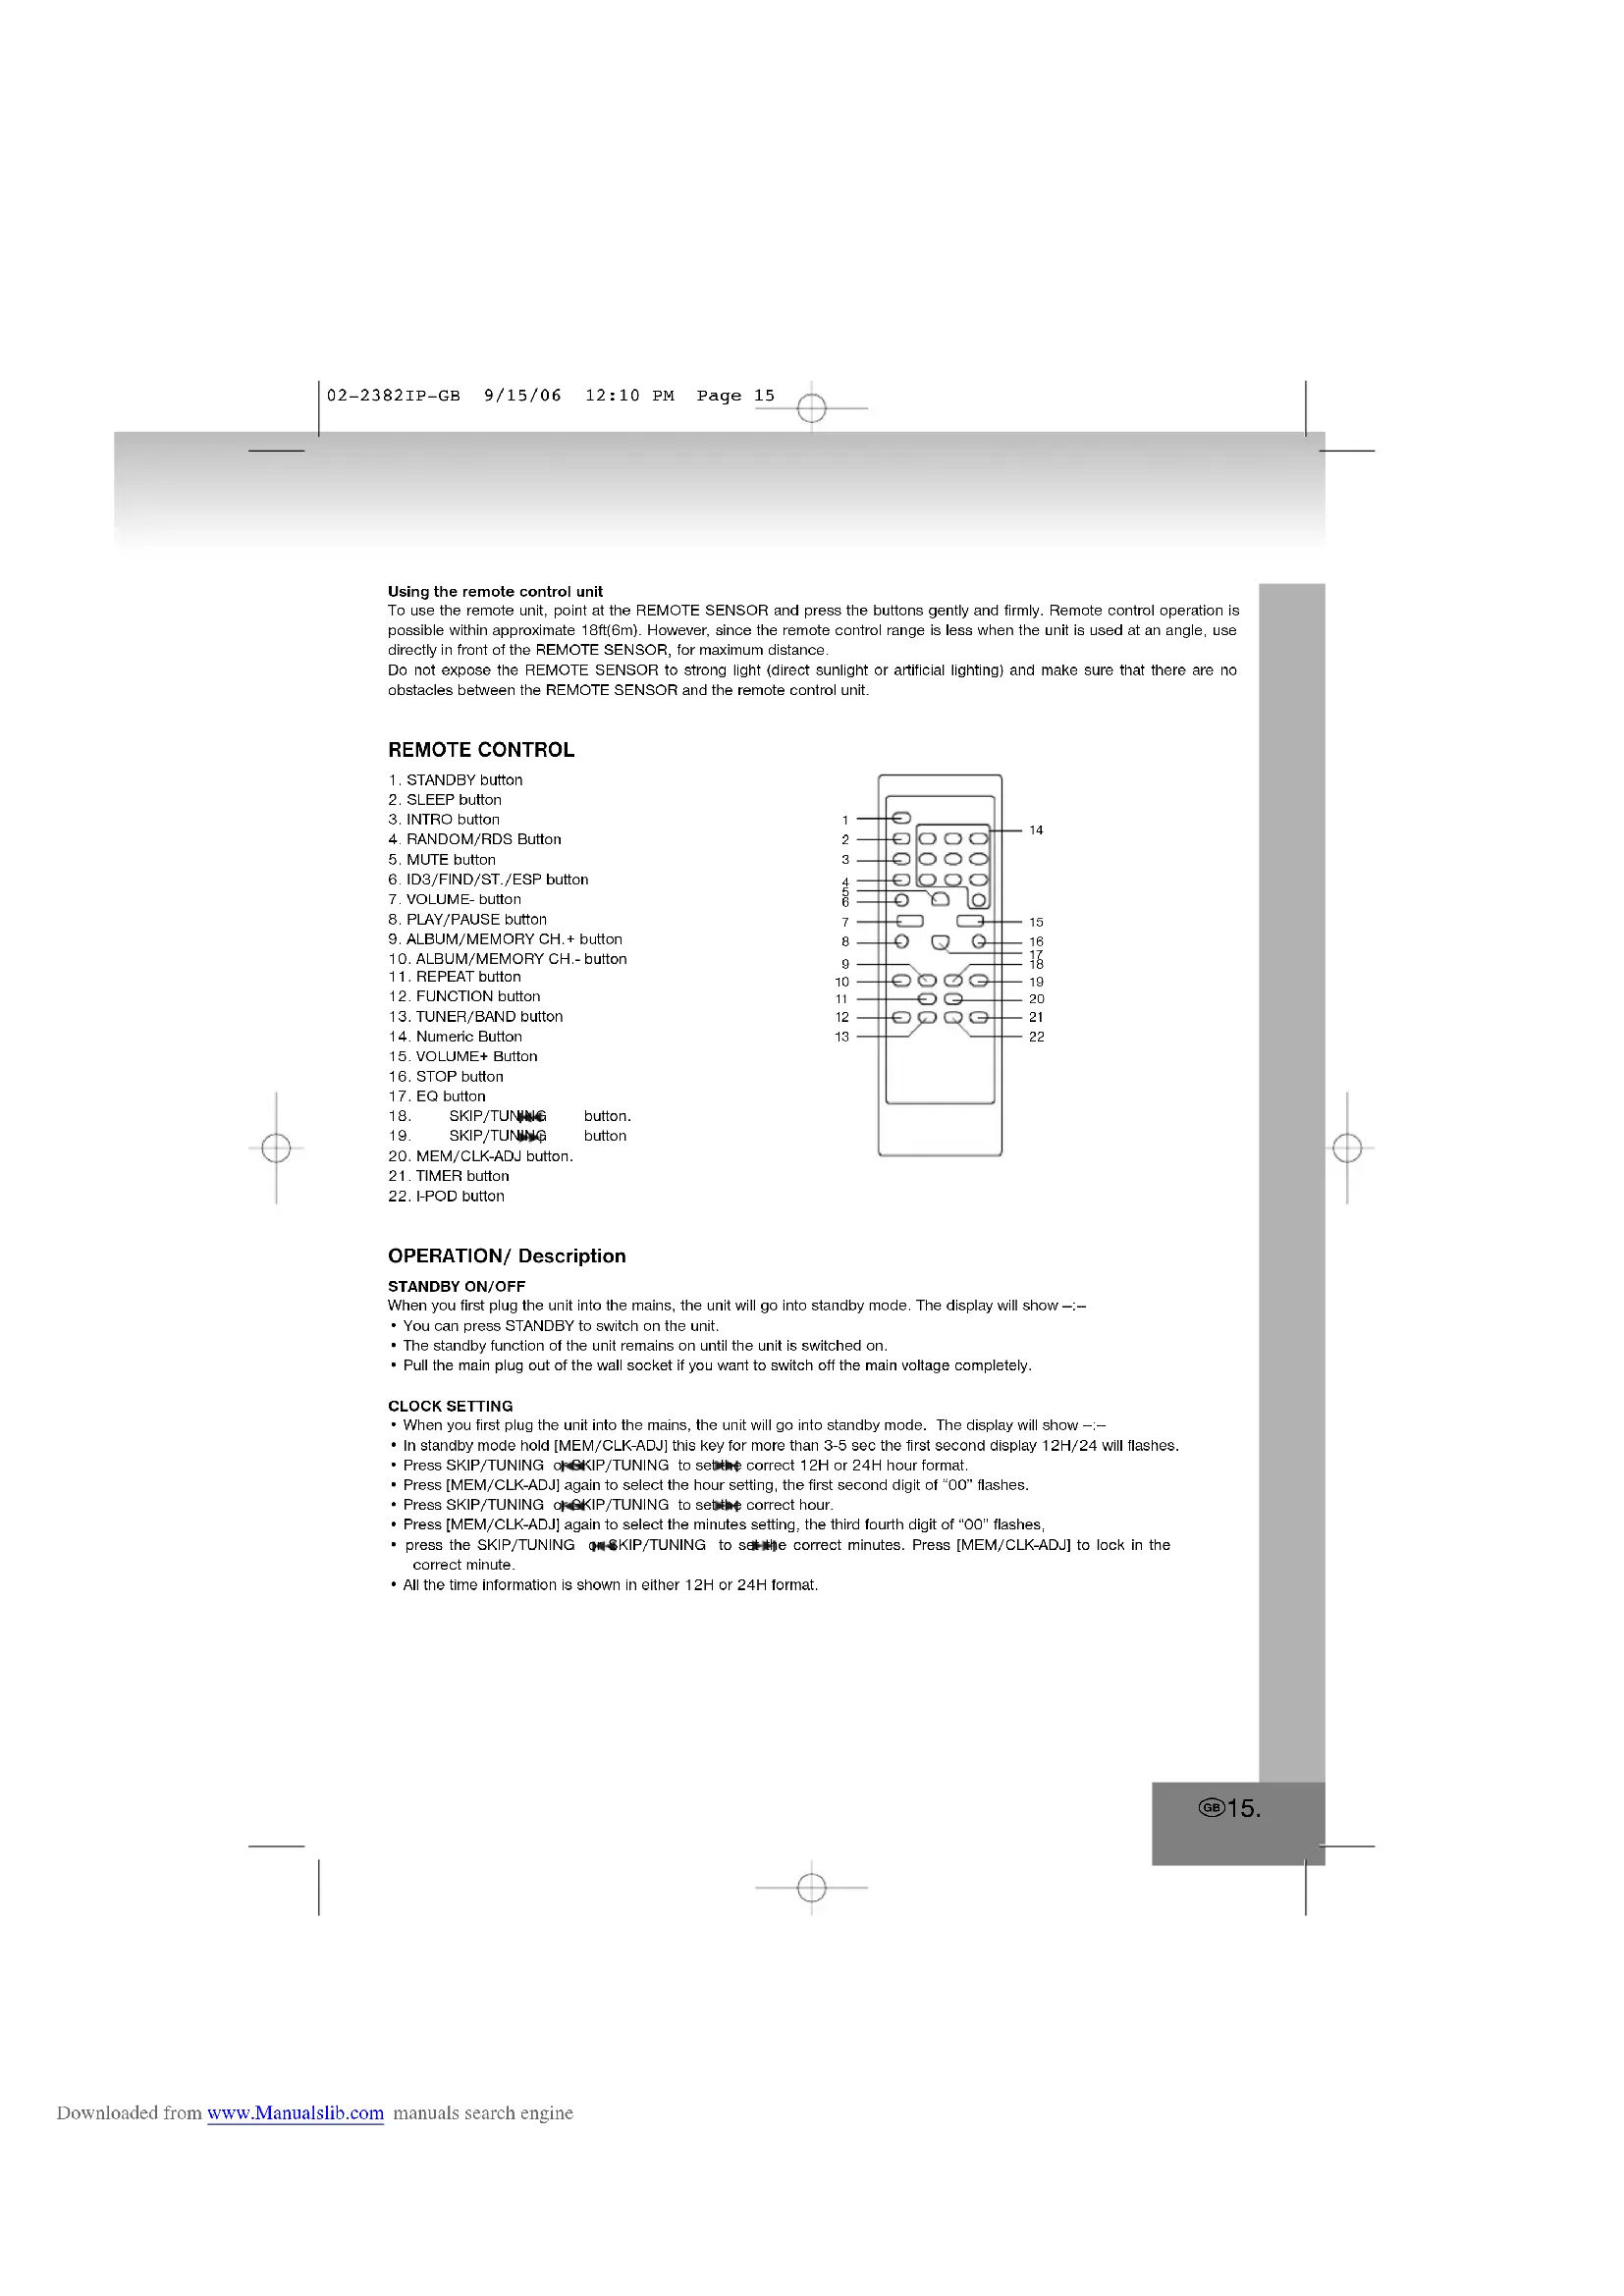
23 24 28 29 25REMOTE CONTROL FUNCTIONS
Preparation before use
• Installing batteries in the remote control unit
1. Remove the battery cover from the back of the remote control unit.
2. Insert two "UM4/AAA/R03" size batteries.
- Insert the batteries with the ④ and ④ terminals matching the indication inside the battery compartment.
3. Replace the cover.
- Battery replacement
- When the remote control operation becomes unstable or the distance from which the remote control works is shorter, replace the batteries with new ones.
Using the remote control unit
To use the remote unit, point at the REMOTE SENSOR and press the buttons gently and firmly. Remote control operation is possible within approximate 18ft(6m). However, since the remote control range is less when the unit is used at an angle, use directly in front of the REMOTE SENSOR, for maximum distance.
Do not expose the REMOTE SENSOR to strong light (direct sunlight or artificial lighting) and make sure that there are no obstacles between the REMOTE SENSOR and the remote control unit.
REMOTE CONTROL
-
STANDBY button
-
SLEEP button
-
INTRO button
-
RANDOM/RDS Button
-
MUTE button
-
ID3/FIND/ST./ESP button
-
VOLUME-button
-
PLAY/PAUSE button
-
ALBUM/MEMORY CH.+ button
-
ALBUM/MEMORY CH.- button
-
REPEAT button
-
FUNCTION button
-
TUNER/BAND button
-
Numeric Button
-
VOLUME+ Button
-
STOP button
-
EQ button
-
SKIP/TUNING button.
-
SKIP/TUNING button
-
MEM/CLK-ADJ button.
-
TIMER button
-
I-POD button
text_image
1 2 3 4 5 6 7 8 9 10 11 12 13 14 15 16 17 18 19 20 21 22OPERATION/ Description
STANDBY ON/OFF
When you first plug the unit into the mains, the unit will go into standby mode. The display will show —:
- You can press STANDBY to switch on the unit.
- The standby function of the unit remains on until the unit is switched on.
- Pull the main plug out of the wall socket if you want to switch off the main voltage completely.
CLOCK SETTING
- When you first plug the unit into the mains, the unit will go into standby mode. The display will show —
- In standby mode hold [MEM/CLK-ADJ] this key for more than 3-5 sec the first second display 12H/24 will flashes.
- Press SKIP/TUNING or SKIP/TUNING to set the correct 12H or 24H hour format.
- Press [MEM/CLK-ADJ] again to select the hour setting, the first second digit of "00" flashes.
- Press SKIP/TUNING or SKIP/TUNING to set the correct hour.
- Press [MEM/CLK-ADJ] again to select the minutes setting, the third fourth digit of "00" flashes,
- press the SKIP/TUNING @SKIP/TUNING to solve the correct minutes. Press [MEM/CLK-ADJ] to lock in the correct minute.
- All the time information is shown in either 12H or 24H format.
FUNCTION SELECT
- The function when it presses this key, the mode is changed.
- Display changes: TUNER > CD/MP3 > I-POD > AUX > CARD-USB >
PLAY/PAUSE
• To start playback or interrupt playback.
STOP
- In Play mode or Pause mode: Changing to Stop mode or Program Entry mode during program play.
• In Program Entry mode: Exit the Program Entry mode, clear program memory and change to Stop mode. - In Random Play mode: Changing to Stop mode and release Random function.
REPEAT
- CDDA Normal play: Repeat 1 track >Repeat all track>Repeat Off
• Music CDROM Normal play: Repeat 1 file > Repeat > all file > Repeat Album > Repeat Off - Random play mode: Random Repeat 1 track >Random play
- Program play mode: Repeat 1 program >?Repeat all program >Program play
MEMORY
CD/MP3 mode:
- Up to 64 tracks can be programmed.
- Press stop key to stop playing.
- Press MEM/CLK-ADJ key to turn on or off the program mode
- Change the track no by pressing the num. Key from remote directly.
- Press MEM/CLK-ADJ key again to save and increase the program step.
- After programmed all desired track, press play key to end the program mode.
- Press play key to start program play.
RADIO mode:
- Up to 30 stations in FM and 10 stations in AM can be programmed.
- FUNCTION Keys It is use to turn on the radio, and toggle the AM and FM band.
- To tune the frequency manually, press SKIP/TUNING ◆SKIP/TUNING key.
-
To tune the frequency automatically, hold the SKIP/TUNING ☐SKIP/TUNING key ▶panel for 2 second. The system will stop when next station is arrived.
-
To store the current radio station frequency, Press MEM/CLK-ADJ key.
-
Press MEMORY CH- or MEMORY CH+ key to select the memory position.
-
Press MEM/CLK-ADJ key again to store the frequency.
SKIP/TUNING
CD/MP3 Mode
- In stop mode: Change the starting play track [file] during stop mode, cyclic to the first track if it is in the last track.
- In Program Entry mode: Change to the next track [file] for program select.
- In Play mode, Pause mode, Program Play mode: Single pressed, skip the playing track [file] to next track [file] for normal play/pause mode, to next program index track [file] for program play/pause mode, to next random track [file] for random play/pause mode. Continue pressed, fast forward during play/pause when pressed more than 0.7 sec.
RADIO Mode:
• The receiving frequency is stepped up by pushing.
- Pushing this key for more than 0.7 sec starts auto tuning.
SKIP/TUNING
CD/MP3 Mode:
- In stop mode: Change the starting play track [file] during stop mode, cyclic to the last track [file] if it is in the first track [file]
- In Program Entry mode: Change to the previous track [file] for program select.
- In Play mode, Pause mode, Program Play mode: Single pressed, skip the playing track [file] to previous track [file] for normal play/pause mode, to previous program index track [file] for program play/pause mode. Continue pressed, fast forward during play/pause when pressed more than 0.7 sec.
RADIO Mode:
- The receiving frequency is stepped up by pushing.
- Auto-tuning is started by pushing this key for more than 0.7 sec.
ALBUM/MEMORY CH.+
MP3 Mode
• In stop mode: Skip the starting play folder to next folder during stop mode, cyclic to the first folder if it is in the last folder.
- In Program Entry mode: Change the album for program select to next folder's first album, cyclic to the first folder if it is in the last folder.
- In Normal Play mode: Skip the playing album to the next folder's first album.
RADIO Mode:
- the preset memory is called in ascending order.
ALBUM/MEMORY CH.-
MP3 Mode
- In stop mode: Skip the starting play folder to previous folder during stop mode, cyclic to the last folder if it is in the first folder.
- In Program Entry mode: Change the album for program select to previous folder's first album, cyclic . to the last folder if it is in the first folder.
- In Normal Play mode: Skip the playing album to the previous folder's first album.
RADIO Mode:
• The preset memory is called in descending order.
NUMERIC KEY
- select the desired track
- Press the play button to start playing.
INTRO
- By selecting this function on the remote control while in CD/MP3 mode, the first 10 seconds of each track only will be played.
RANDOM
- Normal stop: Enable Random function and changing to Random Play mode.
- Repeat 1 track / file stop mode, Repeat Folder stop mode and Repeat all track / file stop mode: It will turn off all Repeat mode, and change system to Random mode.
ID3/FIND/ST./ESP
CD Mode:
- Press [ ID3/FIND/ST./ESP] this key the 10 sec Electronic Shock protection clean.
- Press [ID3/FIND/ST./ESP] this key again to return ESP.
MP3 Mode:
- Press [ID3/FIND/ST./ESP] this key once, FILE search mode changed.
- Press SKIP/TUNING or SKIP/TUNING to select the desired FILE.
- Press [ID3/FIND/ST./ESP] this key twice, ALBUM search mode changed.
- Press SKIP/TUNING or SKIP/TUNING keys when the desired ALBUM track is displayed.
- Press the PLAY keys then start play the track.
- Press [ ID3/FIND/ST./ESP] this key for more than 3-5 sec, ID3 TAG is displayed.
- Press [ ID3/FIND/ST./ESP] this key again for more than 3-5 sec, return the Playing time display.
RADIO Mode:
- Press [ ID3/FIND/ST./ESP] this key select the FM Stereo and Mono Mode.
EQ CONTROL
• EQ shows the present sound tone.
- When you press the EQ button, the sound tone changes: PASS >CLASSIC >ROCK >POP >JAZZ >
MUTE
- Mute the sound.
VOLUME+/-
- Increases volume.
- Reduces volume.
TIMER ON/OFF
- In any mode hold [TIMER] key for more than 3-5 sec, display then the hour digit of will flashes.
- Press SKIP/TUNING 08KIP/TUNING to set the correct hour.
- Press [TIMER] again to select the minutes setting, the third fourth digit of flashes,
- press the SKIP/TUNING or SKIP/TUNING to set the correct minutes. Press [TIMER] to lock in the correct minute.
- Press [TIMER] again to display TIMER OFF, Press [TIMER] again to hour digit of will flashes.
- Press SKIP/TUNING oSKIP/TUNING to set the correct hour.
- Press [TIMER] again to select the minutes setting, the third fourth digit of flashes,
- press the SKIP/TUNING or SKIP/TUNING to set the correct minutes. Press [TIMER] to lock in the correct minute.
- Press [TIMER] again to select the function setting, the function of flashes,
- press the SKIP/TUNING 📄SKIP/TUNING to set the desired function station.
- Press [TIMER] again to the volume Increases or Reduces setting, the volume of flashes,
- press the SKIP/TUNING or SKIP/TUNING to set the desired volume sound level station.
- Press [TIMER] key again until it return to normal mode and the display will show the Ⓧ logo.
SLEEP
- Press sleep key to turn on sleep function, change sleep time and turn off sleep function; The display will change from 90>80>70->10 off; If sleep key is activated, the system will count down until sleep time is zero, then the system turn off automatically.
- Insertion Memory Card and USB, Then TOC Information is displayed.
- Press PLAY/PAUSE key, then 01 is displayed and start play. Pause on/off alternately. On pause condition, display is flashing.
- Press STOP key, then TOC is displayed
Card slot and USB Socket
text_image
FLASH MEMORY-USB MMC USBTUNER/ Operate
Operate in the order shown
- Press STANDBY to switch on the unit.
- Press the source selection button "FUNCTION".to TUNER mode.
- Press the TUNER/BAND button to select the band (FM or AM).
- Tune to the required station by pressing the SKIP/TUNING SKIP/TUNING button
- Adjust the volume sound level by pressing vol+ or vol- button.
RDS BASIC OPERATION
To change RDS display information: FREQUENCY> PS>PTY>RT>
1. Press the RANDOM/RDS button once, PS is displayed. Then, the RDS indicator light up and the station name appears. NO PS appears if no RDS signal is sent.
2. Press the RANDOM/RDS button twice, PTY is displayed. Then, the RDS Indicator light up and the broadcast program type appears. NO PTY appears if no RDS signal is sent.
3. Press RDS MODE button three times, RT is displayed. Then, the RDS indicator light up and a text message sent by the station appears. NO RT appears if no RDS signal is sent
To search desired program type broadcast station:
- Press RDS SEARCH button. PTY SEL is displayed.
- Each time you press the SKIP/TUNING 🎨SKIP/TUNING button, the display shows a category in the following order: NEWS > AFFAIRS > INFO > SPORT > EDUCATE > DRAMA > CULTURE>SCIENCE > VARIED > POP M > ROCK M > M O R M> LIGHT M > CLASSICS > .OTHER M > WEATHER > FINANCE > CHILDREN > SOCIAL A > RELIGION > PHONE IN > TRAVEL > LEISURE > JAZZ > COUNTRY > NATIONAL > OLDIES > FOLK M > DOCUMENT > NEWS
- Press RDS SEARCH button within approx 10 seconds again While searching, "SEARCH" and the selected PTY code alternately appear on the display The Unit search 30 preset stations and stops when it finds a station of the category you have selected, then tunes into that station. If no program is found, "NOT" and "FOUND" alternately appear on the display.
NOTE:
When listening to FM broadcasts it is advisable to fully extend the wire FM antenna on the rear cover.
When listening to AM broadcasts it is advisable to adjust the position of the am loop for optimum reception.
I-POD FUNCTION.
- Open the I-Pod door and put the I-Pod in the I-Pod socket, then the I-Pod unit charging and the display will show the charging situation.
- Press the function button and select I-Pod function, then the I-Pod will start play directly.
- Press the SKIP/TUNING of SKIP/TUNING to select next or pervious track
SPECIFICATIONS
Power Supply : AC 230V
\~ 50Hz
Power Consumption : 38 watts
Radio Section : AM 525 - 1615 KHz
FM 87.5 - 108 MHz
Cassette section
Tape speed : 4.75cm/sec.
Wow and Flutter : < 0.4%
Frequency response : 125Hz - 6.3KHz
Compact Disc Section
Disc Type : CD/CD-R/CD-RW / CD-DA /MP3
Frequency Response (-3dB) : 60 - 16,000 Hz
Signal-to-noise Ratio : >60 dB
Harmonic Distortion : <0.3%
CONTINUOUS IMPROVEMENTS ARE BEING MADE TO OUR EQUIPMENT BOTH IN QUALITY AND PERFORMANCE, THUS WE RESERVE THE RIGHT TO ALTER SPECIFICATIONS WITHOUT NOTICE
MORE INFORMATION

Beware of small pieces and batteries, do not swallow them. It may be hazardous to your health and lead into suffocation. Please, Make sure to keep small devices and batteries out of the reach of children.

Important advice regarding hearing protection
Caution:
You care for your hearing, and so do we
Therefore, use caution while using this appliance.
Our recommendation: Avoid high volumes.
Children should be supervised while using headphones; make sure that the appliance is not set to high volume.
Caution!
High volumes may cause irreparable damage to children's ears.

NEVER let allow anyone, especially children, to put objects into the holes, slots or openings on this devise. This may lead into death due to electric shock. The device must only be opened by a qualified assistant.
GB20.
Only use the appliance for its intended purpose.
This device may only be used in housings and business premises.
Please keep this instruction manual for further reference.

Instructions on environment protection
Do not dispose of this product in the usual household garbage at the end of its life cycle; hand it over at a collection point for the recycling of electrical and electronic appliances. The symbol on the product, the instructions for use or the packing will inform about the methods for disposal.
The materials are recyclable as mentioned in its marking. By recycling, material recycling or other forms of re-utilization of old appliances, you are making an important contribution to protect our environment.
Please inquire at the community administration for the authorized disposal location.

Do not obstruct the ventilation of the device. Make sure, that no curtains, newspapers, furniture or any other type of object are blocking the ventilation system of the apparatus. The ventilation system must be clear of objects at all times! Overheating may lead into serious damage of the device and reduce its performance and lifespan.

Heat and warmth
Do not expose the appliance to direct sunlight. Make sure that the appliance is not subject to direct heat sources such as heaters or open fire. Make sure that the ventilation slots of the appliance are not covered.

Moisture and cleaning
This appliance is not waterproof! Do not immerse player in water. Do not allow player to come in contact with water. If water gets inside the player it may cause serious damage. Do not use cleaning agents that contain alcohol, ammoniac, benzene or abrasives as these could damage the player. For cleaning, use a soft, moistened cloth.

Professional recycling
Batteries and packaging should not be disposed of in the trash. Batteries must be handed over to a collection centre for used batteries. Separating disposable packaging materials is ecologically friendly.
MODEL 2382IP
CHAÎNE HI-FI DESIGN AVEC LECTEUR CD/USB/CARTE SD - MP3 ET STATION DE DOCKAGE IPOD
PRODUIT LASER DE CLASSE 1

ATTENTION!
text_image
FLASH MEMORY-USB MMC USBUTILISATION DE LA RADIO
Notre recommandations: Evitez les volumes forts.
text_image
FLASH MEMORY-USB MMC USBRÁDIÓ/kezelés
• Premere OPEN/CLOSE
text_image
FLASH MEMORY-USB MMC USBtext_image
FLASH MEMORY-USB MMC USBRADIO/Funcionamento
text_image
FLASH MEMORY-USB MMC USBTryb RADIO/Obstuga
DODATKOWE INFORMACJE

EERSTEKLAS LASERPRODUCT

LET OP!
text_image
FLASH MEMORY-USB MMC USBRADIO/Bediening
text_image
FLASH MEMORY-USB MMC USBRADIO/Ovládání
DOPLŇUJÍCÍ INFORMACE