MC 4405 CD - Hi-fi system AEG - Free user manual and instructions
Find the device manual for free MC 4405 CD AEG in PDF.
| Product type | Hi-fi system with CD player and radio tuner |
| Brand | AEG |
| Model | MC 4405 CD |
| Dimensions (W x H x D) | Approximately 300 x 200 x 250 mm |
| Weight | Approximately 3.5 kg |
| Power supply | 230 V, 50 Hz |
| Power consumption | 30 W (estimated) |
| Main functions | CD playback, FM/AM radio, track programming, repeat, BBS amplification, remote control |
| CD player type | Audio CD (does not play MP3) |
| Radio tuner | FM stereo and AM (medium wave) |
| Output power | 2 x 10 W (estimated) |
| Number of speakers | 2 speakers (stereo) |
| Remote control | Infrared, range 5 m |
| Display | LCD screen |
| Care | Clean with a soft, dry cloth |
| Safety | Class 1 laser, do not open the housing |
| Included accessories | 2 speakers, remote control |
| Warranty | 24 months |
| Batteries for remote control | 2 AAA batteries (not included) |
Frequently Asked Questions - MC 4405 CD AEG
User questions about MC 4405 CD AEG
0 question about this device. Answer the ones you know or ask your own.
Ask a new question about this device
Download the instructions for your Hi-fi system in PDF format for free! Find your manual MC 4405 CD - AEG and take your electronic device back in hand. On this page are published all the documents necessary for the use of your device. MC 4405 CD by AEG.
USER MANUAL MC 4405 CD AEG
Control inhalambrico
General safety instructions
To avoid the risk of fire or an electric shock, you should not expose the device to rain or moisture. Consequently, do not use the device in the immediate vicinity of water - for example near a bath tub, a swimming pool or in a damp cellar.
Use the device only for the intended purpose.
Only connect the device at a properly installed plug socket. Pay attention that the specified voltage corresponds to the voltage of the plug socket.
When using external mains supply, pay attention to the correct polarity and voltage. Always place the batteries in the correct direction.
Assemble the device in such a way that the available ventilation openings are not covered.
Never open the housing of the device. Incorrect repairs can constitute a considerable risk for the user. Should the device become damaged, in particular the mains supply cable, do not operate the device any longer, but rather have it repaired by an expert. Check the mains supply cable regularly for damage.
For safety reasons a broken or damaged mains lead may only be replaced by an equivalent lead from the manufacturer, our customer service department or a similary qualified person.
If the device is not used for a longer period, remove the plug connector from the plug socket or take out the batteries.
These symbols may be found on the machine and are intended to indicate the following:

The lightning symbol should advise the user of parts in the inside of the device which carry dangerously high voltage levels.

The symbol with an exclamation mark should advise the user of important operation or maintenance instructions in the accompanying documentation.

Devices bearing this symbol work with a "class 1 laser" for tracing the CD. The built-in safety switches should prevent the user being exposed to dangerous laser light, which is
invisible to the human eye, when the CD compartment is opened.
Under no circumstances should these safety switches be bypassed or manipulated, as this could result in a danger of exposure to the laser light.
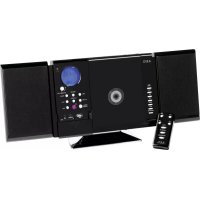
Description of the Controls
1 STANDBY/ON button
2 STANDBY/MUTE control lamp
3 Sensor for the remote control
4 BBS button (ON/OFF)
5 VOLUME + / - buttons
6 Function selector (CD/TUNER)
7 Band selector (AM/FM ST.)
8 TUNING control
9 FM ST control lamp
10 Station scale
11 CD compartment
12 PUSH/OPEN CD compartment
13 LED display
14 PLAY/PAUSE button
15 SKIP button (forward search)
16 SKIP button (reverse search)
17 STOP button
18 PLAY/PAUSE control lamp
19 REPEAT button
20 REPEAT control lamp
21 PROGRAM button
22 PROGRAM control lamp
Reverse, not shown
23 SPEAKER R/L Loudspeaker connections
24 AC Mains connection
25 FM ANT throw-out aerial
Remote control
1 STANDBY/ON button
2 VOLUME + / - buttons
3 /II Play/Pause button
4 STOP button
5 CD button (reverse search)
6 CD button (forward search)
7 REPEAT button
8 PROG button
9 MUTE button
Start-up of the device/Introduction
- Read the operating instructions thoroughly before the start-up!
- Remove any transport safety equipment on the CD and cassette sections.
- Select an appropriate location for the device, e.g. a dry, fl at, non-slip surface on which the device can be easily operated.
- Make sure that the device is adequately ventilated!
- Connect the loudspeakers to the back of the music centre to the sockets market „Speaker R and L" (23).
- Insert the plug into a properly installed 230V , 50Hz power socket. The STANDBY/MUTE (2) control lamp shows the function. Please ensure that the mains voltage corresponds to the information on the type plate.
Inserting the Batteries (not supplied)
- Open the lid of the battery compartment on the back of the remote control.
-
Insert 2 batteries of type UM4 „AAA“ 1.5V. Please ensure that the polarity is correct (see the floor of the battery compartment or the inscription on the outside)! If the remote control is not used for a prolonged period, remove the batteries in order to prevent battery acid leaking.
-
Now close the battery compartment.
Always replace the complete set of batteries. Do not replace just one battery.
Warning: batteries are not to be disposed of together with domestic wastes. Dispose of the used batteries at the relevant collection bin or at your dealer's.
Never throw batteries into the fire.
CD deck transport protection
- Please open the CD compartment (11) by pressing the PUSH/OPEN button (12).
- Remove the transport protection from the CD player if present before use.
General Operation
STANDBY/ON (1): Please switch the machine on using the STANDBY/ON button (1) (1 on the remote control).
Switch off: Switch the music centre to standby using the STANDBY/ON button (1).
BBS ON/OFF (4): This is used to amplify the bass sounds. The switch can be in one of two positions, ON or OFF.
Volume: You can set the desired volume using the VOLUME control (5) (2 on the remote control).
Infrared remote control: For operating the music centre from a distance of up to 5 metres without a lead. If the range of the remote control is reduced, the batteries have to be replaced. During operation ensure that there is nothing blocking the direct line between the remote control and the sensor (3) on the machine.
Listening to the Radio
Press the STANDBY/ON button (1) (1 on the remote control) in order to be able to use the functions with the device switched on. The STANDBY/MUTE light goes off.
- Turn the function selector switch (6) to TUNER.
- Select the desired frequency band with the (7) band selector switch. VHF Stereo = FM ST, Medium wave = AM (mono)
- Tune in the desired station with the station adjustment knob TUNING (8).
- The FM/ST control lamp (9) only lights up when you have selected FM stereo and the station is being received in stereo quality. If reception is too weak and there is noise on the station being received, this lamp will flicker. Try to improve reception by turning and bending or twisting and altering the length of the antenna (25).
- An aerial is integrated into the device for the reception of AM stations. The machine can be aligned to the station by turning it. In this frequency band programs are transmitted in "mono" only.
Playing CDs
This is how you play a CD
- Press the function selector switch (6) to the "CD" position.
- In order to open the CD compartment (11), press the PUSH/OPEN button (12).
- Insert an audio CD with the printed side facing upwards on to the central cone so that the CD clicks into place and then close the lid of the CD compartment.
- After a few seconds the total number of songs/tracks is shown in the display (13).
- Press the / II PLAY/PAUSE button (14) (3 on the remote control) in order to play the CD. The CD will play from the first title. The song currently playing will be shown in the LED display. The PLAY/PAUSE control lamp (18) lights up in the display.
- To remove a CD, press the STOP key (17) (4 on the remote control), open the CD deck with the PUSH/OPEN key (12) and take out the CD carefully.
Please note these instructions for playing back CDs and CDRs in MP3 format!
The device is not able to play back MP3 files. The CD begins to turn, but the sound cannot be heard.
Always keep the CD deck closed.
Note: If a disc has been inserted the wrong way round, or no disc has been inserted, the symbol " _ " appears in the display followed by "00".
Description of the CD buttons
/II PLAY/PAUSE
(14/3): You can briefly interrupt and resume playback using this button. The PLAY/PAUSE control lamp (18) flashes. Pressing again continues playback.
I / I SKIP
(15/16-6/5): When the CD is playing: With (15/6) you can jump to the next or previous track etc. If the button is kept pressed down, the machine starts to search through the tracks. The button (16/5) can be used as follows: Press once = This starts the current track again from the beginning. Press a second time = This jumps back to the previous track. Press a third time = This plays the song before etc. If the button is kept pressed down, the machine starts to search through the tracks.
STOP (17/4): The CD stops.
MUTE (9 on the
remote control): This serves to switch off the volume instantly. The STANDBY/MUTE control lamp (2) fl ashes. When you would like to hear sound again, press the MUTE button once more.
REPEAT (19/7): Press once (the REPEAT LED (20)
fl ashes): the current track is repeated continuously.
Press a second time (the REPEAT LED emits a fixed light): the whole CD is played continuously.
Press a third time: the function is deactivated.
Programmed Play
This can be used to program any desired sequence of tracks.
- Press the STOP key (17/4).
- Press the PROGRAM key (21/8). The number "01" (storage location) and the symbol PROGRAM flash in the display (13). Use the / 山 buttons (15/16-6/5) to select the desired track and then press the PROGRAM button (21/8) again. The display changes to memory slot 02.
- Select the next track with the /1 key and press the PROGRAM key again. Repeat the procedure until all the desired tracks are selected.
- Press the / II PLAY/PAUSE key (14/3). The playback starts. The selected track numbers are shown in the display in the correct order and the PLAY/PAUSE and PROGRAM symbols light up. Press this button to pause briefly the playback.
- Press once the STOP key (17/4) to stop the playback while retaining the program. The PROGRAM control lamp lights up.
- To play back the program again, please press the /II PLAY/PAUSE button (14/3).
- To delete the program, press the STOP key (17/4) twice. The PROGRAM control lamp goes out.
The device stops automatically once the entire sequence of programmed tracks is completed. The programmed order of tracks remains in the memory until you change to a different mode, remove the CD from the CD compartment or switch off the device. In order to play the programmed sequence again, press the / II PLAY/ PAUSE key (14/3).
It is also possible to combine the programmed tracks with the REPEAT function. After you have programmed and started the device, please press the REPEAT button (19/7) up to three times and then you can use the functions as described under "REPEAT".
This device has been tested according to all relevant current CE guidelines, such as electromagnetic compatibility and low voltage directives, and has been constructed in accordance with the latest safety regulations.
Subject to technical changes without prior notice!
Guarantee
The device supplied by our Company is covered by a 24 month guarantee starting on the date of purchase (receipt).
During the life of the guarantee any fault of the device or its accessories *) ascribable to material or manufacturing defects will be eliminated free of charge by repairing or, at our discretion, by replacing it. The guarantee services do not entail an extension of the life of the guarantee nor do they give rise to any right to a new guarantee!
Proof of the guarantee is provided by the proof of purchase. Without proof of purchase no free replacement or repair will be carried out.
For repairs or replacement during the life of the guarantee return the device in its original packing together with the proof of purchase to your dealer.
- Damage to accessories does not mean automatic free replacement of the whole machine. In such cases please contact our hotline. Broken glass or breakage of plastic parts are always subject to a charge.
Defects to consumables or parts subject to wearing (e.g. motor pistons, kneading blades, drive shafts, spare remote control, spare toothbrushes, saw blades, etc.) as well as cleaning, maintenance or the replacement of said parts are not covered by the guarantee and hence are to be paid!
The guarantee lapses in case of unauthorized tampering.
After the expiry of the guarantee
After the expiry of the guarantee repairs can be carried by the competent dealer or repair service against the payment of the ensuing costs.
EcIn 3neKtpnpn6op D0JIroe BpeM He NcNoJIb3yETcra, OKIIIOHTe eO tCEN N BbIHbTe 6aTapeKN.
3TN HAKJIeKIMORyT HAXOINTBcH A KOpnyce n 06paauoT BaeBbHMaHHe Ha CneDyIOUee:
CnMBOJ "MOJIHn" yKa3bIbaeT HaTo, qTO BHyTpN 3JIeKTPoPnpBopa NMeIOTcR DeTaII HaxOJaUncEe NOI ONaChbIM, BbICOKM HAnpJxKeHNEM.

CnMBOJ"BOCKJIuCaTeJIbHbIy3HaK"
O6paaetBaWeBHMaHHeHaBaxHbIe
npmEuaHnB CONpOBoDInTeJIbHbIX
DOkymeHTaxIOIOJIb3OBAHnIOTexOCMOtpy
3JeKtponPi6opa.

3NeKtpnp60pbIC 3TUM CnMBOJOM OChauneHbI Na3epom KnaCca 1, KOtOpBIM NCIOJIb3yETcra IIN CHNTbIBaHnR KOMNaKT- DnCKA.Bo Bpemr OTKpbIBaHnROTcKa
KOMnakT-DnCKa, BCTpoeHHbIe IpeDoXpaHnteNbHbIe YcTpoiCtBa IpeDToBpaaIOT NOnaDaHne ONaCHoro, HeBnIMoro Dny CeNoBeHeckoro rna3a, LyuHa Ja3epa Ha nOTpe6nteJra.
3aIpeaaeTcOtKJIIOuATb IIN MaHnIyIpOBaTb 3TN pIepoXpaHITbHbIe BbIKIOUaTeIIN npIIO6bIX 06CToRteBCTBaX, INaHe BO3HNKHT ONaCHOCTb IOnaHaHnI NOI LyuJa3epa.
Onncanhe yHKun peylnpoBOK
1 Khonka STANDBY/ON
2 KoHTpoBHaJaMaNoUka STANDBY/MUTE
3 CehOp/npneMHnK Iy
4 Khonka BBS (ON/OFF)
5 KhoNKn VOLUME+/- (rpoMkoCTb)
6 ΦyHKUHOHaJIbHbI nepeKIOuHaTeJIb (CD/TUNER)
7IpeeknouateIb dmaana3oHOB (AM/FM ST.)
8 PeryraTop TUNING
9 KOthpoIbHaJaAMnoKa FM ST
10山kaJanaHacTpoKn
11OTcEKCD
12 OTcek CD PUSH/OPEN
13 CBeToIONoHbI, MaTpuHbI duCnJIeI
14 Khonka PLAY/PAUSE
15 Khonka SKIP (nonck Bnepei)
16 KhoNka SKIP (nonck Ha3a)
17 Khonka STOP
18KoHtpoIbHaJaIaMNoUka PLAY/PAUSE
19Khonka REPEAT
20KoHTpoBnaJamaNoUka REPEAT
21 Khonka PROGRAM
22KoHtpolbHaJaamnoUka PROGRAM
06paTHa CTOpHa 6e3 pnc.
23 THe3da nOdkNIOUeHnKoIIOHOK SPEAKER R/L
24 THe3IIO NOdkJIIOHEnIcTeI AC
25 PpOBoJIoUHa nAHTeHHa FM ANT
Nyt dntaHnHOy npabneHn (Ny)
1 KhoNka STANDBY/ON
2 KhonKn VOLUME ^+ /- (rpomkocTB)
3 KhoNka BocnpounBedeHne/nay3a II
4 Khonka STOP
5 KhoNka CD (nonck Ha3a)
6 Khoonka CD (nonck Bnepei)
7 Khonka REPEAT
8 Khonka PROG
9 Khonka MUTE
IodrotOBka KBKIOUeHIO/BBeJeHne
- IpepeB KJIIOUeHnEM TuaTeIbHO pOuHTaIyTepyKOBOCTBO NOJb3OBaTEJI!
- YdaJIte n3 kaccETHnKa n OTCeKa CD TpaHcnpTHyIO yNaKOBky,ecn TaKOBaI MMeTcR.
- POnDbepnTe NOnxOJ RAeE MeCTo DnA yCTaHOBKn UeHTpaN KOLOHOK. NOnxOJAAUM RBAJIaTcR CyXOE, POBHO HNECKOJIb3KOE MeCTo, HA KOTOpOM 6yDet yIO6HO NIOJB3OBAtbcra CEHTpOM.
- PpocneIeIte 3a Tem, YTO6bI cEHTp XopoWo 06dyBaIcR BO3DyXOM!
-ПОДКЛIOUHTe KOLOHKN KTHe3dAm "Speaker R" n "Speaker L" (23), Na 3aДнeI CTOpOHe ΚeHtpa.
BCTaBbTe CeTeByIO BnIKy Bpo3eTKy C HanpJxHeHem cETn 230 B,50 Tc,yCTaHOBJIeHHyIO B COOTBeTCTBmC npednicaHnMn. KOHTPOJBHa JAMnOuKa "STANDBY/MUTE" (2) CnHaNIm3npyET BKIOueHne. Y6eNTecbBTOM, YTO HaPjxKeHne 3IeKTPocETn COBnJaDaet C HApJxKeHEm NITAHN UeHTpa, yka3aHHoe H TaTINOBOM RaJIbke.
BcTabJIeHne 6aTapeek
(6aTapeKn B KOMJIeKT NocTbKn HE BXOJrT)
- OTKpoIte KpbIuKy OTCeKa 6aTaapeek Ha o6paTHoI CTOpOHe Iy.
BCTaBbTe B Hero 26aTapeKn Tnna "LR 3", "AAA", HapJxKeHHeM 1,5 B.CIeNITe 3a npaBnblHoN NOJAPHOCTbIO (CMOTPN DNO OTcKa)! EcIn Ndy DOJIROE BpEM He IcNoB3yETcR, BbIbTe 6aTapeKn n3 OTcKa, YTObI ppeoTbPaTnTB "BbITEKaHne" UeIoHn HIX.
3akpoTeOTcEKo6paTHO.
- MeHnIte 6aTapeKn BcerJa KOMnJIeKTOM, a He nO TDeJIbHOCTN.
BHMMaHHe: He BbIbpaCbIbAaTe 6aTapeKn B DOMaUHm MycOp. IoxKaIyIcTa CdaIte Otpa6oTaHHbIe 6aTapeKn Ha CneuaJIbHbI pyHKT npIema IIN B TOPROByTOkY.
Hn B Koem cnyae He 6pocai Te 6aTaepenB OOrh.
TpaHcnpothyynakobka CD nneepa
- OTPoiTe OTceK CD (11), HaxaB KhoNky "PUSH/ OPEN" (12).
- Npepe nepbIM BKJIOueHnEM Heo6xOIMO ydaJIuTb n3 OTEcKa CD TpaHCnOpTHyU ynaKOBky, ecIn TaKOBa IMeETca.
06üne npabnla noIb3ObaHna
STANDBY/ON (1): Bклioчnte ueHtp,нжав Khonky "STANDBY/ON"(1)иn"STANDBY/ON"(KhoNka 1 ha ПДу).
BbIKIOUeHHe: IpeKIOUHTe CEHTP BpeXIM OxuaHnI pN NOMOUN KHOKN "STANDBY/ON" (1).
BBS ON/OFF (4): Cnyknt nla ycnleHn BOCnpo3BeDeHn Hn3Kx YacTOT. PoiJoxHe nepeKIOuTeJIa: "ON" = BKIOUeHO, "OFF" = BBIKIOUeHO.
Perynnpobka rpomkoctn:
HΦpaKpaChbI pMy:
TpOMKocTB 3Byka p npN NMOOuN KHOKN "VOLUME" (5) (KHOKNa 2 Ha Iy).
IЯ 6ecnpoBOHO rC pacctOHHaD 5 MeTPOB.EcHn DnCTaHnYMeHbuaeTCrHe06xOIMO CmEHHT batapeKn.PooctpaHCTBO MEXy Npy HceHCOPOM (3)Ha My3bKaJIbHOMZeHTpe DoJXHO 6bTTb CBO6OHNbIM.
PpocnyuBauHne paDnonepea
Haxmte KhONky "STANDBY/ON" (1) (KhONka 1 Ha Iny), 4TO6bl NOIb3OBAbCBA CECM NyHKUmaN B pexime "ON". KoHTpOlbHaJ lamnoqKa "STANDBY/MUTE" notyxHET.
- UcTaHOBInTe ΦyHKUHOHaJIbHbI InepeKlIOuAteJIb (6) B NOLOXKeHne "TUNER".
- Bb6epnte He6xOaIMbI dnaIa3OH npn NOMoUnepeKIOuOaTeTEn dnaIa3HOB (7). YKB ctepeo = "FM ST", cpeHne BOJIhbl = "AM" (MOHO).
- HacptoeTecb Ha HykHyoppaNocTaHcNIO npn pmoIpeyIaTopa"TUNING"(8).
- KOnTpOJIbHnIaMnOuKa"FM/ST"(9) cBETITcTcToIbKO B TOM ClyUae, ecIn Bbl6paH dnaNa3OH YKB cTepeo n pinnHmAmem paAnocTaHnIra TpaHCnIpyeT bPexIme "cTepeo".EcIn npnEm IIOXOn I c NOMExAMn,IaMnOuKa 6yEd MTMaTb.
Ioppo6yTe ynyuHtB npneM, BpaaJ, cKpyuBaJ nIin packpyuBa aHTeHHy (25).
5.Длгприма paадионердач Bднana3оhe CB (AM) B ueHTp BCTpoeHa aHTenHa. BpauaЯ nInn n3MeHЯ ee nIoXeHne HactpoiTeCb Ha paadinocTahuio. B 3TOM dlnan3oHe paadinonepeaun TpaHCInpyIOTcToJbKO B pexime"MOHO".
PonrpBbHne CD
Tak npoHrpblBaETcKOMnAKT-dnck
- NpeeBnHbTe cyHKUHOHaIbHbI nepeKJIIOaTeIb (6) B NOIOXeHne "CD".
- OTPoIte oTceK CD (11), HaxaB KhoNky "PUSH/ OPEN" (12).
- BCTaBbTe BOTcE, Ha CEHTpnpyIoum IuN, KOMNaKT-DnCK C 3aIINCbIO, 3TNKeTKoB BBepx N 3aKpoTe KpbIswky OTcEka.
- Yepe3 HeckoJIbKO cekyHd Ha ducnnee (13) noBntcYNCJIO neceH Ha DCNEKe.
- Haxmte KhoNky 一 / II PLAY/PAUSE" (14) (KHOJka 3 Ha Ndy), TTo6bl CTapTOBaTb BOCnpOu3BeDeHne. BocnpoU3BeDeHne HaueHeTcR C IepBOI PeCHN DnCKa. Homep BOCnpOu3BODmoi PeCHN OTo6paXaETcRA Ha DnCJIee. Ha DnCJIee (13) CBeTuTcR KOHTpoJIbHa JAmnoUka"PLAY/PAUSE"(18).
- YTo6bI BbHyTb KOMnAaT-DnCK HaxMnTe Cnayana KHOJky“STOP"17) (KHOJka 4 Ha Iy),OTKpoiTe OTcEK IIPI NOMOUI KHOJKn“PUSH/OPEN"(12) n OCTOpOxHO BblbTe DnCK.
3To npmeaHne pacnpoctpaHreTc H a TOT cnuya, ecn Bbl XeNaTe npOnrpaTb CD nIu CD-R dNCK c 3anncbIO b fOpMate MP3!
Ipeep 3OT fOpmat He uHTaET. Nsck 6ydt BpaataBcA, Ondako 3Byka He 6ydt.
Jnepycte Kpbuiky OTeKa CD NoCToHHo 3aKpItOn.
PnmeaHne:ecn CD-dnck BCTabJe HEnpabuBbHO nI ero BOO6Je HeT BOTCeKe,HaDnCnIe HaunHaet MrraTb“,a3aTEM NOBNTc coo6ueHne"00".
ynpablenna
OnncHne fynkui KhoNOK CD nleepa
I I PLAY/PAUSE
(14/3):
Bocpon3BeDeHne MOXHO
IpePBbHa KOpOTKoe BpEmn
BKIOuHTb ONTb. KOHTpOBhna
JaMNoUka"PLAY/PAUSE"(18)
6ydt MngaTb. NobTophoe
Haxatne KhoNKn npOdoJXnT
BOcPOn3BeDeHne.
I/IKSKIP
(15/16-6/5):BoBpeMBAocnpou3BeJeHnCA