
SDMG76X - Monitor SONY - Free user manual and instructions
Find the device manual for free SDMG76X SONY in PDF.

| Product Type | 17-inch Color LCD Monitor |
| Brand | Sony |
| Model | SDMG76X |
| Maximum Resolution | 1280 x 1024 pixels (SXGA) |
| Horizontal Frequency | 28-80 kHz (analog), 28-64 kHz (digital) |
| Vertical Frequency | 56-75 Hz (analog), 60 Hz (digital) |
| Video Input Connectors | DVI-D (digital), HD15 (analog) |
| Audio Input | Stereo mini jack (0.5 V rms) |
| Built-in Speakers | 2 x 2 W stereo |
| Headphone Jack | Stereo mini jack |
| Dimensions (with stand) | 383.5 x 404.5 x 163 mm |
| Weight | Approx. 5.5 kg |
| Power Consumption (Normal) | 50 W max |
| Power Consumption (Standby) | 1.0 W max |
| Power Supply Voltage | 100-240 V AC, 50/60 Hz (appropriate power cord required) |
| Adjustable Tilt | Yes, up to approx. 20 degrees |
| Preset Picture Modes | Film, PC, User, Game |
| Power Saving Function | Yes, VESA DPMS/DMPM compatible |
| Key Lock | Yes (MENU LOCK menu) |
| VESA Wall Mount Compatible | Yes, 75 mm pitch (screws not supplied) |
| Screen Care | Soft cloth, no solvents or abrasive products |
| Operating Temperature | 5-35 degrees C |
| Certifications | ENERGY STAR, FCC (USA) |
Frequently Asked Questions - SDMG76X SONY
User questions about SDMG76X SONY
0 question about this device. Answer the ones you know or ask your own.
Ask a new question about this device
Download the instructions for your Monitor in PDF format for free! Find your manual SDMG76X - SONY and take your electronic device back in hand. On this page are published all the documents necessary for the use of your device. SDMG76X by SONY.
USER MANUAL SDMG76X SONY
natural_image
Line drawing of a flat-screen monitor with a handle and mounting bracket (no text or symbols)8盗難防止用ロック
natural_image
Technical line drawing of a mechanical clamp or bracket with no visible text or symbolsご注意
natural_image
Illustration of hands holding a folded or folded object with a curved arrow indicating rotation (no text or symbols)3 調整する。
4 メニュー画面を消す。
9 OK ボタンを押す。
メニュー画面に戻ります。
natural_image
Two-panel image showing a computer monitor and a microchip with a grid overlay, both without any visible text or symbols.13 OK ボタンを押す。
メニュー画面に戻ります。
14 [Next] をクリックする。
画像位置のテストパターンが出ます。
natural_image
Two-panel image showing a textured surface before and after transformation, with no visible text or symbols.8 OK ボタンを押す。
メニュー画面に戻ります。
natural_image
Two-panel image showing a striped pattern on the left and a striped pattern on the right, both without any text or symbols.11 OK ボタンを押す。
メニュー画面に戻ります。
This display is designed for use in Japan only and cannot be used in any other country.
主な仕様
SDM-G76X
Operating Instructions_
(GB)
SDM-G76X
SDM-G96X
Owner's Record
The model and serial numbers are located at the rear of the unit. Record these numbers in the spaces provided below. Refer to them whenever you call upon your dealer regarding this product. Model No. ____ Serial No. ____
WARNING
To reduce the risk of fire or electric shock, do not expose this apparatus to rain or moisture.
Dangerously high voltages are present inside the unit. Do not open the cabinet. Refer servicing to qualified personnel only.
FCC Notice
This equipment has been tested and found to comply with the limits for a Class B digital device, pursuant to Part 15 of the FCC Rules. These limits are designed to provide reasonable protection against harmful interference in a residential installation. This equipment generates, uses, and can radiate radio frequency energy and, if not installed and used in accordance with the instructions, may cause harmful interference to radio communications. However, there is no guarantee that interference will not occur in a particular installation. If this equipment does cause harmful interference to radio or television reception, which can be determined by turning the equipment off and on, the user is encouraged to try to correct the interference by one or more of the following measures:
– Reorient or relocate the receiving antenna.
– Increase the separation between the equipment and receiver.
- Connect the equipment into an outlet on a circuit different from that to which the receiver is connected.
- Consult the dealer or an experienced radio/TV technician for help. You are cautioned that any changes or modifications not expressly approved in this manual could void your authority to operate this equipment.
IMPORTANTE
If you have any questions about this product, you may call; Sony Customer Information Services Center 1-800-222-7669 or http://www.sony.com/
Declaration of Conformity
Trade Name: SONY
Model: SDM-G76X
SDM-G96X
Responsible Party: Sony Electronics Inc.
Address: 16530 Via Esprillo,
San Diego, CA 92127 U.S.A.
Telephone Number: 858-942-2230
This device complies with part 15 of the FCC rules. Operation is subject to the following two conditions: (1) This device may not cause harmful interference, and (2) this device must accept any interference received, including interference that may cause undesired operation.
NOTICE
This notice is applicable for USA/Canada only.
If shipped to USA/Canada, install only a UL LISTED/CSA
LABELLED power supply cord meeting the following specifications:
SPECIFICATIONS
Plug Type Nema-Plug 5-15p
Cord Type SVT or SJT, minimum 3 × 18 AWG
Length Maximum 15 feet
Rating Minimum 7 A, 125 V
NOTICE
As an ENERGY STAR Partner, Sony Corporation has determined that this product meets the ENERGY STAR guidelines for energy efficiency.
Table of Contents
Precautions....4
Identifying parts and controls 6
Setup 8
Step 1: Use the stand....8
Step 2: Connect the display to your computer ..... 8
Step 3: Connect the power cord....9
Step 4: Secure the cords ..... 9
Step 5: Turn on the monitor and computer .....9
Adjusting the tilt 10
Selecting the input signal (INPUT button)....10
Customizing Your Monitor....11
Navigating the menu....11
Setting the MODE (PICTURE MODE) 11
PICTURE menu 12
AUDIO menu....14
A SCREEN menu (analog RGB signal only) 14
MENU POSITION menu 16
→ INPUT SENSING menu 17
A LANGUAGE menu 17
→← RESET menu (reset to the default setting) ..... 17
ON MENU LOCK menu 18
Technical Features ....18
Controlling the volume 18
Power saving function....19
Automatic picture quality adjustment function
(analog RGB signal only) 19
Troubleshooting....20
On-screen messages 20
Trouble symptoms and remedies 21
Specifications.....23
Precautions
Warning on power connections
- Use the supplied power cord. If you use a different power cord, be sure that it is compatible with your local power supply.
For the customers in the U.S.A.
If you do not use the appropriate cord, this monitor will not conform to mandatory FCC standards.
For the customers in the UK
If you use the monitor in the UK, be sure to use the appropriate UK power cord.
Example of plug types

natural_image
Three line drawings of different types of electrical plugs (no text or symbols)for 100 to 120 V AC for 200 to 240 V AC for 240 V AC only
The equipment should be installed near an easily accessible outlet.
Installation
Do not install or leave the monitor:
- In places subject to extreme temperatures, for example near a radiator, heating vent, or in direct sunlight. Subjecting the monitor to extreme temperatures, such as in an automobile parked in direct sunlight or near a heating vent, could cause deformations of the casing or malfunctions.
- In places subject to mechanical vibration or shock.
- Near any equipment that generates a strong magnetic field, such as a TV or various other household appliances.
- In places subject to inordinate amounts of dust, dirt, or sand, for example near an open window or an outdoor exit. If setting up temporarily in an outdoor environment, be sure to take adequate precautions against airborne dust and dirt. Otherwise irreparable malfunctions could occur.
Be careful not to touch the air vents on the upper rear of the display, since they become heated.
Place this unit on a flat surface. Do not place it on an uneven surface like the edge of a desk. If a part of this unit sticks out from such surface, it may fall or cause damaged and injury.
Ventilation
The openings of the top and bottom parts are provided for necessary ventilation. To ensure reliable operation of the set, and to protect it from overheating, these openings must never be blocked or covered.
The ventilation should not be impeded by covering the ventilation openings with items, such as newspapers, tablecloths, curtains, etc.
Handling the LCD screen
- Do not leave the LCD screen facing the sun as it can damage the LCD screen. Take care when you place the monitor by a window.
-
Do not push on or scratch the LCD screen. Do not place a heavy object on the LCD screen. This may cause the screen to lose uniformity or cause LCD panel malfunctions.
-
If the monitor is used in a cold place, a residual image may appear on the screen. This is not a malfunction. The screen returns to normal as the temperature rises to a normal operating level.
- If a still picture is displayed for a long time, a residual image may appear for a while. The residual image will eventually disappear.
- The LCD panel becomes warm during operation. This is not a malfunction.
About the built-in stereo speakers
- Do not remove the screws from the back of the speaker. Doing so may lead to a malfunction.
- Be sure to keep magnetic recording equipment, tapes, and floppy discs away from the speaker's opening as the speakers generate a magnetic field. This magnetic field may affect data stored on magnetic tapes and discs.
Note on the LCD (Liquid Crystal Display)
Please note that the LCD screen is made with high-precision technology. However, black points or bright points of light (red, blue, or green) may appear constantly on the LCD screen, and irregular colored stripes or brightness may appear on the LCD screen. This is not malfunction.
(Effective dots: more than 99.99%)
Maintenance
- Be sure to unplug the power cord from the power outlet before cleaning your monitor.
- Clean the LCD screen with a soft cloth. If you use a glass cleaning liquid, do not use any type of cleaner containing an anti-static solution or similar additive as this may scratch the LCD screen's coating.
- Clean the cabinet, panel, and controls with a soft cloth lightly moistened with a mild detergent solution. Do not use any type of abrasive pad, scouring powder, or solvent, such as alcohol or benzine.
- Do not rub, touch, or tap the surface of the screen with sharp or abrasive items such as a ballpoint pen or screwdriver. This type of contact may result in a scratched picture tube.
- Note that material deterioration or LCD screen coating degradation may occur if the monitor is exposed to volatile solvents such as insecticide, or if prolonged contact is maintained with rubber or vinyl materials.
- Note that if service personnel changes some parts during repair, these parts may be retained.
Transportation
- Disconnect all cables from the monitor and grasp the monitor firmly with both hands when transporting. If you drop the monitor, you may be injured or the monitor may be damaged.
- When you transport this monitor for repair or shipment, use the original carton and packing materials.
Installation on a wall or a mounting arm
If you intend to install the display on a wall or a mounting arm, be sure to consult qualified personnel.
Disposal of the monitor
- Do not dispose of this monitor with general household waste.
- The fluorescent tube used in this monitor contains mercury. Disposal of this monitor must be carried out in accordance to the regulations of your local sanitation authority.
For customers in the United States
This product contains mercury. Disposal of this product may be regulated if sold in the United States. For disposal or recycling information, please contact your local authorities or the Electronics Industries Alliance (http://www.eiae.org).
Identifying parts and controls
See the pages in parentheses for further details.
The ⏻ (power) switch and the control buttons are on the front right lower side of the monitor.
Front of the display
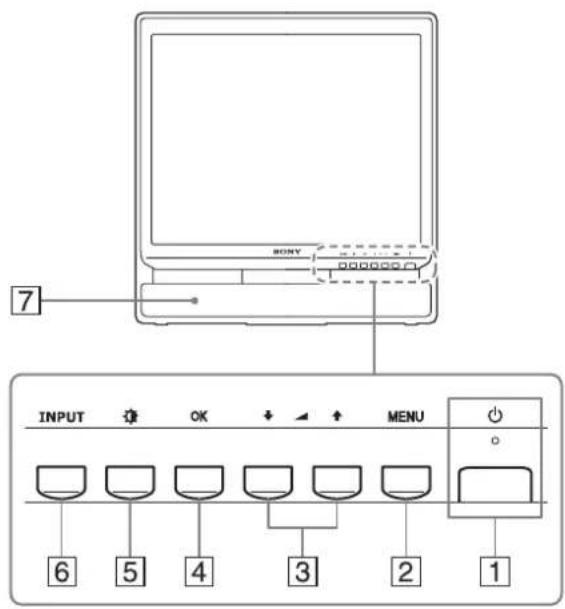
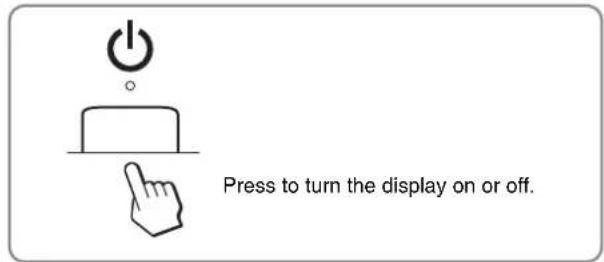
1 ⏻ (Power) switch and indicator (pages 9, 19)
To turn the display on or off, press the ⏻ (power) switch upward.
The power indicator lights up in green when the display is turned on, and lights up in orange when the monitor is in power saving mode.
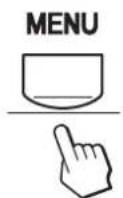
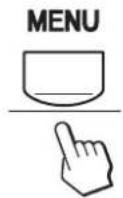
②MENU button (page 11)
This button displays or closes the main menu.
You can also switch on the DDC/CI function by keeping this button pressed for more than 8 seconds.
3 ↓/↑ and ▲ (volume control) buttons (page 11, 18)
These buttons are used to select the menu items and make adjustments, and also display the "Volume" menu to control the volume.
4 OK button (page 11)
This button selects the item or executes the settings in the menu.
5 (PICTURE MODE) button (page 11)
This button is used to adjust the PICTURE MODE.
6 INPUT button (page 10)
This button switches the video input signal between INPUT1 and INPUT2 when two computers are connected to the monitor.
7 Stereo speakers (page 18)
These speakers output the audio signals as sound.
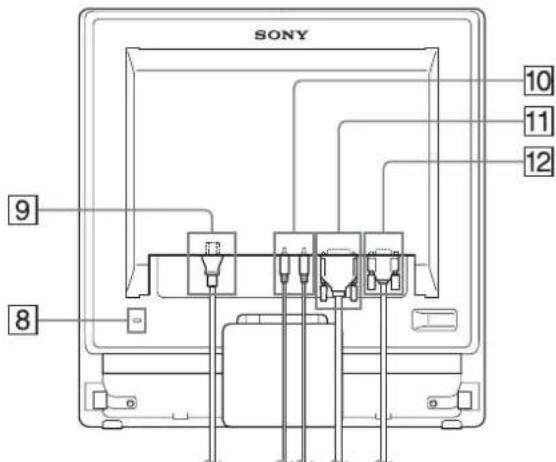
Rear of the display
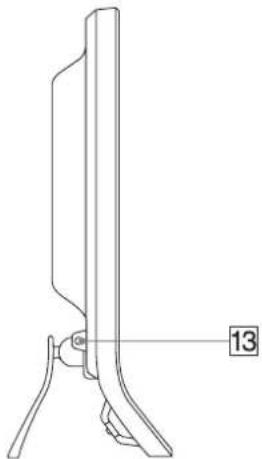
Side view of the LCD display
natural_image
Line drawing of a flat-screen TV stand with a labeled component (no text or symbols on the device itself)8 Security Lock Hole
The security lock hole should be applied with the Kensington Micro Saver Security System.
Micro Saver Security System is a trademark of Kensington.
9 AC IN connector (page 9)
Connect the power cord (supplied).
10 Audio input jack for INPUT1/2 (page 8)
This jack inputs audio signals when connected to the audio output jack of a computer or other audio equipments connected to INPUT1/INPUT2.
11 DVI-D input connector (digital RGB) for INPUT1 (page 8)
This connector inputs digital RGB video signals that comply with DVI Rev.1.0.
12 HD15 input connector (analog RGB) for INPUT2 (page 8)
This connector inputs analog RGB video signals (0.7 Vp-p, positive) and SYNC signals.
13Headphones jack (page 18)
This jack outputs audio signals to the headphones.
Setup
Before using your monitor, check that the following items are included in your carton:
• LCD display
- Power cord
• HD15-HD15 video signal cable (analog RGB)
• DVI-D video signal cable (digital RGB)
• Audio cord (stereo miniplug)
- Cord strap
- CD-ROM (utility software for Windows/Macintosh, Operating Instructions, etc.)
- Warranty card
- Quick Setup Guide
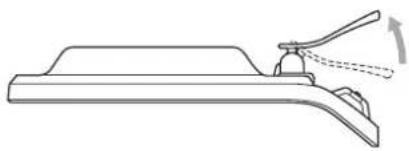
Step 1: Use the stand
■ Using the supplied stand
Open the stand.
natural_image
Line drawing of a mechanical clamp or bracket with a handle and lever mechanism (no text or symbols)Note
The stand is folded at the factory. Be sure not to place the display vertically with the stand as it is. Otherwise, the display may topple over.
■ Using the VESA compatible stand
When using a non-supplied VESA compatible mounting arm or stand, use the VESA compatible screws to attach.
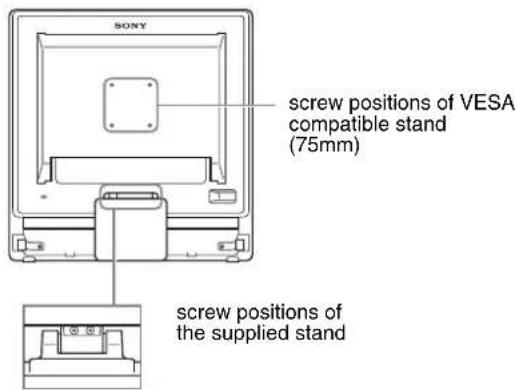
Bottom-side view
You can use the display with or without the supplied stand.
Step 2: Connect the display to your computer
Turn off the monitor and computer before connecting.
Notes
- Do not touch the pins of the video signal cable connector as this might bend the pins.
- Check the alignment of the HD15 connector to prevent bending the pins of the video signal cable connector.
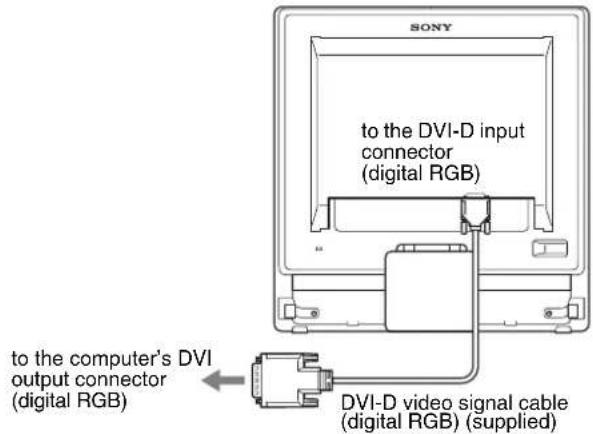
■ Connect a computer equipped with a DVI output connector (digital RGB)
Using the supplied DVI-D video signal cable (digital RGB), connect the computer to the monitor's DVI-D input connector (digital RGB)
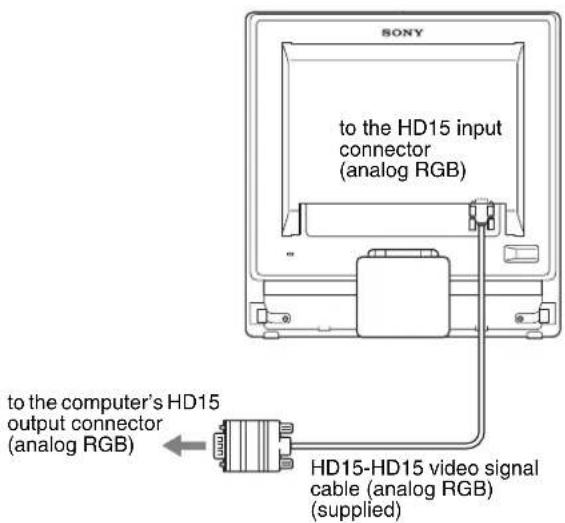
■ Connect a computer equipped with an HD15 output connector (analog RGB)
Using the supplied HD15-HD15 video signal cable (analog RGB), connect the computer to the monitor's HD15 input connector (analog RGB).
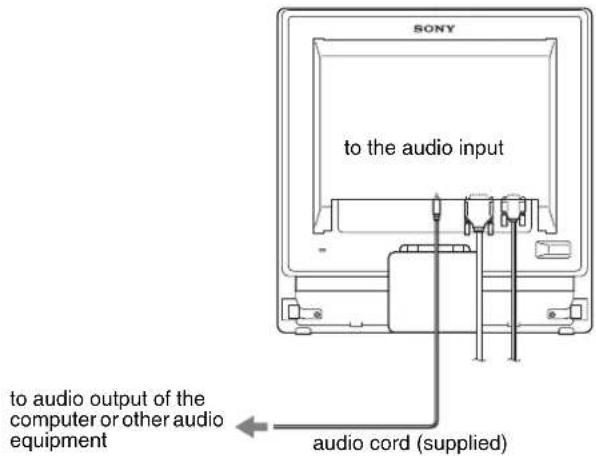
■ Connect the audio cord
Connect the supplied audio cord to the monitor's corresponding audio input jack.
Using the monitor's speakers or headphones, you can listen to sound from your computer or other audio equipment connected to the monitor's audio input jacks.
For more information, see "Controlling the volume" on page 18.
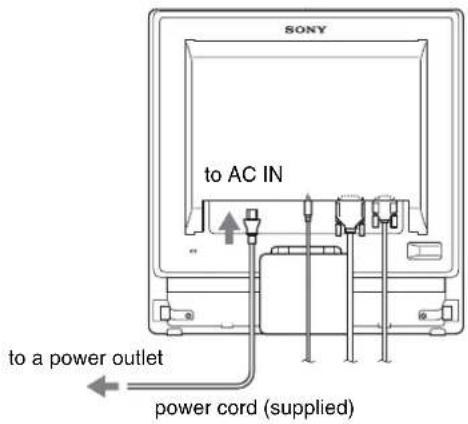
Step 3: Connect the power cord
With the monitor and computer switched off, first connect the power cord to the monitor, then connect it to a power outlet.
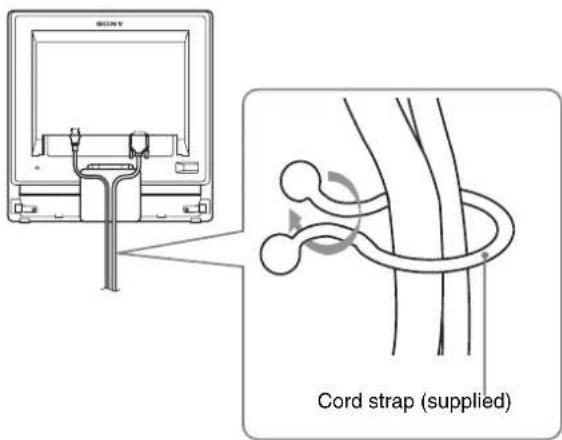
Step 4: Secure the cords
1 Bundle the cables and cords.
Using the supplied cord strap, bundle the cables and cords.
The illustration of the back of the monitor shown here is that of the SDM-G76X.
The same applies for the other models.
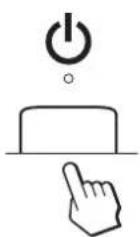
Step 5: Turn on the monitor and computer
Press the ⏻ (power) switch.
The ⏻ (power) indicator of the monitor lights up in green.
Turn on the computer.
The installation of your monitor is complete. If necessary, use the monitor's controls to adjust the picture.
• If no picture appears on your screen
Check that the power cord and the video signal cable are properly connected.
- If NO INPUT SIGNAL appears on the screen:
The computer is in the power saving mode. Try pressing any key on the keyboard or moving the mouse.
- If CABLE DISCONNECTED appears on the screen:
Check that the video signal cable is properly connected.
• If OUT OF RANGE appears on the screen:
Reconnect the old monitor. Then adjust the computer's graphics board within the following ranges.
| Analog RGB Digital RGB | ||
| Horizontal frequency | 28–80 kHz 28–64 kHz | |
| Vertical frequency | 56–75 Hz 60 Hz | |
| Resolution | 1280 × 1024 or less | 1280 × 1024 or less |
For more information about the on-screen messages, see "Trouble symptoms and remedies" on page 21.
No need for specific drivers
The monitor complies with the "DDC" Plug & Play standard and automatically detects all the monitor's information. No specific driver needs to be installed to the computer.
The first time you turn on your computer after connecting the monitor, the setup Wizard may appear on the screen. In this case, follow the on-screen instructions. The Plug & Play monitor is automatically selected so that you can use this monitor.
The vertical frequency turns to 60 Hz.
Since flickers are unobtrusive on the monitor, you can use it as it is. You do not need to set the vertical frequency to any particular high value.
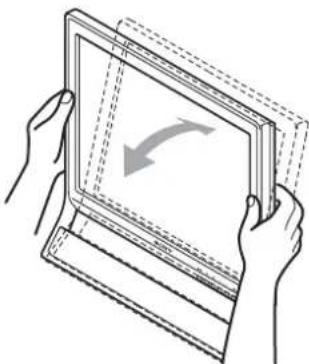
Adjusting the tilt
This display can be adjusted within the angles shown below.
Approx. 20°

natural_image
Diagram of a mechanical device with dashed lines indicating internal components and an arrow indicating rotation (no text or symbols)Grasp the lower sides of the LCD panel, then adjust screen tilt.
natural_image
Illustration of hands holding a folded or folded device with a curved arrow indicating rotation (no text or symbols)To use the display comfortably
This display is designed so that you can set it up at a comfortable viewing angle. Adjust the viewing angle of your display according to the height of the desk and chair, and so that light is not reflected from the screen to your eyes.
Note
When adjusting the screen tilt, make sure not to knock or drop the display off the desk.
Selecting the input signal (INPUT button)
Press the INPUT button.
The input signal changes each time you press this button.
INPUT
On-screen message Input signal configuration (Appears about 5 seconds on the upper left corner.)
INPUT1 : DVI-D DVI-D input connector (digital RGB) for INPUT1
INPUT2 : HD15 HD15 input connector (analog RGB) for INPUT2
Customizing Your Monitor
Before making adjustments
Connect the monitor and the computer, and turn them on. Wait for at least 30 minutes before making adjustments for the best result.
You can make numerous adjustments to your monitor using the on-screen menu.
Navigating the menu
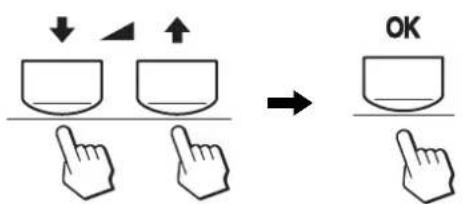
■ Using the MENU, ↓/↑, and OK buttons
1 Display the main menu.
Press the MENU button to display the main menu on your screen.
2 Select the menu you want to adjust.
Press the ↓/↑ buttons to display the desired menu. Press the OK button to select the menu item.
3 Adjust the menu.
Press the ↓/↑ buttons to make the adjustment, then press the OK button.
When you press the OK button, the setting is stored, then the display returns to the previous menu.
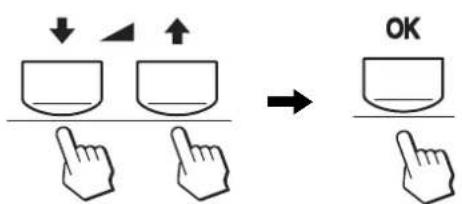
4 Close the menu.
Press the MENU button once to return to normal viewing. If no buttons are pressed, the menu closes automatically after about 45 seconds.
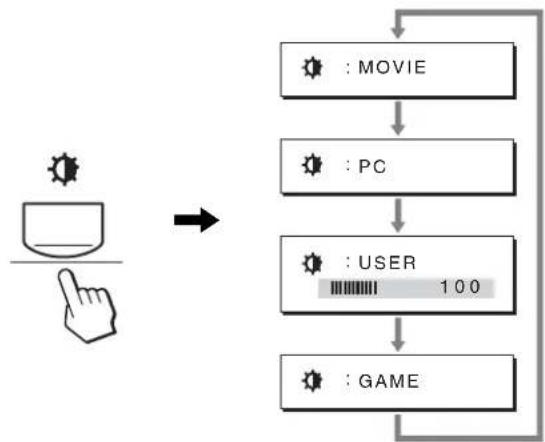
Setting the MODE (PICTURE MODE)
If you press the ⚙ button on the lower right side of the monitor repeatedly, you can select MODE from MOVIE → PC → USER → GAME.
Press the button repeatedly.
The default setting of MODE is set to MOVIE. When you press the 📄 button once, MOVIE (the default setting) is displayed, and when you press again, PC is displayed.
Each time you press the button, the mode changes as follows.
flowchart
graph TD
    A["User Icon"] --> B["PC Icon"]
    B --> C["USER 100 Bar"]
    C --> D["GAME Icon"]
    D --> E["Action Indicator"]
Each mode appears on the screen and MODE is changed. The menu automatically disappears after about 5 seconds.
With USER selected, you can adjust the backlight level by pressing the ↓/↑ buttons or by selecting backlight from the MENU.
Note
You can fine adjust the picture quality for each mode.
■ Resetting the adjustments
You can reset the adjustments using the RESET menu. See page 17 for more information on resetting the adjustments.
■ Controlling the monitor by computer
Press the MENU button down for at least 5 seconds. You will see an on-screen message indicating the current setting. After 3 seconds the DDC/CI setting is switched on or off, as shown below.
On-screen messages (Appear for a while)
| DDC-CI : ON (default setting) | Allows the computer to control menu settings. |
| DDC-CI : OFF Does not allow the computer to control menu settings. | |
Note
This function applies only to computers that support the DDC/CI (Display Data Channel Command Interface) function.
PICTURE menu
You can adjust the following items using PICTURE menu.
• MODE
(GAME/MOVIE/PC/USER)
- BACKLIGHT
• CONTRAST ⬆
• BRIGHTNESS
• COLOR
• GAMMA γ
- SHARPNESS
- MODE RESET

■ MODE menu
You can select the appropriate screen brightness for your purpose. The PICTURE settings can be set for each mode. The changed setting is automatically applied for each input (INPUT1/INPUT2).
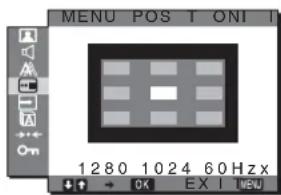
1 Press the MENU button.
The main menu appears on the screen.
2 Press the ↓/↑ button to select 📄 (PICTURE) and press the OK button.
The PICTURE menu appears on the screen.
3 Press the ↓/↑ button to select MOVIE and press the OK button.
The MODE menu appears on the screen.
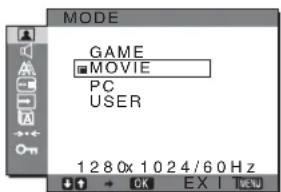
4 Press the ↓/↑ button to select the desired mode and press the OK button.
The default setting is MOVIE.
• GAME: Bright picture.
• MOVIE: Clear picture with strong contrast.
- PC: Soft tone picture.
- USER: Picture with low brightness.
Note
You can fine adjust the picture quality for each mode.
■ Adjusting the backlight (BACKLIGHT)
If the screen is too bright, adjust the backlight to make the screen easier to see.
1 Press the MENU button.
The main menu appears on the screen.
2 Press the ↓/↑ buttons to select 📄 (PICTURE) and press the OK button.
The PICTURE menu appears on the screen.
3 Press the ↓/↑ buttons to select |: (BACKLIGHT) and press the OK button.
The BACKLIGHT menu appears on the screen.
4 Press the ↓/↑ buttons to adjust the light level and press the OK button.
■ Adjusting the contrast (CONTRAST)
Adjust the picture contrast.
Note
While COLOR is set to sRGB, you cannot adjust CONTRAST, BRIGHTNESS or GAMMA.
1 Press the MENU button.
The main menu appears on the screen.
2 Press the ↓/↑ buttons to select 📄 (PICTURE) and press the OK button.
The PICTURE menu appears on the screen.
3 Press the ↓/↑ buttons to select Ⓐ (CONTRAST) and press the OK button.
The CONTRAST menu appears on the screen.
4 Press the ↓/↑ buttons to adjust the contrast and press the OK button.
■ Adjusting the black level of an image (BRIGHTNESS)
Adjust the picture brightness (black level).
Note
While COLOR is set to sRGB, you cannot adjust CONTRAST, BRIGHTNESS or GAMMA.
1 Press the MENU button.
The main menu appears on the screen.
2 Press the ↓/↑ buttons to select 📄 (PICTURE) and press the OK button.
The PICTURE menu appears on the screen.
3 Press the ↓/↑ buttons to select ⚙ (BRIGHTNESS) and press the OK button.
The BRIGHTNESS menu appears on the screen.
4 Press the ↓/↑ buttons to adjust the brightness and press the OK button.
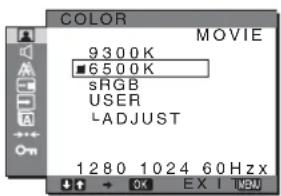
■ Adjusting the color temperature (COLOR)
You can select the picture's color level for the white color field from the default color temperature settings.
Also, if necessary, you can fine tune the color temperature.
You can set the desired color temperature for each mode of the brightness of screen.
1 Press the MENU button.
The main menu appears on the screen.
2 Press the ↓/↑ buttons to select 📄 (PICTURE) and press the OK button.
The PICTURE menu appears on the screen.
3 Press the ↓/↑ buttons to select ☐ (COLOR) and press the OK button.
The COLOR menu appears on the screen.
4 Press the ↓/↑ buttons to select the desired color temperature and press the OK button.
Whites will change from a bluish hue to reddish hue as the temperature is lowered from 9300K to 6500K (default setting).
When you select “sRGB,” the colors adjust to the sRGB profile. (The sRGB color setting is an industry-standard color space protocol designed for computer products.) If you select “sRGB,” the color settings of your computer must be set to the sRGB profile.
Notes
- If a connected computer or other equipment is not sRGB-compliant, color cannot be adjusted to the sRGB profile.
- While COLOR is set to sRGB, you cannot adjust CONTRAST, BRIGHTNESS or GAMMA.
Fine tuning the color temperature (USER ADJUSTMENT)
The color temperature can be set for each mode (GAME/MOVIE/PC/USER).
1 Press the ↓/↑ buttons to select ADJUST and press the OK button.
The USER ADJUSTMENT menu appears on the screen.
2 Press the ↓/↑ buttons to select R (Red) or B (Blue) and press the OK button. Then press the ↓/↑ buttons to adjust the color temperature and press the OK button.
Since this adjustment changes the color temperature by increasing or decreasing the R and B components with respect to G (green), the G component is fixed.
3 Press the ↓/↑ buttons to select ↻, then press the OK button.
The new color setting is stored in memory and automatically recalled whenever USER is selected.
The COLOR menu appears on the screen.
■ Changing the gamma setting (GAMMA)
You can associate the picture's color shade on the screen with the picture's original color shade.
Note
While COLOR is set to sRGB, you cannot adjust CONTRAST, BRIGHTNESS or GAMMA.

1 Press the MENU button.
The main menu appears on the screen.
2 Press the ↓/↑ buttons to select 📄 (PICTURE) and press the OK button.
The PICTURE menu appears on the screen.
3 Press the ↓/↑ buttons to select γ (GAMMA) and press the OK button.
The GAMMA menu appears on the screen.
4 Press the ↓/↑ buttons to select the desired mode and press the OK button.
■ Adjusting the sharpness (SHARPNESS)
Adjust to sharpen the edge of images, etc.
1 Press the MENU button.
The main menu appears on the screen.
2 Press the ↓/↑ buttons to select 📄 (PICTURE) and press the OK button.
The PICTURE menu appears on the screen.
3 Press the ↓/↑ buttons to select ☐ (SHARPNESS) and press the OK button.
The SHARPNESS menu appears on the screen.
4 Press the ↓/↑ buttons to adjust the sharpness and press the OK button.
■ MODE RESET menu (resetting every mode to the default) →←
You can reset the adjustments to the default settings.
1 Press the MENU button.
The main menu appears on the screen.
2 Press the ↓/↑ button to select 📄 (PICTURE) and press the OK button.
The PICTURE menu appears on the screen.
3 Press the ↓/↑ buttons to select →← (MODE RESET) and press the OK button.
The MODE RESET menu appears on the screen.
4 Press the ↓/↑ buttons to select the desired mode and press the OK button.
- OK: To reset every mode in the PICTURE menu to the default settings.
- CANCEL: To cancel resetting and return to the PICTURE menu.
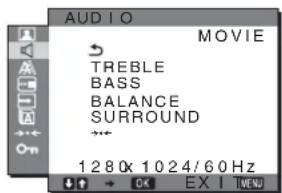
AUDIO menu
You can adjust the following items using the AUDIO menu.
- TREBLE
• B A S S
• BALANCE
- SURROUND
- RESET
■ Adjusting TREBLE, BASS or BALANCE
1 Press the MENU button.
The main menu appears on the screen.
2 Press the ↓/↑ buttons to select ▶ (AUDIO) and press the OK button.
3 Press the ↓/↑ buttons to select TREBLE, BASS or BALANCE, and press the OK button.
4 Press the ↓/↑ buttons to to adjust the treble, bass or balance, and press the OK button.
NOTE
Only when SURROUND is set to off, TREBLE and BASS can be adjusted.
The main menu appears on the screen.
2 Press the ↓/↑ buttons to select ▶ (AUDIO) and press the OK button.
3 Press the ↓/↑ buttons to select SURROUND and press the OK button.
4 Press the ↓/↑ buttons to select the desired mode and press the OK button.
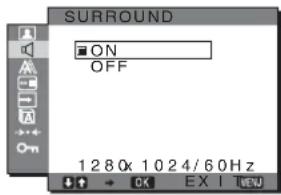
- ON: Provides powerful sound(surround effect).
- OFF: Turns off the surround effect.
■ AUDIO RESET menu (resetting every mode to the default) →←
You can reset the adjustments to the default settings.
1 Press the MENU button.
The main menu appears on the screen.
2 Press the ↓/↑ button to select ◀ (AUDIO) and press the OK button.
The AUDIO menu appears on the screen.
3 Press the ↓/↑ buttons to select →← (RESET) and press the OK button.
The AUDIO RESET menu appears on the screen.
4 Press the ↓/↑ buttons to select the desired mode and press the OK button.
- OK: To reset every mode in the AUDIO menu to the default settings.
- CANCEL: To cancel resetting and return to the AUDIO menu.
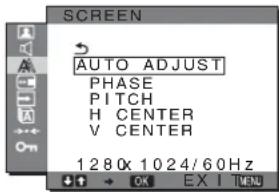
A SCREEN menu (analog RGB signal only)
You can adjust the following items using the SCREEN menu.
- AUTO ADJUST
- PHASE
• P I T C H
• H CENTER
• V CENTER
Note
When receiving digital RGB signals from the DVI-D input connector for INPUT1, adjustment is unnecessary.
■ Automatic picture quality adjustment function
When the monitor receives an input signal, it automatically adjusts the picture's position and sharpness (phase/pitch), and ensures that a clear picture appears on the screen (page 19).
Note
While the automatic picture quality adjustment function is activated, only the ⏻ (power) switch will operate.
If the automatic picture quality adjustment function of this monitor seems to not completely adjust the picture
You can make further automatic adjustment of the picture quality for the current input signal (See AUTO ADJUST below).
If you still need to make further adjustments to the picture quality
You can manually adjust the picture's sharpness (phase/pitch) and position (horizontal/vertical position).
These adjustments are stored in memory and automatically recalled when the monitor receives a previously input and registered input signal.
■ Make further automatic adjustments to the picture quality for the current input signal (AUTO ADJUST)
1 Press the MENU button.
The main menu appears on the screen.
2 Press the ↓/↑ buttons to select Ⓐ (SCREEN) and press the OK button.
The SCREEN menu appears on the screen.
3 Press the ↓/↑ buttons to select AUTO ADJUST and press the OK button.
The AUTO ADJUST menu appears on the screen.
4 Press the ↓/↑ buttons to select ON or OFF and press the OK button.
- ON: Make the appropriate adjustments of the screen's phase, pitch and horizontal/vertical position for the current input signal and store them.
Note
When the monitor is turned on or the input signal is changed, AUTO ADJUST makes the automatic adjustments.
- OFF: AUTO ADJUST is not available.
Note
AUTO ADJUST works automatically when the input signal is changed.
5 Press the ↓/↑ buttons to select ↩ and press the OK button.
Return to the menu screen.
■ Adjust the picture's sharpness and position manually (PITCH/PHASE/H CENTER/V CENTER)
You can adjust the picture's sharpness as follows. This adjustment is effective when the computer is connected to the monitor's HD15 input connector (analog RGB).
1 Set the resolution to 1280 × 1024 on the computer.
2 Load the CD-ROM.
3 Start the CD-ROM
For Windows User
When Auto run operates:
Select the area, language and model, and click DISPLAY ADJUSTMENT TOOL (UTILITY).
4 Click "Adjust" and confirm the current resolution (top value) and recommended resolution (bottom value), and then click "Next".
Test pattern for PITCH appears.
5 Press the MENU button.
The main menu appears on the screen.
6 Press the ↓/↑ buttons to select ⚪ (SCREEN) and press the OK button.
The SCREEN menu appears on the screen.
7 Press the ↓/↑ buttons to select PITCH and press the OK button.
The PITCH adjustment menu appears on the screen.
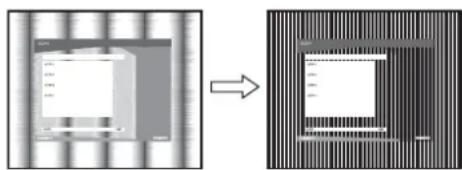
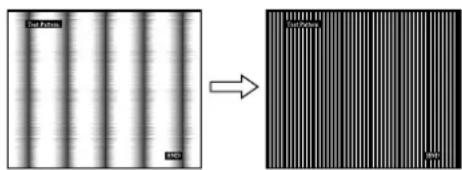
8 Press the ↓/↑ buttons until the vertical stripes disappear.
Adjust so that the vertical stripes disappear.
natural_image
Diagram showing a device with a grid layout transforming into a striped patterned device (no text or symbols)9 Press the OK button.
The main menu appears on the screen.
If horizontal stripes are observed over the entire screen, adjust the PHASE using the following procedures.
10 Click "Next".
Test pattern for PHASE appears.
11 Press the ↓/↑ buttons to select PHASE and press the OK button.
The PHASE adjustment menu appears on the screen.
12 Press the ↓/↑ buttons until the horizontal stripes are at a minimum.
Adjust so that the horizontal stripes are at a minimum.
13 Press the OK button.
The main menu appears on the screen.
14 Click "Next".
Test pattern for CENTER appears.
15 Press the ↓/↑ buttons to select H CENTER or V CENTER and press the OK button.
The H CENTER adjustment menu or V CENTER adjustment menu appears on the screen.
16 Press the ↓/↑ buttons to center the test pattern on the screen.
17 Click "Next".
Click "End" or "EXIT" to turn off the test pattern.
When Auto run fails to operate:
1 Open "My Computer" and right click the CD-ROM icon.
Go to "Explorer" and open the CD-ROM icon.
2 Open [Utility] and then select [WINDOWS].
3 Start [WIN_UTILITY.EXE].
Test pattern appears. Go to step 4.
For Macintosh User
1 Open the CD-ROM.
2 Open [Utility] and then select [MAC].
3 Open [MAC UTILITY] and then start [MAC_CLASSIC_UTILITY] or [MAC_OSX_UTILITY].
Test pattern appears. Go to step 4.
4 Press the MENU button.
The main menu appears on the screen.
5 Press the ↓/↑ buttons to select Ⓐ (SCREEN) and press the OK button.
The SCREEN menu appears on the screen.
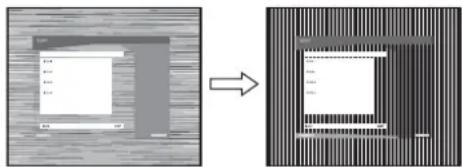
6 Press the ↓/↑ buttons to select PHASE and press the OK button.
The PHASE adjustment menu appears on the screen.
7 Press the ↓/↑ buttons until the horizontal stripes are at a minimum.
Adjust so that the horizontal stripes are at a minimum.
natural_image
Two-panel image showing a textured surface before and after transformation, with no visible text or symbols.8 Press the OK button.
The main menu appears on the screen.
If vertical stripes are observed over the entire screen, adjust the PITCH using the following procedures.
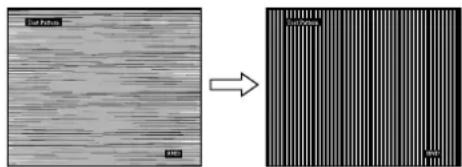
9 Press the ↓/↑ buttons to select PITCH and press the OK button.
The PITCH adjustment menu appears on the screen.
10 Press the ↓/↑ buttons until the vertical stripes disappear.
Adjust so that the vertical stripes disappear.
natural_image
Two-panel image showing a vertical striped pattern on the left and a striped pattern on the right, both without any text or symbols.11 Press the OK button.
The main menu appears on the screen.
12 Press the ↓/↑ buttons to select H CENTER or V CENTER and press the OK button.
The H CENTER adjustment menu or V CENTER adjustment menu appears on the screen.
13 Press the ↓/↑ buttons to center the test pattern on the screen.
14 Click "END" on the screen to turn off the test pattern.

MENU POSITION menu
You can change the menu position if it is blocking an image on the screen.
1 Press the MENU button.
The main menu appears on the screen.
2 Press the ↓/↑ buttons to select ☐ (MENU POSITION) and press the OK button.
The MENU POSITION menu appears on the screen.
3 Press the ↓/↑ buttons to select the desired position and press the OK button.
There are three positions each for the top, center and bottom of the screen.

INPUT SENSING menu
When you select AUTO ON in the INPUT SENSING menu, the monitor automatically detects an input signal to an input terminal, and changes the input automatically before the monitor goes into the power saving mode.
1 Press the MENU button.
The main menu appears on the screen.
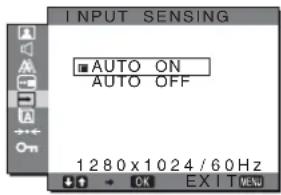
2 Press the ↓/↑ buttons to select → (INPUT SENSING) and press the OK button.
The INPUT SENSING menu appears on the screen.
3 Press the ↓/↑ buttons to select the desired mode and press the OK button.
- AUTO ON: When the selected input terminal has no input signal, or when you select an input terminal by the INPUT button on the monitor and the terminal has no input signal, the on-screen message appears (page 20) and the monitor checks the input signal to another input terminal automatically to change the input. When the input is changed, the selected input terminal is displayed on the left upper of the screen. When there is no input signal, the monitor goes into the power saving mode automatically.
- AUTO OFF: The input is not changed automatically. Press the INPUT button to change the input.

LANGUAGE menu
You can change the languages used on menus or messages displayed on this monitor.
1 Press the MENU button.
The main menu appears on the screen.
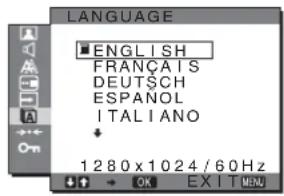
2 Press the ↓/↑ buttons to select A (LANGUAGE) and press the OK button.
The LANGUAGE menu appears on the screen.
3 Press the ↓/↑ buttons to select a language and press the OK button.
• ENGLISH
• FRANÇAIS: French
• DEUTSCH: German
- ESPAÑOL: Spanish
• ITALIANO: Italian
• NEDERLANDS: Dutch
• SVENSKA: Swedish
• :Русский
• : Japanese
- 中文: C h i n e s e
→← RESET menu (reset to the default setting)
You can reset the adjustments to the default settings.
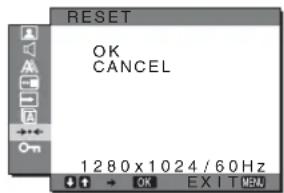
1 Press the MENU button.
The main menu appears on the screen.
2 Press the ↓/↑ buttons to select →← (RESET) and press the OK button.
The RESET menu appears on the screen.
3 Press the ↓/↑ buttons to select the desired mode and press the OK button.
- OK: To reset all of the adjustment data to the default settings. Note that the LANGUAGE setting is not reset by this method.
- CANCEL: To cancel resetting and return to the menu screen.
MENU LOCK menu
You can lock the control of buttons to prevent accidental adjustments or resetting.
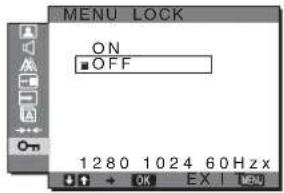
1 Press the MENU button.
The main menu appears on the screen.
2 Press the ↓/↑ buttons to select O _π (MENU LOCK) and press the OK button.
The MENU LOCK menu appears on the screen.
3 Press the ↓/↑ buttons to select either ON or OFF.
- ON: Only the ⏻ (power) switch and MENU button will operate. If you attempt any other operation, the 📊 on appears on the screen. With MENU LOCK set to ON, only this menu item can be selected.
• OFF: MENU LOCK is set to OFF.
Technical Features
Controlling the volume
Using the monitor's speakers or headphones, you can listen to sound from your computer or other audio equipment connected to the monitor's audio input jacks.
You can control the volume by using a separate "Volume" menu from the main menu.
1 Press the ↓/↑ buttons when no menu appears on the screen.
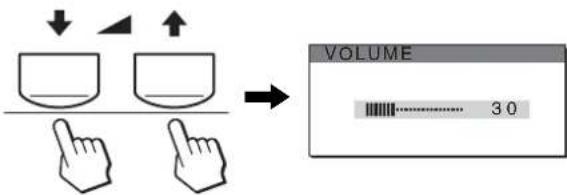
2 Press the ↓/↑ buttons to control the volume.
The menu automatically disappears after about 5 seconds.
Notes
- You cannot adjust the volume when the main menu is displayed on the screen.
- When your monitor is in power saving mode, no sound comes from the speakers or the headphones.
Power saving function
This monitor meets the power-saving guidelines set by VESA, ENERGY STAR, and NUTEK. If the monitor is connected to a computer or video graphics board that is DPMS (Display Power Management Standard) for Analog input/DMPM (DVI Digital Monitor Power Management) for Digital input compliant, the monitor will automatically reduce power consumption as shown below.
SDM-G76X
| Power mode Power consumption ⏻ (power) indicator | |
| normal operation | 50 W (max.) green |
| active off* (deep sleep)** | 1.0 W (max.) orange |
| power off 1.0 W (max.) off | |
SDM-G96X
| Power mode | Power consumption | (power) indicator |
| normal operation | 53 W (max.) green | |
| active off* (deep sleep)** | 1.0 W (max.) orange | |
| power off 1.0 W (max.) off | ||
* When your computer enters the “active off” mode, the input signal is cut and NO INPUT SIGNAL appears on the screen. After 5 seconds, the monitor enters the power saving mode.
** "deep sleep" is the power saving mode defined by the Environmental Protection Agency.
Automatic picture quality adjustment function (analog RGB signal only)
When the monitor receives an input signal, it automatically adjusts the picture's position and sharpness (phase/pitch), and ensures that a clear picture appears on the screen.
The factory preset mode
When the monitor receives an input signal, it automatically matches the signal to one of the factory preset modes stored in the monitor's memory to provide a high quality picture at the center of the screen. If the input signal matches the factory preset mode, the picture appears on the screen automatically with the appropriate default adjustments.
If input signals do not match one of the factory preset modes
When the monitor receives an input signal that does not match one of the factory preset modes, the automatic picture quality adjustment function of this monitor is activated to ensure that a clear picture always appears on the screen (within the following monitor frequency ranges):
Horizontal frequency: 28–80 kHz
Vertical frequency: 56–75 Hz
Consequently, the first time the monitor receives input signals that do not match one of the factory preset modes, the monitor may take a longer time than normal to display the picture on the screen. This adjustment data is automatically stored in memory so that next time, the monitor will function in the same way as when the monitor receives the signals that match one of the factory preset modes.
If you adjust the phase, pitch and picture position manually while OFF of AUTO ADJUST is selected
For some input signals, the automatic picture quality adjustment function of this monitor may not completely adjust the picture position, phase, and pitch. In this case, you can set these adjustments manually (page 15). If you set these adjustments manually, they are stored in memory as user modes and automatically recalled whenever the monitor receives the same input signals.
Notes
- While the automatic picture quality adjustment function is activated, only the ⏻ (power) switch will operate.
- The picture may flicker during this time, but this is not a malfunction. Simply wait a few moments until the adjustment completes.
Troubleshooting
Before contacting technical support, refer to this section.
On-screen messages
If there is something wrong with the input signal, one of the following messages appears on the screen. To solve the problem, see “Trouble symptoms and remedies” on page 21.
If OUT OF RANGE appears on the screen
This indicates that the input signal is not supported by the monitor's specifications. Check the following items.
Example
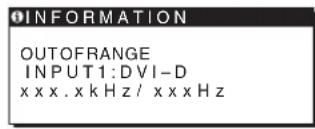
If "xxx.x kHz/xxx Hz" is displayed
This indicates that either the horizontal or vertical frequency is not supported by the monitor's specifications.
The figures indicate the horizontal and vertical frequencies of the current input signal.
If "RESOLUTION > 1280 × 1024" is displayed
This indicates that the resolution is not supported by the monitor's specifications (1280 × 1024 or less).
If NO INPUT SIGNAL appears on the screen
This indicates that no signal is being input.
Example
GO TO POWER SAVE
The monitor will enter the power saving mode after about 5 seconds from the time the message is displayed.
If CABLE DISCONNECTED appears on the screen
This indicates that the video signal cable has been disconnected.
Example
GO TO POWER SAVE
The monitor will enter the power saving mode after about 45 seconds from the time the message is displayed.
Trouble symptoms and remedies
If a problem is caused by the connected computer or other equipment, please refer to the connected equipment's instruction manual.
| Symptom Check these items | |
| No picture | |
| If the ⏻(power) indicator is not lit after power cord is connected, or if the ⏻(power) indicator is not lit after the power switch is pressed, | ·Check that the power cord is properly connected. |
| If “CABLE DISCONNECTED” appears on the screen, | ·Check that the video signal cable is properly connected and all plugs are firmly seated in their sockets (page 8).·Check that the video input connector’s pins are not bent or pushed in.·Check that the input select setting is correct (page 10).·A non-supplied video signal cable is connected. If you connect a non-supplied video signal cable, “CABLE DISCONNECTED” may appear on the screen before entering the power saving mode. This is not a malfunction. |
| If “NO INPUT SIGNAL” appears on the screen, or the ⏻(power) indicator is orange, | ·Check that the video signal cable is properly connected and all plugs are firmly seated in their sockets (page 8).·Check that the video input connector’s pins are not bent or pushed in.·Check that the input select setting is correct (page 10).■Problems caused by a computer or other equipment connected, and not caused by the monitor·The computer is in the power saving mode. Try pressing any key on the keyboard or moving the mouse.·Check that your graphics board is installed properly.·Change your graphic board to the latest driver. Or match the version of your graphic board to the current OS.·When using a laptop computer, set the output of your computer to video out (for details on video out setting, contact your computer manufacturer).·Check that the computer’s power is on.·Restart the computer. |
| If “OUT OF RANGE” appears on the screen, | ■Problems caused by a computer or other equipment connected, and not caused by the monitor·Check that the video frequency range is within that specified for the monitor. If you replaced an old monitor with this monitor, reconnect the old monitor and adjust the computer’s graphics board within the following ranges:Horizontal: 28–80 kHz (analog RGB), 28–64 kHz (digital RGB)Vertical: 56–75 Hz (analog RGB), 60 Hz (digital RGB)Resolution: 1280 × 1024 or less·Start your OS in Safe mode and restart the computer after setting the resolution. The setting of safe mode varies depending on your OS. For more details, contact your computer manufacturer. |
| If you are using Windows and replaced an old monitor with this monitor, | ·If you replaced an old monitor with this monitor, reconnect the old monitor and do the following. Select “SONY” from the “Manufacturers” list and select “SDM-G76X” or “SDM-G96X” from the “Models” list in the Windows device selection screen. If the model name of this monitor does not appear in the “Models” list, try “Plug & Play.” |
| If using a Macintosh system, | ·If you use the Macintosh adapter (not supplied), check that the Macintosh adapter and the video signal cable are properly connected. |
| Picture flickers, bounces, oscillates, or is scrambled | ·Adjust the pitch and phase (analog RGB signal only) (page 15).·Try plugging the monitor into a different AC outlet, preferably on a different circuit.■Problems caused by a computer or other equipment connected, and not caused by the monitor·Check your graphics board manual for the proper monitor setting.·Confirm that the graphics mode (VESA, Macintosh 19" Color, etc.) and the frequency of the input signal are supported by this monitor. Even if the frequency is within the proper range, some graphics boards may have a sync pulse that is too narrow for the monitor to sync correctly.·Adjust the computer’s refresh rate (vertical frequency) to obtain the best possible picture. |
| Picture is fuzzy • Adjust the brightness and contrast (page 12).• Adjust the pitch and phase (analog RGB signal only) (page 15).■ Problems caused by a computer or other equipment connected, and not caused by the monitor• Set the resolution to SXGA (1280 × 1024) on your computer. | |
| Picture is ghosting | • Eliminate the use of video cable extensions and/or video switch boxes.• Check that all plugs are firmly seated in their sockets. |
| Picture is not centered or sized properly (analog RGB signal only) | • Adjust the pitch and phase (page 15).• Adjust the picture position (page 15). Note that some video modes do not fill the screen to the edges. |
| Picture is too small | ■ Problems caused by a computer or other equipment connected, and not caused by the monitor• Set the resolution to SXGA (1280 × 1024) on your computer. |
| Picture is dark • Adjust the brightness (page 12).• Adjust the backlight (page 12).• It takes a few minutes for the display to become bright after turning on the monitor. | |
| Wavy or elliptical pattern (moire) is visible | • Adjust the pitch and phase (analog RGB signal only) (page 15). |
| Color is not uniform | • Adjust the pitch and phase (analog RGB signal only) (page 15). |
| White does not look white | • Adjust the color temperature (page 13). |
| Monitor buttons do not operate (Appears on the screen) | • If MENU LOCK is set to ON, set it to OFF (page 18). |
| The monitor turns off after a while | ■ Problems caused by a computer or other equipment connected, and not caused by the monitor• Set the computer's power saving setting to off. |
| Resolution displayed on the menu screen is incorrect | • Depending on the graphics board setting, the resolution displayed on the menu screen may not coincide with the one set on the computer. |
If any problem persists, call your authorized Sony dealer and give the following information:
- Model name: SDM-G76X or SDM-G96X
- Serial number
• Detailed description of the problem - Date of purchase
- Name and specifications of your computer and graphics board
Specifications
SDM-G76X
LCD panel Panel type: a-Si TFT Active Matrix
Picture size: 17.0 inch
Input signal format RGB operating frequency*
Horizontal: 28–80 kHz (analog RGB)
28–64 kHz (digital RGB)
Vertical: 56–75 Hz (analog RGB)
60 Hz (digital RGB)
Resolution Horizontal: Max.1280 dots
Vertical: Max.1024 lines
Input signal levels Analog RGB video signal
0.7 Vp-p, 75 Ω, positive
SYNC signal
TTL level, 2.2 kΩ,
positive or negative
(Separate horizontal and vertical)
Digital RGB (DVI) signal:
TMDS (Single link)
Audio input Stereo minijack, 0.5 Vrms
Speaker output 2 W × 2
Headphones jack Stereo minijack
Power requirements 100–240 V, 50–60 Hz,
Max. 1.0 A
Operating temperature 5–35 °C
Dimensions (width/height/depth)
Display (upright):
Approx. 383.5×404.5×163 mm
(15 ^1 /8 × 16 × 6 ^1 /2 inches)
Mass Approx. 5.5 kg (12 lb 2 oz)
Plug & Play DDC2B
Accessories
See page 8.
SDM-G96X
LCD panel Panel type: a-Si TFT Active Matrix
Picture size: 19.0 inch
Input signal format RGB operating frequency*
Horizontal: 28–80 kHz (analog RGB)
28–64 kHz (digital RGB)
Vertical: 56–75 Hz (analog RGB)
60 Hz (digital RGB)
Resolution Horizontal: Max.1280 dots
Vertical: Max.1024 lines
Input signal levels Analog RGB video signal
0.7 Vp-p, 75 Ω positive
SYNC signal
TTL level, 2.2 kΩ
positive or negative
(Separate horizontal and vertical)
Digital RGB (DVI) signal:
TMDS (Single link)
Audio input Stereo minijack, 0.5 Vrms
Speaker output 2 W × 2
Headphones jack Stereo minijack
Power requirements 100–240 V, 50–60 Hz,
Max. 1.0 A
Operating temperature 5–35 °C
Dimensions (width/height/depth)
Display (upright):
Approx. 422.5 × 435.5 × 163 mm
(16^3/4 × 17^1/4 × 6^1/2 inches)
Mass Approx. 6 kg (13 lb 3 ^5 /8 oz)
Plug & Play DDC2B
Accessories See page 8.
* Recommended horizontal and vertical timing condition
- Horizontal sync width duty should be more than 4.8% of total horizontal time or 0.8 μs, whichever is larger.
• Horizontal blanking width should be more than 2.5 μsec.
• Vertical blanking width should be more than 450 μsec.
Design and specifications are subject to change without notice.
TFT LCD Color Computer Display
Mode d'emploi (FR)
SDM-G76X
SDM-G96X
Owner's Record
The model and serial numbers are located at the rear of the unit. Record these numbers in the spaces provided below. Refer to them whenever you call upon your dealer regarding this product. Model No. ____ Serial No. ____
WARNING
To reduce the risk of fire or electric shock, do not expose this apparatus to rain or moisture.
Dangerously high voltages are present inside the unit. Do not open the cabinet. Refer servicing to qualified personnel only.
FCC Notice
This equipment has been tested and found to comply with the limits for a Class B digital device, pursuant to Part 15 of the FCC Rules. These limits are designed to provide reasonable protection against harmful interference in a residential installation. This equipment generates, uses, and can radiate radio frequency energy and, if not installed and used in accordance with the instructions, may cause harmful interference to radio communications. However, there is no guarantee that interference will not occur in a particular installation. If this equipment does cause harmful interference to radio or television reception, which can be determined by turning the equipment off and on, the user is encouraged to try to correct the interference by one or more of the following measures:
– Reorient or relocate the receiving antenna.
– Increase the separation between the equipment and receiver.
- Connect the equipment into an outlet on a circuit different from that to which the receiver is connected.
- Consult the dealer or an experienced radio/TV technician for help. You are cautioned that any changes or modifications not expressly approved in this manual could void your authority to operate this equipment.
IMPORTANTE
If you have any questions about this product, you may call; Sony Customer Information Services Center 1-800-222-7669 or http://www.sony.com/
Declaration of Conformity
Trade Name: SONY
Model: SDM-G76X
SDM-G96X
Responsible Party: Sony Electronics Inc.
Address: 16530 Via Esprillo,
San Diego, CA 92127 U.S.A.
Telephone Number: 858-942-2230
This device complies with part 15 of the FCC rules. Operation is subject to the following two conditions: (1) This device may not cause harmful interference, and (2) this device must accept any interference received, including interference that may cause undesired operation.
NOTICE
This notice is applicable for USA/Canada only. If shipped to USA/Canada, install only a UL LISTED/CSA LABELLED power supply cord meeting the following specifications:
SPECIFICATIONS
Plug Type Nema-Plug 5-15p
Cord Type SVT or SJT, minimum 3 × 18 AWG
Length Maximum 15 feet
Rating Minimum 7 A, 125 V
NOTICE
As an ENERGY STAR Partner, Sony Corporation has determined that this product meets the ENERGY STAR guidelines for energy efficiency.
Table des matières
Précautions....4
natural_image
Three line drawings of different types of electrical plugs (no text or symbols)natural_image
Line drawing of a vertical monitor with a handle and base, labeled with number 13 (no text or symbols on the device itself)natural_image
Diagram of a mechanical lever system with a handle and pivot, showing motion direction (no text or symbols)Remarque
natural_image
Illustration of hands holding a tablet device with a curved arrow indicating rotation (no text or symbols)3 Ajustez le menu.
4 Refermez le menu.
natural_image
Two-panel image showing a computer monitor and a server rack with a file icon, both without any readable text or symbols.natural_image
Two-panel image showing a textured surface before and after transformation: left panel shows 'Soil Project' with scale bar, right panel shows 'Soil Project' with striped pattern and scale bar.natural_image
Two-panel image showing a vertical striped pattern on the left and a striped pattern on the right, both without any text or symbols.100–240 V, 50–60 Hz,
max. 1,0 A
100–240 V, 50–60 Hz,
max. 1,0 A
The model and serial numbers are located at the rear of the unit. Record these numbers in the spaces provided below. Refer to them whenever you call upon your dealer regarding this product. Model No. ____ Serial No. ____
WARNING
To reduce the risk of fire or electric shock, do not expose this apparatus to rain or moisture.
Dangerously high voltages are present inside the unit. Do not open the cabinet. Refer servicing to qualified personnel only.
FCC Notice
This equipment has been tested and found to comply with the limits for a Class B digital device, pursuant to Part 15 of the FCC Rules. These limits are designed to provide reasonable protection against harmful interference in a residential installation. This equipment generates, uses, and can radiate radio frequency energy and, if not installed and used in accordance with the instructions, may cause harmful interference to radio communications. However, there is no guarantee that interference will not occur in a particular installation. If this equipment does cause harmful interference to radio or television reception, which can be determined by turning the equipment off and on, the user is encouraged to try to correct the interference by one or more of the following measures:
– Reorient or relocate the receiving antenna.
– Increase the separation between the equipment and receiver.
- Connect the equipment into an outlet on a circuit different from that to which the receiver is connected.
- Consult the dealer or an experienced radio/TV technician for help. You are cautioned that any changes or modifications not expressly approved in this manual could void your authority to operate this equipment.
IMPORTANTE
If you have any questions about this product, you may call; Sony Customer Information Services Center 1-800-222-7669 or http://www.sony.com/
Declaration of Conformity
Trade Name: SONY
Model: SDM-G76X
SDM-G96X
Responsible Party: Sony Electronics Inc.
Address: 16530 Via Esprillo,
San Diego, CA 92127 U.S.A.
Telephone Number: 858-942-2230
This device complies with part 15 of the FCC rules. Operation is subject to the following two conditions: (1) This device may not cause harmful interference, and (2) this device must accept any interference received, including interference that may cause undesired operation.
NOTICE
This notice is applicable for USA/Canada only. If shipped to USA/Canada, install only a UL LISTED/CSA LABELLED power supply cord meeting the following specifications:
SPECIFICATIONS
Plug Type Nema-Plug 5-15p
Cord Type SVT or SJT, minimum 3 × 18 AWG
Length Maximum 15 feet
Rating Minimum 7 A, 125 V
NOTICE
As an ENERGY STAR Partner, Sony Corporation has determined that this product meets the ENERGY STAR guidelines for energy efficiency.
Inhalt
natural_image
Line drawing of a vertical monitor with a handle and base, labeled with number 13 (no text or symbols on the device itself)natural_image
Diagram of a mechanical lever system with a handle and pivot, showing motion direction (no text or symbols)Hinweis
natural_image
Illustration of hands holding a tablet device with a curved arrow indicating rotation (no text or symbols)natural_image
Diagram showing a device transforming into a microchip (no text or symbols present)natural_image
Two grayscale images showing a small object on the left and a rectangular object on the right, both with an arrow indicating transformation (no text or symbols present)natural_image
Two-panel image showing a vertical striped pattern on the left and a grid-patterned rectangular block on the right, both without any text or symbols.Horizontal: 28–80 kHz
(analoges RGB)
28–64 kHz
(digitales RGB)
Vertikal: 56–75 Hz (analoges RGB)
60 Hz (digitales RGB)
Horizontal: 28–80 kHz
(analoges RGB)
28–64 kHz
(digitales RGB)
Vertical: 56–75 Hz (analoges RGB)
60 Hz (digitales RGB)
The model and serial numbers are located at the rear of the unit. Record these numbers in the spaces provided below. Refer to them whenever you call upon your dealer regarding this product. Model No. ____ Serial No. ____
WARNING
To reduce the risk of fire or electric shock, do not expose this apparatus to rain or moisture.
Dangerously high voltages are present inside the unit. Do not open the cabinet. Refer servicing to qualified personnel only.
FCC Notice
This equipment has been tested and found to comply with the limits for a Class B digital device, pursuant to Part 15 of the FCC Rules. These limits are designed to provide reasonable protection against harmful interference in a residential installation. This equipment generates, uses, and can radiate radio frequency energy and, if not installed and used in accordance with the instructions, may cause harmful interference to radio communications. However, there is no guarantee that interference will not occur in a particular installation. If this equipment does cause harmful interference to radio or television reception, which can be determined by turning the equipment off and on, the user is encouraged to try to correct the interference by one or more of the following measures:
– Reorient or relocate the receiving antenna.
– Increase the separation between the equipment and receiver.
- Connect the equipment into an outlet on a circuit different from that to which the receiver is connected.
- Consult the dealer or an experienced radio/TV technician for help. You are cautioned that any changes or modifications not expressly approved in this manual could void your authority to operate this equipment.
IMPORTANTE
If you have any questions about this product, you may call; Sony Customer Information Services Center 1-800-222-7669 or http://www.sony.com/
Declaration of Conformity
Trade Name: SONY
Model: SDM-G76X
SDM-G96X
Responsible Party: Sony Electronics Inc.
Address: 16530 Via Esprillo,
San Diego, CA 92127 U.S.A.
Telephone Number: 858-942-2230
This device complies with part 15 of the FCC rules. Operation is subject to the following two conditions: (1) This device may not cause harmful interference, and (2) this device must accept any interference received, including interference that may cause undesired operation.
NOTICE
This notice is applicable for USA/Canada only. If shipped to USA/Canada, install only a UL LISTED/CSA LABELLED power supply cord meeting the following specifications:
SPECIFICATIONS
Plug Type Nema-Plug 5-15p
Cord Type SVT or SJT, minimum 3 × 18 AWG
Length Maximum 15 feet
Rating Minimum 7 A, 125 V
NOTICE
As an ENERGY STAR Partner, Sony Corporation has determined that this product meets the ENERGY STAR guidelines for energy efficiency.
Índice
Precauciones 4
natural_image
Three line drawings of different types of electrical plugs (no text or symbols)natural_image
Line drawing of a vertical monitor with a handle and base, labeled with number 13 (no text or symbols on the device itself)natural_image
Line drawing of a mechanical component with a lever and curved handle (no text or symbols)Nota
natural_image
Illustration of hands holding a tablet device with a curved arrow indicating rotation (no text or symbols)3 Ajuste el menú.
4 Cierre el menú.
natural_image
Two-panel image showing a document being processed into a striped patterned surface, no text or symbols present.natural_image
Two-panel image showing a textured surface before and after transformation: left panel shows horizontal striations, right panel shows vertical striped patterns (no text or symbols)natural_image
Two-panel scientific image showing a striped pattern before and after transformation, with no visible text or symbols.Horizontal: 28–80 kHz
(RGB analógico)
28–64 kHz (RGB digital)
Vertical: 56–75 Hz (RGB analógico)
60 Hz (RGB digital)
Horizontal: 28–80 kHz (RGB
analógico)
28–64 kHz (RGB digital)
Vertical: 56–75 Hz (RGB analógico)
60 Hz (RGB digital)
The model and serial numbers are located at the rear of the unit. Record these numbers in the spaces provided below. Refer to them whenever you call upon your dealer regarding this product. Model No. ____ Serial No. ____
WARNING
To reduce the risk of fire or electric shock, do not expose this apparatus to rain or moisture.
Dangerously high voltages are present inside the unit. Do not open the cabinet. Refer servicing to qualified personnel only.
FCC Notice
This equipment has been tested and found to comply with the limits for a Class B digital device, pursuant to Part 15 of the FCC Rules. These limits are designed to provide reasonable protection against harmful interference in a residential installation. This equipment generates, uses, and can radiate radio frequency energy and, if not installed and used in accordance with the instructions, may cause harmful interference to radio communications. However, there is no guarantee that interference will not occur in a particular installation. If this equipment does cause harmful interference to radio or television reception, which can be determined by turning the equipment off and on, the user is encouraged to try to correct the interference by one or more of the following measures: - Reorient or relocate the receiving antenna. - Increase the separation between the equipment and receiver. - Connect the equipment into an outlet on a circuit different from that to which the receiver is connected. - Consult the dealer or an experienced radio/TV technician for help. You are cautioned that any changes or modifications not expressly approved in this manual could void your authority to operate this equipment.
IMPORTANTE
If you have any questions about this product, you may call; Sony Customer Information Services Center 1-800-222-7669 or http://www.sony.com/
Declaration of Conformity
Trade Name: SONY
Model: SDM-G76X
SDM-G96X
Responsible Party: Sony Electronics Inc.
Address: 16530 Via Esprillo,
San Diego, CA 92127 U.S.A.
Telephone Number: 858-942-2230
This device complies with part 15 of the FCC rules. Operation is subject to the following two conditions: (1) This device may not cause harmful interference, and (2) this device must accept any interference received, including interference that may cause undesired operation.
NOTICE
This notice is applicable for USA/Canada only.
If shipped to USA/Canada, install only a UL LISTED/CSA
LABELLED power supply cord meeting the following
specifications:
SPECIFICATIONS
Plug Type Nema-Plug 5-15p
Cord Type SVT or SJT, minimum 3 × 18 AWG
Length Maximum 15 feet
Rating Minimum 7 A, 125 V
NOTICE
As an ENERGY STAR Partner, Sony Corporation has determined that this product meets the ENERGY STAR guidelines for energy efficiency.
Indice
Precauzioni 4
natural_image
Three line drawings of different types of electrical plugs (no text or symbols)da 100 a 120 V CA da 200 a 240 V CA solo 240 V CA
natural_image
Line drawing of a vertical monitor with a handle and base, labeled with number 13 (no text or symbols on the device itself)8Foro di protezione
natural_image
Diagram of a mechanical lever mechanism with no text or symbolsNota
natural_image
Illustration of hands holding a tablet device with a curved arrow indicating rotation (no text or symbols)3 Regolare il menu.
4 Chiudere il menu.
natural_image
Diagram showing a document being processed into a striped patterned device (no text or symbols visible)natural_image
Two-panel image showing a computer monitor and a striped screen with a grid, both without any visible text or symbols.natural_image
Two-panel image showing a textured surface before and after processing, with no visible text or symbols.natural_image
Two-panel image showing a striped pattern on the left and a striped pattern on the right, both without any text or symbols.The model and serial numbers are located at the rear of the unit. Record these numbers in the spaces provided below. Refer to them whenever you call upon your dealer regarding this product. Model No. ____ Serial No. ____
WARNING
To reduce the risk of fire or electric shock, do not expose this apparatus to rain or moisture.
Dangerously high voltages are present inside the unit. Do not open the cabinet. Refer servicing to qualified personnel only.
FCC Notice
This equipment has been tested and found to comply with the limits for a Class B digital device, pursuant to Part 15 of the FCC Rules. These limits are designed to provide reasonable protection against harmful interference in a residential installation. This equipment generates, uses, and can radiate radio frequency energy and, if not installed and used in accordance with the instructions, may cause harmful interference to radio communications. However, there is no guarantee that interference will not occur in a particular installation. If this equipment does cause harmful interference to radio or television reception, which can be determined by turning the equipment off and on, the user is encouraged to try to correct the interference by one or more of the following measures:
– Reorient or relocate the receiving antenna.
– Increase the separation between the equipment and receiver.
- Connect the equipment into an outlet on a circuit different from that to which the receiver is connected.
- Consult the dealer or an experienced radio/TV technician for help. You are cautioned that any changes or modifications not expressly approved in this manual could void your authority to operate this equipment.
IMPORTANTE
If you have any questions about this product, you may call; Sony Customer Information Services Center 1-800-222-7669 or http://www.sony.com/
Declaration of Conformity
Trade Name: SONY
Model: SDM-G76X
SDM-G96X
Responsible Party: Sony Electronics Inc.
Address: 16530 Via Esprillo,
San Diego, CA 92127 U.S.A.
Telephone Number: 858-942-2230
This device complies with part 15 of the FCC rules. Operation is subject to the following two conditions: (1) This device may not cause harmful interference, and (2) this device must accept any interference received, including interference that may cause undesired operation.
NOTICE
This notice is applicable for USA/Canada only. If shipped to USA/Canada, install only a UL LISTED/CSA LABELLED power supply cord meeting the following specifications:
SPECIFICATIONS
Plug Type Nema-Plug 5-15p
Cord Type SVT or SJT, minimum 3 × 18 AWG
Length Maximum 15 feet
Rating Minimum 7 A, 125 V
NOTICE
As an ENERGY STAR Partner, Sony Corporation has determined that this product meets the ENERGY STAR guidelines for energy efficiency.
Conteúdos
Precauções....4
natural_image
Three line drawings of different types of electrical plugs (no text or symbols)natural_image
Line drawing of a vertical monitor with a handle and base, labeled with number 13 (no text or symbols on the device itself)natural_image
Simple line drawing of a mechanical component with a lever and curved base (no text or symbols)Nota
natural_image
Illustration of hands holding a tablet device with a curved arrow indicating rotation (no text or symbols)3 Regule o menu.
4 Feche o menu.
natural_image
Two-panel image showing a document being processed into a microchip, with no visible text or symbols.9 Prima o botão OK.
Surge no ecrã o menu principal.
natural_image
Two-panel image showing a textured surface before and after processing, with no visible text or symbols.8 Prima o botão OK.
Surge no ecrã o menu principal.
natural_image
Two-panel image showing a vertical striped pattern on the left and a grayscale striped pattern on the right, both without any text or symbols.→•← Menu RESET (repor as predefinições)
GO TO POWER SAVE
Vertical: 56–75 Hz (RGB
analógico)
60 Hz (RGB digital)
Vertical: 56–75 Hz (RGB
analógico)
60 Hz (RGB digital)
The model and serial numbers are located at the rear of the unit. Record these numbers in the spaces provided below. Refer to them whenever you call upon your dealer regarding this product. Model No. ____ Serial No. ____
WARNING
To reduce the risk of fire or electric shock, do not expose this apparatus to rain or moisture.
Dangerously high voltages are present inside the unit. Do not open the cabinet. Refer servicing to qualified personnel only.
FCC Notice
This equipment has been tested and found to comply with the limits for a Class B digital device, pursuant to Part 15 of the FCC Rules. These limits are designed to provide reasonable protection against harmful interference in a residential installation. This equipment generates, uses, and can radiate radio frequency energy and, if not installed and used in accordance with the instructions, may cause harmful interference to radio communications. However, there is no guarantee that interference will not occur in a particular installation. If this equipment does cause harmful interference to radio or television reception, which can be determined by turning the equipment off and on, the user is encouraged to try to correct the interference by one or more of the following measures: - Reorient or relocate the receiving antenna. - Increase the separation between the equipment and receiver. - Connect the equipment into an outlet on a circuit different from that to which the receiver is connected. - Consult the dealer or an experienced radio/TV technician for help. You are cautioned that any changes or modifications not expressly approved in this manual could void your authority to operate this equipment.
IMPORTANTE
If you have any questions about this product, you may call; Sony Customer Information Services Center 1-800-222-7669 or http://www.sony.com/
Declaration of Conformity
Trade Name: SONY
Model: SDM-G76X
SDM-G96X
Responsible Party: Sony Electronics Inc.
Address: 16530 Via Esprillo,
San Diego, CA 92127 U.S.A.
Telephone Number: 858-942-2230
This device complies with part 15 of the FCC rules. Operation is subject to the following two conditions: (1) This device may not cause harmful interference, and (2) this device must accept any interference received, including interference that may cause undesired operation.

BZ03
This notice is applicable for USA/Canada only.
If shipped to USA/Canada, install only a UL LISTED/CSA
LABELLED power supply cord meeting the following specifications:
SPECIFICATIONS
Plug Type Nema-Plug 5-15p
Cord Type SVT or SJT, minimum 3 × 18 AWG
Length Maximum 15 feet
Rating Minimum 7 A, 125 V
NOTICE
As an ENERGY STAR Partner, Sony Corporation has determined that this product meets the ENERGY STAR guidelines for energy efficiency.
Содержание
natural_image
Line drawing of a vertical monitor with a handle and base, labeled with number 13 (no text or symbols on the device itself)natural_image
Technical line drawing of a mechanical clamp or bracket with a handle and arrow indicating motion (no text or symbols)Примечание
natural_image
Illustration of hands holding a tablet device with a curved arrow indicating rotation (no text or symbols)4 Закройте меню.
natural_image
Diagram showing a device transforming into a microchip or memory unit (no text or symbols visible)natural_image
Two-panel image showing a textured surface before and after processing, with no visible text or symbols.The model and serial numbers are located at the rear of the unit. Record these numbers in the spaces provided below. Refer to them whenever you call upon your dealer regarding this product. Model No. ____ Serial No. ____
WARNING
To reduce the risk of fire or electric shock, do not expose this apparatus to rain or moisture.
Dangerously high voltages are present inside the unit. Do not open the cabinet. Refer servicing to qualified personnel only.
FCC Notice
This equipment has been tested and found to comply with the limits for a Class B digital device, pursuant to Part 15 of the FCC Rules. These limits are designed to provide reasonable protection against harmful interference in a residential installation. This equipment generates, uses, and can radiate radio frequency energy and, if not installed and used in accordance with the instructions, may cause harmful interference to radio communications. However, there is no guarantee that interference will not occur in a particular installation. If this equipment does cause harmful interference to radio or television reception, which can be determined by turning the equipment off and on, the user is encouraged to try to correct the interference by one or more of the following measures:
– Reorient or relocate the receiving antenna.
– Increase the separation between the equipment and receiver.
- Connect the equipment into an outlet on a circuit different from that to which the receiver is connected.
- Consult the dealer or an experienced radio/TV technician for help. You are cautioned that any changes or modifications not expressly approved in this manual could void your authority to operate this equipment.
IMPORTANTE
If you have any questions about this product, you may call; Sony Customer Information Services Center 1-800-222-7669 or http://www.sony.com/
Declaration of Conformity
Trade Name: SONY
Model: SDM-G76X
SDM-G96X
Responsible Party: Sony Electronics Inc.
Address: 16530 Via Esprillo,
San Diego, CA 92127 U.S.A.
Telephone Number: 858-942-2230
This device complies with part 15 of the FCC rules. Operation is subject to the following two conditions: (1) This device may not cause harmful interference, and (2) this device must accept any interference received, including interference that may cause undesired operation.
NOTICE
This notice is applicable for USA/Canada only. If shipped to USA/Canada, install only a UL LISTED/CSA LABELLED power supply cord meeting the following specifications:
SPECIFICATIONS
Plug Type Nema-Plug 5-15p
Cord Type SVT or SJT, minimum 3 × 18 AWG
Length Maximum 15 feet
Rating Minimum 7 A, 125 V
NOTICE
As an ENERGY STAR Partner, Sony Corporation has determined that this product meets the ENERGY STAR guidelines for energy efficiency.
natural_image
Line drawing of a vertical monitor with a handle and base, labeled with number 13 (no text or symbols on the device itself)natural_image
Diagram of a mechanical lever system with a handle and pivot, showing motion direction (no text or symbols)Obs!
natural_image
Diagram of a mechanical assembly with dashed lines indicating components, no text or symbols presentnatural_image
Illustration of hands holding a folded or folded device with a curved arrow indicating rotation (no text or symbols)3 Justera menyn.
4 Stäng menyn.
1 Tryck på MENU-knappen.
natural_image
Diagram showing a document transforming into a microchip or display (no text or symbols present)natural_image
Two-panel image showing a computer monitor and a striped circuit board with a grid overlay (no text or symbols)natural_image
Two-panel image showing a textured surface before and after transformation, with no visible text or symbols.natural_image
Two-panel image showing a vertical striped pattern on the left and a grayscale striped pattern on the right, both without any text or symbols.28–64 kHz (digital RGB)
Vertical: 56-75 Hz (analog RGB)
60 Hz (digital RGB)
Upplösning Horisontal: Max. 1 280 punkter
Digital RGB-signal (DVI):
TMDS (Enkel länk)
28–64 kHz (digital RGB)
Vertical: 56-75 Hz (analog RGB)
60 Hz (digital RGB)
Upplösning Horisontal: Max. 1 280 punkter
Vertical: Max. 1 024 linjer
Insignalnivåer
Analog RGB-videosignal
0,7 Vp-p, 75 Ω, positiv
SYNC-signal
TTL-nivå, 2,2 kΩ,
Digital RGB-signal (DVI):
TMDS (Enkel länk)
The model and serial numbers are located at the rear of the unit. Record these numbers in the spaces provided below. Refer to them whenever you call upon your dealer regarding this product. Model No. ____ Serial No. ____
WARNING
To reduce the risk of fire or electric shock, do not expose this apparatus to rain or moisture.
Dangerously high voltages are present inside the unit. Do not open the cabinet. Refer servicing to qualified personnel only.
FCC Notice
This equipment has been tested and found to comply with the limits for a Class B digital device, pursuant to Part 15 of the FCC Rules. These limits are designed to provide reasonable protection against harmful interference in a residential installation. This equipment generates, uses, and can radiate radio frequency energy and, if not installed and used in accordance with the instructions, may cause harmful interference to radio communications. However, there is no guarantee that interference will not occur in a particular installation. If this equipment does cause harmful interference to radio or television reception, which can be determined by turning the equipment off and on, the user is encouraged to try to correct the interference by one or more of the following measures: - Reorient or relocate the receiving antenna. - Increase the separation between the equipment and receiver. - Connect the equipment into an outlet on a circuit different from that to which the receiver is connected. - Consult the dealer or an experienced radio/TV technician for help. You are cautioned that any changes or modifications not expressly approved in this manual could void your authority to operate this equipment.
IMPORTANTE
If you have any questions about this product, you may call; Sony Customer Information Services Center 1-800-222-7669 or http://www.sony.com/
Declaration of Conformity
Trade Name: SONY
Model: SDM-G76X
SDM-G96X
Responsible Party: Sony Electronics Inc.
Address: 16530 Via Esprillo,
San Diego, CA 92127 U.S.A.
Telephone Number: 858-942-2230
This device complies with part 15 of the FCC rules. Operation is subject to the following two conditions: (1) This device may not cause harmful interference, and (2) this device must accept any interference received, including interference that may cause undesired operation.
NOTICE
This notice is applicable for USA/Canada only.
If shipped to USA/Canada, install only a UL LISTED/CSA
LABELLED power supply cord meeting the following
specifications:
SPECIFICATIONS
Plug Type Nema-Plug 5-15p
Cord Type SVT or SJT, minimum 3 × 18 AWG
Length Maximum 15 feet
Rating Minimum 7 A, 125 V
NOTICE
As an ENERGY STAR Partner, Sony Corporation has determined that this product meets the ENERGY STAR guidelines for energy efficiency.
Inhoud
natural_image
Line drawing of a vertical monitor with a handle and base, labeled with number 13 (no text or symbols on the device itself)8 Veiligheidsvergrendeling
natural_image
Technical line drawing of a mechanical clamp or bracket with a handle and arrow indicating motion (no text or symbols)Opmerking
natural_image
Illustration of hands holding a tablet device with a curved arrow indicating rotation (no text or symbols)3 Pas het menu aan.
4 Sluit het menu.
natural_image
Two-panel image showing a grid of rectangular blocks and a close-up of a microchip or display (no text or symbols visible)[MAC_CLASSIC_UTILITY] of [MAC_OSX_UTILITY].
natural_image
Two-panel image showing a textured surface before and after processing, with no visible text or symbols.natural_image
Two-panel image showing a vertical striped pattern on the left and a striped pattern on the right, both without any text or symbols.The model and serial numbers are located at the rear of the unit. Record these numbers in the spaces provided below. Refer to them whenever you call upon your dealer regarding this product. Model No. ____ Serial No. ____
WARNING
To reduce the risk of fire or electric shock, do not expose this apparatus to rain or moisture.
Dangerously high voltages are present inside the unit. Do not open the cabinet. Refer servicing to qualified personnel only.
FCC Notice
This equipment has been tested and found to comply with the limits for a Class B digital device, pursuant to Part 15 of the FCC Rules. These limits are designed to provide reasonable protection against harmful interference in a residential installation. This equipment generates, uses, and can radiate radio frequency energy and, if not installed and used in accordance with the instructions, may cause harmful interference to radio communications. However, there is no guarantee that interference will not occur in a particular installation. If this equipment does cause harmful interference to radio or television reception, which can be determined by turning the equipment off and on, the user is encouraged to try to correct the interference by one or more of the following measures: - Reorient or relocate the receiving antenna. - Increase the separation between the equipment and receiver. - Connect the equipment into an outlet on a circuit different from that to which the receiver is connected. - Consult the dealer or an experienced radio/TV technician for help. You are cautioned that any changes or modifications not expressly approved in this manual could void your authority to operate this equipment.
IMPORTANTE
If you have any questions about this product, you may call; Sony Customer Information Services Center 1-800-222-7669 or http://www.sony.com/
Declaration of Conformity
Trade Name: SONY
Model: SDM-G76X
SDM-G96X
Responsible Party: Sony Electronics Inc.
Address: 16530 Via Esprillo,
San Diego, CA 92127 U.S.A.
Telephone Number: 858-942-2230
This device complies with part 15 of the FCC rules. Operation is subject to the following two conditions: (1) This device may not cause harmful interference, and (2) this device must accept any interference received, including interference that may cause undesired operation.
NOTICE
This notice is applicable for USA/Canada only.
If shipped to USA/Canada, install only a UL LISTED/CSA
LABELLED power supply cord meeting the following
specifications:
SPECIFICATIONS
Plug Type Nema-Plug 5-15p
Cord Type SVT or SJT, minimum 3 × 18 AWG
Length Maximum 15 feet
Rating Minimum 7 A, 125 V
NOTICE
As an ENERGY STAR Partner, Sony Corporation has determined that this product meets the ENERGY STAR guidelines for energy efficiency.
目录
使用前注意事项 4
识别部件和控制钮 5
安装 7
步骤 1:使用支架 ..... 7
natural_image
Line drawing of a flat-screen monitor with a stand and handle, labeled with number 13 (no text or symbols on the device itself)8安全锁定孔
natural_image
Technical line drawing of a mechanical clamp or bracket with a handle and base, showing no text or symbols.注意
natural_image
Illustration of hands holding a folded or folded device with a curved arrow indicating rotation (no text or symbols)若要舒适地使用显示器
3 调整菜单。
4 关闭菜单。
1 按 MENU 按钮。
屏幕上出现主菜单。
natural_image
Diagram showing a document being processed into a microchip (no text or symbols visible)9 按 OK 按钮。
屏幕上出现主菜单。
natural_image
Two-panel image showing a small screen with text and a right-pointing arrow, alongside a striped patterned background (no readable text or symbols)13 按 OK 按钮。
屏幕上出现主菜单。
14 单击 “Next”。
出现 CENTER 的测试图案。
natural_image
Two-panel image showing a textured surface before and after transformation, with no visible text or symbols.8 按 OK 按钮。
屏幕上出现主菜单。
natural_image
Two-panel image showing a striped pattern on the left and a striped pattern on the right, both without any text or symbols.11 按 OK 按钮。
屏幕上出现主菜单。
The model and serial numbers are located at the rear of the unit. Record these numbers in the spaces provided below. Refer to them whenever you call upon your dealer regarding this product. Model No. ____ Serial No. ____
WARNING
To reduce the risk of fire or electric shock, do not expose this apparatus to rain or moisture.
Dangerously high voltages are present inside the unit. Do not open the cabinet. Refer servicing to qualified personnel only.
FCC Notice
This equipment has been tested and found to comply with the limits for a Class B digital device, pursuant to Part 15 of the FCC Rules. These limits are designed to provide reasonable protection against harmful interference in a residential installation. This equipment generates, uses, and can radiate radio frequency energy and, if not installed and used in accordance with the instructions, may cause harmful interference to radio communications. However, there is no guarantee that interference will not occur in a particular installation. If this equipment does cause harmful interference to radio or television reception, which can be determined by turning the equipment off and on, the user is encouraged to try to correct the interference by one or more of the following measures:
– Reorient or relocate the receiving antenna.
– Increase the separation between the equipment and receiver.
- Connect the equipment into an outlet on a circuit different from that to which the receiver is connected.
- Consult the dealer or an experienced radio/TV technician for help. You are cautioned that any changes or modifications not expressly approved in this manual could void your authority to operate this equipment.
IMPORTANTE
If you have any questions about this product, you may call; Sony Customer Information Services Center 1-800-222-7669 or http://www.sony.com/
Declaration of Conformity
Trade Name: SONY
Model: SDM-G76X
SDM-G96X
Responsible Party: Sony Electronics Inc.
Address: 16530 Via Esprillo,
San Diego, CA 92127 U.S.A.
Telephone Number: 858-942-2230
This device complies with part 15 of the FCC rules. Operation is subject to the following two conditions: (1) This device may not cause harmful interference, and (2) this device must accept any interference received, including interference that may cause undesired operation.
NOTICE
This notice is applicable for USA/Canada only. If shipped to USA/Canada, install only a UL LISTED/CSA LABELLED power supply cord meeting the following specifications:
SPECIFICATIONS
Plug Type Nema-Plug 5-15p
Cord Type SVT or SJT, minimum 3 × 18 AWG
Length Maximum 15 feet
Rating Minimum 7 A, 125 V
NOTICE
As an ENERGY STAR Partner, Sony Corporation has determined that this product meets the ENERGY STAR guidelines for energy efficiency.
Obsah
natural_image
Line drawing of a vertical monitor with a base mount and handle, labeled with number 13 (no text or symbols on the device itself)natural_image
Diagram of a mechanical lever system with a handle and pivot, showing motion direction (no text or symbols)Poznámka
natural_image
Illustration of hands holding a tablet device with a curved arrow indicating rotation (no text or symbols)3 Upravte nabídku.
4 Zavřete nabídku.
natural_image
Diagram showing a microchip or memory unit being processed into a striped patterned surface (no text or symbols visible)natural_image
Two-panel image showing a textured surface before and after transformation, with no visible text or symbols.natural_image
Two-panel image showing a vertical striped pattern on the left and a striped pattern on the right, both without any text or symbols.GO TO POWER SAVE
The model and serial numbers are located at the rear of the unit. Record these numbers in the spaces provided below. Refer to them whenever you call upon your dealer regarding this product. Model No. ____ Serial No. ____
WARNING
To reduce the risk of fire or electric shock, do not expose this apparatus to rain or moisture.
Dangerously high voltages are present inside the unit. Do not open the cabinet. Refer servicing to qualified personnel only.
FCC Notice
This equipment has been tested and found to comply with the limits for a Class B digital device, pursuant to Part 15 of the FCC Rules. These limits are designed to provide reasonable protection against harmful interference in a residential installation. This equipment generates, uses, and can radiate radio frequency energy and, if not installed and used in accordance with the instructions, may cause harmful interference to radio communications. However, there is no guarantee that interference will not occur in a particular installation. If this equipment does cause harmful interference to radio or television reception, which can be determined by turning the equipment off and on, the user is encouraged to try to correct the interference by one or more of the following measures: - Reorient or relocate the receiving antenna. - Increase the separation between the equipment and receiver. - Connect the equipment into an outlet on a circuit different from that to which the receiver is connected. - Consult the dealer or an experienced radio/TV technician for help. You are cautioned that any changes or modifications not expressly approved in this manual could void your authority to operate this equipment.
IMPORTANTE
If you have any questions about this product, you may call; Sony Customer Information Services Center 1-800-222-7669 or http://www.sony.com/
Declaration of Conformity
Trade Name: SONY
Model: SDM-G76X
SDM-G96X
Responsible Party: Sony Electronics Inc.
Address: 16530 Via Esprillo,
San Diego, CA 92127 U.S.A.
Telephone Number: 858-942-2230
This device complies with part 15 of the FCC rules. Operation is subject to the following two conditions: (1) This device may not cause harmful interference, and (2) this device must accept any interference received, including interference that may cause undesired operation.
NOTICE
This notice is applicable for USA/Canada only.
If shipped to USA/Canada, install only a UL LISTED/CSA
LABELLED power supply cord meeting the following
specifications:
SPECIFICATIONS
Plug Type Nema-Plug 5-15p
Cord Type SVT or SJT, minimum 3 × 18 AWG
Length Maximum 15 feet
Rating Minimum 7 A, 125 V
NOTICE
As an ENERGY STAR Partner, Sony Corporation has determined that this product meets the ENERGY STAR guidelines for energy efficiency.
Tartalomjegyzék
Óvintézkedések 4
natural_image
Line drawing of a vertical monitor with a handle and base, labeled with number 13 (no text or symbols on the device itself)natural_image
Line drawing of a mechanical component with a lever and curved base (no text or symbols)Megjegyzés
natural_image
Illustration of hands holding a tablet device with a curved arrow indicating rotation (no text or symbols)natural_image
Diagram showing a device transforming into a striped patterned device (no text or symbols present)natural_image
Two-panel image showing a document with text inside a square frame and a computer monitor displaying text, both without any readable symbols or text.natural_image
Two-panel image showing a textured surface before and after structural change, with no visible text or symbols.natural_image
Two-panel image showing a vertical striped pattern on the left and a grid-patterned rectangular block on the right, both without any text or symbols.GO TO POWER SAVE
The model and serial numbers are located at the rear of the unit. Record these numbers in the spaces provided below. Refer to them whenever you call upon your dealer regarding this product. Model No. ____ Serial No. ____
WARNING
To reduce the risk of fire or electric shock, do not expose this apparatus to rain or moisture.
Dangerously high voltages are present inside the unit. Do not open the cabinet. Refer servicing to qualified personnel only.
FCC Notice
This equipment has been tested and found to comply with the limits for a Class B digital device, pursuant to Part 15 of the FCC Rules. These limits are designed to provide reasonable protection against harmful interference in a residential installation. This equipment generates, uses, and can radiate radio frequency energy and, if not installed and used in accordance with the instructions, may cause harmful interference to radio communications. However, there is no guarantee that interference will not occur in a particular installation. If this equipment does cause harmful interference to radio or television reception, which can be determined by turning the equipment off and on, the user is encouraged to try to correct the interference by one or more of the following measures:
– Reorient or relocate the receiving antenna.
– Increase the separation between the equipment and receiver.
- Connect the equipment into an outlet on a circuit different from that to which the receiver is connected.
- Consult the dealer or an experienced radio/TV technician for help. You are cautioned that any changes or modifications not expressly approved in this manual could void your authority to operate this equipment.
IMPORTANTE
If you have any questions about this product, you may call; Sony Customer Information Services Center 1-800-222-7669 or http://www.sony.com/
Declaration of Conformity
Trade Name: SONY
Model: SDM-G76X
SDM-G96X
Responsible Party: Sony Electronics Inc.
Address: 16530 Via Esprillo,
San Diego, CA 92127 U.S.A.
Telephone Number: 858-942-2230
This device complies with part 15 of the FCC rules. Operation is subject to the following two conditions: (1) This device may not cause harmful interference, and (2) this device must accept any interference received, including interference that may cause undesired operation.
NOTICE
This notice is applicable for USA/Canada only. If shipped to USA/Canada, install only a UL LISTED/CSA LABELLED power supply cord meeting the following specifications:
SPECIFICATIONS
Plug Type Nema-Plug 5-15p
Cord Type SVT or SJT, minimum 3 × 18 AWG
Length Maximum 15 feet
Rating Minimum 7 A, 125 V
NOTICE
As an ENERGY STAR Partner, Sony Corporation has determined that this product meets the ENERGY STAR guidelines for energy efficiency.
Spis treści
natural_image
Line drawing of a vertical monitor with a handle and base, labeled with number 13 (no text or symbols on the device itself)natural_image
Line drawing of a mechanical lever mechanism with no text or symbolsUwaga
natural_image
Illustration of hands holding a tablet device with a curved arrow indicating rotation (no text or symbols)4 Zamykanie menu.
■ Menu MODE
natural_image
Diagram showing a device with internal components before and after processing, alongside a striped patterned background (no text or symbols)natural_image
Two-panel image showing a blank document and a striped patterned background, no text or symbols present.[MAC_CLASSIC_UTILITY] lub [MAC_OSX_UTILITY].
natural_image
Two-panel image showing a textured surface before and after transformation: left panel with 'red Fiber' label, right panel with 'Red Fiber' label, both without any readable text or symbols.natural_image
Two-panel image showing a striped pattern on the left and a striped pattern on the right, both without any text or symbols.Wymagania mocy 100–240 V, 50–60 Hz, Maks. 1,0 A
Temperatura pracy 5–35 °C
Wymagania mocy 100–240 V, 50–60 Hz, Maks. 1,0 A
Temperatura pracy 5–35 °C
The model and serial numbers are located at the rear of the unit. Record these numbers in the spaces provided below. Refer to them whenever you call upon your dealer regarding this product. Model No. ____ Serial No. ____
WARNING
To reduce the risk of fire or electric shock, do not expose this apparatus to rain or moisture.
Dangerously high voltages are present inside the unit. Do not open the cabinet. Refer servicing to qualified personnel only.
FCC Notice
This equipment has been tested and found to comply with the limits for a Class B digital device, pursuant to Part 15 of the FCC Rules. These limits are designed to provide reasonable protection against harmful interference in a residential installation. This equipment generates, uses, and can radiate radio frequency energy and, if not installed and used in accordance with the instructions, may cause harmful interference to radio communications. However, there is no guarantee that interference will not occur in a particular installation. If this equipment does cause harmful interference to radio or television reception, which can be determined by turning the equipment off and on, the user is encouraged to try to correct the interference by one or more of the following measures: - Reorient or relocate the receiving antenna. - Increase the separation between the equipment and receiver. - Connect the equipment into an outlet on a circuit different from that to which the receiver is connected. - Consult the dealer or an experienced radio/TV technician for help. You are cautioned that any changes or modifications not expressly approved in this manual could void your authority to operate this equipment.
IMPORTANTE
If you have any questions about this product, you may call; Sony Customer Information Services Center 1-800-222-7669 or http://www.sony.com/
Declaration of Conformity
Trade Name: SONY
Model: SDM-G76X
SDM-G96X
Responsible Party: Sony Electronics Inc.
Address: 16530 Via Esprillo,
San Diego, CA 92127 U.S.A.
Telephone Number: 858-942-2230
This device complies with part 15 of the FCC rules. Operation is subject to the following two conditions: (1) This device may not cause harmful interference, and (2) this device must accept any interference received, including interference that may cause undesired operation.
NOTICE
This notice is applicable for USA/Canada only.
If shipped to USA/Canada, install only a UL LISTED/CSA
LABELLED power supply cord meeting the following
specifications:
SPECIFICATIONS
Plug Type Nema-Plug 5-15p
Cord Type SVT or SJT, minimum 3 × 18 AWG
Length Maximum 15 feet
Rating Minimum 7 A, 125 V
NOTICE
As an ENERGY STAR Partner, Sony Corporation has determined that this product meets the ENERGY STAR guidelines for energy efficiency.
Kazalo
Pozor 4
Deli monitorja in elementi za upravljanje 6
Nastavitev....8
Korak 1: Uporabite podstavek....8
→ INPUT SENSING meni 17
A LANGUAGE meni 17
natural_image
Three line drawings of different types of electrical plugs (no text or symbols)za 100 do 120 V za 200 do 240 V samo za 240 V
natural_image
Line drawing of a vertical monitor with a handle and base, labeled with number 13 (no text or symbols on the device itself)natural_image
Technical line drawing of a mechanical component with a handle and curved base (no text or symbols)Opozorilo
Pritisnite stikalo ⏻ (tok).
Indikator ⏻ (tok) monitorja posveti v zeleni barvi.
Primate spodnji del LCD zaslona in nastavite naklon.

natural_image
Illustration of hands holding a folded or folded device with a curved arrow indicating rotation (no text or symbols)3 U re j an j e m en i j e v.
Pritiskajte tipki ↓/↑, da izvedete nastavitve, nato pritisnite tipko OK.
4 Z a p r i t e m e n i.
Z enim pritiskom na tipko MENU se povrnete v normalni prikaz. Če ne pritisnete na nobeno od tipk, se meni samodejno izklopi po ca. 45 sekundah.

Nastavitev slike MODE (PICTURE MODE)
1 Pritisnite tipko MENU.
Na zaslonu se prikaže glavni meni.
2 Pritiskajte tipki ↓/↑ za izbiro 📄 (PICTURE), nato pritisnite tipko OK.
Na zaslonu se pojavi meni PICTURE.
3 Pritiskajte tipki ↓/↑ za izbiro γ (GAMMA), nato pritisnite tipko OK.
Na zaslonu se pojavi meni GAMMA.
4 Pritiskajte tipki ↓/↑ za izbiro želenega modula, nato pritisnite tipko OK.
■ Nastavitev ostrine (SHARPNESS)
natural_image
Diagram showing a device transforming into a striped screen (no text or symbols present)9 Pritisnite tipko OK.
Na zaslonu se prikaže glavni meni.
natural_image
Two-panel image showing a document and a computer monitor with a grid overlay, both without any visible text or symbols.13 Pritisnite tipko OK.
Na zaslonu se prikaže glavni meni.
8 Pritisnite tipko OK.
Na zaslonu se prikaže glavni meni.
natural_image
Two-panel image showing a grid of vertical lines on the left and a striped pattern on the right, both without any text or symbols.11 Pritisnite tipko OK.
Na zaslonu se prikaže glavni meni.
12 Pritiskajte tipki ↓/↑ za izbiro H CENTER ali V CENTER, nato pritisnite tipko OK.
Na zaslonu se prikaže nastavitveni meni H CENTER ali V CENTER.
GO TO POWER SAVE
Velikost slike: 17,0 "
100–240 V, 50–60 Hz,
največ 1,0 A
Delovna temperatura 5–35 °C
Velikost slike: 19,0 "
100–240 V, 50–60 Hz,
največ 1,0 A
Delovna temperatura 5–35 °C
The model and serial numbers are located at the rear of the unit. Record these numbers in the spaces provided below. Refer to them whenever you call upon your dealer regarding this product. Model No. ____ Serial No. ____
WARNING
To reduce the risk of fire or electric shock, do not expose this apparatus to rain or moisture.
Dangerously high voltages are present inside the unit. Do not open the cabinet. Refer servicing to qualified personnel only.
FCC Notice
This equipment has been tested and found to comply with the limits for a Class B digital device, pursuant to Part 15 of the FCC Rules. These limits are designed to provide reasonable protection against harmful interference in a residential installation. This equipment generates, uses, and can radiate radio frequency energy and, if not installed and used in accordance with the instructions, may cause harmful interference to radio communications. However, there is no guarantee that interference will not occur in a particular installation. If this equipment does cause harmful interference to radio or television reception, which can be determined by turning the equipment off and on, the user is encouraged to try to correct the interference by one or more of the following measures: - Reorient or relocate the receiving antenna. - Increase the separation between the equipment and receiver. - Connect the equipment into an outlet on a circuit different from that to which the receiver is connected. - Consult the dealer or an experienced radio/TV technician for help. You are cautioned that any changes or modifications not expressly approved in this manual could void your authority to operate this equipment.
IMPORTANTE
If you have any questions about this product, you may call; Sony Customer Information Services Center 1-800-222-7669 or http://www.sony.com/
Declaration of Conformity
Trade Name: SONY
Model: SDM-G76X
SDM-G96X
Responsible Party: Sony Electronics Inc.
Address: 16530 Via Esprillo,
San Diego, CA 92127 U.S.A.
Telephone Number: 858-942-2230
This device complies with part 15 of the FCC rules. Operation is subject to the following two conditions: (1) This device may not cause harmful interference, and (2) this device must accept any interference received, including interference that may cause undesired operation.
NOTICE
This notice is applicable for USA/Canada only.
If shipped to USA/Canada, install only a UL LISTED/CSA
LABELLED power supply cord meeting the following specifications:
SPECIFICATIONS
Plug Type Nema-Plug 5-15p
Cord Type SVT or SJT, minimum 3 × 18 AWG
Length Maximum 15 feet
Rating Minimum 7 A, 125 V
NOTICE
As an ENERGY STAR Partner, Sony Corporation has determined that this product meets the ENERGY STAR guidelines for energy efficiency.
İçindekiler
Uyarılar....4