4574 - Alarm clock radio ELTA - Free user manual and instructions
Find the device manual for free 4574 ELTA in PDF.
User questions about 4574 ELTA
0 question about this device. Answer the ones you know or ask your own.
Ask a new question about this device
Download the instructions for your Alarm clock radio in PDF format for free! Find your manual 4574 - ELTA and take your electronic device back in hand. On this page are published all the documents necessary for the use of your device. 4574 by ELTA.
USER MANUAL 4574 ELTA
PRODUCTOR CDMPSFERTO USB
RELOGO COM RADIO ESTEREO COM LEITOR CD/MP3 E PORTA USB
RADIOBUDZIK STEREO Z ODTWARZ.ACZEM COMPLORAZ PORTAL USP
STECIONLONADGIM
STEREOLOKROKADIPOET CD/MP3-SPELER EN USB POART
CDMP3 CALARIVE USB
PORTLUSTEREOSAATLIRADYO
STEREO RADIO BUDIK S PREHRAVACEM
DISKU CDMP3 A PORTEM USB
RADIO STEREOCUCEAS, RO
CDMP3PLAYER $I PORT USB
CTEPEO PAHIOPHEMHHK-4ACBIC CD/MP3/TEFEOHIMLSR/ORTOM
CETPFOA1HCHGPHFGL
CTEPEAOHACOBHBRCB CD/MP-3IIEBbPbBXO13AUSB 8U
MODELL 4574 STEREO- UHRENRADIO MIT CD/MP3- PLAYER UND USB-ANSCHLUSS
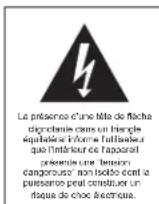
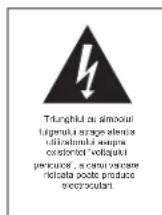
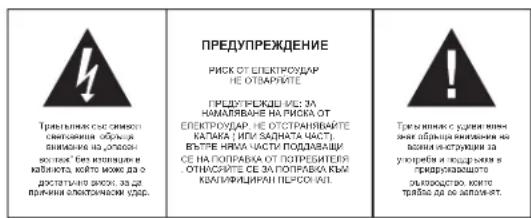
The triangular symbol with the explanation highlights Important points of which the user should refer to the manual regarding maintenance and repair.
FURTHER INFORMATION

Beware of small pieces and batteries, do not swallow them. It may be hazardous to your health and lead into suffocation. Please, Make sure to keep small devices and batteries out of the reach of children.

Important advice regarding hearing protection
Caution:
You care for your hearing, and so do we.
Therefore, use caution while using this appliance.
Our recommendation: Avoid high volumes.
Children should be supervised while using headphones; make sure that the appliance is not set to high volume.
Caution!
High volumes may cause irreparable damage to children's ears.

NEVER let allow anyone, especially children, to put objects into the holes, slots or openings on this devise. This may lead into death due to electric shock. The device must only be opened by a qualified assistant.

Only use the appliance for its intended purpose.
This device may only be used in housings and business premises.

Please keep this instruction manual for further reference.
Instructions on environment protection
Do not dispose of this product in the usual household garbage at the end of its life cycle; hand it over at a collection point for the recycling of electrical and electronic appliances. The symbol on the product, the instructions for use or the packing will inform about the methods for disposal.
The materials are recyclable as mentioned in its marking. By recycling, material recycling or other forms of re-utilization of old appliances, you are making an important contribution to protect our environment.
Please inquire at the community administration for the authorized disposal location.

Do not obstruct the ventilation of the device. Make sure, that no curtains, newspapers, furniture or any other type of object are blocking the ventilation system of the apparatus. The ventilation system must be clear of objects at all times! Overhealing may lead into serious damage of the device and reduce its performance and lifespan.

Heat and warmth
Do not expose the appliance to direct sunlight. Make sure that the appliance is not subject to direct heat sources such as heaters or open fire. Make sure that the ventilation slots of the appliance are not covered.

Moisture and cleaning
This appliance is not waterproof. Do not immerse player in water. Do not allow player to come in contact with water. If water gets inside the player it may cause serious damage. Do not use cleaning agents that contain alcohol, ammoniac, benzene or abrasives as these could damage the player. For cleaning, use a soft, moistened cloth.

Professional recycling
Batteries and packaging should not be disposed of in the trash. Batteries must be handed over to a collection centre for used batteries. Separating disposable packaging materials is ecologically friendly.
SAFETY INSTRUCTIONS
- READ INSTRUCTIONS - all the safety and operating instructions should be read before the unit is operated.
- RETAIN INSTRUCTIONS - the safety and operating instruction should be retained for future reference.
- HEED WARNINGS - all warnings on the unit and in the operating instructions should be adhered to.
- FOLLOW INSTRUCTIONS - all operating instructions should be followed.
- WATER AND MOISTURE - the appliance should not be used near water, for example, near a bathtub, washbowl, kitchen sink, laundry tub, swimming pool or in a wet basement.
- VENTILATION - openings in the device serve its proper ventilation, are necessary for the operation and prevent overheating. The unit should be situated so that its location or position does not interfere with its proper ventilation. Do not place on bed, sofa, rug or similar surface that may block the ventilation openings, in a built-in installation, such as a bookcase or cabinet that may impede the flow of air through the ventilation openings.
- HEAT - the unit should be situated away from heat sources such as radiators, stoves, or other appliances (including amplifiers) that produce heat.
- POWER SOURCE - the unit should be connected to power supply only of the type described in the operating instructions or as marked on the unit.
- POWER CORD PROTECTION - power supply cords should be routed so that they are not likely to be walked on or pinched by items placed upon or against them.
- NON-USE - during longer periods of non-use please disconnect from mains power supply and antenna.
- OBJECT AND LIQUID ENTRY - care should be taken so that objects do not fall and liquids are not spilled into the enclosure through openings.
- DAMAGE REQUIRING SERVICE - the unit should be serviced by qualified service personnel when:
a. The power-supply cord or plug has been damaged.
b. Objects have fallen into, or liquid has been spilled into the unit enclosure.
c. The unit has been exposed to rain or moisture.
d. The appliance has been dropped, or the enclosure damaged. Only use controls and adjustments as specified in the manual.
e. The unit does not appear to operate normally.
f. The unit displays serious changes in its performance
13. SERVICING - The user should not attempt to service the unit beyond that described in the user operating instructions. All other servicing should be referred to qualified service personnel.
14. CLEANING - Disconnect from mains power supply before cleaning. Do not use liquid or spray cleaners, only use a damp cloth. Follow the care and maintenance instructions in this manual.
15. LIGHTNING - During lightning and longer periods of non-use please disconnect from power supply and antenna.
16. SAFETY CHECK - After servicing the unit ask the customer service for a safety check.
17. OVERLOAD - To avoid fire and electric shock do not overload wall outlets and convenience receptacles.
18. ELECTROSTATIC DISCHARGE - Disconnect from mains power supply and remove batteries if unit malfunctions. Reconnect after a short time.
CAUTION
THIS CD PLAYER IS A CLASS I LASER PRODUCT. HOWEVER, THIS CD PLAYER USES A VISIBLE/INAVAILABLE LASER BEAM, WHICH COULD CAUSE HAZARDOUS RADIATION EXPOSURE IF DIRECTED. BE SURE TO OPERATE THE CD PLAYER CORRECTLY AS INSTRUCTED.
AVOID LOOKING DIRECTLY INTO THE OPEN CD DRIVE OR OTHER OPENINGS WHEN CONNECTED TO MAINS POWER SUPPLY.
USE OF CONTROLS OR ADJUSTMENTS OR PERFORMANCE OF PROCEDURES OTHER THAN THOSE SPECIFIED HEREIN MAY RESULT IN HAZARDOUS RADIATION EXPOSURE.
TO REDUCE THE RISK OF FIRE OR ELECTRIC SHOCK AND ANNOYING INTERFERENCE USE ONLY THE RECOMMENDED ACCESSORIES.
CONTROLS AND DISPLAYS
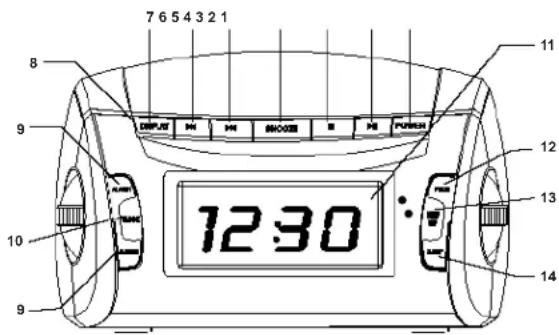
1) FRONT VIEW
- POWER (ON/OFF)
Turn unit on / off (Stand-by) - PLAY/PAUSE button
Start/Pause CD playback - STOP button
Stop CD playback - SNOOZE button
Dozing for 6 minutes - ISKIP
Skip to previous track
Set clock and alarm - SKIP
Skip to previous track
Set clock and alarm - DISPLAY button
Display information of CD tracks or radio stations - Light sensor
Automatic brightness control of the display - ALARM1 / ALARM2
Set alarm 1 and 2
10.CLOCK button
Set the clock
11.LCD DISPLAY
Display clock / alarm time or CD-/ Radio- Information
12.PROG button
Preset CD playback - SHUF/ REP button
Select a CD playback mode - SLEEP button
Set the sleep timer
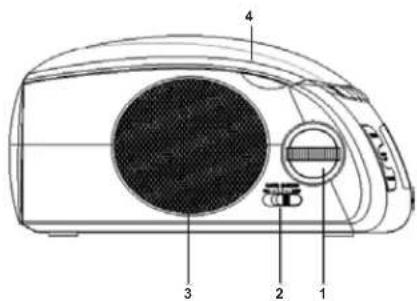
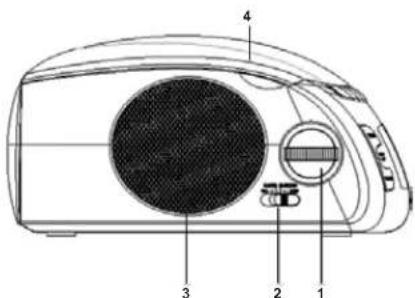
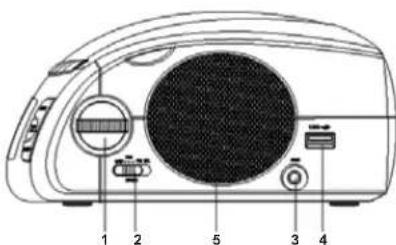
2) LEFT SIDE VIEW
- VOLUME
Volume control
2. Function Selector
CD / MP3 / RADIO / BUZZER / USB
3. Left Speaker
4. Door Of CD-drive
3) RIGHT SIDE VIEW
- TUNING
Search stations
2. BAND Switch
FMST./FM/AM
3. AUX Input Jack
4. USB port
5. Right Speaker
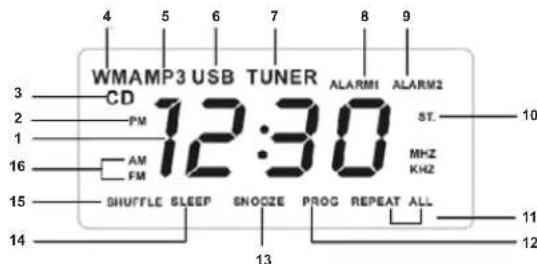
MULTIFUNCTIONAL DISPLAY (BACKLIGHT)
- Clock / Alarm clock / Radio frequency display
2.PMicon (afternoon) -
CD icon
4.WMAICOR
5.MP3icon
6.USBiron
7.TUN5R jnp
8.Alam1 icon -
Alarm2 icon
10.ST. icon - REPEAT/REPEAT ALL icon
12.PROGicon - SNOOZE icon
14.SLEEP icon - SHUEEFE icon
- Frequency band icon (AM / FM)
INSERT / REPLACE BACKUP BATTERY
- Insert the battery at the bottom of the unit for clock memory backup.
- Connect the mains plug to the wall outlet. Replace the battery once a year.
- In case of a power outage the unit turns off completely. After recovery of the power supply the unit displays the time as 12:00 and needs to be set again.
- Insert a 9V battery (not supplied) into the battery compartment for backing up clock memory and alarm settings in case of power outages. This way the clock settings are backed up.
- During battery operation the time is not displayed and radio or CD alarm modes are also deactivated. All functions including display are restored as soon as the power supply recovers.
POWER SUPPLY
- Make sure before connecting to the mains that your household voltage complies with the specifications on the rating label (230V-50Hz) located at the bottom of the unit.
- Connect the mains plug to the wall outlet; the display shows 12:00. You need to set the correct time.
- Please disconnect the mains plug to completely turn off the device.
SETTING THE CLOCK
Time is displayed in 24-hour-formal
1. Press and hold CLOCK until you see the hour digits blinking in the display. The display will return to normal mode if there is no operation within 5 seconds.
2. Press to adjust the hours (or press and hold for quick adjustment).
3. Press CLOCK to confirm the hour settings. Now the minute digits are blinking in the display.
4. Process 11/10 to adjust the minutes (process and hold for quick adjustment)
4. Press OK to adjust the limits (or press and hold for quick adjustment). 5. Press CLOCK to confirm your settings.
RADIO RECEPTION
- Press POWER to turn on the unit. The display lights up.
- Set the FUNCTION SELECTOR to RADIO position; the display shows TUNER.
- Set the BAND to FM ST., FM or AM.
- Search your desired station using the TUNING knob.
- Use VOLUME to adjust the volume settings.
- Press DISPLAY twice to display the radio station information. The display will show the frequency range and frequency for a few seconds, then returns to display of time.
- Press POWER to turn off (Stand-by) the unit. The backlight turns off.
IMPROVE RADIO RECEPTION
FM: Completely uncoil the wire antenna for best reception.
AM: The unit uses a built-in ferrite antenna. Direct the unit for best reception.
CD PLAYBACK
- Press POWER to turn on the unit. The display lights up.
- Set the FUNCTION SELECTOR to CD position; the display shows Cd.
- Open the door of the CD drive.
- Insert a disk with the printed side facing up and close the door of the CD drive. The unit shortly displays CD and then starts playback automatically.
- If playback does not start automatically, please press for playback.
- Press DISPLAY twice to display theCD track information. After a few seconds the unit returns to display of time.
- Use VOLUME to adjust volume settings
- To temporary pause playback (pause), press I. Press again to resume playback at the same position. The track number is blinking in the display.
- Press to completely stop playback. The display shows the total number of tracks.
- Press POWER to turn off CD playback (Stand-by). The backlight turns off.
Skip to a certain track
- Use skip to previous or next track; numbers are shown in the display.
During stop mode press select a track and then press start playback.
Search a certain position within a track
- During playback press and hold or The CD will fast rewind or fast forward at higher
speed and reduced volume. - The unit will resume normal playback when you release the buttons or
PROGRAMMING TRACKS
You can program up to 20 tracks in arbitrary order. Multiple programming of one track is possible. 1. During stop mode press PROG; the display will show PROG and P01.
2.Useorto select a desired track.
- Press PROG to store the track. 002 appears in the display; you can now store the second track.
- Repeat steps 2 and 3 to select and store the desired tracks. You can store up to 20 tracks.
- Press to start program playback; PROG appears in the display.
DELETE THE PRESET TRACKS
During stop mode press PROG to recall all preset tracks, and press , or open the CD drive, or press POWER, or set the FUNCTION SELECTOR to RADIO, USB or BUZZER.
SELECT DIFFERENT PLAYBACK MODES: REPEAT AND SHUFFLE
You can select a playback mode prior or during playback. You can combine repeat and program functions.
SHUFFLE:Play all tracks in arbitrary order.
REPEAT: Repeat current track.
REPEAT ALL: Repeat complete disc.
SHUFFLE REPEAT ALL: Repeat all tracks of the disc in arbitrary order.
CONTINUOUS REPEAT AND RANDOM REPEAT FUNCTION
- Press SHUF/REP once or repeatedly to select a playback mode. The different playback modes appear in the display respectively.
- Press during stop mode to start playback. During shuffle mode playback starts automatically after a few seconds.
- To return to normal playback, repeatedly press SHUF/REP until the playback modes disappear from the display. By pressing ■ you can also return to normal playback.
Note:
When you select the shuffle mode during playback, it will not be activated until the current track has elapsed. The shuffle mode is not available during program playback.
CONNECTING AUXILIARY DEVICES
You can also connect auxiliary devices for audio playback on the speakers of the clock radio.
- Press POWER to turn on the unit. The display lights up.
- Connect the supplied line-in cable to the AUX input jack of the clock radio and to the audio or earphone output jack of the auxiliary device (CD player, video recorder, etc.).
AEX appears in the display.
The AUX mode overruns the activated CD or radio mode.
MP3 PLAYBACK FROM USB REMOVABLE DISK
- Press POWER to turn on the unit. The display lights up.
- Set the FUNCTION SELECTOR to USB; the unit shortly displays USB and then returns to display of time.
- Connect your USB device to the USB port; the display shows USB and WMA or MP3, depending on the format.
- Make sure your USB device contains MP3 music files in MP3 or WMA format.
- The unit decodes the first file and automatically starts playback. If playback does not start automatically, please press
- Press or to skip to previous or next file; press to start or pause playback; press to stop playback.
- During pause mode the file number is blinking in the display.
MP3 PLAYBACK FROM MP3 PLAYER
- Connect your MP3 player to the USB port using the USB cable (battery of MP3 player will not recharge).
- You can control playback using the control buttons on the clock radio (as described above).
ALARM FUNCTION
Using the alarm function
This clock radio allows you to set two different alarms (alarm1 and alarm2) that are available during CD, RADIO, USB or BUZZER mode. You have, of course, to set the correct time first.
Setting the alarm time
- Press and hold the button alarm1 or alarm2 until you see the hour digits blinking in the display. Alarm1 or alarm2 are displayed respectively and blink.
If there is no operation within 5 seconds the unit will automatically return to display of time. - Adjust the alarm hours using
- Press alarm1 or alarm2 (corresponding with your settings) to confirm the hour settings. The minute digits are blinking.
- Adjust the alarm minutes using
- Press alarm1 or alarm2 (corresponding with your settings) to confirm the minute settings.
Set the function selector to cd; the display will ask you to select a track number. Use select a track.
If you want to set the second alarm, please repeat the above steps.
Activate the alarm by pressing alarm1 and/or alarm2; the display shows the respective information.
Select the alarm mode
- Press power to turn on (stand-by) the unit.
- Select an alarm mode by setting the function selector to cd, radio or buzzer.
When the alarm is activated the display will show alarm1 and/or alarm2
When the preset alarm time is reached, the unit will wake you up with cd, radio or buzzer.
Note:
- When the alarm time is reached, a cd inserted and function selector set to cd, the unit will start cd playback from its first track or from the track you have programmed during the alarm settings.
The unit will automatically activate buzzer as alarm mode if there is no cd in the compartment. - Make sure the volume settings are correct when you have selected radio or cd as alarm mode.
Turning off the alarm
There are three ways to turn off the alarm. The daily alarm reset function is activated as long as you do not completely turn off the alarm function.
1. When the wake-up call is on, press ALARM1 or ALARM2 or POWER.
The display still shows ALARM1 or ALARM2.
Snoozling function
Wake-up call repeats at intervals of 6 minutes.
1. When wake-up call is on, press SNOOZE: the alarm will pause and the unit will display the time. The display still shows ALARM1 or ALARM2 (blinking).
2. To completely turn off the alarm function, press ALARM1 and/or ALARM2, until ALARM1 and/or ALARM2 disappear from the display.
SLEEP FUNCTION
The clock radio has an integrated sleep timer which tums off the unit after a certain preset time.
Setting the sleep timer
- Press POWER to turn off (Stand-by) the unit.
- Repeatedly press SLEEP to adjust the sleep timer until you can see the desired time in the display.
The unit automatically turns on the CD or RADIO mode and shows SLEEP in the display. The timer can be set at steps of 10 minutes for 90, 80, 70, 60, 50, 40, 30, 20 and 10 minutes.
- When the preset time is reached the unit will turn off automatically.
- To deactivate the sleep timer, press SLEEP or POWER again
SLEEP will disappear from the display when you deactivate the sleep function.
Note:
The sleep function does not interfere with the alarm settings.
TROUBLE-SHOOTING
- If you experience problems with the unit, please check the suggestions in the list below first before you contact our customer service.
- If you cannot remedy the deficiencies by following this list, please contact your local dealer or our customer service.
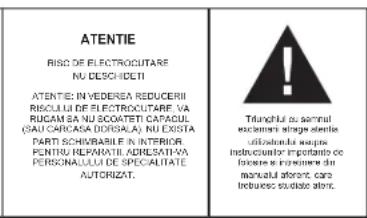
Warning:
Do not open the unit. There is a possible risk of electric shock.
Exclusively refer to an authorized service center. Unauthorized modifications void all warranty claims.
1) No sound
Volume too low
Increase volume using VOLUME.
2) No CD playback
CD is scratched or dirty.
Replace/ clean th
- Condensation on laser lens.
Wait until the unit has adopted room temperature.
- Laser lens is dirty.
Clean the laser lens with a CD cleaning kit.
CD-R has not been finalized
Only use finalized CD-R discs.
3) Background noise during FM reception or poor signal Completely uncoil the wire antenna.
4) Continuous scratching and fizzling during MW reception
- Interference with TVs, computers, fluorescent lamps, etc. Position the unit away from these sources of interference.
Alarm does not trigger
Please refer to the chapter about setting the alarm function.
- Alarm modus not set
Please refer to the chapter about setting the alarm mode.
- CD mode is set as alarm mode, but no CD inserted.
Insert a CD.
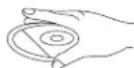
HANDLING AND CARE OF DISCS
Handling of CD's
Remove the CD from its cover.
Do not touch the surfaces.
Do not attach stickers to CD's and do not write on them.
Do not bend CD's.

Storage
Always store CD's in their cover.
Do not subject discs to direct sunlight, or dirty, dusty and damp areas or heat.
Cleaning CD's
Clean CD's with a soft cloth.
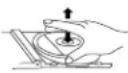
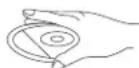
* Clean CD's from the center to the edge
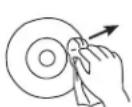
FROM THE CENTRE TO THE EDGE
CORRECT

INCORRECT
Do not use chemicals such as benzene, thinner, gramophone record cleaners or antistatic sprays.
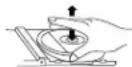
* Close the door of the CD drive to prevent the infiltration of dust.
* Do not touch the pick-up lens.
SPECIFICATIONS
Frequency range: UKW (FM) 87,5MHz - 108MHz
MW (AM) 525kHz - 1615kHz
Speakers: 2.25 Inch, 8Ω
Power Supply: AC 230V-5Hz
Clock memory backup: 1 x DC 9V battery (F22 / E-Block)
Battery life span: approx. 9 hours (for clock and
Dimensions: approx. 208.6 x 164.5 x 103.6 mm
Weight: approx. 1.2 kg (without battery)
Subject to change without prior notice.
MODELL 4574
RADIO RÉVEIL STÉRÉO AVEC LECTEUR CD/MP3 ET PORT USB
MANUELD'UTILISATION
INSTRUCTIONS RELATIVES À LA SECURITÉ
ATTENTION
RISQUE DE CHOC ELECTROJE N.PAS OUVRIK
ATTENTION: ANOLO BILLOU,LLC
TENANTIENI, CHINESE PAPER 105
BETRILLES CAPAC (OU LARRETS)
UNITLILHUI,LLC (APPEARUL,NL)
CONTINENT AUCHE PIQUE PUONGUÉ
PAPER 106
CONSERIERS DES REPARATIONS AU UN
SLIVIERIL,ML. MANTANENCE ORAL/QUIFIL

MW (AM) 525kHz - 1615kHz
MW (AM) 525kHz - 1615 kHz
Colunas: 5,71 centimetros, 8Ω
Adaptador: AC 230V-50Hz
USUN WSTEPNIE USTAWIONE UTWORY
De laserlens is yuil.
MW (AM) 525kHz - 1615kHz
Hoparior:2.25Inc,80
Güç Kaynag: AC 230V~50Hz
Saat hafiza yedeigi: 1 x DC 9V pil (F22-Blok)
MANUAL CU INSTRUCTIUNI
INSTRUCTIUNI DE SIGURANTA
INFORMATII SUPLIMENTARE

Aveti grijia de componentele de dimensionali mici si baterii, nu le inghitti. Eie pot fi extrem de penculoaso putand afectand grav sanatalea si sulocandu-va. Va rugam sa pastrati acste componente si baterille除去 del accessul copilor.

203 1001981 BIOCHEMISTRY OF PROTEIN BINDING BY L-1, DACTYOL-3-O-BUCOMBIN, CYP5L2-276A-PREP, AND PEP-DEPENDENT PROTEIN BINDING
BHIMAHNE
PVC 3389/PTAE/AQE60 LIOXU HE OPTEs/BATb
BHMWVE, LIL CHICKHILL PUCOCA
CINEMA 2015, 13:1-14.
ENIPOV ENEA AOKHOLO CTOPKOVA
ORG/NO.1648A4M2K
RO/NoBATEFEM
DE/NO.150379
G/ALUARTEC-K
AM/NO.150401-CRIY
R/NO.150402

10CCTCYL-56C
10CCTCYL-56C
10CCTCYL-56C
10CCTCYL-56C
10CCTCYL-56C
10CCTCYL-56C
10CCTCYL-56C
10CCTCYL-56C
10CCTCYL-56C
10CCTCYL-56C
DAJIbHEIJAHFOOPMAUNA

OctepaTaeBHebOBLHINDANTENH BatapeH,HeHNTAHTI INx.30MOKETbbl 0anACHOJnBAUeroBDOpBBN NOBNEH yUdbE. TPOANJICTe,PNMIEMEpBt,HTo6bl ManeHbuknPnHOBu HXPANHcB HEOCTCYHOM DnTaeMeCt
BaxKJIbe peKOMeHdauin OTHOINbHO 3auNTb cnyXaBHUMAnhe:
Bb6epkTe C00 Cny, Mbl Toke.
TOMOTMY 6b7be TOcOpXbHn pRn noBtOBaHN daNHBm pRbOpOM. Haua PekoMOnaIaHn: NabeAerBe ToBnWbPROMKcN.
DnTdoXNbHAXoNTBcNIOI pIMCMOTPMIN MCIOI3OBAHHHAYUHKOBy6eIeCTb,TOYcPTPOCTBO HcYCTAOHEHO BA BICOKMYP0EBPOMKOTBNBHAMHe!
Bolbua rpoMkoCT MOKET npHnHTb HEnonpaHmbl yuepe6 cnyx dyet.

HIKKOrDA HIOI3aONJIe HNKOMY,OCO6bHNO DcTAM,BCABNTBIPpMdtB BOTBepCTHHNUIEHN 3TOPOIN60pa.3TO MOKET pNBEcTN K CMEPTN BCNECTNB NoPAKeHHN3NEKTPnHEcKN TOKM. OTKPbBaTb pN6Op MOKET TONLKBaNNPHIMPOAHHHN NMOUHK.

NcnoJIb3yAte 3TOTnPNOBTOKIO NOpeDHAHauHENIO. 3TOTnPNOBMOKETHCNOB0BATCA TOnBOKIO B6TOBtIKIN OPCHIbIX NPOMEHHIAX
TOXAnyCTA, COxPAHNTe 37U INCHTpyKIMIOIINDAIbHEHnEHOIICNBOB3O8AHNA B KAYeCTe CrrapAOHIVKA.
Hnctpykunno 3aunTe Okpykaoue Cpebl
YeIytnn3npye TaaHnnpB o HcNep cpoKa cnKbB MeCte C o bHaMMI 6b10BaMbT OXoDAmA; npeJaeTdo Eo NIKy TcOpaD aI npePabGtKIO nIaKTPNckKIM XnI 3NeKtPOhNbY cyTOptCB. CnBOMI hA NO pOyTe, hNCTPyrN mo NcNOBtOBaHHIO YnnaXaokao caOpEATnHfOPMauO o CnoCo5eYytnHn4zau.
MATEpIaHbNoJIOJIeKAtIpepe6OBeK, KAK yKa3HaHO MApKpOBAe. BIAIpoAorJapepe6OBeK, BTOPHcYMOHCN0B3oAHOpMIEPAePAnOB ININ HbIM CnOc0BaM yTHNIH3auzni CTapLx pRi6oBop BB oCyUeCTBNReTe aXhNb bKnAd B aazHTy OOKyKaHcu cpeDb.
XOAnyIaTHcY, 3aHnAeBROPOCDKoADMMHHCTPAuHN pACONNOKHeMH CauHKUHOHPoBAHIXk YNHTOKB TYNH3AUH.

FM: dnyyueHn npHema nonHOCTbO paCnpaMNTe npOBONHYo aHTEHY.
AM: yctpoBTO hONLbEyet BCTOeHNOyfepeppTOBOy aHTENHY. COpHEnTHpyTe cAmO yctpoBTO TAKIM 6bAp3oM, YTObI KaHECTOBPiNMe bSIHO HANUYUWM
BOCINPOH3BEDEHNE KOMNAKT-DACKOB
- HauKMITE KHOKNY POWER, ITO6bI BKNIOHHT bcyTPOCTBO; 3aOpTTCN TIOICBETKA dncnTNE.
- YcTaHOBNTe FyHKUHOHAJIbHbI NPEKNIHOATEJIb b noJooKeHH CE; Ha dnCnneB bUCBETITCA Cd.
- OTKpoTKe KpbIuKy npBbOda KOMnAaT-DnCKOB.
4.BctBaTBe DnK TtEeKoB KEBPx N A3kPOWte KpUHky PNPbOda KomnAaT-DnKOB. Ha DnCnIe Ha HeckNoBc Cexyhd BvCBTeTnC 3Aahok CD, Noce Yero abOMaTHueCKn HauHETcR BocPnoBzdeHeNe OmKAnT-DnKAc. - EcnBn BocnpOn3BeDeHHe He HauHaTaCRA ABToMaTWhecKn, HaxMMTe KHOkny
- KaHmme KONKY DISPLAYAa paa3a, Hb07a Hn daHcHbOaHbOaHbOaHbOaHbOaHbOaHbOaO kOMMAKT -JDCKc. Upeh3 KeckoJIkoBc cekyHd JnciHne CHORA 6yDt ONkAobBaHT KTeUeOe BPEMn
- 706bl OtperynnpoBaB rpoMkoCTb, mnoIb3yIte pyky VOLUME.
- 406bI cpenaTb naayy B bocnpn3eBdHm, HAXMMTE 11. 406bI BO3O6HOABHTb BOCpN3BcEHeHc C 3TOr KO HeMeCTa, HAXMMTE KHOKNK Euepe pa3. Ha DCINNEe 6yDen MTNRtB HOMEP DOPOXKM.
- TchBJI noJIHCTIO bOHTBbCnPOIMBaDEHeHMe, HAKMITE KHONIKI. HaJINcIIe 6yETNOKAaBH OoIeee KOJIaYcTeBTO DOpOKeK.
10.HAKMHTE KHONY POWER, YTObbl BkIIOHHTb yCPTPOCTBO (nepeBcTn erO B KdyuHn peKHM). PndceBaTc Dnncnner noCahert.
PepexoK konpepeHHOJdoPoxke
Ycboa nepei K cnlyuoye Hn npdeyuyae Dopokoe, ncnnoh3yTe KHONK HOMERA dopokek 6bdtnpokahaa h kdoane.
B pexHMe octabOHxHCnONy3e KHOKIN /HToTObI bIbPaTbDopKO, nocHe HAKMITE 11,TObI hauHb BCPOpOBeAedHeN.
ONCK ONPEDEJEHHHO TOUKB INPEDEJAX ODHNOPOKKN
1.BoBpMABOcPOMaBeHnA HxMHTe C yDepXAHmE HxONKy HAnHETCR 《 NApEMOTKA》KMOIANT-DNCKA BNEpeM HIN HA3dCIOBbUeHHO CKOPCTbO NOHIXOHBBIM VDOBHE 3BYK
2. Ycptoe30 8036HOBHT HopMaJIbHOe 8OcPON3BEdHHe, KOrDa Bli OTyCtTEK HONKI
PPOPMPOBAHNE CnNCKA BOCNPON3BEDEHNA
Bb MoKTe 3aONPQoPPAMMPOBAtb Do 20doopOKeBIOPOHBOHOM PnOJKHO HcKOJIbKO p33aONPAMPMPOBAtb ODHy IH TY KoeDOPKKY.
1. B BoBMA BOOPIAOBAEDENI, HAKIMITE KOHNY PROG; AH KINCIIEE BVCBETNTC ProG P01. 2. C NMOIOJIHO KHONIK JIIBABPTEJXKANBMMVDPDDQXY.
3. HAmKITE KONKy PROG,NTb6u BHeCTN DOPOXKY a NAMTb.TeneBb HA DCnne NoRBCTc 3HAOK002,bNMOKte Bt6paBb NBeCH T bNAMTb BTOPyo DOPOXKY.
10. ROBPTOE UAM, YKAZHANBIE B IYNYKTA2 2 n, 3TObI bIb6PbTb N BHECTN B NAMrTB DpyTN E DOPOKKI. BBy MOXETE BHECTN B NAMrTB Do 20 DOPEKJ.
H. KaNHMeT KONKy H! TcObI bNauTh 3aOpRpaMMPOBAHHe BocPnOBeDEHHe; Na DcNtEe BbcBcTnTc PROG.
YDAIYEHE3AINTPOPTPAMMPOBAHORIO CINCKA DOPOXEK IINBOCPOIN3BDEEHNBA B.DEXPHO 0GTANHOKHKNHAKMTKHNKHYPROG.OTQDSTMEHTUBKANTDPAPMPADBOHHOG
BOCNPOH3BDEHNE, INN HAKMITE XKONKYI, INN OTKPOITNE PNPBD KOMKNT-DCKOB, INN HAKMITE POWER, INN nepeKIOHHTe FHYKLMOHANbHbI NPEKNIQUATEIb nnonoxene RADI, USB INN BUZZER.
BbIbOP PA3JIuHbIX PEXKIMOB BOCINPO3BEDEHnR: NOBTOP INEPETACOBKA
Bb MoKote Bb6pTaB pexmM Bocipn3BdHIN B0peM NINI Pepeq HAHTOM BOCIPn3BdHINB My MoKote coBmeaTb phyHKIO NOPTOP C cyHKIO INPOTAMMPOBAHN BOCIPn3BdHINH SHUFFLE: BCOpN3BdHEHe BEX DApOKeK B npom3BOHNOHM PnpJAE.
REPEAT: noBtOp Tekyuuei Dopoknn.
REPEAT ALL: no8Top Bcero ducka.
SHUFFLE REPEAT ALL: noBtop Bcex dopokek ncka B npOn3BOhOM npRJaKe.
ФУнкцИЯ NOCTOуHHO FO NOBTOPA I NOBTOPA B PON3BOJbHOM NOPRAKE
-
Hakmite Khoi NYUF SHF-REP ODN hni khyi dba paa, tvo6bblp8p9xim BocponpoBeseHnHa Hd 1nnncie 6dy bblcneHbcbcooBTCTrykOupepepepepepepepepepepepepepepepepepepepepepepepepepepepepepepepepepepepepepepepepepepepepepepepepepepepepepepepepepepepepepepepepepepepepepepepepepepepepepepepepepepe pe
-
B PekIME octahOBKn, HAKMME THKONKY 10Tb6I HauHtBocNPo3BeDEHeN. B PekIME nepetacOBOK, BOCPOn3BeDEHeN HAcHTeC BOTAMOTHEC, YECEH3EPCNOkBo CEkyH.
-
4T06b BEpyhCb K HOPMnHOMy peKIMMy BOCNPOBDEHIN, HAKMMAte KHONKY SHUF/REP, NOKA C DnCnIe He NcEsHTy 3HAnK peKIMMOB. Bb TaKke MoKetE BePYHcB B peKMn HOPMnHOrO BOCNPoBDEHIN, HAKaB KNKNY ■
PnueaHne:
EcnBb BnKIOaetepeXMMpePecTACOBX BO BpEMBBOCPNO3BedeHNO,HO He 6yDcTAKBnPOBAH, NOKA He 8aKOHnOCHBOCPIOMBDEHe TckueJDPoXMM. PeXMMpePecTACOBHHeDocTyIeN BO BpEMB3AITporPAmMPOBAHORO BOCPNO3BedeHNN.
IOIKHQUEHNE BCNOMOTENbHbIX YCTPOIcTB
BbMOKTeIIOJIIOHOHT BCIOMORATEIeHbYe UcTPOCTBaX rPoMKOIBOOPHTENAM cAOB-paIOIgIaBCPOIOB3EDEDHaeAUYIO.
1.HaKMITEPOWER,TO6bblbIKIOHHTbycTPOIcTBO.PoCBeTKaDcnnernorachET.
2.Пдкгчсгte coeMHINTeblH KABe6Ie (ecTb B KOMnJIKeTbe) B XbOdHMy THeaY AUX NaCob-paHIO, N K bXbOHDHomy ayDINO hTHe3dy BCNOMORAteBHorO yCTpoiCTBa (CD nneep, BVDeOMARHToFOH, t.n.).
Hdncnnee noBntc3aohk AUX.
Pakm AUX nepkpbbaatp qkm BOCIPPOBDAEKMOMIAKT-DCKOB HIN pAIOO (CNIH OH) 6bIHN AKTNBOPOAH).
BOCPON3BEDEHNE MP3 C BHEWHERO USB YCTPONCTB
- Haxmte KhoNky POWER, 406bI BkIOHHTyCTPOINCTBO; 3aROpNTc NOCDCBETKa DnCnnner.
- YctahonBATE ΦYHKUONAHbLY NIEPEKNIOYATEAB n NOXENHE USB; hAicnnee H aNcHOBJI KcOyHbYh BcBcETHTCR USB, NoCte ORe CINNIe CHOBa NOKaBbBt BpEMR
- Podkniokhite bheinneu USB yctpoTbO K npoy USB; dncnne nokaket 3aayOK USB m WMA nH MP3, 8 aBcnnmocnTo oT dpomata faaiNoB
6.4861013b, TcH HBAHHEM USB yctpoRCTBcOeDPKATCBMybKaIbMbHe paJIbIgΦopMTBe MP3 nWMA. - YcptroctBO pacoONo3eT nepbbl aayn HauHET eFO BOcPON3BDEEHEA BOATMAHNECK. EcnH BOcPON3BDEEHE HE HauHINCT ABOMATMHeCK, HAKMMEKONKY
-
TObb BepHybC K npdeBdyuemy Hm nepeTn Cnedyuemy Fainy, NcNtBsyte KHONK nH; TObb cIeTaB naay BocPon3aedeHnn, H noCHBa 03o6BHOTB BOCPon3aedeHne, NcNtBsyte KOHKnY; TObb OCTaOBHHTBocPon3aedeHno, HAKMNTE
-
B eximee nay3bHa daicnnee 6ydt MrraTb Hmep texyuzero faia.
BOCnPOn3BEDEHNE MP3 C MP3 NEEPAP
- Npoeoiennnte cno MP3 npeep K USB npoty cTrepocttaa (6atapaeK M3 npeep he 6dyt nepeeaepkatac).
- Bly MOKETe KOHTONPOBARTPoIcECCOINPOB3EneHnCnIOB3y KHOKNY npAbaENHnaocP-adoHn, KAte, KAKoIbIoOnaHnCaBHue.
ФУHKLЯБДИЛБHИКА
HcnoIb3oBaHHe cyHKn6yInnbHnKa
Дангдучысвадупостовлгетахоньддгснань (ALARMIи ALARM2),КOTopьддocтуньВ рекимaxCD,RADIO,USBи BUZZER.Ho chayana,Kohechny,Hyckhoуctahonobурпавиньhoe apemia.
YcTaHOBka BpeMeHH 6yDnIbHnKa
- HaxMMTE Ha konHry ALARM1 n HAALRM2, yIydepxKbAte ee do Tex npo, noKa hAn dncnne He HNHT MIRATb UNDPO, NOKA3BBAOIOWc HAC.
Hdncnnee 6ydt MRatb 3aOK ALARM1 mnn ALARM2 COOTBeTCTBeHHO.
EHN B TENHEN 5 C6YCN H N KHMMAETCBN H OJH3A KHONIK, DCINNN YCPTPOCTBA ABOTMATYCEK BO3BPAAUHCTB P EKKM NOK3A BSPEMEH. - OTKOPPEKTMpyTe Ha cCnHana 6yDnBnKa KHOKNAM
- KaHMeNTE ALARMI 11 HIN ALARM2 (B COOTBCTBm C BAAUE HAcTPOK), YTObI NOITBepDnTbYCTAHOBNEHO 3HAeHNH yaa.
Tepb 6dyT Mrratb Unpb, noka3bBAkUne 3HaueHne MHyTbI. - OtkoppeKtppyTe MNHyTc Hana 6yDnBnHKa KHONKaM
- HAKIMTE ALARM1 INH ALRM2 (B COOTBCTTINC B CAUEB NACTPOK), YTOBBI NOITBEPNTbYCTAHQIDNEHO 3HAUYEH MHNHTy.
Pobepnhe FyHKUHOHJIbHbI INPEEKJIOYATEB b nonokHe CD;Ha dncnnee
BbICBeTITc3aIpcHbBbOpHOMepaDopoxKn.Bb6peHteDopoxKcycnmooukhoNHO
#
Ecln Bb xOHTe YCTAHONITb BpEMr BTOPORO CUNHANB 6yININbNtKNA, NOPTOPNTB 80C BblweyKa3AHHHe SIAM.
AeBnVpyRte dyNtuHIO 6bUdNnH KAAHTaEN H AINONIy ALARM1 WmN ALARM2;HaN CNTNHN BDEBETBBEEDA COOTBETCTBQUAH INHOPMUNIA.
Bb6oppeKMa3ByaHaH6yDnIbHnKa
- Haxmte KONky POWER, TTo6bI BkHCHyCTpoHCTBO (8 kdyu npexnM).
- Bébéchére péremé 3Bvayhàme 6dEybHbHKa, yctahOBnΦYHKlIOHAHbHbI NPEKNIQOATENB b nonoKeHeme CD, RADIO nNt Buzzer.
KordaФункIMБуDNHbNKBAKTBNBPOBaHA,HAJMCNIIe6yED3HAPOKALARM1W/YNALARM2.
BocKaIaHcyTUTYCTAHOBENHOBE BPERM, YcTPOCTBOA p3a5yDITBaC nOMIOUO BOcPON3AEHEDH NCMKAT-DnCKA, BKHOHODN PAHOIN IIN PTOCBOAHOKOM.
Pnmeyahne
EcnIyFKHIOAHOBHbIYEPEKJIHOATEJbYCTAOHNB RIOONKEHGE CD,IN BYCTPOCTBO BCTABENKOMKTAKNCTO,TO PnH HACTNYYENBNBPEMEN, YCTAOHNBHOIOJPN 6yDnblhNkA, YCTPOCTBO HNTHEBCPNOPAEEHcKOEMTAPDNCKa Cpepoe DOPOOKKN,IMC cdoPOOKKN,KOTOPAR B5Na3APORPAMPMPOBA BO BPEMNAHCTPOPMN6yDnblNHkA. EcnIe K BYCTPOCTBE HET KOIMNAKT-DNCA, TO ABOTMAHNECHK ANIKBYPETCR 380HCN.
Y6dAmTeBCTOM, YTO BbI bCTABNIM JENKAEMMY yOPOBcHbE KMOKCTO, cCINB KAKCTEC 6yDnA HNkBa b6pAo PAHO nIO ABOPOPQEDHNO KOMIAKT-JDAcka.
BbIKIOeHne 6yDnNbHnKa
Ectp Tm CnCtO6Ba BkNIOHTbBMyHNBK. _K_H EeBdHBNOBpeyCTOBHKbBHyDnBnHbNKAKTbMnBpyTcKaKBa p3, Korda Bb HEoKIOHNpyHkyHIOBbHyBNbNKaONHOCTbK.
- Koda 3a3ByuTb6dyuNbHK, HaxMMte ALARM1 uH ALARM2, uH POWER.
Ha dncnnee BCE eue 6ydt ropetb ALARM1 nn ALARM2.
He BckpbBaIte ycTpoNCTBO; cyuEcTByeT pNCK IopapKeHHAeNKTpOToKOM.
O6aouaIeTAETOBkoBbAUTOBIOBAHNNcBepBCNzETHp. HecahKlONHOHPOBAAHbHe 3MNEHEHBA BycyTOpeBtBe AHNYPDQHTBCoPAHNTM.
1) Her 3byka
CnHsKOM Hn3Kn ypoBeH 3yKa.
YBENNITe rPOMKoCTb,HCNONb3y peryrnapTOp VOLUME.
2) He BOCPON3BOUHTKOMnAKT-ANCK
KOMNAKT-DACK 3aRpaHEn HIN NOJapanaH.
3aMeHHTe/NOuCTHTeD
- Konduhcaunn Bnarn Ha naepbix nHHax
Nooxnne, noka yctpoCTBO He HArpeetc no KOMHthOH TemnepaTypb.
- 3arpra3HeHbI na3epHbI nHH3bl.
PPOHCTNTe NINH3bI, INCNOJbayr KOMNNEKT DnA YNCTKKOMNAKT-DNCKOB.
CD-R He 6bIn 3akpyr (finalized).
Icnojb3yIeToJbKO3aKpbItble CD-R dncn.
3)ΦoHOBBIe Wymbl npn npneMe FM paHOBONH nnn cNnKOM cnabbnrHan
NonHOCTbIO pACNPAMITE npOBONHYIO aHTEHY.
4) NocToaHHoe NoTpecknBaHne H WnneHne npn npneMe paNHOBONM MeTpOBOrO dnaana30Ha
BnnaHHe nomex ot TeneBn3opa, KOMnbKTepa, fnyopeCueHTbIX naMn nT.n.
Pa3MecTNe YCTPOINCTBO BDAHOT NCTOCHIKOB NOMEX.
5) He cpa6aTaBbAe 6yDnBHHK
HeaktnBnpoBaHaΦyHKua6yDnBnKa.
Cm.paan06aktnBaunnФyHKm6ydmNbHnKa
He yctahOBnEH peKHM 3ByHn6yDnBnKa.
CM.pa3deI06yctahOBKepeKIMa3ByaHn6yDnBnKa
B KAHCTBE PEXKMHMA 38YHNAH 62UYNHLNMA YCTAOHBNEH PEXKMHBO CBOPOHO3BDEH NOMKAPT-DINCKOS, HO B YCTOPCBO HE BCTAENBH NOMKAPT-DINCK.
BCTaBbTe KOMNaKT-DnCK.
OBPAUEHNE C KOMNAKT-DIACKAMN
OcbpaueHne c KOMnAKT-DnCKaMn
- N3BneKNTe KOMnAKT-ДнСК ИЗФуТЯРа.
- He npukacaiTecb K nobepxHocTAM.
-
He npkneBaIte Ha KOMnK-TDCKN 3TNKETKN. H He NnHnTHe HnX
-
He cπbαηte KOMnαKT-πnCKn.

XpaheHne
Bcerda xpaHnTe dncKn Bnx fpyTnpax.
He IIOBepaTRE DNKPNPMO B03eDCTNHO COnHNEbXbNpyoH,HE DEpKtne IX B TPRn, NpIIM, INN B MCTC X BLOCKON TMENPATPOYIN BNNBOOKDNYPBOHMIBIJIHXOCHNT.
YnCTKa KOMnAKT-DnCKOB
PnTnpaTe KOMnakT-DnCKMnKOBETOsbIO.
PpOtpaIte DNCKN OIT ceHTpa KKpaIO.

OT LIEHTPAK KPAHO
CORRECT

HEINPABUNbHO
He HcHbIy3e XmHcNEck BELueCTBa, TAKHE KAK 6EHNH, PACTOBPTENIM, KJDKOCTIN DITN HCTXMR pRnMnTHNOK, HNNTHNTATYNCKCN CIPNO.
3axpbbaTe Kpki npnboa komnaKT-dnckOB, TTo6b Tyda He npohkana nblb.
He npkkacainTecb KnnH3e
CNEUFOKALUN
YKB(FM)87.5Mg-108Mg
MB (AM) 525 kTg - 1615 kTg
PpOMKOrOBOpHTeH: 2.25 IOJMa, 8Ω
3NeKtponntaHHe: 230B-50Tc
Pe3epbHoe nHTaHne dna Yacob: 9-BonbTobBa 6aTapeiKa (F22/E-Blcck)
PpOdoXnTeBnOcTb pa6oTb 6aTapeKn: npMepHo 9 YacOB (pa6oTa YacOB n 6yDnBnHnKa)
Pa3Mepb: npnMepHo. 208,6 x 164,5 x 103,6 MM
Bec: npnmepeHo 1,2 Kr (6es baatapeKn)
CneuqkaaMQKet 6bItb N3MeHeHa 6e3 npedBaHrTeBHO yBeDMnEHN.
MOJEN 4574 CTEPEO PAIIOUACOBHnK CbC CD/MP-3 IJIeBp IN BXOD 3A USB
PbKOBODCTBO 3A YNITPEBA
INHCTPYKUN3A B3O3NACHOCT
DONJIHHTEJIHAHHΦOPMAUIN

BHHMABAHTE 3a MANKI YACTN N BATEPHN,He NT BPTTAE. MoKE Da ce OKAKe ONAO 3a 3aPABETO H N DA DOBOE Do 3aDyUbaHae. MoIN NaTe MaKHN ypeDN i BATEPHN M3BbN O6cBA HA Dua.

BaxhencbBEBOTOHacnCe do 3aunHa cnyxa
PpeynpeKdHHe:
BnCe TnKnte 3a BauHn Cnyx. Hne Cbno.
3aTOBa 6bTeBHNMaTeHn, KOrato HsNo13BaTe To3n ypeD.
Hawata npenopbka: N36yBaTe BnCOK 3ByK.
Eueta tpa 6a de habmoaba, korato nnoanba cnywankia; yepete ce ye ypeda He nactpoen Hn ciene 3yck.
PpeynpexdHne!
BucOKn 3ByK MoKe Da npHn HEnonpaBnMa BpeDa Ha DeTCKn CnyX.

HNIKOTA He no3OBnRbAte Ha NIKOgo Ooc6eHO ha Da neoTABT PpeDMTeB 0TobOn, cIeTHaTHInn HINX BDOBe Ohe TaN ToSy eD.1e MOKUdo da BoDeE Do CmBT oETekPOApd. Yepda TpBBa DA ce TBAPCA mOTo KANHfDvPVAH nPecoan

Hnon3aaye ypeda cmo 3a npedHa3nHeHaTa ynoTpe6a.
To3n ypeD moXe da ce n3non3Ba cAmo X doma nn Ophica.

NaTe ToBa pBkoBOcTBo 3a 6bdeu ynotpe6a.

Hnctpykun 3a ona3BaHe Ha OKoJHaTa CpeDa
He HxBbLpIaIe npoDyKta B O6NkOBHBeHTe MoDAHJn OTMaIaJIuNcIe KpaA HxImzHEHn MyIbKtI; npEJaIae rO 8CbPaiTeHN yNtK3 apeKINKpHa HE NekETPmVckN k EneKTOHNH ypeKn. CmBOHa na pONDyKa, INCHpyKUHKe 3a NytoPe6 Ka Nn OAnokBKbKa tte IHCOPMnAT a MeTOnMeH aHXsBdJIHNe.
MatepHnAte ca roDnHa 3a peuKnIpaHae, KaKTo e CnoMeHtO b MapKpOKBATA. Ype3 peuKnIpaHae nIpyrHΦopm Hn A NobTporHa yNtpeBa Hc TApH yPeDnBOpHNACHe 3a ZaHTHa Hn PnpOBDHata CpDxa.
Mon 3a nntaTe MeCTHata ynpaba 3a OToPn3npaHO MxTO 3a HxBbPnHe.

He npenpeyae BENTHINLAHTA Ha yepda. Yapepe Tae che npetda, BECTHIN, MeBEN mHn Dpyr npdMeTn He bknopat BENTHINLAHOHATA cNCTEMHa H anapata. BeNTHINLAHOHATA cNCTEMa TpRbBa da MoKe Da kyHIOHOHPa no BCKHO BPEme! IPrperbaeHETO MKe Da doBeDe Da cepno3Ha NopepeHa yepda n da HAMAn Heroboto cyHKIOHOHPa e XHBOT.

TpeuHa TOnnHa
He HanaarE ypeDa h npraK cIbHueBa CBeTnHa. YBepTe ce, ye ypeDa He e 1N0xOKeH H aDpEeTHn HToTnHHn H3ToHnHn Kato pAdnTopr nH orBh. YBepTe ce, Ye BEHTnAaOHnHE OTBOPn HyaPeHa 3a Ka3KpnH.

Bnara n noocTbaHe
TOny yepie he enPomokAaem! He notanlneBb bOda. He n03oNanBte KOtAKcB OBAJa. Ako Bn3Ba 0a BypeJa, TOBa MoxKe J a npnnHn CepnoHa 8peJa. He HnON3BaTe NoocCTBaun MaTePHAni, KOnTO cIbPkat anKoXon, amOHk, beHNHn HnHn paarpaKaDaun cIbCTANK bI KaTO Te MoTg a Ia nopejrt yepda. 3a NoocHTBaHe mNOr3BaTe MEKO, BrAkanNoapeJ.

PpoepocnoHaHNopeuKnnpaHe
Bateprrn 1n OAIokOBH nTpe6BaJa Cae 3x3xPnRt B 06uiTe OTnAa. Bateprrn Tpr6BaJ Da cpeIaBArB aCb6BpaTeHn pNKT 3a HnOanBaHn Bateprrn OTdenHe Ha eHIOKHTnAn OAOkE dOpBe 3a ekOIOMrHATA cPeJa.
YINTBAHE 3A BE3ONACTHOCT
- NPO-ETEHETYLTBAHETO-BCINHKINHTPYKUNI3a 6eONACTHOYNOTpeBaTBAaD 6bJATPOHETENIPDnIaCEpAOBTOcypEJa
2.3AIA3ETE INHCTPYKUNITE -INHCTPYKUNITE 3a 6beonaactnoctn y noptpe6a Tpr6ba da 6b.dat ctbxpaneha 3a 6bdeua cnpraka.
3 NCLJIAYNI INPDEYINPEXHEJN -Tbpa8a de cna3baB CwIKN INPDEYINPEXHEJN 3nKINCHIN Bbyxpyedya nTei bynTBaHETO a yontp6ea.
4.CNEBBAIHTE INHCTPYKUNITE - Tp6Ba da ce cna3BaT BCNUHnHCTpyKun 3a ynoTpe6a - BOДA I BJIАF - YpeДа He 6I TrpБaIIO Da cc ИлгОЗдб 6IIM3O Do BOДA, HApIMeP 6IIM3O Do duKbIbHnA, yMbBaIINHk, KxHyEнCkA MNBkA, OTKPnTa nepaHnA, pIyBcH 6aCInHmMOKpo anTpe.
- BEHTIJIALJ4Y - OTBOPHTE B yypda C a HAPRABENa 3A HeORA HbAOKHJa BEHTIJIALJ4Y. Te ca HEbOxDPMDA Ta a npePnAaBtBpyd. Ypda TpBBA da a noCTABeH taKa, He HerOBOTo MecToHaxoKdHeNe IHH NOnoKeHMe Da he npEnu 3a CBObDHO To MY BeHTIJIINPAe (Ho xONkDAHe). He nocTABeTJe Pyaed bLpxy NnHO, DnHB, OaEto IHH NoNIOHbNoNobXPOCTPAHCTBa KORTo 6M MoNA da 3aKPNe BEHTIJIINOHmTE My OTBOPK, KAKTO h BATOBPOHnPOCTPAHCTBa KATO 6bNIMTeKA INI ukaq, KOHTO CNIPAT CBObDHO pRTOK HA Bb-3dyx npce3 BEHTIJIINOHMHOTIO BTOPDK.
- TONJIHNA - YpeDa Tp86Ba Da e paaonoxeH, daneye OHTOHN HA tonIINa KATO padnatoPn, neKn Hn DpyTa TEXHnka, (BKNIOHTENHO yCHNBATeN), KOITo MOrT Da nJbYBaT
- IN3OTUHIK HA EHEPPTY - Ypea Tp8aa da Ce cBpke KbM I3TOHIN HA e HEPRn CMO OT Ntna, noocen B yIbTbaTeHO a yNToP6e KaI NkA KAtO e OIbTaHNO A bPyXhoer.
9.3AHTA H 3AXPAHBAUHT KABEN - 3aXpaHAAuHTe Ka6En Tp8Ba Da 6bDat HNCTAnPnAHNo TaKbB NauH, Ye Da He Ce HAc7bNbat pnx XoHe Hn npOsbNbat OT Heua CTOKEHN B5DXY NIO DO TAK.
HEYNOPTPEBA-Lo Bpme HnIytni npnoaHn HeynTOPbBa HpyeHa,MOHnIKIOHcTe rO tEneKTPo3aXpaHHeTnAHTeHtKa.
11.PNEI3BAHEOTAMBPCBAHINTEHYCTHOIT -Tpa6ba da ce BHMAABA pTe3 OTOBHTKVAHDAE 0a He HNATBt BHNUHNIPEMETN INYHTHOCTO.
12.13NCKBAHNAI PNI PEMOHT - Ypea Tp6ba Da bJe peMOHTnapan cmo OT cneuHnIO 0bueyPABOBTHNkoTTO
a. 3axpaHbauT Ka6en nnu wencen e nopehen.
b. BbB bTpewHocTt Ha ypeDa ca nonaHaNN BbHnH npeDMTe Hn TeHoCT.
c. Ypepa e bun nnaoxkhen ha dbjk nn Bnara.
d. Yeda e 6 khl n3nyckan , HnO 6bKhrae a NOBpeHna . HnON5BaHTe cMoA KOHTPONITE H NaCTPOKIIKeHAKTOEYkA3a0B NOPTe6BNCKOTbKOBQDBCTO.
e. YpeDa He DeiCtBa No HopMaIeH NaH.
f. Ypepa noka3Ba cepno3Hn OTKIOHOHn OT HOpMaHHaTa Cn pa6oTa.
13. PEMOHT -Помбалгштуда Нтугбда се опнвддо рогипсгннн
NPOBENI HeONICAH B pLKBODCTBOTo a yntpe6a BCNKN CLOXHNPEMOHTN TpR6Ba da ce
M8bprupat ot cneuINHIO obeyHnPABOTHIN.
14. NIOCTBAHE - I3KIOKNOTe YpeaO OI eONeKTHoCkTO 3xKpAHBaHne pRdNIOVCTBAHe. HcN03BaJIte TeuHN IMN aeEOZHOIN NIOCTBAWn IpnepaATn, a cAmO MeKa, BLnAaH KpPa. CnDjaBtAE YkaAaHaHTA 3a NOIcTBAHe NIOJDPbIKKa OIKCNAMB T O3N HApNHyK.
15.3AUNITOAOTMbNIIHAR-No pIe me HA rBpOteBHeVA Bpyr nbltn nepnIO HA HeyntpeBa MoHIN kHIOHNBAIE YpeDA OEIEKTPNEEAE XABPAHBeA IN HENTAE?
16. IPOBEPKA 3A CNYPHOTOC-CTN BPMOHT HA YPDEA, HOMONETE CNYKNTENTOT OT CEPMBA DA HANPABT NPOBEPKA 3A CNYPHOT HC HA YPDEA.
17. IEPOTABPAHAE - 3a NaIeHerTe OAnOHCT oB aIbnNameHae H eJnKTPUHecku Ydap He npETOBAPBAITE KOHTAKITE N pAKIOHNITNE B KONTO E BKNKUYE PHE
18.PA3TOBAPBAHEOTENEKTPOCTATNUHOHANPEXEHNE-IsKTHNHTe eNkTPO3aXpaHbAHetoHnBaTeDe 6aTePmIte, Ako ypeDaHe paoToH KaTo TpRbGa.CneD kPATKO BPOMe OTHoBO NoCTABe ToBePmTe H KIOKHTe GtEKPto3aXpaHbAHTo.
PENPYNPEKDEHNE
TANI CD CNTEMA E KIACI I LAEPEH INPOJYKT. CNTECTAMA INIPOJ3BA BVIDIM/ HEBIVDINLAEPEH JILU, KOIO TO MOKEJA PIPNUVHON ATO NAO BCTBHAJE, AKO CE HACOHN. YBEPETE CE, CE DEIECTBVETO HA CD CNTECTAMA E B CBOTBTCTBVE C INHCTPYKUNITE.
N35RBAIYE DIPKETHO B3PNAE DE TOBPEHOYEN CD PAIBN IIN DYPTNY OTBOTPO, KOFATO CICTEMATA E BKIOHUEHA KbM JIABHOTO ENEKTOPOAXPAHBAHO
H3N0JI3BAHETO HA KOHTPOINI N HACTPOIKIN IIN PIOBEXDAHE HA IPOULEDUPY, PA3JINHHOT YKA3AHITE TYK MOXE DA IOBENE DO ONACHO PADNALMOHO OBbUBAHE.
3A HAMALBAHE PA NCKA OT NOKAP INI ENEKTPOYADIP NDCADNI CMUZEHNA. 3N013BAE7CAMPOENPBOHAHITE AKCECOAPR.
KOHTPONN N DNCNNEI

1) N3TPEIOTPPEI
- POWER (BKJ/N3KJI)
BknkuBaHe /n3KnKuHaBe Ha ypea (aadbpxahe)
2.16yToHCTAPT/NAY3A
CTapT/nay3a Ha npocBnPbaHe Ha CD - CTON6ytoh
CnnpaH npocBpBaH Ha CD - SNOOZE 6yToH
Cnnpahe 3a6 MNHyTN
5.PPECKAAYAH
PpexBbpnahe KbM CneBaunr TpeK
HactpoKaHa HacobnKa n 6ydnnka - PPECKAUAHE
PpexBbPnHHe KbM npeduHnTpeK
HacpoKaHa yacOBnKa n 6ydnHnKa - 6yToH DISPLAY
Poka3Ba HhOpMaun 3a CD TpeKOBe Hn PauoocTaHcnte - CBeTmHeH ceH3Op
ABTomatHHeH KOHTpon Ha npKocTTa Ha dncnner - ALARM1/ALARM2
HacpoKa 6yDnHHK 1 u2
10.ByTOH CLOCK
HacpoBa yacobnka
11.LCDnncnn
Dcnnne 3a yaca Ha yacOBnka /6ydnHnka nn HNFOMaunr 3a KOMNAKTdNcKa /paNTO
12.6yTOH PROG
PepBapnteHNO HAcTpoen npocBnPaHe Ha KOMNaKTtckA - SHUF/ REP 6yToH
H36epeTe pexHM Ha npocBnpuBaHe Ha CD - SLEEP 6yToH
HactpoTe TaMep 3a 3acnBaHe
2) N3TPEO TNRBO
- VOLUME
KoHTpon Ha 3Byka - Ⅲ6op Ha ΦyHKUH
CD / MP3 / RADIO / BUZZER / USB - JIb BncoKorOBopuTeN
4.BpaTataHa CD-dpaBba
3) IN3ΓIENOTДЯCHO
1.TUNING
Vyhledavani stanic
2. Pfeplnac Pasma BAND
FMST./FM/AM
3. Vstupni Zdifka AUX
4.Port USB
5. Pravy Reproduktor
BU 162.
MHOROΦYHKUHOHAJIEN DUCNNEI (OCBETNEHNE)
1.YacOBHK/BvynHMK/Incpe3a paHO
yectotata
2.нконкa PM (cneio6e)
3. IKOKKa CD
4. IKOHKA WMA
5. INKOKB MP3
6. KOKKA USB
7. IKOHKA TUNER
8.ИКОнKaAlarm1
9.ИконьАlarm2
- NOKHKA ST
11.нконкa REPEAT/REPEAT ALL
12.нконкa PROG - IKOHKA SNOOZE
- mkoHsA SLEEP
- mKoHs HA SHUFFLE
16.Икога усета band (AM/FM)
CNAHAE/NOIMRAHA HABATEPNTE (3A NOIDPbXKAHE HA NAMETTA)
- Cnoxete Batepnte B donHata yact Ha ypeda 3a 3ana3BaHe Ha naMeTTHa YacOBHHKA.
2.Cbpxkete k6e3a 3a xpaHbaHe c KOHTAKra Ha CTHeTt. CMeHnTe BatepePnte BeDhK
B cnhy Ha cnpahe Ha 3axpahbaHTo ypeDa ce NkIOyBa HAmbHO. Cnep BcSTAHOBaHa EneKtpo3xaphaHBeHa HdCnner Ha ycTPOCTBOTe cNOKa3a 12:00 n HcbT trp6ba Da bSyteHrpoTHOHO
Cnokote batepnor 09 Vhe ce doctantc ypeia B oTneIeHneto 3a batepnir 3a nocdycrrpahnabe HA naMetTA Ha cacobHnka H aactpOKe H a6dynnHnka a cnyauHa npkecbaan He ha zaxpaHbAHTo. IIO To3n HauHn HactpOKe H aacobHnka 3a nocdycrrpahn.
No peme Ha na bota c Gateprime nacb He ne Kokabba Hncknner npexminkte 3a cbkyjdahe c pa Jno hnnomKAMJNTCK duHc no GA kTNBn. BCHNpyfHKnI, BKIOHHTHO DN CINNEe Ce BbCTAHOBIRB BdHrAra CnBg BbCTAHOBIRBAHETO HA 3QXPDAHBAHTo.
EneKtpo3axpAHBaHe
1.PnDn Da CbPkTe C rAaBHO EneKpO3xApaHbAe Ce YEpeTe,Ye BOnTAka HA DOMAKHNCTBOTo BN CbOTBeTcBA HnCnUeMnKaunMe HnEtKeta (230V-50Hz),PaNOnIOKeH HdoHnata HaT yPeHa.
2.CbPXTeKa6a3a7aHnHOeKtPO3AxaPbHABe CbCTEHNE KOHTAKDnCnner NOk3a8a 12:00THeBA HACPTPOE PpBNHTO RPEME
3. 3a da n3kn0Hte Hanb1nHO ypeDa, n3kn0HTe OT rnaBHOTo enektpo3axpaHbAHe Hanb1nHO.
BU 163
HACTPOBAHE HA YACOBHINA
YacbT ce nok3Ba B 24-hacOB cOpMaT.
- Hattichene T a 3aBtke CLOCK DOKATO HE BHTUATE UCDPNTE 3a caca Ia 3aONHAT 3M HATR AT DcNnner. DicnneTNE tce bIe HkUM HOPMAHEN PekHM. AOK HA RA DECTBE Oo 5 cekHyd.
HaHnchete /pba da hactponte Yacobete (nn Hnatchete n 3aDpbkte 3a bpa a HACTPOKA) - HataHCTe CLOK 3A da noTobpDnTe hactpoikHe Ha caca.Cera Ha dnncnnaaohbTa Da MMAT KUdPcTe HA MHNYtHe
- Hattchote 1/3a da hactponite MHHyntte (nnn Hattchote n 3a3p3kte 3a b3pa3 HACTTOKA).
5.HATNCHETe CCLK 3a Da notBpDnTe BauNte HactpoKm.
PAIIO IPIEMHNIK
- Hatnche TE POWER 3a da BknIOUHTe yCTPOHCTBOTo. DnCnner CBeTBA.
- HactpoTe CENEKTOP HA FYHKUH na noaunr RADI ; dncnne noka3Ba TUNER.
- HactpoTe BAND Ha FM ST., FM nn AM.
- TbpceTe XeNaHAT cTAHmC KONHTO TUNING
5.наллбайтve VOLUME,зднгпгси сиита на Аыka - HaTHCHETe Daa PLTN DISPLAY, 3a da ce noBn HmFopMaunz 3a padNocTAHINTE. Dncnner ue nokaxe YecToTHNb Oxbat N YecToTATA 3a HAKOTIO CekyHn n CneT Toa 3e Ce BpHc KbM dncnner 38vac
- Hataichete POPE 3a da IaiknoiHTe (BkIOHnIte Ha CTHe-68) ypeHa. 3aNHO tOcEBTBAHe ce IaIKIOHae.
IIOOBSPEHOIPNEMAHEHAPADNOCHHAJA
FM: HanbuHIO pa3BmYteXtIa HAtHTeHa 3a Hn-d6p0 npHemaHe.
AM: YpeJzIa3N3Ia8 BrpaTeA feepnHa BHTeHa. HacOtehe ypeJa 3a Hn-d6b-p npHema.
NPOCBNUPBAHE HA KOMNAKT DNCK
- Hatnche TE POWER 3a da BknIOHTe ypeDa. Dcnnner CBETBa.
- Hactpoite CEIEKTOP HA FYHKUH Ha noosnna CD; dncnnner nokasBaCd.
- OTBOPETe BpataHa KOMNAKT DnCK VCTPOINCTBOTO
4.CNOKTO DKK G HANHATAHATA NOBpXHOCT HAROpE N aTHoPETO BpATWHTA HAKOMNKT DKK YCTPOICTBOTO.YpeDA NOKA3BA 3a KpATKO HA DNnner CD nCNE TOBA 3anoHBA ABOTAMTHHO DA CBMP.
5.AKINPOCBNPAHae a cTAPTNPA ABOTMATNUHO,MOJI, HATNCHETe 3a npocBnPBAHe
HAnchtehe 18a nTn DISPLAY, 3a da ce nookae HnOPOMauniaa 3a TpeKa Ha nCnneR. Cnnd HNKoKoCe kUyDna eBpuHa KbMnCnner aa BPeMe.
7.наллбайтЕ VOLUME,а ду HabtpoNTe HAcTpoNKe 3a cnHaTa Ha 3Byka
8.aBpeMHeHIO npKbcBaA (ny3a), HATcHETe HATcHETe OTHOBO 3a Da b3ctAHOBITE nOPOBpAHTEOT CHATA POMHOTN, HOMPOTN, TH, TEPK, POMNTPA HAMDDNE. - HataeHcTe 3a da npkehchTe HauhNIO npocnbpHcTe. Ha dncnnr co nokaaBn nnna
- CHATCHTE POWER 3a da 3a HKIOHIOHTI nPOCBPBAHO To HA KOMNAKT NCK (CTEHJ-6a)
Ppeckaaye KbM onpepeen TpeK
Ioka3aHn Hn 11
- No ipere Ha cnpahe HATCHETe -Ha da na 6epete TpeK n cneT TOBA HATCHETe -Ha da zanohoe PnocBpRBHe.
TbPCEHE HA ONPEDEJEHA N03NUR BbTPEB TPEKA
- No BPeme Hn npocBnBaHn HATCHETe H 3aBtXeTbe Nnn KOMAKT DnckL T ce CE npBcBpTb6P30n Hnped2 Hn H3aBd Hn NO-BNCKA CKOPOT H nhamalaena Cnna Hn 38yka.
- Yeda 3b3ctahOBBa HOpMaHIOTo CH npocBpuHe, KORATO OCB6OJDMe 8yTOHNITE INI
NPOPTPAMHPAHE HA TPEKOBETE
MOKeTe La nporpamapate do 20 rpke B cbTb8eten peB. Bb3mOHO e da c6 nporpamapA MHOKOPAOE dHIN b CbU TPEK.
- No Bpeme Ha peKIM ,CTon" HATNCHEt PROG; Ha dncnner ce ce nokae PROG n P01.
2.нэпогаытTe 附nna la da n36peTe TpeK - Hantchete PROG 3a da 3ana3te Tpeka. Ha dncnner ce no8raBa 002; cera mokeTe da 3ana3te BTorpa Tpek.
- NtOtoTe CTbIKn 2u 3a Ja Ia6oepTe nIaIaIaIte TpeKOBe. MoKeTe Ja aIaIaIte Do 20 TeKa.
- HatniheTe Ta da 3aonHte nporpaMnpoHto npocBnBaHe; Na dncner ce noBBA PROG.
H3TPNBAHE HA IPEDBAPNTENHO 3ADAEHNTE TPEKOBE
No apeme Ha pexHCTOn" HATNCHETE PROG 3a Ha NBAKATE CBAHN PpeBapnTeHO HACTPOEH TPEKOBHe HN HATNCHETE , HN OTBPeTOM KOMPAKT DMCkyctpoTHTOH HN HATNCHE TPOEER, HN HACTPOIE CELEKTOPA HA FYHKUMITE HADADIO, USB HN BUZZER.
Mokete da hIepeTe pexim 3 npocBpBaHe npEIMn no Bpeme Ha camOto npocBpBAHe. Mokete da kOMbHInaPe, nOBaTe npIrnporpaMe yfHKm.
SHUFFLE: npocBnbpBa BcNKn TpeKOBe B cBoTBeTeH peI.
REPEAT: NOBTapaCe HacToaTm TpeK
REPEAT ALL: NOB TaPc ce enn
SHUFFLE REPEAT ALL: NOBtapBcNCHTpeKOBe Ha ncka B cbOTBeTeH pe.
ФУHKUH HENPEKbCHATO NOBTPAReH CJIyauHNOBTPAReH
- HataHcTeBE TbeBtJbK INI INIKKO INI TH SHUF/REP 3a Ia N36epBeTgHbA HPOCnPBaeH. PaaNIIHtepeHHMn HPOPCnPBaeCe noFOBBAAT BACINNNe A CToEeMHNA peq.
- HATNCHETe IIO Bpeme Ha cnpaHTo 3a Da ce CTapTnPa npocBpBaHTo. No BpeMe Ha
peKIMa 3a pa36bPKBaHe npocBnPaHETo 3anoYBa ABTOMaTHHO CneH HKOJIKO CEkyHN - 3a da ce BbPHeTe KbM HopMaHnHTo npocBnBpBaHe, HATncHeTe HraKoNko nTSHUF/REP
DOKOKO KDMKHE 3B IOPOCBPBAHO HE 1N403HATOT DNNNE. U63 HATCKAHO H MOKCTE DA C BbPbHeTe KbM HOPMBAIO HO PBCBPAHO.
3a6eEckKa:
KORATO 3mbpate pexkma 3a pa35b,pkbae no bpeme HA npocBpBAe, TOn NHMA nCe 3daenCTBa DOKATO He pnpmHe hactoTnI rtek. Pexkma Ha pa36bPkBAe He e b3m0KeH no bpeme Ha nporpaMPaHO npocBpBAe.
CBbP3BAHE HA DONTBJHINH YCTPOINCTBA
MOKETE DaBcPKEIe OJIOJIINTEENH YCPTOCHRA 3a IPOCNIIBHE HA ayINO TPEKOBE PnEX BWCOKOBOPENTNEHTA HApMDIAOCCBHNA.
1. Hatnche TE POWER 3a da BknquHte ypega. DnCnnner caeTba.
2.CbPKTe pinnnoKxHnnaPnene HKBaen KbM bXoDn HJAK AUX ha padOacOBHnka n KbM XHOHNH JAK 3a CUYsAANIK HA DoBnHInTeHNOY OCTPOINCTBO (KOMNIAKT NDC NPEBp, BIDEO peKOpDRnpI.)
HaHcnnpe Ce noRaAUX
PekmbT AUX 3aIywabaakTNBnpeKUM Ha KOMNAKT NCK nn paNo.
IPOCBUPBAHE HA MP3-TPEKOBETIPEHOCMO USB YCTPOINCTBO
- Hatnche TE POWER 3a da Bkniouthe ypeda Dnncnnner CBetba.
- Hacrpoite CNEKETOPA HA YWKLIN HA noosnla USB; 3a kparko dnnnna na ypeada nokzba USB nce tos a ce bpuia kbl nnndra 3a peere.
3.CbPjKTeB BaeTcpeIpncHCMU USB yctpoRcTBo kMb USB-8xoJa ,dmcNcRn HokaBA USB WMA HIN MP3, 3AbaCmOOT oFOPMATA. - Yabepe tce,he aae toe USB yctpoictoBc b,bpka Mysnkannn fainnoe MP3 bIb foopmatm MP3 nwn WMA.
JaBpeAeKDbIpaIbPnAIBaTOMBtHIOA3NoaBpNBAPOCBBPBEA. Ako pOcBpRBHEo HE 3AnOpHe aOBATMnHO,MOJI, HATCNIEHTe - HATNCHETE 14a Da npceKoCHte KbM npednHnna HIN cndBaunn bain; HATNCHETe 3a da aanOHHe TE nDa cnpTe BpeMeHHO npocBnPBaHTe; HATNCHETe 3a da cnpTe npocCBPBAHTo.
- No Bpeme Ha pexkM Ha nay3a HomepaTa Ha qainNoBcTe Mrrat Ha dncnner.
PPOCBNUPBAHE HA MP3 ΦAIIOBE OT MP3-ПЛЕньP
1.CbPjKtehe maBn MP3 nIep kMb USB BXoda qpea USB ka6en (GateWrite na MP3 nIep-paMaJa da ce ppe3aepd).
2. Moxtede Ka KONTPNATPe nPOCBPBAHETO Upe3 KOHTPNOHITE ByTOHA Na PAIMNoCABHNKA (kAKTo EOniCAHO No-rope)
ФУHKUЯБДИNHK
H3non3BaHe Ha yHKnraTa 6ydnHHK
PadiuocobHnka nO3BONBA DA HAcTPOTe DBe pAaNHNn AnapMn HA 6yDjInnKna (ALARM1 IN ALARM2), KOTo Ca ha paAnoTOXeHe N O BpeMe Hpexmte CD, RADIO, USB mN BUZZER . HaH nped, ectctBeHo, Tpr6Ba DA HacTPOTe npAaNHO To BpeMe.
HactpoBaeHaacbT3a anapMa
1.HaHcHTo H aDpKbTe 6yOna ALARM1 nHn ALARM2 npKaTo H bNtte U pPnTe Ha Yacaa da 3anoHnat Da MHrata Ha Ncnnner. HauCnner ce noKakBa CLOTBEHO ALARM1 nHn ALARM2 mHrAe.
A HMA JENCTBHE B PAMKNTBE HA 5 CEKYHJN, ypeJa ABTCOMATINHO Ce BpIbIa K-M DnPNNE 3B PMeE.
2. HactpoTe YacbT 3a anapam KaTo n3nonBaTe I
3. Hauchete ALAM1 nii ALAM2 (cbTaeTHo HA buaHte HaCTpOikn) 3a da NotbPdnte HACTPOKNTe HA cca.
LppTe 3a MNHyTHe MnraT.
4.HaTpoNTe MmHyTne Ha anapMaTa, Kato n3non3BaTe
5. Hachteche ALARM1 an ALARM2 (cbotetctbaaio ha bawite hactpokn) 3a da notb.pdnte Hachpoikne HA MHTyTe.
HactpoTe CEJEKTOPA HADHYKLUN HA N03NIAO CD;CN13PNEI ⅢA NOIMOKA OTR BAC da Ⅲb3epeH oHOMEP H TpE.KINs3nB8aTae>3a Da I3b63epeTpeK.
AIOKcATE Da HACTPOITE BTOPA ANAPMA,MOI, NOBTOPETE CTbIKHTE, ONMCAHNO-rope. AAMPAIE AnAPMAI KATO HAATNCHETE ALARM1 N/INN ALARM2;DcNnner noKa3aBa cBoTBETHATA INHFOPMNAIA.
H36opHapeKHM6yDnHHK
- Hatnche Power 3a da BknquHte (BknquHte Ha cTeHd 6an) ypeaa.
- Ⅱa6peTe pexnH Ma 6yDnHnK Ype3 HAcTpoBAne HA CELEKTOPA HA ΦYHKlInn HA CD. RADIO Iuu Buzzer.
UOM anapmata ce akTbnpa, dncnner ue nokaxe ALARM1 u/nu ALARM2.
KoRtO HnIePbAeTINHOHCTPOEHNATAIaIPMAEOCTIHHT,ypedaeBcBbDyUcC KOMNKT DnCK.PADINO INI3 385HEI.
3a6eennka
Korato Nauch HA npedapbertno HAOHepoara ana IAPMA e DOCTHRAT, CNOJHK e KOMAK DNCK N CENEKTOPA HA FYHKLIN e HACtPOEH HA CD, ypea ige CTnPAIPOCBNPAHA HA KOMAK DNCK OT INBPNRA TPEK ONI TPEKA KOITO cTe IPOPTAMPAIN NO BPEME HA HACTPOBAHe H b6yDNIHNA. AKO HMA KOMAK DNCK B OT DEIOHNHO, ypeDA ABOTMTHHO AKTINBMPA 3Bb H B DEKIM HA 6yDNIHNA.
YepeTe Ce, Ye HnctPOnkHa 3A bYka E npBnHbNc KOrato H36paTe pexMn HA GdynnHKn C pAnIO NmKOMTJnk.
N3KIOUBAHe Ha 6yDnHnKa
BcIcIeCTByaT PTH NauHnJa Ce NkNIOHb BydIINHnK. YHKIaTra a npOchAcpoRBAHe Ha BcKeKnBeHbTa anapMa e AKTNbBA BinHar, KORATO HE CTe NsIKHOHN HbIHO FyHKINrA TbIDNIHk.
YBcHnueTe 3Byka ot VOLUME.
2) KomnakT nck nneBpa He npocBupBa
KOMNAKT DnCKe HappackaHo nn Mpbcho.
CmeheTe/NoHCTeTe KOMnAKT DnCKa
- KondeH3 Bbpxy naepHaTa neha
IaKaIte DOKaTo ypeDa He ce npncnocobn KbM CTaHaTa TemnpaTypa.
-JaacpHaTaNeucaMpbcha
NoHCTeTe Na3epHaTaNOMnNEKT 3a NOHCTBaHe HA KOMNAKT DNCK.
CD-R Hg e aopbpuoh
H3noaheCaMOOBpueHN CD-R
3) WymoB fOH no BpeMe Ha FM paDnO npMaHeTo nn Now CnHAn
Hantbno pa3BnTe kuaTa Ha aHTeHaTa.
4) npoDbnKHeNoDpaKaHe npoBaHa He 3Byka no BpeMe Ha npMaHeTo CpeHn
BbJHH
BnHHe HteNeBn3OpN, KOMNIOTPN, fnyopncueHTN naMnN, n dp.
NoctapTe ypeDa daJeH OT Te3n H3TOHmHn Ha BnHnHe.
5) BydnnnKbT He ce 3aedcTBa
-ФункиетаHa anapMaTa He e HAcTpoeHa.
Mon, BuxTe rnaBaTa 3a HactpoBHaHeTo Ha dyHKnraTa "6ydnHnK".
- Pekima Ha anapMaTa He e HAcTpoHa.
Mon, BnTe, nabata 3a HAcTPOBBAHe Ha DEKMA Ha anadmTa.
- peKHMa Ha KOMnAaKT Daucke HAcTpoeH 3a anapMa, Ho HrMa CIOXKeH KOMnAaKT dNCK.
CnOKTeKOMNAKT DnCK
BOPABEHE IN TPNXKA 3A DnCKOBETE
EopaBeHe C KomnakT DmCKOBe
*OTcTaHete o6BnBkata O T KOMnAkr Dncka
HeDOKOcBAIte NOBbPxHOCTHTe.
He 3aJenaiTe CTnKePN Ha dNCKOBeTe H He NnWeTe PbPxy T8X.
He npereBaIe DnckOBeTe.

CbxpaheneHne
BnHarn cIbXpaHraBaIe DnCKOBeTe B OBBkata Nm.
He n3naraIte DnCKOBETe Ha npRAK CbHcBA CBETNHa, MPbCHN, PpaUHN BnaxHM MecTA HIN
TONJIMHA

168

169.