4259 - Alarm clock radio ELTA - Free user manual and instructions
Find the device manual for free 4259 ELTA in PDF.



User questions about 4259 ELTA
0 question about this device. Answer the ones you know or ask your own.
Ask a new question about this device
Download the instructions for your Alarm clock radio in PDF format for free! Find your manual 4259 - ELTA and take your electronic device back in hand. On this page are published all the documents necessary for the use of your device. 4259 by ELTA.
USER MANUAL 4259 ELTA
text_image
AL-100 AL-MON AL-MON AL-MON AL-MON AL-MON AL-MON AL-MON AL-MON AL-MON AL-MON AL-MON AL-MON AL-MON AL-MON AL-MON AL-MON AL-MON AL-MON AL-MON AL-MON AL-MON AL-MON AL-MON AL-MON AL-MON AL-MOM AL-MOM AL-MOM AL-MOM AL-MOM AL-MOM AL-MOM AL-MOM AL-MOM AL-MOM AL-MOM AL-MOM AL-MOM AL-MOM AL-MOM AL-MOM AL-MOM AL-MOM AL-MOM AL-MOM AL-MOM AL-MOM AL-MOM AL-MOM AL-MOM AL-MO AL-MOM AL-MOM AL-MOM AL-MOM AL-MOM AL-MOM AL-MOM AL-MOM AL-MOM AL-MOM AL-MOM AL-MOM AL-MOM AL-MOM AL-MOM AL-MOM AL-MOM AL-MOM AL-MOM AL-MOM AL-MOM AL-MOM AL-MOM AL-MOM AL-MOHUNTERBAU- UHRENRADIO MIT ① PLL-TUNER
UNDER-CABINET CLOCK RADIO Ⓗ WITH PLL TUNER
RADIO-RÉVEIL POUR MONTAGE ® SOUS L'ARMOIRE AVEC SYNTONISEUR PLL
ALULRÓL SZERELT ÓRÁS RÁDIÓ Ⓗ PLL TUNERREL
RADIOSVEGLIA CON SINTONIZZATORE PLL ① APPLICABILE AL DI SOTTO DI ALCUNI MOBILI
RADIO RELOJ DE COCINA CON Ⓔ SINTONIZADOR PLL
RÁDIO EMBUTIDO COM Ⓓ
text_image
Labeled diagram of a car air conditioner panel with numbered buttons and control knobs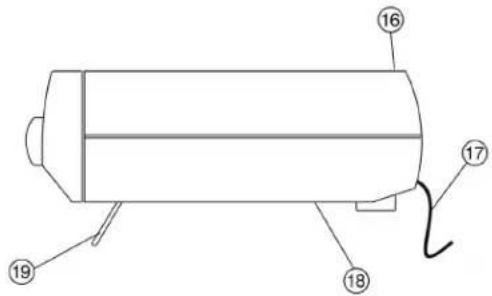
text_image
Technical diagram of a cylindrical device with numbered components labeled 16, 17, 18, and 19.STROMVERSORGUNGEN
Lightning flash with arrowhead symbol within an equilateral triangle, is intended to alert the user to the presence of uninsulated dangerous voltage within the products enclosure that may be of sufficient magnitude to constitute a risk of electric shock to persons.
CAUTION
RISK OF ELECTRIC SHOCK DO NOT OPEN
WARNING
TO PREVENT FIRE OR SHOCK HAZARD DO NOT EXPOSE THIS APPLIANCE TO RAIN OR MOISTURE.
WARNING:
SHOCK HAZARD-DO NOT OPEN!

Exclamation point within an equilateral triangle, is used to indicate that a specific component shall be replaced only by the component specified in that documentation for safety reason.
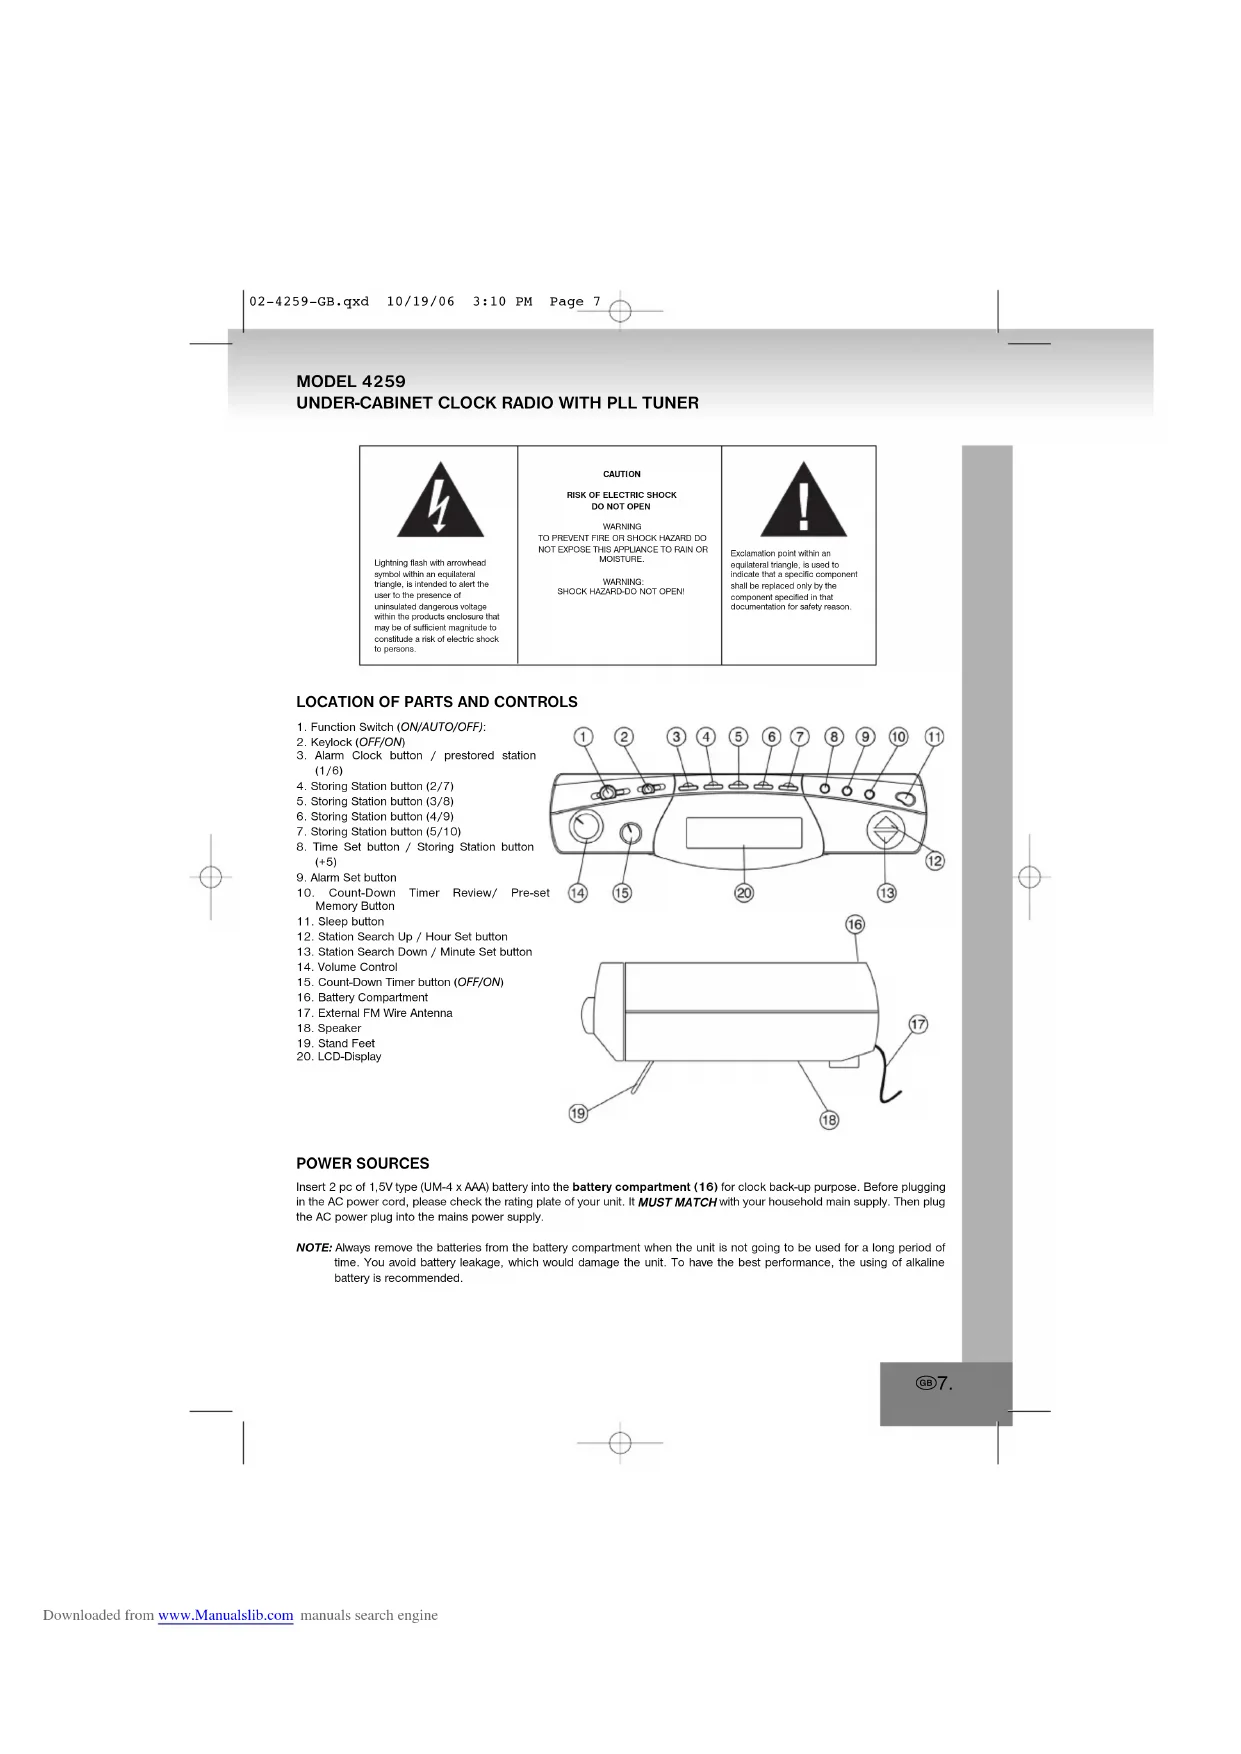
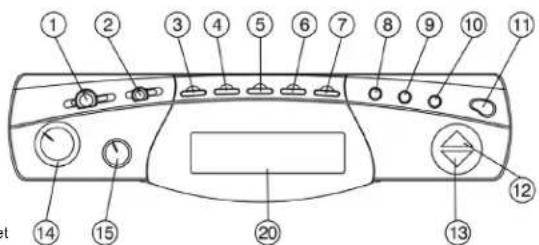
LOCATION OF PARTS AND CONTROLS
- Function Switch (ON/AUTO/OFF):
- Keylock (OFF/ON)
- Alarm Clock button / prestored station (1/6)
- Storing Station button (2/7)
- Storing Station button (3/8)
- Storing Station button (4/9)
- Storing Station button (5/10)
-
Time Set button / Storing Station button (+5)
-
Alarm Set button
-
Count-Down Timer Review/ Pre-set Memory Button
-
Sleep button
-
Station Search Up / Hour Set button
-
Station Search Down / Minute Set button
-
Volume Control
-
Count-Down Timer button (OFF/ON)
-
Battery Compartment
-
External FM Wire Antenna
-
Speaker
-
Stand Feet
-
LCD-Display
text_image
Labeled diagram of a car air conditioner panel with numbered components for identification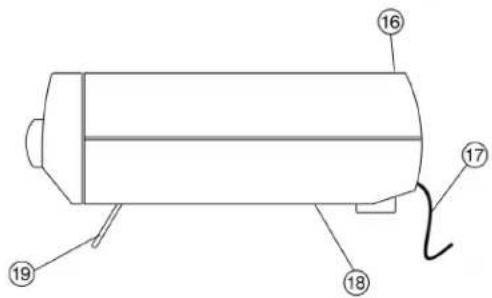
text_image
Technical diagram of a cylindrical device with numbered components labeled 16, 17, 18, and 19.POWER SOURCES
Insert 2 pc of 1,5V type (UM-4 x AAA) battery into the battery compartment (16) for clock back-up purpose. Before plugging in the AC power cord, please check the rating plate of your unit. It MUST MATCH with your household main supply. Then plug the AC power plug into the mains power supply.
NOTE: Always remove the batteries from the battery compartment when the unit is not going to be used for a long period of time. You avoid battery leakage, which would damage the unit. To have the best performance, the using of alkaline battery is recommended.
ATTENTION
This unit fulfills the highest technical standards. In case of any disorder remove the AC power cord and batteries for a few minutes, so that the unit is absolutely disconnected from power. Then energize the unit again.
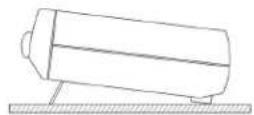
This unit is specially designed to be installed under the kitchen cabinet (please use provided screws). It is also possible to place it at a table by using the stand feet.
CLOCK SETTING
- Set the Function switch (1) to "OFF".
- Hold down the Time Set button (8) for 2 seconds. [The current time flashes]
- Press the Hour Set button (12) to set the hour. [Hold down the Hour Set button (12).]
-
Press the Minute Set button (13) to set the minute. [For fast setting, hold down Minute Set button (13).]
-
Press Hour Set button (8) again to confirm. The current time will always be displayed. [If you do not press any button within 8 seconds, the time will be displayed with the current setting.]
RADIO OPERATION
- To switch on the radio, slide the Function Switch (1) to the "ON" position. [The current frequency will be displayed for 10 seconds.]
- Then adjust your desired sound volume level by turning the Volume Control (14).
- Use the Station Search up button (12) and the Station Search down (13) button for manual setting step for step up or down.
- Press and hold down the Station Search up button (12) and the Station Search down (13) button for a fast up and down station search. [After starting the fast station search, detach the button. The station search will start automatically.] [The search will end, once a high frequency signal will be received.] You can continue the search by repeating step 5, till the desired station will be found.
- To switch off the unit, slide the Function switch (1) to "OFF" position.
NOTE: For the best reception, un-wire the External FM Wire Antenna (17) and strap the end somewhere.
STORE AND PLAY YOUR FAVOURITE STATIONS
Please store your favourite stations as follows:
-
Switch ON the radio and search for the desired station. [See "RADIO OPERATION" for more details.]
-
Press the Storing button (10) one time. [The symbol "M" flashes.]
-
Press the Storing station button (3)-(7) to store the station with the desired number (1-5). [To store stations 6-10, please press Storing Station button (+5) (8) one time and then press Storing Station button (3)-(7) accordingly.]
4 [If you do not press any button within 8 seconds, the current setting will be stored automatically.]
Play your stored stations:
- Switch ON the radio.
- Press Storing Station button (3)-(7) to choose the prestored station. [To store stations 6-10, please press Storing Station button (+5) (8) one time and then press Storing Station button (3)-(7) accordingly.]
GB8.
-
Please set the Function Switch (1) "OFF".
-
Press Alarm Set button (9).
-
Please press the Hour Set button (12) to set the hour. [For fast setting, hold down Hour Set button (12).]
-
Please press the Minute Set button (13) to set the minute. [For fast setting, hold down Minute Set button (13).]
-
Please press the Alarm Set button (9) to confirm the current setting. [If you do not press any button within 8 seconds, the current setting will be stored automatically.]
-
Press the Alarm Clock button (3) to switch on the alarm clock. Wake to radio: "RADIO" symbol Wake to buzzer: "BUZZER" symbol Switch off the alarm clock: All symbols are deleted.
-
If you want to get awake from radio music, switch on the radio and search for the desired station, before setting the alarm clock. [See "RADIO OPERATION" for more details.]
ACTIVATED ALARM CLOCK
- If the alarm clock starts with radio music or buzzer, please press Storing Station button (3)-(7), to stop the alarm clock for 10 minutes. Afterwards it will turn on again automatically. [The total alarm clock time constitutes 60 minutes.] [The symbol "OFF" appears.]
- To switch off the alarm clock slide the Function Switch (1) to the position "OFF".
FALL ASLEEP WITH THE RADIO
- Set the Function Switch (1) "AUTO" or "OFF". [Please adjust the desired radio station before activating the snooze function.] [See "RADIO OPERATION" for more details.]
- Press Sleep button (11) one time to activate the snooze function and to switch on the radio. [A standard time about 30 minutes will be displayed.]
- Please press button Station Search Up (12) and Station Search Down (13) to change these settings in steps for each 10 minutes. Duration of snooze time: [From 10 to 90 minutes].
- The radio stops automatically, when it reaches the adjusted switch-off time.
COUNT-DOWN TIMER
- Switch the Count-Down Timer Button (15) to "ON" position. [The "COUNT-DOWN TIMER" icon and the previous timer setting will appear]
- Press the Hour Set Button (12) to advance the timer alarm hour setting. [Press and hold the Hour Set Button (12) to fast advance the setting]
- Press the Minute Set Button (13) to advance the timer minute setting. [Press and hold the Minute Set Button (13) to fast advance the setting]
- Press the Count-down Timer Button (15) again to confirm the current setting. [If no key pressed for 8 seconds, the current setting will be confirmed]
- During real-time running mode, press the Count-Down Timer Review Button (10) once to view the count-down timer. If you wish to change the setting, follow the STEP-2 and STEP-4 accordingly.
- When the preset timer due; the buzzer will ON for 10 minutes.
- To disable prior to the set time; switch the Count-Down Timer Button (15) to "OFF" position.
KEYLOCK
- If you want to lock the keys, slide the keylock to "OFF" position.
TIP
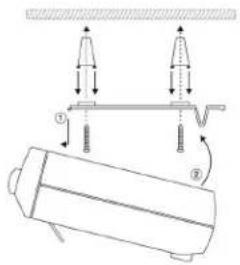
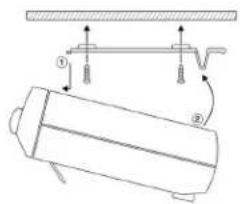
There are two possibilities to mount the unit under the kitchen cabinet.
Method (A)
- Mount the plastic pipes together by snapping the pipes in the holes of the border.
- Tum the long screws (x4) in the pipes and through the border. Then mount the border with the pipes below the kitchen cabinet.
- Install the unit by inserting the hook ahead the border towards (1).
- Then press the unit towards (2) to the border.
- To dismantle the unit press the hook locking behind the unit. Then do steps (4) and (3) in reverse order.
text_image
Technical diagram showing a cylindrical object with two conical structures and directional arrows indicating flow or movement, labeled with numbers ① and ②.Method (B)
- Tum the long screws (x4) in the border. Then mount the border below the kitchen cabinet.
- Install the unit by inserting the hook ahead the border towards (1).
- Then press the unit towards (2) to the border.
- To dismantle the unit press the hook locking behind the unit. Then do steps (3) and (2) in reverse order.
text_image
Technical diagram showing a mechanical assembly with labeled components and directional arrowsUsing the unit as a table radio-clock
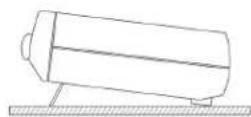
- It is also possible to use the unit with the Stand Feet (19).
Attention!!
- Your unit must not be exposed to rain, direct sun-light or high temperature!
- Your unit must only be repaired by a qualified specialist.
VENTILATION WARNING!!
The normal ventilation of the product must not be impeded for intended use.
DRIPPING WARNING!!
The product must not be exposed to dripping or splashing. No objects filled with liquids, such as vases, may be placed on the product
All subjected to change for improvement without any notice.
TECHNICAL SPECIFICATIONS
Power source : Mains connection: 230V \~ 50Hz
Back-up battery: DC 3 V = (2 x 1,5V UM-4) Batteries (not included)
Radio frequency bandwidth : FM 87.5 - 108 MHz
MORE INFORMATION

Beware of small pieces and batteries, do not swallow them. It may be hazardous to your health and lead into suffocation. Please, Make sure to keep small devices and batteries out of the reach of children.

Important advice regarding hearing protection
Caution:
You care for your hearing, and so do we.
Therefore, use caution while using this appliance.
Our recommendation: Avoid high volumes.
Children should be supervised while using headphones; make sure that the appliance is not set to high volume.
Caution!
High volumes may cause irreparable damage to children's ears.

NEVER let allow anyone, especially children, to put objects into the holes, slots or openings on this devise. This may lead into death due to electric shock. The device must only be opened by a qualified assistant.

Only use the appliance for its intended purpose.
This device may only be used in housings and business premises.

Please keep this instruction manual for further reference.

Instructions on environment protection
Do not dispose of this product in the usual household garbage at the end of its life cycle; hand it over at a collection point for the recycling of electrical and electronic appliances. The symbol on the product, the instructions for use or the packing will inform about the methods for disposal.
The materials are recyclable as mentioned in its marking. By recycling, material recycling or other forms of re-utilization of old appliances, you are making an important contribution to protect our environment.
Please inquire at the community administration for the authorized disposal location.

Do not obstruct the ventilation of the device. Make sure, that no curtains, newspapers, furniture or any other type of object are blocking the ventilation system of the apparatus. The ventilation system must be clear of objects at all times! Overheating may lead into serious damage of the device and reduce its performance and lifespan.

Heat and warmth
Do not expose the appliance to direct sunlight. Make sure that the appliance is not subject to direct heat sources such as heaters or open fire. Make sure that the ventilation slots of the appliance are not covered.

Moisture and cleaning
This appliance is not waterproof! Do not immerse player in water. Do not allow player to come in contact with water. If water gets inside the player it may cause serious damage. Do not use cleaning agents that contain alcohol, ammoniac, benzene or abrasives as these could damage the player. For cleaning, use a soft, moistened cloth.

Professional recycling
Batteries and packaging should not be disposed of in the trash. Batteries must be handed over to a collection centre for used batteries. Separating disposable packaging materials is ecologically friendly.
MODEL 4259
RADIO-RÉVEIL POUR MONTAGE SOUS L'ARMOIRE AVEC SYNTONISEUR PLL

RISQUE D'ELECTROCUTION. NE PAS OUVRIR
ATTENTION: AFIN DE REDUIRE LES RISQUES D'ELECTROCUTION, NE PAS RETIRER LE COUVERCLE (OU LE DOS). AUCUNE PIECE A L'INTERIEUR N'EST UTILE AU CONSOMMATEUR. POUR UN DEPANNAGE, SE REFERER AU PERSONNEL QUALIFIE.

text_image
Labeled diagram of a car air conditioner panel with numbered buttons and control knobs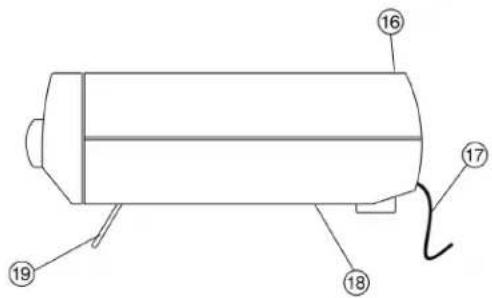
text_image
Technical diagram of a cylindrical device with numbered components labeled 16, 17, 18, and 19.SOURCES D'ENERGIE
text_image
Technical diagram showing a cylindrical object with labeled parts and directional arrows indicating motion or force vectors.Méthode (B)
text_image
Technical diagram showing a mechanical assembly with labeled components and directional arrowsBatterle de secours: DC 3 V = (2 x 1,5V UM-4) Piles (non fournies)
Notre recommandations: Evitez les volumes forts.
text_image
Labeled diagram of a car air conditioner panel with numbered buttons and control knobs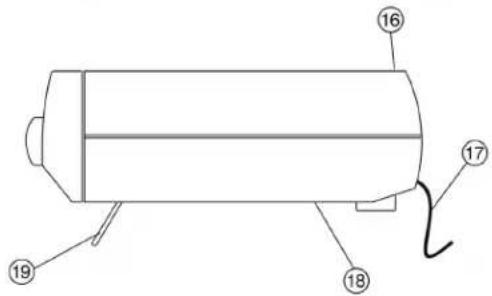
text_image
Technical diagram of a cylindrical device with numbered components labeled 16, 17, 18, and 19.ÁRAMFORRÁSOK
text_image
Technical diagram showing mechanical assembly with labeled components and directional arrowsMód (B)
text_image
Technical diagram showing a mechanical assembly with labeled components and directional arrowstext_image
Technical diagram of a cylindrical device with numbered components labeled 16, 17, 18, and 19.FONTI DI ENERGIA
text_image
Technical diagram showing a cylindrical object with two conical structures and directional arrows indicating flow or movement.Metodo (B)
text_image
Technical diagram showing a mechanical assembly with labeled components and directional arrowstext_image
Labeled diagram of a car dashboard with numbered buttons and control panel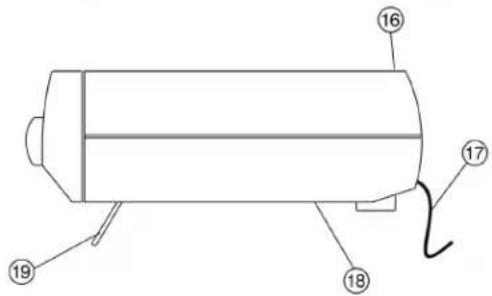
text_image
Technical diagram of a cylindrical device with numbered components labeled 16, 17, 18, and 19.text_image
Technical diagram showing a cylindrical object with two conical structures and directional arrows indicating flow or movement, labeled with numbers ① and ②.Método (B)
text_image
Technical diagram showing a mechanical assembly with labeled components and directional arrowstext_image
Labeled diagram of a car air conditioner panel with numbered buttons and control knobs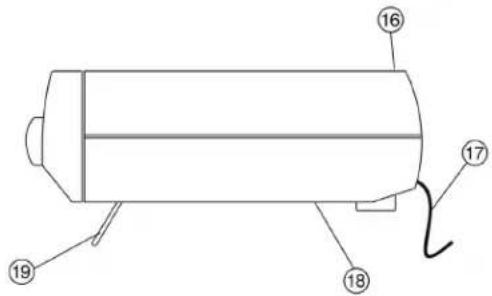
text_image
Technical diagram of a cylindrical device with numbered components labeled 16, 17, 18, and 19.FONTES DE ENERGIA
text_image
Labeled diagram of a car air conditioner panel with numbered buttons and control knobs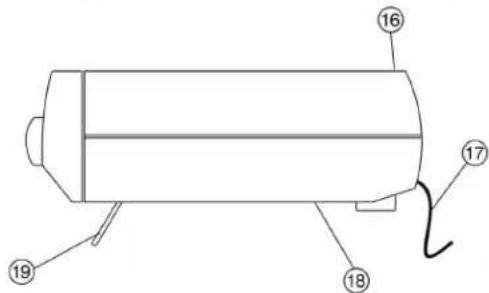
text_image
Technical diagram of a cylindrical device with numbered components labeled 16, 17, 18, and 19.ZASILANIE
text_image
Technical diagram showing a cylindrical device with labeled components and directional arrows indicating flow or movement.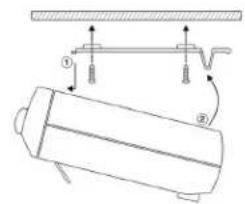
text_image
Technical diagram showing a mechanical assembly with labeled components and directional arrows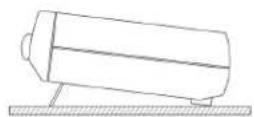
Uwaga!!
DODATKOWE INFORMACJE

text_image
Diagram of a car dashboard with numbered labels pointing to various function buttons and indicators.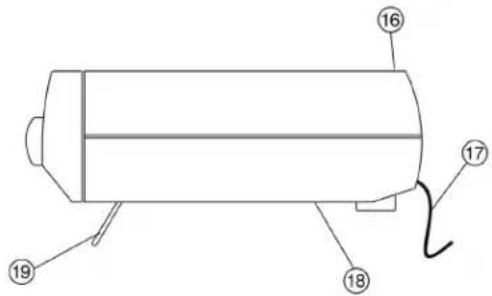
text_image
Technical diagram of a cylindrical device with numbered components labeled 16, 17, 18, and 19.VERMOGENSBRONNEN
text_image
Technical diagram showing mechanical assembly with labeled components and directional arrows indicating motion or force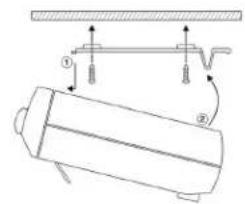
text_image
Technical diagram showing a mechanical assembly with labeled components and directional arrows indicating motion or force.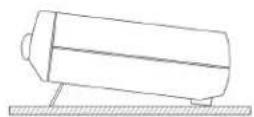
ATTENTIE!!
WAARSCHUWING M.B.T. VENTILATIE!!
WAARSCHUWING M.B.T. VOCHT!!
text_image
Labeled diagram of a car dashboard with numbered buttons and control panel
text_image
Technical diagram of a cylindrical device with numbered components labeled 16, 17, 18, and 19.ZDROJE ENERGIE
text_image
Technical diagram showing a cylindrical device with labeled components and directional arrows indicating flow or movement.Způsob (B)
text_image
Technical diagram showing a mechanical assembly with labeled components and directional arrowsDOPLŇUJÍCÍ INFORMACE

text_image
Labeled diagram of a car air conditioner panel with numbered buttons and control knobs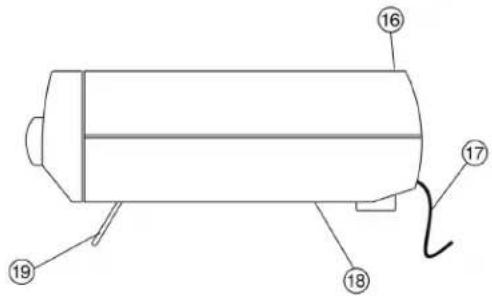
text_image
Technical diagram of a cylindrical device with numbered components labeled 16, 17, 18, and 19.ELEKTRİK ÜRETİMLERİ
text_image
Technical diagram showing a mechanical assembly with labeled components and directional arrows indicating motion or force.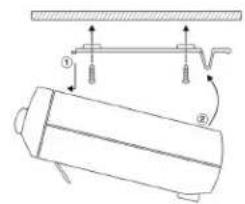
text_image
Technical diagram showing a mechanical assembly with labeled components and directional arrows