
RN301S - Home cinema amp YAMAHA - Free user manual and instructions
Find the device manual for free RN301S YAMAHA in PDF.

| Product type | Home theater amplifier / network receiver |
| Brand | YAMAHA |
| Model | RN301S |
| Dimensions (W × H × D) | 435 × 141 × 333 mm |
| Weight | 6.95 kg |
| Power supply | AC 230 V, 50 Hz (Europe model); Power consumption: 200 W, standby: 0.1 W, network standby: 2.0 W |
| Output power | 2 × 100 W (8 Ω, 40 Hz – 20 kHz, 0.2 % THD) |
| Audio inputs | CD (analog), LINE 1-3 (analog), OPTICAL (digital), COAXIAL (digital) |
| Audio outputs | Speakers A/B (terminals), headphones (PHONES), LINE 3 REC (recording) |
| Built-in tuner | FM/AM with RDS (Radio Data System) |
| Network functions | Wi-Fi (via router), Ethernet (RJ45), AirPlay, Spotify Connect, Internet radio (vTuner), DLNA playback (PC/NAS) |
| Playable audio formats | WAV (PCM), MP3, WMA, MPEG-4 AAC, FLAC (up to 192 kHz for WAV/FLAC) |
| Control | Infrared remote control, mobile app "NETWORK PLAYER CONTROLLER" (iOS/Android) |
| Special features | Bi-wiring (bi-amplification), BASS/TREBLE controls, balance, sleep timer, max and initial volume settings |
| Maintenance and cleaning | Use a dry, clean cloth; do not use chemical solvents |
| Safety precautions | Ventilation (top 30 cm, rear 20 cm, sides 20 cm); do not expose to water, excessive heat; unplug during storms; do not open the casing |
| Spare parts and repairability | Do not attempt to repair yourself; contact an authorized Yamaha service center |
Frequently Asked Questions - RN301S YAMAHA
User questions about RN301S YAMAHA
0 question about this device. Answer the ones you know or ask your own.
Ask a new question about this device
Download the instructions for your Home cinema amp in PDF format for free! Find your manual RN301S - YAMAHA and take your electronic device back in hand. On this page are published all the documents necessary for the use of your device. RN301S by YAMAHA.
USER MANUAL RN301S YAMAHA
Caution: Read this before operating your unit.
1 To assure the finest performance, please read this manual carefully. Keep it in a safe place for future reference.
2 Install this sound system in a well ventilated, cool, dry, clean place - away from direct sunlight, heat sources, vibration, dust, moisture, and/or cold. For proper ventilation, allow the following minimum clearances.
Top: 30~cm (11-3/4 in)
Rear: 20cm (7-7/8 in)
Sides: 20cm (7-7/8 in)
3 Locate this unit away from other electrical appliances, motors, or transformers to avoid humming sounds.
4 Do not expose this unit to sudden temperature changes from cold to hot, and do not locate this unit in an environment with high humidity (i.e. a room with a humidifier) to prevent condensation inside this unit, which may cause an electrical shock, fire, damage to this unit, and/or personal injury.
5 Avoid installing this unit where foreign objects may fall onto this unit and/or this unit may be exposed to liquid dripping or splashing. On the top of this unit, do not place:
- Other components, as they may cause damage and/or discoloration on the surface of this unit.
- Burning objects (i.e. candles), as they may cause fire, damage to this unit, and/or personal injury.
- Containers with liquid in them, as they may fall and liquid may cause electrical shock to the user and/or damage to this unit.
6Do not cover this unit with a newspaper, tablecloth, curtain, etc. in order not to obstruct heat radiation. If the temperature inside this unit rises, it may cause fire, damage to this unit, and/or personal injury.
7 Do not plug in this unit to a wall outlet until all connections are complete.
8Do not operate this unit upside-down. It may overheat, possibly causing damage.
9Do not use force on switches, knobs and/or cords.
10 When disconnecting the power cable from the wall outlet, grasp the plug; do not pull the cable.
11Do not clean this unit with chemical solvents; this might damage the finish. Use a clean, dry cloth.
12 Only voltage specified on this unit must be used. Using this unit with a higher voltage than specified is dangerous and may cause fire, damage to this unit, and/or personal injury. Yamaha will not be held responsible for any damage resulting from use of this unit with a voltage other than specified.
13To prevent damage by lightning, keep the power cord disconnected from a wall outlet or the unit during a lightning storm.
14 Do not attempt to modify or fix this unit. Contact qualified Yamaha service personnel when any service is needed. The cabinet should never be opened for any reasons.
15 When not planning to use this unit for long periods of time (i.e. vacation), disconnect the AC power plug from the wall outlet.
16 Be sure to read the "Troubleshooting" section in the owner's manual on common operating errors before concluding that this unit is faulty.
17 Before moving this unit, press downward to turn off this unit and then disconnect the AC power plug from the AC wall outlet.
18 Condensation will form when the surrounding temperature changes suddenly. Disconnect the power cable from the outlet, then leave this unit alone.
19 When using this unit for a long time, this unit may become warm. Turn the system off, then leave this unit alone for cooling.
20 Install this unit near the wall outlet and where the AC power plug can be reached easily.
21 The batteries shall not be exposed to excessive heat such as sunshine, fire or the like. When you dispose of batteries, follow your regional regulations.
22Excessive sound pressure from earphones and headphones can cause hearing loss.
As long as this unit is connected to the AC wall outlet, it is not disconnected from the AC power source even if you set this unit to standby mode by . In this state, this unit is designed to consume a very small quantity of power.
WARNING
TO REDUCE THE RISK OF FIRE OR ELECTRIC SHOCK, DO NOT EXPOSE THIS UNIT TO RAIN OR MOISTURE.
CAUTION
Danger of explosion if battery is incorrectly replaced. Replace only with the same or equivalent type.

This label is required to be attached to a product of which the temperature of the top cover may be hot during operation.
■For U.K. customers
If the socket outlets in the home are not suitable for the plug supplied with this appliance, it should be cut off and an appropriate 3 pin plug fitted. For details, refer to the instructions described below.

The plug severed from the mains lead must be destroyed, as a plug with bared flexible cord is hazardous if engaged in a live socket outlet.
■Special Instructions for U.K. Model
IMPORTANT
THE WIRES IN MAINS LEAD ARE COLOURED IN ACCORDANCE WITH THE FOLLOWING CODE:
Bluc: NEUTRAL
Brown: LIVE
As the colours of the wires in the mains lead of this apparatus may not correspond with the coloured markings identifying the terminals in your plug, proceed as follows:
The wire which is coloured BLUE must be connected to the terminal which is marked with the letter N or coloured BLACK. The wire which is coloured BROWN must be connected to the terminal which is marked with the letter L or coloured RED.
Make sure that neither core is connected to the earth terminal of the three pin plug.
Contents
INTRODUCTION
What you can do with this unit 2
Sources that can be played back on this unit 2
Devices that can control this unit. 3
Operations from your mobile device 3
Supplied accessories 4
Controls and functions 5
Front panel 5
Front display 6
Rear panel 7
Remote control. 8
Using the remote controls. 9
PREPARATION
Connections 10
Connecting speakers and source components. 10
Connecting the speakers 11
Connecting the FM and AM antennas. 12
Connecting to a network. 13
Connecting power cable 13
Setup of your network devices 14
BASIC OPERATION
Playback 15
Playing a source. 15
Using the sleep timer 16
Listening to FM/AM radio. 17
FM/AM tuning. 17
Automatic preset tuning (FM stations only). 18
Manual tuning preset 18
Recalling a preset station 19
Clearing a preset station. 19
Radio Data System tuning 20
Using the Spotify service 21
Playing back music stored on media servers
(PCs/NAS) 22
Setting the media sharing of music files. 22
Playback of PC music contents. 23
Listening to Internet radio. 25
Registering favorite Internet radio stations (bookmarks). 26
Playing back iPod/iTunes music via a network
(AirPlay) 27
Playback of iPodiTunes music contents 27
Switching information on the front display 29
ADVANCED OPERATION
Configuring playback settings for different playback sources (Option menu) 30
Option menu items. 30
Configuring various functions (Setup menu) 32
Setup menu items. 32
Network Setup 33
Tone Control. 34
Balance 34
Max Volume 34
Initial Volume. 34
DC OUT 34
Configuring the system settings
(ADVANCED SETUP menu). 35
ADVANCED SETUP menu items 35
Restoring the default settings (INIT). 35
Updating the firmware (UPDATE) 35
Checking the firmware version (VERSION) 35
Updating the unit's firmware via the network.....36
ADDITIONAL INFORMATION
Troubleshooting. 37
Error indications on the front display. 41
Trademarks 42
Specifications 43
Index. 44
(at the end of this manual)
Information about third party software licenses ... i
indicates a tip for your operation.
- This manual explains operations using the supplied remote control.
This manual describes all the "iPod", "iPhone" and "iPad" as the "iPod". "iPod" refers to "iPod", "iPhone" and "iPad", unless otherwise specified.
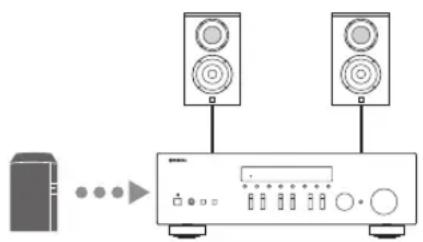
What you can do with this unit
This unit is a network receiver, on which you can enjoy playing back music files stored on your media server (PC or NAS), audio contents on the Internet radio, Spotify, AirPlay devices (iPod/iTunes) by connecting the unit to your home network (DLNA) and audio system on the same network.
Sources that can be played back on this unit
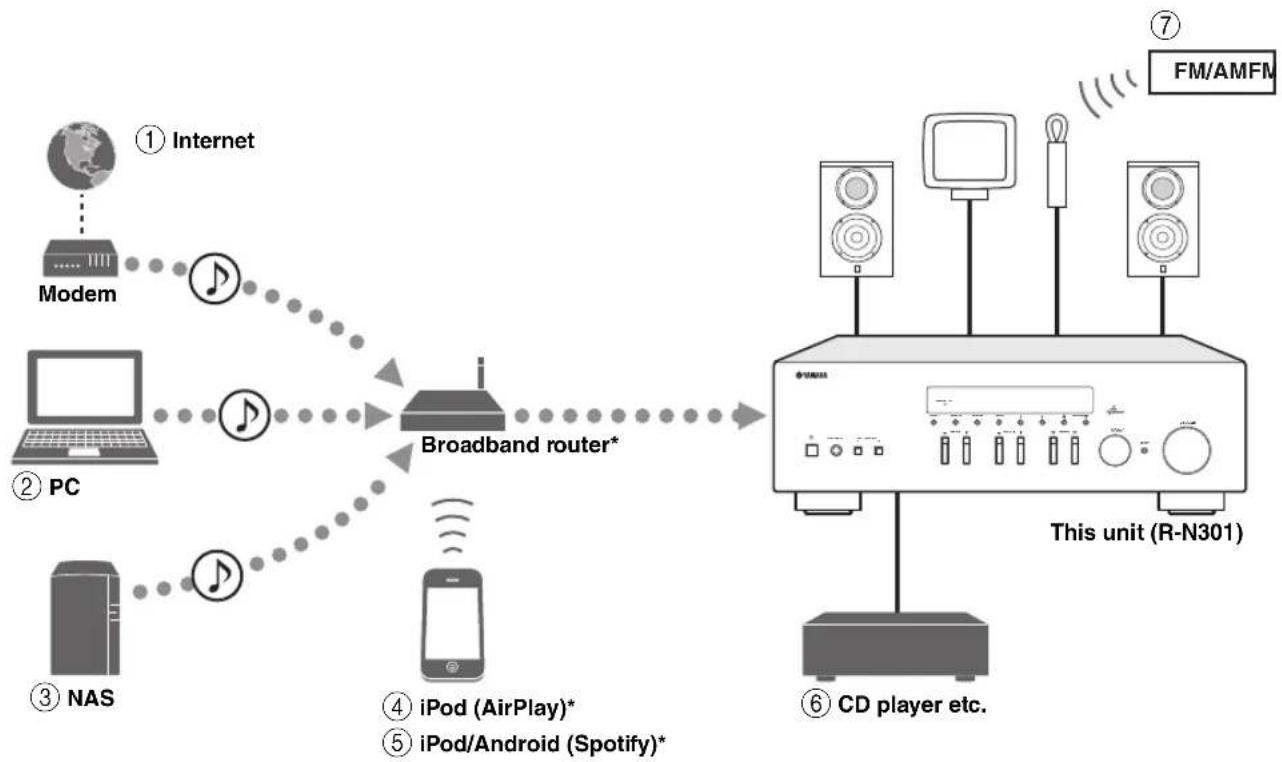
- You need a commercially available Wi-Fi broadband router when you use an iPod/Android.
①Play back the Internet radio (p.25)
④Play back your iPod with AirPlay (p.27)
②Play back music files stored on your PC (p.22)
⑤Play back the Spotify service (p.21)
③Play back music files stored on your NAS (p.22)
⑥Play back your external component (p.10)

⑦Listening to FM/AM radio (p.17)
For details on connecting the devices, see "Connections" (p.10).
Devices that can control this unit
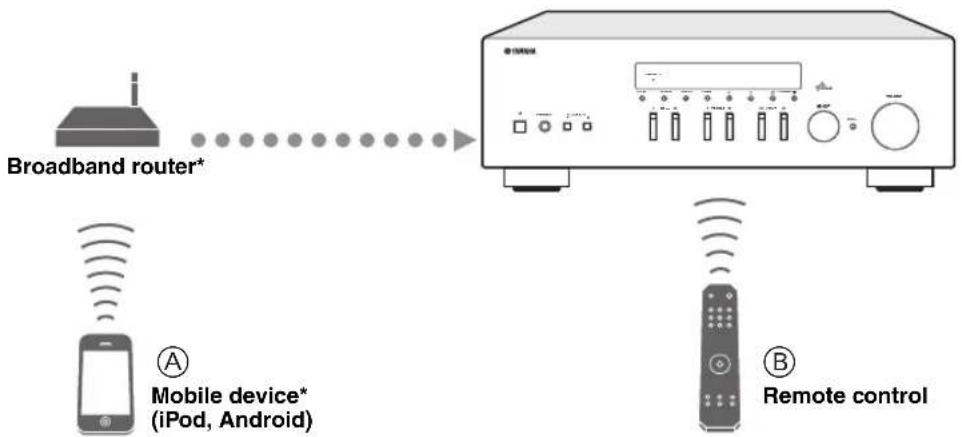
- You need a commercially available Wi-Fi broadband router when you use a mobile device.
Control this unit using your mobile devices (p.3).
Control this unit using the remote control.
Operations from your mobile device
Once you install the app "NETWORK PLAYER CONTROLLER" in your mobile device, you can operate the unit with the mobile device.
Features
- Power-on/off or other basic operation
- Changing the music source
- Selecting, playing back, and stopping songs
- Playing back songs stored in devices
For downloading the app or the latest information, access to the App Store or Google Play and search "NETWORK PLAYER CONTROLLER."
Supplied accessories
Check that the following accessories are supplied with the product.
Remote control

FM antennaAM antenna

Batteries (x2) AAA, R03, UM
Notes on remote controls and batteries
- Do not spill water or other liquids on the remote control.
- Do not drop the remote control.
- Do not leave or store the remote control in the following conditions:
places of high humidity, such as near a bath
places of high temperatures, such as near a heater or stove
places of extremely low temperatures
-dusty places
- Insert batteries according to the polarity markings (+ and -).
- Change all batteries if you notice the operation range of the remote control narrows.
- If the batteries run out, immediately remove them from the remote control to prevent an explosion or acid leak.
If you find leaking batteries, discard the batteries immediately, taking care not to touch the leaked material. If the leaked material comes into contact with your skin or gets into your eyes or mouth, rinse it away immediately and consult a doctor. Clean the battery compartment thoroughly before installing new batteries.
Do not use old batteries together with new ones. This may shorten the life of the new batteries or cause old batteries to leak. - Do not use different types of batteries (such as alkaline and manganese batteries) together. Read the packaging carefully as these different types of batteries may have the same shape and color.
- Before inserting new batteries, wipe the battery compartment clean.
- Keep the batteries in a location out of reach of children. Batteries can be dangerous if a child were to put in his or her mouth.
- If the batteries grow old, the effective operation range of the remote control decreases considerably. If this happens, replace the batteries with new one as soon as possible.
If you plan not to use the unit for a long period of time, remove the batteries from the unit. Otherwise, the batteries will wear out, possibly resulting in a leakage of battery liquid that may damage the unit. - Do not throw away batteries with general house waste. Dispase of them correctly in accordance with your local regulations.
Controls and functions
Front panel

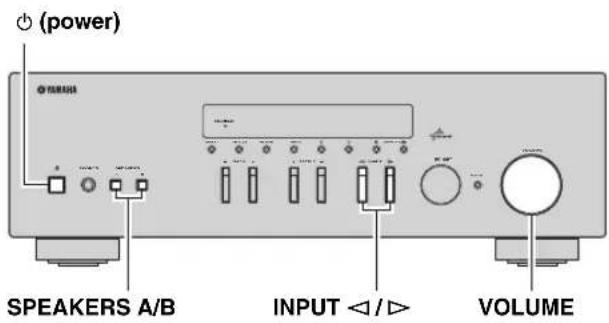
① (power)
Turns on/off (standby) the unit.
Note
In standby mode, this unit consumes a small amount of power to receive infrared signals from the remote control.
②PHONES jack
Outputs audio to your headphones for private listening.
③SPEAKERS A/B
Turns on or off the speaker set connected to the SPEAKERS A and/or SPEAKERS B terminals on the rear panel each time the corresponding button is pressed.
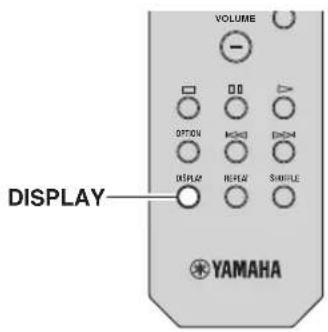
④DISPLAY
Selects the information displayed on the front display (p.29).
⑤Remote control sensor
Receives infrared signals from the remote control.
⑥STANDBY/ON indicator
Lights up as follows:
Brightly lit: Power is on
Dimly lit: Standby mode
⑦FM MODE
Set the FM band reception mode to automatic stereo or monaural (p.17).
⑧MEMORY
Stores the current FM/AM station as a preset when TUNER is selected as the input source (p.18).
FM/AM
Switch between FM and AM (p.17).
⑥ Front display
Shows information about the operational status of this unit.
1 PRESET
Selects a preset FM/AM station when TUNER is selected as the input source (p.19).
TUNING /
Selects the tuning frequency when TUNER is selected as the input source (p.17).
13BASS+/-
Increases or decreases the low frequency response. The center position produces a flat response (p.16).
TREBLE +/-
Increases or decreases the high frequency response. The center position produces a flat response (p.16).
15 INPUT
Selects the input source you want to listen to.
16SELECT/ENTER (jog dial)
Turn the dial to select a numeric value or setting, and press the dial to confirm.
⑦RETURN
Returns to the previous indication of the front display.
18VOLUME control
Increases or decreases the sound output level.


① Information display
Displays the current status (such as input name sound mode name).
You can switch the information that is displayed when you press DISPLAY (p.29).
②STEREO
Lights up when the unit is receiving a stereo FM radio signal.
③ TUNED
Lights up when the unit is receiving an FM/AM radio station signal.
4Speaker indicators
"SP A" lights up when the SPEAKERS A output is enabled and "SP B" lights up when the SPEAKERS B output is enabled.
⑤ MUTE
Blinks when audio is muted.
⑥ SLEEP
Lights up when the sleep timer is on.
中
You can change the brightness level of the front display by pressing DIMMER on the remote control (p.8).
Rear panel

①ANTENNA terminals
For connecting to FM and AM antennas (p.12).
②DC OUT jack
For supplying power to a Yamaha AV accessory. For details, refer to the instruction manual of the AV accessory.
③NETWORK jack
For connecting to a network (p.13).
④ Power cable
For connecting to an AC wall outlet (p.13).
⑤ OPTICAL jack
For connecting to audio components equipped with optical digital output (p.10).
⑥COAXIAL jack
For connecting to audio components equipped with a coaxial digital output (p.10).
⑦CD jacks
For connecting to a CD player (p.10).
⑧LINE 1-3 jacks
For connecting to analog audio components (p.10).
SPEAKERS terminals
Used to connect speakers (p.11).
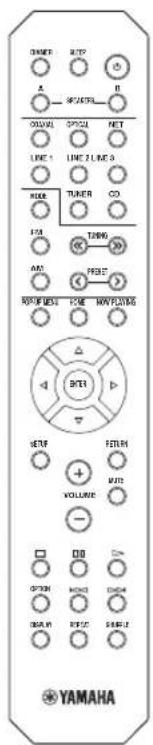
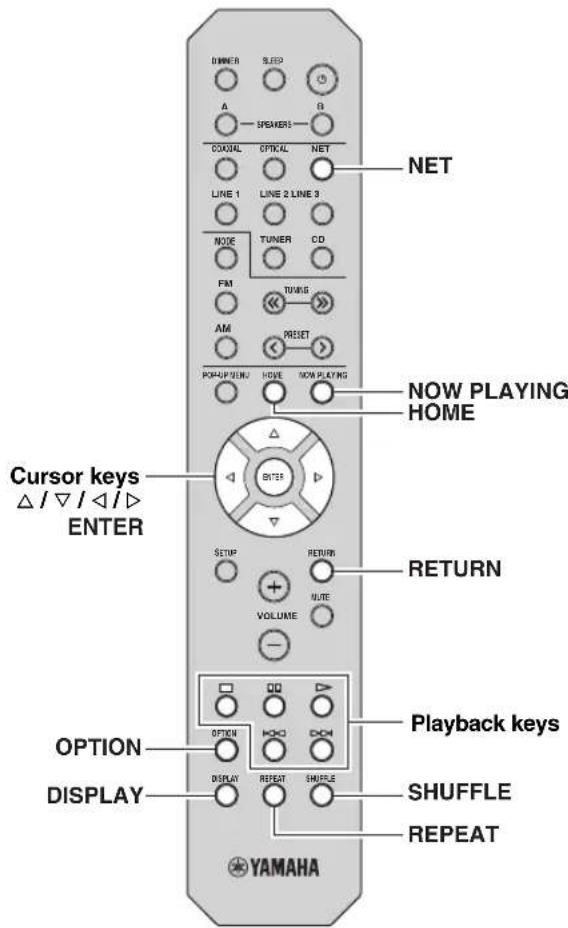
Remote control
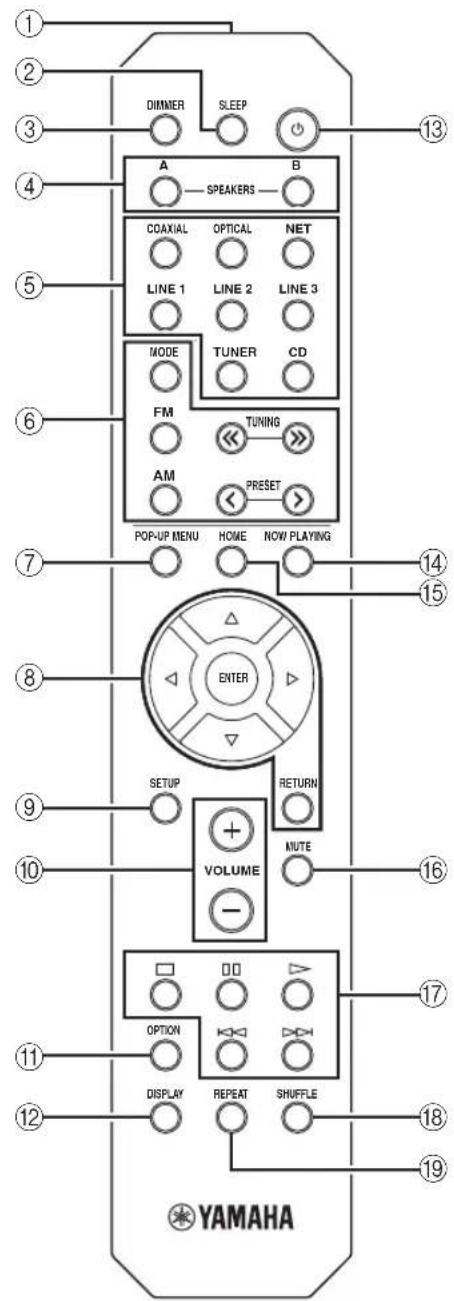
① Infrared signal transmitter
Sends infrared signals.
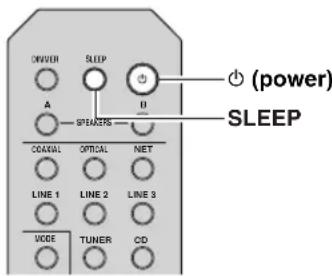
②SLEEP
Sets the sleep timer (p.16).
③DIMMER
Changes the brightness level of the front display. Choose brightness from 5 levels by pressing this key repeatedly.
④SPEAKERS A/B
Turns on and off the set of speakers connected to the SPEAKERS A and/or SPEAKERS B terminals on the rear panel of this unit when the corresponding key is pressed.
⑤Input selection keys
Select an input source for playback.
COAXIAL COAXIAL jack
OPTICAL OPTICAL jack
NET NETWORK jack (press repeatedly to select a desired network source)
LINE 1-3 LINE 1-3 jacks
TUNER FM/AM tuner
CD CD jacks
⑥ Radio keys
Operate the FM/AM radio (p.17).
MODE Switches between "Stereo" and "Mono" for FM radio reception (p.17).
FM Switches to FM radio.
AM Switches to AM radio.
TUNING / Select the radio frequency.
PRESET < / > Select a preset station.
⑦POP-UP MENU
This button is not available for this unit.
⑧Menu operation keys
Cursor keys Select a menu or a parameter.
(△/V/D)
ENTER Confirms a selected item.
RETURN Returns to the previous state.
⑨SETUP
Displays the "Setup" menu (p.32).
10VOLUME keys
Adjust the volume.
⑪OPTION
Displays the "Option" menu (p.30).
⑫DISPLAY
Switches information shown in the front display.
⑬ (power)
Turns on/off (standby) the unit.
14 NOW PLAYING
Shows the playback information in the front display.
15HOME
Shows top-level menu in the front display.
MUTE
Mutes the audio output.
⑦Playback keys
Let you play back and perform other operations for network sources.
18SHUFFLE
Switches shuffle modes.
19REPEAT
Switches repeat modes.
Using the remote controls
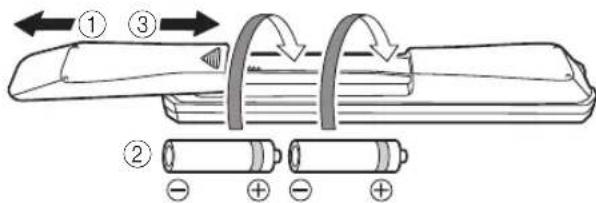
■Installing batteries
Notes
- Change all batteries if the operation range of the remote control narrows.
- Before inserting new batteries, wipe the compartment clean.
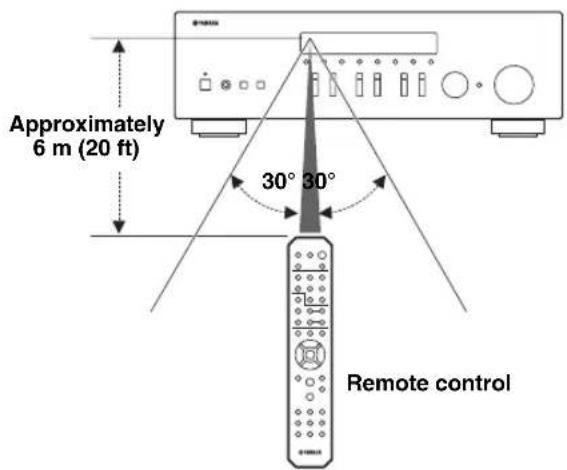
Operation range
The remote controls transmit a directional infrared beam. Be sure to aim the remote controls directly at the remote control sensor on the front panel of this unit.
Connections
Connecting speakers and source components
CAUTION
- Do not connect this unit or other components to the main power until all connections between components are complete.
- All connections must be correct: L (left) to L, R (right) to R, “+” to “+” and “-” to “-”. If the connections are faulty, no sound will be heard from the speakers, and if the polarity of the speaker connections is incorrect, the sound will be unnatural and lack bass. Refer to the owner's manual for each of your components.
- Do not let bare speaker wires touch each other or any metal part of this unit. This could damage this unit and/or the speakers.
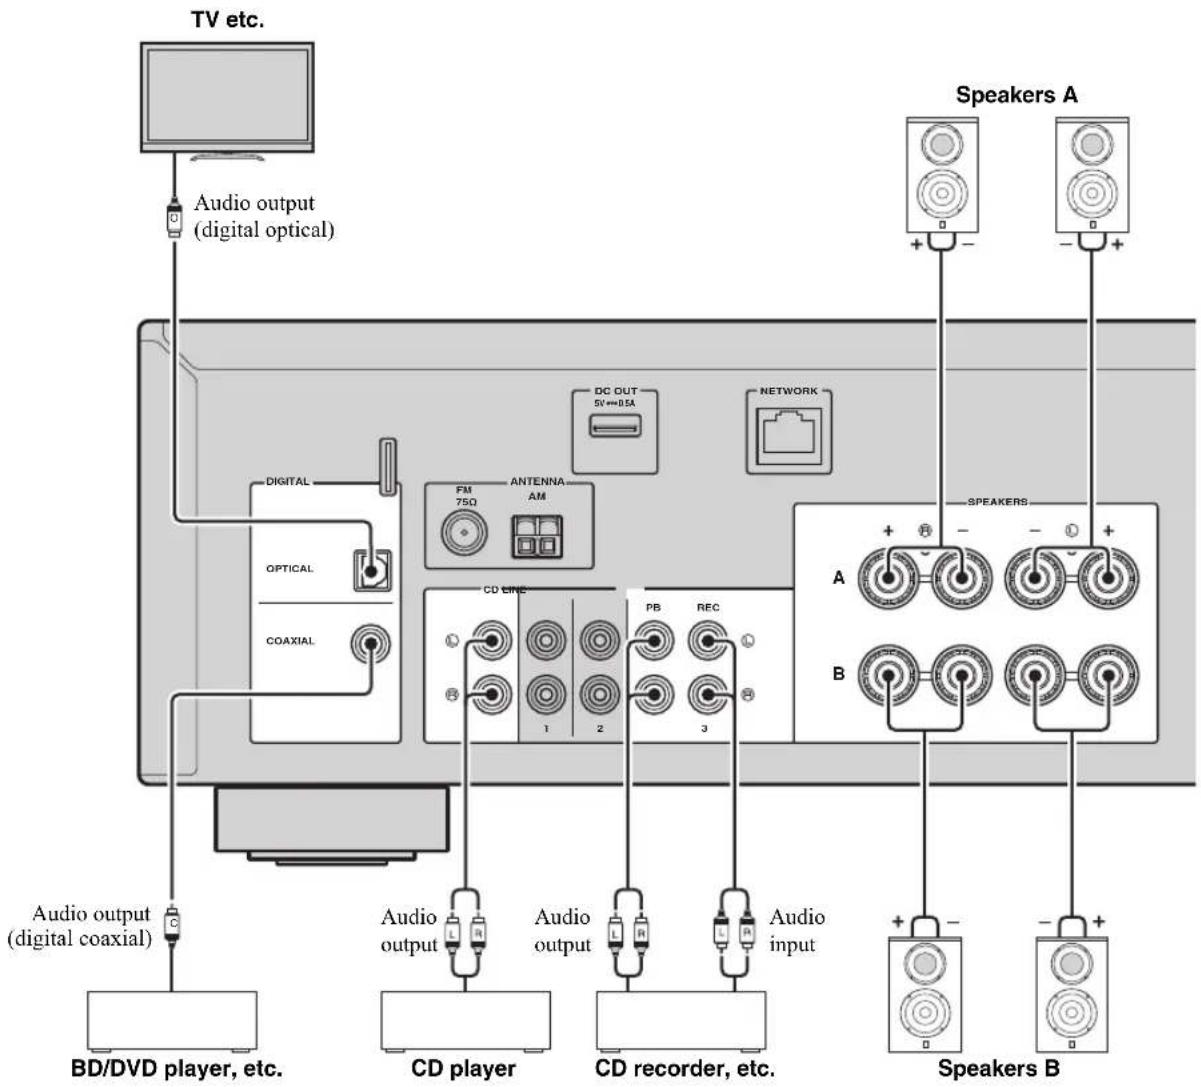
Connecting recording devices
You can connect audio recording devices to the LINE 3 (REC) jacks. This jack outputs the selected input signals (from COAXIAL, OPTICAL, LINE 1-2, TUNER and CD).
Notes
- Be sure to use the LINE 3 (REC) jacks only for connecting recording devices.
If you select LINE 3 as the input source, the audio output of the LINE 3 (REC) jacks will be muted.
Connecting the speakers
Connecting speaker cables
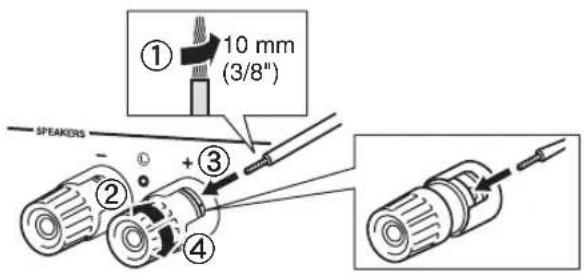
Speaker cables have two wires. One is for connecting the negative (-) terminal of the unit and the speaker, and the other is for the positive (+) terminal. If the wires are colored to prevent confusion, connect the black wire to the negative and the other wire to the positive terminal.
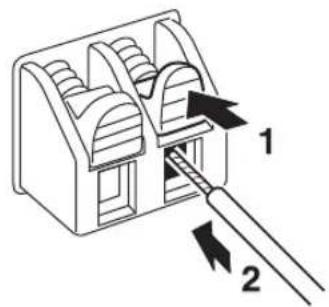
① Remove approximately 10mm (3/8^ ) of insulation from the ends of the speaker cable and twist the bare wires of the cable firmly together.
②Loosen the speaker terminal.
③ Insert the bare wires of the cable into the gap on the side (upper right or bottom left) of the terminal.
④ Tighten the terminal.
■Bi-wire connection
Bi-wire connection separates the woofer from the combined midrange and tweeter section. A bi-wire compatible speaker has four binding post terminals. These two sets of terminals allow the speaker to be split into two independent sections. With these connections, the mid and high frequency drivers are connected to one set of terminals and the low frequency driver to another set of terminals.
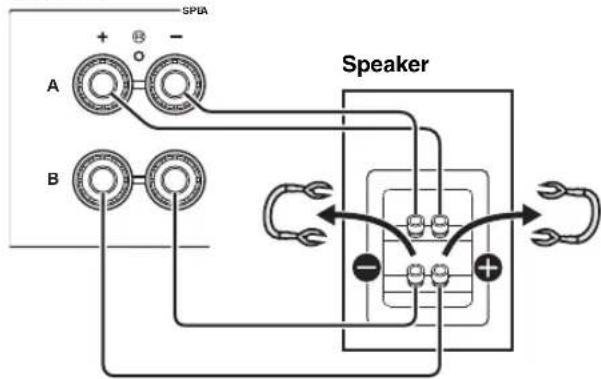
This unit
Connect the other speaker to the other set of terminals in the same way.
Note
When making bi-wire connections, remove the shorting bridges or cables on the speaker. Refer to the speakers' instruction manuals for more information.
中
To use the bi-wire connections, press SPEAKERS A and SPEAKERS B on the front panel or on the remote control so that both SP A and B light up on the front display.
SPEAKERS A/B

Connecting the FM and AM antennas
The antennas for receiving FM and AM broadcasts are included with this unit. In general, these antennas should provide sufficient signal strength. Connect each antenna correctly to the designated terminals.
Note
If you experience poor reception quality, install an outdoor antenna. Consult the nearest authorized Yamaha dealer or service center about outdoor antennas.
Outdoor FM antenna
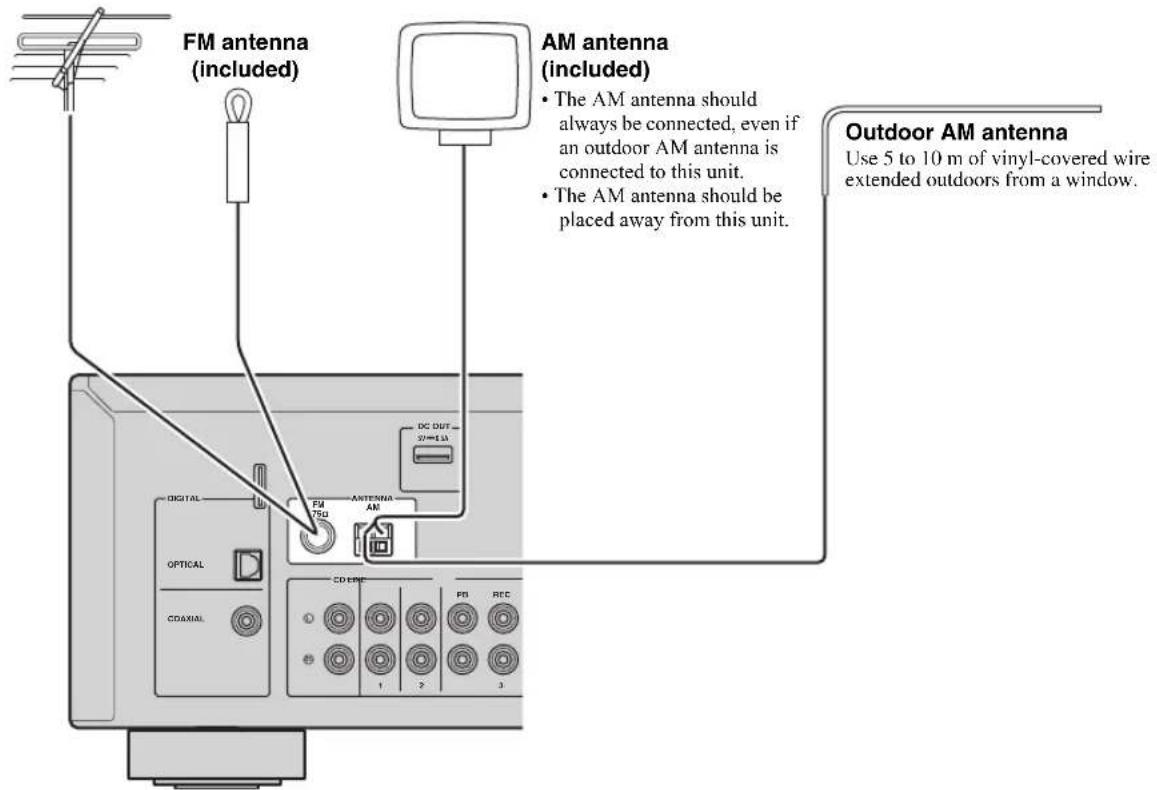
Assembling the supplied AM antenna

- Connecting the wires of the AM antenna
Connecting to a network
You can enjoy Internet radio or music files stored on media servers, such as PCs and Network Attached Storage (NAS), on the unit.
Connect the unit to your router with a commercially-available STP network cable (CAT-5 or higher straight cable).
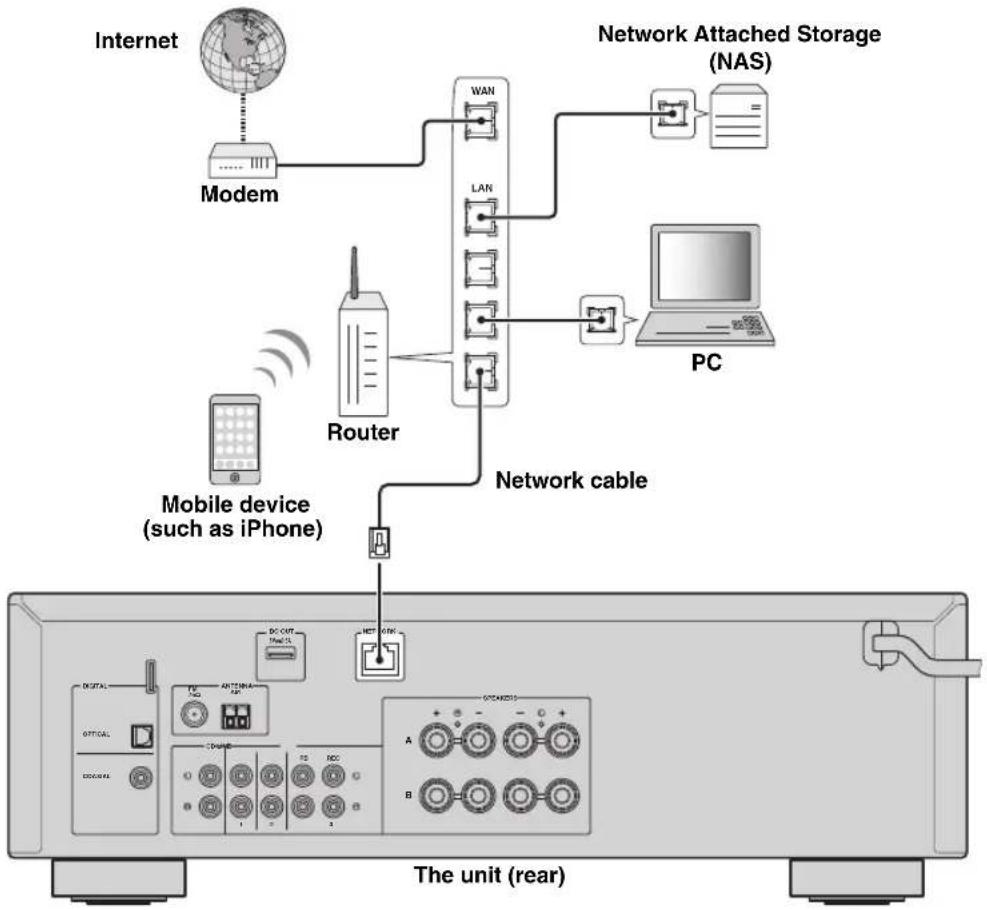

- If you are using a router that supports DHCP, you do not need to configure any network settings for the unit, as the network parameters (such as the IP address) will be assigned automatically to it. You only need to configure the network settings if your router does not support DHCP or if you want to configure the network parameters manually (p.33).
- You can check whether the network parameters (such as IP address) are properly assigned to the unit in "Information" (p.33) in the "Setup" menu.
Notes
- Some security software installed on your PC or the firewall settings of network devices (such as a router) may block the access of the unit to the network devices or the Internet. In these cases, configure the security software or firewall settings appropriately.
Each server must be connected to the same subnet as the unit.
To use the service via the Internet, broadband connection is strongly recommended.
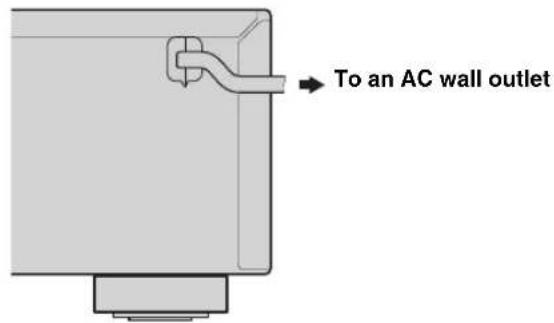
Connecting power cable
After all the connections are complete, plug in the power cable.
Setup of your network devices
Configure your devices connected to the network to play back music files stored on the devices, or configure your mobile device to control this unit. Use the following configurations to suit your needs.

For details on Internet connection, please refer to the manual of your network devices.
If you want to play the music files stored on your PC
You need to configure the media sharing setting of your PC. Configure the media sharing setting of music files on Windows Media Player 12. For details on sharing setting, please refer to "Setting the media sharing of music files" (p.22).

You can operate from your PC using Windows Media Player. For details, refer to Windows Media Player help.
If you want to play music files stored on your NAS
You need to configure the media sharing settings of your NAS. Setup operations differ depending on your NAS. Refer to the NAS manual.

- If you want to configure the network parameters manually, check that you are using an IP address which is not used by other network devices in your network.
- In case that you use DHCP and automatically obtain necessary information for network, such as IP address. We recommend that DHCP for the NAS normally be enabled.
If you want to play iPodiTunes with AirPlay
Select this unit from your iPod or from iTunes (p.27). Check that the router being accessed by the iPod/iTunes is connected to the same network as this unit.
If you want to operate this unit with your mobile device
You need to download the dedicated application, and install it (p.3).

- If you want to configure the network parameters manually, check that you are using an IP address which is not used by other network devices in your network.
- In case that you use DHCP and automatically obtain necessary information for network, such as IP address. We recommend that DHCP for the mobile device normally be enabled.
Playback
Playing a source

4 Play the source.
5 Rotate the VOLUME control on the front panel (or press VOLUME + / - on the remote control) to adjust the sound output level.
#
- You can adjust the tonal quality by using the BASS, TREBLE, controls on the front panel.
- You can adjust the speaker balance in the "Setup" menu (p.16).
6 Press (power) again to finish using this unit and set it to standby mode.
1 Press (power) to turn on this unit.
2 Press the INPUT < / > selector on the front panel (or press one of the input selection keys on the remote control) to select the input source you want to listen to.
3 Press SPEAKERS A and/or SPEAKERS B on the front panel or on the remote control to select speakers A and/or speakers B.
When speaker set A or speaker set B are turned on, SP A or SP B is displayed on the front display accordingly (p.6).
Notes
- When one set of speakers is connected using bi-wire connections, or when using two sets of speakers simultaneously (A and B), make sure SP A and SP B are displayed on the front display.
- When listening with headphones, turn off the speakers.
Playback
Adjusting the BASS and TREBLE controls
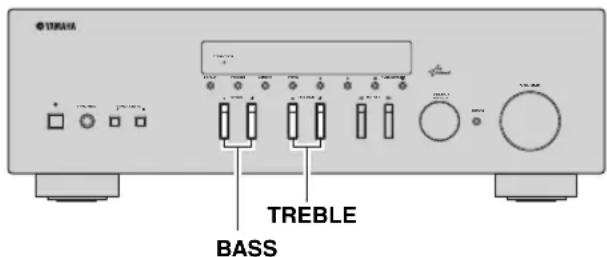
The BASS + / - and TREBLE + / - adjust high and low frequency response.
When you adjust to "0", produces a flat response.
BASS
Increases or decreases the low frequency response. Control range: -10 to +10 (20 Hz)
TREBLE
Increases or decreases the high frequency response. Control range: -10 to +10 (20 kHz)

BASS and TREBLE can be adjusted in the "Setup" menu (p.32).
Adjusting the speaker balance
The sound output balance of the left and right speakers to compensate for sound imbalance caused by speaker locations or listening room conditions. To adjust the speaker balance, perform the following steps.
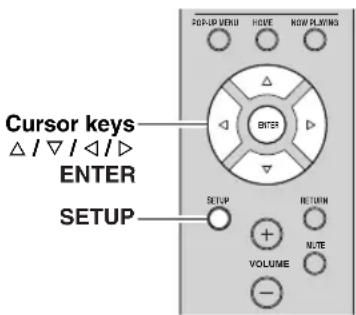
1 Press SETUP on the remote control.
The "Setup" menu shown on the front display.

2 Press / to select "Balance" and press ENTER.

3 Press / to adjust speaker balance. Control range: L+10 to R+10
4 To exit from the "Setup" menu, press SETUP again.
Using the sleep timer
Use this feature to automatically set this unit to standby mode after a certain amount of time. The sleep timer is useful when you are going to sleep while this unit is playing or recording a source.
Note
The sleep timer can only be set with the remote control.
1 Press SLEEP repeatedly to set the amount of time before this unit is set to standby mode.
Each time you press SLEEP, the front display changes as shown below.

The SLEEP indicator blinks while setting the amount of time for the sleep timer.

If the sleep timer is set, the SLEEP indicator on the front display lights up.

- To disable the sleep timer, select "Sleep Off".
- The sleep timer setting can also be canceled by pressing (power) to set this unit to standby mode.
Listening to FM/AM radio
FM/AM tuning
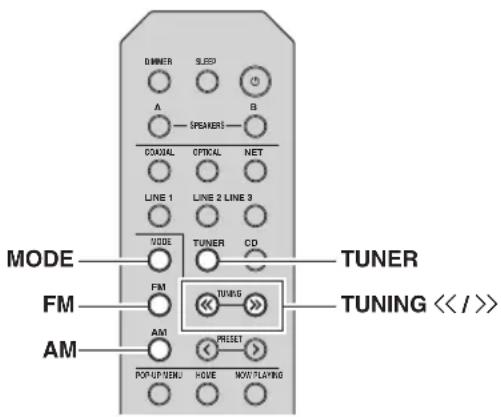
1 Press TUNER to select "TUNER" as the input source.
2 Press FM or AM to select the reception band (FM or AM).
3 Press and hold TUNING / for more than 1 second to begin tuning.
Press to tune in to a higher frequency.
Press to tune in to a lower frequency.
The frequency of the received station is shown in the front display.
If a broadcast is being received, "TUNED" indicator on the front display will be lit. If a stereo broadcast is being received, the "STEREO" indicator will also lit.

If the tuning search does not stop at the desired station because the station signals are weak, use the following keys to set a frequency.

When the signal reception for an FM radio station is unstable, switching to monaural may improve it.
Improving FM reception
If the signal from the station is weak and the sound quality is not good, set the FM band reception mode to monaural mode to improve reception.
1 Press MODE repeatedly to select "Stereo" (automatic stereo mode) or "Mono" (monaural mode) when this unit is tuned in to an FM radio station.
When Mono is selected, FM broadcasts will be heard in monaural sound.
Note
The STEREO indicator on the front panel lights up while listening to a station in stereo mode.
Automatic preset tuning (FM stations only)
You can use the automatic preset tuning function to automatically register FM stations as presets. This function enables this unit to automatically tune in to FM stations that have a strong signal and store up to 40 of those stations in order. You can then easily recall any preset station by selecting its preset number.
Notes
If a station is registered to a preset number that already has a station registered to it, the previously registered station is overwritten.
- If the station you want to store is weak in signal strength, try using the manual preset tuning method.
中
FM stations registered as presets using the automatic preset registration feature will be heard in stereo.
- Only Radio Data System broadcasting stations are stored automatically by the Auto Presct function.
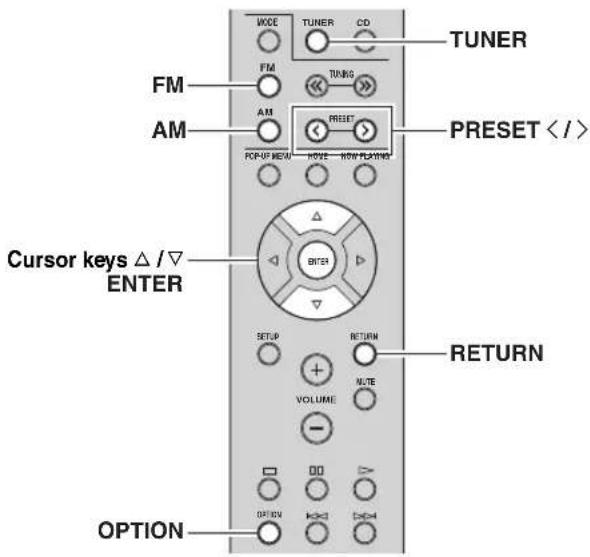
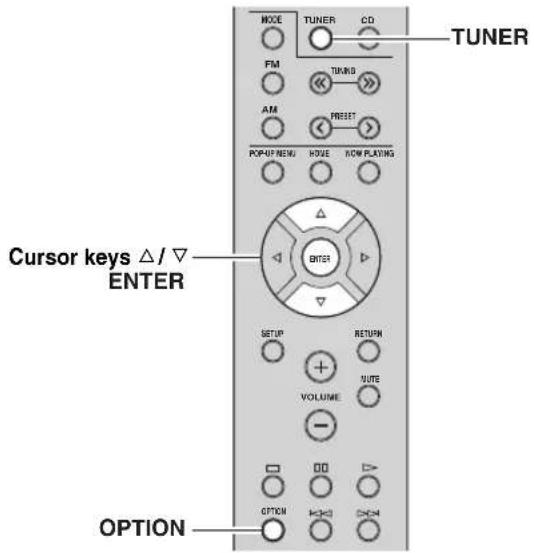
1 Press TUNER to select "TUNER" as the input source.
2 Press OPTION on the remote control.
The "Option" menu is displayed (p.30).
3 Press / to select "Auto Preset", and then press ENTER.

This unit starts scanning the FM band about 5 seconds later from the lowest frequency upwards. To begin scanning immediately, hold down the ENTER key.

- Before scanning begins, you can specify the first preset number to be used by pressing PRESET / or cursor key (/) on the remote control.
- To cancel scanning, press FM, AM or RETURN.

When scanning is complete, "FINISH" is displayed and then the display returns to original state.
Manual tuning preset
You can manually register up to 40 FM/AM stations (40 total). You can then easily recall any preset station by selecting its preset number.
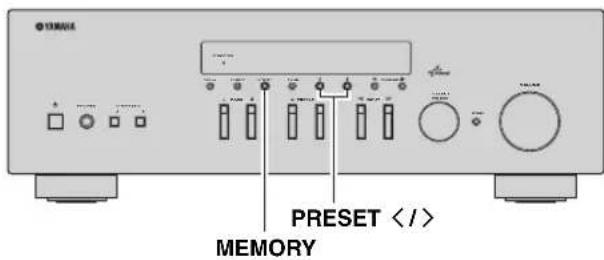
■Registering a radio station manually
Select a radio station manually and register it to a preset number.
1 Follow "FM/AM tuning" (p.17) to tune into the desired radio station.
2 Hold down MEMORY for more than 2 seconds.
The first time that you do register a station, the selected radio station will be registered to the preset number "01". Thereafter, each radio station you select will be registered to the next empty (unused) preset number after the most recently registered number.

中
To select a preset number for registering, press MEMORY once after tuning into the desired radio station, press PRESET < / > to select a preset number, and then press MEMORY again.

Recalling a preset station
You can recall preset stations that were registered using automatic station presct or manual station presct.
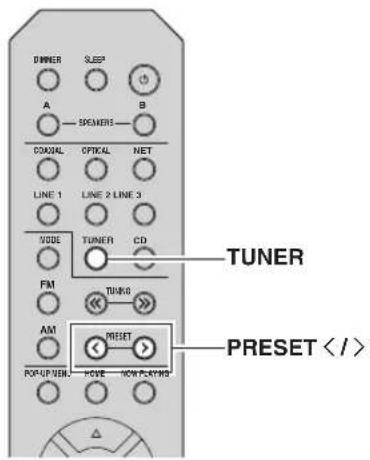
1 Press TUNER to select "TUNER" as the input source.
2 Press PRESET / to select a preset number.
中
- Preset numbers to which no stations are registered are skipped.
- "No Presets" is displayed if no stations are registered.
Clearing a preset station
Clear radio stations registered to the preset numbers.
1 Press TUNER to select "TUNER" as the input source.
2 Press OPTION.
3 Use the cursor keys to select "Clear Preset" and press ENTER.

4 Use the cursor keys ( / ) to select a preset station to be cleared and press ENTER.

If the preset station is cleared, "Cleared" appears and then the next in-use preset number is displayed.

5 Repeat step 4 until all desired preset stations are cleared.
6 To exit from the "Option" menu, press OPTION.
Radio Data System tuning
Radio Data System is a data transmission system used by FM stations in many countries. The unit can receive various types of Radio Data System data, such as "Program Service", "Program Type," "Radio Text" and "Clock Time", when it is tuned into a Radio Data System broadcasting station.
■Displaying the Radio Data System information
1 Tune into the desired Radio Data System broadcasting station.
We recommend using "Auto Preset" to tune into the Radio Data System broadcasting stations (p.18).
2 Press DISPLAY.
Each time you press the key, the displayed item changes.

About 3 seconds later, the corresponding information for the displayed item appears.

| Program Service | Program service name |
| Program Type Current | program type |
| Radio Text Information on the current program | |
| Clock Time Current | time |
| Frequency Frequency | |
Note
"Program Service", "Program Type", "Radio Text", and "Clock Time" are not displayed if the radio station does not provide the Radio Data System service.
Receiving traffic information automatically
When "TUNER" is selected as the input source, the unit automatically receives traffic information. To enable this function, follow the procedure below to set the traffic information station.
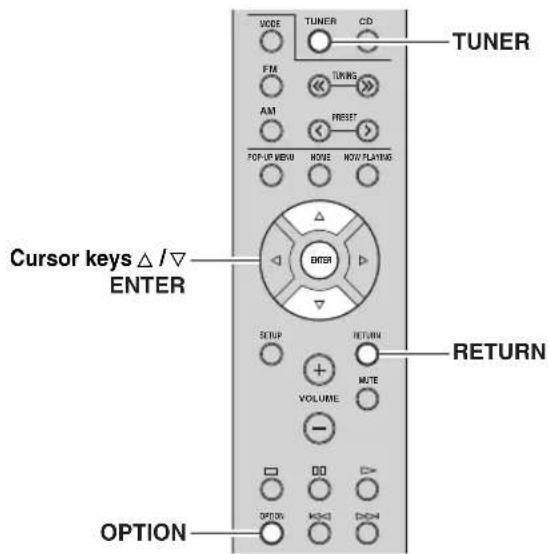
1 When "TUNER" is selected as the input source, press OPTION.
2 Use the cursor keys to select
"TrafficProgram" and press ENTER.
The traffic information station search will start in 5 seconds. Press ENTER again to start the search immediately.

- To search upward/downward from the current frequency, press the cursor keys (/) while "READY" is displayed.
To cancel the search, press RETURN. - Texts in parentheses denote indicators on the front display.
The following screen appears for about 3 seconds when the search finishes.

Note
"TP Not Found" appears for about 3 seconds when no traffic information stations are found.
Using the Spotify service
Spotify gives you instant access to millions of songs on your mobile devices. Just hit play to stream anything you like. The Spotify Connect feature lets you choose music on your Spotify app and listen on your Yamaha home entertainment system.
See Spotify.com for service area information.
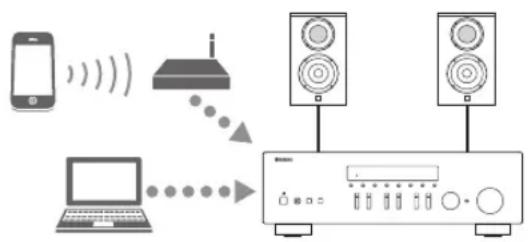
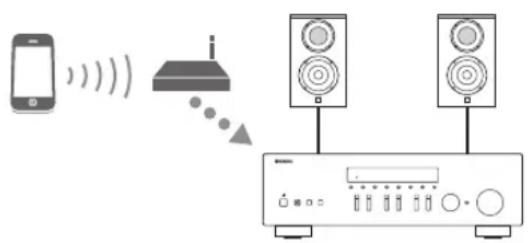
1 Connect your device to your home Wi-Fi network.
Connect the unit and your mobile or tablet to your home Wi-Fi network as shown in the illustration below. All devices need to be on the same network.
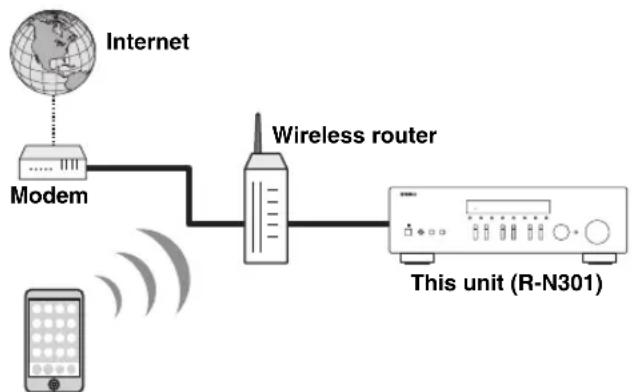
Network connection (example)
Mobile or tablet device*
* iOS/AndroidTM apps are available as of August 2014. For more details, visit Spotify.com
中
To use this function, this unit and your mobile or tablet must be connected to the Internet. For detail on connections and network settings, refer to "Owner's Manual".
2 Get Spotify app and premium free trial.
Download the Spotify app for your mobile or tablet from your app store, and take the Premium free trial.
The Spotify app and Premium account are required. Visit spi tify. com for details.
www.spotify.com/connect
3Playback of Spotify contents.
Start Spotify app on your mobile or tablet device, log in to Spotify and start playing a track.
① Tap on the Now Playing bar to reveal extra controls and tap the Speaker icon.
② Select the unit (network name of the unit) as the audio output device.

Spotify app (example)
中
- The playback screen is displayed on the front display.
- You can adjust the unit's volume from the Spotify app during playback.
Caution
- When you use Spotify app controls to adjust volume, the volume may be unexpectedly loud. This could result in damage to the unit or speakers. If the volume suddenly increases during playback, stop playback on the Spotify app immediately.

Spotify
Spotify and Spotify logo are registered trademarks of the Spotify Group.
Playing back music stored on media servers (PCs/NAS)
You can play back music files stored on your PC or DLNA-compatible NAS on the unit.
Notes
- To use this function, the unit and your PC must be connected to the same router (p.13). You can check whether the network parameters (such as the IP address) are properly assigned to the unit in "Information" (p.33) in the "Setup" menu.
The unit supports playback of WAV (PCM format only), MP3, WMA, MPEG-4 AAC and FLAC files. - The unit is compatible with sampling rates of up to 192kHz for WAV and FLAC files,and 48kHz for other files.
To play back FLAC files, you need to install server software that supports sharing of FLAC files via DLNA on your PC or use a NAS that supports FLAC files.
Setting the media sharing of music files
To play back music files in your computer with this unit, you need to make the media sharing setting between the unit and computer (Windows Media Player 11 or later). In here, setting with Windows Media Player in Windows 7 is taken as an example.
1 Start Windows Media Player 12 on your PC.
2 Select "Stream", then "Turn on media streaming."
The control panel window of your PC is shown.
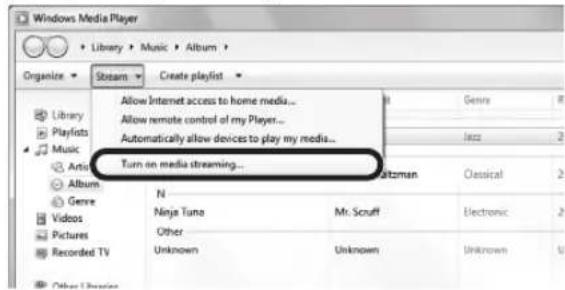
(Example of English version)
3 Click "Turn on media streaming."
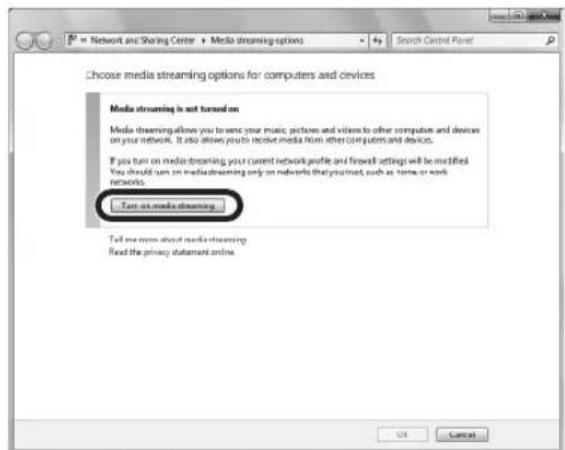
4 Select "Allowed" from the drop-down list next to "R-N301".

5 Click "OK" to exit.

For details on media sharing settings, refer to Windows Media Player help.
- For Windows Media Player 11
① Start the Windows Media Player 11 on your PC.
②Select "Library" then "Media Sharing".
③Check the "Share my media to" box, select the "R-N301" icon, and click "Allow".
④Click “OK” to exit.
- For a PC or a NAS with other DLNA server software installed
Refer to the user's manual of your device or software and configure the media sharing settings.
Playback of PC music contents
Follow the procedure below to operate the PC music contents and start playback.
Note
"_" (underscore) will be displayed for characters not supported by the unit.
1 Press NET repeatedly to select "Server" as the input source.
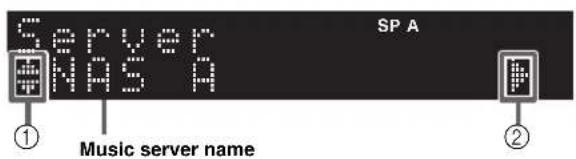
The following icons are displayed on the front panel display.
| Icon Content | |
| ① | Displayed an audio contents can be selected. |
| Displayed when there is upper level in the current folder. | |
| Displayed when a not supported music file is selected. | |
| ② | Displayed when there is lower level in the current folder. |
中
If playback of a music file selected from the unit is ongoing on your PC, the playback information is displayed.
2 Use the cursor keys ( /) to select a music server and press ENTER.
3 Use the cursor keys to select an item and press ENTER.
If a song is selected, playback starts and the playback information is displayed.

中
To return to the previous state, press RETURN.
- If you press the DISPLAY repeatedly, you can switch the playback information on the front display (p.29).
Use the following remote control keys to control playback.
| Keys Function | ||
| Playback keys | ▷ | Resumes playback from pause. |
| □ | Stops playback. | |
| □□ | Stops playback temporarily. | |
| [K] | Skipping forward/backward. | |
| [D] | ||
| HOME | Displays the root directory of the music server. | |
| NOW PLAYING | Displays information about the song that's playing. | |
#
You can also use a DLNA-compatible Digital Media Controller (DMC) to control playback. For details, see "DMC Control" (p.33).
Repeat/shuffle settings
You can configure the repeat/shuffle settings for the playback of PC music content.
1 When the input source is "Server," press REPEAT or SHUFFLE repeatedly to select the playback method.
| Item Setting Function | ||
| Repeat | Off Turns off | the repeat function. |
| One | Plays back the current song repeatedly. | |
| All | Plays back all songs in the current album (folder) repeatedly. | |
| Shuffle | Off Turns off | the shuffle function. |
| On | Plays back songs in the current album (folder) in random order. | |
中
Repeat/shuffle can also be specified in the "Option" menu (p.30).
Listening to Internet radio
You can listen to Internet radio stations from all over the world.
Notes
- To use this function, the unit must be connected to the Internet (p.13). You can check whether the network parameters (such as the IP address) are properly assigned to the unit in "Information" (p.33) in the "Setup" menu.
- You may not be able to receive some Internet radio stations.
- The unit uses the vTuner Internet radio station database service.
This service may be discontinued without notice.
1 Press NET repeatedly to select "NetRadio" as the input source.
The station list appears on the front display.
The following icons are shown on the front panel display.
| Icon Content | |
| ① | Displayed when an Internet radio station can be selected. |
| ② | Displayed when there is lower level in the current folder. |
2 Use the cursor keys to select an item and press ENTER.
If an Internet radio station is selected, playback starts and the playback information is displayed.

If you want to display the station list during playback, press HOME. To return the playback information, press NOW PLAYING.
中
To return to the previous state, press RETURN.
- If you press the DISPLAY repeatedly, you can switch the playback information on the front display (p.29).
- Use the Playback keys (□) to stop playback.
- Some information may not be available depending on the station.
Registering favorite Internet radio stations (bookmarks)
By registering your favorite Internet radio stations to "Bookmarks", you can quickly access to them from the "Bookmarks" folder in the front display.
1 Select any of Internet radio stations on the unit.
This operation is necessary to register the radio station for the first time.
2 Check the vTuner ID of the unit.
You can find the vTuner ID (MAC address of the unit) in "Information" (p.33) in the "Setup" menu.
3 Access the vTuner website
(http://yradio.vtuner.com/) with the web browser on your PC and enter the vTuner ID.
You can switch the language.

To use this feature, you need to create your personal account. Create your account using your e-mail address.
4 Register your favorite radio stations.
Click the "Add" icon (心 +) next to the station name.

To remove the station from the "Bookmarks" folder, select "Bookmarks" in the Home screen, and then click the "Remove" icon ( -) next to the station name.
Playing back iPod/iTunes music via a network (AirPlay)
The AirPlay function allows you to play back iPodiTunes music on the unit via network.
Note
To use this function, the unit and your PC or iPod must be connected to the same router (p.13). You can check whether the network parameters (such as the IP address) are properly assigned to the unit in "Information" (p.33) in the "Setup" menu.
AirPlay works with iPhone, iPad, and iPod touch with iOS 4.3.3 or later, Mac with OS X Mountain Lion, and Mac and PC with iTunes 10.2.2 or later. (as of August 2014)
Playback of iPodiTunes music contents
Follow the procedure below to play back iPod/iTunes music contents on the unit.
1 Turn on the unit, and start iTunes on the PC or display the playback screen on the iPod.
If the iPod/iTunes recognizes the unit, the AirPlay icon ( appears.
#
For iPods using iOS 7, AirPlay is displayed in Control Center. To access Control Center, swipe up from the bottom of the screen.

Example on iTunes Example on iOS6


Example on iOS7
Note
If the icon does not appear, check whether the unit and PC/iPod are connected to the router properly.
2 On the iPod/iTunes, click (tap) the AirPlay icon and select the unit (network name of the unit) as the audio output device.
Example on iTunes Example on iOS
3 Select a song and start playback.
The unit automatically selects "AirPlay" as the input source and starts playback. The playback information is displayed on the front display.
#
- If you press the DISPLAY repeatedly, you can switch the playback information on the front display (p.29).
- You can turn on the unit automatically when starting playback on iTunes or iPod by setting "Net Standby" (p.33) in the "Setup" menu to "On".
- You can edit the network name (the unit's name on the network) displayed on iPod/iTunes in "Network Name" (p.34) in the "Setup" menu.
- If you select the other input source on the unit during playback, playback on the iPod/iTunes stops automatically.
- You can adjust the unit's volume from the iPod/iTunes during playback.
Caution
- When you use iPodiTunes controls to adjust volume, the volume may be unexpectedly loud. This could result in damage to the unit or speakers. If the volume suddenly increases during playback, stop playback on the iPodiTunes immediately.
Use the following remote control keys to control playback.
| Playback keys | ▷ | Resumes playback from pause. |
| □ | Stops playback. | |
| □□ | Stops playback temporarily. | |
| □□□ | Skipping forward/backward. | |
| □□□□ | ||
| REPEAT Changes the Repeat settings | ||
| SHUFFLE Changes the Shuffle settings | ||
Note
To control iTunes playback with the remote control of the unit, you need to configure the iTunes preferences to enable iTunes control from remote speakers in advance.
Switching information on the front display
When you select a network source as the input source, you can switch playback information on the front display.
1 Press DISPLAY.
Each time you press the key, the displayed item changes.

About 3 seconds later, the corresponding information for the displayed item appears.

| Input source Item | |
| Server | Song (song title), Artist (artist name), Album (album name), Time |
| AirPlay | |
| Net Radio | Song (song title), Album (album name), Station (station name), Time |
| Spotify | Song (song title), Artist (artist name), Album (album name) |
Configuring playback settings for different playback sources (Option menu)
You can configure separate playback settings for different playback sources. This menu allows you to easily configure settings during playback.

1 Press OPTION.

2 Use the cursor keys to select an item and press ENTER.
To return to the previous state during menu operations, press RETURN.
3 Use the cursor keys ( / ) to select a setting.
4 To exit from the menu, press OPTION.
Option menu items

Available items vary depending on the selected input source.
| Item Function Page | ||
| Input Trim | Corrects volume differences between input sources. | 30 |
| Signal Info | Displays information about the audio signal. | 30 |
| Auto Preset | Automatically registers FM radio stations with strong signals as preset. | 18 |
| Clear Preset | Clear radio stations registered to preset numbers. | 19 |
| TrafficProgram | Automatically searches for a traffic information station. | 20 |
| Repeat | Configs the repeat setting for the media server. | 24 |
| Shuffle | Configs the shuffle setting for the media server. | 24 |
| AutoPowerStdby | Sets the amount of time for the auto-standby function to each input. | 31 |
■Input Trim
Corrects volume differences between input sources. If you are bothered by volume differences when switching between input sources, use this function to correct it.

This setting is applied separately to each input source.
Setting range
-10 to +10 (1.0 dB increments)
Default
0
■Signal Info
Displays information about audio signal.
Choices
| Format Audio | format of the input signal |
| Sampling | The number of samples per second of the input digital signal |

To switch the information on the front display, press the cursor keys ( / ) repeatedly.
■AutoPowerStdby
Sets the amount of time for the auto-standby function to each input. If you do not operate the unit for the specified time, the unit will automatically go into standby mode.
| Off Does not set | the unit to standby mode automatically. |
| 20 minutes*, 2 hours, 4 hours, 8 hours*, 12 hours | For network sources (Spotify, Server, Net Radio, or AirPlay) Sets the unit to standby mode when you have not operated the unit for the specified time while audio contents are stopped/paused. For other input sources When you have not operated the unit for the specified time, the unit switches to standby modc. |
- Spotify, Server, Net Radio, AirPlay has been set to 20 minutes by default. Other input has been set to 8 hours by default.
中
Before the unit enters standby mode, "AutoPowerStdby" appears, then a 30-second countdown starts in the front display.
Configuring various functions (Setup menu)
You can configure the unit's various functions.
1 Press SETUP.

2 Use the cursor keys ( / ) to select a menu.

3 Press ENTER.

4 Use the cursor keys ( / ) to select a setting and press ENTER.

To return to the previous state during menu operations, press RETURN.
5 Exit from the menu, press SETUP.
Setup menu items
| Menu item Function | on | Page | |
| Network Setup | Information | Displays the network information on the unit. | 33 |
| IP Address | Configures the network parameters (such as IP address). | 33 | |
| MAC Filter | Filter Sets the MAC address filter to limit access to the unit from other network devices. | 33 | |
| DMC Control | Selects whether to allow a DLNA-compatible Digital Media Controller (DMC) to control playback. | 33 | |
| Net Standby | Selects whether to enable/disable the function that turns on the unit from other network devices. | 33 | |
| Network Name | Edits the network name (the unit's name on the network) displayed on other network devices. | 34 | |
| Update | Updates the firmware via the network. | 34 | |
| Tone Control | Adjusting the high and low frequency response. | 34 | |
| Balance | Adjusting the sound output balance of the left and right speakers. | 34 | |
| Max Volume | Sets the maximum volume to prevent excessive loudness. | 34 | |
| Initial Volume | Sets the initial volume for when this receiver is turned on. | 34 | |
| DC OUT | Selects how to supply power through the DC OUT jack. | 34 | |
Network Setup
Configures the network settings.
Information
Displays the network information on the unit.
| NewFwAvailable | Appears if an update for this unit's firmware is available (p.36). |
| Status The connection status of the NETWORK jack | |
| MAC MAC address | |
| IP IP address | |
| Subnet Subnet mask | |
| Gateway The IP address of the default gateway | |
| DNS(P) The IP address of the primary DNS server | |
| DNS(S) The IP address of the secondary DNS server | |
| vTunerID The ID of the Internet radio (vTuner) | |
IP Address
Configures the network parameters (such as IP address).
DHCP
Select whether to use a DHCP server.
| Off | Does not use a DHCP server. Configure the network parameters manually. For details, see "Manual network settings". |
| On (default) | Uses a DHCP server to automatically obtain the unit's network parameters (such as IP address). |
Manual network settings
1 Set "DHCP" to "Off".
2 Use the cursor keys ( / ) to select a parameter type.
| Address Specifies an IP address. | |
| Subnet Mask | Specifies a subnet mask. |
| Default Gateway | Specifies the IP address of the default gateway. |
| DNS Server(P) | Specifies the IP address of the primary DNS server. |
| DNS Server(S) | Specifies the IP address of the secondary DNS server. |
3 Use the cursor keys ( / ) to select the edit position.

(Example: IP address setting)
Use the cursor keys ( / ) to switch between segments (Address1, Address2...) of the address.
4 Use the Cursor keys ( / ) to change a value.
5 To exit from the menu, press SETUP.
■MAC Filter
Sets the MAC address filter to limit access to the unit from other network devices.
Filter
Enables/disables the MAC address filter.
| Off (default) | Disables the MAC address filter. |
| On | Enables the MAC address filter. In “MAC Address 01-10”, specify the MAC addresses of the network devices that will be permitted access to the unit. |
MAC address filter settings
1 Set "Filter" to "On".
2 Use the cursor keys ( /) to select an MAC address number (01 to 10).
3 Use the cursor keys ( / ) to move the edit position and the cursor keys ( / ) to select a value.
4 To exit from the menu, press SETUP.
中
When using "AirPlay" (p.27) and "DMC Control" (p.33), you cannot limit access from network devices regardless of the MAC address filter.
DMC Control
Selects whether to allow DLNA-compatible Digital Media Controller (DMC) to control playback.
| Disable Does | not allow DMCs to control playback. |
| Enable (default) | Allows DMCs to control playback. |
A Digital Media Controller (DMC) is a device that can control other network devices through the network. When this function is enabled, you can control playback of the unit from DMCs (such as Windows Media Player 12) on the same network.
Net Standby
Selects whether the unit can be turned on from other network devices (network standby).
| Off (default) | Disables the network standby function. |
| On | Enables the network standby function. (The unit consumes more power than when “Off” is selected.) |
■Network Name
Edits the network name (the unit's name on the network) displayed on other network devices.
1 Select "Network Name".

2 Press ENTER to enter the name edit display.

3 Use the cursor keys ( / ) to move the edit position and the cursor keys ( / ) to select a character.

4 To confirm the new name, press ENTER.
5 To exit from the menu, press SETUP.
■Update
Updates the firmware via the network.
| Perform Update | Starts the process to update the unit's firmware. For details, see “Updating the unit's firmware via the network” (p.36). |
| Version | Displays the version of the firmware installed on the unit. |
| ID Displays the | system ID number. |
Tone Control
Adjusting the high and low frequency response.
| Bass | When you feel there is not enough bass (low frequency sound). Control range: -10 to +10 (20 Hz) |
| Treble | When you feel there is not enough treble (high frequency sound). Control range: -10 to +10 (20 kHz) |
Balance
Adjusting the sound output balance of the left and right speakers to compensate for sound imbalance caused by speaker locations or listening room conditions.
Control range
L + 10 to R + 10

For details, refer to the "Adjusting the speaker balance" (p.16).
Max Volume
Sets the maximum volume to prevent excessive loudness.
Setting range
1 to 99 (1 step increments), Max
Default
Max
Initial Volume
Sets the initial volume when the receiver is turned on.
Setting range
Off, Mute, 1 to 99 (1 step increments), Max
Default
Off
DC OUT
Configures the DC OUT jack setting.
PowerMode
Selects how to supply power to the Yamaha AV accessory connected to the DC OUT jack.
| Con (default) | Supplies power through the DC OUT jack continuously regardless of the power state (on/ standby) of the unit. |
| Sync | Supplies power through the DC OUT jack only when the unit is turned on. |
Configuring the system settings (ADVANCED SETUP menu)
Configure the system settings of the unit while viewing the front display.
1 Turn off the unit.
2 While holding down RETURN on the front panel, press (power).
3 Rotate SELECT/ENTER to select an item.
4 Press SELECT/ENTER to select a setting.
5 Press (power) to set the unit to turn off and turn it on again.
The new settings take effect.
ADVANCED SETUP menu items
Restoring the default settings (INIT)
| Item Function Page | |
| INIT Restores the default settings. 35 | |
| UPDATE Updates the firmware. 35 | |
| VERSION Checks the version of firmware currently installed on the unit. | 35 |

Restores the default settings for the unit.
Choices
| ALL Restores the default settings for the unit. |
| CANCEL Does not perform an initialization. |
Updating the firmware (UPDATE)
UPDATE···NETWORK
New firmware that provides additional features or product improvements will be released as needed. If the unit is connected to the Internet, you can download the firmware via the network. For details, refer to the information supplied with updates.
■Firmware update procedure
Do not perform this procedure unless firmware update is necessary. Also, make sure you read the information supplied with updates before updating the firmware.
1 When the "NETWORK" displayed on the front display, press RETURN to start firmware update.
中
If the unit detects newer firmware over the network, "NewFwAvailable" appears as the "Information" menu item in
"Network Setup". In this case, you can also update the unit's firmware by following the procedure in "Updating the unit's firmware via the network" (p.36).
Checking the firmware version (VERSION)
VERSION·.xx.xx
Check the version of firmware currently installed on the unit.
中
- You can also check the firmware version in "Update" (p.34) in the "Setup" menu.
- It may take a while until the firmware version is displayed.
Updating the unit's firmware via the network
New firmware that provides additional features or product improvements will be released as needed. When new firmware is available, "New Firm" is displayed for a while when the unit is turned on. Follow the steps below to update the firmware.
New Firm Please Update!
Note
Do not operate the unit or disconnect the power cable or network cable during firmware update. Firmware update takes about 20 minutes or more (depending on your Internet connection speed).
7 If "UPDATE SUCCESS" appears on the front display, press (power) on the front panel.
The firmware update is complete.
1 Press SETUP.
2 Use the cursor keys to select "Network Setup" and press ENTER.
3 Use the cursor keys to select "Information" and press ENTER.
If new firmware is available, "NewFwAvailable" appears on the front display.
Firmware SPA NewFWHvailable
4 Press RETURN to return the previous state.
5 Use the cursor keys to select "Update" and press ENTER.
Network SPA
<h1 id="perform-update">Perform Update</h1>
6 To start the firmware update, press ENTER.
The unit to restart and the firmware update starts.
中
To cancel the operation without updating the firmware, press SETUP.
Troubleshooting
Refer to the chart below if this unit does not function properly. If the problem you are experiencing is not listed below or if the instructions below do not help, set this unit to standby mode, disconnect the power cable, and contact the nearest authorized Yamaha dealer or service center.
General
| Problem Cause | Remedy | See page | |
| The power does not turn on. | The protection circuitry has been activated three times consecutively. If the unit is in this condition, the standby indicator on the unit blinks when you try to turn on the power. | As a safety precaution, capability to turn on the power is disabled. Contact your nearest Yamaha dealer or service center to request repair. | — |
| The power cable is not connected or the plug is not completely inserted. | Connect the power cable firmly. | — | |
| The protection circuitry has been activated because of a short circuit, etc. | Check that the speaker wires are not touching each other and then turn the power of this unit back on. | 10 | |
| This unit has been exposed to a strong external electric shock (such as lightning or strong static electricity). | Set this unit to standby mode, disconnect the power cable, plug it back in after 30 seconds, then use it normally. | — | |
| The power does not turn off. | The internal microcomputer has frozen, due to an external electric shock (such as lightning or excessive static electricity) or to a drop in the power supply voltage. | Hold down Φ (power) on the front panel for more than 15 seconds to initialize and reboot the unit. (If the problem persists, disconnect the power cable from the AC wall outlet and plug it again.) | — |
| No sound Incorrect input | or output cable connections. | Connect the cables properly. If the problem persists, the cables may be defective. | 10 |
| No appropriate input source has been selected. | Select an appropriate input source with the INPUT selector on the front panel (or one of the input selection key on the remote control). | 15 | |
| The SPEAKERS A/B switches are not set properly. | Turn on the corresponding SPEAKERS A or SPEAKERS B. | 15 | |
| Speaker connections are not secure. Secure | the connections. | 10 | |
| Output has been muted. Turn off the mute. | 8 | ||
| The Max volume or Initial volume setting is set too low. | Set the setting to a higher value. | 34 | |
| The component corresponding to the selected input source is turned off or is not playing. | Turn the component on and make sure it is playing. | — | |
| The audio output of a device connected to a digital audio input (COAXIAL/OPTICAL jacks) is set to other than PCM. | Set the audio output of the connected device to PCM. | — | |
| The sound suddenly goes off. | The protection circuitry has been activated because of a short circuit, etc. | Set the speaker impedance to match your speakers. | 11 |
| Check that the speaker wires are not touching each other and then turn the power of this unit back on. | 10 | ||
| This unit has become too hot. Make sure the | openings on the top panel are not blocked. | — | |
| The auto power standby function has turned this unit off. | Change the auto power standby ("AutoPowerStdby" in the "Option" menu) to a longer setting or turn off. | 31 | |
| Only the speaker on one side can be heard. | Incorrect cable connections. Connect the cables properly. If the problem persists, the cables may be defective. | the speaker balance to the appropriate position in the "Setup" menu. | 10 |
| Incorrect setting for the speaker balance. Set | the speaker balance to the appropriate position in the "Setup" menu. | 16 |
Troubleshooting
■Tuner
| Problem Cause | Remedy | See page | |
| There is a lack of bass and no ambience. | The + and - wires are connected in reverse at the amplifier or the speakers. | Connect the speaker wires to the correct + and - phase. | 10 |
| A “humming” sound can be heard. | Incorrect cable connections. Connect the au | dio plugs firmly. If the problem persists, the cables may be defective. | 10 |
| No connection from the turntable to the GND terminal. | Make the GND connection between the turntable and this unit. | 10 | |
| The sound is degraded when listening with the headphones connected to the CD player or the tape deck connected to this unit. | The power of this unit is turned off, or this unit is set to standby mode. | Turn on the power of this unit. | 15 |
| Problem Cause | Remedy | See page | ||
| FM | FM stereo reception is noisy. | The particular characteristics of the FM stereo broadcasts being received may cause this problem when the transmitter is too far away or the antenna input is poor. | Check the antenna connections.Try using a high-quality directional FM antenna. | 12 |
| Switch to monaural mode. | 17 | |||
| There is distortion, and clear reception cannot be obtained even with a good FM antenna. | There is multipath interference. Adjust the antenna position to eliminate the multipath interference. | — | ||
| The desired station cannot be tuned in with the automatic tuning method. | The signal is too weak. Try using a high-quality directional FM antenna. | 12 | ||
| Try using the manual tuning method. | 17 | |||
| FM/AM | NO PRESETS is displayed. | No preset stations are registered. Register stations you want to listen to as preset stations before operation. | 18 | |
| AM | The desired station cannot be tuned in with the automatic tuning method. | The signal is weak or the antenna connections are loose. | Tighten the AM antenna connections and orient it for the best reception. | — |
| Try using the manual tuning method. | 17 | |||
| Automatic station preset does not work. | Automatic station preset is not available for AM stations. | Use manual station preset. | 18 | |
| There are continuous crackling and hissing noises. | The noises may result from lightning, fluorescent lamps, motors, thermostats or other electrical equipment. | Try using an outdoor antenna and a ground wire.This will help somewhat, but it is difficult to eliminate all noise. | — | |
| There are buzzing and whining noises. | A TV set is being used nearby. Move this unit away from the TV set. | — | ||
Network
| Problem Cause | Remedy | See page | |
| The network feature does not function. | The network parameters (IP address) have not been obtained properly. | Enable the DHCP server function on your router and set “DHCP” in the “Setup” menu to “On” on the unit. If you want to configure the network parameters manually, check that you are using an IP address which is not used by other network devices in your network. | 33 |
| The unit does not detect the PC. | The media sharing setting is not correct. Con# figure the sharing setting and select the unit as a device to which music contents are shared. | — | |
| Some security software installed on your PC is blocking the access of the unit to your PC. | Check the settings of security software installed on your PC. | — | |
| The unit and PC are not in the same network. | Check the network connections and your router settings, and then connect the unit and the PC to the same network. | 13 | |
| The MAC address filter is enabled on the unit. | In “MAC Filter” in the “Setup” menu, disable the MAC address filter or specify the MAC address of your PC to allow it to access to the unit. | 33 | |
| The files in the PC cannot be viewed or played back. | The files are not supported by the unit or the media server. | Use the file format supported by both the unit and the media server. For information about the file formats supported by the unit, see “Playing back music stored on media servers (PCs/NAS)”. | 22 |
| The Internet radio cannot be played. | The selected Internet radio station is currently not available. | There may be a network problem at the radio station, or the service may have been stopped. Try the station later or select another station. | — |
| The selected Internet radio station is currently broadcasting silence. | Some Internet radio stations broadcast silence at certain of times of the day. Try the station later or select another station. | — | |
| Access to the network is restricted by the firewall settings of your network devices (such as the router). | Check the firewall settings of your network devices. The Internet radio can be played only when it passes through the port designated by each radio station. The port number varies depending on the radio station. | — | |
| The application for smartphone/tablet“Network Player Controller” does not detect the unit. | The MAC address filter is enabled on the unit. | In “MAC Filter” in the “Network Setup”, disable the MAC address filter or specify the MAC address of your smartphone/tablet to allow it to access to the unit. | 33 |
| The unit and smartphone/tablet are not in the same network. | Check the network connections and your router settings, and then connect the unit and smartphone/tablet to the same network. | — | |
| Firmware update via the network is failed. | It may not be possible depending on the condition of the network. | Update the firmware via the network again. | 35 |
Remote control
| Problem Cause | Remedy | See page | |
| The remote control does not work nor function properly. | Wrong distance or angle. The remote control | will function within a maximum range of 6 m (20 ft) and no more than 30 degrees off-axis from the front panel. | 9 |
| Direct sunlight or lighting (from an inverter type of fluorescent lamp, etc.) is striking the remote control sensor of this unit. | Reposition this unit. | — | |
| The batteries are weak. Replace all batteries. | — | ||
| Even if the remote control code is correctly set, there are some models that do not respond to the remote control. | Use the supplied remote control for the components. | — | |
| You did not press the input selection key corresponding to the component you are trying to control. | Press the input selection key corresponding to the component you are trying to control, and then press the desired remote control key(s). | — |
Error indications on the front display
| Message Cause | Remedy | |
| Access denied | Access to the PC is denied. | Configure the sharing settings and select the unit as a device to which music contents are shared (p.22). |
| Access error There is a problem with the signal path from the network to the unit. | Make sure your router and modem are turned on. | |
| Check the connection between the unit and your router (or hub) (p.13). | ||
| Check SP Wires | The speaker cables short circuit. | Twist the bare wires of the cables firmly and connect to the unit and speakers properly. |
| No content There are no playable files in the selected folder. | Select a folder that contains files supported by the unit. | |
| Please wait The unit is preparing for connecting to the network. | Wait until the message disappears. If the message stays more than 3 minutes, turn off the unit and turn it on again. | |
| Unable to play The unit cannot play back the songs stored on the iPod for some reason. | Check the song data. If it cannot be played on the iPod itself, the song data or storage area may be defective. | |
| The unit cannot play back the songs stored on the PC for some reason. | Check if the format of files you are trying to play is supported by the unit. For information about the formats supported by the unit, see “Playing back music stored on media servers (PCs/NAS)” (p.22). If the unit supports the file format, but still cannot play back any files, the network may be overloaded with heavy traffic. | |
| Version error Firmware update is failed. Update the firmware again. |
Trademarks

AirPlay works with iPhone, iPad, and iPod touch with iOS 4.3.3 or later, Mac with OS X Mountain Lion, and Mac and PC with iTunes 10.2.2 or later.
AirPlay, iPad, iPhone, iPod touch, iTunes and Retina are trademarks of Apple Inc., registered in the U.S. and other countries.
iPad Air and iPad mini are trade marks of Apple Inc.

MPEG Layer-3 audio coding technology licensed from Fraunhofer IIS and Thomson.


DLNATM and DLNA CERTIFIEDTM are trademarks or registered trademarks of Digital Living Network Alliance. All rights reserved. Unauthorized use is strictly prohibited.
WindowsTM
Windows is a registered trademark of Microsoft Corporation in the United States and other countries.
Internet Explorer, Windows Media Audio and Windows Media Player are either registered trademarks or trademarks of Microsoft Corporation in the United States and/or other countries.
AndroidTM
Android is a trademark of Google Inc.

This receiver supports network connections.
Specifications
AUDIO SECTION
Minimum RMS Output Power
(40 Hz to 20 kHz, 0.2% THD, 8 Ω)
[U.S.A, Canada, General, Korea, Australia, U.K, Europe models] 100 W + 100 W
[Asia model] 85 W + 85 W
- Dynamic power per channel (IHIF) (8 / 6 / 4 / 2)
125/150/165/180 W
Maximum power per channel [Europe model only]
(1 kHz, 0.7% THD, 4 Ω) 115 W
- IEC power [Europe model only]
(1 kHz, 0.2% THD, 8 Ω) 110 W
Damping factor (SPEAKERS A)
1 kHz, 8 Ω. 120 or more
Maximum effective output power (JEITA)
(1 kHz, 10% THD, 8 Ω)
[General model] 140 W or more
[Asia model] 125 W or more
- Input sensitivity/Input impedance
CD,etc. 500 mV/47 kΩ
Maximum input signal
CD, etc. (1 kHz, 0.5% THD) 2.2 V or more
Output level/Output impedance
CD, etc. (Input 1 kHz, 500 mV)
REC OUT 500 mV/2.2 kΩ
PHONES (8 Ω load) 470 mV/470 Ω
Frequency response
CD, etc. (20 Hz to 20 kHz) .0 ± 0.5 dB
CD,etc. (10Hz to 100kHz) 0+0.5/-3.0 dB
- Total harmonic distortion
CD, etc. to SPEAKERS
(20 Hz to 20 kHz, 50.0 W, 8 Ω) 0.2% or less
- Signal to Noise Ratio (IHF-A Network)
CD, etc. (input shorted, 500mV 100 dB or more
-
Residual noise (IHIF-A network)
-
Channel separation
CD, etc. (5.1 kΩ input shorted, 1/10 kHz) 65/50 dB or more
- Tone control characteristics
BASS
Boost/Cut (50 Hz) ± 10 dB
TREBLE
Boost/Cut (20 kHz) ± 10 dB
Digital input
OPTICAL
COAXIAL
Support audio sample rate 32/44.1/48/88.2/96/176.4/192 kHz
FM SECTION
Tuning range
[U.S.A. and Canada models] .87.5 to 107.9 MHz
[Asia and General models] .87.5/87.50 to 108.0/108.00 MHz
[U.K., Europe, Korea, Australia models] ....87.50 to 108.00 MHz
- 50 dB quieting sensitivity (IHF, 1 kHz, 100% MOD.)
Mono 3.0 V (20.8 dBf)
- Signal to noise ratio (IHF)
Mono/Stereo 72 dB/70 dB
- Harmonic distortion (1 kHz)
Mono/Stereo 0.3%/0.5%
Antenna input. 75Ω unbalanced
AM SECTION
Tuning range
[U.S.A. and Canada models] 530 to 1710kHz
[Asia and General models] 530/531 to 1710/1611 kHz
[U.K, Europe, Korea, Australia models] 531 to 1611 kHz
GENERAL
- Power supply
[U.S.A. and Canada models] AC 120 V, 60 Hz
[General model] AC 110-120/220-240 V, 50/60 Hz
[Korea model] AC 220 V, 60Hz
[Australia model] AC 240 V, 50 Hz
[U.K. and Europe models] AC 230 V, 50 Hz
[Asia model] AC 220-240 V, 50/60 Hz
- Power consumption
[U.S.A, Canada, General, Korea, Australia, U.K. and Europe models]
200W
[Asia model] 165 W
- Standby power consumption 0.1 W
Network standby on 2.0 W
- Dimensions (W × H × D) 435 × 141 × 333 mm
(17 - 1 / 8^ × 5 - 1 / 2^ × 13 - 1 / 8^ )
Weight 6.95 kg (15.3 lbs)
- Specifications are subject to change without notice.
Index
A
ADVANCED SETUP menu. 35
AirPlay 27
AM antenna connection. 12
AM radio listening. 17
Audio device connection 10
Audio file format (PC/NAS) 22
AUDIO jack. 7,10
Auto Power Standby (Option menu) 30
Auto Preset (FM radio, Option menu) 18
Automatic station preset (FM radio) 18
AutoPowerStdby (Option menu) 30
B
Balance (Setup menu) 16, 34
Basic playback operation. 15
BASS (Tone Control) 16
Batteries 9
Bi-Amp (Speaker connection) 11
Bi-wire (Speaker connection). 11
Bookmark (Internet Radio) 25
C
CAT-5 cable 13
Clear Preset (FM/AM radio, Option menu) 19
Clock Time (Radio Data System) 20
COAXIAL jack 7,10
D
DC OUT (Setup menu). 34
DC OUT jack. 7
Default Gateway (Information, Setup menu) 33
Default Gateway (IP Address, Setup menu) 33
DHCP (IP Address, Setup menu) 33
Digital Media Controller (DMC) 33
DIMMER key (Front display) 6
DISPLAYkey 5,8,29
DLNA 22
DMC Control (Network Setup, Setup menu) 33
DNS Server (Information, Setup menu) 33
DNS Server (IP Address, Setup menu) 33
E
Error indication. 41
F
Filter (MAC Filter, Setup menu) 33
Firmware update. 36
Firmware update (network) 35, 36
Firmware version check 34, 35
FM antenna connection 12
FM radio listening 17
FM/AM radio tuning 17
Format (Signal Info, Option menu) 30
G
Gateway 33
H
Headphones 5
HOME key (Internet radio). 25
HOME key (PC/NAS) 23
1
ID (Network Setup, Setup menu) 34
Indicator (part names and functions) 6
Information (Network Setup, Setup menu) 33
Information display (front display). 6
Information switching (front display). 29
INIT (ADVANCED SETUP menu) 35
Initial Volume (Setup menu) 34
Input selection key 8
Input trim (Option menu) 30
Internet radio listening 25
IP Address (Information, Setup menu) 33
IP Address (Network Setup, Setup menu) 33
iPod content playback (AirPlay) 27
iTunes content playback (AirPlay) 27
M
MAC Address (Information, Setup menu) 33
MAC Address (MAC Filter, Setup menu) 33
MAC Filter (Network Setup, Setup menu) 33
Manual station preset (FM/AM radio). 18
Max Volume (Setup menu) 34
Media sharing setup. 22
MODE key. 8
Monaural reception (FM radio) 17
MUTE key 8
N
NAS (Network Attached Storage) connection. 13
NAS content playback 22
Net Standby (Network Setup, Setup menu) 33
Network cable 13
Network connection. 13
Network information. 33
Network Name (Network Setup, Setup menu) 34
Network Setup (Setup menu) 33
Network Update (Network Setup, Setup menu) 34
NewFwAvailable 36
NOW PLAYING key (Internet radio) 25
NOW PLAYING key (PC/NAS) 23
0
OPTICAL jack. 7
OPTION key. 8
Option menu 30
P
PC connection. 13
PC content playback 22
Perform Update (Network Setup, Setup menu) 34
PHONES jack 5
Playback device connection 10
Power cable connection 13
Power indicator (front panel) 5
Power Mode (DC OUT, Setup menu) 34
Preset station selection (FM/AM radio) 19
Program Service (Radio Data System) 20
Program Type (Radio Data System) 20
R
Radio Data System (FM radio). 20
Radio Data System information. 20
Radio Data System tuning 20
Radio Text (Radio Data System) 20
Rear panel (part names and functions) 7
REC (REC OUT) jack 10
Recording device connection. 10
Remote control (part names and functions) 8
Remote control range 9
Remote control signal transmitter (remote control) 8
Rename (network name) 34
Repeat (PC/NAS). 24
Router connection 13
s
Sampling (Signal Info, Option menu) 30
SETUP key 8
Setup menu 32
Shuffle (PC/NAS). 24
Signal Info (Option menu) 30
Signal information 30
SLEEP key. 16
Sleep timer 16
Speaker cable connection 11
Speaker indicator (front display) 6
Spotify 21
Station presct (FM/AM radio) 18
Status (Information, Setup menu) 33
STP network cable. 13
Subnet Mask (Information, Setup menu) 33
Subnet Mask (IP Address, Setup menu) 33
T
TONE CONTROL 16
TP (Traffic Program) 20
Traffic information (Radio Data System). 20
Traffic Program (FM radio, Option menu) 20
TREBLE (Tone Control) 16
U
UPDATE (ADVANCED SETUP menu) 35
Update (Network Setup) 34
V
VERSION (ADVANCED SETUP menu) 35
Version (Network Setup, Setup menu) 34
Volume trim (Option menu) 30
vTuner ID (Information, Setup menu) 33

Piles (x2)
(AAA, R03, UM-4)
www.spotify.com/connect
3 Lecture de contenus Spotify.
New Firm Please Update!
Remarque
Firmware SPA
NewFWAvailable
Network SPA
© Perform Update
Accentuation/attenuation (50 Hz) ± 10 dB
TREBLE
Accentuation/attenuation (20 kHz) ± 10 dB
- Entree numérique
OPTICAL
COAXIAL
Antenne AM, raccordement 12
Antenne FM, raccordement 12
Appareil de lecture, raccordement. 10
Appareils audio, raccordement 10
AUDIO,prisc 7,10
Auto Power Standby (menu Option) 30
Auto Preset (radio FM, menu Option). 18
AutoPowerStdby (menu Option) 30
B
Balance (menu Setup) 16, 34
Clear Presct (radio FM/AM, menu Option) 19
Clock Time (Radio Data System) 20
COAXIAL,prise 7,10
Connexion reseau 13
Cordon d'alimentation, raccordement. 13
D
DC OUT (menu Setup). 34
DC OUT,prise. 7
Default Gateway (Information, menu Setup) 33
Default Gateway (IP Address, menu Setup) 33
DHCP (IP Address, menu Setup) 33
Digital Media Controller (DMC) 33
DISPLAY, touche. 5,8,29
DLNA 22
DMC Control (Network Setup, menu Setup) 33
DNS Server (Information, menu Setup) 33
DNS Server (IP Address, menu Setup) 33
E
ID (Network Setup, menu Setup) 34
Information (Network Setup, menu Setup) 33
Informations (afficheur de la face avant) 6
Informations, changement (afficheur de la face avant) 29
INIT (menu ADVANCED SETUP) 35
Initial Volume (menu Setup) 34
Input trim (menu Option). 30
IP Address (Information, menu Setup) 33
IP Address (Network Setup, menu Setup) 33
iPod, lecture (AirPlay) 27
iTunes, lecture (AirPlay). 27
L
NAS (Network Attached Storage), connexion 13
NAS, lecture 22
Net Standby (Network Setup, menu Setup) 33
Network Name (Network Setup, menu Setup) 34
Network Setup (menu Setup). 33
Network Update (Network Setup, menu Setup) 34
NewFwAvailable 36
NOW PLAYING, touche (PC/NAS) 23
NOW PLAYING, touche (radio Internet) 25
0
OPTICAL,prise. 7
Option, menu 30
OPTION, touche 8
P
Perform Update (Network Setup, menu Setup) 34
PHONES,prise 5
Piles. 9
Power Mode (DC OUT, menu Setup) 34
Radio Data System (radio FM) 20
Radio Data System, informations 20
Radio Data System, syntonisation 20
REC (REC OUT),prise 10
Sampling (Signal Info, menu Option) 30
Subnet Mask (Information, menu Setup) 33
Subnet Mask (IP Address, menu Setup) 33
T
TP (Traffic Program) 20
Traffic Program (radio FM, menu Option) 20
Update (Network Setup) 34
V
VERSION (menu ADVANCED SETUP) 35
Version (Network Setup, menu Setup) 34
www.spotify.com/connect
New Firm Please Update!
Hinweis
Firmware SPA
NewFWAvailable
AutoPowerStdby (Menu Option) 30
B
Balance (Menu Setup) 16,34
BASS (Tone Control) 16
Batterien 9
DC OUT (Menu Setup) 34
Default Gateway (Information, Menu Setup) 33
Default Gateway (IP Address, Menu Setup) 33
DHCP (IP Address, Menu Setup) 33
Digital Media Controller (DMC) 33
DLNA 22
DMC Control (Network Setup, Menu Setup) 33
DNS Server (Information, Menu Setup) 33
DNS Server (IP Address, Menu Setup) 33
E
ID (Network Setup, Menu Setup). 34
Information (Network Setup, Menu Setup) 33
Initial Volume (Menu Setup). 34
Input trim (Menu Option) 30
Internetradio horen. 25
IP Address (Information, Menu Setup) 33
IP Address (Network Setup, Menu Setup) 33
MAC Address (MAC Filter, Menu Setup) 33
MAC Filter (Network Setup, Menu Setup) 33
Max Volume (Menu Setup) 34
NAS (Network Attached Storage) Verbindung 13
Net Standby (Network Setup, Menu Setup) 34
Network Name (Network Setup, Menu Setup) 34
Network Setup (Menu Setup) 33
Network Update (Network Setup, Menu Setup) 34
Perform Update (Network Setup, Menu Setup) 34
Power Mode (DC OUT, Menu Setup). 34
Program Service (Radio Data System) 20
Program Type (Radio Data System) 20
R
Radio Data System (FM-Radio) 20
Sampling (Signal Info, Menu Option) 30
Signal Info (Menu Option) 30
Signalinformationen 30
Spotify 21
Status (Information, Menu Setup) 33
Subnet Mask (IP Address, Menu Setup) 33
T
Taste DIMMER (Frontblende-Display) 6
Taste DISPLAY 5,8,29
Taste HOME (Internetradio). 25
Taste HOME (PC/NAS) 23
Taste MODE. 8
Taste MUTE 8
Taste NOW PLAYING (Internetradio) 25
Taste NOW PLAYING (PC/NAS). 23
Taste OPTION 8
Taste SETUP 8
Taste SLEEP. 16
TONE CONTROL. 16
TP (Traffic Program) 20
Traffic Program (FM-Radio, Menu Option) 20
TREBLE (Tone Control) 16
U
Update (Network Setup) 34
V
Version (Network Setup, Menu Setup) 34
Volume trim (Menu Option) 30
vTuner ID (Menu Information, Setup) 33
W
Wiederholung (PC/NAS) 24
Z
Zufallswiedergabe (PC/NAS) 24
Observera: Läs detta innan encheten tas iBruk.
Radio Data System -installing
Radio Data System ar att system for dataoverforing som anvands av FM-stationer i mange lander. Enheten kan ta emot oika typ er av Radio Data System data, sasom "Program Service", "Program Type," "Radio Text" och "Clock Time", nar den stalls in pa en Radio Data System sandningsstation.
www.spotify.com/connect
New Firm Please Update!
Anmarkning
Firmware SPA NewFWHvailable
[Modell for Asien] .85 W + 85 W
Dynamisk effekt per kanal (IHF) (8 / 6 / 4 / 2)
125/150/165/180 W
(1 kHz, 0.7% THD, 4 Ω) 115 W
(1 kHz, 0.2% THD, 8 Ω) 110 W
Dampfaktor (HÖGTALARE A)
1 kHz, 8Ω. 120 cller mer
(1 kHz, 10% THD, 8 Ω)
[Standard model] 140 W ell er mera
[Asien-model]. 125 Weller mera
- Total harmonisk distortion
CD m.m. till SPEAKERS
(20 Hz till 20 kHz, 50.0 W, 8 Ω) 0.2% cllr minde
- Signalbrusforhallandc (IHF-A-natverk)
CD m.m. (kortsluten ingang, 500mV ). 100 dB erler mer
-
Grundbrus (IHF-A-nätverk) 70 μV
-
Kanalseparation
CD m.m. (5,1 kΩ med kortsluten ingang, 1/10 kHz)
65/50 dB erler mer
- Harmonisk distortion (1 kHz)
Mono/Stereo. 0,3%/0,5%
Antenningang 75Ω obalanserad
AM
Perform Update (Network Setup, Setup-menyn) 34
PHONES -jack. 5
Power Mode (DC OUT, Setup-menyn) 34
Program Service (Radio Data System) 20
Program Type (Radio Data System) 20
R
Radio Data System (FM-radio) 20
Radio Data System information. 20
Radio Data System installing 20
Radio Text (Radio Data System) 20
REC (REC OUT)-jack. 10
Routeranslutting. 13
S
Sampling (Signal Info, Option-menyn) 30
SETUP -knapp 8
Setup-menyn 32
Signal Info (Option-menyn) 30
Signalinformation 30
Signalsandare for fjarrkontroll (fjarrkontroll) 8
SLEEP -knapp 16
Spotify 21
Status (Information, Setup-menyn) 33
TP (Traffic Program) 20
Traffic Program (FM-radio, Option-menyn) 20
Trafikinformation (Radio Data System) 20
TREBLE (Tonkontroll) 16
U
UPDATE (ADVANCED SETUP-menyn) 35
Update (Network Setup) 34
■Collegamento bi-wire
www.spotify.com/connect
| Network | SP A |
| # Address | 1 192 |
New Firm Please Update!
Nota
Firmware SPA NewFWHvailable
Network SPA
Perfor Update
(1 kHz, 0.7% THD, 4 Ω) 115 W
(1 kHz, 0.2% THD, 8 Ω) 110 W
Balance (menu Setup) 16, 34
Digital Media Controller (DMC) 33
DIMMER, taste (display anteriore) 6
Display informativo (display anteriore) 6
DISPLAY,tasto. 5,8,29
DMC Control (Network Setup, menuSetup). 33
DNS Server (Information, menuSetup) 33
DNS Server (IP Address, menuSetup) 33
NAS (Network Attached Storage), collegamento. 13
NAS, riproduzione di contenuti 22
Net Standby (Network Setup, menuSetup) 33
Network information. 33
Network Name (Network Setup, menuSetup) 34
Network Setup (menu Setup) 33
Network Update (Network Setup, menuSetup) 34
NewFwAvailable 36
0
OPTION,tasto 8
P
Radio Data System (radio FM) 20
Subnet Mask (IP Address, menuSetup) 33
T
Tasto IOME (PC/NAS). 23
Tasto IHOME (radio Internet) 25
Tasto NOW PLAYING (PC/NAS) 23
Tasto NOW PLAYING (radio Internet) 25
TP (Traffic Program) 20
Traffic Program (FM radio, menu Option) 20
Update (Network Setup) 34
V
VERSION (menu ADVANCED SETUP) 35
Version (Network Setup, menuSetup) 34
Versionedelfirmware,controllo 34,35
Volume trim (menu Option) 30
vTuner ID (menu Information, Setup) 33
Balance 34
Max Volume 34
Initial Volume. 34
DC OUT 34

Pilas (x2)
(AAA, R03, UM-4)
www.spotify.com/connect
New Firm Please Update!
Nota
Firmware SPA
NewFWAvailable
(dc 40 Hz a 20 kHz, 0.2% THD, 8 Ω)
[Modelos de EE. UU., Canadá, general, Corea, Australia, Reino Unido y Europa] 100 W + 100 W [Modelo de Asia] 85 W + 85 W
- Potencia dinamica por canal (IHF) (8/6/4/2)
125/150/165/180W
(1 kHz, 0.7% THD, 4 Ω) 115 W
- Potencia IEC [solo modelo de Europa]
(1 kHz, 0.2% THD, 8 Ω) 110 W
- Factor de amortiguation (SPEAKERS A)
1 kHz, 8 Ω. 120 o mas
- Potencia de salute efctiva maxima (JEITA)
(1 kHz, 10% THD, 8 Ω)
[Modelo general] 140 W o mas
[Modelo de Asia] 125 W o mas
Rudo residual (red IHF-A) 70 V
Balance (menu Setup) 16, 34
Clear Preset (radio FM/AM, menu Option) 19
Clock Time (Radio Data System) 20
Default Gateway (IP Address, menu Setup) 33
DHCP (IP Address, menu Setup) 33
Digital Media Controller (DMC) 33
DLNA 22
DMC Control (Network Setup, menu Setup) 33
DNS Server (Information, menu Setup) 33
DNS Server (IP Address, menu Setup) 33
Format (Signal Info, menu Option) 30
ID (Network Setup, menu Setup) 34
ID de vTuner (Information, menu Setup) 33
Information (Network Setup, menu Setup) 33
INIT (menu ADVANCED SETUP) 35
Initial Volume (menu Setup) 34
Input trim (menu Option) 30
IP Address (Information, menu Setup) 33
IP Address (Network Setup, menu Setup) 33
M
MAC Address (Information, menu Setup) 33
MAC Address (MAC Filter, menu Setup) 33
MAC Filter (Network Setup, menu Setup) 33
Mando a distancia
Net Standby (Network Setup, menu Setup) 33
Network Name (Network Setup, menu Setup) 34
Network Setup (menu Setup). 33
Network Update (Network Setup, menu Setup) 34
NewFwAvailable 36
P
Perform Update (Network Setup, menu Setup) 34
Pilas. 9
Power Mode (DC OUT, menu Setup) 34
Radio Data System (radio FM) 20
Radio Text (Radio Data System) 20
Sampling (Signal Info, menu Option) 30
Subnet Mask (IP Address, menu Setup) 33
T
TP (Traffic Program) 20
Traffic Program (radio FM, menu Option) 20
Update (Network Setup) 34
V
VERSION (menu ADVANCED SETUP) 35
Version (Network Setup, menu Setup). 34
www.spotify.com/connect
1 Stel "DHCP" in op "Off".
1 Selecteer "Network Name".

New Firm Please Update!
Opmerking
Firmware SPA NewFWHvailable
(1 kHz, 0.2% THD, 8 Ω) 110 W
Dempfactor (SPEAKERS A)
1 kHz, 8 Ω. 120 of meer
(1 kHz, 10% THD, 8 Ω)
[Algemeen model] 140 W ofmeer
Mono/stereo 0.3%/0.5%
HOME-tocts (pc/NAS) 23
Hoofdtelcoon 5
1
ID (Network Setup, Setup-menu) 34
IP Address (Network Setup, Setup-menu). 33
Perform Update (Network Setup, Setup-menu) 34
PHONES-aansluiting 5
Power Mode (DC OUT, Setup-menu) 34
Program Service (Radio Data System) 20
Program Type (Radio Data System) 20
R
Radio Data System (FM-radio) 20
Radio Data System afstemmen 20
Radio Data System-informatic 20
Radio Text (Radio Data System) 20
TP (Traffic Program) 20
Traffic Program (FM-radio, Option-menu) 20
TREBLE (toonregeling) 16
U
UPDATE (ADVANCED SETUP-menu) 35
Update (Network Setup) 34
V
Ppnilaraemblpe npHaJnxHOCTN
Y6eINTEcB,TOB KOMJIeKTIOCTaBKN H3eJINBAxOIT CJeIyIOIIne IpHHAnJIeKHOCTN.
Nybld
FM-aHTehHaAM-aHTehHa

Batapekx (x2) (AAA, R03, UM-4)
PnmuMeaHnO npJIbTe Dy n 6aTapeKkax
-Ⅲ6eraIte HONaJAHIN BOBb HIN pyrnx XnKocTe Ha IIyIbT IV.
-HepoHnTteIyJbTⅡY.
He xpaHHTe Hc octabJHrte HylbT YB TaKHX MecTx: -CBbICOKOBlaXHoCTbIO,HaIIpHMep,pAOM C BaHHo; -CBbICOKO TeMIIepaTyPoI,HaIIpHMep,pAOM C o6oPpeBaTeJIeM HIN IIeYbIO; -C OCHb Hn3KmM TcMIpePaTypaM; -C 60JIbHO KOHIeHTpaUncH IIbH.
BCTaBBTe 6aTapeKn B COOTBeTcTBH C MeTKaMH IIOJIpaHOCTH (+I-).
- Pn ymcnbnnn npabocero nnaa3oHa nyibra Ny 3amncntc Bcc 6aTapeKn.
- EcHn 6aTapeKn pa3paTcra, HeMeIeHHO H3BJIeKHTe HN H3 NylTa DY, YTO6bI H36ExaTb B3pbBa HIN yTeKN KNCIOBTi.
O6HApyKHB yTeKy KnIKoCTHa 6aTapeKkax, HMcMIIeHIO H36aBBTcB OT TaKHX 6aTapeck, HN B KOcM cIyac He IIpHKacacb K BblTEKIIIEmy BeIecTBy. EcIN BblTEKIIee BeIecTBO IOnaJIO Ha KOKy, B rJa3a HJIN pot, IpomOIte MeCTo IIOIIaHn BOIO HCMcIIeHIO 6paTHcB K BpaY. Ipcd YcTAHOBKOHOBBIX 6aTapeck TIIaTeJIbHO OOHCTHTc OTcK JIA 6aTapeek.
He HIOJIb3yIte cTapBie 6aTapeKIN BMeCTe C HOBIMN. 3TO MOKeT IprHBeCTN K COKpaIIeHHIO cPOKa CJyX6BI HOBBIX 6aTapeck HIN K IIpoTeKaHHIO cTapBX 6aTapeck.
He HIO3yTe pa3JINHbIe TINbI 6aTapeek OIOHBpeMeHHO (HaIIpHMEp, IJIIOYHbIe N MapraHcEBBie).BHIMATEJIbHO IIpoHTTE yKa3AHn Ha YIIaKOBKe, IIOCKoJIbKy pa3HbIe TINbI 6aTapeck MOryt HmETb OIOHAKOByIO fOpMy H cBET.
- Ipej yctaHOBKO HOBIX 6aTapeek HauHcTo IIpoTpIe OTeck Jnla 6aTapeek.
XpaHHe 6aTapeKn B He IocTyIHOM IJIa JeTeI MeCTe. BaTapeKN MOrYt 6bITb OIacHB, ecJH pe6eHOK IOIOxHT Hx B pot.
- EcHn 6aTapeKn cTAHOBRTc TApBM, paOchN JHaHa3OH IIyIbTa DY 3HaHTeJIbHO cOKpaIIaETc. Ecln 3TO IPOHxOJIT, 3AmEHnTe 6aTapeKn Ha HOBbE KaK MoXHO cKOpee.
- EcHn Bbl HnHpye He HcHIOJIb3OBA tB aIIapar T B TeueHne IIOIroro IepHOJa BpeMeHN, BblHe 6aTapeKN H3 aIIIapara. B IpOTNBOM cIyae, 6aTapeKn 6yIyT IOJIHOCTbIO pa3pXkeHb, YTO MOKeT IIpHBecTH K yTeUke JNIOKORO BEIeCTBa 6aTapeKn H IOBpeIHTb aIIIapar.
He Bb6paBbBAe 6aTapeKn BMEcTe c 6bTOBbMn OTXoAMH. YTHIN3pyTE Hx IIpaBbJIbHO B COOTBcTBBN C MecTHbIM 3aKOHOJaTeJIbCTBOM.
3JIeMeHTbI ynpaBHeHnI nФyHKcnn
IpeednnaHelb
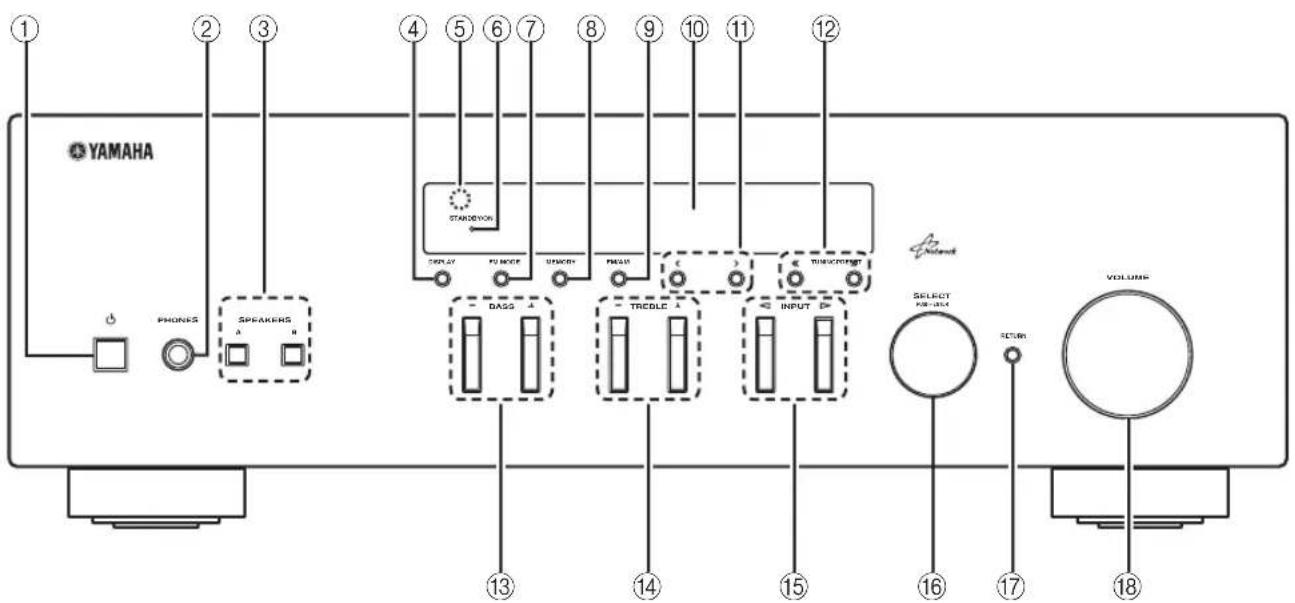
①Φ (NITaHne)
BkIOueHnE/BbIKJIOueHnE (IepexoJI B pexm OxuaHna) aIInapata.
PnmuMeaHne
BpeKHeOxHuaHnHaHHb anHapat HOTpe6JIeT MaIOE KOJIHueCTBO HeprHn IJIpyHema IIHpaKpaPacHBIX CnHAIIOB OT IIyIbTa NY.
②Γhe3do PHONES
BbBOJ 3Byka Ha HayHHNKn IJIa HINHBHyaJIbHOrIO npocjUHHBaHH.
③ SPEAKERS A/B
BKKIOUOHe HIN BbIKIOUeHHe KOMIIIEKTa IINHaMIKOB, IIIOKIIIOUeHHORO K pa3bEmaM SPEAKERS A n/IN SPEAKERS B Ha 3aIHe IaHeJN, KaXbIpa3 npn HaxKaTHN COOTBeTCTBYIOSe KHOIIKN.
④DISPLAY
Bb6op HhOpMaHn, oTo6paKaemn Ha JncPiie IpeJHe nnHeJn (cTp.29).
⑤Cechop Dv
PpHem HhpaKpaChbIX CnHaJIOB OT NyIbTa IINCTaHIOHOHOrO yIpaBJIeHHa.
6HdkaTop STANDBY/ON
HnHKaIgOcYIeCTBJIeTcraONcaHHbIM HIXe 06pa3OM:
JPKO ROPHT: IHTaHHe BKNIOUeHO
TycKIO rOpHT:peXHM OxHnDaHHN
⑦FM MODE
YcTaIOBHTe aBTOMaTHUeCKn cTepeofoHHueCKn peKHM JIN MOHOFOHueCKn peKHM IIpHema IIporpaMMbI B dHaia3OHe FM (ctp.17).
⑧MEMORY
CoxpaHeHHe TeKyuIe FM/AM-CTaHInn B KaueCTBe IpeJyctaHOBKn, ecJIN HcTOuHHKOM BXOJHOrO cHrHaJa BbI6paH TUNER (ctp.18).
FM/AM
IpekeHIOeHHMeKJy IHaIa3OHaMn FM n AM (ctp.17).
10 DnCJIeI nepeDHeI naneJN
OTo6paXeHHe HnΦopMaunn O pa6ooyem COCTOaHH JaHHoro aannapata.
1 PRESET
Bb6op IpeynOBoHEnHfM/AM-cTAnHH,ecJIN HcToHnKOM BxOHOrO cHHaJa Bb6paH TUNER (crp.19).
TUNING /
Bb6op TaCTObI NaCTPOkN,ccJIN B KaueCTBe HcTOuHnKa BxOIOHO CnHaJa Bb6paT TunER (ctp.17).
13BASS+/-
YBeJIHueHHe HJIN yMeHbIeHHe TeM6pa Hn3KHX TaCTOT.B IeHTpaJIbHOM IOJOxKeHHN OeCneYBaetc JIOCKaXapaKTePCHka (ctp.16).
14TREBLE + / -
YBeJIHueHHe HJIN yMeHbIIeHHe TeM6pa BbICOKHX
aCTOT.BIeHTpaJIbHOMIOJOKeHHN OeCIIeHuBaETcA
IIIOCKaXapaKTePnCTnKa (cTp.16).
15 INPUT
Bb6op HcToyHnKa BBOJa, KOtOpb Tpe6yeTc npocJyMaTb.
16 SELECT/ENTER (noBopothb nepekeLioaTeIb)
IIOBepHNTe IpeKJIIOyateJIb, YTO6bI BbI6paTb
YHCIOBOE 3HaueHHe HIN HaCTPOIKy, H HAKMHTe HAn
HcRO, YTO6bI IOITBepNTb BbI6Op.
⑦RETURN
Bo3BpaK IIpeIbIyIeMy COo6IeHHIO Ha IINcIIe IpeIeH NaneIe.
18PernyTop VOLUME
YBeJIuHeHne HIn yMeHbIeHHe yPOBnI rPOMKocTn 3ByKa.


①OKHO mHΦopMaζm
HcnoJIb3yecraIINOTOBpaKcHHaTeKyIIEO coCToHaHHaHnep,Ha3BaHHNHCToUHHKa BXoIHOro cHHaJa HHa3BaHHapeXHMa 3ByaHHa). MoKHO IIepeKIOuYaTB OTO6paKaemyo HHΦOpMaUNo,HaXHMa KHOIIky DISPLAY (ctp.2
②STEREO
3aropaeTc npn npneMe aannapatom ctepeoHueckoro paHnOCHHaJa FM.
③TUNED
3aropaetc npn nphe me aannapatom cnrha paanoctaHn FM/AM.
④MнДиКаTOрБI KОЛоHOK
HnHKaTOp "SP A" 3aropaeTc,ecnHa aKTHBnPOBaH BbIOJ cHnHaJa Ha KOJIOHKN SPEAKERS A,a HnHKaTOp "SP B" 3aropacTc,ecnHa aKTHBnPOBaH BbIOJ cHnHaJa Ha KOJIOHKN SPEAKERS B.
⑤MUTE
Mnraet BO Bpem nprJyueaaynochnaJa.
⑥SLEEP
3aropaetc npB BKIOHHeHHOM TaHMepe cHa.
#
MOxHO H3MeHHTb JRPKocT bIcIIe IpepeHHe IIaHeII HAkaTHem KhoIIK DIMMER Ha IIyIbTe IV (ctp.8).
3aHnaHeIb
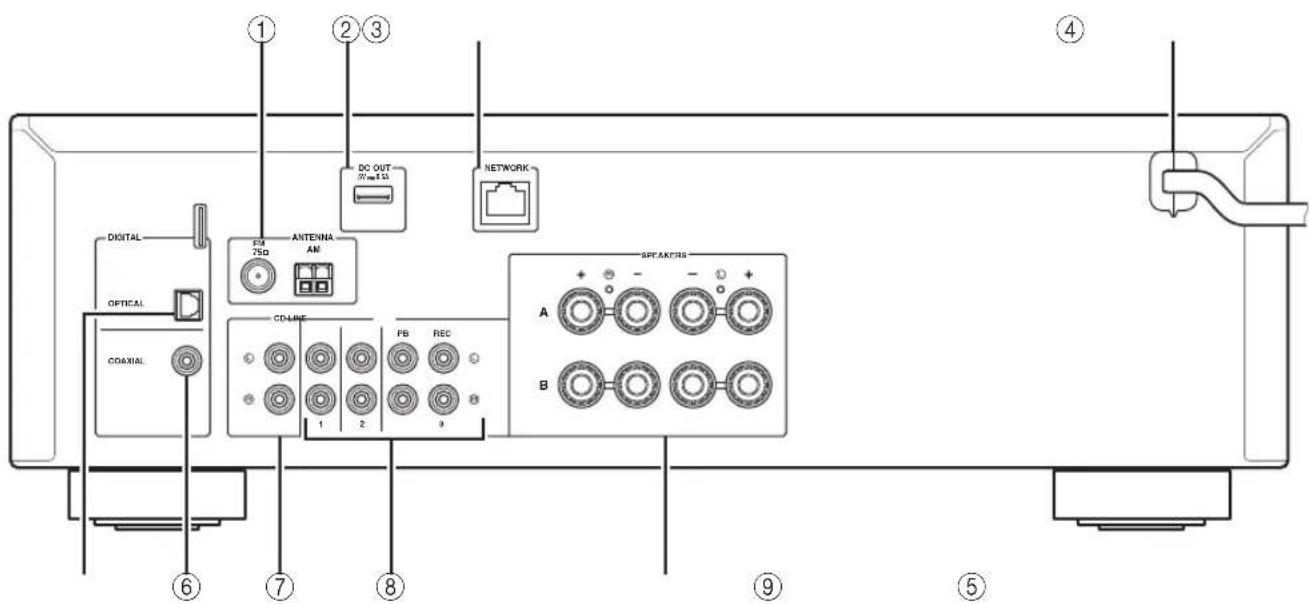
①Pa3beMBI ANTENNA
IIJIIOJIKIIOUeHnK aHTeHHaM FM n AM (cTp.12).
②ΓHe3do DC OUT
IJIa IIOaH HHTaHn Ha ayINO- H BIneooo6OpyIOBaHne YamaHa. IJIa IIOlyueHn IOIOJINHTCJIbHOH INHΦOpMaHH CM. INHCTpyKIIHO IO KcNJIyataHn AayINO-H BIneoo6OpyIOBaHn.
③ΓHe3do NETWORK
TUNING / BbI6op paJIOuACToTbI.
PRESET</> BbI6op IpeJyucTaHOBJeHHoJ cTaHINH.
⑦POP-UP MENU
3a KhoIIKa HeOCTyHa IaIaHOro aHapara.
⑧KnabniynynpabnemMeHIO
KJIaBnHKn Kypcopa BbI6op MeHIO HIN IapaMeTpa. ( / / /
ENTER IIOITBePKeHHeBbI6paHHoroIyHKTa.
RETURN Bo3BpaT K IIpeIbIyIeMy coCTOHHIO.
⑨SETUP
OTo6paKHeHMe MeHIO Setup (cTp.32).
10KhONIKVOLUME
PeryJInpOBKa rPOMKocTH.
OPTION
OTo6paXeHHMeHIO Option (cTp.30).
12DISPLAY
Ipeeknochne HOpmaun Ha dncnuee npenHn HaneJH.
③(nntaHne)
BKnIOueHHe/BbIKIOueHHe (IepcxOaBpeKHM OxuaHn) amnpaTa.
14 NOW PLAYING
OTo6paKeHHe IaHHbIX BocIIPOH3BcIeHHHa IIHCIIe IpeHHe IaHeH.
⑤HOME
OTo6paKeHHe MeHIO BepXHero ypoBHa Ha HcIIe e HepeHHe HaeJIH.
MUTE
PnHJyIeHHe BbIOJIMoro 3Byka.
⑦KnaBmBn BocnpOn3BeDeHn
BocpoH3BeHe He ceTeBbIX HcToHHKOB HpyTHe OepaHH C HmH.
18SHUFFLE
Bb60pexHMAcIyuaHOroBOcnPOn3BeHeHn.
19REPEAT
Bb6oppeKHaIOBTopa.
IcnoB3OBaHne npbTob dy
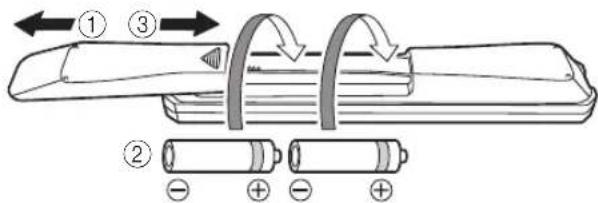
YcTaHOBka 6aTapeek
PnmeuHna
EcIIaJIbHOCTb DeIcTBHn IyJIbTa IIcTcAHIOHHORO yIpaJIeHN COKpAHTJIacB,3aMeHHrCe 06e 6aTapeKKn
- Ipeen yctaHOBKOHOBBIX 6aTapeek IIpoTpHTe OTJeHHe Jn8 6aTapccK.
Pa6oyn dnaana3OH
IyIbT Iy Iepeiaet HaupaBJIeHHbI INHΦpaKpaChbI JIyU.
O63aTeJIbHO HaIpaBJIaTe IyJIbT YI npMo Ha ceHCOP INCTaHIOHNOYIpaBJeHHa, pacNoJoxeHHbI Ha IpeJHe IaHeJIH daHHOro aIInapata.
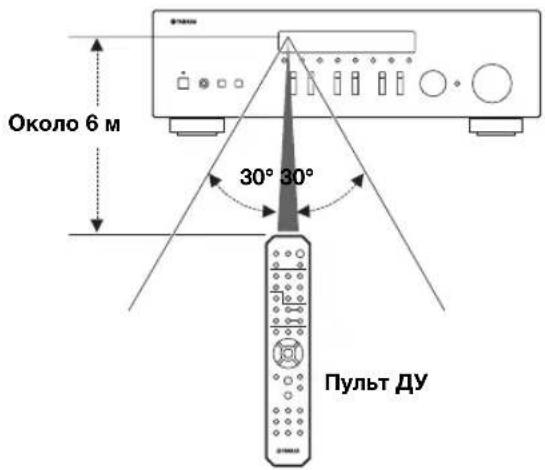
Повлоченя
IopKJIIOueHne dHAMNKOB IN KOMNHOHTOB NCTOCHNKOB
BHIMMAHVE
HeIOJKIOUaTe 3OT aIIIpaT HIN IpyrHE KOMIOHeHTbI K HCTOuHKy IJIaBHOrO IITaHH, IOKa He 6yJeT 3ABCPIIcHO IOIKJIOUeCHNE BCCX KOMIOHcHTOB.
BceIOIKJIIOUeHnIIOJXHbI6bITb BbIIIOJIHeHbI IpaBbIbHO: L (JIcBbI) K L, R (IpaBbI) K R, “+” K “+” n “-” K “-” EcII INOJKIIOUeHnIBbIOJIHeHbI HeIIpaBbIbHO, H3 IIINHAMKOB He 6yIET CJIbIIIEH 3ByK, a ecIIH He CO6JIIOEHa IIIOJIaPHOCTb IIINAMHKOB, 3ByK 6yIET HecCTECCTBEHHbIM C HeIOCTaTOIHbIM KOJIINcCTBOM HIXHX YactOT. CM. HHCPTpyKIIIO IO 9KCIJIYAtaIIHN KaKJIOrO H3 KOMIOHIEHTOB.
- H36eAraTe coPnKOCOBHeHr OOrHeHHbIX qaTeH Ka6eJIe JINHaMKNOB Ipyr C pyrrom HJIN C MetaJJINYeCKHM NactHMN 3TOrO aIIIapapa. B IIPOTNBHom cIyae eTO MoKeT CTaTB IIpUHNHOIOBpeKHeHr aIIIapapa H/INJIN DnHaMKOB.
PoiKJIouHHe 3aIINcBIBaIOxuYcTpoIcTB
IIIOIIOKIIIOUeHHe 3aHHcBbAIOHx ayHOuyCTPOH HIOJIb3yOTcRrHE3JlA LINE 3 (REC). Hepe3 3TO rHe3JIO BbIBOJrTcHrHaJIbI, BbIbpaHHBe B KaTeCTBe BXoJIHIX c COAXIAL, OPTICAL, LINE 1-2, TUNER n CD).
PnmeuHna
- IcnoJIb3yIte rHe3a LINE 3 (REC) ToJIbKO JIA IOIKJIOUeHn 3aIIINCbIBaHOHx YcTPOCTB.
- EcIn B KauceTBC HcToOHKa BXoHOrO cHraJa BbI6paH LINE 3, BbIXoHoi ayHocHraJ uepe3 rHe3a LINE 3 (REC) 6yTe TnpHryWeH.
IopKJIouyeHne KOJOhok
IOnkHueHne Ka6eJen KOJHOK
Ka6eJIN KOJIOHOK COCTOHT H3 IByx IPOBOJHNKOB. OJINN IOJKNJIOUacTcK OTpHuaTeJIbHOMy (-) pa3beMy aIAPAATA N KOJIOHKn, a npYrO - K IOJOXHTeJIbHOMy (+).EcJIN IPOBOJa HMeOT pa3HbI QBET, YTO6blHX HeJIb38 6blIO IpePHyTaTB, IOJKJIOUHTe UepHbI INPOBOJ K OTpHuaTeJIbHOMy pa3beMy, a npYrO IIPOBOJ - K IOJOXHTeJIbHOMy.
① CHHMMTe Ipi6IIN3TEcIbHO 10 MM H3OJIINH Ha KOHJax Ka6cJIa KOJOHKn HnJaexKHO CKpyTHe OROJIeHHbIe YAcTHn IPOBOIOB.
② OTKpyTHe pa3bEm Ha KOJOHKe.
③BcTaBbTe OROJIeHIIbe IPOBOJa Ka6eJIa KOJIOHN B IIeJIb Ha 6OKOBONCTOPOHe pa3IbMa (IpaBOB BcpxHcH HIN JcBOH HIXKHC).
④ 3aTAAHITpepa3bcM.
■Поdkлоченecnomoьkuбеля Biwire
IIpnIOKJIIOUeHHN C IIMOIbIO Ka6eJIa Bi-wire 3Byk KaHaJa Hn3KOuACTOTHO rINHAMKa OTJeJIeH OT coeIHHeHHOrO KaHaJa cpeIHeuactOTHO n BBICOKOuACTOTHO dINHAMKOB. IIHNAMKH, IIOJIepKNaBAIOHne IOIKJIIOUeHHe C IIMOUbIO Ka6eJIa Bi-wire, OCHAIEHbI YcTBIPbMpa3bcMaMn C KJIeMMaMH. C IIMOIbIO 3THX JByx Ha6OpOB pa3bcMOB 3BYK IIINAMHKOB MOXHO BbIBODHT b IO JBYM He3aBHCMBIM KaHaJAm. C IIMOIbIO 3THX coeIHHeHH NINAMHK cpeIHnx H BbICOKHX AcCTOT MOXHO IIOKJIIOUHTb K OJHOMy Ha6Opy pa3bcMOB, a INHAMK Hn3KNX YaCTOT-K JpyROMy Ha6Opy pa3bcMOB.

Anhhniannapat
AHaJIOrHnIbIM O6pa3OM IIOKIIIOuHTe Ka6eJIN HnHaMHKOB K npYrOmy Ha6opy pa3'beMOB.
PnmuMeaHne
PnIOJKIOOeHHN C HOMOIOIO KabeJIa Bi-wire CHIMHTe IepembIKH NIN Ka6JIIN DHHAMKa. IIINIOJYeHHN IOIOJIHNTEJIbHOI HOpMaIH CM. HICTpyKIOIO NO 9KCHJIyATaIH N KOJOHOK.
中
IIHIOJIb3OBAHHIIOKIIIOUeHHIc HOMOIOB Ka6JIa Biwire HAxMHTe KHOIIKN SPEAKERS A IN SPEAKERS B HaIpeepHe IaHeIIN IIy TaK, TTO6bl 3aRopeHcBIIHKaTOPbI SP A N B Ha IINCHIEe IpepeHn.
SPEAKERS A/B
Повлочене aHTeHH dnaana30Ha FM n AM
AHTeHHbI IJII IIpHema BeIIaHnB B DnHaIa3OHe FM H AM BXoJrT B KOMIIIEKT IOCTaBKn JaHHoro aIIIapata. B IJIOM 3TN aHTeHHbI OecIeYBaIOT IIpHem CnHaJa IOCTaTOHcNJIbI. IOnKJIIOHTe KaXJyIO N3 aHTeHH K COOTBeTCTByIOIeMy pa3bemy.
PnmeaHne
IIpH IIOXOM KaueCTBe IIpHeMa ycTaHOBHTe HApYxHyO aHTeHHy. IJIIOIpyEHHa 60Jee IOIpo6HO HΦopMaHn O BHeHHx aHTeHHax o6paTHTeCb K 6JIHXaIHIeMy aBTOPH3HPOBaHHomy IJIePy YamaHa IIN B cepBcHbI HeHTp.
C6opKa nocTabJrEmoAM-aHTehHbI
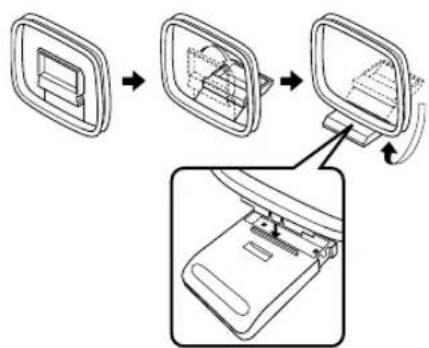
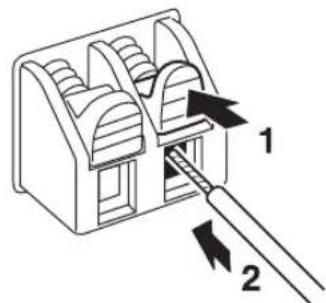
IpoKJIoueHne npoBOJOB AM-aHTehHbI
IopKIOUeHne K cETn
Bb mokeTe IPOcJIyUHbTaB Ha aIIIapate INHTepHeT-paIOcTaHUn HJIM My3bKaJIbHbIe faiJIb, KOTOpbIe XpaHrTcHa MeJHa-cepBepax, TaKHX KaK II cTeBOE ycTpoiCTBO XpaHcHnJaHHbIX (NAS). IJIra coeIHHeHnMa MapIpyTHaTopa I daHHoro aIIIapaTa HCIOJIb3yIte HMeIOIIHcR B IpoJaxKe cTeBOI Ka6JIb STP (CAT-5 IIIN 6OJIee ckopocTHoN Ka6JIb IprMOrO IOIKJIIOueHn).
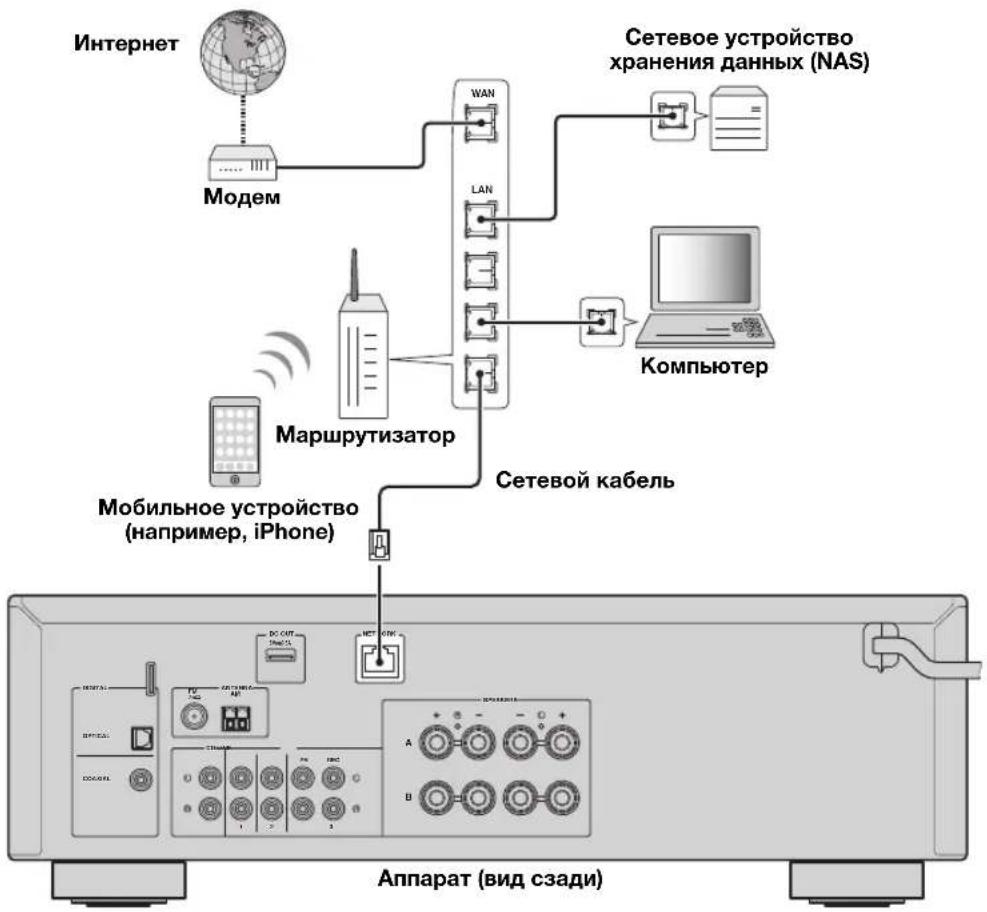
#
- IIpn HcIOJIb3OBAHHm MapIpyTH3aTopa, HOIeepKHaIOIeTo fHKIIIO DHCP, cTeCbIe IapaMeTpBI (IP-aIpec H T. I.) 6yUyt Ha3HaueHbI aIIIapATy ABTOMaTHuCCKN, T. C. IcO6XoIMMoCTn HAcTpaHBaTb ceTeBbIE IapaMeTpBI HeT. EclN BaIII MApIpyTH3aTOp He IIOIeepKHaBcT fHKIIIO DHCP HIN BbIXOTHe HAcTpOHTb CeTeBbIE IapaMeTpBI BpyHyIO, BblIOJHHTe HAcTpoIKy cCTH (cTp.33).
BbMoKeTe IIPOBePHTb,IIpaABJIbHO JIN Ha3HaueHbI ycTpoiCTBy ceTeBHe IapameTpbl (HaipnMep, IP-aIpec), B NyHKTe "Information" (cTp.33) McHIO "Setup".
PnmuMeaHna
HeKOTOpBIE IporpaMMbI 3aHHTbI daHHbIX, yCTaHOBJeHHbIe Ha PIK, HIN HAcTPOKn 6paHIMaypa ceTeBBIX ycTpoNCB MORY3a6IOKNpOBaTB IOCTYII daHHOR aIIIapata K cTeBBIM ycTpoNCBaM HIN INHTepHety. B TaKHX CUYaAX bHIOJIHNITE HaJIiExKaIyU O HAcTPOKn IporpaMM 3aHHTbI daHHbIX HIN 6paHIMaypa.
KaKbHn3 cepBepOB noJxhen HaxoHTbcB TOn JKe NOcETn,TOHcAm anHaapaT.
-ⅡHNCIOJIb3OBAHHaHHoCJyK6bIcpe3 HHTepHer HAcTOrTeJbHO peKOMeHnyem HcIOJIb3OBaTb HHPOKIOIOCHIOc COcHNCHHC.
Pn HacrpoKe 3NaueHn TaMepa CnIeero peKHa mNkAToP SLEEP mHaT.

IocJIe 3aBepHHeHn HAcTpoHKn TaHMePa 3aRopHTc HnDnKAtOp SLEEP Ha JncJIiEc IpeDHeH nHaHeH.
#
-ПЯ OTKJOUChHn TaHMePa CIIIeRo peXHMa BbI6epHTe 3HaJeHHe "Sleep Off".
- HactpoKa TaHMepa CnHcero peKHa TaKaKe MoKcET 6bITb OTMeHeHa C NOMOIBbKO HONK (NHTaHHe) Ha IIyJIbTe IY, YTO6bI IePCBeCTn JaHHoc yCTPOCTBO B peKm OxKnJaHH.
Прослuyшваиме FM/AM-разно
HacrtpoiKa FM/AM-paNo
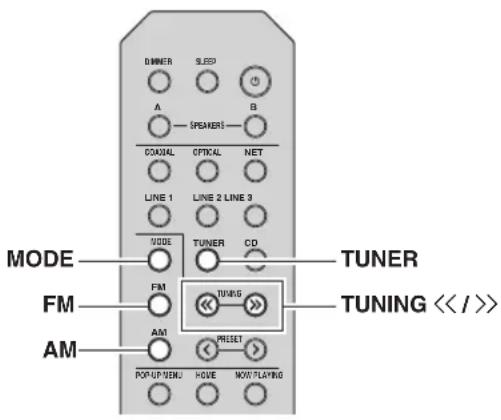
1 HaxmTe TUNER, yTo6bI BbI6paTb "TUNER" B KaueCTBe NCTOCHNka BXoDHoro CnRHaJa.
2 HaxmTe KhoNky FM nIy AM dIy Bbl6opa dna30Ha npnema (FM nIy AM).
3 HaxmTe udepXuBaTe KhoNk TUNING />>6oJee 1 cekyHdbI, yTo6bI HaaTb HacTpoiKy.
IIIAHACTPOKHNa6OJIe BbICOKYIO YAcTOTy HauKMITE KHOIIKy>>.
IIIAHACTPOKHNa6OJIee Hn3KYIO YAcTOTy HauKMITE KHOIIKy<<.
YacToTa IIpHHMaemoi paHocTaHnIIN OTo6paKaetcHa IInCIIeepedHeIaHeJI. Bo BpeMa BeIaIIHn3aTOpITcI HIIKATOp "TUNED" Ha IInCIIeepedHe IaHeJI.Bo BpeMa IprHema cTepeOBeUaHn3 aTOpITcI HIIKATOp "STEREO" Ha IInCIIeepedHeIaHeJI.

EcHn H3-3a CJIa6OCTn CNHaJIa HyKHOI cTaNIIHN ABTOMATNueckn IIOCK He IpeKpaIaecTc, HCIOJIb3yHTe CJIeNyIOUHe KJIaBHIIN JIA NaCTPOKN YAcTOTbl.
中
EcHINIpHem CnRHaJa FM-paIIIOCTaHIHH HeCtBaIIHe, MOKHOIOBbICHTb KaueCTBO 3ByaHH, IpeKJIIOUHBIHHcHb HA MOHOOHIECKH CNrHaJI.
UnyucheHne npHemaB dnaana3oHe FM
YTO6bI yJyUHINTb KaueCTBO IIpHEMa IIpN cJIa6OM CHTHaJIe paJIOCTaHIIN H IILOXOM KaueCTBe 3BYKa YcTaHOBHTe MOHOFOHNUECKn peKHM IIpHEMa IIporpaMMbI B dHaIIa3OHe FM.
1 HaXmTe HeckoIbko pa3 KnaBnUy MODE, TTo6bl Bbl6paTb 3HaueHne "Stereo" (aBTOMaTHueCKn CTepeofoHNueCKn peXm) nIi 3HaueHne "Mono" (MOHOFOHueCKn peXm), npn HacTpOKe daHHoro annapaTa Ha npnem FM- padnoctaHcnn.
EcIN BbI6paH peXHM Mono, BeIIaHHe FMpaIHOCTaIHIN 6yIeT BOCIPON3BOINTBcR B MOHOPOHNueCKOM peXHMe.
PnmeuHne
Pn npocJyuHbAHn paHocTaHnB CtepeoHueckom peKHe Ha IpeJIHe IIaHeJI 3aROpHTcraHHNKaTOp STERO.
ABTOMATNUeCKa HAcTPOKa npedyCTaHOBOK (ToJbKO dJa CTaHcN B Dnana3OHe FM)
C IIOMOUbIO cyHKuIN aBTOMaTHueCKo IIpeyuctaHOBKn cTAHmIOKMOHNO aBTOMaTHueCKn COXpaHrTb FM-CTAHmN B CnHcKe IpeYCTaHOBOK. C IIOMOUbIO 3TOI cyHKmI dAHHbI aIIIapAT aBTOMaTHueCKn HAcTpaHbAcTcRHa FMcTaHmN cHaHoJIe CNJbHbIM cHrHaIOM n COxpaHraET cIHcOK H3 40 TaHX cTAHm. 3aTeM JIO6yIO IIpeYCTaHOBJEHNIO CTAHmIO MOXHO C JIErKocTbIO BB3BaTb, BB6pab Homep IIpeYCTaHOBKn.
PpmeuHn
EcnHnPncBOHTbCTAHINHOMepIpeyctAHOBKN, KOtOpbIyKe IpnCBOeHpyrOcTAHINN,3Ta cTAHINN 6yTe Tpe3aHcHaHOBOH.
EcnHnCnHaJIcoxpaHcEmoTcAHHnCJIa6,IIHPO6yHTe coXpaHHTb cB CINHCKe IpcDyctAHOBOK BpyHUYO.
#
FM-paHocTaHHHH,3aHeceHHbIe B cHcOK IpeIyCTaHOBJEHHbIX BABTOMaTHIEcKOM pexHMe,6yDyt BOCIIPOH3BOIDTbcraB CTCpcOFOHHueckOM pcXHMc.
ToIbko paHIOCTaHH, IIOJIePKeHBAIOUHe BCIIaHHe B Radio Data System, aBtOMaTHuecKn coXpaHnOTcN IIpH HIOJIb3ObaHH FyHKIIHN Auto Preset.

1 HaXmTe TUNER, YTo6bI Bbl6paTb "TUNER" B KaueCTBe NcTOHHKa BXoHOrO CNrHaJa.
2 HaxmTe KhoNky OPTION Ha nyIbTe Dy. IIOBHTcMeHIO "Option" (ctp.30).
3 C NOMOUIKHOHOK △/V BbIbepnTe NyHKT "Auto Preset",a 3aTe m HaxMnTe KhoNky ENTER.

AIIIapat NaHcT cKaHHPOBaHHe FM-ⅡHaIIa3OHa uepe3 5 cekyH, HauHHa c camoro Hn3KOro 3NaueHnI JnaIa3OHa.
YTo6bHaaTaBcKaHnPoBaHne cpa3y, yIepKbHaTe KJIaBuHsY ENTER.

ⅡHaJaJa cKaHnPoBaHH MoKHO yKa3aTb HOMep IepBOI npCyCTaHOBKN, KOTOPYIO CJIeYcET HcIOJB3OBaTb, C IIOMOIIbIO KHOIOK PRESET /> HIN KJIaBIII Kypcopa ( /) Ha IIyJIbTe IV.
- ITMCHbICaHHPOBaHnHaXMMTe KHOIIky FM,AM HIN RETURN.

IocJIe 3aBepHHeHHcKaHnPoBaHHHa 3KpaHe OTO6pa3HTcHnDnKaTOp "FINISH", a 3aTeM INCIIJIe BepHeTcB HxCoDnOe COCTOHHne.
Pунай Настpoиka пpeдуновok
BpyHyIO MOxHIO coXpaHTb IO 40 FM/AM-CTaHIN (BceTo 40).3aTeM JIO6yIO IpeIycTaHOBJeHHyIO CTaHINIO MOxHO C JeTKOCtBIO BbI3BaTb, BBI6paB HOMep IpeIycTaHOBKN.
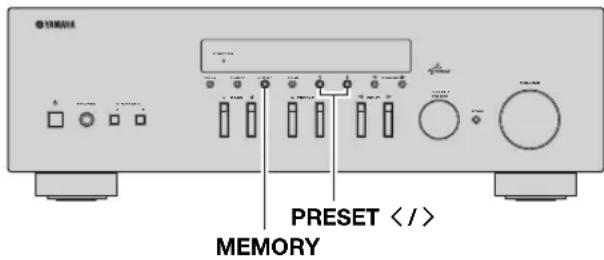
CoxpaheHne paIIOCTaHcIMn BpyHyIO
BbIbepeTe cTaHnIO BpyHyIO n coXpaHrTe ee IIOI HOMePOM IIpeDyCTaHOBKn.
1 Cnedynte nHctpyKzmaM B pa3dene "HaCtpoNka FM/AM-paDnO" (cTp.17),uTo6bI HacTpOHTb JKeJaemyo paDnOCTaHcNIO.
2 ydepxmbaTe KhONky MEMORY 6oJee 2 cekyHd.
IIpi IIepBOM CoXpaHeHH BbI6paHHa paHIOCTaHnna 6yTe COxpaHeHa IOD HOMePOM IIpeYCTaHOBKn 01. IocJIe 3TOrO KaKJIAra BbI6paHHa paHIOCTaHnna 6yTe COxpaHeHa IIOI CJIeYIOIHIM He3AHITbIM (HEHCIOJB3yEMbIM) HOMePOM IIpeYCTaHOBKn, KOTOpBI cJIeYET 3a IocJIeIHIM COxpaHeHHbIM HOMePOM.

#
YTO6bI BbI6paTb HOMep IpeyctaHOBKn JIN COxpaHeHH, HAKMITE KHOIIky MEMORY OJHH pa3 IIOcJIe HAcTpOHN HaKeJaemyo paAnocTaHIO, HAKMITE KHOIIky PRESET</>, YTO6bI BbI6paTb HOMep IpeyctaHOBKn, a 3aTeM CHOBA HAKMITE KHOIIky MEMORY.

3haehme "Empty" (he nclonb3yctc), m6o BblonHreTc coxpaehme qactotbl
Bb13OB npedyctaHOBlenHO CTAHCUH
MOxHOBbI3bBAbCTaHnH3 CnNcKa IpeJyctaHOBOK, COCTaBJIEHHORO BpyHyIO HIN aBTOMaTHUeCKN.
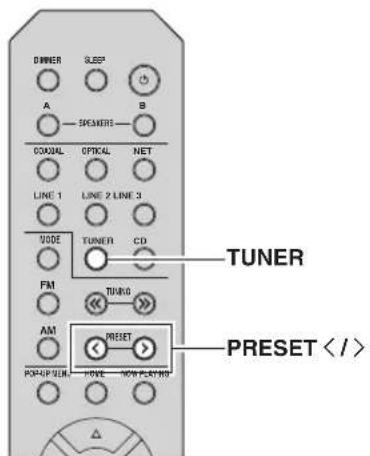
1 HaxmTe TUNER, YTo6bI Bbl6paTb "TUNER" B KaYeCTBe NCTOCHNkA BXoHOrO CnRHaJa.
2 HaxmTe KhoNky PREsET / ,YTo6bI Bbl6paTb HOMep npedyctaHOBKn.
中
Homepa npyeTcTaHOBOK, JIJI KOTOpbIX yKe coXpaHeHbI cTaHHH, 6yNyT nponyHbI.
HaJnHJIe oTo6paKaAetc coo6IeHNe "No Presets",ccn coxpaHeHHbIe cTaHINn OTCyTCTBYOT.
YdaJIeHne CTAHcHn n3 CnNcKa npedyCTaHOBOK
YdaJIeHHe paIIOCTaHIuI, COxpaHeHHbIX IOI HOMcpaMn IpeJyctaHOBOK.
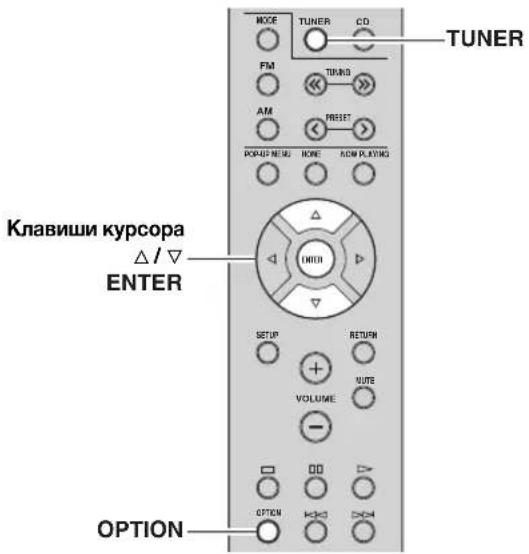
1 HaXMMTe TUNER, YTO6bI Bbl6paTb "TUNER" B KaueCTBe NCTOHHKa BXoDHoro CNrHaJa.
2 HaXMMTe KHonKy OPTION.
3 C NOMOusbko KJIaBmU Kypcopa BbI6epnte Clear Preset" n Haxmnte ENTER.

4 C nOMoIbIO KJIaBnI Kypcopa ( /) Bbl6epnte npedyctaHOBneHHyo cTaHcuIO, KOtOpyO cnedyet ydaJIITb, HaxMnte KhONky ENTER.

PpeyctaHOBnEHnA cTAHn, KOTOpYIO CNeJeYeT ydaNTb
Ecnn npedyctaHOBHeHHa cTAHn ydaIeHa, oTo6paKaetaCra "Cleared" HOMep cJeNyOuEINIOJIb3yOuIeCRA npedyCTaHOBKn.

5 NOBTOPaTe 4, noka BCE Heo6xOIMbI npedyCTaHOBJIeHbI cTaHcN He 6ydt ydaJIeHbI.
6ДЯ BbIXOda n3 MeHIO HaxMnTe "Option" OPTION.
Hactpoika Radio Data System
Radio Data System - ΝTO снстema пеетачп даньх, ИПОЛьзуема FM-staHIMM MHOгнх CTpaH. AПИAPAT MOжET ПОЛУЧАТ pa3JIINYHBIE TПБIДANHBIX Radio Data System, NaPpIMeP "Program Service", "Program Type," "Radio Text"и"Clock Time", ecIn erO hAcTpoNTb Ha cTAHIIIO, TrpaHcJIpyIoIyIO Radio Data System.
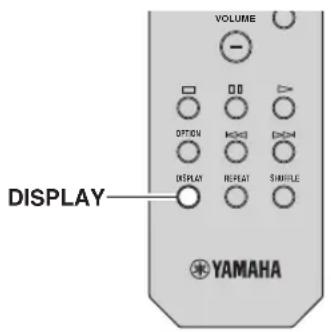
Отобрахенье Информаць Radio Data System
1 HacTpoITeCb Ha HyxHyIO cTaHcNIO, TpaHCnpyUOyIO Radio Data System.
PekomeHnyetcHIOIb3ObaTb "Auto Preset" HIAHCTPOKN cTaHnI, TpaHcHpyoIInx Radio Data System (ctp.18).
2 HaxMMTe KHonky DISPLAY.
Pn KaKdOM HaKaTHN 3ToH KHOIIKN OTOppaXacMbI 3JIeMeHT H3MeHReTcR.

IpiHnH3nteJIbHoYepe3 3 cekyHnbl OTo6paKaTcra COOTBeTCTByIOuAa HhOpMaunn IJr OTo6paKaemOrO 9JIeMeHTa.

| Program Service H | a3BaHHe IIpoIgpaMMHoi cIyJbBi |
| Program Type THiI | TeKyuIe IIpoIgpaMMbI |
| Radio Text ΙnΦopMaIIII O TeKyuIe IIpoIgpaMMc | |
| Clock Time TcKyuIe C BpeMia | |
| Frequency Chactota | |
PpmeaHne
Co06Hn“Program Service”,“Program Type”,“Radio Text” n“Clock Time" He oTo6paKaIOTc, ccln paHocraHnHe noIIepKHaET cnKy6y Radio Data System.
■AByTOMaTnueckn npneM nHΦopMaun O DOpOxHOM dBXKeHN
EcJIIN B KaueCTBe HcToUHHKa BXOJHOrO CnHHaJa BbI6paH BapHaHT “TUNER”, aIIIapaT aBtOMaTHueCKN IIpHHMaet HOpMaunIO O dOpOXHM IBNKHeHH.
YTO6bI BKIOHHTb 3Ty cyHKUHO, BBIOJIHAHTe OINcAHHbIE HIXe IeHCTBnI JIA HaCTPOIKn CTaHIHN, TpaHCJNpyIOIIe INHOpMaIIHO O IDOPOXHOM JBHXKeHHN.
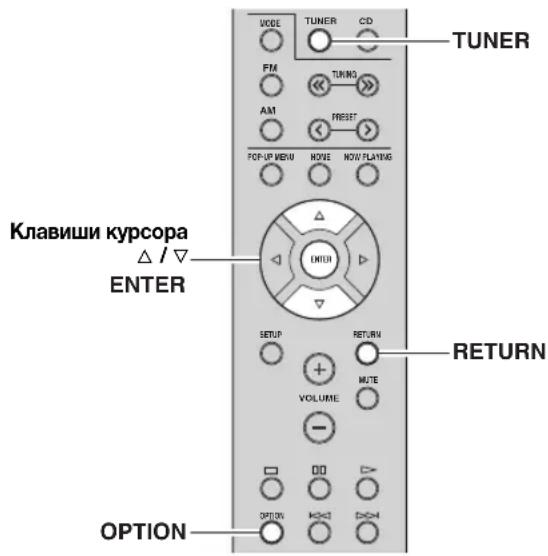
1 EcInB KaueCTBe NcToUHnKa BXoHOrO cHnHaBa BbI6paH BapnaHT "TUNER", HaXmTe OPTION.
2 C nOMOuI KJIaBnI Kypcopa Bbl6epnte "TrafficProgram" n HaxMTe ENTER.
IIOHK CTaHIN, TpaHCJINpyIOUe HNΦOpMaIIH O IDOPOXHOM JBHXKeHH HaHHeTcA Hepe3 5 ceKHyI. YTO6bI HAaTaB IIONCK HEmEJIeHHO, eIe pa3 HaxMHTe KHOINKy ENTER.

TTO6bI BbHIOHHb HONCK BBcpx/BHN3 OT TckyHcN TaCToTBi, HaxMnTe KJIaBHHN Kypcopa ( /) ,KOrTa oTo6paXacTcRA "READY".
-ДЯ OTMeHbI ПОнсKa HaxMHTe KHOIIKy RETURN.
- TcKCT B CkO6KaX O60HaayeT HnDnKaunIO Ha nCnJIee IIpeJHeIIaHeJIN.
IIO OKOHuaHH H3MepeHH npHmepHO Ha 3 ceKyHbI IOBHTcJIeJyIOaA HHnKaHna.

PnmeaHne
Coo6HHe "TP Not Found" oTo6paKaaeTcI pHMePHO B TeYHe 3 ckyH, ecIIN CTaHHN, TpaHCJHyOIIHe HOpMaIIO O IOpOKHOM DBXKeHH, He HaJIeHbI.
Исповаиме сервica Spotify
CepBnC Spoty o6ccneuHbAcT MTHOBeHHbI IOCTyK MNIJIHOHa IeCEH Ha BAIIHX MOHJIbHBIX yCTPOIcTBax.
PiocTo HaxMHTe KhoIKy BOCINpOHN3BeJeHn IA JIOTOKOBOI IpeJaYN JIO6bIX JaHHbIX.
FyHKnA Spotify Connect IO3BOJAE T BbOpaTb My3bIKy B IIpnJOxKeHHn Spotify n IpocnyHbAtb ee c
HOMoUb IOMAHIero KHNOTeaTpA Yamaha.
IHΦopMaIIO O 30hAx o6cIyXBaHHn cm. Ha caITe Spotify.com.
1 PoiKJIIOUeHHe yCTpoIcTBA K DoMaUHei cTeN Wi-Fi.
IIOJKJIOHHTe annapaT mMO6NJbHOc yCTPOINCTBO HIN IJIaHIWeT K JOMaIIHeN cETn Wi-Fi, KaK IOKa3AHO Ha pncyIke HnKe. Bce ycTPOINCTBa IOJXHbI 6bITb IIOJKIIOUeHbIK OJHOH TOH Ke cETn.
IopKnloueHne K ceTu (npuMep)
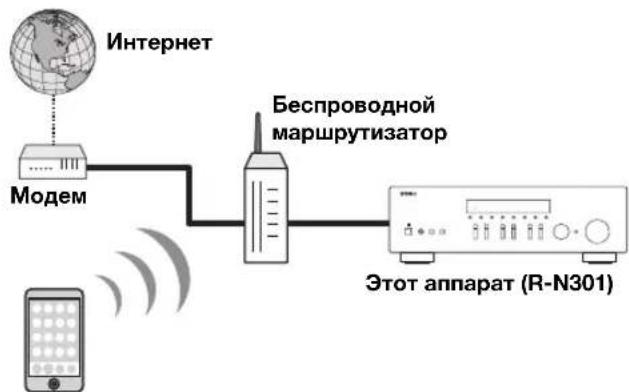
Mo6nIbHoe ycTpoiCtBO nnn nnaHwet*
*Ipnnojokenni iOS/AndroidTM 6dyT doerynnnc a cabycTa 2014 roda. Iopnpbnyu Hnnpomauu no cm. na caire Spotify.com
中
HIOJIb3OBaHHIaHHoIyHKIIH anHaPaT H MOHbHOe yCTPOIcTBO IINI IIAHHeT JOIKHbI 6bITb IOIKIOCHbIK cETN IVTCpHcT. POJpO6Hcc O IOIKIOJeHHx HAcTPOIkaX cETn CM. B PyKOBIOCTBE IO KCIJIyataHH.
www.spotify.com/connect
3 Bocnpo3BeDHe cOepeKMMoro cepBnca Spotify.
3aIyCTHTe IpHJIOXeHHe SpOtfy Ha MObHOM yCTPOIcTBe HIN IIaHIteTe, BOIITe B IprHIOXeHHe SpOtfy II 3aIyCTHTe BOCIPoH3BeJIeHHe KOMIO3HIIH.
① HaKMHTeHaIIaHeJIb“PiOHHpIbBaETc”,HTo6bIOTo6pa3HTbIOIOJIHHTeJIbHbIe 3JEMeHTbIyIppaJIeHHN,HaKMHTeHa3HaQOKINHAMHKa.
② Bb6epHrte aHnapar (ceTeBOe Hmra annapata) BauecTBe yctpoHCTBa Dn BBIOda 3Byka.
PpIIOxKeHne SpOty (npIMep)

中
HaIINJIe IepEnHe IIaHeII INOBHTcKpaH BOCINPOHNBCENH.
- PeryJHPOBaTb TpOMKocTB BOCIIpON3BeJeHnA aIIIapaTa MoKHO UpeC3 IIpHIOXeHHc Spotify.
PpeynpeKdHne
IIpn HcnoIb3oBAHH 3JeMeHTOB ynpaBHeHH
HpIOKeHH Spoty IpapeYIpNPOBKN rPOMKCTN
rPOMKCTb BOCIPON3BeJHeHH MoKeT OKa3aTbcN
HcoXHaHHO BbICOKOH.3TO MOKeT IIpHBecTH K
IOBpeXJIeHHo aIIapapaT HIN KOJIHOK.EcIH rPOMKCTb
BHe3aIIHO BO3pAcTeT BO BpEMBaOBCipON3BeJHeHH,
HEMeJIeHHO OCTaHOBBITE BOCIPON3BeJHeHb
IIpHIOKeHHSpotify.

Spotify
Spotify and Spotify are the most popular music streaming services in the UK. They offer a variety of mobile applications, such as YouTube, iTunes, and Amazon.
Bocnpon3BedeHne My3bIKn Ha MeDna-cepBepax (PK/NAS)
C IOMOIIbIO aIINapata MOXHO BOCPON3BOJNTb MY3bIKaJIbHbIE aJIbHa KOMIbIOTpe HIN DLNA-COBMECTHMOM CeTEBOM XpaHHJIHIIe JaHHbIX.
PnmuMeaHna
-IIJIHIOJIb3OBAHHN 3TOI yHKINH DAHHB I aIIIapAT H IIK IOJIXHb 6bITb IOIKIIOyeHb K OIHOMy H TOMy JKe MapIpyTH3aTOpY (cTp.13). BbMOKTe IIPOBepHTb, IIpaBHIO HO IIN Ha3HaueHb YcTpoIcTBy cTeBBie IapaMeTpby (HaIIpHMeP, IP-aIpec), B IIyHKTe "Information" (cTp.33) MeHIO "Setup".
- AIIIapat IIOIIeepKHBaeT BocIpOn3BcEHeHne faHIOB WAV (ToJIbKO fOpMaT PCM), MP3, WMA, MPEG-4 AAC H FLAC.
AIIHapar coBmecrnn cactotamn nckpntaun no 192 Kfui jia paaiob WAV n FLAC n 48 Kfui jiu npuix paaiioB.
- IJIa BOCIOH3BeEHHIQAIIIOB FLAC Heo6xOIMHO yTaHOBHbHa IIK cepBepHO EIOIDePKBaIOIe COBMeTHOE HIOJIb3OBAHHe FLAC-paiIOB uepe3 DLNA, HIN HIOJIb3OBaTB ceTeBOe xpaHHInne JaaHHbIX, IOJepKBAIOIe e paJIb FLAC.
Hactpoika oobero doctyna K My3bIkaJIbHbIM paIJam
IIIBOCIPON3BeHnHMy3bIkaJIbHbIXΦaJIIOB, XpaHuaXcH aBaIeM PIK, c IIOMOU bHaHHo r anapata Heo6xOHNMO HacTpOB 06HIN IOCTyIK ΦaJIAM MyIbTHMeHna MeJy aIIIAPA TOM H KOMIbIOTepom (Windows Media Player 11 IIIN 60Jee I03dHra Bepn).3Decb, B KaueCTBe npHMepa, IOKa3aHa HacTpOnKa Windows Media Player B Windows 7.
1 3anyctute Windows Media Player 12 ha cboem PIK.
2 Bb6epTe "ItoK" n haxMnte "BkIIOHTb IOTOKOByo nepeaay MylbTmMeHa." Hxke Ioka3aHO OKHO IaHeJn yIpaBJIeHn IIK. (BaueCTBe npimepa npnbODITc BepCn Ha aHrJ. Ra3bKe)
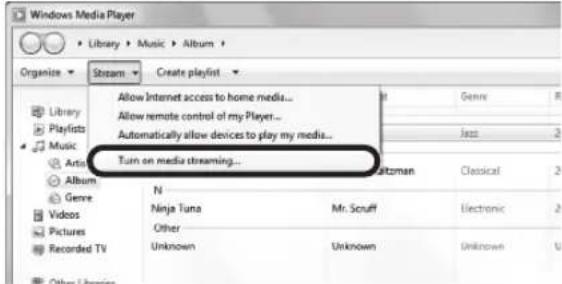
3 BbI6epnte nyHKT "BKnIOHTb nOTOKOByo nepeyaMuNbTImmeda."

4B BbInaIauoem cInnKe Bbl6epnte "Pa3peuHo" HAnpoTnB nyHKta "R-N301".
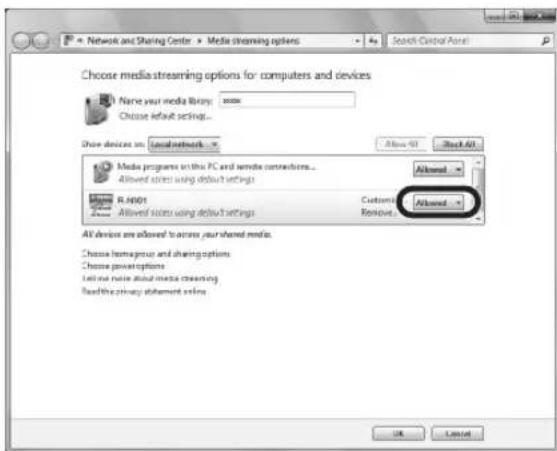
5 HaXmTe OK, yTo6bl BbItn.
IIOpObHee O HAcTPOKe 06IeTo IOCTyPa K faHJaM MyJBTHmCmHa Cm. B pa3Ie cHpaBKn IIO Windows Media Player.
- Windows Media Player 11
① 3anyctre Windows Media Player 11 ha cboem PIK.
② BbI6epHTe“Bn6HOTeka”HnHexMHTe“O6nnnoctynK
③YcTaHOBHTeΦJaxKOK"OTKpbHbO6HmNIOCTynKMOHmФaJIiAMMyJBTHMeHnA”,BbI6epHte3HaQOK“R-N301”HAXMHTe KHOJky“Pa3peHINTb”.
④HaXMITc“OK”,YTO6bI BbHTH.
Ceteboe xpaHHJHnIe daHHbIX HIN IIK cycTaHOBJeHHbIM npyHM cepBepHBIM IO DLNA
HacptpoIte IapametpbIO 6oIero IOcTyIIa K paIlaM MyJIbTHMeJnBa B COOTBeTCTBHH C HHCtpyKIIHmN IIO 3KcIIyataaHn yCtpoIcTBa HIII IIIO.
Bocnpon3BedeHne My3bikaJbHoro KOHTeHTa Ha PIK
IIy npabIeHMy3bIkaJIbHbIM coepKHMbIM PIK H 3aIycka BOCIpOu3BcJIeHnBBIOJHrTe CJIeJyIOIInc JeCTBn.
PnmuMeaHne
BmecTO CMBBOIOB, KOtOpbIe He IOJIePKNBaIOTc aIIIapaTOM, OTo6paKaTaC“_” (IOJIuePKNBaHHe).
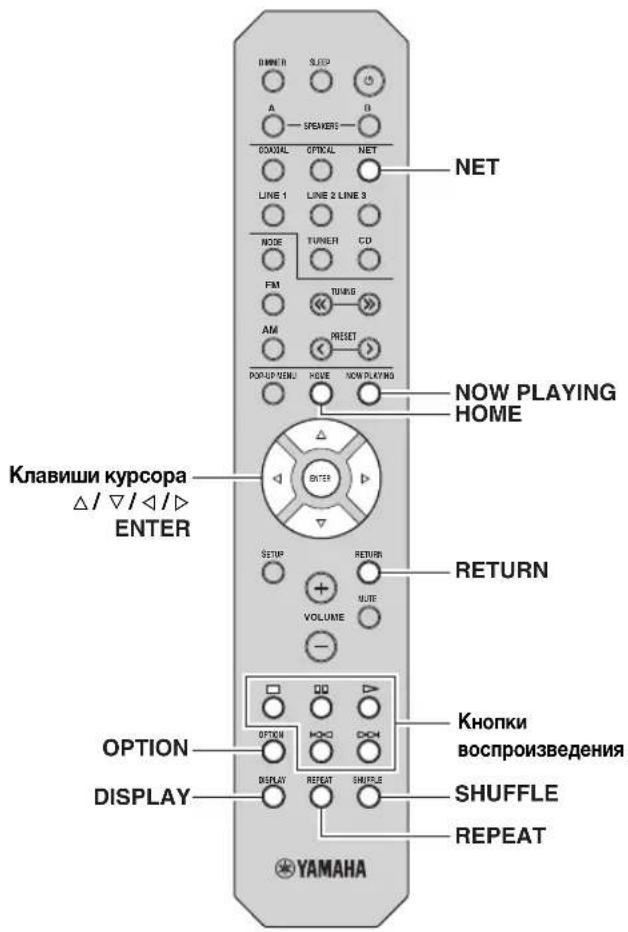
1 HeckoJIbKO pa3 haXMMTe KhoNky NETДЯ BbIbopa "Server" B KaueCTBe NCTOuHnKa BXoHOrO cnrHaJa.
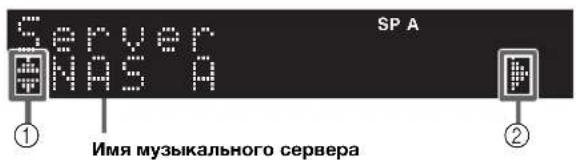
Ha nncnnee nepeHne nane nn OTo6paKaIOTc nJeynuune 3NaUKn.
- IJIa BO3Bpata K IIpeIbIyIeMy COCTOHHIO HAXMHTETRETURN.
- IIpn MHOrOKpaTHOM HaKaTHN KJIaBHHIN DISPLAY MOxHo HpeckJIOHauTb JaaHbIe BocHPOH3BeChnHa JncHJiee NepeHei NaHeJi (cTp.29).
Iy npabHeHHBocpOn3BeHEm HcIOJIb3yIte CJeIyIOUHNE KHOIIKn IyJIbTa IY.
HactpoKn BocnpOn3BeDeHnB CnyaHOM nopAKe/NoBTOpHOro BOCnpOn3BeDeHn
MOxHO HAcTPOHTb IapaMaTePbI BOCIIPOH3BeJeHnB CJIyuaHOM IopJKe/IOBTOPHORO BOCIIPOH3BeJeHn IAMy3bIKHa PIK.
1 Ecnn nctouhikom BxodHoro cnHaJraBJIaTcra "Server", haxMnte KhoNky REPEAT uIN SHUFFLE heckoIbko pa3, yTo6bl BbI6paTb cnocO6 BocPon3BeDeHn.
EcIN BbI6paHa INHTepHET-paHIOCTaHnHn, NaHHeTcE ee BocPOn3BeJeHne, H6yDyT OTo6paKaTbcJaHHbIe BocPOn3BeJeHn.

IJIa OTO6paKeHnCINcKa paINOCtAHn BO BpeMa BOcIIpoHN3BeJeHHn HaXMHTe KJIaBHnHY HOME. JJIaBO3BpTaK JaHHbIM BOcIIpoHN3BeJeHHn HaXMHTe KJIaBHnHY NOW PLAYING.
- IIJI BO3BpaTa K IInpeIbIyIeMy COCTOaHIO HaKMnTe RETURN.
-ПиMHOROKpaTHOMHaKaTHN KJIaBbHIN DISPLAY MOxHo IepeKJIIOuATb IaHHbc BocIpOH3BeJcHnHa IIncIIJce IepeJHeI NaHeJIn (ctp.29).
-ⅢIOJIb3yHTe KHOIIKN BOCIIPOH3BeJeHn(口),YTO6blOCTaHOBNTbBOCIIPOH3BeJeHne.
B 3aHCHMOCTH OT cTaHH HeKOTOPa HhΦopMaIIHA MOKET 6bITb HeIOCTyIIHa.
Coхсанne n36paHHbIX INHTepHETpaHIOCTaHcN (3aKnaIKN)
CoxpaHeHne H36paHHbIX INHTepHET-paHocTaHnB "Bookmarks" IO3BOJIaT OcyIeCTBJIaTb 6bICTpbH IOcTyN K Hm N3 NaIKN "Bookmarks" Ha JncJIee IpeJHHe NpHeJI.
1 BbI6epHTe INTEpHET-paIOCTaHcHIO Ha annapate.
To Heo6xOIMO IJIa coXpaHeHH paHocTaHH B IepBbI pa3.
2 PpOBepbTe nIeHTnФuKaUHbI KOD vTuner Ha annapate.
IeHTnKauHbI KoTuner (MAC-aIpec aIapata) MoKHO IOcMOTpeTB pa3JeIe "Information" (cTp.33) MeHIO "Setup".
3 3aɪnɪte Ha Be6-caɪT vTuner
(http://yradio.vtuner.com/) c IOMOIIbIO Be6-6pay3cpa Ha cBocm IIK N BBcIHTe HNeHTHnKnAINHOHHk KOvTuner.
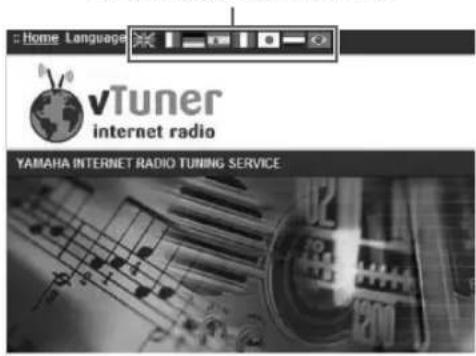
Moxho napeKJIIOHTb 3bIK.

Sign in with your ID # From the Media Player
BBeNTe nIeHTnФKaUHbI KOvTuner B3To none.

HIOJIb3OBAHH 3TOI FyHKINH Heo6xINMO CO3aTb HHyIO yEtHyIO 3aIHcB. Co3aIte CBOIO yEtHyIO 3aIHcB c HOMIOIBIO aIpeca 9JEKTPOHHO IOHTBI.
4 CoxpaHnTe m36paHHbIe paHIOCTaHcII.
HaKMnTe Ha 3NaOH “Add” (一 + ) pIOM c Ha3BaHHe paIIOCTaIIHH.

YTo6bI yJaIHTb paHocTaHnIO H3 IaIKK "Bookmarks", Bb6cPHTe "Bookmarks" Ha rJABHOM 3KpaHc, a 3aTcM HaXMMTe Ha 3HaYok "Remove" (♥-) pJOM c Ha3BaHHem paHIOCTaHnn.
Bocnpo3BedeHne my3bIKn iPod/iTunes no cetn (AirPlay)
Функин AirPlay NO3BOJЯET BOCIPON3BOJNTb My3bIKy c iPod/iTunes HaДанHOM anIIapare Yepe3 ceTb.
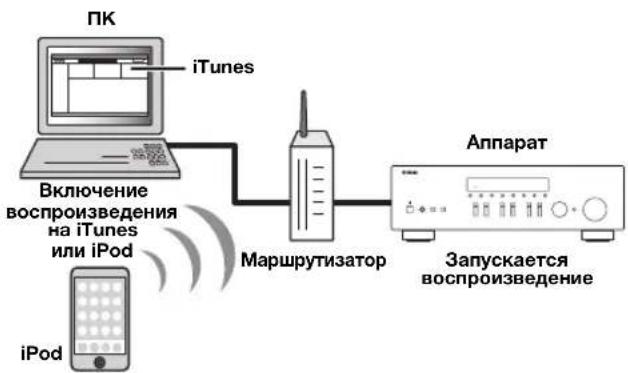
PnmuMeaHne
IJIHIOJIb3OBAHHaTOIyHKINHaAHbIaIIHpaT HIK IIN iPod JOJIKHb6bITb IOIKIIIOUChbIK OIOHMY H TOMy Kc MapIpyTHaTOpY (ctp.13).BIMoKeTe IPOBepHTb,IPAHNBJHO JIN Ha3NaueHbI yCTpoIcTBcYBaIe IIapAMeTpbl (HaIPmep, IP-aIpec), B INyKTe "Information" (ctp.33) MeHIO "Setup".
AirPlay pa6oTaet c iPhone, iPad n iPod touch c iOS 4.3.3 HIN 60Jee 103JHe BepCnH, Mac c OS X Mountain Lion, H Mac n 1K c iTunes 10.2.2 HIN 60Jee 103JHe BepCnH. (No coCTOHHIO Ha aBryct 2014 r.)
Bocnpon3BedeHne My3bikaIbHoro KOHTeHa c iPod/iTunes
IJIbBOcIIPOH3BeHeHHHa aIiIapaTe My3bIKn c iPod/ iTunes BbIOJIHHTE cIeNyIOUHe JeCTBnJ.
1 BkIoUHTe annapaT, 3anyCTnte Ha PIK npIIOJKeHHe iTunes nII N OTKpoTe 3KpaH BocnpOn3BeDEnHa iPod.
Ecn iPod/iTunes pacno3Haer yctpoHcTBO, nOBHTc3HaOK AirPlay (
中
IiPods, HIOJIb3yIOUIx iOS 7, fYHKIIAirPlay oTo6paKaetcB pa3JeJIe "UeHTp yIpaBJIeHII".IJIa IOCTyIIa K 3TOMy pa3JIeJIy IIPOBeIHTe IaJIbIeM BBepx OT HIXKHeRo KpaJ 3KpaHa.

PpMep nT iTunes PpMep nT iOS6


PpMep nia iOS7
PnmeuHne
EcH3NaYOK He IOBBAIEcTc, IIPOBepbTe IpaBHbHOCTb IOIKJIIOUeHHI K/Pod K MapIpyTHaTopy.
2 B iPod/iTunes BBi6epnte 3NaOH AirPlay n ykaxnTe ycTpoNCTBO (ceTeBOe nMa yctpoNCTBa) B KaueCTBe ycTpoNCTBa dJa BBIOda 3Byka.

PpimepIa iTunes PpimepIa iOS
3 BbI6epTe neChIO u BKJIIOUHTe BOcnpOu3BeDeHne.
AIIIpaT aBtOMaTHueckn BbIbnpaet "AirPlay" B KaueCTBe NcTOUHnKa BXoIHORO cHHaJa H NauHnHaET BOCIpOn3BeJeHne. IaHHbe BocIpOn3BeJeHn OTo6paKaIoTcHa nHcINJIe IIpeJHe IIaHeJIH.
#
-ПиMHOROKpaTHOMHaKaTHN KJIaBHH DISPLAYMOxHO HepeKJIOuATbJaHHIe BOCIpOHN3BeJeHnHa JINcIIJee NepeDHei NaHeIi (cTp.29).
- TTo6bI aIIIapAT BKNIOUaJIcA ABTOMATueckn IIpH HauJIe BOCIIPOH3BVeDEHHaYepe3 iTunes IIN iPod, yCTaHOBHTe IIN IapAmETpa "Net Standby" (ctp.34) B MeHIO "Setup" 3HaYeHHe "On".
- MoKHO pcJaKaTIpOBAb cTeBcE HMa (HMa aIIIapaTa B ceTH), OTo6paXkaEmoe Ha iPod/iTunes, IIIOJIb3yI IapaMeTp "Network Name" (ctp.34) B MeHIO "Setup",
EcnBb6paTbpYrOHNCTOCHNkCnHaJBABO BpemBocPOn3BeHHeH,Ha iPod/iTunes BocPOn3BeHHe 6yIeTOCTAHOBIOHOABTONMATHueCKH.
- PeryJInPoBaTb rPOMKocTb BOCIpOn3BeJeHnA anIapaTa MoXHO cepc3 iPod/iTuncs.
PpeynpeKdHne
IIpn HcnoIb3OBAHHn OpraHO ynpaBHeHH iPod/iTunes IpyrpyOBKN rpoMKoCTH rpoMKoCTb BOCIpOH3BeJeHH MoKET OKa3aTbcr HeoxHJaHHo BBICOKo. 3TO MOKeT pHBecTH K IOBpeXeHHIO anHaapaTa HIN KOIOHOK. EcHr pOMKOCTb BHe3aHHO BO3pAcTeBO BpEm BOCIpOH3BeJeHH, HeMeJIeHHO octaHOHTe BocIpOH3BeJeHH Ha iPod/iTunes.
Iy npabJIeHn BOCpOuN3BeJeHEm HcIOJIb3yIte CJeyUoiue KHOIIK IIyIbTa IY.
HactpoKa npaMeTpOB BOCpOu3BedeHnA dIpa3JIuHbIX NCTOuHnKOB BOCpOu3BedeHnA (MeHIO Option)
MoKHO HAcTPOHTb OTJeJIbHbIe IapamEtpbI BOCIpON3BeJeHHN JIIpa3JINHbIX NCTOHHKOB BOCIpON3BeJeHHN.
JaHHoe MeHIO IO3BOJIAET JeTKO HAcTpaHbAT IIapamEtpbI BO Bpemr BOCIpON3BeJeHHN.
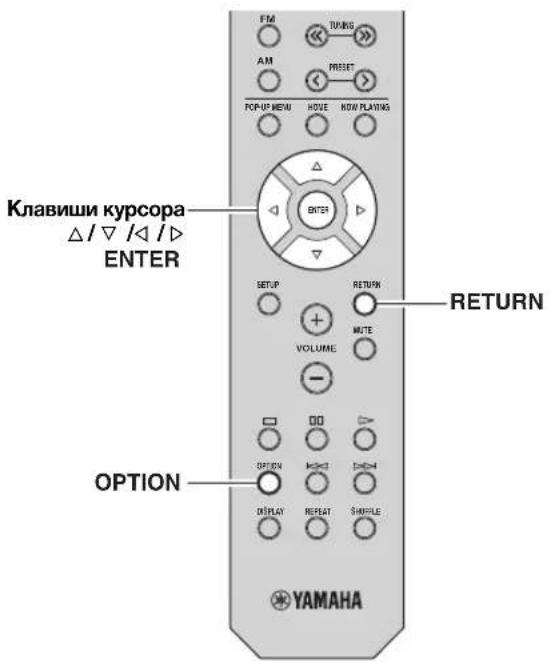
1 HaXMMTE KHonky OPTION.

2 C nOmoIbIO KJIaBmKypcopa Bbl6epnte 3JIemEt HaxMITE ENTER.
YTo6bI BepHyTbC K IpeBbIyIeMy COcTOHIO BO BpeMBAIIIOJIICII ONepaIcN C McHIO, HaxMHTc KJIaBHIYRETURN.
3 C nomoubky KlaBnKypcopa ( / ) BBibepnte napameTp.
4ДЯ BBIXOda n3 MeHIO HaxMnTe OPTION.
3nemeHbI MeHIO OPTION

IOCTyIHbIe ⅢJIeMeHTbI MeHIO MeHIOITcB 3aBHCHMOCTH OT BbIbpaHHORIO HcTOOHnKa BXOHOHRo CnHaJa.
| Злем ent Фу | нкця Стр. | |
| Input Trim | Корpeкtnровka разиць в Гомковст мжду Нстункамь BXODHOrO сгнала. | 30 |
| Signal Info | Отоображени Инфорmaць по удиношгале. | 30 |
| Auto Preset | АВТOMATЧУЕСКЕ COXFpaHEнe FM-paДИСТАнДС C снЛБНМ снГАЛOMВ КаЧESТВЕ ПпEDуСТАнOBЛЕнБИХ. | 18 |
| Clear Preset | УдALEнe радиocтагни, coхраненbIXиюнHomeРамн п dedуSTАнOBOK. | 19 |
| TrafficProgram | АВТOMATЧУЕСКД ПОПСК CTaHцIN,ТранCSЛПуTOПСЕ ИNФOPMaцINо OДОPOЖHOM ДВИЖENHN. | 20 |
| Repeat | Настpoиka парamETROВ ПОВТOPHOROBOSПОнЗВсДЕнЯ ДПЯ МсДи-ccPВсра. | 24 |
| Shuffle | Настpoиka парamETROВВСПОнЗВсДЕнЯВсПУТ希HOMПОДКСДПЯ МсДи-ccPВсра. | 24 |
| AutoPowerStdby | Установka перноза Врemeи дпуФнДИАВТOMATЧУЕСКО ПЕХОДABPEЖIM OЖИДANII DПЯ KAKДОГONCTOCHNKA BXODHOTO снгала. | 31 |
■Input Trim
KoppeKTnPOBka pa3HnIbIBrpoMKoCTM MeKny HcTOuHnKaAMn BXoHOrO cHHaJa.EcHn Bac He ycTpaHBaET pa3HnIa B rPoMKoCTN Ipeep IpepeKJIIOueHHeM MeKdy HcTOUHnKaAMn BXoHOrO cHHaJa,Bbl MoKeTe OTkoppeKTnPOBaTb ee C NOMOIIbHO 3ToHyHKIN.

JaHna HacTpoKa IpiMeHReTcR OTJeJIbHO K KaJIOMy HCTOUYHKY BXoIHORO CHTHaJa.
Dnana3OH HacTp.
Dnana3oH perylinpoBKn
or L + 10 no R+10

Плдрбпссм.Враздсгп "Hастpoиka 6aIahca IIHHAMNKOB" (cTp.16).
Max Volume
YcTaHOBKa MaKcHMaJIbHOr rPOMKOCTN, YTO6bI 3ByK Hc 6bIJ CJINIKOM rPOMKIM.
Anana3OH HacTp.
OT 109 (c 7arom 1), Max
No ymoJuaHnO
Max
Initial Volume
YcTaHOBka HaayaJIbHOH rPOMKocTH BO BpeMa BKJIOUeHnpeCNBepa.
Dnana3OH HacTp.
Off, Mute, or 1 do 99 (c marom 1), Max
No ymoJuaHnIO
Off
DC OUT
HactpoKa npaMaTePoB rHe3da DC OUT.
Power Mode
Bb6oppeXHMaIIOaun HHTaHHHaayHO- IN BnEoo60pyoBaHneYamaha,IOKJIIOueHHoe K rHe3y DC OUT.
HOBbIe HAcTPOKn BCTyIITB CnJIy.
3JIeMeHbI MeHIO ADVANCED SETUP
Bb6op IpeynCTaHOBJIeHHoN cTaHINn (FM/AM-paIHO) 19
F
THe3IO AUDIO 7,10
THe3IO COAXIAL 7,10
THe3IO DC OUT. 7
ΓHe3IO OPTICAL 7
THe3IO PHONES 5
ΓHe3IOREC(RECOUT) 10
A
Iina3OH npJbTa IY. 9
3
3aIIHnI HaeJIb (Ha3BaHHN KOMIOHeHTOB Hx yHKINH) 7
M
HHeHTnΦHKaTOp vTuner (MeHIO Information, Setup) 33
HnHKaTOp (Ha3BaHHKOMIOHeHTOB Hx qyHKuHH) 6
HnHKaTOp KOJIOHOK (IINJIeI IpepeHHe IIaHeJIH) 6
HnHKatop IHTaHna (Ha IpeIHe HnHeJIH) 5
HOpMaIgOIOPOJGHOMIBIXKeHHI (Radio Data System) 20
Hdopmaia O cHraJIe 30
Hdopmaia Radio Data System. 20
K
Ka6eJIb CAT-5 13
KJIaBnIa BbIbOpa HcToUHkA BXoJHO rCnHaJa ... 8
KJIaBnIIa DIMMER (JINCHJIeI IpepeHcI NaHeJIH) 6
KlaBnHa DISPLAY 5,8,29
KJIaBnHa HOME (HITepHeT-paIHO) 25
KJIaBnHa HOME (IKN/NAS) 23
KJIaBnIa MODE 8
KJIaBnHa MUTE 8
KJIaBnHa NOW PLAYING (INHTepHr-paIIO)... 25
KlaBnna NOW PLAYING (IK/NAS) 23
KJIaBnIa OPTION 8
KJIaBnHa SETUP 8
KJIaBnIa SLEEP 16
M
McHIO ADVANCED SETUP 35
Mehio Option. 30
Menio Setup 32
MoHooHueckn IipHeM (FM-paHno) 17
H
HacrpoKa o6uero IOcTuHa K paaiJiAm MyJBTHMeHa. 22
HacTroika FM/AM-paio. 17
Hactpoika Radio Data System. 20
Haynnnkn 5
0
O6HOBJeHHe BCtpoEHHO IIO 36
O6HOBJeHHe BCTpoeHHOro IIO (IIO ceTH) 35,36
OKnHO INHΦOpMaIIN (INCNJIe IpepeJHe IaHeJIn) .... 6
OchOBHna OIepaIIIBOCIpON3BeJeHHN 15
#
IpeetaK cnHaJa IIyIbTa IY (nyIbT IY).. 8
IpehenMeHOBaHne (ceTeBOe Hm) 34
IpeekJIOueHHe HhOpMaJIIN (JInCJIeI IepeJHeI NaHeJI). 29
PiBtop (PIK/NAS) 24
PoiKIOueHHe AM-aHTeHHbI 12
PiokIIOueHHe BOCIIPOIN3BOJIAIeO yCTPOIcTBa.... 10
IopKIOueHHe 3aINcBIAIOIero yCTPOIcTBA ....10
IoiKJIIOUeHHe Ka6eJIa KOJIOHOK 11
IIOKJIIOUeHHe KOJIOHKn C IByXKaHaJIbHbIM yCNJIeHHem 11
ПОДКЛIOUeHHe KOJOHKn C ПOMOIIbIc Ka6eJIa Bi-wire. 11
IoiKJIIOueHne MapuPyTu3aTopa 13
IoiKJIIOUeHHe IIK. 13
IoiKJIIOueHne paHNOyCTPOINCTBa 10
PiKJIIOueHHe cIIOBOrO Ka6eJra. 13
ПОДКЛЮЧЕНС FM-aHTeHHbI 12
ПОДКЛЮЧЕНС NAS (ceTeBOe ycTPOHCTBO xpaHeHnJaHHbIX)............ 13
PyuHaI IpeIyctraHOBka cTaHcH (FM/AM-paIIO) 18
C
CbeHnOceTn 33
CetbeoeIOIKJIIOUeHHe 13
Cetebon ka6eJIb 13
Cetebon ka6eJIb STP 13
Co06HnHa 06 oHn6kax 41
T
Taimep cIIeero pexima. 16
y
YPOBCHb BXOIOB (McHIO Option) 30
Φ
ΦopMaT ayIIOΦaIIOB (IIK/NAS) 22
A
AirPlay 27
Auto Power Standby (MeHHo Option) 30
Auto Preset (FM-paio, MeHIO Option) 18
AutoPowerStdby (MeHIO Option) 30
B
Balance (Mehio Setup) 16,34
BASS (PerynpoBka Tem6pa) 16
Bookmark (IHTepHeT-paHNo) 25
C
Clear Preset (FM-paIIO, MeHIO Option). 19
Clock Time (Radio Data System) 20
D
DC OUT (MeHIO Setup) 34
Default Gateway (Information, Menio Setup) 33
Default Gateway (IP Address, Memo Setup) 33
DHCP (IP Address, menio Setup) 33
Digital Media Controller (DMC) 33
DLNA 22
DMC Control (Network Setup, Memo Setup) 33
DNS Server (Information, Menro Setup) 33
DNS Server (IP Address, Menio Setup) 33
F
Filter (MAC Filter, MeHHo Setup). 33
Format (Signal Info, MeHIO Option). 30
G
Gateway 33
1
ID (Network Setup, MeHIO Setup) 34
Information (Network Setup, MeHIO Setup) 33
INIT (MeHHIO ADVANCED SETUP) 35
Initial Volume (MeHIO Setup) 34
Input trim (MeHIO Option) 30
IP Address (Information, MeHHo Setup) 33
IP Address (Network Setup, meHIO Setup) 33
M
MAC Address (Information, MeHIO Setup) 33
MAC Address (MAC Filter, MeHIO Setup) 33
MAC Filter (Network Setup, meHIO Setup) 33
Max Volume (Mehio Setup) 34
N
Net Standby (Network Setup, MeHIO Setup) 34
Network Name (Network Setup, MeHIO Setup) 34
Network Setup (MeHIO Setup) 33
Network Update (Network Setup, MeHIO Setup).... 34
NewFwAvailable 36
P
Perform Update (Network Setup, menio Setup) .... 34
Power Mode (DC OUT, Menio Setup) 34
Program Service (Radio Data System) 20
Program Type (Radio Data System) 20
R
Radio Data System (FM-panno). 20
Radio Text (Radio Data System) 20
s
Sampling (Signal Info, MeHIO Option) 30
Signal Info (MeHIO Option) 30
Spotify 21
Status (Information, MeHIO Setup) 33
Subnet Mask (Information, MCHIO Setup) 33
Subnet Mask (IP Address, MeHIO Setup) 33
T
TONE CONTROL 16
TP (Traffic Program). 20
Traffic Program (FM-paio, meHIO Option). 20
TREBLE (PeryJInpOBKa Tem6pa) 16
U
UPDATE (MeHIO ADVANCED SETUP) 35
Update (Network Setup) 34
V
VERSION (MeHIO ADVANCED SETUP) 35
Version (MeHIO Network Setup, Setup) 34
Information about third party software licenses
This product incorporates the following third party software.
For information (copyright, etc) about each software, please read the terms and conditions stated below. By using this product, you will be deemed to have accepted the terms and conditions.
■About ASN.1 object dumping code
ASN.1 object dumping code, copyright Peter Gutmann pgut001@cs.auckland.ac.nz, based on ASN.1 dump program by David Kemp dpkemp@missi.ncsc.mil, with contributions from various people including Matthew Hamrick hamrick@rsa.com, Bruno Couillard
bcouillard@chrysalis-its.com, Hallvard Furuseth
h.b.furuseth@usit.uio.no>,Geoff Thorpe
geoff@raas.co.nz, David Boyce
d .boyce@isode.com>, John Hughes
john.hughes@entegrity.com, Life is hard, and then you die ronald@trustpoint.com, Hans-Olof Hermansson
< Hans-olof.hermannsson@postnet.se>, Tor Rustad
jsweeny@us.ibm.com, and several other people whose names I've misplaced.
This code grew slowly over time without much design or planning, with features being tacked on as required.
It's not representative of my normal coding style.
About FLAC codec Library
Copyright © 2000,2001,2002,2003,2004,2005,2006,2007, 2008,2009 Josh Coalson
Redistribution and use in source and binary forms, with or without modification, are permitted provided that the
following conditions are met:
Redistributions of source code must retain the above copyright notice, this list of conditions and the following disclaimer.
Redistributions in binary form must reproduce the above copyright notice, this list of conditions and the following disclaimer in the documentation and/or other materials provided with the distribution.
Neither the name of the Xiph.org Foundation nor the names of its contributors may be used to endorse or promote products derived from this software without specific prior written permission.
THIS SOFTWARE IS PROVIDED BY THE
COPYRIGHT HOLDERS AND CONTRIBUTORS "AS
IS" AND ANY EXPRESS OR IMPLIED
WARRANTIES, INCLUDING, BUT NOT LIMITED TO,
THE IMPLIED WARRANTYES OF
MERCHANTABILITY AND FITNESS FOR A
PARTICULAR PURPOSE ARE DISCLAIMED. IN NO
EVENT SHALL THE FOUNDATION OR
CONTRIBUTORS BE LIABLE FOR ANY DIRECT,
INDIRECT, INCIDENTAL, SPECIAL, EXEMPLARY,
OR CONSEQUENTIAL DAMAGES (INCLUDING,
BUT NOT LIMITED TO, PROCEDURE OF
SUBSTITUTE GOODS OR SERVICES; LOSS OF USE,
DATA, OR PROFITS; OR BUSINESS
INTERRUPTION) HOWEVER CAUSED AND ON
ANY THEORY OF LIABILITY, WHETHER IN
CONTRACT, STRICT LIABILITY, OR TORT
(INCLUDING NEGLIGENCE OR OTHERWISE)
ARISING IN ANY WAY OUT OF THE USE OF THIS
SOFTWARE, EVEN IF ADVISED OF THE
POSSIBILITY OF SUCH DAMAGE.
About libexpat
Copyright © 1998, 1999, 2000 Thai Open Source Software Center Ltd and Clark Cooper
Copyright © 2001, 2002, 2003, 2004, 2005, 2006 Expat maintainers.
Permission is hereby granted, free of charge, to any person obtaining a copy of this software and associated documentation files (the "Software"), to deal in the Software without restriction, including without limitation the rights to use, copy, modify, merge, publish, distribute, sublicense, and/or sell copies of the Software, and to permit persons to whom the Software is furnished to do so, subject to the following conditions:
The above copyright notice and this permission notice shall be included in all copies or substantial portions of the Software.
THE SOFTWARE IS PROVIDED "AS IS", WITHOUT WARRANTY OF ANY KIND, EXPRESS OR IMPLIED, INCLUDING BUT NOT LIMITED TO THE WARRANTY OF MERCHANTABILITY, FITNESS FOR A PARTICULAR PURPOSE AND NONINFRINGEMENT. IN NO EVENT SHALL THE AUTHORS OR COPYRIGHT HOLDERS BE LIABLE FOR ANY CLAIM, DAMAGES OR OTHER LIABILITY, WHETHER IN AN ACTION OF CONTRACT, TORT OR OTHERWISE, ARISING FROM, OUT OF OR IN CONNECTION WITH THE SOFTWARE OR THE USE OR OTHER DEALINGS IN THE SOFTWARE.
■About The Independent JPEG Group's JPEG software
The Independent JPEG Group's JPEG software
Copyright © 1991-2010, Thomas G. Lane, Guido Vollbeding.
All Rights Reserved except as specified below.
The authors make NO WARRANTY or representation, either express or implied, with respect to this software, its quality, accuracy, merchantability, or fitness for a particular purpose. This software is provided "AS IS", and you, its user, assume the entire risk as to its quality and accuracy.
Permission is hereby granted to use, copy, modify, and distribute this software (or portions thereof) for any purpose, without fee, subject to these conditions:
(1) If any part of the source code for this software is distributed, then this README file must be included, with this copyright and no-warranty notice unaltered; and any additions, deletions, or changes to the original files must be clearly indicated in accompanying documentation.
(2) If only executable code is distributed, then the accompanying documentation must state that "this software is based in part on the work of the Independent JPEG Group".
(3) Permission for use of this software is granted only if the user accepts full responsibility for any undesirable consequences; the authors accept NO LIABILITY for damages of any kind.
These conditions apply to any software derived from or based on the IJG code, not just to the unmodified library. If you use our work, you ought to acknowledge us.
Permission is NOT granted for the use of any IJG author's name or company name in advertising or publicity relating to this software or products derived from it. This software
may be referred to only as "the Independent JPEG Group's software".
We specifically permit and encourage the use of this software as the basis of commercial products, provided that all warranty or liability claims are assumed by the product vendor.
■About JsonCpp
Permission is hereby granted, free of charge, to any person obtaining a copy of this software and associated documentation files (the "Software"), to deal in the Software without restriction, including without limitation the rights to use, copy, modify, merge, publish, distribute, sublicense, and/or sell copies of the Software, and to permit persons to whom the Software is furnished to do so, subject to the following conditions:
The above copyright notice and this permission notice shall be included in all copies or substantial portions of the Software.
THE SOFTWARE IS PROVIDED "AS IS", WITHOUT WARRANTY OF ANY KIND, EXPRESS OR IMPLIED, INCLUDING BUT NOT LIMITED TO THE WARRANTYES OF MERCHANTABILITY, FITNESS FOR A PARTICULAR PURPOSE AND NONINFRINGEMENT. IN NO EVENT SHALL THE AUTHORS OR COPYRIGHT HOLDERS BE LIABLE FOR ANY CLAIM, DAMAGES OR OTHER LIABILITY, WHETHER IN AN ACTION OF CONTRACT, TORT OR OTHERWISE, ARISING FROM, OUT OF OR IN CONNECTION WITH THE SOFTWARE OR THE USE OR OTHER DEALINGS IN THE SOFTWARE.
■About Network
Copyright © 1988 Stephen Deering.
Copyright © 1992, 1993
The Regents of the University of California. All rights reserved.
Copyright © 1985, 1986, 1993
The Regents of the University of California. All rights reserved.
Redistribution and use in source and binary forms, with or without modification, are permitted provided that the following conditions are met:
-
Redistributions of source code must retain the above copyright notice, this list of conditions and the following disclaimer.
-
Redistributions in binary form must reproduce the above copyright notice, this list of conditions and the following disclaimer in the documentation and/or other materials provided with the distribution.
- All advertising materials mentioning features or use of this software must display the following acknowledgement:
This product includes software developed by the University of California, Berkeley and its contributors.
4. Neither the name of the University nor the names of its contributors may be used to endorse or promote products derived from this software without specific prior written permission.
THIS SOFTWARE IS PROVIDED BY THE REGENTS AND COLNTRIBUTORS "AS IS" AND ANY EXPRESS OR IMPLIED WARRANTY, INCLUDING, BUT NOT LIMITED TO, THE IMPLIED WARRANTY OF MERCHANTABILITY AND FITNESS FOR A PARTICULAR PURPOSE ARE DISCLAIMED. IN NO EVENT SHALL THE REGENTS OR COLNTRIBUTORS BE LIABLE FOR ANY DIRECT, INDIRECT, INCIDENTAL, SPECIAL, EXEMPLARY, OR CONSEQUENTIAL DAMAGES (INCLUDING, BUT NOT LIMITED TO, PROCEDURE OF SUBSTITUTE GOODSOR SERVICES;LOSS OF USE, DATA,OR PROFITS;OR BUSINESS INTERRUPTION) HOWEVER CAUSED AND ON ANY THEORY OF LIABILITY,WHETHER IN CONTRACT,STRICT LIABILITY,OR TORT (INCLUDING NEGLIGENCE OR OTHERWISE) ARISING IN ANY WAY OUT OF THE USE OF THIS SOFTWARE, EVEN IF ADVISED OF THE POSSIBILITY OF SUCH DAMAGE.
Copyright © 1982, 1986 Regents of the University of California.
All rights reserved.
Copyright © 1982, 1986, 1988 Regents of the University of California.
All rights reserved.
Redistribution and use in source and binary forms are permitted provided that the above copyright notice and this paragraph are duplicated in all such forms and that any documentation, advertising materials, and other materials related to such distribution and use acknowledge that the software was developed by the University of California, Berkeley. The name of the University may not be used to endorse or promote products derived from this software without specific prior written permission.
THIS SOFTWARE IS PROVIDED "AS IS" AND WITHOUT ANY EXPRESS OR IMPLIED WARRANTY, INCLUDING, WITHOUT LIMITATION, THE IMPLIED WARRANTY OF MERCHANTIBILITY AND FITNESS FOR A PARTICULAR PURPOSE.
About PNG Reference Library
ibpng versions 1.2.6, August 15, 2004, through 1.4.5, December 9, 2010, are Copyright © 2004, 2006-2010 Glenn Randers-Pehrson, and are distributed according to the same disclaimer and license as libpng-1.2.5 with the following individual added to the list of Contributing Authors
Cosmin Truta
libpng versions 1.0.7, July 1, 2000, through 1.2.5 - October 3, 2002, are Copyright © 2000-2002 Glenn Randers-Pehrson, and are distributed according to the same disclaimer and license as libpng-1.0.6 with the following individuals added to the list of Contributing Authors
Simon-Pierre Cadieux
Eric S. Raymond
Gilles Vollant
and with the following additions to the disclaimer: There is no warranty against interference with your enjoyment of the library or against infringement. There is no warranty that our efforts or the library will fulfill any of your particular purposes or needs. This library is provided with all faults, and the entire risk of satisfactory quality, performance, accuracy, and effort is with the user.
libpng versions 0.97, January 1998, through 1.0.6, March 20, 2000, are Copyright © 1998, 1999 Glenn Randers-Pehrson, and are distributed according to the same disclaimer and license as libpng-0.96, with the following individuals added to the list of Contributing Authors:
Tom Lane
Glenn Randers-Pehrson
Willem van Schaik
libpng versions 0.89, June 1996, through 0.96, May 1997, are Copyright © 1996, 1997 Andreas Dilger Distributed according to the same disclaimer and license as libpng-0.88, with the following individuals added to the list of Contributing Authors:
John Bowler
Kevin Bracey
Sam Bushell
Magnus Holmgren
Greg Roelofs
Tom Tanner
libpng versions 0.5, May 1995, through 0.88, January 1996, are Copyright © 1995, 1996 Guy Eric Schalnat,
Group 42, Inc.
For the purposes of this copyright and license, "Contributing Authors" is defined as the following set of individuals:
Andreas Dilger
Dave Martindale
Guy Eric Schalnat
Paul Schmidt
Tim Wegner
The PNG Reference Library is supplied "AS IS". The Contributing Authors and Group 42, Inc. disclaim all warranties, expressed or implied, including, without limitation, the warranties of merchantability and of fitness for any purpose. The Contributing Authors and Group 42, Inc. assume no liability for direct, indirect, incidental, special, exemplary, or consequential damages, which may result from the use of the PNG Reference Library, even if advised of the possibility of such damage.
Permission is hereby granted to use, copy, modify, and distribute this source code, or portions thereof, for any purpose, without fee, subject to the following restrictions:
- The origin of this source code must not be misrepresented.
- Altered versions must be plainly marked as such and must not be misrepresented as being the original source.
- This Copyright notice may not be removed or altered from any source or altered source distribution.
The Contributing Authors and Group 42, Inc. specifically permit, without fee, and encourage the use of this source code as a component to supporting the PNG file format in commercial products. If you use this source code in a product, acknowledgment is not required but would be appreciated.
■About RC4 Algorithm
Copyright Mocana Corp 2003-2005. All Rights Reserved.
Proprietary and Confidential Material.
About WPA Suppliant
Copyright © 2003-2008, Jouni Malinen j@w1.fi and contributors
All Rights Reserved.
Redistribution and use in source and binary forms, with or without modification, are permitted provided that the following conditions are met:
- Redistributions of source code must retain the above
copyright notice, this list of conditions and the following disclaimer.
- Redistributions in binary form must reproduce the above copyright notice, this list of conditions and the following disclaimer in the documentation and/or other materials provided with the distribution.
- Neither the name(s) of the above-listed copyright holder(s) nor the names of its contributors may be used to endorse or promote products derived from this software without specific prior written permission.
THIS SOFTWARE IS PROVIDED BY THE
COPYRIGHT HOLDERS AND COLNTRIBUTORS "AS
IS" AND ANY EXPRESS OR IMPLIED
WARRANTIES, INCLUDING, BUT NOT LIMITED TO,
THE IMPLIED WARRANTYES OF
MERCHANTABILITY AND FITNESS FOR A
PARTICULAR PURPOSE ARE DISCLAIMED. IN NO
EVENT SHALL THE COPYRIGHT OWNER OR
CONTRIBUTORS BE LIABLE FOR ANY DIRECT,
INDIRECT, INCIDENTAL, SPECIAL, EXEMPLARY,
OR CONSEQUENTIAL DAMAGES (INCLUDING,
BUT NOT LIMITED TO, PROCEDURE OF
SUBSTITUTE GOODS OR SERVICES; LOSS OF USE,
DATA, OR PROFITS; OR BUSINESS
INTERRUPTION) HOWEVER CAUSED AND ON
ANY THEORY OF LIABILITY, WHETHER IN
CONTRACT, STRICT LIABILITY, OR TORT
(INCLUDING NEGLIGENCE OR OTHERWISE)
ARISING IN ANY WAY OUT OF THE USE OF THIS
SOFTWARE, EVEN IF ADVISED OF THE
POSSIBILITY OF SUCH DAMAGE.
About zlib Library
Copyright notice:
1995-2010 Jean-loup Gailly and Mark Adler
This software is provided 'as-is', without any express or implied warranty. In no event will the authors be held liable for any damages arising from the use of this software.
Permission is granted to anyone to use this software for any purpose, including commercial applications, and to alter it and redistribute it freely, subject to the following restrictions:
- The origin of this software must not be misrepresented; you must not claim that you wrote the original software. If you use this software in a product, an acknowledgment in the product documentation would be appreciated but is not required.
-
Altered source versions must be plainly marked as such, and must not be misrepresented as being the original software.
-
This notice may not be removed or altered from any source distribution.
■About Apple Lossless Audio Codec
Copyright © 2011 Apple Inc. All rights reserved.
Licensed under the Apache License, Version 2.0 (the "License"); you may not use this file except in compliance with the License. You may obtain a copy of the License at
http://www.apache.org/licenses/License-2.0
Unless required by applicable law or agreed to in writing, software distributed under the License is distributed on an "AS IS" BASIS, WITHOUT WARRANTY OR CONDITIONS OF ANY KIND, either express or implied. See the License for the specific language governing permissions and limitations under the License.
Boost
Boost Software License - Version 1.0 - August 17th, 2003
Permission is hereby granted, free of charge, to any person or organization obtaining a copy of the software and accompanying documentation covered by this license (the "Software") to use, reproduce, display, distribute, execute, and transmit the Software, and to prepare derivative works of the Software, and to permit third-parties to whom the Software is furnished to do so, all subject to the following: The copyright notices in the Software and this entire statement, including the above license grant, this restriction and the following disclaimer, must be included in all copies of the Software, in whole or in part, and all derivative works of the Software, unless such copies or derivative works are solely in the form of machine-executable object code generated by a source language processor.
THE SOFTWARE IS PROVIDED "AS IS", WITHOUT WARRANTY OF ANY KIND, EXPRESS OR IMPLIED, INCLUDING BUT NOT LIMITED TO THE WARRANTY OF MERCHANTABILITY, FITNESS FOR A PARTICULAR PURPOSE, TITLE AND NONINFRINGEMENT. IN NO EVENT SHALL THE COPYRIGHT HOLDERS OR ANYONE DISTRIBUTING THE SOFTWARE BE LIABLE FOR ANY DAMAGES OR OTHER LIABILITY, WHETHER IN CONTRACT, TORT OR OTHERWISE, ARISING FROM, OUT OF OR IN CONNECTION WITH THE SOFTWARE OR THE USE OR OTHER DEALINGS IN THE SOFTWARE.
Expat
http://www.jclark.com/xml/expat.html
Expat License. Copyright © 1998, 1999, 2000 Thai Open Source Software Center Ltd
Permission is hereby granted, free of charge, to any person obtaining a copy of this software and associated documentation files (the "Software"), to deal in the Software without restriction, including without limitation the rights to use, copy, modify, merge, publish, distribute, sublicense, and/or sell copies of the Software, and to permit persons to whom the Software is furnished to do so, subject to the following conditions:
The above copyright notice and this permission notice shall be included in all copies or substantial portions of the Software.
THE SOFTWARE IS PROVIDED "AS IS", WITHOUT WARRANTY OF ANY KIND, EXPRESS OR IMPLIED, INCLUDING BUT NOT LIMITED TO THE WARRANTY OF MERCHANTABILITY, FITNESS FOR A PARTICULAR PURPOSE AND NONINFRINGEMENT. IN NO EVENT SHALL THE AUTHORS OR COPYRIGHT HOLDERS BE LIABLE FOR ANY CLAIM, DAMAGES OR OTHER LIABILITY, WHETHER IN AN ACTION OF CONTRACT, TORT OR OTHERWISE, ARISING FROM, OUT OF OR IN CONNECTION WITH THE SOFTWARE OR THE USE OR OTHER DEALINGS IN THE SOFTWARE.
FastDelegate
http://www.codeproject.com/KBcpp/FastDelegate.aspx
THE WORK (AS DEFINED BELOW) IS PROVIDED UNDER THE TERMS OF THIS CODE PROJECT OPEN LICENSE ("LICENSE"). THE WORK IS PROTECTED BY COPYRIGHT AND/OR OTHER APPLICABLE LAW. ANY USE OF THE WORK OTHER THAN AS AUTHORIZED UNDER THIS LICENSE OR COPYRIGHT LAW IS PROHIBITED. BY EXERCISING ANY RIGHTS TO THE WORK PROVIDED HEREIN, YOU ACCEPT AND AGREE TO BE BOUND BY THE TERMS OF THIS LICENSE. THE AUTHOR GRANTS YOU THE RIGHTS CONTAINED HEREIN IN CONSIDERATION OF YOUR ACCEPTANCE OF SUCH TERMS AND CONDITIONS. IF YOU DO NOT AGREE TO ACCEPT AND BE BOUND BY THE TERMS OF THIS LICENSE, YOU CANNOT MAKE ANY USE OF THE WORK.
1.Definitions.
a."Articles" means, collectively, all articles written by Author which describes how the Source Code and Executable Files for the Work may be used by a user.
b. "Author" means the individual or entity that offers the Work under the terms of this License.
c. "Derivative Work" means a work based upon the Work or upon the Work and other pre-existing works.
d. "Executable Files" refer to the executables, binary files, configuration and any required data files included in the Work.
e. "Publisher" means the provider of the website, magazine, CD-ROM, DVD or other medium from or by which the Work is obtained by You.
f. "Source Code" refers to the collection of source code and configuration files used to create the Executable Files.
g. "Standard Version" refers to such a Work if it has not been modified, or has been modified in accordance with the consent of the Author, such consent being in the full discretion of the Author.
h. "Work" refers to the collection of files distributed by the Publisher, including the Source Code, Executable Files, binaries, data files, documentation, whitepapers and the Articles.
i. "You" is you, an individual or entity wishing to use the Work and exercise your rights under this License.
2. Fair Use/Fair Use Rights. Nothing in this License is intended to reduce, limit, or restrict any rights arising from fair use, fair dealing, first sale or other limitations on the exclusive rights of the copyright owner under copyright law or other applicable laws.
3. License Grant. Subject to the terms and conditions of this License, the Author hereby grants You a worldwide, royalty-free, non-exclusive, perpetual (for the duration of the applicable copyright) license to exercise the rights in the Work as stated below:
a. You may use the standard version of the Source Code or Executable Files in Your own applications.
b. You may apply bug fixes, portability fixes and other modifications obtained from the Public Domain or from the Author. A Work modified in such a way shall still be considered the standard version and will be subject to this License.
c. You may otherwise modify Your copy of this Work (excluding the Articles) in any way to create a Derivative Work, provided that You insert a prominent notice in each changed file stating how, when and where You changed that file.
d. You may distribute the standard version of the Executable Files and Source Code or Derivative Work in aggregate with other (possibly commercial) programs as part of a larger (possibly commercial) software distribution.
c. The Articles discussing the Work published in any form by the author may not be distributed or republished without the Author's consent. The author retains copyright to any such Articles. You may use the Executable Files and Source Code pursuant to this License but you may not repost or
republish or otherwise distribute or make available the Articles, without the prior written consent of the Author.
Any subroutines or modules supplied by You and linked into the Source Code or Executable Files this Work shall not be considered part of this Work and will not be subject to the terms of this License.
-
Patent License. Subject to the terms and conditions of this License, each Author hereby grants to You a perpetual, worldwide, non-exclusive, no-charge, royalty-free, irrevocable (except as stated in this section) patent license to make, have made, use, import, and otherwise transfer the Work.
-
Restrictions. The license granted in Section 3 above is expressly made subject to and limited by the following restrictions:
a. You agree not to remove any of the original copyright, patent, trademark, and attribution notices and associated disclaimers that may appear in the Source Code or Executable Files.
b. You agree not to advertise or in any way imply that this Work is a product of Your own.
c. The name of the Author may not be used to endorse or promote products derived from the Work without the prior written consent of the Author.
d. You agree not to sell, lease, or rent any part of the Work. This does not restrict you from including the Work or any part of the Work inside a larger software distribution that itself is being sold. The Work by itself, though, cannot be sold, leased or rented.
e. You may distribute the Executable Files and Source Code only under the terms of this License, and You must include a copy of, or the Uniform Resource Identifier for, this License with every copy of the Executable Files or Source Code You distribute and ensure that anyone receiving such Executable Files and Source Code agrees that the terms of this License apply to such Executable Files and/or Source Code. You may not offer or impose any terms on the Work that alter or restrict the terms of this License or the recipients' exercise of the rights granted hereunder. You may not sublicense the Work. You must keep intact all notices that refer to this License and to the disclaimer of warranties. You may not distribute the Executable Files or Source Code with any technological measures that control access or use of the Work in a manner inconsistent with the terms of this License.
f. You agree not to use the Work for illegal, immoral or improper purposes, or on pages containing illegal, immoral or improper material. The Work is subject to applicable export laws. You agree to comply with all such laws and regulations that may apply to the Work after Your receipt of the Work.
-
Representations, Warranties and Disclaimer. THIS WORK IS PROVIDED "AS IS", "WHERE IS" AND "AS AVAILABLE", WITHOUT ANY EXPRESS OR IMPLIED WARRANTY OR CONDITIONS OR GUARANTEES. YOU, THE USER, ASSUME ALL RISK IN ITS USE, INCLUDING COPYRIGHT INFRINGEMENT, PATENT INFRINGEMENT, SUITABILITY, ETC. AUTHOR EXPRESSLY DISCLAIMS ALL EXPRESS, IMPLIED OR STATUTORY WARRANTY OR CONDITIONS, INCLUDING WITHOUT LIMITATION, WARRANTY OR CONDITIONS OF MERCHANTABILITY, MERCHANTABLE QUALITY OR FITNESS FOR A PARTICULAR PURPOSE, OR ANY WARRANTY OF TITLE OR NON-INFRINGEMENT, OR THAT THE WORK (OR ANY PORTION THEREOF) IS CORRECT, USEFUL, BUG-FREE OR FREE OF VIRUSES. YOU MUST PASS THIS DISCLAIMER ON WHENEVER YOU DISTRIBUTE THE WORK OR DERIVATIVE WORKS.
-
Indemnity. You agree to defend, indemnify and hold harmless the Author and the Publisher from and against any claims, suits, losses, damages, liabilities, costs, and expenses (including reasonable legal or attorneys' fees) resulting from or relating to any use of the Work by You.
-
Limitation on Liability. EXCEPT TO THE EXTENT REQUIRED BY APPLICABLE LAW, IN NO EVENT WILL THE AUTHOR OR THE PUBLISHER BE LIABLE TO YOU ON ANY LEGAL THEORY FOR ANY SPECIAL, INCIDENTAL, CONSEQUENTIAL, PUNITIVE OR EXEMPLARY DAMAGES ARISING OUT OF THIS LICENSE OR THE USE OF THE WORK OR OTHERWISE, EVEN IF THE AUTHOR OR THE PUBLISHER HAS BEEN ADVISED OF THE POSSIBILITY OF SUCH DAMAGES.
-
Termination.
a. This License and the rights granted hereunder will terminate automatically upon any breach by You of any term of this License. Individuals or entities who have received Derivative Works from You under this License, however, will not have their licenses terminated provided such individuals or entities remain in full compliance with those licenses. Sections 1, 2, 6, 7, 8, 9, 10 and 11 will survive any termination of this License.
b. If You bring a copyright, trademark, patent or any other infringement claim against any contributor over infringements You claim are made by the Work, your License from such contributor to the Work ends automatically.
c. Subject to the above terms and conditions, this License is perpetual (for the duration of the applicable copyright in the Work). Notwithstanding
the above, the Author reserves the right to release the Work under different license terms or to stop distributing the Work at any time; provided, however that any such election will not serve to withdraw this License (or any other license that has been, or is required to be, granted under the terms of this License), and this License will continue in full force and effect unless terminated as stated above.
- Publisher. The parties hereby confirm that the Publisher shall not, under any circumstances, be responsible for and shall not have any liability in respect of the subject matter of this License. The Publisher makes no warranty whatsoever in connection with the Work and shall not be liable to You or any party on any legal theory for any damages whatsoever, including without limitation any general, special, incidental or consequential damages arising in connection to this license. The Publisher reserves the right to cease making the Work available to You at any time without notice
- Miscellaneous.
a. This License shall be governed by the laws of the location of the head office of the Author or if the Author is an individual, the laws of location of the principal place of residence of the Author.
b. If any provision of this License is invalid or unenforceable under applicable law, it shall not affect the validity or enforceability of the remainder of the terms of this License, and without further action by the parties to this License, such provision shall be reformed to the minimum extent necessary to make such provision valid and enforceable.
c. No term or provision of this License shall be deemed waived and no breach consented to unless such waiver or consent shall be in writing and signed by the party to be charged with such waiver or consent.
d. This License constitutes the entire agreement between the parties with respect to the Work licensed herein. There are no understandings, agreements or representations with respect to the Work not specified herein. The Author shall not be bound by any additional provisions that may appear in any communication from You. This License may not be modified without the mutual written agreement of the Author and You
■libogg
http://www.xiph.org/ogg/
Copyright © 2002, Xiph.org Foundation
Redistribution and use in source and binary forms, with or without modification, are permitted provided that the following conditions are met:
- Redistributions of source code must retain the above copyright notice, this list of conditions and the
following disclaimer.
- Redistributions in binary form must reproduce the above copyright notice, this list of conditions and the following disclaimer in the documentation and/or other materials provided with the distribution.
- Neither the name of the Xiph.org Foundation nor the names of its contributors may be used to endorse or promote products derived from this software without specific prior written permission.
THIS SOFTWARE IS PROVIDED BY THE
COPYRIGHT HOLDERS AND COLNTRIBUTORS "AS
IS" AND ANY EXPRESS OR IMPLIED
WARRANTIES, INCLUDING, BUT NOT LIMITED TO,
THE IMPLIED WARRANTYES OF
MERCHANTABILITY AND FITNESS FOR A
PARTICULAR PURPOSE ARE DISCLAIMED. IN NO
EVENT SHALL THE FOUNDATION OR
CONTRIBUTORS BE LIABLE FOR ANY DIRECT,
INDIRECT, INCIDENTAL, SPECIAL, EXEMPLARY,
OR CONSEQUENTIAL DAMAGES (INCLUDING,
BUT NOT LIMITED TO, PROCEDURE OF
SUBSTITUTE GOODSOR SERVICES;LOSSOF USE,
DATA,OR PROFITS;OR BUSINESS
INTERRUPTION)HOWEVER CAUSEDAND ON
ANY THEORY OF LIABILITY,WHETHER IN
CONTRACT,STRICTLIABILITY,ORTORT
(INCLUDING NEGLIGENCE OR OTHERWISE)
ARISING IN ANY WAY OUT OF THE USE OF THIS
SOFTWARE,EVEN IF ADVISED OF THE
POSSIBILITY OF SUCH DAMAGE.
■libvorbis
http://www.xiph.org/vorbis/
Copyright © 2002-2004 Xiph.org Foundation
Redistribution and use in source and binary forms, with or without modification, are permitted provided that the following conditions are met:
- Redistributions of source code must retain the above copyright notice, this list of conditions and the following disclaimer.
- Redistributions in binary form must reproduce the above copyright notice, this list of conditions and the following disclaimer in the documentation and/or other materials provided with the distribution.
- Neither the name of the Xiph.org Foundation nor the names of its contributors may be used to endorse or promote products derived from this software without specific prior written permission.
THIS SOFTWARE IS PROVIDED BY THE
COPYRIGHT HOLDERS AND COLNTRIBUTORS "AS
IS" AND ANY EXPRESS OR IMPLIED
WARRANTIES, INCLUDING, BUT NOT LIMITED TO,
THE IMPLIED WARRANTY OF
MERCHANTABILITY AND FITNESS FOR A
PARTICULAR PURPOSE ARE DISCLAIMED. IN NO
EVENT SHALL THE FOUNDATION OR
CONTRIBUTORS BE LIABLE FOR ANY DIRECT, INDIRECT, INCIDENTAL, SPECIAL, EXEMPLARY, OR CONSEQUENTIAL DAMAGES (INCLUDING, BUT NOT LIMITED TO, PROCEDURE OF SUBSTITUTE GOODS OR SERVICES; LOSS OF USE, DATA, OR PROFITS; OR BUSINESS INTERRUPTION) HOWEVER CAUSED AND ON ANY THEORY OF LIABILITY, WHETHER IN CONTRACT, STRICT LIABILITY, OR TORT (INCLUDING NEGLIGENCE OR OTHERWISE) ARISING IN ANY WAY OUT OF THE USE OF THIS SOFTWARE, EVEN IF ADVISED OF THE POSSIBILITY OF SUCH DAMAGE.
■Tremolo
http://wss.co.uk/pinknoise/tremolo
Copyright © 2002-2009 Xiph.org Foundation Changes Copyright © 2009-2010 Robin Watts for Pinknoise Productions Ltd
Redistribution and use in source and binary forms, with or without modification, are permitted provided that the following conditions are met:
- Redistributions of source code must retain the above copyright notice, this list of conditions and the following disclaimer.
- Redistributions in binary form must reproduce the above copyright notice, this list of conditions and the following disclaimer in the documentation and/or other materials provided with the distribution.
- Neither the name of the Xiph.org Foundation nor the names of its contributors may be used to endorse or promote products derived from this software without specific prior written permission.
THIS SOFTWARE IS PROVIDED BY THE
COPYRIGHT HOLDERS AND COLNTRIBUTORS "AS
IS" AND ANY EXPRESS OR IMPLIED
WARRANTIES, INCLUDING, BUT NOT LIMITED TO,
THE IMPLIED WARRANTYES OF
MERCHANTABILITY AND FITNESS FOR A
PARTICULAR PURPOSE ARE DISCLAIMED. IN NO
EVENT SHALL THE FOUNDATION OR
CONTRIBUTORS BE LIABLE FOR ANY DIRECT,
INDIRECT, INCIDENTAL, SPECIAL, EXEMPLARY,
OR CONSEQUENTIAL DAMAGES (INCLUDING,
BUT NOT LIMITED TO, PROCEDURE OF
SUBSTITUTE GOODS OR SERVICES; LOSS OF USE,
DATA, OR PROFITS; OR BUSINESS
INTERRUPTION) HOWEVER CAUSED AND ON
ANY THEORY OF LIABILITY, WHETHER IN
CONTRACT, STRICT LIABILITY, OR TORT
(INCLUDING NEGLIGENCE OR OTHERWISE)ARISING
IN ANY WAY OUT OF THE USE OF THIS SOFTWARE,
EVEN IF ADVISED OF THE POSSIBILITY OF SUCH
DAMAGE.
■Tremor
http://wiki.xiph.org/index.php/Tremor
Copyright © 2002, Xiph.org Foundation
Redistribution and use in source and binary forms, with or without modification, are permitted provided that the following conditions are met:
- Redistributions of source code must retain the above copyright notice, this list of conditions and the following disclaimer.
- Redistributions in binary form must reproduce the above copyright notice, this list of conditions and the following disclaimer in the documentation and/or other materials provided with the distribution.
- Neither the name of the Xiph.org Foundation nor the names of its contributors may be used to endorse or promote products derived from this software without specific prior written permission.
THIS SOFTWARE IS PROVIDED BY THE
COPYRIGHT HOLDERS AND CONTRIBUTORS "AS
IS" AND ANY EXPRESS OR IMPLIED
WARRANTIES, INCLUDING, BUT NOT LIMITED TO,
THE IMPLIED WARRANTYES OF
MERCHANTABILITY AND FITNESS FOR A
PARTICULAR PURPOSE ARE DISCLAIMED. IN NO
EVENT SHALL THE FOUNDATION OR
CONTRIBUTORS BE LIABLE FOR ANY DIRECT,
INDIRECT, INCIDENTAL, SPECIAL, EXEMPLARY,
OR CONSEQUENTIAL DAMAGES (INCLUDING,
BUT NOT LIMITED TO, PROCEDURE OF
SUBSTITUTE GOODS OR SERVICES; LOSS OF USE,
DATA, OR PROFITS; OR BUSINESS
INTERRUPTION) HOWEVER CAUSED AND ON
ANY THEORY OF LIABILITY, WHETHER IN
CONTRACT, STRICT LIABILITY, OR TORT
(INCLUDING NEGLIGENCE OR OTHERWISE)
ARISING IN ANY WAY OUT OF THE USE OF THIS
SOFTWARE, EVEN IF ADVISED OF THE
POSSIBILITY OF SUCH DAMAGE.
■Mersenne Twister
http://www.math.sci.hiroshima-u.ac.jp/~m-mat/MT/ MT2002/CODES/mt19937ar.c
Copyright © 1997 - 2002, Makoto Matsumoto and Takuji Nishimura,
All rights reserved.
Redistribution and use in source and binary forms, with or without modification, are permitted provided that the following conditions are met:
-
Redistributions of source code must retain the above copyright notice, this list of conditions and the following disclaimer.
-
Redistributions in binary form must reproduce the above copyright notice, this list of conditions and the following disclaimer in the documentation and/or other materials provided with the distribution.
- The names of its contributors may not be used to endorse or promote products derived from this software without specific prior written permission.
THIS SOFTWARE IS PROVIDED BY THE
COPYRIGHT HOLDERS AND CONTRIBUTORS "AS
IS" AND ANY EXPRESS OR IMPLIED
WARRANTIES, INCLUDING, BUT NOT LIMITED TO,
THE IMPLIED WARRANTYES OF
MERCHANTABILITY AND FITNESS FOR A
PARTICULAR PURPOSE ARE DISCLAIMED. IN NO
EVENT SHALL THE COPYRIGHT OWNER OR
CONTRIBUTORS BE LIABLE FOR ANY DIRECT,
INDIRECT, INCIDENTAL, SPECIAL, EXEMPLARY,
OR CONSEQUENTIAL DAMAGES (INCLUDING,
BUT NOT LIMITED TO, PROCEDURE OF
SUBSTITUTE GOODS OR SERVICES; LOSS OF USE,
DATA, OR PROFITS; OR BUSINESS
INTERRUPTION) HOWEVER CAUSED AND ON
ANY THEORY OF LIABILITY, WHETHER IN
CONTRACT, STRICT LIABILITY, OR TORT
(INCLUDING NEGLIGENCE OR OTHERWISE)
ARISING IN ANY WAY OUT OF THE USE OF THIS
SOFTWARE, EVEN IF ADVISED OF THE
POSSIBILITY OF SUCH DAMAGE.
■zlib
http://www.zlib.net/
zlib.h -- interface of the ' zlib' general purpose compression library version 1.2.3, July 18th, 2005
Copyright © 1995-2004 Jean-loup Gailly and Mark Adler
This software is provided 'as-is', without any express or implied warranty. In no event will the authors be held liable for any damages arising from the use of this software.
Permission is granted to anyone to use this software for any purpose, including commercial applications, and to alter it and redistribute it freely, subject to the following restrictions:
The origin of this software must not be misrepresented; you must not claim that you wrote the original software. If you use this software in a product, an acknowledgment in the product documentation would be appreciated but is not required.
- Altered source versions must be plainly marked as such, and must not be misrepresented as being the original software.
- This notice may not be removed or altered from any source distribution.
Jean-Ioup Gailly jloup@gzip.org, Mark Adler madler@alumni.caltech.edu
cURL
http://curl.haxx.se
COPYRIGHT AND PERMISSION NOTICE
Copyright © 1996 - 2011, Daniel Stenberg, daniel@haxx.se.
All rights reserved.
Permission to use, copy, modify, and distribute this software for any purpose with or without fee is hereby granted, provided that the above copyright notice and this permission notice appear in all copies. THE SOFTWARE IS PROVIDED "AS IS", WITHOUT WARRANTY OF ANY KIND, EXPRESS OR IMPLIED, INCLUDING BUT NOT LIMITED TO THE WARRANTY OF MERCHANTABILITY, FITNESS FOR A PARTICULAR PURPOSE AND NONINFRINGEMENT OF THIRD PARTY RIGHTS. IN NO EVENT SHALL THE AUTHORS OR COPYRIGHT HOLDERS BE LIABLE FOR ANY CLAIM, DAMAGES OR OTHER LIABILITY, WHETHER IN AN ACTION OF CONTRACT, TORT OR OTHERWISE, ARISING FROM, OUT OF OR IN CONNECTION WITH THE SOFTWARE OR THE USE OR OTHER DEALINGS IN THE SOFTWARE.
Except as contained in this notice, the name of a copyright holder shall not be used in advertising or otherwise to promote the sale, use or other dealings in this Software without prior written authorization of the copyright holder.
■c-ares
http://c-ares.haxx.se
Copyright 1998 by the Massachusetts Institute of Technology.
Permission to use, copy, modify, and distribute this software and its documentation for any purpose and without fee is hereby granted, provided that the above copyright notice appear in all copies and that both that copyright notice and this permission notice appear in supporting documentation, and that the name of M.I.T. not be used in advertising or publicity pertaining to distribution of the software without specific, written prior permission. M.I.T. makes no representations about the suitability of this software for any purpose. It is provided "as is" without express or implied warranty.
Do not disassemble, decompile, or reverse engineer the software included in Yamaha AV products.
Information for Users on Collection and Disposal of Old Equipment and Used Batteries

These symbols on the products, packaging, and/or accompanying documents mean that used electrical and electronic products and batteries should not be mixed with general household waste.
For proper treatment, recovery and recycling of old products and used batteries, please take them to applicable collection points, in accordance with your national legislation and the Directives 2002/96/EC and 2006/66/EC.
By disposing of these products and batteries correctly, you will help to save valuable resources and prevent any potential negative effects on human health and the environment which could otherwise arise from inappropriate waste handling.
For more information about collection and recycling of old products and batteries, please contact your local municipality, your waste disposal service or the point of sale where you purchased the items.
[Information on Disposal in other Countries outside the European Union]
These symbols are only valid in the European Union. If you wish to discard these items, please contact your local authorities or dealer and ask for the correct method of disposal.
Note for the battery symbol (bottom two symbol examples):
This symbol might be used in combination with a chemical symbol. In this case it complies with the requirement set by the Directive for the chemical involved.


