
MusicCast Aventage CXA5200 - Home cinema amp YAMAHA - Free user manual and instructions
Find the device manual for free MusicCast Aventage CXA5200 YAMAHA in PDF.
| Product Type | Audio-Video Preamplifier / Home Theater Amplifier |
| Brand / Model | YAMAHA MusicCast Aventage CXA5200 |
| Dimensions (W x H x D) | 435 x 193 x 474 mm (with antenna: 435 x 270 x 474 mm) |
| Weight | 15.2 kg |
| Power Supply | 220-240 V AC, 50/60 Hz (depending on region) |
| Power Consumption | 65 W (standby: 0.1 W with HDMI and network disabled) |
| Wireless Features | Wi-Fi (2.4/5 GHz), Bluetooth 4.2, AirPlay, MusicCast |
| HDMI Inputs | 7 inputs, 3 outputs (including 1 with ARC) |
| Preamplifier Outputs | 11 channels (XLR and RCA), 2 subwoofer outputs |
| Acoustic Optimization | YPAO (automatic speaker optimization) |
| Supported Audio Formats | Dolby Atmos, DTS:X, AI Surround, Pure Direct |
| Compatible Applications | MusicCast CONTROLLER (iOS/Android) |
| SCENE Function | 8 programmable buttons for instant recall of settings |
| Radio | FM/AM, DAB+, Internet Radio |
| Maintenance and Cleaning | Soft, dry cloth; avoid chemical products |
| Safety | Auto shut-off, surge protection, protection circuit |
| Spare Parts and Repairability | Repair by authorized Yamaha technician; no parts provided |
| General Information | 128-page manual available in PDF; online manual at yamaha.com |
Frequently Asked Questions - MusicCast Aventage CXA5200 YAMAHA
User questions about MusicCast Aventage CXA5200 YAMAHA
0 question about this device. Answer the ones you know or ask your own.
Ask a new question about this device
Download the instructions for your Home cinema amp in PDF format for free! Find your manual MusicCast Aventage CXA5200 - YAMAHA and take your electronic device back in hand. On this page are published all the documents necessary for the use of your device. MusicCast Aventage CXA5200 by YAMAHA.
USER MANUAL MusicCast Aventage CXA5200 YAMAHA
Precautions 2
Preparations. 7
Playback 18
English
Précautions d'usage 27
Preparations. 32
Lecture. 43
Français
The precautions listed below are to prevent risk of harm to the user and others, as well as to prevent property damage, and to help the user use this unit properly and safely. Be sure to follow these instructions.
After reading this manual, be sure to keep it in a safe place where it can be referenced at any time.
- Be sure to request inspections or repairs from the dealer where you purchased the unit or from qualified Yamaha service personnel.
- Yamaha cannot be held responsible for injury to you or damage of the products caused by improper use or modifications to the unit, or data that is lost or destroyed.
- This product is for ordinary homes. Do not use for applications requiring high reliability, such as managing lives, health care or high-value assets.

WARNING
This content indicates "risk of serious injury or death."
Power supply/power cord
-
Do not do anything that could damage the power cord.
-
Do not place it near a heater.
- Do not bend it excessively or alter it.
- Do not scratch it.
- Do not place it under a heavy object.
Using the power cord/adaptor with the core of the cord exposed could cause electric shocks or a fire.
- Do not touch the power plug or cord if there is a chance of lightning. Failure to observe this may cause electric shocks.
-
Use this unit with the power supply voltage printed on it. Failure to connect to an appropriate AC outlet may cause a fire, electric shocks, or malfunctions.
-
Be sure to use the power cord. Also, do not use the supplied power cord for other units. Failure to observe the above may cause a fire, burns, or malfunctions.
- Check the electric plug periodically and remove any dirt or dust which may have accumulated on it. Failure to observe this may cause a fire or electric shocks.
- When setting up the unit, make sure that the AC outlet you are using is easily accessible. If some trouble or malfunction occurs, immediately turn off the power switch and disconnect the plug from the AC outlet. Even when the power switch is turned off, as long as the power cord is not unplugged from the wall AC outlet, the unit will not be disconnected from the power source.
- If you hear thunder or suspect approaching lightning, quickly turn off the power switch and pull the power plug from the AC outlet. Failure to observe this may cause a fire or malfunctions.
- If not using the unit for long periods of time, be sure to pull the power plug from the AC outlet. Failure to observe this may cause a fire or malfunctions.
Do not disassemble
- Do not disassemble or modify this unit. Failure to observe this may cause a fire, electric shocks, injury, or malfunctions. If you notice any irregularities, be sure to request an inspection or repair from the dealer where you purchased the unit or from qualified Yamaha service personnel.
Water warning
- Do not expose the unit to rain, use it near water or in damp or wet conditions, or place on it any containers (such as vases, bottles or glasses) containing liquids which might spill Into any openings or places where water may drop. A liquid such as water getting into the unit may cause a fire, electric shocks, or malfunctions. If any liquid such as water seeps into the device, turn off the power immediately and unplug the power cord from the AC outlet. Then, request an inspection from the dealer where you purchased the unit or from qualified Yamaha service personnel.
- Never insert or remove an electric plug with wet hands. Do not handle this unit with wet hands. Failure to observe this may cause electric shocks or malfunctions.
Fire warning
- Do not place any burning items or open flames near the unit, since they may cause a fire.
Maintenance and care
- Do not use aerosols or spray-type chemicals that contain combustible gas for cleaning or lubrication. The combustible gas will remain inside the unit, which may cause explosion or fire.
Battery use
- Do not disassemble a battery. If the contents of the battery get on your hands or in your eyes, it can cause blindness or chemical burns.
-
Do not dispose of batteries in fire. Doing so may result in the battery bursting, causing a fire or injury.
-
Do not expose a battery to high temperatures, such as direct sunlight or a fire. The battery may burst, causing a fire or injury.
- Do not attempt to recharge batteries that are not intended to be charged. Charging could cause the battery to burst or leak, which can cause blindness, chemical burns, or injury.
- If the batteries do leak, avoid contact with the leaked fluid. If the battery fluid should come in contact with your eyes, mouth, or skin, wash immediately with water and consult a doctor. Battery fluid is corrosive and may possibly cause loss of sight or chemical burns.
Wireless unit
- Do not use this unit near medical devices or inside medical facilities. Radio waves from this unit may affect electro-medical devices.
- Do not use this unit within 15cm (6 in) of persons with a heart pacemaker implant or a defibrillator implant. Radio waves from this unit may affect electro-medical devices, such as a heart pacemaker implant or defibrillator implant.
If you notice any abnormality
-
If any of the following abnormalities occur, immediately turn off the power and disconnect the power plug. If any of the following abnormalities occur, immediately turn off any amplifiers and receivers.
-
The power cord/plug is damaged.
- An unusual smell or smoke is emitted from the unit.
- Foreign material gets into the interior of the unit.
-
There is a loss of sound during use.
-
There is a crack or damage in the unit.
Continued use could cause electric shocks, a fire, or malfunctions. Immediately request an inspection or repair from the dealer where you purchased the unit or from qualified Yamaha service personnel.
- Be careful not to drop or apply strong impact to this unit. If you suspect the unit may have been damaged due to dropping or Impact, immediately turn off the power and pull the power plug from the AC outlet. Failure to observe this may cause electric shocks, a fire, or malfunctions. Immediately request an inspection from the dealer where you purchased the unit or from qualified Yamaha service personnel.

CAUTION
This content indicates "risk of injury."
Power supply/power cord
- Do not use an AC outlet where the power plug fits loosely when inserted. Failure to observe this may cause a fire, electric shocks, or burns.
- When removing the electric plug from the unit or an AC outlet, always hold the plug itself and not the cord. Pulling by the cord can damage it and cause electric shocks or a fire.
- Insert the power plug firmly all the way into the AC outlet. Using the unit when it is not
plugged in sufficiently can cause dust to accumulate on the plug, causing a fire or burns.
Installation
- Do not place the unit in an unstable position where it might accidentally drop or fall over and cause injuries.
- Do not block this unit's ventilation holes (cooling slits). This unit has ventilation holes on the top/side/bottom to prevent the internal temperature from becoming too high. Failure to observe this may trap heat inside the unit, causing a fire or malfunctions.
-
When installing this unit:
-
Do not cover it with any cloth.
- Do not install it on a carpet or rug.
- Make sure the top surface faces up; do not install on its sides or upside down.
- Do not use the device in a confined, poorly-ventilated location.
Failure to observe the above may trap heat inside the unit, causing a fire or malfunctions. Ensure that there is adequate space around the unit: at least 30~cm (11-3/4 in) on top, 20~cm (7-7/8 in) on the sides, and 20~cm (7-7/8 in) on the rear.
- Do not install the unit in places where it may come into contact with corrosive gases or salt air. Doing so may result in malfunction.
- Avoid being near the unit during a disaster, such as an earthquake. Since the unit may turn over or fall and cause injury, quickly move away from the unit and go to a safe place.
- Before moving this unit, be sure to turn off the power switch and disconnect all connection cables. Failure to observe this may damage the cables or cause you or someone else to trip and fall.
- When transporting or moving the unit always use two or more people. Attempting to lift the unit by yourself may damage your back, result in other injury, or cause damage to the unit itself.
- For proper installation of the outdoor antenna, make sure to have it done by the dealer from where you purchased the unit or by qualified service personnel. Failure to observe this may cause the installation to fall and result in injury. Installation requires special skills and experience.
Hearing loss
- Do not use the unit/speakers or headphones for a long period of time at a high or uncomfortable volume level, since this can cause permanent hearing loss. If you experience any hearing loss or ringing in the ears, consult a physician.
- Before connecting the unit to other devices, turn off the power for all devices. Also, before turning the power of all devices on or off, make sure that all volume levels are set to the minimum. Failing to do so may result in hearing loss, electric shock, or device damage.
- When tuming on the AC power in your audio system, always turn on the amplifier or receiver LAST, to avoid hearing loss and speaker damage. When turning the power off, the amplifier or receiver should be turned off FIRST for the same reason. Failure to observe the above may cause hearing impairment or speaker damage.
Maintenance
- Remove the power plug from the AC outlet before cleaning the unit. Failure to observe this may cause electric shocks.

Handling caution
- Do not insert your hand or fingers into the ventilation holes of this unit. Failure to observe this may cause injury.
- Do not insert foreign materials such as metal or paper into the ventilation holes of this unit. Failure to observe this may cause a fire, electric shocks, or malfunctions. If foreign material gets into the unit, immediately shut off the power and pull the power plug from the AC outlet and request an inspection from the dealer where you purchased the unit or from qualified Yamaha service personnel.
-
Do not do the following:
-
put heavy items on top of the equipment.
- place the equipment in a stack.
-
apply unreasonable force to buttons, switches, input/output terminals, etc.
-
Avoid pulling the connected cables to prevent injuries or damage to the unit by causing it to fall.
Battery use
- Always replace all batteries at the same time. Do not use new batteries together with old ones. Using new ones with old ones could cause a fire, burns, or inflammation due to fluid leaks.
- Do not use batteries other than specified batteries. Doing so can cause fire, burns, or inflammation due to leakage.
- Do not mix battery types, such as alkaline batteries with manganese batteries, or batteries from different makers, or different types of batteries from the same maker, since this can cause a fire, burns, or inflammation due to fluid leaks.
- Keep batteries away from children. A child could accidentally swallow a battery. Failure to observe this may also cause inflammation due to battery fluid leaks.
- Do not put in a pocket or bag, carry, or store batteries together with pieces of metal. The battery could short, burst, or leak, causing a fire or injury.
- Always make sure all batteries are inserted in conformity with the +/- polarity markings. Failure to do so might result in a fire, burns, or inflammation due to fluid leaks.
- When the batteries run out, or if the unit is not to be used for a long time remove the batteries from the remote control to prevent possible leakage of the battery fluid.
- When storing or discarding batteries, insulate the terminal area by applying tape, or some other protection. Mixing them with other batteries or metal objects can cause a fire, burns, or inflammation due to fluid.
Notice
Indicates points that you must observe in order to prevent product failure, damage or malfunction and data loss.
Power supply/power cord
- If not using the unit for a long period of time, be sure to pull the power plug from the outlet. Even if the (Standby/On) switch has been turned off (the screen display is off), a minute current is still flowing.
Installation
- Do not use this unit in the vicinity of other electronic equipment, such as a TV, radio, or mobile phone. Failure to observe this may cause this unit or the TV or radio to produce noise.
- Do not use this unit in a location that is exposed to direct sunlight, that becomes extremely hot, such as near a heater, or extremely cold, or that is subject to excessive dust or vibration. Failure to observe this may cause the unit's panel to become deformed, the internal components to malfunction, or for operation to become unstable.
- Install this unit as far away from other electronic equipment as possible. Digital signals from this unit may interfere with other electronic equipment.
- If using a wireless function, avoid installing this unit near metal walls or desks, microwave ovens, or other wireless network devices. Obstructions could shorten the transmission distance.
Connections
- If connecting external units, be sure to thoroughly read the manual for each unit and connect them in accordance with the instructions. Failure to properly handle a unit in accordance with the instructions could cause malfunctions.
- Do not connect this unit to industrial units.
Digital audio interface standards for consumer use and industrial use are different. This unit has been designed to connect to a consumer-use digital audio interface. Connections to an industrial-use digital audio interface could not only cause this unit to malfunction, but could also damage the speakers.
Handling
- Do not place vinyl, plastic, or rubber products on this unit. Failure to observe this may cause discoloration or deformation in the panel of this unit.
- If the ambient temperature changes drastically (such as during unit transportation or under rapid heating or cooling) and there is a chance condensation may have formed in the unit, leave the unit for several hours without turning on the power until it is completely dry before use. Using the unit while there is condensation can cause malfunctions.
Maintenance
- When cleaning the unit, use a dry, soft cloth. Using chemicals such as benzine or thinner, cleaning agents, or chemical scrubbing cloths can cause discoloration or deformation.
Batteries
- Be sure to discard used batteries in accordance with local regulations.
Information
About content in this manual
The illustrations and screens in this manual are for instructional purposes only.
- The company names and product names in this manual are the trademarks or registered trademarks of their respective companies.
Software may be revised and updated without prior notice.
Wireless communication functions [U.K. and Europe models]
Bluetooth
Radio Frequency (Operational Frequency): 2402 MHz to 2480 MHz
Maximum Output Power (EIRP): 7.27 dBm
Wi-Fi (2.4 GHz)
Radio Frequency (Operational Frequency): 2412 MHz to 2472 MHz
Maximum Output Power (EIRP): 19.98 dBm
Wi-Fi (5 GHz)
Radio Frequency (Operational Frequency), Maximum Output Power (EIRP):
5170 to 5250MHz, 22.30 dBm
5250 to 5330MHz, 22.27 dBm
5490 to 5710MHz, 24.56 dBm
5735 to 5835MHz, 13.96 dBm
- Wireless devices transmitting over a 5 GHz frequency band can only be used indoors. Use of such devices outdoors is prohibited by law.
Information for users on collection and disposal of old equipment and used batteries:

These symbols on the products, packaging, and/or accompanying documents mean that used electrical and electronic products and batteries should not be mixed with general household waste.
For proper treatment, recovery and recycling of old products and used batteries, please take them to applicable collection points, in accordance with your national legislation.

By disposing of these products and batteries correctly, you will help to save valuable resources and prevent any potential negative effects on human health and the environment which could otherwise arise from inappropriate waste handling.
For more information about collection and recycling of old products and batteries, please contact your local municipality, your waste disposal service or the point of sale where you purchased the items.

Pb
For business users in the European Union:
If you wish to discard electrical and electronic equipment, please contact your dealer or supplier for further information.
Information on Disposal in other Countries outside the European Union: These symbols are only valid in the European Union. If you wish to discard these items, please contact your local authorities or dealer and ask for the correct method of disposal.
Note for the battery symbol (bottom two symbol examples):
This symbol might be used in combination with a chemical symbol. In this case it complies with the requirement set by the EU Battery Directive for the chemical involved.
(weee_battery_eu_en_02)

Introduction
- This unit is a product for enjoying music and video at home.
- This document explains basic speaker system setup and unit configuration, followed by step-by-step instructions. Basic operations, such as playing Blu-ray Discs, DVDs, and radio content, are also explained.
The unit is equipped with a number of other functions not described in this document. For more information about this product, refer to the Owner's Manual on the Yamaha website.
Follow one of the methods described below to view the latest Owner's Manual.
In HTML format
- Scan the QR code found on the front cover of this document.
- Visit the following website.
http://avpro.global.yamaha.com/manual/avr/cxa5200
In PDF format
- Visit the following website.
http://download.yamaha.com/
[For U.S. customers only]
Visit the following website for additional information, FAQ's, downloads such as "Owner's Manual" and product updates. http://usa.yamaha.com/support/
Trademarks and trade names used in this document are those of their respective owners. See the Owner's Manual for more information.
Features
The unit is also capable of the following, which are not described in this document. See the Owner's Manual to help you get the most out of the unit.
- Playing music files stored on a media server (PC or NAS)
- Playing iTunes music or iPhone/iPad/iPod touch music over a network (AirPlay)
- Playing music in multiple rooms (Zone function)
- Configuring the advanced settings (ADVANCED SETUP menu)
For more information, see "What you can do with the unit" in the Owner's Manual.
Opening and closing the front panel door
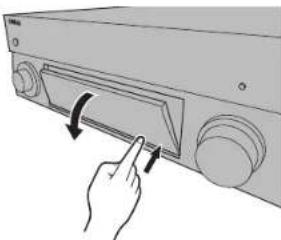
Press the bottom of the door gently to open it when using controls or jacks behind the front panel door. Keep the door closed when controls or jacks behind the front panel door are not in use. (Be careful not to trap your fingers.)
1
Preparation
Confirming package contents
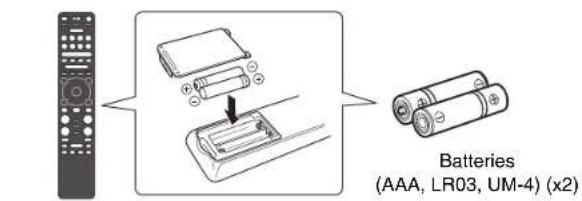
Remote control

DAB/FM antenna
Australia, U.K., Europe, Russia, and Middle East models)
Power cable supplied power cable varies along the region of purchase.
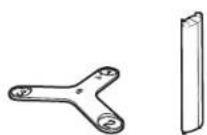
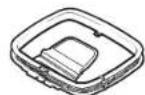
Microphone base Pole Use to measure angle/height during YPAO.

FM antenna
(Except for Australia, U.K., Europe, Russia, and Middle East models)
One of the above is supplied depending on the region of purchase.
Quick Start Guide (this booklet)
Preparing cables
The following cables (not supplied) are required to build the system described in this document.
- Speaker cables (depending on the number of speakers)
- XLR balanced cable or Audio pin cable (RCA unbalanced cable) (x11 + number of subwoofer)
HDMI cables (x3)
Network cable (x1) (when connecting to a router via a network cable)
2
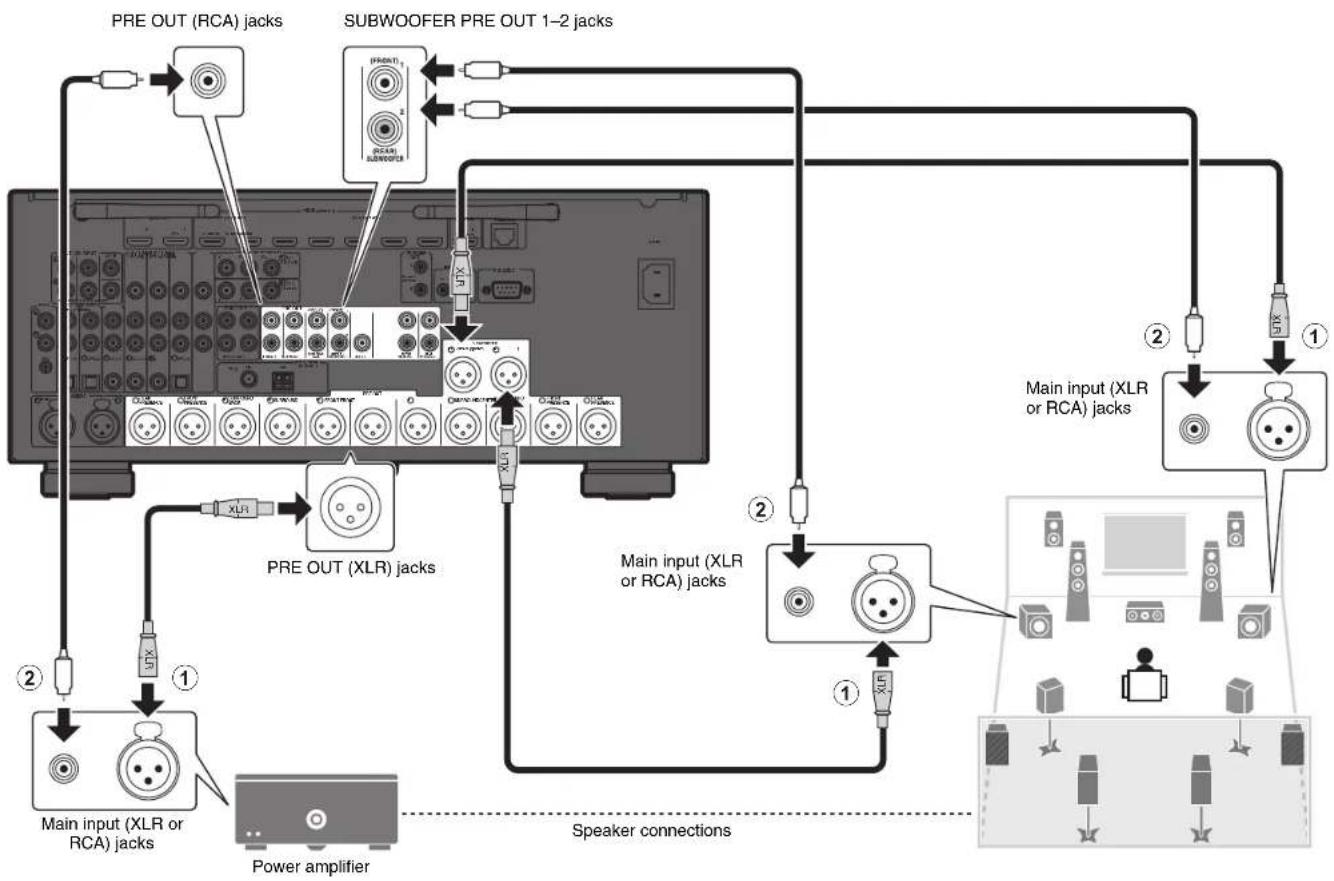
Connecting a power amplifier, speakers and subwoofoers
Refer to the connection diagram shown on the next page.
1 Connect the PRE OUT jack of the unit to the main input jack of the power amplifier for each of 11 channels (① or ②).
When making balanced connections (①), connect PRE OUT (XLR) jacks of the unit to the main input (XLR) jacks of the amplifier with XLR balanced cables.
When making unbalanced connections (2), connect PRE OUT (RCA) jacks of the unit to the main input (RCA) jacks of the amplifier with audio pin cables (RCA unbalanced cables).
2 Connect the subwoofer (with built-in amplifier) to the SUBWOOFER PRE OUT 1-2 jacks (① or ②).
3 Connect each speaker to the corresponding speaker terminal of the power amplifier.
For details on speaker connections, refer to the instruction manuals for your power amplifier and speakers.
Note
- You can connect 2 subwoofoers to the unit and place them on the right/left (or front/rear) sides of the room. When using 2 subwoofoers, configure the "Configuration(Subwoofer)" setting after connecting the power cable to an AC wall outlet. For details, refer to the Owner's Manual.
-
If you have a Yamaha power amplifier that supports the trigger function (such as MX-A5200), you can control the power amplifier in conjunction with operating the unit (such as powering on/off) by making a system connection. For details, refer to the Owner's Manual.
-
Use a subwoofer equipped with built-in amplifier.
- Before connecting a power amplifier and subwoofer to the unit, remove the power cables of the unit, power amplifier and subwoofer from the AC wall outlets.
- The pin assignments for the XLR output jacks of the unit are shown below. Before connecting an XLR balanced cable, refer to the instruction manual of your device and verify that its XLR jacks are compatible with the pin assignments.

XLR output jacks
3
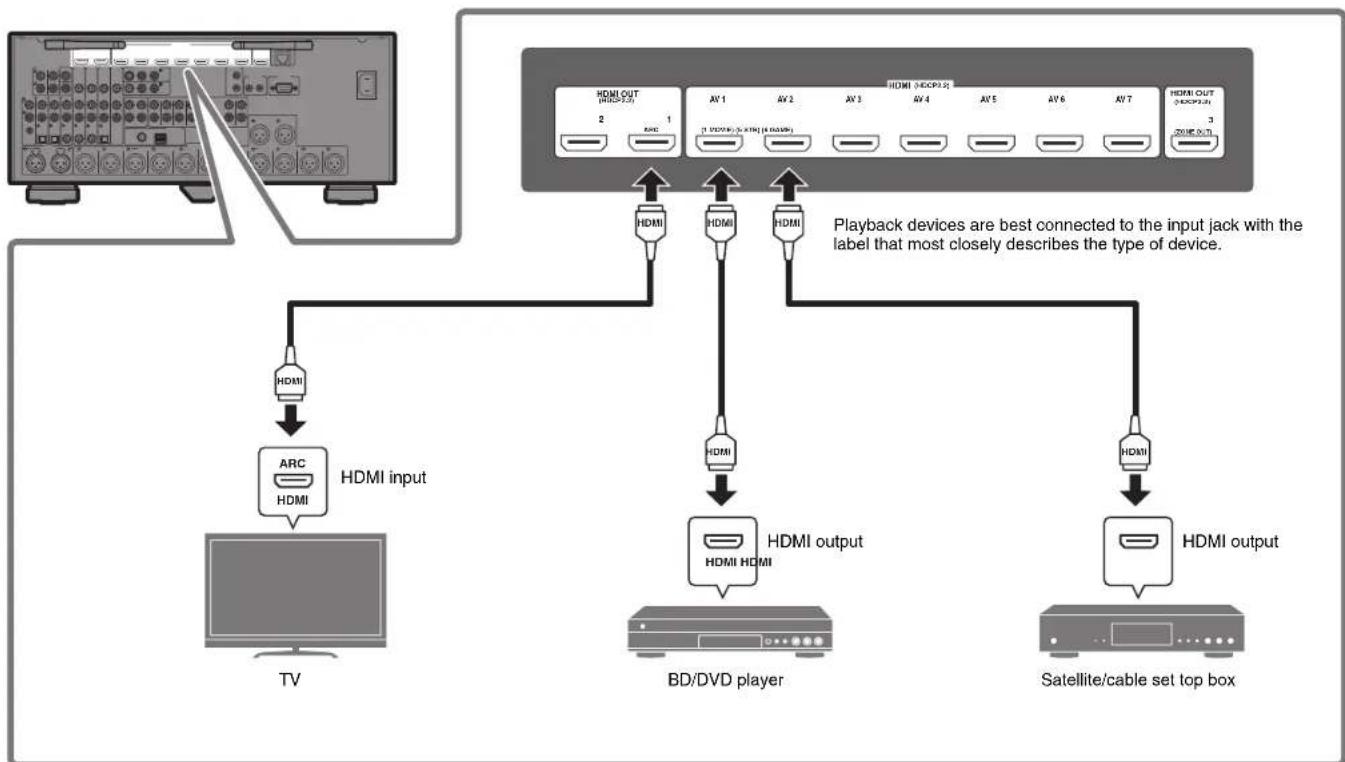
Connecting external devices
4
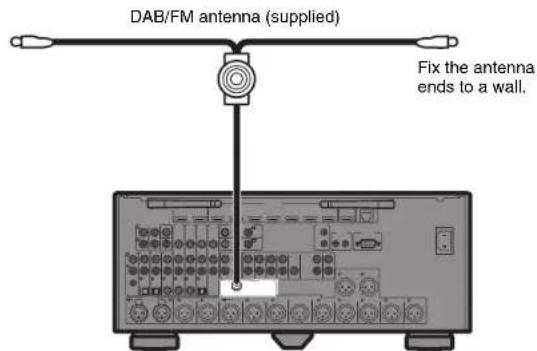
Connecting the radio antennas
FM/AM antennas
(Except for Australia, U.K., Europe, Russia, and Middle East models)
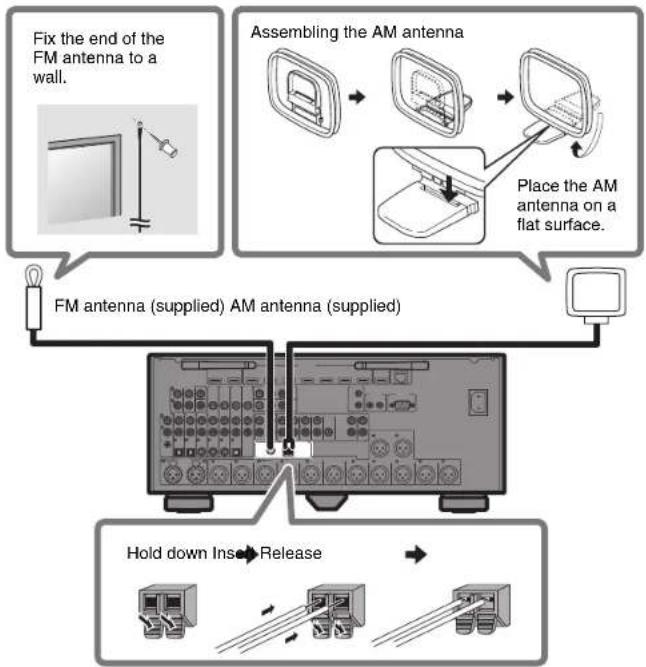
DAB/FM antenna
(Australia, U.K., Europe, Russia, and Middle East models)
5
Preparing a network connection
Prepare a wired or wireless network connection in accordance with your network environment.
Note
The wireless antenna must be raised if the unit will be connected to a Bluetooth device.
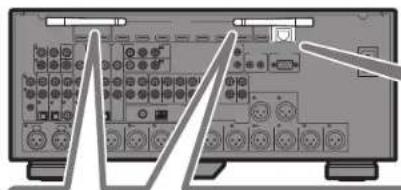
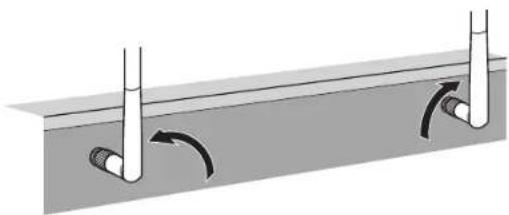
Wireless network connection
Raise the wireless antenna so that it is standing up straight. (Procedures for connecting the unit to a wireless router are described in step 8.)
Notice
Do not apply excessive force on the antenna. Doing so may damage it.
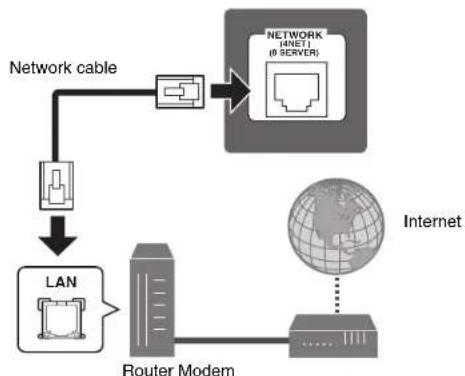
Wired network connection
6
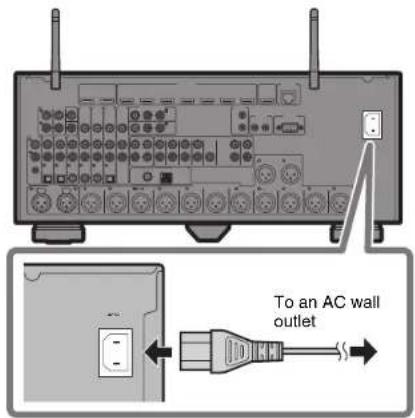
Connecting the power cable to an AC wall outlet, and turning on the unit
1 Plug the power cable into an AC wall outlet.
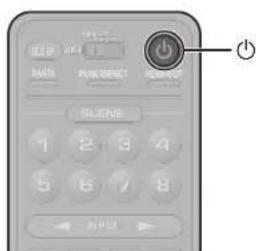
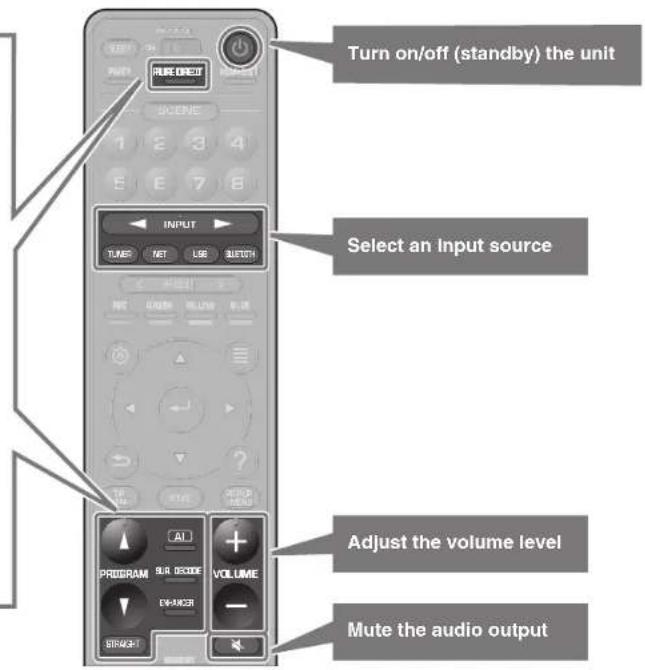
2 Press (receiver power) to turn on the unit.
3 Turn on the TV and switch the TV input to display video from the unit (HDMI OUT jack).
The Network Setup screen shown below will be displayed on the TV when the unit is turned on for the first time after purchase. It may take several tens of seconds for the screen to be displayed (WAC: Wireless Accessory Configuration).
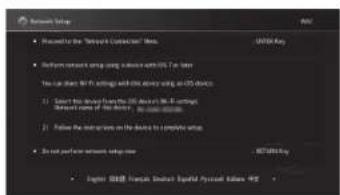
See "Sharing the iOS device setting" under "Connecting to a network wirelessly" in the Owner's Manual when using this function to connect the unit to a network. This document explains wireless connection using the MusicCast CONTROLLER app installed on your mobile device. Follow the procedure described under "8 Setting MusicCast" (p. 16).
Note
This screen will not be displayed if the unit is connected to a router via its NETWORK jack (wired connection).
7
Optimizing the speaker settings automatically (YPAO)
The Yama h t i t, and then automatically optimizes the speaker settings, such as volume balance and acoustic parameters, to suit your room.
Note the following regarding YPAO measurement
Test tones are output at high volume and may surprise or frighten small children.
Test tone volume cannot be adjusted.
- Keep the room as quiet as possible.
- Stay in a corner of the room behind the listening position so that you do not become an obstacle between speakers and the YPAO microphone.
- Do not connect headphones.
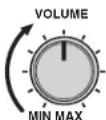
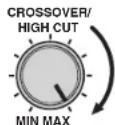
1 Turn on the subwoofer and set the volume to half.
If the crossover frequency is adjustable, set it to maximum.
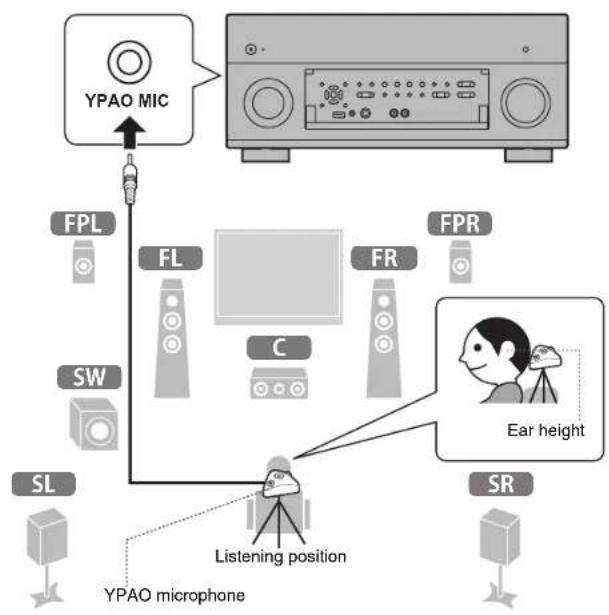
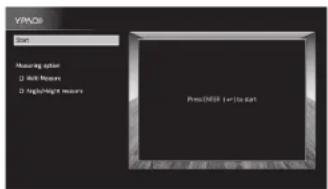
2 Place the YPAO microphone at your listening position and connect it to the YPAO MIC jack on the front panel.
The screen below appears on the TV.
Note
Place the YPAO microphone at your listening position (same height as your ears). We recommend the use of a tripod as a microphone stand. You can use the tripod screws to stabilize the microphone.
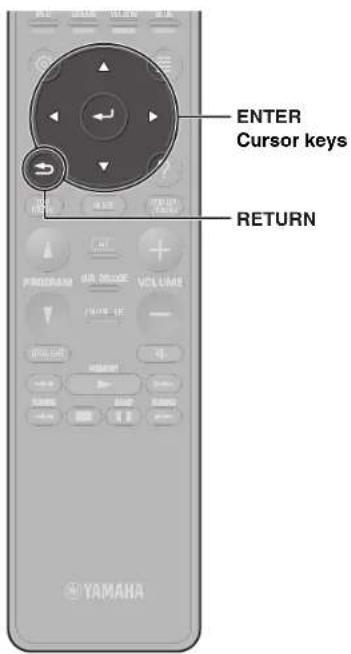
3 Use the cursor keys to select "Start" and press ENTER.
The measurement will start in 10 seconds.
It takes about 5 minutes to measure.
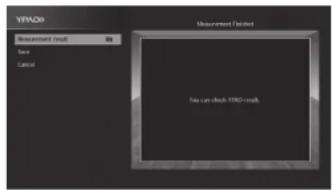
The screen below appears on the TV when the measurement finishes.
Note
If an error message (such as ERROR 1) or warning message (such as WARNING 2) appears, see "Optimizing the speaker settings automatically (YPAO)" in the Owner's Manual.
4 Select "Measurement result" and press ENTER to display the result.
After confirming the result, press RETURN to return to the "Measurement Finished" screen.
5 Use the cursor keys to select "Save" and press ENTER.
6 Disconnect the YPAO microphone from the unit.
This completes optimization of the speaker settings.

Setting MusicCast
What is MusicCast
MusicCast is a brand new wireless musical solution from Yamaha, allowing you to share music among all of your rooms with a variety of devices. You can enjoy music from your smartphone, PC, NAS drive and music streaming service anywhere in your house with one easy-to-use app. For more details and a lineup of MusicCast compatible products, refer to the following site: http://www.yamaha.com/musiccast/
- Seamlessly control all MusicCast compatible devices with the dedicated app "MusicCast CONTROLLER".
- Play back music from music streaming services. (The compatible music streaming services may differ depending on your region and product.)
- Configure wireless network settings of MusicCast compatible devices.
Note
See the Owner's Manual for information on other wireless connection methods if the MusicCast CONTROLLER app will not be used.
Using MusicCast CONTROLLER
To use the network features on the MusicCast compatible device, you need the dedicated app "MusicCast CONTROLLER" for the operation. Search for the free app "MusicCast CONTROLLER" on the App Store or Google Play and install it to your device.
Adding the unit to the MusicCast network
Perform the following procedure to add the unit to the MusicCast network. You can also configure the unit's wireless network settings at once.
Note
The SSID and security key for your network will be needed.
1 Tap the "MusicCast CONTROLLER" app your mobile device and tap "Setup".
Note
If you have already connected other MusicCast compatible devices to the network, tap "Settings" and then "Add New Device".
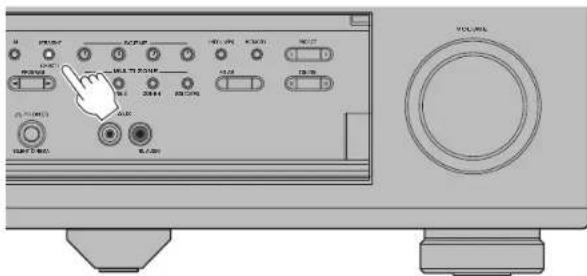
2 Follow the app's on-screen instructions.
3 Press and hold the CONNECT button on the front panel of the unit for 5 seconds, as instructed by the app.
4 Follow the app's on-screen instructions to configure network settings.
When a connection has been established, "Completed" will be displayed in the front display of the unit.
Network connection with the MusicCast CONTROLLER app is now complete, and the unit has been registered as a MusicCast-enabled device.
Playback
This section describes basic operations such as playing Blu-ray Discs and DVDs, and tuning into radio stations. Most operations can be performed using the remote control.
Basic playback functions
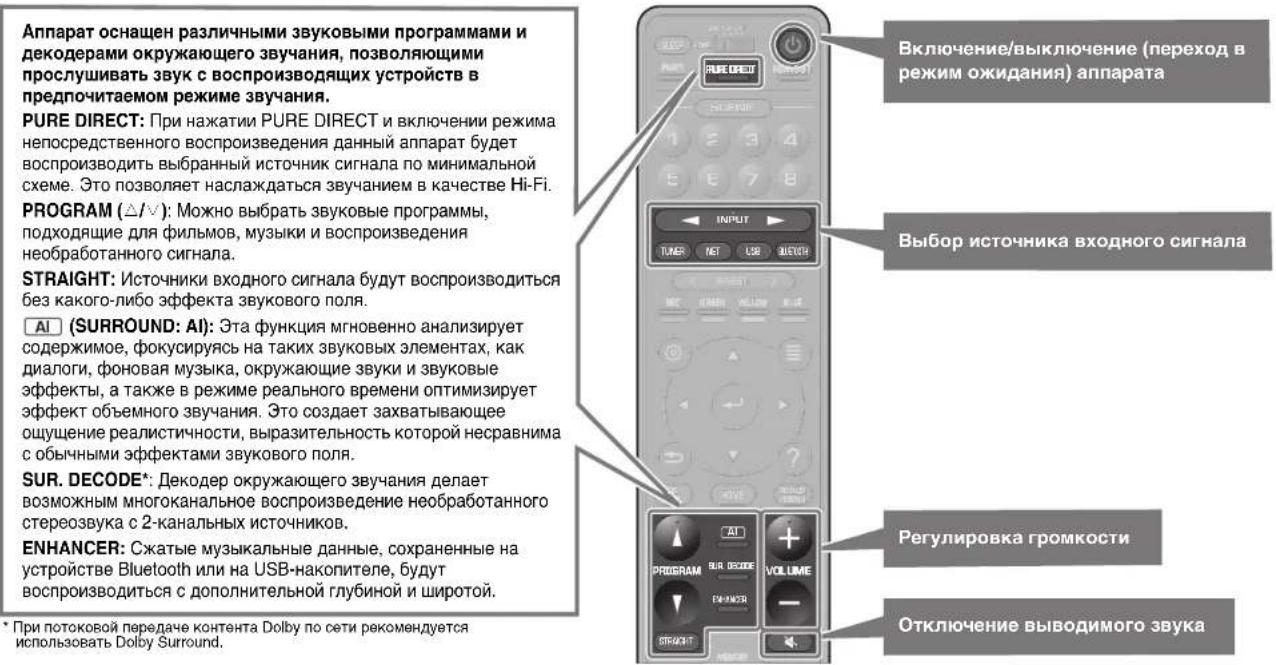
The unit is equipped with a variety of sound programs and surround decoders that allow you to enjoy playback sources in your favorite sound mode.
PURE DIRECT: When PURE DIRECT is pressed and the direct playback mode is enabled, the unit plays back the selected source with the least circuitry. It allows you to enjoy Hi-Fi sound quality.
PROGRAM ( / ) : Sound programs suitable for movies, music and unprocessed playback can be selected.
STRAIGHT: Input sources will be played without any sound field effects.
AI (SURROUND: AI): This function instantly analyzes content, focusing on sound elements such as dialog, background music, ambient sounds and sound effects, and optimizes the surround effect in real time. This creates a compelling sense of realism with expressive power beyond that of conventional sound field effects.
SUR. DECODE*: The surround decoder enables unprocessed multichannel playback from 2-channel sources.
ENHANCER: Compressed music stored on a Bluetooth device or USB storage device will be played with additional depth and breadth.
* We recommend Dolby Surround while network streaming is Dolby contents.
Playing a BD/DVD
We recommend playing back multichannel audio (5.1-channel or more) to feel surround sound produced by the unit.
1 Turn on the BD/DVD player.
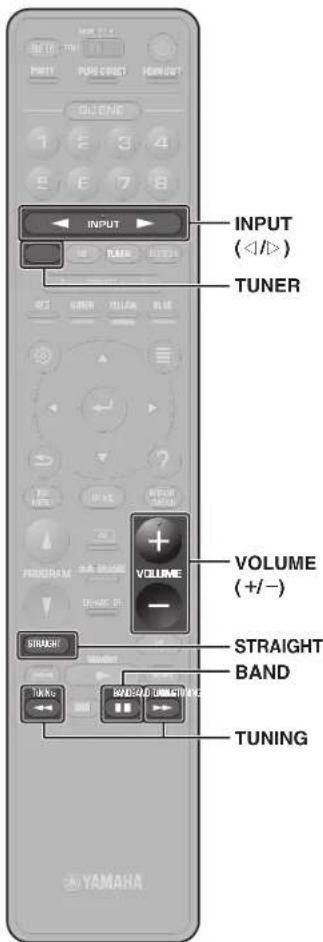
2 Press INPUT (< / >) repeatedly to select "AV 1".
The name of the connected device such as "BD player" may be displayed.

Input source Device name
3 Start playback on the BD/DVD player.
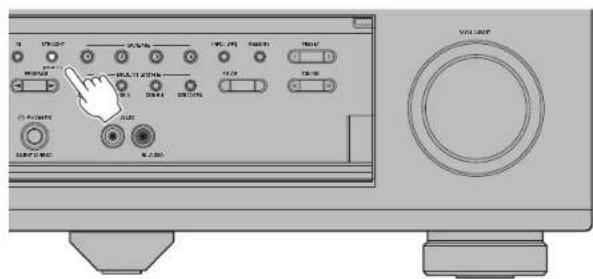
4 Press STRAIGHT to select "STRAIGHT".
Note
When "STRAIGHT" (straight decode) is enabled, each speaker produces each channel audio signal directly (without sound field processing).
5 Press VOLUME to adjust the volume.
Note
When sound is not heard, or no sound is output from a specific speaker, see "Troubleshooting".
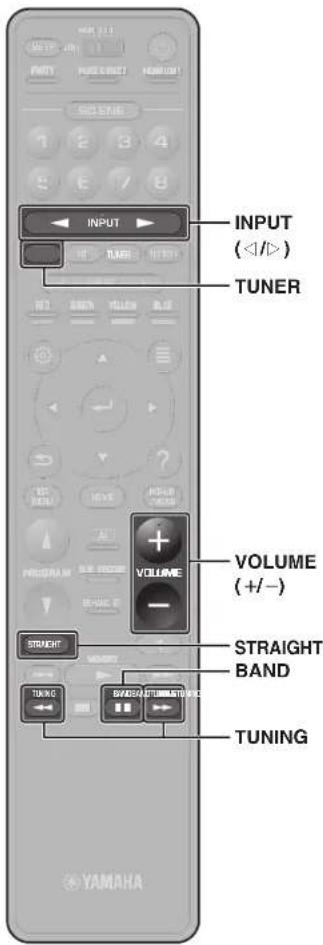
Listening to FM/AM radio
(Except for Australia, U.K., Europe, Russia, and Middle East models)
1 Press TUNER to select "TUNER" as the input source.
2 Press BAND to select FM or AM.
3 Press TUNING to set a frequency.
Hold down the key for about a second to search stations automatically.

"TUNED" lights up when the unit is receiving an FM/AM radio station signal.
"STEREO" lights up when the unit is receiving a stereo FM radio signal.

Setting the frequency steps
(Asla, Taiwan, Brazil, General, and Central and South America models only)
At the factory, the frequency step setting is set to 50kHz for FM and 9kHz for AM.
Depending on your country or region, set the frequency steps to 100kHz for FM and 10kHz for AM.
1 Set the unit to standby mode.
2 Hold down STRAIGHT on the front panel and press MAIN ZONE.
3 Press PROGRAM on the front panel repeatedly to select "TUNER FRQ STEP".

4 Press STRAIGHT on the front panel to select "FM100/AM10".
5 Press MAIN ZONE to set the unit to standby mode and turn it on again.
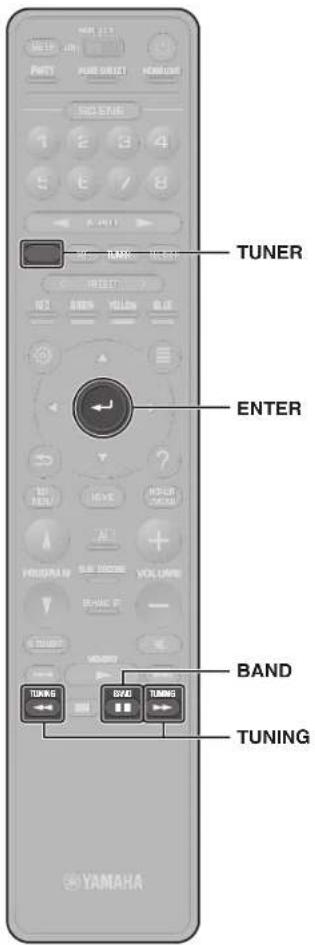
Listening to DAB radio
(Australia, U.K., Europe, Russia, and Middle East models)
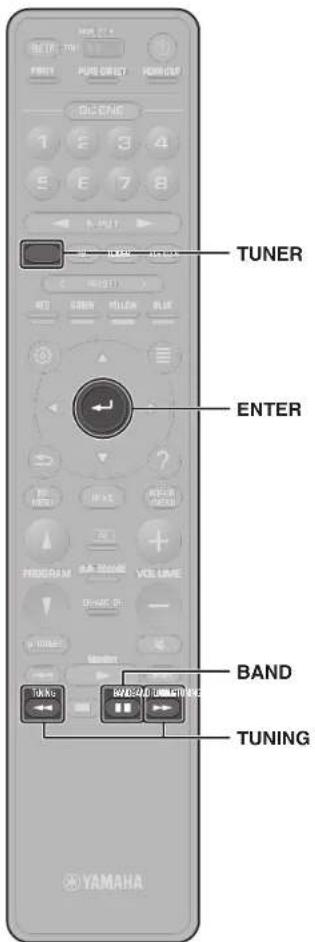
1 Press TUNER to select "TUNER" as the input source.
2 Press BAND to select the DAB band.
The following message appears on the front panel if you have not performed an initial scan yet.

3 Press ENTER to start an initial scan.

When the initial scan finishes, the unit automatically tunes into the first DAB radio station as stored in station order.

4 Press TUNING repeatedly to select a DAB radio station.
Listening to Internet radio
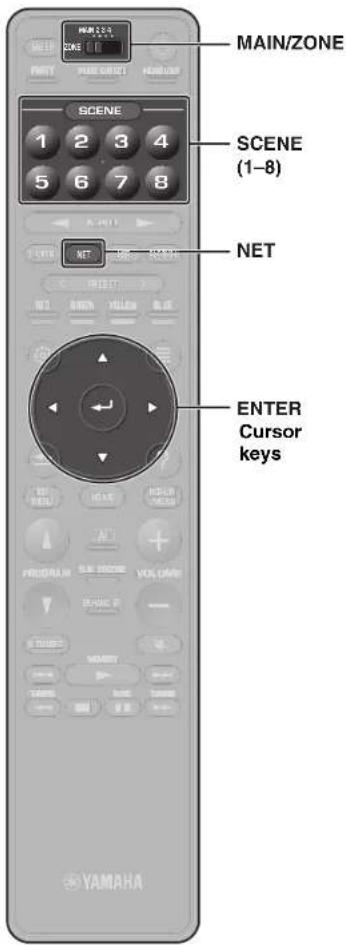
1 Press NET repeatedly to select "NET RADIO" as the input source.
The browse screen is displayed on the TV.
2 Use the cursor keys to select an item and press ENTER.
When an Internet radio station is selected, playback starts and the playback screen is displayed.
Note
Internet radio stations can also be selected using the MusicCast CONTROLLER app installed on your mobile device.
Listening to music from streaming services
The MusicCast CONTROLLER app installed on your mobile device can be used to receive streaming services.
1 Select a streaming service on the MusicCast CONTROLLER app screen.
2 Select a station.
Note
The following may be required, depending upon the streaming service used.
Install the streaming service app on your mobile device
- Register a streaming service account
Notes on streaming services
- Streaming services may be changed or discontinued without notice.
- Supported streaming services may vary by the country or region of use.
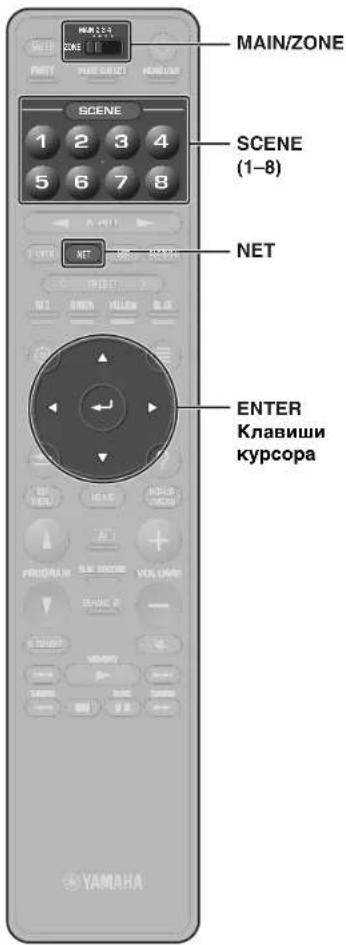
SCENE function
Unit input sources and settings that have been assigned to SCENE (1-8) keys can be selected with a single touch (SCENE function). When a SCENE (1-8) key is pressed, the unit turns on automatically if it is in standby mode.
By default, the following input sources have been assigned to each SCENE (1-8) key when the MAIN/ZONE switch is set to MAIN, ZONE2, or ZONE3.
Note
The default settings in ZONE4 differ from the table below.
| SCENE key Input | |
| 1 | AV 1 |
| 2 | TUNER |
| 3 | AUDIO 2 |
| 4 | NET RADIO |
| 5 | AV 2 |
| 6 | AV 3 |
| 7 | AUDIO 1 |
| 8 | SERVER |
Registering a scene
The settings assigned to each SCENE (1-8) key by default can be changed to suit individual preferences.
- Play an input source.
- Apply settings for functions such as Sound programs and Compressed Music Enhancer.
- Press and hold a SCENE (1-8) key until "SET Complete" appears on the front display.
Playing music stored on a Bluetooth® device
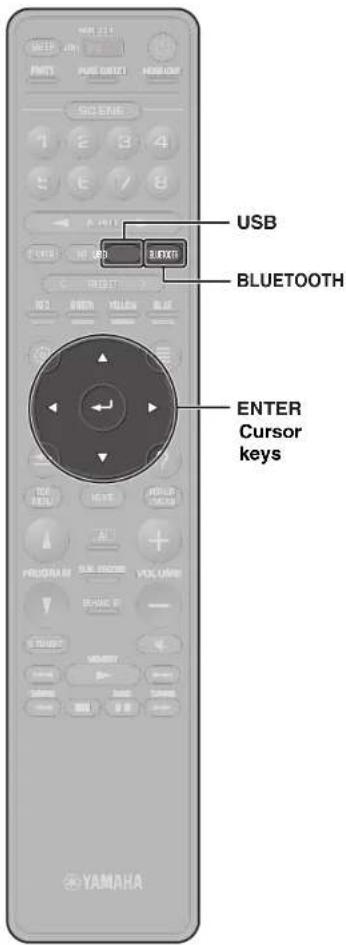
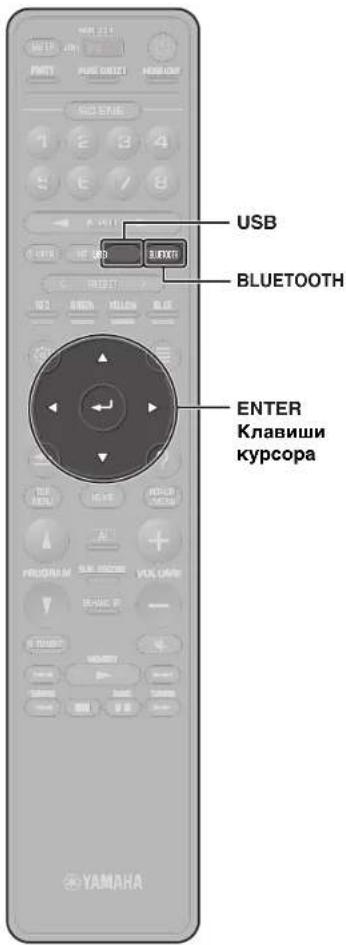
1 Press BLUETOOTH to select "Bluetooth" as the input source.
2 Select the unit (network name of the unit) from the available device list on the Bluetooth device.
If the passkey is required, enter the number "0000". When the connection is established, the indicator will glow in the front display.
3 Select a song and start playback on the Bluetooth device.
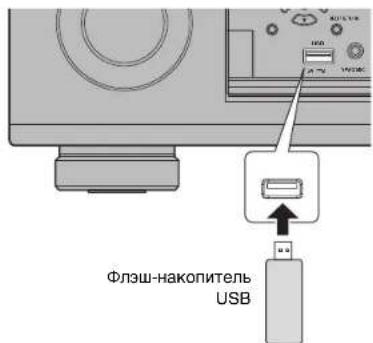
Playing music stored on a USB flash drive
1 Connect the USB flash drive to the USB jack.
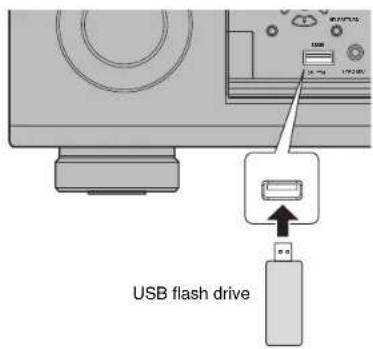
Note
Connect the USB flash drive directly to the USB jack. Do not use an extension cable.
2 Press USB to select "USB" as the input source.
The browse screen is displayed on the TV.
3 Use the cursor keys to select an item and press ENTER.
When a song is selected, playback starts and the playback screen is displayed.
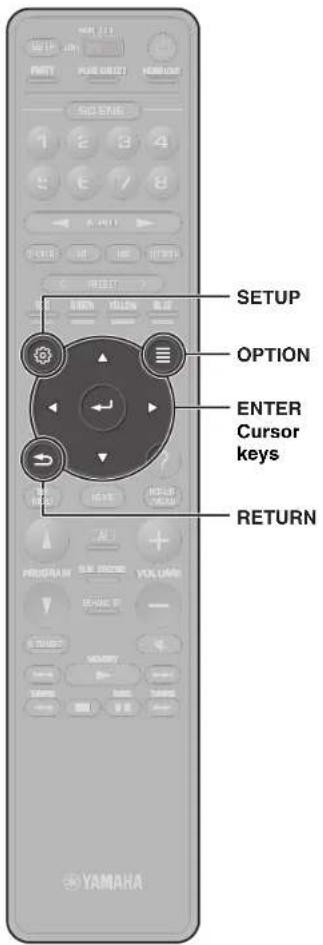
Basic operation of the Option menu
This section explains basic operation of the Option menu. The Option menu can be used to configure the unit's playback functions according to the input source.
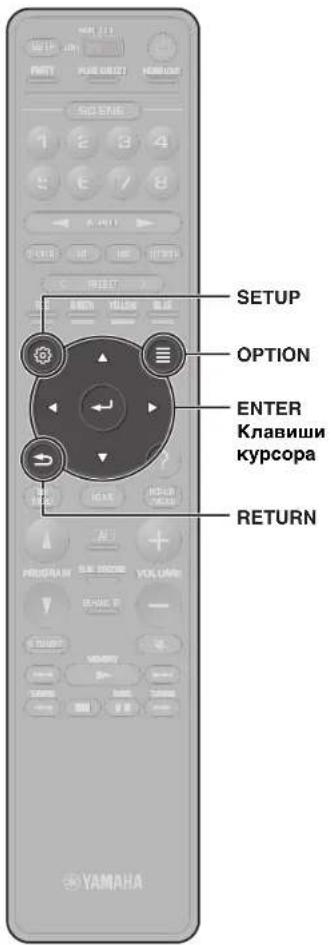
1 Press OPTION.

The Option menu is also displayed on the TV screen.
2 Use the cursor keys to select an item and press ENTER.
To return to the previous screen during menu operations, press RETURN.
3 Use the cursor keys to select a setting.
4 Press OPTION.
For more information, see "Configuring playback settings for different playback sources (Option menu)" in the Owner's Manual.
Basic operation of the Setup menu
This section explains basic operation of the Setup menu. The setup menu can be used to configure the unit's functions in detail.
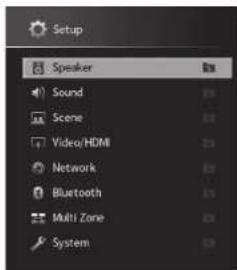
1 Press SETUP.
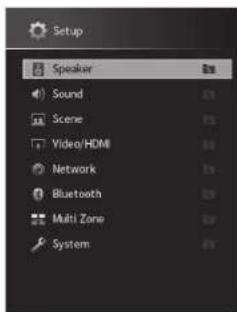
2 Use the cursor keys to select a menu and press ENTER.
To return to the previous screen during menu operations, press RETURN.
3 Use the cursor keys to select an item and press ENTER.
4 Use the cursor keys to select a setting.
5 Press SETUP.
For more information, see "Configuring various functions (Setup menu)" in the Owner's Manual.
Troubleshooting
If trouble occurs, first check the following:
Make sure of the following when the unit does not function properly.
The power cables of the unit, power amplifier, TV and playback devices (such as BD/DVD players) are connected to AC wall outlets securely.
The unit, power amplifier, subwoofer, TV and playback devices (such as BD/DVD players) are turned on.
- The connectors of each cable are securely inserted in to jacks on each device.
If there is no problem with the power and cables, refer to the instructions shown in the table below.
If the problem you are experiencing is not listed or if the instructions do not help, turn off the unit. disconnect the power cable and contact the nearest authorized
Yamaha dealer or service center.
| Problem Cause Remedy | ||
| The power does not turn on. The protection circuitry has been activated three times consecutively.When the unit is in this condition, the standby indicator on the unit's front panel blinks if you try to turn on the power. | As a safety precaution, capability to turn on the power is disabled. Contact your nearest Yamaha dealer or service center to request repair. | |
| The unit is not reacting. The internal microcomputer is frozen, due to an external electric shock (such as lightning or excessive static electricity) or to a drop in the power supply voltage. | Hold down MAIN ZONE (1) on the unit's front panel for more than 15 seconds to initialize and reboot the unit. (If the problem persists, disconnect the power cable from the AC wall outlet and plug it again.) | |
| No sound. | Another input source is selected. | Select an appropriate input source with the input selection keys. |
| Signals that the unit cannot reproduce are being input. | Some digital audio formats cannot be played back on the unit. To check the audio format of the input signal, use "Information" under "Sound" in the "Setup" menu (p. 23). | |
| No sound is coming from a specific speaker. | The playback source does not contain a signal for the channel. | Use "Information" under "Sound" in the "Setup" menu (p. 23) to check the audio signal. |
| The currently selected sound program/decoder does not use the speaker. | Use "Test Tone" in the "Setup" menu (p. 23) to check the speaker output. | |
| Audio output of the speaker is disabled. Perform YPAO (p. 14). | 14). | |
| Use "Configuration" in the "Setup" menu to change the speaker settings (p. 23). | ||
| No sound is coming from the subwoofer. | The playback source does not contain LFE or low-frequency signals. | To check if the subwoofer is working properly, use "Test Tone" in the "Setup" menu (p. 23). |
| Subwoofer output is disabled. Perform YPAO (p. 14). | ||
| Set "Subwoofer" in the "Setup" menu to "Use" (p. 23). | ||
| No video. | Another input source is selected on the unit. | Select an appropriate input source with the input selection keys. |
| Another input source is selected on the TV. Switch the TV in input to display the video from the unit. | ||
| No video from the playback device connected to the unit with HDMI. | The input video signal (resolution) is not supported by the unit. | To check the information about the current video signal (resolution), see "Information" under "Video/HDMI" in the "Setup" menu (p. 23). For information about video signals supported by the unit, see "HDMI signal compatibility" in the Owner's Manual. |
| The TV does not support HDCP (High-bandwidth Digital Content Protection). | Refer to the instruction manuals for the TV and check the TV's specifications. If you want to play back contents that require HDCP 2.2-compatible devices, both the TV and playback device must support HDCP 2.2. | |
| Cannot make the connection settings on MusicCast CONTROLLER. | The mobile device is not connected to the wireless router at your home. | Connect the mobile device to the wireless router and use MusicCast CONTROLLER. |
| It takes time for the app to detect the unit. | Wait a moment while making sure that your mobile device will not be in the sleep mode. | |
| Access to the network is restricted by the firewall settings of the wireless router (access point). | Check the firewall setting and the MAC address filter of the wireless router (access point). | |

Specifications
| Bluetooth | |
| Supported profile A2DP, AVRCP | |
| Supported codec SBC, AAC | |
| Bluetooth version Ver. 4.2 | |
| Wireless output Bluetooth Class 2 | |
| Maximum communication distance 10 m (33 ft) without interference | |
| Supported content protection method | SCMS-T |
| Network | ||
| Wi-Fi function Radio Freq. | ency Band 2.4 GHz, 5 GHz band | |
| Wireless LAN Standards: IEEE 802.11 a/b/g/n/ac*20 MHz channel bandwidth only | ||
| Security Method: WEP, WPA2-PSK (AES), Mixed Mode | ||
| Capable of WPS by PIN Method and Push-Button-Method | ||
| Capable of sharing with iOS devices by wireless connection | ||
| Tuner | ||
| FM/AM Tuning Range U.S. | A. and Canada models [FM] 87.5 MHz | to 107.9 MHz [AM] 530 kHz to 1710 kHz |
| Asia, Taiwan, Brazil, General, and Central and South America models | [FM] 87.5/87.50 MHz to 108.0/ 108.00 MHz [AM] 530/531 kHz to 1710/ 1611 kHz | |
| China and Korea models [FM] 87.50 MHz | MHz to 108.00 MHz [AM] 531 kHz to 1611 kHz | |
| DAB/FM Tuning Range Australia, U.K., Europe, Russia, and Middle East models | [DAB] 174 MHz to 240 MHz (Band III) [FM] 87.50 MHz to 108.00 MHz | |
| General | |||
| Power Supply U.S.A. and Canada models AC 120 V, 60 Hz | |||
| Taiwan model AC110 to 120 V, | 50/60 Hz | ||
| Brazil, and Central and South America models | AC110 to 120 V, 50/60 Hz | ||
| China model AC 220 V, 50 Hz | |||
| Korea model | AC 220 V, 60 Hz | ||
| General, Asia, Australia, U.K., Europe, Middle East, and Russia models | AC 220 to 240 V, 50/60 Hz | ||
| Power Consumption | 65 W | ||
| Standby Power Consumption | HDMI Control Off/Standby Through Off/Network Standby OFF | 0.1 W | |
| HDMI Control On/Standby Through On/Network Standby OFFInput: AV 1 (HDMI no signal) | 1.4 W | ||
| HDMI Control OFF/Standby Through OFF/Network Standby ON/Bluetooth Standby OFF | Wired | 1.4 W | |
| Wireless (Wi-Fi) | 1.6 W | ||
| HDMI Control OFF/Standby Through OFF/Network Standby ON (Wired)/Bluetooth Standby ON | 1.4 W | ||
| HDMI Control ON/Standby Through ON/Network Standby ON (Wi-Fi)/Bluetooth Standby ON | 2.5 W | ||
| Dimensions (W x H x D) | 435 x 193 x 474 mm (17-1/8" x 7-1/2" x 18-5/8") | ||
| Reference Dimensions(with wireless antenna upright)* Including legs and protrusions | 435 x 270 x 474 mm (17-1/8" x 10-5/8" x 18-5/8") | ||
| Weight 15.2 kg (33.5 lbs) | |||
The contents of this manual apply to the latest specifications as of the publishing date. Refer to the Owner's Manual on the Yamaha website to confirm specifications other than described above and obtain the latest information of the unit.
PRECAUTIONS D'USAGE
LISEZ ATTENTIVEMENT AVANT DE PROCEEDER A Toute UTILISATION. VEILLEZ A SUIVRE CES INSTRUCTIONS.
(weee_battery_eu(es_02)
Introduccion
(weee_batemy_eu_ct_02a)
IcNcNtBcAaHbK BcAaBnTAAHbAaDITaPcCOrOEnHbM npOBDoHHKOM KpOBeCTN CnKApoeHbOeNtKHeTPOeCKHM TOKOM INI NNOxApdy.
He pinnacaincB KNTeNIO INI KABENIO NITAHNA PNI HAIHNY PIKCA YUAPA MOHNNI. HecnoiHOINIO STOYOKA TAKAHNMOKOT PNPAGBCTN NOKAPGNDN 1NEKTRPNCKDM TKOM
HapraKHeMHIO CTOCHNKA NITAHIN JOONHO COOTBOCTBOBATyKyaAHHOMY HA HEM 3NaHeHIO. POKIIOUeHN KHe NpApBNBHO PO3eTKe NpeMeHHORTO KA MoKET CTaTb pNCHNO HOKAPA, NOPAEHN 3IEKTPUeCKHM TOKOM INH HeHHCPABHOCTN.
NcnoIb3yteKa6eBnPiTHAHn. He IcNoIb3yte Ka6eBnPiTHAHn, BxOdHmB KOMInEKT NoCTABKN, CdpYIMN yCTPOHCTBAMn. HecoBIOJIOeHNO 3TOr OyKA3AHNMOKETnpBECNTK NOXAPK, OOKFAM INH NHeCNPABHOCTRn.
-Пелюндашип поьоветушtenь ичшaite erо окршьшпс nbimn rрз. HecobndneHme 3t0r ykaaHaMH MoKET npBecTN K noxkapy mN npokaeHHIO 3eKpTnepckm TOKOM.
IpeNd HactPtoKoI anapata y60,ntteb, TTO nOIOB3y0mAM PO3OTKa NPOeMOHORo TOKa IeKTo DoCTyTHa. PnR Bo3NHKOHeBN KAKO-1JIO 6c08 Wn HeCNpABHOCTH HMOJIINHO TOKNIQUHTE NTAHNO C NMOUcIO BIKIQUHTeJI IN OTOCDMHNT EWTENCnB OT PO3ETKMI NPEMeHORO TOKA. DaKe ECNI BlkTIQNHTeJI NTAHNA HAXOITRCB B BbIKIOHEHOM NOIOJEHIN, To Tex NOP NOKA WTENTCeJI He OTOeIMHNOT O p3eTKH, anapata OCTaTeTCA NOIKIOHHeM KTOCHMQNYHNTAHA.
B CNYaep rpoMA nnpnpiN6KHHHr pO3bl HsAmoJNTbHO OTKIOHHTe BbIKIOHATeNB nITAHIN NOTCOeMHInTe WITcENb OTpO3KN PepeMeHHOrO ToKa. HeoJIIOeHHe 3TOrO yka3AHMOKET npMBecTN K NOXAPy HmIeHNPABHOCTM.
Ecnn annapat he 6ydtncnlo308aB C TeHNE DnTHeBHO BpEMH,OTcOeHNHTe WtencebI OT po3ekn nepeHHORo ToKa. HecobdneHne 3TO rKa3AHN MoKET pNMBCT K NOXAPY Nnn HcnpaBBOCTM.
He pa36npaTb
He pa36bpaiaTe annapaTne Hn Hm3MeHnTe ero KOHCTpyKUHO. Heco6NIOeHne 3tOro ykA3aHN MOKeT nPcBteKn N KpOApy, noPaeHHO 3NeKTPMNECKHM TOKOM, TpaBMAM INHNCNPABHOCTM. PnI NOBANHn HnONAOK O6paaiTecn DnA OCMOTPa INN pEMONTA B MeTO pINNo6peTeHN annapaTn IN B cEpBNCbln CEHTYamaHa.
BepuyoT BoDbl
- He donnyckaTe nonadahn annapata noDdoJb, he noIb3yItecb im padom C boDoB, B yCIOBIAKcBPOCTN INN NOBIIUEHNOI BAAxHOCTHe. N CTABTE HA annapat KAKHe-Ni60 BoMOKCTC c XINKOCTbO (HANPMep, B3bl, 6byTbnIKu INN CTAKAnbH), KOTOPAR MOKET npONITcB IN NoNAcTB O BTEPcTHA, a TAOKE He NoIb3yIteCB annapatOM tam, rHe Ha Hero MOKET nOJaCTBoDA. IOnaADHe XINKOCTn, HANPMep BOBbl, BHTpy ANAPATaMOKET cTb pIMHNOH NOkapa, nopaxHenr JNEKTPmecKm ToKOM uHEeKnpaBHOCtB. CN CyJAE noNAdAHn B Annapat XINKOCTn, HANPMep BOBbl, HEmEJIeHNo OTKHIOHTe PINTAHIE NTcoEOHNIte Ka6BeMbI NITAHNRT OTO pO3ETKN NpeMeMHORo TOKA. 3ATEM o6pATInTeCb dN OCMToPa annapata B MecTo pInno6peTeHHn INB CepBNCbM CEHTP YamaHa.
Hn B Koem CnyAe HcBCTaJIaTE H He BbHMImae TlTeNCEb MOKbIMm DyKAMn. He 6epNTec3a annapat BaNXbMn pykAMn. HecBoIIOHeNeT OTO rya3AHnM NOKet pNtBCIE K N oPAXeHEMOI 3NeKTHPNECKHM TOKOM IINH HeINCPaBHOCTm.
Bepeb ot orHa
- HaP3MaEaIeTO rOpIaIIpeIeMBeTI HINI ITOCHN4HQN KTOBPTORO OTRPAOM C anapAtonAT, NOCKoJIbKY 3TO MOTEPI PnEBcTeK B03rOPaHIO.
06cnykubahne nyxoid
He HcNolbyeIIN OYCTKN ININ CMA3KN A3PO30NI ININ paCbIJIReMle XMMHueckKe BceCTBA, COePxAaIIIO ROpOIO RaBIL. IopOuH RA3 MoGOT OCTaBcR BHyTpAnnapata, YTO MOET PnPBCTN K B3pBY IN IN NOXAPY.
Ncnojb3ObaHne 6aTaapeek
He pa36npaTne 6atapeKy. PonaIaHne coepxMIMO 6atapeKu B rnaHa pykmoKOTnpBeCTN K nOtepe 3peHn N XmHHeCKOMY OXKGY.
He 6pocate Batapeh K OROh.3To MoKet PnBcTn K B3bBy BatapeHKn N CTaB pnuHno Hoxapa HIN TpaMbI.
He noDBepraTe 6atapeky BO3dEChTBHO BbICOKHX TemnepaTp, HApIMeP npRMO COIohno CBO eTa IIN ORH. 6atapeKa MoKet B3OpBaTbCBy n CTaB npYHNOI NOXAPA INI TpABMbI.
HeIbTuTaeCb3apXbAtb6aTeKIn,NepeDnHa3auHHeNbleIpnep3aPdKn.3apRka MoKET pINBeCTK b3BpybI INI pOteKaTHIO 6aTePekIn,HTO,B CBOO OuepeDb,MOKET Bb3BaTb NOTIOpE3PNH, XMMHcckN OOKr IIN TPAByM.
- EcnbatapeKnBce je npoTeKIn, 368aTe KeHtKaTc B bteKeIIm 3eKtpOnrM. B cyuae npNaadJa 3neKtpOniTa B rna3a pot Hn HA K0KY HEmEJNeHNO CmOITe 3neKtpOnl BoDn o6paTitek B kpaUy. 3neKtpOniTe -3to eKOe BeuejcTBO, cnooc6oHe Bb3BbTb Notepio 3peHn IN XMMHecNE OKON.
ModyIb 6ecnpoBDOHNO CB3N
He HcnoIb3yIe annapat OKOJI MEniHcKHX NpI6OBu IN MeiHcHcKHX yUpeKJdHMe. PAnIOBnJIbOT OaHIOHO annapTa MOrT Bo3JeCTBOBaTb Ha 3NEKtpeckneM EMeiHcKHeCtpyo
He nnonbayte annapat 6nke, cem B 15 cm ot JIOe C mnnnantnpoBaHHbIM
kapnOCTMmNtPOPMnDnO6PmNITPOPMnADMOBONHb,roHOpyoMbIe DaHHBM annapatom, MOrT NpOBnITb Ha pAOyTo 1EeKTPNECKHX MeIMUNCNKHX yCTPOINCTB, napmPMBkBNBHehIXk APKNOTMNTMPOPNIOINN DEaMnPnTPOB.
HeWtathbIe cHTyaUu
PnB03HKnHOBeHmNIO6oN3yka3aHHbIXHnKpeNpObIeHMeEJIeHHOOTKIOHTe NITAHHeNOTcOeAINHTeKa6eJIbNTAHnO TJIeKTPOcETn. PnpB03HKnHOBeHmNAKKO106oN3nepeuCnEHHbIXHapUeHMeHMeJNeHHo BkIKIOHTe BcYcUNTTeN IN NPDMEHNKK.
-NoBpeXdeHnKa6eNnTuTaHn nnWtencen.
-13annapataNCXOHTHeo6bHb3aIaxnnDbIM.
-BHtpb annapata nonan nocToPOHHn npEdMeT.
-BoBpEMRaPbOtBn npOnaJaet 3ByK.
- Ha annapate IMeIOrTa TpeunHb nn NOBpeKDeHNr.
PojdoJXKHeH NcIb3OBAHN MoKET Bb3BaTb NopAeXHe HJIaKTPNUeCKHM TOKOM, KApOp IIN npBecTeN K HeCNpBaHocTH. HeaMeIINTeBHO o6MaTBeC JnO cOtMtpa Annapata B MeTO erpoIrooepoEnerinB CepBcHbU eHTp YamaHa
He poHnIte H He noBepraTe annapa TcNbHomy Fm3neckOmy Bo3eCTBIO.EcnI cyueCTBeT BepoTHOCb TOrTO, YTo annapa5bN NOpeBeknB E p3yntBaT NaedHn IIN PnH3NECKOBO3EETBnTH, HEmeJNeHOOTKNOHIE NtAHEMIO NTcHMe OTO pOsetKN NEpemEHNO TOKA. HecobIOJeHMe 3TOr OYka3AHn MOeKt npBecTr N oPapaeHHIO 3NEKTpueeckm TokOM, nOxApy INI HEnCnpaHoCTM. He3aMeJNTeBH O6paTITcB DnA OCMToPa annapata B MecTO npNo6peTeHHN INI B CepBCHbIeHTP Yahama.

BHUMAHNE
DaanHnHOpMaun npedynpeKdaet o pncke nonyeHHa TpaBMbl.
IcToHmNnTaHmN Ka6Enb nTaHm
HeHCNoB3yIePo3eTKnpeMeHHoroTOKA,BKToPbIX WTeNCelb depXHTcRe HHeaHKeHO.HeoCNoHeMe3TOPO yka3aHmNOKeT pNBeCTN K NOxApy, npaxeHnO 3NEKTpckmN TOKOM NIN NKOTAM.
BbHIMaCeTeByO UntencelN3 yCTpoiCTBa HnI po3eTK npeMeHHoro TOKa,
depKntcEcb 3a cam Untencel. HnKOrJa HE TAnHe 3a UHyp. 3To MOxET npINBOCTK nIOBpeXeHNIO Ka6eJI N CTaTb PnHHOI NopaeHn 3NeKTPueeCKM TokOM HnNOxapka.
BctabnIte wntncb b po3eKny nepemehHoro ToKa nIOth IO do ynopa.
VcNonsbsaHne ycTPOCTBa, wntncb KOTOPORo HeOcTOATNO h NtOHTHO BCTABNEHa B
po3eKy, MoKET Bbl3BaTb HAKONNEHe qACTNU nbIN HA Wtncene I CTaTb pNHHOH
NoXkapa nn OXORA.
YCTaHOBka
He octaIaIaIe anIapar B HcyToHbOM NIOJOKHIN. AnIparat MOKOT CNyauHIO yNactb I npnHHHTb TpMbY.
He 3a4kpBbAeBE TBeBHnHIOHOHE OTEpCBT (OxNkDaIOIOpePcE) Annapata.
DAnHHAn annapat OChauHn BBeTHINIOHOHM NTOBpCTPMABEPXY/CBOKy/BHN3y DnnpTeoTPBaueHm CnIKoKOM nIbHoro NOBbHEHn TEMpePaTyBHyTp. HecoNODeHn 3To0Yka3AHMOEET PnEBCTK HApuyEHNO HOToPA TenaOT Annapata. 3To MOeKt CTb pNPHIO NOKpaI HNNCpNAPOBCTE.
- Bo BpMa yCTaHOBKn annapaTa:
-HeHaKpbBaTe annapaT KaHbIO;
-HeCTaBBTe anPnapTa Hs KOBPKN NIN KOBPbI;
YbEaTeBc, YTOBEXHnAbaHEnBaNapBAJIeHa BBEpX I TOI ANPapHe YCeTahOBENB NpeBepETyOMNoJIOKEnHNI HnO6O?
HNOJb3yIeBc 1nnapATOB T EChxh, INOxo npoBpTaBMAHmIX NMOUHNHX. HHeocBIOHNE pNpBDEHHbBy BILK UZaAHHN MOKET pNpBCTN K HAPUUGHNO OTBOA TENLA OYCTPOBCTBA. 3TO MOKET CTbT pNmuHO NOkApA INHcHpaBHOCTe. YBeDnEbC B NAHmN DOCTAOHORO CBOOHO NOpCTPAHCTBA BOKpy Annapata: no KPAnHE MEPE 30 CM CBEPX20 CM NO6aAMN 20 CM caADM.
http://www.yamaha.com/musiccast/
Jlerko ynpabnTe BcemM MusicCast-coBmecTmbmU yctpoiCTbAMn C nomoosbu cneuaJIbHoro npIIOxejHn "MusicCast CONTROLLER".
Bocnpn3oDpnte My3bky C yCnyr nOTOKOBn nepeDaHm3bIKn. (CObMeTnMbte yCnyr nTOKOBn nepeDaHm3bIKn MoryT OTNnAtpbCR B 3aBNCIMOCTN OT perHOHa nI3dEJIIN.)
BbnoHnTe KOHpyauu 6ecnpoBOHOcTn MusicCast-coBmectmbix yCTPOUCTB.
PpmeHne
Cm. RykoDbTRO noIbToBaeTn nnnoYhen HIOpOaMuaO OdyRTH CNoOc6Ba 6ecPiPoAoHOro noNkIo-ueHH, eonn pinoKoeHe MusicCAST CONTROLLER he dyet erncnloBaTob.
Испобзовке MusicCast CONTROLLER
Длн Испьзоваим сеетьх Функши Ha MusicCast-coBmecTHMOM yctpoiCTBE He6xOdHMo cneuaJIbHoe npINOJoxHeHne "MusicCast CONTROLLER" Дл pa60ы. БиоЛнITE NOIck npINOJoxHeHn "MusicCast CONTROLLER" Ha App Store ИИн Google Play nycTaHOBite erо ha yctpoiCTBE.
Добальенье annapata K ceTN MusicCast
BbInonHnTe CnEduyUOHy npoueDpy dnn Do6abJeHHaNemTa K cetn MusicCast. 3aoNo TaKke MoXHo BbInonHnTb KOHpIpyauuHaCTpoek 6ecnpoBOHOcTn annapata.
PpmeuHne
PnHao68Tc SSID KnH 6e3oACHOCTm nBaew cTeN.
1 HaxmTe 3NaOk npuOxKeHnA "MusicCast CONTROLLER" MO6nIbHOM yCTpoNCTBe n HaxmTe "Setup".
PpmeaHne
EcnBbIyKeNoKnIOUynIpyrme MusicCast-coMecTmMbYeycTpoCTBaKceTN, haxMMte"Settings",a3aTEM"Add New Device".
2 CneyuTe HnctpyKzHM Ha 3kpaHe nporpamMbI.
3 Haxmte u yepxnbate 5 ckynd KhoNkY CONNECT Ha nepeDne nahein annapata corlacho nHCTpyKu npnloKeHH.
4 Cnedynte 3KpaHHbIM HNCTpyKcIaM npHIOXeHN No HAcTpoKe CeTeBbIX npaMeTPOB.
Iocne yctaHOBENHIOKIIOeHNHa IaMcNHee nepeHne NaHeJI annapata NOBHTC coo6eHne «Completed»
HacTpoKa cTeBOrO noKlIoueHnC nOMoMbIO npINOxHeHn MusicCast CONTROLLER 3aBepSeHa, n annapaT 3apeNCTpipoBaH kAk ycTpoIcTBo C noDpeKkOi MusicCast.

Ru 117
Bocnpon3VepeHne
B 3TOM pa3dene OINcBbAeTc8 OCHOBHbE ONEpaMn, TAKHe KAK BOCpOIN3BeDeHne INCKOB Blu-ray, DVD-DnCKOB n HacTpOJa Ha paAnocTaMn. BoIbHnHCTBO OpeaMHo MOnHO BbIOINHTb C NOMOJIbHO NyIbTa Dv.
OchOBhble yHKuB Bocnpn3BeHnA
Bocnpon3BedeHne BD/DVD-dncka
TTObBI NOHNO MEpe OuyTNb OBemHb3ByK, BbIaBaEmbI annapaTOM, peKoMeHdyeTcR BOCnPONBIOH MHOROKaHaNbHbIe 3ByKO3aNNcN (5.1 KAHaONBIOH 60bnJbe).
1 BkIouHe BD/DVD-nponrpbBaTeJIb.
2 HeckoIbko pa3 HaXmTe INPUT (</>)ДЯ BbI6opa "AV 1". Moket OTobpaKaTcHnBaHne NOKJIIOueHHoro yctpoIcTa, HanpIMep "BD player".

NCTOCHIK BXOHDOROMHNA
Ha3BaHne yCtpoiCTBa
3 HaHnTe BocnpOn3BeDeHne Ha BD/ DVD-nponrpbIbaTeNe.
4 Haxmnte KhoNky STRAIGHT, 1TO6bl BbI6paTb "STRAIGHT".
PpmeaHne
KordaBkIOHepKIM“STRAIGHT"(npRMOE
deKOIOHOBAHn).KAKDAKOONKABOCIPNO3BOHT
ayDIOCHNANKJQDOKANA HAprrmyo(6e3
06abotkn 3ykoBOrO noJIa).
5 Haxmnte KhoNky VOLUME dnypeRyInpOBKn rPOMKoCTn.
PpmeaHne
EmcAaYbCbeHbIeHNBeBbBOBHTCNBepe3 onpeDeneHHyQ KOHOHKy, CM. "ToTckK cYtPaeHHeNEHnPaNHOCTb"
Прослuyшваиме FM/AMpaадио
(Kpome moDenei nA BCTpannn, BeNko6paTAHn, EbponbI, Pocn n CpeHero Boctoka)
1 HaXMMTE TUNER, YTO6bI BbI6paTb "TUNER" B KaueCTBe NcToUHnKa BXoDHoro CnHaHa.
2 HaxmTe BAND, yTo6bI Bbl6paTb FM nn AM.
3 HaKMTe TUNING yCTaHOBKn YACTOTbl.
Haxmnte n ydepkmbaite 3ty kHONky np6bn3ntelbHO cekHy dnaBOMATHeckoro nonka CTAHNI.

"TUNED" 3aropaetc npnpneMe annapatom CnHana FM/AM-paiooctanm.
Pn npne me annapatom ctepeocponueckoro FMpaoinocnHa n3aropaetra STEREO
YcTaHOBka Waara HactpoKn YacToTbI (TolbKO moDen nA3nn, TaBaHn, Bpa3nnn, o6uaa moDen n moDen n DaN LcHTpAlbHo n IOxho Amepnk)
3ABOKDMMYCTAHOBKMIMIINIIaIaTCACTOTBIABNTOC3HAHENB50KfUFMN9KfUAM
B 3A BNNMOCTN OT cTBAHb HIN PEFHOA MOXHO YCtAHOBHT bWAT hACPOKHNACTOTN 100 kTu, dAN FM n 10 kTu, dAN AM.
1 Ieeppeyne anapay B xepm 0xuaaHn.
2 TSTRAIGHT naepenrn n Haxmmnte MAIN ZONE (3)
3 Heckobko PB3 HAXMME KOHNKY PROGRAM HA nepedHn PAHENI,TOb6I bOpbat "TUNER FRG STEP".
TUNER FRO STEP FN50/AM9
4 HAnmte KOnky STRAIGHT HA nepeDnei nanei, Tc06blb6paTb FM100/AM10".
5 HaKmTne MAIN ZONE 己 Tb6bI nepebeCTa annapat B pEKMn OKMDAHnA, a 3aTeM BKJIOHTe erO CHOBA.
Cleyuooee coo6eHne oTo6paKaetcHa nepeHne naHnE,ecnHaalbHoBCKaHApOBaHne eue He BblOnHeNo.

3 HaxmTe ENTER, yTo6bHaayaTb HaayalbHoe cKaHnpoBaHne.

Pocne 3aBepueHHN HCXoDHorO cKaHIOBaHN annapat aBtOMaTnueckn HAcTpOnTCHa nepByo DAB-CTaHmUo, coxpaehHHy B nepehy CtaHmU.

4 HaxmaTe TUNING ⅡBbIbopa hyxHOB DAB-paIOcTaHIN.
Порocлшваиме ИНТерпет-разно
1 Heckolbko pa3 HaxMnte KhONky NET, TTo6bl Bbl6paTb "NET RADIO" B KaueCTBe NcTOUHnKa BXoDHorO cnHaJa.
Ha TeneBn3ope OTo6pa3ntc3kpan npocmoTpa.
2 KhoNkamn Kypcopa Bbl6epnte HxHbI 3JIeMeHT n HaKMITE ENTER.
EcnBb6paHa HHTepHET-paIOCTAHU
HaHHeTcEe BOCPON3BedeHHe N NOBHTc 3KpaH BOCPON3BedeHn.
Ppmeyahne
INHTepet-PaiaoCTaIaMIMO XoTAKe BbBpTaBc T NOMOIO BPOIOXENHIA MusicCASI CONTROLLER, YCTAOHBIOHO HOBMOHIOBTOYPOKTBE.
IpocnyuBaHne ycnyr notokobn nepedaun My3bIKN
PnpnoKHeM MusicCast CONTROLLER, yctaHOBnEHHO H BAeEM MObHbOM yCTPOIcTBc, MOKHO McNtB3oBaT dna nOmyHmY cynr TNOTOKOB NpepeHa.
1 Bäbepine ycnyry tnoKoboi nepeaunHa h 3kpahe npnOxehnA MusicCast CONTROLLER.
2Bb6epntcTaHm.
PpmeaHne
B 3aBcMnCToEOTnOALyEMOYcynrNNOTAKOBORNEpDAHMOKET nptoeBbAorCBnCNDyQoue.
• YctahOBaHE MA HOmiBbHOM yCTpoIcTe BpnpIOXeHBe
yCynIy NTOKoBOB NeppeDa
3apernctprpyte yehTHyO 3aIncb ycnYrN NOTOKOBI nepeda
PnmeaHn no ycnyram notokob nepepa
UcTN NOTOKOBI NEpeaM MORYT 6bITb OKIIIOHEB 663 yBDMONHE.
PnDepkXyCnyrnotOKoBn nepeaHMOKET 3aBNCeTbOTCTpaHnPERHOA,BKOTOpbIX INONBcYETCRDaHHOEYCTPOCTBO.
Функця SCENE
NCTOCHNI BxODHORO CIRHana annpapaTn HAcTPOKNI, HA3NaueHHbIe KnaBnAm SCENE (1-8),MOXHO BB6pTaB ODNHM KACAHmE (PHHKUNR SCENE).PnP HaxaTN KONKN SCENE (1-8) annapat ABOTMaTHUeCKN BKJIOChTc,ecn OH bIN B peKIMe OKNJDAHIA.
No ymonuHIO, kOrda nepeKIOUaTeB MAIN/ZONE yctahOBEN B noLoXeHne MAIN,ZONE2 nn ZONE3, KhoNkAM SCENE (1-8) Na3aueHebl cNeDyUoHne nCTOUYHK BXoDHoro CnHJHa.
PpMueaHne
Hactroka no YMOTAHMIO dZNE Z4OTNIHAIOTc OTPnBDEOHbX B Tablne HNHO.
| Khoilea SCENE Bxod | |
| 1 | AV 1 |
| 2 | TUNER |
| 3 | AUDIO 2 |
| 4 | NET RADIO |
| 5 | AV 2 |
| 6 | AV 3 |
| 7 | AUDIO 1 |
| 8 | SERVER |
CoxpaHeHne cueHbI
HactpOKn,Ha3Ha-ENHHbE KaKdoN KnaBnue SCENE (1-8) NO yMOmAnHNO,MOrY 5bItb NMeHeHB COOTBETCBN C HINDBNDAyJbBHIM PpeDnQTeHNMAI.
- Bocnpoun3BedeNTe NCTOCHNK BXoHOrO CnHaHa.
2.Применгпсктоюдлфункшарпметр. ЗуковыхnporpammИCompressed Music Enhancer. - HaxMnte n ydepKnBaIte KnaBnSy SCENE (1-8) do noBnHn“SET Complete"Ha dncnnee nepedne nahei.
Bocnpon3BeDeHne My3bIKN, COxpaHeHHoHa yctpoinCTbe Bluetooth®
1 HaXmTe BLUETOOTH, YTo6bI BbI6paTb B KaueCTBe NcTOHnKa BXoDHorO cnHana "Bluetooth".
2 Ha yctpoicTBe Bluetooth B cnncke doCTyHbIX ycTPOcTB Bbl6epnte annapat (ceTeBOE mMa annpapaTa).
Ecni noTpe6yETc npoB, BBeDnte "0000". Iocne yCTaHOBENHa NOKIIIOUeHn Ha DnCnIee nepeHei NaHEn 3arOpNTc HnDKKaTOp
3 Ha yctpoiCTBe Bluetooth BbI6epNTe NecHIO NaHHTe BOCnpon3BedeHne.
Bocnpon3BeJeHne My3bIKN,coXpaHeHHoH Na Флэш-нakОпNTeIe USB
1 NpoknOHTe pJ3H-HaKoNtEnb USB K rHe3dy USB.
PpmeaHne
Φn3H-NAKONITe USB CneDyET NOKINOHTb HENOCpeCTBeHHo K rHe3dy USB.He nCnOJIb3yIte ydNHNITeB.
2 HaxMnte USB, yTo6bI Bbl6paTb KauecTBe nCTouHnKa BXoDHoro CnrHana "USB".
HaTeBnOpe OTo6pa3ntcAkpan npocMOTpa.
3 Khonkamn Kypcopa BbIbepnte HxHbI 3JIeMeHT n HaXMMTe ENTER.
PbBbOpe PeCHN HauHcTcEe BOpONB3eHeHne NOBHTcKpAH BOCPONB3eHeHnA.
OCHOBhbie onepaunm MeHIO Onua
B 3TOM pa3dene npmbedeHcO nncahne oCHOBbIX onepaun MeHO OnuMn. MeHO OOnnMoKHO nCNOJb30BaT bIaN HAcTpOKn FyHKuN BOCpON3BeHcHnn annapata B COOTBETBn C nCTOHNKOM BXoDHorO cRHaJa.
1 HaKmTe KnaBnWy OPTION.

Meho Onu TaKke oTo6paKaetcHa 3kpaHe TeneBn3opa.
2 KhoNkamn Kypcopa BbIbepnte HxHbI 3JIeMeHT n HaxMnTe ENTER.
YTo6bI BepHyTbCk npdeBdyuemy 3KpaHMy MeHIO, HaxMNTe RETURN.
3 BbI6epnte HacTpoKy c NOMOuBIO KnaBnKypcopa.
4 Haxmte KnaBnuy OPTION.
Дяп поунецьдоюнгельбин Иформси CM. "Hactpoika napametpoB BOCPON3BDEHNEДЯ p3aJIYbIb XICTOHNKOB BOCPON3BDEHNE(MEOI OOni)В DOKUMEHTePyKOBdCTBO nonb3OBateN.
OchOBhble onepaunmeho HacTpoKa
B 3TOM pa3dene npnbedeHo onncahme ochOBhix onepaun MeHO HacTpoKa. MeHO HactpoKa moxHO nCOnb3oBaT bIa IIOpO6Hoi HAcTPOKn fynKcui annapata.
1 Haxmnte KlaBnuy SETUP.
2 C NOMOJIbIO KJIaBNI Kypcopa BbIbepNTe MeHIO HauKMnTe ENTER.
Yro6bI BepHyTbcK npdeblDyMeMy 3KpaHy MeHIO, HaxmTe RETURN.
3 KhoNkamn Kypcopa BbIbepnte HxHbI 3JIeMeHT n HaxMnTe ENTER.
4 BbIbepnte HactpoKy c NOMOuBIO KnaBnKypcopa.
5 Haxmte KnaBnuy SETUP.
HAcTPOKa pa3NHybX cyHKuM (MeHO HAcTPOKa) B DOKyMente PyKOBoDCTBO NOB3OBaTeIa.
Понск и устараенье несправност
Pn BO3HKnHOBeHHn npo6nembl cHaJana npOBepbTe cnedyiooe:
Ecn annapaT cyHKmOHnpye T HnpabInbHo, npOBepbTe cneyiooee.
Kabefn HNAAPA, yCUNNTN MIOHCTN, TENB3O N BOCNPBOAUX YCTPOINCTB (TAKNX, KAP npONrPBbATEEN BD/DVD-IMCKOB) HADEXHO NOKNUHBI K HAETHEHNBM POSETKAM NEPEMEHORO TOKA.
AnnapaT, ycnntenb moohocn, ca6byep, TeeneB3Op n Bocnpn3oBdoAune ycToeCTBa (TaKne, KaK npourpbaTeN BD/DVD-dckOB) BkHoueHbI.
- WTeKepeK KaKDoRo Ka6eNa HaJeXHo BCTaBneHb B rHe3Da KaKDoRo yCtPoIcTBA.
PnOTCyTCTBmN pO6nEM C nHTaHmE N Ka6eMaM CM. HcHcTpKuM, npNBedeHHbE B Ta6nue Hxke.
EcHn HncnpabHoctb He yka3aHa B Ta6nue nnnn Hnctpykun He nnoor, BbIKIOHTe annapat, OTCoeHNHTe Kaebn NtAHm N 6paTntecb K 6nKaiuemy aBTOIN0BAHOMy dInepy nN B cepBnCHb ueHtp Yama.
Important Notice: Guarantee Information for customers in EEA* and Switzerland
English
For detailed guarantee information about this Yamaha product, and Pan-EEA* and Switzerland warranty service, please either visit the website address below (Printable file is available at our website) or contact the Yamaha representative office for your country. * EEA: European Economic Area


- WARNING
- This content indicates "risk of serious injury or death."
- Power supply/power cord
- Do not disassemble
- Water warning
- Fire warning
- Maintenance and care
- Battery use
- Wireless unit
- If you notice any abnormality
- CAUTION
- This content indicates "risk of injury."
- Installation
- Hearing loss
- Maintenance
- Handling caution
- Notice
- Indicates points that you must observe in order to prevent product failure, damage or malfunction and data loss.
- Connections
- Handling
- Batteries
- Information
- About content in this manual
- Wireless communication functions [U.K. and Europe models]
- Bluetooth
- Wi-Fi (2.4 GHz)
- Wi-Fi (5 GHz)
- Information for users on collection and disposal of old equipment and used batteries:
- Introduction
- In HTML format
- http://avpro.global.yamaha.com/manual/avr/cxa5200
- In PDF format
- http://download.yamaha.com/
- [For U.S. customers only]
- Features
- Opening and closing the front panel door
- 1
- Preparation
- Preparing cables
- 2
- Connecting a power amplifier, speakers and subwoofoers
- Note
- 3
- Connecting external devices
- 4
- Connecting the radio antennas
- FM/AM antennas
- DAB/FM antenna
- 5
- Preparing a network connection
- 6
- Connecting the power cable to an AC wall outlet, and turning on the unit
- Plug the power cable into an AC wall outlet.
- Press (receiver power) to turn on the unit.
- Turn on the TV and switch the TV input to display video from the unit (HDMI OUT jack).
- 7
- Optimizing the speaker settings automatically (YPAO)
- Turn on the subwoofer and set the volume to half.
- Place the YPAO microphone at your listening position and connect it to the YPAO MIC jack on the front panel.
- Use the cursor keys to select "Start" and press ENTER.
- Select "Measurement result" and press ENTER to display the result.
- Use the cursor keys to select "Save" and press ENTER.
- Disconnect the YPAO microphone from the unit.
- Setting MusicCast
- What is MusicCast
- Using MusicCast CONTROLLER
- Adding the unit to the MusicCast network
- Tap the "MusicCast CONTROLLER" app your mobile device and tap "Setup".
- Playback
- Basic playback functions
- Playing a BD/DVD
- Listening to FM/AM radio
- Setting the frequency steps
- Listening to DAB radio
- Listening to Internet radio
- Notes on streaming services
- SCENE function
- Registering a scene
- Playing music stored on a Bluetooth® device
- Playing music stored on a USB flash drive
- Basic operation of the Option menu
- Press OPTION.
- Use the cursor keys to select an item and press ENTER.
- Use the cursor keys to select a setting.
- Press OPTION.
- Basic operation of the Setup menu
- Press SETUP.
- Use the cursor keys to select a menu and press ENTER.
- Use the cursor keys to select an item and press ENTER.
- Use the cursor keys to select a setting.
- Press SETUP.
- Troubleshooting
- If trouble occurs, first check the following:
- Specifications
- PRECAUTIONS D'USAGE
- LISEZ ATTENTIVEMENT AVANT DE PROCEEDER A Toute UTILISATION. VEILLEZ A SUIVRE CES INSTRUCTIONS.
- Introduccion
- He pa36npaTb
- BepuyoT BoDbl
- Bepeb ot orHa
- 06cnykubahne nyxoid
- Ncnojb3ObaHne 6aTaapeek
- ModyIb 6ecnpoBDOHNO CB3N
- HeWtathbIe cHTyaUu
- BHUMAHNE
- DaanHnHOpMaun npedynpeKdaet o pncke nonyeHHa TpaBMbl.
- IcToHmNnTaHmN Ka6Enb nTaHm
- YCTaHOBka
- PpmeHne
- Испобзовке MusicCast CONTROLLER
- Добальенье annapata K ceTN MusicCast
- PpmeuHne
- Haxmte u yepxnbate 5 ckynd KhoNkY CONNECT Ha nepeDne nahein annapata corlacho nHCTpyKu npnloKeHH.
- Cnedynte 3KpaHHbIM HNCTpyKcIaM npHIOXeHN No HAcTpoKe CeTeBbIX npaMeTPOB.
- Bocnpon3VepeHne
- OchOBhble yHKuB Bocnpn3BeHnA
- Bocnpon3BedeHne BD/DVD-dncka
- Прослuyшваиме FM/AMpaадио
- TUNER FRO STEP FN50/AM9
- Порocлшваиме ИНТерпет-разно
- Ppmeyahne
- IpocnyuBaHne ycnyr notokobn nepedaun My3bIKN
- PpmeaHne
- PnmeaHn no ycnyram notokob nepepa
- Функця SCENE
- PpMueaHne
- CoxpaHeHne cueHbI
- Bocnpon3BeDeHne My3bIKN, COxpaHeHHoHa yctpoinCTbe Bluetooth®
- Bocnpon3BeJeHne My3bIKN,coXpaHeHHoH Na Флэш-нakОпNTeIe USB
- OCHOBhbie onepaunm MeHIO Onua
- HaKmTe KnaBnWy OPTION.
- KhoNkamn Kypcopa BbIbepnte HxHbI 3JIeMeHT n HaxMnTe ENTER.
- BbI6epnte HacTpoKy c NOMOuBIO KnaBnKypcopa.
- Haxmte KnaBnuy OPTION.
- OchOBhble onepaunmeho HacTpoKa
- Haxmnte KlaBnuy SETUP.
- C NOMOJIbIO KJIaBNI Kypcopa BbIbepNTe MeHIO HauKMnTe ENTER.
- KhoNkamn Kypcopa BbIbepnte HxHbI 3JIeMeHT n HaxMnTe ENTER.
- BbIbepnte HactpoKy c NOMOuBIO KnaBnKypcopa.
- Haxmte KnaBnuy SETUP.
- Понск и устараенье несправност
- Pn BO3HKnHOBeHHn npo6nembl cHaJana npOBepbTe cnedyiooe:
- Important Notice: Guarantee Information for customers in EEA* and Switzerland
Brand : YAMAHA
Model : MusicCast Aventage CXA5200
Category : Home cinema amp