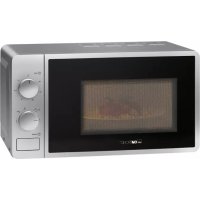
MWG 759 H - Microwaves CLATRONIC - Free user manual and instructions
Find the device manual for free MWG 759 H CLATRONIC in PDF.
| Product type | Combination microwave |
| Brand | Clatronic |
| Model | MWG 759 H |
| Oven capacity | 25 liters |
| Power supply | 230 V, 50 Hz |
| Microwave consumption | 1400 W |
| Microwave power | 900 W |
| Main functions | Microwave, grill, hot air, combination grill/microwave, combination hot air/microwave, automatic defrost, automatic programs |
| Microwave power levels | 5 levels (100%, 80%, 60%, 40%, 20%) |
| Automatic programs | 8 programs (rice/pasta, fresh vegetables, frozen vegetables, popcorn, liquids, potatoes, pizza, fish) |
| Automatic defrost | 3 programs (meat, poultry, seafood) |
| Display type | LED screen |
| Child lock | Yes (long press on Stop) |
| Included accessories | Glass turntable, guide ring, cooking rack |
| Control type | Touch keys |
| Installation | Do not build in; ventilation distance of at least 20 cm around the appliance |
| Maintenance and cleaning | Clean interior with a damp cloth; glass turntable dishwasher safe; rotation ring hand washable |
| Safety | Automatic stop when door opens, child lock, end-of-cooking audible signal |
| Warranty | 24 months |
Frequently Asked Questions - MWG 759 H CLATRONIC
User questions about MWG 759 H CLATRONIC
0 question about this device. Answer the ones you know or ask your own.
Ask a new question about this device
Download the instructions for your Microwaves in PDF format for free! Find your manual MWG 759 H - CLATRONIC and take your electronic device back in hand. On this page are published all the documents necessary for the use of your device. MWG 759 H by CLATRONIC.
USER MANUAL MWG 759 H CLATRONIC
natural_image
Exterior view of a modern microwave oven with a plate of cooked meat and a side dish, no visible text or symbols on the main subject.CE
MIKROWELLENGERÄT MIT GRILL UND HEIßLUFT
Magnatron met grill en heta lucht • Four à microondes avec grill et chaleur traditionnelle • Microondas con parrila y aire calente • Aparelho de microondas com grehader e ar quente Microonde con torno a griglia e aïre calda • Mikroalgevon med grill og varmiutt • Microwave Oven with Grill and Hot Air Function • Kuchenka mikrotalowe z opiekaczam i termoogiejam Mikrolimná troubo s griem a horkým vzuchem • Grillező és högékeveréses mikroluillamú készülék • Микроволновая печь с прилем и обработкой горячим воздухом
MWG 759 H
DEUTSCH
Inhalt
Overview of the Components ...... Page 3
Instruction Manual...... Page 73
Technical Data Page 81
Guarantee Page
JEZYK POLSKI
Spis tres'ci
*) Caution: Do not remove any installed parts from inside the oven or anything from the inside of the door! The foils on the inside of the door must not be removed!
Conv/Combi Grill/Combi
D-47906 Kempen/Germany
Conv/Combi Grill/Combi
Hete lucht/combi grill/combi
Hete lucht:
Conv/Combi Grill/Combi
Air chaud/combiné/grill/combiné
Conv/Combi Grill/Combi
Conv/Combi Grill/Combi
Ar quente/misto Grelha/misto
Conv/Combi Grill/Combi
Aria calda/Combi Grill/Combi
Aria calda:
Conv/Combi Grill/Combi
Tabell for oppvarming
| Næringsmidler/matvarer | Mengde | Effekt ca. watt | Tid ca. min. | Tildek-king |
| Væsker | ||||
| Vann, 1 kopp | 150 g | 900 | 0,5 - 1 nei | |
| Vann, 0,5 l | 500 g | 900 | 3,5 - 5 | nei |
| Vann, 0,75 l | 750 g | 900 | 5 - 7 | nei |
| Kaffe, 1 kopp | 150 g | 900 | 0,5 - 1 nei | |
| Melk, 1 kopp | 150 g | 900 | 0,5 - 1 nei | |
| OBS: Sett en glasstav e.l. (ikke metall) i beholderen for å forhindre forsinket oppkoking. Rør godt rundt før du drikker. | ||||
| Tallerkenretter | ||||
| Snitsel, poteter og grønnsaker | 450 g | 900 | 2,5 - 3,5 | ja |
| Gulasj med pasta | 450 g | 900 | 2 - 2,5 | ja |
| Kjøtt, raspeball og saus | 450 g | 900 | 2,5 - 3,5 | ja |
| Tips: Fukte maten lett på forhånd, rør om iblant. | ||||
| Kjøtt | ||||
| Snitsel, panert | 200 g | 900 | 1 - 2 | nei |
| Kjøttkaker, 4 stk. | 500 g | 900 | 3 - 4 | nei |
| Braadvlees | 250 g | 900 | 2 - 3 | nei |
| Tips: Pensle med olje, slik at paneringen eller skorpen ikke blir bløt. | ||||
| Fjærkre | ||||
| 1/2 kylling 450 g 900 3,5 | - 5 nei | |||
| Hønsefrikassé 400 g 900 | 3 - 4,5 ja | |||
| Tips: Pensle kjøttet med olje, rør om iblant. | ||||
| Tilbehør | ||||
| Pasta, ris 1 porsjon2 porsjoner | 150 g 900 1 - 2 ja | |||
| 300 g 900 2,5 - 3,5 | ja | |||
| Poteter 500 g 900 3 - 4 ja | ||||
| Tips: Fukte matvarene lett på forhånd. | ||||
| Supper/sauser | ||||
| Klar suppe, 1 tallerken 2 | 50 g 900 1 | - 1,5 ja | ||
| Suppe med biter av kjøtt,pasta, grønnsaker e.l. | 250 g 900 | 1,5 - 2 ja | ||
| Saus 250 g 900 1 - 2 ja | ||||
| Babymat | ||||
| Melk 100 ml 540 0,5 - 1 | nei | |||
| Grøt | 200 g 540 | 1 - 1,5 nei | ||
| Tips: Rist godt og rør om. Kontroller temperaturen! | ||||
Koking
Praktiske tips om koking
General Safety Instructions
Read the operating instructions carefully before putting the appliance into operation and keep the instructions including the warranty, the receipt and, if possible, the box with the internal packing. If you give this device to other people, please also pass on the operating instructions.
- The appliance is designed exclusively for private use and for the envisaged purpose. This appliance is not fit for commercial use. Do not use it outdoors (except if it is designed to be used outdoors). Keep it away from sources of heat, direct sunlight, humidity (never dip it into any liquid) and sharp edges. Do not use the appliance with wet hands. If the appliance is humid or wet, unplug it immediately.
- When cleaning or putting it away, switch off the appliance and always pull out the plug from the socket (pull on the plug, not the cable) if the appliance is not being used and remove the attached accessories.
- Do not operate the machine without supervision. If you should leave the workplace, always switch the machine off or remove the plug from the socket (pull the plug itself, not the lead).
- Check the appliance and the cable for damage on a regular basis. Do not use the appliance if it is damaged.
- Do not try to repair the appliance on your own. Always contact an authorized technician. To avoid the exposure to danger, always have a faulty cable be replaced only by the manufacturer, by our customer service or by a qualified person and with a cable of the same type.
- Use only original spare parts.
- Pay careful attention to the following "Special Safety Instructions".
Children and Frail Individuals
- In order to ensure your children's safety, please keep all packaging (plastic bags, boxes, polystyrene etc.) out of their reach.
Caution! Do not allow small children to play with the foil as there is a danger of suffocation!
- In order to protect children or frail individuals from the hazards of electrical equipment, please ensure that this device is only used under supervision. This device is not a toy. Do not allow small children to play with it.
Symbols in these Instructions for Use
Important information for your safety is specially marked. It is essential to comply with these instructions in order to avoid accidents and prevent damage to the machine:

WARNING:
This warns you of dangers to your health and indicates possible injury risks.

CAUTION:
This refers to possible hazards to the machine or other objects.

NOTE: This highlights tips and information.
Important Safety Information!
Please read carefully and keep for future use.
- Warning: When the door or the door seals are damaged, the microwave oven must not be used until it has been repaired by a qualified specialist.
- Warning: Please do not repair the device yourself, but have it repaired by an authorised specialist. Carrying out maintenance or repair work which involves removal of the cover that protects the surroundings from microwave radiation is dangerous unless carried out by an expert.
- Warning: Do not heat liquids in closed containers. Danger of explosion!
- Warning: Do not place your microwave in a cupboard. Please ensure that there is a minimum ventilation gap of 20 cm from cupboards, walls etc. on all sides of the machine.
- Warning: Children and frail individuals may only use the oven without supervision if they have been instructed in its use in such a way that they are able to use the device safely and understand the dangers of incorrect operation.
- Warning: If the device is operated using combined mode children may use the device only when supervised by adults due to the temperatures that are produced.
• Note: The microwave oven is not suitable for warming/heating up living animals. - Only suitable tableware should be used such as: glass, porcelain, ceramics, heat-resistant plastic or special microwave tableware.
- If food is being heated or cooked in combustible materials, such as plastic or paper containers, the microwave oven should be checked frequently due to the risk of fire.
- If smoke is produced, turn the device off and remove the plug. Keep the door closed in order to suffocate any flames.
- Delay in boiling: During boiling, particularly during the reheating of liquids (water), it may happen that the boiling temperature has been reached but the typical bubbles have not yet started to rise. The liquid does not boil evenly. When the vessel is removed this so-called delay in boiling may result in the sudden formation of bubbles when the vessel is knocked, causing the water to boil over. There is a serious danger of burns! In order to achieve even boiling, please place a glass rod or similar item, but nothing metallic, in the vessel.
- The contents of babies' bottles and jars of baby food must be stirred or shaken and the temperature checked before use. There is a danger of burns.
- Food with a shell or skin, such as eggs, sausages, sealed jars etc. must not be heated up in the microwave as they may explode even when heating by the microwaves is finished.
- Any dirt on the door frame/door seal and neighbouring parts must be carefully cleaned with a damp cloth.
- Clean the microwave oven regularly and remove any food residues from the interior.
- If the machine is not clean the surface may be damaged, affecting its serviceable life and possibly resulting in hazardous situations.
- Do not store any food or other items in the oven.
- Symbols on the device!

WARNING: Hot surface!
While the device is in operation the temperature of the exposed surfaces may be very high.
Description of the Components
Description of Parts
1 Door lock
| 2 | Display |
| 3 | Housing |
| 4 | Drive |
| 5 | Sliding |
| 6 | Rotating |
| 7 Control panel | |
| 8 | Cover |
| 9 | Grilling |
The buttons of the control panel
Power
Power:
For selecting the power levels of the microwave
Clock
Clock:
For setting the time together with the arrow keys
Auto Cook
Cooking Programmes:
Selection of an automatic programme by repeated pressing
Conv/Combi Grill/Combi
Hot Air/Combi Grill/Combi
Hot Air:
Exclusive hot air operation, thermostat-controlled


Hot Air/Combi:
Hot air and microwave work alternately
Grill:
For grilling and scolloping
Grill/Combi:
Grill and microwave work alternately
Arrow Keys
For setting the time,
temperatures or weights
Stop Clear
Stop/Clear
Press once to stop the cooking process
Press twice to delete the programme
Hold down for 3 seconds to lock/unlock the device
Instant Start
Start the programme or instant start
Initial Operation
- If there are any oil or other residues from the manufacturing process on the housing or heating element, smoke or odours may initially be produced. This is normal and will not occur after the oven has been used a few times.
The following procedure is strongly recommended:
Turn the oven to the hot air or grill function and operate it several times without any food inside. Please ensure adequate ventilation.

CAUTION:
The oven can only be used without food inside with the hot air or grill function; this is not possible during combined or microwave operation!
- After removing all the accessories from inside the oven, unpack them and place the sliding ring in the middle. Position the glass plate on the drive axle in such a way that it locks into the dents of the drive shafts and is lying flat.
- Check the device for any visible damage, particularly in the area of the door. If any damage is found, the machine must not be used.
- In order to avoid interference to other machines when the microwave oven is operated, do not place it in the direct vicinity of other electronic devices.
- Remove any protective foils that may be adhered to the housing.
- Insert the mains plug into a properly installed 230 V, 50 Hz power socket.
Using the Device
What you should know about microwave operation:
- Your device works with microwave radiation, which heats up water particles in food in a very short time. There is no heat radiation and therefore hardly any browning.
- Only food should be heated up with this device.
- Do not fry food in the microwave as hot oil may damage the oven and lead to skin burns.
- Only 1-2 portions should be heated up at the same time. Otherwise the microwave will become less efficient.
- In order to interrupt the cooking process, press the STOP button.
- Microwaves provide their full energy levels immediately. Pre-heating is therefore not necessary.
- Never operate the microwave function when the oven is empty.
- The microwave oven does not replace your traditional cooker. It is used mainly for:
• defrosting deep-frozen food
- rapid warming/heating of food or drinks
- cooking meals
Information on Grilling and Combined Operation
- As heat radiation is used during grilling and combined operation, please use only heat-resistant tableware.
- When food is only being grilled, metal or aluminium tableware may also be used -but not during combined or microwave operation.
- Do not place anything on top of the housing as this becomes hot. Always leave the ventilation slits uncovered.
- Please use the grilling grid to move the food to be cooked nearer to the heating element.
Suitable Microwave Tableware
- The ideal material for use in a microwave is transparent and allows the microwave radiation to heat the food evenly.
- Microwaves are not able to penetrate metal, so that no metal vessels or plates should be used.
- Do not use any paper dishes made of recycled material as these may contain small amounts of metal, which may result in sparks or fi res.
- Round/oval dishes and plates are more suitable than rectangular ones as the food in the corners may overcook.
The list below is intended to help you select suitable microwave tableware:
| Material | Suitable for | |||
| micro-wave | grill hot air | combination* | ||
| Heat-resistant glass vessel | yes yes | yes yes | ||
| Non-heat-resistant glass vessel | no no | no no | ||
| Heat-resistant ceramic vessel/plate | yes yes | yes yes | ||
| Plastic vessels suitable for microwave use | yes no | no no | ||
| Kitchen roll yes no no no | ||||
| Metal tray no yes yes no | ||||
| Grilling grid no yes yes no | ||||
| Aluminium foil and foil containers | no yes | yes no | ||
*) Combination of grill with microwave or hot air
Setting the Time
i NOTE:
When the device is switched on all display messages initially light up followed by a fl ashing colon.
- Press the stop button.
- Press the CLOCK button. The display changes to „0:00“. The first figure flashes.
- Enter the desired hour figure with the help of the arrow keys.
- Press the CLOCK button. The second figures flash.
- Enter the desired minute figure with the help of the arrow keys.
- Press the CLOCK button again or wait a few seconds.
The new time is activated.
Operating the Microwave
Place the food to be heated up into suitable tableware. Open the door and place the vessel in the middle of the glass plate. Then close the door. (For safety reasons the device only works when the door is firmly closed.)
- Press the stop button.
- Select the desired microwave power by pressing the POWER button once or several times.
| Power in the display as selected in % | Power in watts (approx.) | Field of application |
| 100 | 900 | Rapid heating |
| 80 | 720 | Cooking |
| 60 | 540 Continued cooking | |
| 40 | 360 | Melting cheese etc. |
| 20 | 180 | Defrosting deep-frozen food |
| START | 900 | Rapid heating |
- Set their desired cooking time with the help of the arrow keys.
For example: 10:00 min length of cooking at 100% power.
| Step | Button | Display |
| 1 | ||
| 2 | 10 0P | |
| 3 | 10:00 | |
| 4 |
- Press the START button to start the machine. The length of cooking depends on the quantity and consistency of the contents. With a little practice you will soon learn to estimate the cooking time.
i NOTE:
cooking in the microwave oven is very much faster than in a standard cooker. If you are not sure, set the cooking time to low and continue cooking afterwards if necessary.
After the time has elapsed the oven switches itself off and the word „END“ appears in the display. Then you can remove the food.
Interrupting or Stopping the Cooking Process
- If you would like to interrupt the cooking process, press the stop button or simply open the door.
- If you would like to continue cooking, close the door and press the START button.
- If you would like to stop cooking completely, press the stop button twice.
For automatic defrosting of frozen meat, poultry and seafood please proceed as follows:
- Press the stop button.
- Press an arrow key. You are now in the defrost programme.
Select one of the defrost programmes by pressing the arrow key repeatedly:
| AD1 | Defrosting meat from 0.1 – 2.0kg | |
| AD2 | Defrosting poultry from 0.2 – 3.0kg | |
| AD3 | Defrosting seafood from 0.1 – 0.9kg |
-
Press the START button to confirm your selection.
-
Then select a weight with the help of the arrow keys.
For example: Defrosting 2.0 kg of poultry.
| Step | ButtonDisplay | |
| 1 | StopClear | |
| 2 |  | AD -2 |
| 3 |  | |
| 4 |  | 2.0 |
| 5 | InstantStart |
- Press the START button to start the machine.
After the time has expired the device switches off and the word „END“ appears in the display. You can then take out the food.
The following table provides information on manual defrosting.
Defrosting Table
| Food/dish | Quan- tity | Power in watts | Approx. time in minutes | Additional thawing time in minutes |
| Meat, Sausages | ||||
| Meat (beef, veal, pork) in pieces | 500 g | 180 14 – 18 | 0 – 15 | |
| 1000 g | 180 25 | -30 | 20 - 25 | |
| Schnitzel, cutlet | 200 g | 180 | 4 - 6 | 5 - 10 |
| Minced meat 250 g | 180 | 6 | -8 | 5 - 10 |
| Frying sau- sage, Frankfurter | 200 g | 180 4 | 6 | 5 - 10 |
| Slices of cold meat | 300 g | 180 4 | 6 | 5 - 10 |
| Tip: turn the meat halfway through and cover sensitive pieces; break up the minced meat and remove pieces that have already thawed; separate sausage slices. | ||||
| Poultry | ||||
| Chicken | 1000 g | 180 20 | -25 10 - 15 | |
| Chicken pieces | 500 g | 180 | 12 - 15 | 5 - 10 |
| Duck | 1700 g | 180 | 25 - 40 | 20 - 25 |
| Goose and turkey pieces | 500 g | 180 | 12 - 18 | 10 - 15 |
| Tip: turn poultry halfway through, cover wings and legs. | ||||
| Caution: throw away thawed liquid and do not allow to come into contact with other foods. | ||||
| Food/dish | Quan- tity | Power in watts | Approx. time in minutes | Additional thawing time in minutes |
| Game | ||||
| Saddle of venison | 1000 g | 180 | 20 - 35 | 20 - 30 |
| Saddle of hare | 500 g | 180 | 12 - 13 | 10 - 20 |
| Tip: turn once and cover edges. | ||||
| Fish | ||||
| Prawns, shrimps | 250 g | 180 | 5 - 7 | 5 - 10 |
| Trout | 340 g | 180 | 4 - 6 | 5 - 10 |
| Whole fish | 500 g | 180 | 7 - 10 | 10 - 15 |
| Fish fillet | 250 g | 180 | 5 - 7 | 5 - 10 |
| Tip: stir several times and turn frequently. | ||||
| Fruit | ||||
| Raspberries, strawberries | 250 g | 180 | 4 - 6 | 5 - 10 |
| Cherries, plums | 250 g | 180 | 5 - 7 | 5 - 10 |
| Stewed apple | 500 g | 180 | 9 - 12 | 5 - 10 |
| Tip: stir carefully or break up into pieces. | ||||
| Vegetables | ||||
| see „Cooking Table“, „Defrosting and Cooking Vegetables“ | ||||
| Bread and Pastries | ||||
| Rolls | 4 pieces | 180 | ca. 1 - 3 | 5 |
| Bread | 1000 g | 180 | 13 - 15 | 8 - 10 |
| Bread for toasting | 500 g | 180 | 5 - 6 | 5 - 10 |
| Stirred cake | 500 g | 180 | 6 - 8 | 5 - 10 |
| Fruit cake | 1 piece | 180 | 2 - 3 | 2 - 3 |
| Flan | 1 piece | 180 | 0,5 - 1 | 3 - 5 |
| Flan | 1200 g | 180 | 10 - 12 | 30 - 60 |
| Tip: place the bread and pastries on kitchen crepe paper to take up the moisture; only defrost sensitive pastry slightly. | ||||
| Milk Products | ||||
| Butter | 250 g | 180 | 5 - 7 | 10 - 15 |
| Curds | 250 g | 180 | 6 - 8 | 5 - 10 |
| Cream | 200 g | 180 | 3 - 5 | 2 - 3 |
| Tip: remove the aluminium foil and stir halfway through; whip the cream until it is semisolid. | ||||
Warming
The warming and heating of food is a particular strength of the microwave. Liquids and foods that are in the refrigerator can be easily brought up to room temperature or the right temperature for consumption without the need for many pots.
The heating times contained in the following table are only rough guides as the time depends very much on the starting temperature and the composition of the food. You are therefore advised to check from time to time whether the dish is already hot enough.
Heating Table
| Food/dish | Quan- tity | Power in watts | Approx. time in minutes | Cover |
| Liquids | ||||
| Water, 1 cup 150 g 900 0,5 - 1 no | ||||
| Water, 0.5 l 500 g 900 3,5 - 5 no | ||||
| Water, 0.75 l 750 g 900 5 - 7 no | ||||
| Coffee, 1 cup 150 g 900 0,5 - 1 no | ||||
| Milk, 1 cup 150 g 900 0,5 - 1 no | ||||
| Caution: Place a glass rod or similar item (but nothing made of metal) into the vessel to prevent delayed boiling. Stir well before drinking. | ||||
| One-Course Meals | ||||
| Schnitzel, potatoes and vegetables | 450 g 900 2,5 - 3,5 | yes | ||
| Goulash with noodles | 450 g 900 2 - 2,5 yes | |||
| Meat, dumpling and sauce | 450 g 900 2,5 - 3,5 | yes | ||
| Tip: moisten slightly beforehand, stir from time to time. | ||||
| Meat | ||||
| Schnitzel, coated with breadcrumbs | 200 g 900 1 - 2 no | |||
| Meatballs, 4 in total | 500 g 900 3 - 4 no | |||
| Joint 250 g 900 2 - 3 no | ||||
| Tip: brush with oil so that the breadcrumbs or crust do not become soft. | ||||
| Poultry | ||||
| Half a chicken 450 g 900 3,5 - 5 no | ||||
| Chicken fricassee | 400 g 900 3 - 4,5 yes | |||
| Tip: brush with oil, stir from time to time. | ||||
| Extras | ||||
| Noodles, rice 1 portion | 150 g 900 | 900 | 1 - 2 | yes |
| 2 portions | 300 g 900 | 900 | 2,5 - 3,5 | yes |
| Potatoes 500 g 900 3 - 4 | yes | |||
| Tip: moisten slightly beforehand. | ||||
| Soups/Sauces | ||||
| Clear soup, 1 plate | 250 g 900 | 1 - 1,5 | yes | |
| Soup with garnish | 250 g 900 | 1,5 - 2 | yes | |
| Sauce | 250 g 900 1 - 2 | yes | ||
| Baby Food | ||||
| Milk | 100 ml | 540 0,5 - 1 no | ||
| Mash | 200 g 540 | 1 - 1,5 | no | |
| Tip: shake well or stir. Check the temperature! | ||||
Cooking
Practical Cooking Tips
Please keep to the recommended values in the cooking table and the recipes. Keep an eye on the cooking process until you have more experience.
The door of the microwave can be opened at any time. The machine switches off automatically.
It starts again when the door is closed.
Foods taken directly from the refrigerator require a slightly longer cooking time than those at room temperature.
The more compact a food is, the longer is the cooking time. For example, a large piece of meat has to be cooked longer than the same quantity of sliced meat. It is advisable to start cooking sizeable quantities on maximum power and then to continue cooking evenly on medium power.
Flat dishes cook faster than thick ones. Therefore it is advisable to spread the food as thinly as possible. Thinner pieces, e.g. chicken legs or fish fillets should be placed towards the inside or allowed to overlap.
Smaller quantities cook faster than large ones.
The following rule of thumb applies:
Double the quantity = almost double the time Half the quantity = half the time
If you are not able to find a suitable time for a dish, the following rule applies:
approx. 1 minute cooking time for each 100 g.
All dishes which are covered up on a normal cooker should also be covered in the microwave oven.
A lid prevents the food from drying out. Suitable covers are an inverted plate, parchment paper or microwave foil. Dishes which are to be given a crust should not be covered when cooked.
*) Ready-made meals
Cooking Table
| Food/dish | Quantity | Power in watts | Approx. time in minutes | Cover |
| Vegetables | ||||
| Aubergines | 500 g 7 | 20 7 | 10 | yes |
| Cauliflower | 500 g | 720 | 8 - 11 | yes |
| Broccoli | 500 g 7 | 20 6 - 9 | yes | |
| Chicory | 500 g 7 | 20 6 - 7 | yes | |
| Peas | 500 g 7 | 20 6 - 7 | yes | |
| Fennel | 500 g 7 | 20 8 | 11 | yes |
| Green beans | 300 g 7 | 20 13 - 15 | yes | |
| Potatoes | 500 g 7 | 20 9 | 12 | yes |
| Turnip cabbage | 500 g 7 | 20 8 | 10 | yes |
| Leek | 500 g 7 | 20 7 - 9 | yes | |
| Maize cob | 250 g 7 | 20 7 - 9 | yes | |
| Carrots | 500 g 7 | 20 8 | 10 | yes |
| Paprika | 500 g 7 | 20 6 - 9 | yes | |
| Sprouts | 300 g 7 | 20 7 | 10 | yes |
| Asparagus | 300 g 7 | 20 6 - 9 | yes | |
| Tomatoes | 500 g 7 | 20 6 - 7 | yes | |
| Courgettes | 500 g 7 | 20 9 | 10 | yes |
| Tip: Cut the vegetables into small pieces and cook with 2 - 3 tablespoons of liquid, stir from time to time, continue cooking for 3 - 5 minutes, season just before serving. | ||||
| Food/dish | Quan- tity | Power in watts | Approx. time in minutes | Cover |
| Fruit | ||||
| Stewed apple, pear | 500 g 7 | 20 5 - 8 yes | ||
| Plum jam 250 g 7 | 20 4 - 6 no | |||
| Stewed rhubarb 2 | 50 g 720 5 | - 8 yes | ||
| 4 baked apples 5 | 0 g 720 7 | - 9 yes | ||
| Tip: add 125 ml water. Lemon juice prevents the fruit from changing colour. Cook for a further 3 - 5 minutes. | ||||
| Meat *) | ||||
| Meat with sauce 4 | 0 g 720 | 10 - 12 yes | ||
| Goulash, stewed strips of meat | 500 g 7 | 20 10 - 15 yes | ||
| Roulade of beef 2 | 50 g 720 7 | - 8 yes | ||
| Tip: stir from time to time, allow to stand for 3 - 5 minutes. | ||||
| Poultry *) | ||||
| Chicken fricassee | 250 g 720 | 6 - 7 yes | ||
| Poultry soup 200 g | 720 5 - 6 yes | |||
| Tip: stir from time to time, allow to stand for 3 - 5 minutes. | ||||
| Fish | ||||
| Fish fi llet 300 g 7 | 20 7 - 8 yes | |||
| Fish fi llet 400 g 7 | 20 8 - 9 yes | |||
| Tip: turn halfway through, continue cooking for 3 - 5 minutes. | ||||
| Defrosting and Cooking Vegetables | ||||
| Apple and red cabbage | 450 g 7 | 20 14 | -16 | yes |
| Leaf spinach | 300 g 7 | 20 11 - 13 yes | ||
| Caulifl ower | 200 g 7 | 20 7 - 9 yes | ||
| French beans | 200 g 7 | 20 8 - 10 | yes | |
| Broccoli | 300 g 7 | 20 8 - 9 yes | ||
| Peas | 300 g 7 | 20 7 - 8 yes | ||
| Turnip cabbage | 300 g 7 | 20 13 | -15 | yes |
| Leek | 200 g 7 | 20 10 - 11 yes | ||
| Corn | 200 g 7 | 20 4 - 6 yes | ||
| Carrots | 200 g 7 | 20 5 - 6 yes | ||
| Sprouts | 300 g 7 | 20 7 - 8 yes | ||
| Spinach | 450 g 600 g | 720 720 | 12 - 13 15 - 17 | yes yes |
| Tip: cook in 1 - 2 tablespoons of liquid, stir from time to time or divide carefully into pieces. Continue cooking for 2 - 3 minutes and season just before serving. | ||||
| Soups/Stews *) | ||||
| Stew | 500 g 7 | 20 13 - 15 yes | ||
| Soup with garnish | 300 g 7 | 20 7 - 8 yes | ||
| Crème soup 500 g | 720 13 | - 15 yes | ||
| Tip: stir from time to time and continue cooking for 3 - 5 minutes. | ||||
INSTANT START
If you would like to heat up some food or a drink briefly at the highest microwave power level:
- Start INSTANT START by pressing the START button directly.
- The heating process begins immediately, with every further press of the button increasing the heating time by 10 seconds.
78
• From a time of 5 minutes the heating time is increased by 30 seconds in each case.
• The power of the microwave is 100%.
Automatic Programmes
With the help of the automatic control you can cook certain quantities of food automatically. The length of cooking and microwave power level are included in the programme.
Please proceed as follows:
- Press the stop button.
- Press the AUTO COOK button. The oven is now in the cooking programmes. Select one of the programmes by pressing the AUTO COOK button repeatedly:
| Code | Programme | Weight | ||||||
| AC-1 | Rice/noodles | 0,1kg | 0,2kg | 0,3kg | ||||
| Rice, with water | 180ml | 330ml | 480ml | Cover the food | ||||
| Noodles, with water | 300ml | 600ml | 900ml | Do not cover the food | ||||
| AC-2 | Vegetables, fresh | 0,2kg | 0,3kg | 0,4kg | 0,5kg | 0,6kg | 0,7kg | 0,8kg |
| With water | 2 EL | 2 EL | 2 EL | 4 EL | 4 EL | 4 EL | 4 EL | |
| AC-3 | Vegetables, frozen | 0,2kg | 0,3kg | 0,4kg | 0,5kg | 0,6kg | 0,7kg | 0,8kg |
| AC-4 | Popcorn | 3,0Oz | 3,5Oz | Corresponds to approx. 80/100 g | ||||
| Please only use microwave popcorn in a bag. | ||||||||
| AC-5 | Liquids | 250ml | 500ml | |||||
| Do not cover! Caution - delayed boiling! | ||||||||
| AC-6 | Potatoes | 0,45kg | 0,65kg | |||||
| Prick the potatoes and place spaced out on the rotating plate. | ||||||||
| AC-7 | Pizza (warming) | 0,15kg | ||||||
| AC-8 | Fish | 0,45kg | ||||||
| Cut into the fi sh beforehand | ||||||||
- Then use the arrow keys to select a weight in the programmes AC-1 to AC-6.
For example: Cook 0.2 kg fresh vegetables.
| Step | Button | Display |
| 1 | StopClear | |
| 2 | Auto Cook | AC -2 |
| 3 | 0.2 | |
| 4 | InstantStart |
- Press the START button to start the machine.
After the time has elapsed the oven switches off and the word „END“ appears in the display. Then take out the food.
i NOTE: EL refers to a tablespoon.
Hot air/Combi Grill/Combi
Hot air and hot air/combined operation
For the hot air and the hot air/combined operation please proceed as follows:
-
Press the stop button.
-
Press the hot air/combi grill/combi button.
Select one of the programmes by pressing the hot air/combi grill/combi button repeatedly:
| C Hot air only | |
| C1 Hot air and microwave in combination | |
| C2 | Hot air and microwave in combination with an increased microwave share |
- Then use the arrow keys to set a temperature between 100^ C and 230^ C.
i NOTE:
In combi operation it is only possible to set temperatures up to 180°C.
-
Confir rm what you have entered with the help of the START button.
-
Use the arrow keys to enter the desired cooking time.
For example:
Programme C, 180°C, cooking length 8 minutes.
| Step | Button | Display |
| 1 | StopClear | |
| 2 |  | C 2 |
| 3 |  | 180C |
| 4 |  | |
| 5 |  | 08:00 |
| 6 |  |
- Press the START button to start the machine.
After this time has expired the oven switches off and the word "END" appears in the display. Then remove the food.
Error Messages
• During operation "Err2" appears in the display.
The temperature in the cavity has exceeded the pre-set temperature.
It is possible that the selected temperature is too low for this preparation. Please correct the setting.
- During operation "Err3" appears in the display.
The pre-set temperature could not be reached within the given time.
Please correct the setting.
Grill and Grill/Combi Operation
For grilling please use the grilling grid. Use suitable heatresistant tableware or place the food to be grilled directly on the grid.
Large, thick food is grilled directly on the rotating plate!
It is not necessary to „pre-heat“ the grill as the infrared grill produces radiation energy immediately.
If you prepare food using the combined microwave-grill functions you should note the following:
For large, thick foods such as roast pork the microwave time is correspondingly longer than for small, fl at foods. However, in the case of the grill it is the other way round. The closer the food is to the grill, the faster it turns brown. This means that when large joints are prepared using combined operation the grilling time may be shorter than for smaller joints.
For grill and grill/combi operation please proceed as follows:
-
Press the stop button.
-
Press the hot air/combi grill/combi button.
Select one of the programmes by pressing the hot air/combi grill/combi button repeatedly:
| G Grill only | |
| G1 Grill and microwave in combination | |
| G2 | Grill and microwave in combination with an increased grill share |
- Enter the desired cooking time with the help of the arrow keys.
For example: Programme G2, 10:30 minutes cooking time.
| Step | Button | Display |
| 1 | ||
| 2 | G 2 | |
| 3 | 10:30 | |
| 4 |
- Press the START button to start the machine.
After this time has expired the oven switches off and the word „END“ appears in the display. Now take out the food.
Grill/Combi Operation Table
| Food/dish | Quantity | Combined operation | Approx. time in minutes | Cover |
| Meat, Sausages | ||||
| Beef, pork or veal in pieces | 500 g | 10 - 12 | no | |
| 750 g | 12 - 15 | no | ||
| Smoked pork loin | 500 g | 12 - 14 | no | |
| Meat loaf | 500 g | 13 - 15 | no | |
| Wienerwurst | 200 g | 2 - 3 | no | |
| Frankfurter | 200 g | 2 - 3 | no | |
| Tip: turn the meat halfway through and continue cooking for 3 - 5 minutes; coat the meat loaf with egg white; prick the sausages with a fork. | ||||
| Poultry | ||||
| Boiling fowl | 1000 g | 13 - 15 | no | |
| Chicken pieces | 250 g | 4 - 5 | no | |
| Tip: allow to cook without liquid in its own juice, turn once and continue cooking for 4 - 5 minutes. | ||||
| Fish | ||||
| Trout, blue | 300 g | 5 - 6 | no | |
| Fish fillet | 300 g | 3 - 4 | no | |
| Tip: turn halfway through and continue cooking for 3 - 5 minutes. | ||||
Individual Cooking Programme
If you would like to enter your own cooking programme for certain preparations you can put this together from the programmes „Power of the Microwave“ and „Grill/Combi (G, G1, G2)“ and/or „Hot Air/Combi (C, C1, C2)“.
Examples of the above:
- Press the stop button.
- Select the desired microwave power by pressing the POWER button once or repeatedly.
- Enter the desired cooking time with the help of the arrow keys.
- Press the hot air/combi grill/combi button once or several times to select one of the C, C1, C2, G, G1 or G2 programmes.
- Enter the desired cooking time with the help of the arrow keys.
For example: 3:00 minutes cooking time at 100% and microwave power and then 9:00 minutes grilling.
| Step | Button | Display |
| 1 | StopClear | |
| 2 |  | 10 0P |
| 3 |  | 03:00 |
| 4 |  | G |
| 5 |  | 09:00 |
| 6 |  |
- Press the START button to start the machine.
After this time has expired the oven switches off and the word „END“ appears in the display. Then take out the food.
i NOTE:
In this way it is possible to combine up to 4 different cooking sequences one after the other. You can also begin the programme with a grill/combi or hot air/combi setting.
Special Functions
Automatic Start
You can start the microwave or also a grill/combi or hot air/combi setting at a predetermined time. To do so, first set the clock.
In order to start the microwave automatically, for example, please proceed as follows:
- Press the stop button.
- Press the POWER button once or repeatedly to select the desired microwave power.
- Enter the desired cooking time with the help of the arrow keys.
- Press the CLOCK button for more than 2 seconds. A signal is heard and the display changes to the current time. The first figure fl ashes.
- Enter the desired starting time with the help of the arrow keys.
- Press the CLOCK button. A longer signal is now heard and the letter "M" appears in the display.
i NOTE:
If another function has been programmed, the corresponding message appears in the display.
For example: 12:30 minutes cooking time at 100% power, start time 14:20.
| Step | Button | Display |
| 1 |  | |
| 2 |  | 10 0P |
| 3 |  | 12:30 |
| 4 |  | 10:00 |
| 5 |  | 14:20 |
| 6 |  | 14:20 |
i NOTE:
- If you would like to see the start time again, press the CLOCK button.
- The device begins operation at the preset time.

WARNING:
- Danger of fire! The device must never be left unattended during operation. When setting a delayed cooking time always ensure that when the device is operating it is not left unattended.
- Do not operate the microwave oven when it is empty. If you take the food out earlier than the set time it is important to cancel the programme by means of the stop button.
After the time has expired the device switches off and the word "END" appears in the display. Now remove the food.
Automatic Reminder
After cooking has fi nished you are reminded every 2 minutes by a beep to remove the food.
This reminder is switched off when the door is opened or the stop button pressed.
Disabling
Press the stop button for more than 2 seconds to lock the device. The fact that the machine is disabled is then shown in the display. The function of the operating controls is now blocked. Press the stop button again for longer than 2 seconds to cancel the lock.
Error Messages
During operation „Err0“ or „Err1“ appears in the display. In this case there is a problem with the electronic control unit.
Cleaning
Turn the microwave off and remove the mains plug.
Interior
- Keep the interior of the oven clean. Splashes and overflowing liquids on the walls of the oven can be removed with a damp cloth. If the oven is very dirty a mild detergent can also be used. Please do not use any abrasive detergents.
- Wipe off the viewing window on the inside and outside with a damp cloth and remove splashes and stains from overflowing liquids regularly.
External Walls
- The external walls of the microwave should only be cleaned with a damp cloth. Please ensure that no water enters the openings in the housing and therefore inside the device.
- The switches should also only be cleaned with a damp cloth. In order to clean the function switch, first open the microwave door to avoid switching on the device so accidentally.
Accessories
- The glass plate should occasionally be cleaned with washing-up liquid or in the dishwasher.
- The rotating ring and the inside floor of the oven should be cleaned regularly. The rotating ring can be removed and cleaned by hand. You may use a mild detergent or window cleaner for this. Please dry thoroughly afterwards. Ensure that the ring is put back in the correct position afterwards.
Odours
- In order to remove any unpleasant odours that may emanate from the microwave, place a dish filled with water and lemon juice that is suitable for microwave use in the oven and heat it for approximately 5 minutes. Then wipe out the oven with a soft cloth.
Oven light
- If you need to replace the lighting in the oven, please contact a specialist workshop near you.
Technical Data
Model:....MWG 759 H
Power supply: 230 V, 50 Hz
Power consumption:
microwave: 1400 W hot air: 1300 W grill: 1000 W
Rated microwave power output: 900 W
Cavity volume: 25 litres
Protection class: I
This device has been tested according to all relevant current CE guidelines, such as electromagnetic compatibility and low voltage directives, and has been constructed in accordance with the latest safety regulations.
Subject to technical changes without prior notice!
Guarantee
The device supplied by our Company is covered by a 24 month guarantee starting on the date of purchase (receipt).
During the life of the guarantee any fault of the device or its accessories ascribable to material or manufacturing defects will be eliminated free of charge by repairing or, at our discretion, by replacing it. The guarantee services do not entail an extension of the life of the guarantee nor do they give rise to any right to a new guarantee!
Proof of the guarantee is provided by the proof of purchase. Without proof of purchase no free replacement or repair will be carried out.
If you wish to make a claim under the guarantee please return the entire machine in the original packaging to your dealer together with the receipt.
Defects to consumables or parts subject to wearing as well as cleaning, maintenance or the replacement of said parts are not covered by the guarantee and hence are to be paid! The guarantee lapses in case of unauthorized tampering.
After the expiry of the guarantee
After the expiry of the guarantee repairs can be carried by the competent dealer or repair service against the payment of the ensuing costs.
Meaning of the "Dustbin" Symbol
Protect our environment: do not dispose of electrical equipment in the domestic waste.
Please return any electrical equipment that you will no longer use to the collection points provided for their disposal.
This helps avoid the potential effects of incorrect disposal on the environment and human health.
This will contribute to the recycling and other forms of reutilisation of electrical and electronic equipment.
Information concerning where the equipment can be disposed of can be obtained from your local authority.