JBY 103 - Baby monitors BEURER - Free user manual and instructions
Find the device manual for free JBY 103 BEURER in PDF.
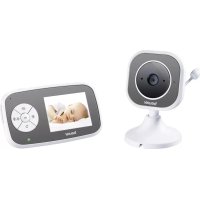
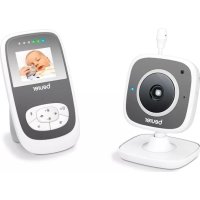
| Product type | Video baby monitor (monitor for baby with camera) |
| Brand | Beurer |
| Model | JBY 103 |
| Camera dimensions (L x W x H) | 82 x 75 x 75 mm (with stand: 90 mm in height) |
| Monitor dimensions (L x W x H) | 130 x 76 x 31 mm |
| Camera weight | 93 g |
| Monitor weight | 117 g |
| Battery weight | 80 g |
| Power supply | Power adapter 100-240 V ~50/60 Hz, output 5 V/1 A (for camera and monitor) |
| Monitor battery | Lithium-ion 3.7 V, 900 mAh |
| Monitor battery life | Approximately 9 h in ECO mode, approximately 5 h in LCD mode |
| Range (without obstacles) | Up to 200 m |
| Number of channels | 16 channels (frequency 2.4 - 2.483 GHz) |
| Monitor screen | 2.4 inch LCD screen |
| Night vision | Yes, infrared (switchable infrared night light) |
| ECO mode (energy saving) | Yes, reduces radiation and power consumption |
| Alarms | Sound alarm, movement alarm, out-of-range/interference alarm |
| Zoom function | Yes, with selection of 5 zones |
| Talk-back function | Yes, via the monitor |
| Operating temperature | Not explicitly specified, household use (estimated 0-40°C) |
| Maintenance and cleaning | Wipe with a soft dry cloth; do not use abrasive cleaners; do not immerse |
| Safety | Do not place the camera in the baby's crib; keep at least 1.5 m away; keep cable out of reach |
| Spare parts and repairability | Additional camera available (ref. 952.53); repair by customer service only |
| General information | Manufacturer's warranty (terms vary); compliance with R&TTE 1999/5/EC |
Frequently Asked Questions - JBY 103 BEURER
User questions about JBY 103 BEURER
0 question about this device. Answer the ones you know or ask your own.
Ask a new question about this device
Download the instructions for your Baby monitors in PDF format for free! Find your manual JBY 103 - BEURER and take your electronic device back in hand. On this page are published all the documents necessary for the use of your device. JBY 103 by BEURER.
USER MANUAL JBY 103 BEURER
Instructions for use. 12-20
F BABYPHONE VIDÉO
Soflinger StraBe 218,89077 Ulm, Germany
1 Getting to know your instrument. 12
2 Signs and symbols 12
3 Intended use. 13
4 Notes 13
5 Device description. 14
6 Initial use 15
7 Operation. 16
8 Technical data. 18
9 Useful information about the baby monitor. 18
10 Storage and maintenance 19
11 Disposal. 19
12 What if there are problems? 19
Included in delivery
Camera
- Stand
Monitor with holder
- Two mains part plugs
Lithium ion battery
These instructions for use
Dear Customer
Thank you for choosing one of our products. Our name stands for high-quality, thoroughly tested products for applications related to heating, weight, blood pressure, body temperature, pulse, gentle therapy, massage, air, beauty and baby care. Please read these instructions for use carefully and keep them for later use, be sure to make them accessible to other users and observe the information they contain.
With kind regards,
Your Beurer team
1 Getting to know your instrument
Functions of the device
This video baby monitor enables you to see your baby at all times whilst you pursue activities in other rooms or in the garden. The 16 channels ensure a connection that is secure and as free of interference as possible.
The device has the following functions:
Video surveillance
Night vision function using infrared
ECO function/energy saving mode
- Warning when the range is exceeded or if there are interferences to the connection
Range of up to 200m with a clear view
2 Signs and symbols
The following symbols appear in these instructions:
| Warning Warning instruction indicating a risk of injury or damage to health. | |
| Important | Safety note indicating possible damage to the unit/accessory |
| Note | Note on important information. |
3 Intended use
Warning
- Only use the device to monitor your baby when you cannot mind your baby directly. It is not a substitute for your own personal, responsible supervision!
Any improper use can be dangerous.
4 Notes
Notes for the ECO mode
With ECO mode, you can reduce the radiation between the baby and parent unit when the baby is quiet.
This ensures the safety of your baby as there is no exposure to any unnecessary radiation. Before switching to ECO mode, ensure that the transmission is free from interference.
Safety notes
Warning
Always position the device and power cord out of the reach of children. The power cord may cause strangulation or injury to children.
- Keep small parts out of reach of children.
- Keep packaging material away from children (risk of suffocation).
- Never place the camera in the cot or within reach of your child.
- Place the camera 1.5m away from your baby, in order to minimise the possibility of electrosmog pollution and noise pollution.
Make sure that cables are not accessible to your child.
The device is only intended for domestic/private use, not for commercial use.
Always make sure that the devices are fully functioning before use and check that the monitor battery is sufficiently charged when operating the device with the battery.
- Never submerge the device in water. Never rinse it in running water.
- Never use the devices in proximity to moisture.
- Do not cover the devices with a towel or cover
Only use the mains part plugs included in delivery.
- Do not use the cable to pull the mains part plug out of the socket.
- This device may be used by children over the age of eight and by people with reduced physical, sensory or mental skills or a lack of experience or knowledge, provided that they are supervised or have been instructed on how to use the device safely, and are fully aware of the consequent risks of use.
Children must not play with the device.
- Cleaning and user maintenance must not be performed by children unless supervised.
- Do not pull, twist or bend the mains cable.
- Pull the mains part plug out in the case of operational faults before the cleaning process, after charging and when the device is not in use.
- The device and the mains part plug should not come into contact with hot surfaces or sharp-edged objects.
- Do not use any additional parts that are not recommended by the manufacturer or offered as accessories.

General notes
Before making a claim, please check the battery and replace it if necessary.
- Repairs must only be carried out by Customer Services or authorized suppliers. Under no circumstances should you open or repair the device yourself, as faultless functionality could no longer be guaranteed thereafter. Failure to comply will result in voiding of the warranty.
If you should have any questions about using our devices, please contact either your retailer or Customer Services.
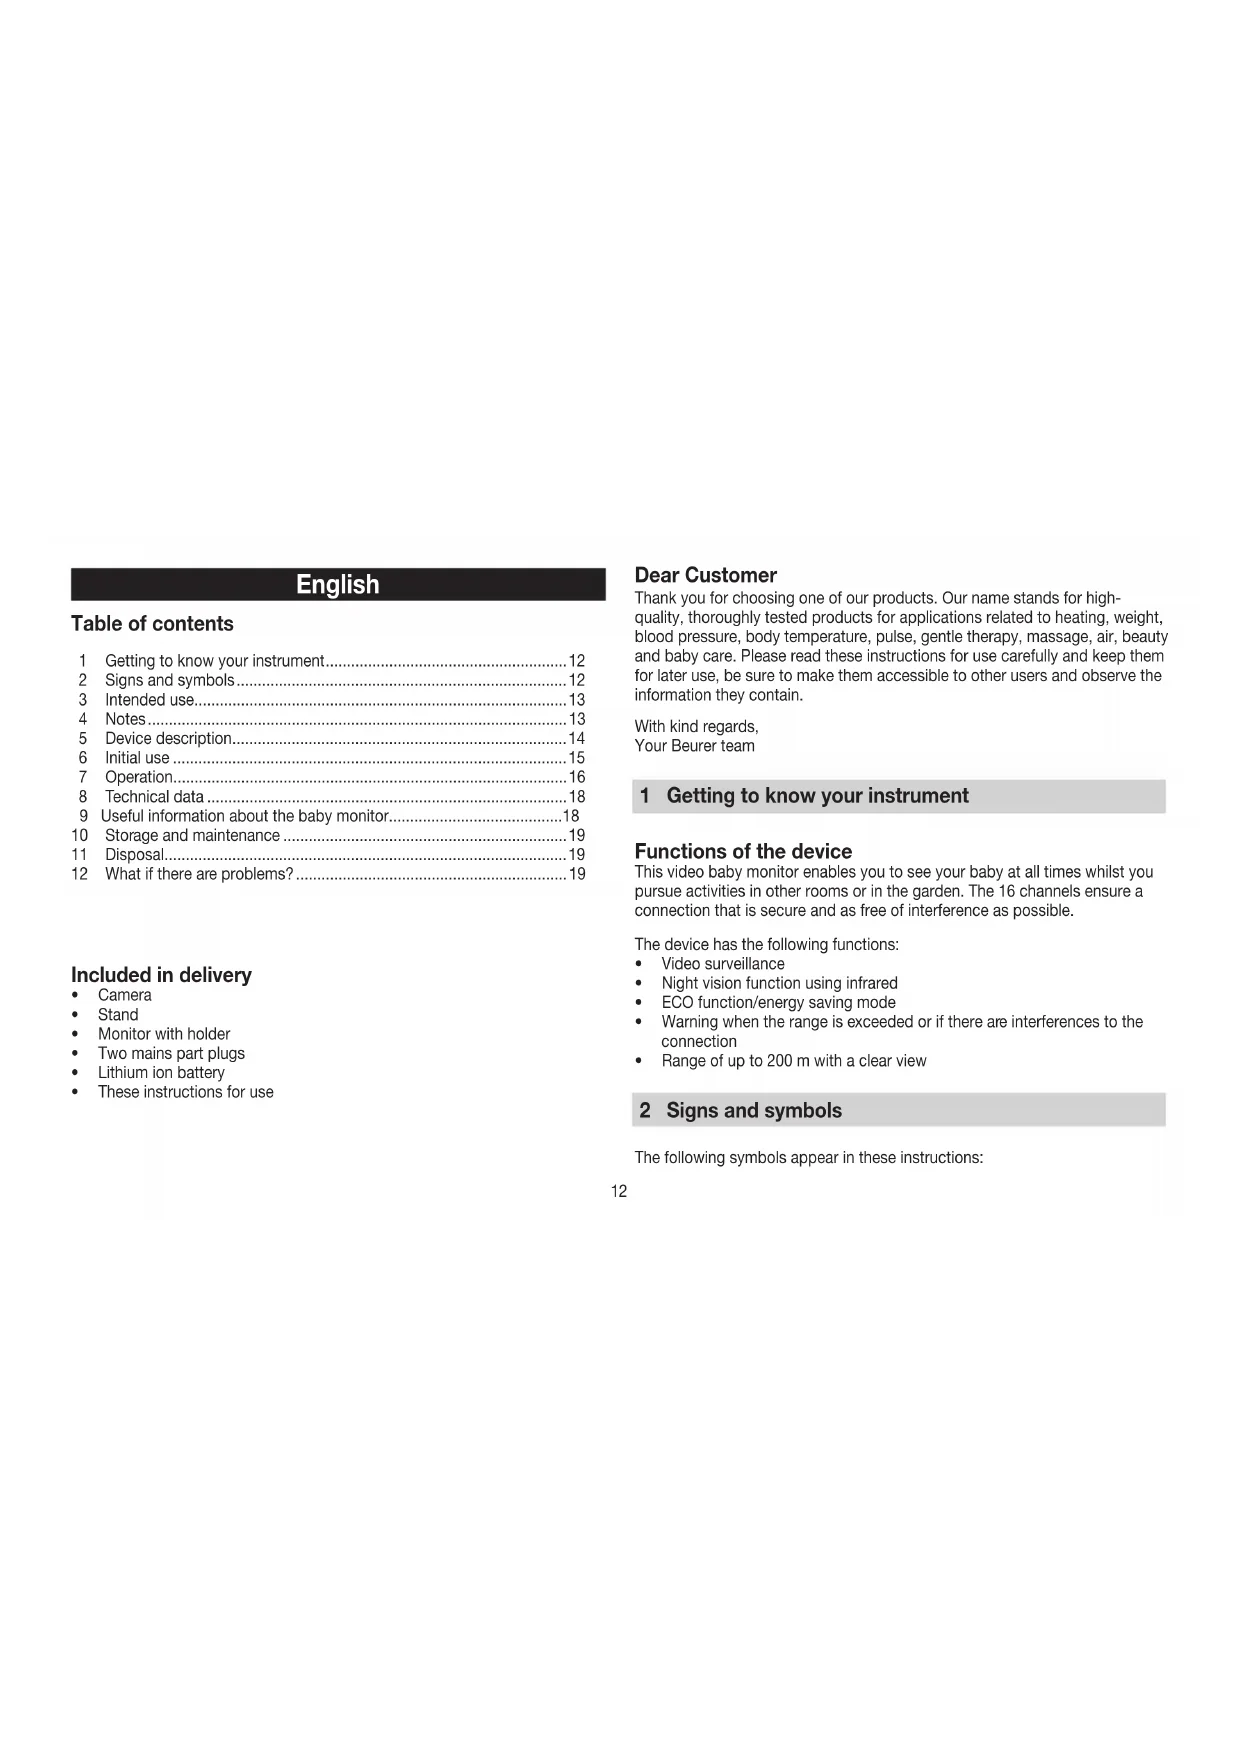
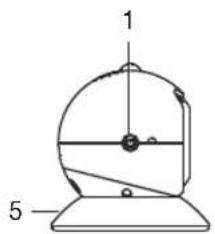
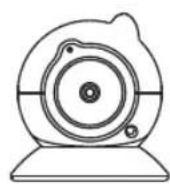
5 Device description
Overview
Camera
- On/Off button
- Connector button
- USB power connection
- Reset button
- Stand
Monitor
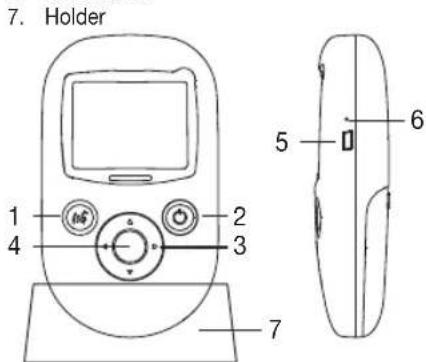
- Intercom function
- On/Offbutton in the menu: Back function (ESC)
- Arrow buttons (up, down, left, right)
- OK/Menu button
- USB power connection
- Reset button
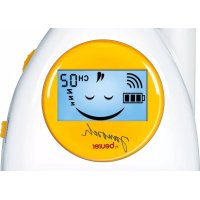
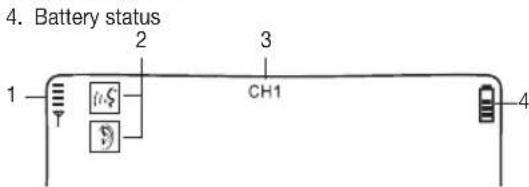
Display description
-
Signal strength
-
Ear = Sound transmission from the baby; Mouth = Intercom function activated
-
Channel number
6 Initial use
Camera
Using the mains part plug, connect the camera to a socket.
Now position the camera on the stand.

The monitor is compatible with up to four cameras. You can order additional cameras (including mains part plug and stand) using item number 952.53 via the appropriate service address (according to the service address list).
Monitor
You can operate the monitor with the battery or with the mains part plug.
Operation with mains part plug:
Plug the monitor into a socket using the mains part plug.
Battery operation:
The battery must be charged for at least eight hours before the monitor can be first used independently of the mains. You can operate the device during this time, however this will prolong the charging period.
You can either charge the battery with the mains part plug inserted into the socket or with a USB cable plugged into a computer. (USB cable not included in delivery)
When the battery level is low, you will hear an acoustic signal.
If the monitor is operated using a mains part plug and there is a power cut, it switches to battery operation. For this reason, the standby time is dependent on the battery charge status.
- Position the camera so that it is in an elevated position and is not in proximity to any other devices that may cause interference.
- Set the camera angle by turning the camera.
7 Operation
Press and hold the On/Off button on the camera for 5 seconds.
- Press and hold the On/Off button on the monitor for 3 seconds. After a few seconds, a start logo appears on the display, followed by the camera transmission image. If the transmission image does not appear on the display, check that the mains part plug on the camera is connected to a socket.
If you have connected several cameras and would like to switch between the individual cameras, press the up or down arrow buttons on the monitor.
- To set your desired volume on the monitor, press the right or left arrow buttons during operation.
Settings
You can select the following settings on your monitor: Zoom function, pan camera image in the zoom window, sound alarm, motion alarm, infrared night vision and system settings.
- To access the settings menu, switch the monitor on and press the OK/ Menu button. The settings menu appears at the bottom of the monitor screen.

中
2
X
- Select your desired menu option using the left and right arrow buttons:

Zoom function
With the zoom function, you can enlarge one of five sections of the transmission image on the display.
- In order to activate the zoom function, select this menu option and press the OK/Menu button.
- Now use the arrow buttons to select the extract that you would like to enlarge and confirm with the OK/Menu button.
If you would like to switch back to the full transmission image, press the OK/Menu button, select and confirm with the OK/Menu button.

Pan camera image in the zoom window
This function can only be selected if the zoom function is activated.
If you would like to pan the camera image inside the zoom window, select this menu option and press the OK/Menu button.
You can now pan the camera image in the zoom window with the arrow buttons.

Sound alarm
If the sound alarm is activated, an alarm tone sounds on the monitor as soon as the camera registers a noise.
To activate the sound alarm, select this menu option and press the OK/Menu button. If the sound alarm is activated, a small red dot appears in the menu option

Motion alarm
If the motion alarm is activated, an alarm tone sounds on the monitor as soon as the camera registers a movement.
- In order to activate the motion alarm, select this menu option D and press the OK/Menu button. If the motion alarm is activated, the thumb lights up red in the menu option D.

Infrared night vision
In order to also see clearly visible transmission images in the dark, activate the infrared night vision.
To do this, select this menu option and press the OK/Menu button. If the infrared night vision is activated, a bar lights up red in the menu option

System settings
In this menu option, you can make the following settings:
Register
Here, you can synchronise the device signals of the camera and the monitor with one another (pairing).
Power saving
You can activate the energy saving mode here. If the device is in energy saving mode, no transmission image is displayed on the monitor. The transmission image only reappears when any button is pressed or the sound/motion alarm is triggered.
You can specify whether the energy saving mode should be activated after 10 or 30 seconds.
Language setting
You can change the menu language of the system settings here. You can choose between German, English, French, Spanish and Italian.
Camera control
You can set the following parameters for your camera here:
Brightness, Contrast, Saturation and Frame Rate.
In order to be able to set the parameters, you must first select the channel number of your camera (e.g. CH1, CH2, etc.) with the arrow buttons.
Confirm your selection with the OK/Menu button. Now you can adjust the individual parameters of the camera with the arrow buttons.
To exit the menu again, press the On/Off button.
Version
The software version that is currently being used on the device can be read off here.
Default
Resetssall settingsto the factory settings.
If no button is pressed for five seconds, or the On/Off button is pressed, the settings menu disappears.
Resetting the device to factory settings
To reset the device to factory settings, use a sharp object to press the reset button on the monitor and on the camera.
8 Technical data
16 channels
Frequency 2.4 - 2.483 GHz
Digital receiver
2.4" TFT display
Infrared technology
ECO mode
Dimensions: camera 82 mm x 75 mm / base: 90 mm /
monitor: 130 × 76 × 31 mm / stand: 105 × 64 × 45 mm
Weight: camera 93 g; monitor 117 g; battery 80 g
200 m range with a clear view
| Operation Camera and monitor mails part plug: input: 100-240 V ~50/60 Hz, 200 mA; output: \( 5\mathrm{\;V} = = = 1\mathrm{\;A} \) Monitor: Lithium ion battery 3.7 V; 900 mAh | |
| Battery life (dependent on battery state, ambient temperature, method and frequency of charging, etc.) | Monitor: approx. 9 hours in ECO mode approx. 5 hours in LCD mode |
9 Useful information about the baby monitor
If you operate the monitor with the battery, this minimises electrosmog from electrical and magnetic alternating fields.
- You can increase the range of the baby monitor by positioning the camera as high up as possible near a door or window and ensuring that the battery is not too weak.
- Other radio waves may interfere with the transmission of the baby monitor. Therefore, do not position the baby monitor near devices such as microwaves, WLAN, etc.
- The following other factors can interfere with the baby monitor's transmission or shorten its range: furniture, walls, houses, trees, environmental factors (such as fog, rain).
10 Storage and maintenance
The service life of the devices depends on careful use:

Important:
- Remove the battery if the device is not in use for an extended period.
- You will get the maximum capacity from your battery if you run down the battery at least once every six months. To do this, disconnect the device from the mains and run the battery down through normal use. Then fully charge the battery up again.
- The maximum battery capacity can only be reached after it has been charged several times and is dependent on many factors (battery state, ambient temperature, means and frequency of charging, etc.).
- Protect the devices from knocks, damp, dust, chemicals, drastic changes in temperature, electromagnetic fields and nearby sources of heat (ovens, heaters).
If dirty, wipe the device with a soft, dry cloth. - Clean the device with a dry cloth. Do not use any abrasive cleaning products.
11 Disposal
Batteries must not be disposed of with household waste. As a consumer, you are required by law to recycle used batteries. You can recycle your old batteries and rechargeable batteries at public collection points in your community, or wherever batteries of the relevant type are sold.

Note:

The codes below are printed on batteries containing harmful substances:
Pb = Battery contains lead.
Cd = Battery contains cadmium,
Hg = Battery contains mercury.
For environmental reasons, do not dispose of the devices including the batteries in the household waste at the end of their service life. Dispose of the unit at a suitable local collection or recycling point.
Observe the local regulations for material disposal.

Dispose of the device in accordance with EC Directive 2002/96/EC - WEEE (Waste Electrical and Electronic Equipment).
If you have any questions, please contact the local authorities responsible for waste disposal.
12 What if there are problems?
| Faults Actions | |
| Monitor will not switch on. | Check whether • the mains part plug is properly plugged in, • the battery is correctly connected, • the rechargeable battery is full, needs charging or is damaged. |
| On the monitor, an acoustic signal sounds. | Check whether • the maximum range has been exceeded, • the mains part plug for the camera is correctly connected, • the camera is switched on. • the battery needs to be charged. |
| The monitor is swit-ched on, but is not making any noise. | To set your desired volume on the monitor, press the right or left arrow buttons during operation. |
| The monitor switches itself off. | Recharge the battery of the monitor. It could be that the device is in energy saving mode. Press any button to make the device exit energy saving mode. |
| The signal is weak, the connection keeps breaking up or there is interference. | If another technical device such as a microwave is in the area between the camera and the monitor, remove the device, or switch it off. Check whether other factors, such as trees or anything else are in the area between the devices, and change the position of the devices until the monitor signals a connection. Check whether the camera and monitor are inside the maximum receiving range. |
| Faults Actions | |
| If no transmission is possible, you have the option to retune the device signals digitally = pairing. | Turn on both devices. Open the menu bar by pressing the OK/Menu button. Select the „Settings“ menu item and then „Register“. Select the required channel number (if you are running the video baby monitor with just one camera, this is number 1). Press the OK/Menu button again. Keep the Connector button on the camera pressed for approx. 3 seconds. After successfully connecting with the camera, press the On/Off button twice to switch to image transfer. |
We hereby guarantee that this product complies with the European R&TTE Directive 1999/5/EC.
Please contact the specified service address to obtain further information, such as the CE Declaration of Conformity.
Français
Table des matieres
Chere cliente, cher client,
Power saving. (3KoHOMN 3Heprn)
3neB Bby MoKTe aKTbNbPObaTb peXkM 3KOHOOMn 3Heprn.
Korda npnbop pa6oTaET B pexmme 3KOHOMMn 3Heprnn, n3O6paXeHne C
BndeokamepbHe NOKa3bIbAeTcHa MoHITope.V3O6paKeHne NOBnRETC TObko B Tom clyae,ecnbl HaxMeTe Kakyo-1n60 KhONky nIn ecnBn DEOKaMepa 3aΦNKcpyet yM nIN dBxKeHne.
Bb mokehe hactpoitb BpempeoxoBa peKIM 3KOHOMn 3Heprn:Yepe3 10nn nepe3 30 cekynd.
3ndeBbMoKeTe HAcTpoNTb CnEduOuIe NapaMeTpbl BnDeokamepbl: npKocTB (Brightness), KOnTpaCT (Contrast), HacbIueHHocTb Ubeta (Saturation) nHaCTOTy CMeHbI N3o6paXeHm (Frame Rate).
YTo6bHaCTpOHTbnapaMeTpbl,Heo6xOIMBOBbpaTbHomepKaHaN BnEOKaMepbl(Hanpimep,CH1,CH2nT.)cNOMoubKHOONKBbIbOpa HapabEnH.NoTBePNTeBaWbIbOp haxaTne KhoNKn 一 0 / M e H I O . BbIbPa KaHaN BnEOKaMepbl,BbCMoxTe N3MeHnTbe ee OTenbHbie npaMeTpbl c NOMUbKHOONKbIbOpa HapabEnH.
YTO6bI BbIMTNm MeHIO, HAKMITE KHOKNK BYKJI./BbIKJI.
Version(Bepcw)
3Decb Bbl MoXeTe y3HaTb BepCnIO nporpaMMHOrO oBeCneHnA, nCNOJIb3yEMORo pnp6Opom.
Default(No ymOnHaHnIO>
Bo3bpaaet 3abOcKne HacTpoKn np60pa.
Ecnn BbI He haxmaeTe KONKn B TeeyHne 5 ckyHd NIn HaxmaeTe KONKy BKJ./BblKJ., MeHIO HAcTpoE KcHc3aET.
C6poc K 3aBODCKHM HAcTpoiKaM
YtO6bI BepHyTb npi6op K 3aBODcKIM HAcTpoiKaM, OCTpbim npedMeTOM
HaxMnTe KhoNkN «C6pO» Ha MoHTope n Ha BvIeOkamepe.
8 TexHnueckne xapaKTepeNCTMKN
16 KaHaJIOB
- Yactota 2,400-2,483 Tt
LcnpoBOn npnemHnK
2,4-IOHMOBBI TFT-dmcJIeI
VHpaKpaChaTexHOJor
- Pekum ECO
Pa3Mepb: BnEeKaemepa 82 MM x 75 MM/onopa: 90 MM/MOHITOP: 130 x 76 x 31 MM/NoCTabka: 105 x 64 x 45 MM
Bec:Bundeokamepa 93 r;MOHITop117r;akkymyIATOPnHa6atape80r
Paunyc DeiCTBn 200 m npu cbooHOB BNDMOCTN
IITaHHe CTeBbE aAnTepb BUneokamepb H
| MOHITOPA: BxOДнай мошноctь 100-240 B ~50/60 Г, 200 mA, мошноctь на ВьIxode: 5 B --- 1 A MOHITOP: Литий-ионнай akКуМлЯТорпай батаря 37 B; 480 mA·ч |