BY 110 - Baby monitors BEURER - Free user manual and instructions
Find the device manual for free BY 110 BEURER in PDF.

| Product Type | Video baby monitor (baby monitor) |
| Brand | Beurer |
| Model | BY 110 |
| Parent unit screen | 2.8-inch LCD |
| Camera dimensions | 7.4 x 7.0 x 10.0 cm |
| Parent unit dimensions | 13.0 x 2.1 x 7.2 cm |
| Camera weight | 114 g |
| Parent unit weight (without battery) | 95 g |
| Battery weight | 38 g |
| Parent unit power supply | 5V USB power adapter / 1.5 A |
| Camera power supply | 5V USB power adapter / 1.0 A |
| Parent unit battery | Li-ion 1800 mAh, battery life approx. 8 h |
| Number of channels | 21 channels (frequency 2.4 - 2.483 GHz) |
| Maximum range | Up to 300 m without obstacles |
| Max. number of cameras | 4 cameras |
| Main features | Infrared night vision (ECO+ mode), 2x digital zoom, intercom, 4 lullabies, timer, temperature alarm, motion alarm, energy-saving mode, sound sensitivity adjustment, frequency selection (50/60 Hz) |
| Usage | Domestic/private, for monitoring a baby |
| Safety | Camera to be placed out of reach of child, power cable to be kept out of reach (≥1.5 m), do not use if visible damage |
| Maintenance and cleaning | Clean with a soft, dry cloth, do not use abrasive products, discharge the battery at least every 6 months |
| Repairability | Repairs only by customer service or an authorized operator |
| Spare parts available | Additional camera (ref. 952.63), power adapters, battery |
| Warranty | In accordance with the conditions on the provided warranty card |
Frequently Asked Questions - BY 110 BEURER
User questions about BY 110 BEURER
0 question about this device. Answer the ones you know or ask your own.
Ask a new question about this device
Download the instructions for your Baby monitors in PDF format for free! Find your manual BY 110 - BEURER and take your electronic device back in hand. On this page are published all the documents necessary for the use of your device. BY 110 by BEURER.
USER MANUAL BY 110 BEURER
natural_image
Beurer-style camera with a circular head and antenna, no visible text or symbols on the device body.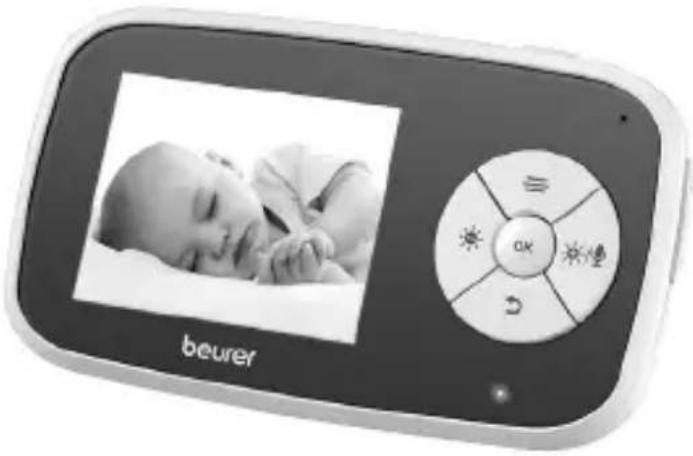
natural_image
Digital beurer device displaying a sleeping baby image alongside its circular app interface (no readable text or symbols on the device itself)EN Video baby monitor Instructions for use......23
natural_image
Simple line drawing of an open book with no text or symbols visiblehttps://www.beurer.com/web/we-landingpages/de/cedeclarationofconfor-mity.php
14. Garantie
natural_image
Simple line drawing of an open book with no text or symbols visibleRead these instructions for use carefully and keep them for later use. Make them accessible to other users and note the information they contain.
WARNING
- The device is only intended for domestic/private use, not for commercial use.
- This device may be used by children over the age of 8 and by people with reduced physical, sensory or mental skills or a lack of experience or knowledge, provided that they are supervised or have been instructed on how to use the device safely, and are fully aware of the consequent risks of use.
- Children must not play with the device.
- Do not use the device if it shows signs of damage or does not function properly. In such cases, contact Customer Services.
- Repairs must only be carried out by Customer Services or authorised suppliers.
- Ensure that the cable is out of the reach of children (at least 1.5 m away). There is a risk of strangulation.
- Cleaning and user maintenance must not be performed by children unless supervised.
- If the mains connection cable of this device is damaged, it must be disposed of. If it cannot be removed, the device must be disposed of.
Dear customer,
Thank you for choosing one of our products. Our name stands for high-quality, thoroughly tested products for applications in the areas of heat, gentle therapy, blood pressure/diagnosis, weight, massage, beauty, baby and air.
With kind regards,
Your Beurer team.
Getting to know your device
Functions of the device
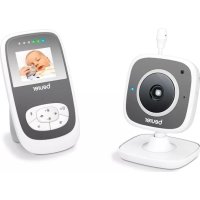
This video baby monitor allows you to keep an eye on your baby during the day and at night. Whether you are carrying out tasks in another room, in the garden, or whether you yourself are sleeping – you are always connected with your baby. Enjoy watching your baby sleep with the large 2.8-inch colour screen. With 2-level digital zoom for additional peace of mind, so you don’t miss any little movement of your baby. The 21 channels ensure a connection that is secure and as free of interference as possible.
The device has the following additional functions:
• Infrared night vision function
- ECO ^+ mode / energy-saving mode
- Temperature alarm for monitoring the optimum room temperature
- Timer function
- Intercom function to allow you to talk to your baby directly
- 4 gentle and calming lullabies which can be controlled from the parent unit
- Range control with acoustic signal if connection is interrupted
- Range of up to 300 m with a clear view
- The monitor is compatible with up to 4 cameras
- Handy wall-mounting fixture for the camera
Table of contents
-
Included in delivery .....25
-
Signs and symbols ......26
-
Warnings and safety notes ......27
-
Intended use ......29
-
Device description......29
5.1 "Baby" camera 29
5.2 "Monitor" parent unit......30
5.3 Display description......31
- Initial use ....32
6.1 Preparing the device for first time use ....32
6.2 Initial use of camera .....32
6.3 Initial use of parent unit with battery 32
6.4 Initial use of parent unit with mains part plug ....33
- Usage....33
7.1 Adjusting the volume......33
7.2 Adjusting the brightness......33
7.3 Intercom function ......33
7.4 Settings menu ......33
7.5 Zoom function 34
7.6 Lullabies ....34
7.7 Timer 34
7.8 Adding a camera 35
7.9 Deleting a camera 35
7.10 Selecting camera transmission image....36
7.11 Noise sensitivity setting......36
7.12 Selecting the frequency......37
7.13 Energy-saving mode .....37
7.14 Selecting the temperature unit 37
7.15 Setting the temperature alarm.38
7.16 Setting the movement alarm ...38
7.17 Resetting to factory settings ...38
-
Useful information about the baby monitor 39
-
Cleaning and maintenance......39
-
Accessories and replacement parts....40
-
What if there are problems?......40
-
Disposal......41
-
Technical specifications ....42
-
Warranty 43
1. Included in delivery
Check that the exterior of the cardboard delivery packaging is intact and make sure that all contents are present. Before use, ensure that there is no visible damage to the device or accessories and that all packaging material has been removed. If you have any doubts, do not use the device and contact your retailer or the specified Customer Service address.
- 1x camera (baby unit)
- 1x parent unit
- 2x mains part plugs
- 1x lithium-ion battery for parent unit
• 1x these instructions for use
2. Signs and symbols
The following symbols are used on the device, in these instructions for use, on the packaging and on the type plate for the device:
 | WARNINGWarning notice indicating a risk of injury or damage to health |
 | IMPORTANTSafety note indicating possible damage to the device/accessories |
 | NoteNote on important information |
 | Read the instructions for use |
 | Disposal in accordance with the Waste Electrical and Electronic Equipment EC Directive – WEEE |
 | This product satisfies the requirements of the applicable European and national directives. |
 | United Kingdom Conformity Assessed Mark |
 | Manufacturer |
 | Dispose of packaging in an environmentally friendly manner |
 | Certification symbol for products that are exported to the Russian Federation and members of the CIS |
 | Only use indoors |
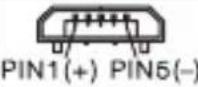 | Polarity of the output terminal |
 | Energy efficiency class 6 |
3. Warnings and safety notes

WARNING
- Always position the camera and power cord out of the reach of children. The power cord may cause strangulation or injury to children.
- Keep small parts out of reach of children.
- Keep packaging material away from children (risk of suffocation).
- Never place the camera in the cot or within reach of your child.
- Place the camera 2 m away from your baby, in order to minimise the possibility of electrosmog pollution and noise pollution.
- Make sure that cables are not accessible to your child.
- Make sure that the video baby monitor is fully functioning before use and check that the battery in the parent unit is sufficiently charged when operating the device with the battery.
- Never submerge the camera and the parent unit in water. Never rinse it in running water.
- Never use the camera and the parent unit in proximity to moisture.
- Do not cover the camera and the parent unit with a towel or cover.
- Only use the mains part plugs included in delivery.
- Do not use the cable to pull the mains part plug out of the socket.
- This device may be used by children over the age of 8 and by people with reduced physical, sensory or mental skills or a lack of experience or knowledge, provided that they are supervised or have been instructed on how to use the device safely, and are fully aware of the consequent risks of use.
• Children must not play with the device.
- Cleaning and user maintenance must not be performed by children unless supervised.
- Do not pull, twist or bend the mains cable.
- Pull the mains part plug out in the case of operational faults before the cleaning process, after charging and when the device is not in use.
- The camera, the parent unit and the mains part plugs should not come into contact with hot surfaces or sharp-edged objects.
- Do not use any additional parts that are not recommended by the manufacturer or offered as accessories.
i Note
- Before making a claim, please check the battery in the parent unit and replace it if necessary.
- Repairs must only be carried out by Customer Services or authorised retailers. Under no circumstances should you open or repair the camera or parent unit yourself, as faultless functionality can no longer be guaranteed thereafter. Failure to comply with this instruction will void the warranty.
- Should you have any questions about using the video baby monitor, please contact either your retailer or Customer Services.

WARNING
Safety notes on handling batteries
- If the battery leaks, put on protective gloves and clean the battery compartment with a dry cloth.
- If your skin or eyes come into contact with fluid from a battery cell, flush out the affected areas with water and seek medical assistance.
- Choking hazard! Small children may swallow and choke on batteries. Therefore, store batteries out of the reach of small children.
- Observe the plus (+) and minus (-) polarity signs.
- Protect batteries from excessive heat.
- Risk of explosion! Never throw batteries into a fire.
- If the device is not to be used for a long period of time, remove the batteries from the battery compartment.
- Do not disassemble, split or crush the batteries.
- Only use chargers specified in the instructions for use.
- Batteries must be charged correctly prior to use. The instructions from the manufacturer and the specifications in these instructions for use regarding correct charging must be observed at all times.
- Fully charge the battery prior to initial use (see Chapter 6.1).
- In order to achieve as long a battery service life as possible, fully charge the battery at least 2 times a year.
4. Intended use

WARNING
- Only use the device to monitor your baby when you cannot mind your baby directly. It is not a substitute for your own personal, responsible supervision!
- Any form of improper use can be dangerous.
- The video baby monitor is only intended for domestic/private use, not for commercial use.
5. Device description
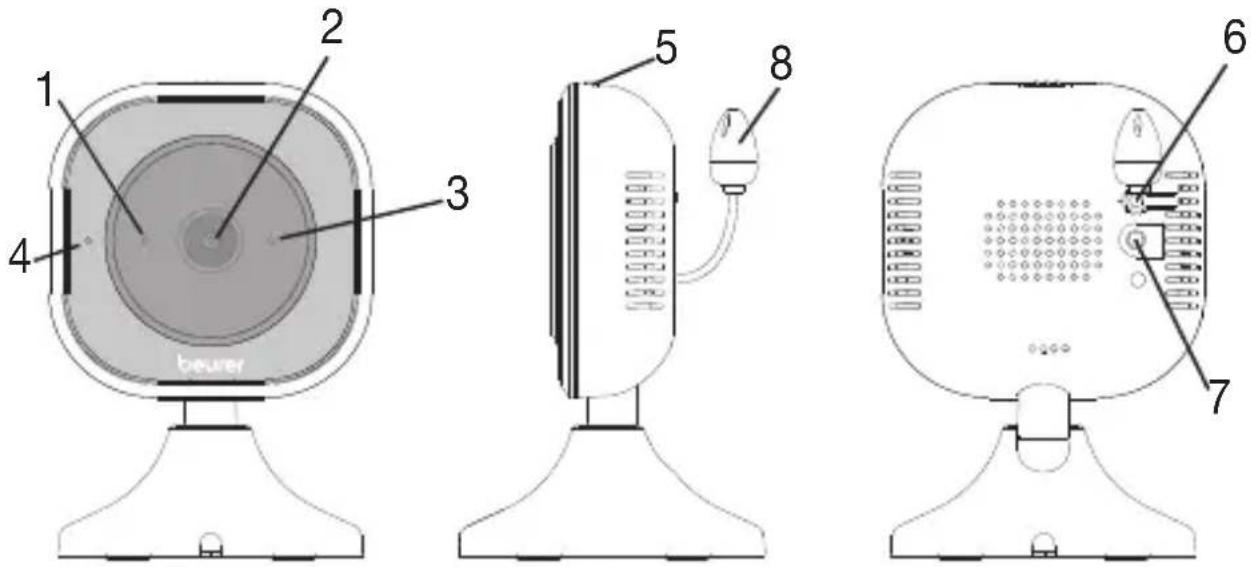
5.1 "Baby" camera
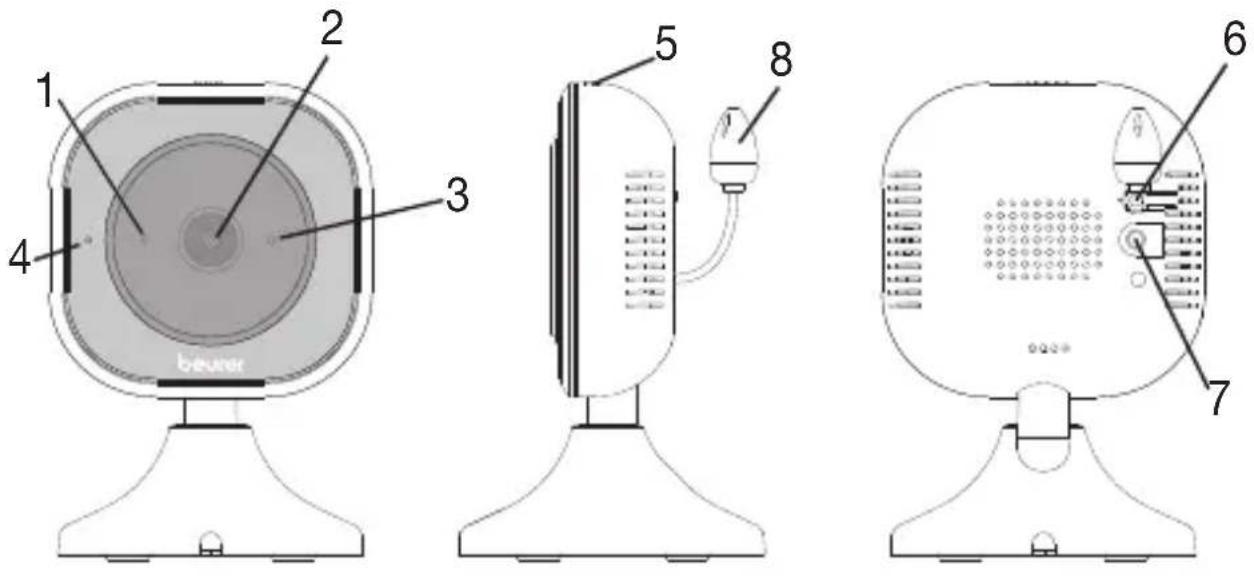
| 1. Microphone 5. ON/OFF switch | |
| 2. Camera lens 6. Pair button | |
| 3. Brightness sensor(night vision function) | 7. Connection for mains part plug |
| 4. Function lightgreen = camera is ready for use | 8. Temperature sensor |
5.2 "Monitor" parent unit
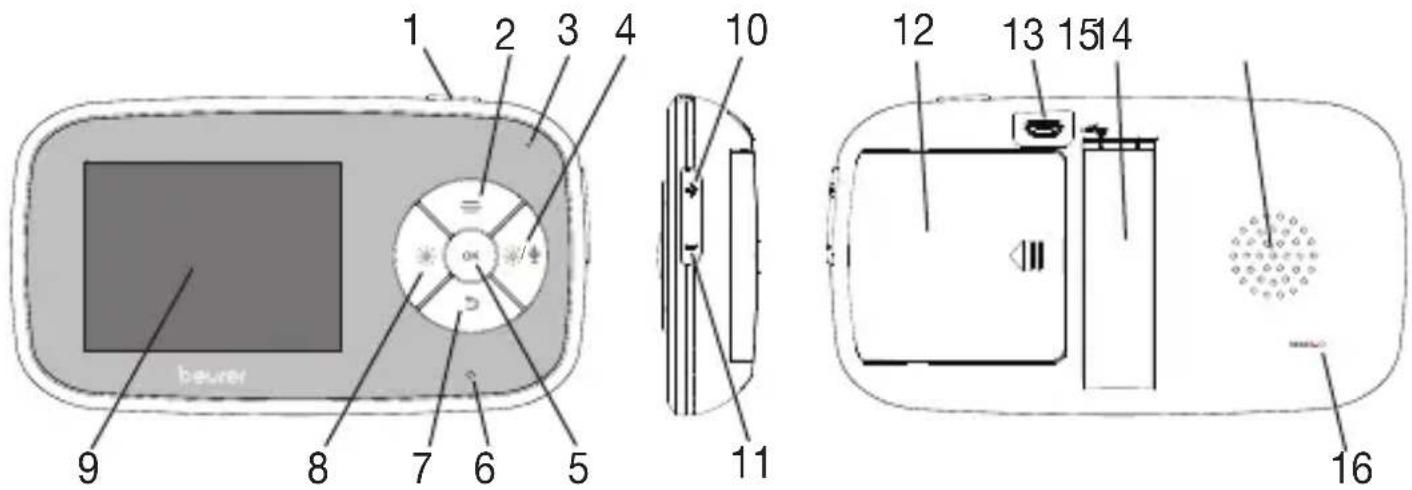
| 1. ON/OFF button 9. Display | |
| 2. Menu button/up direction button 10. Increase volume | |
| 3. Microphone 11. Decrease volume | |
| 4. Intercom function/increase screen brightness | 12. Battery compartment lid |
| 5. OK button 13. Connection for mains part plug | |
| 6. Battery status indicator green = battery fully charged/ parent unit connected to power via mains part plug red = battery charging | 14. Stand (fold-out) |
| 7. Back button/down direction button | 15. Speaker |
| 8. Decrease screen brightness 16. Reset button | |
5.3 Display description
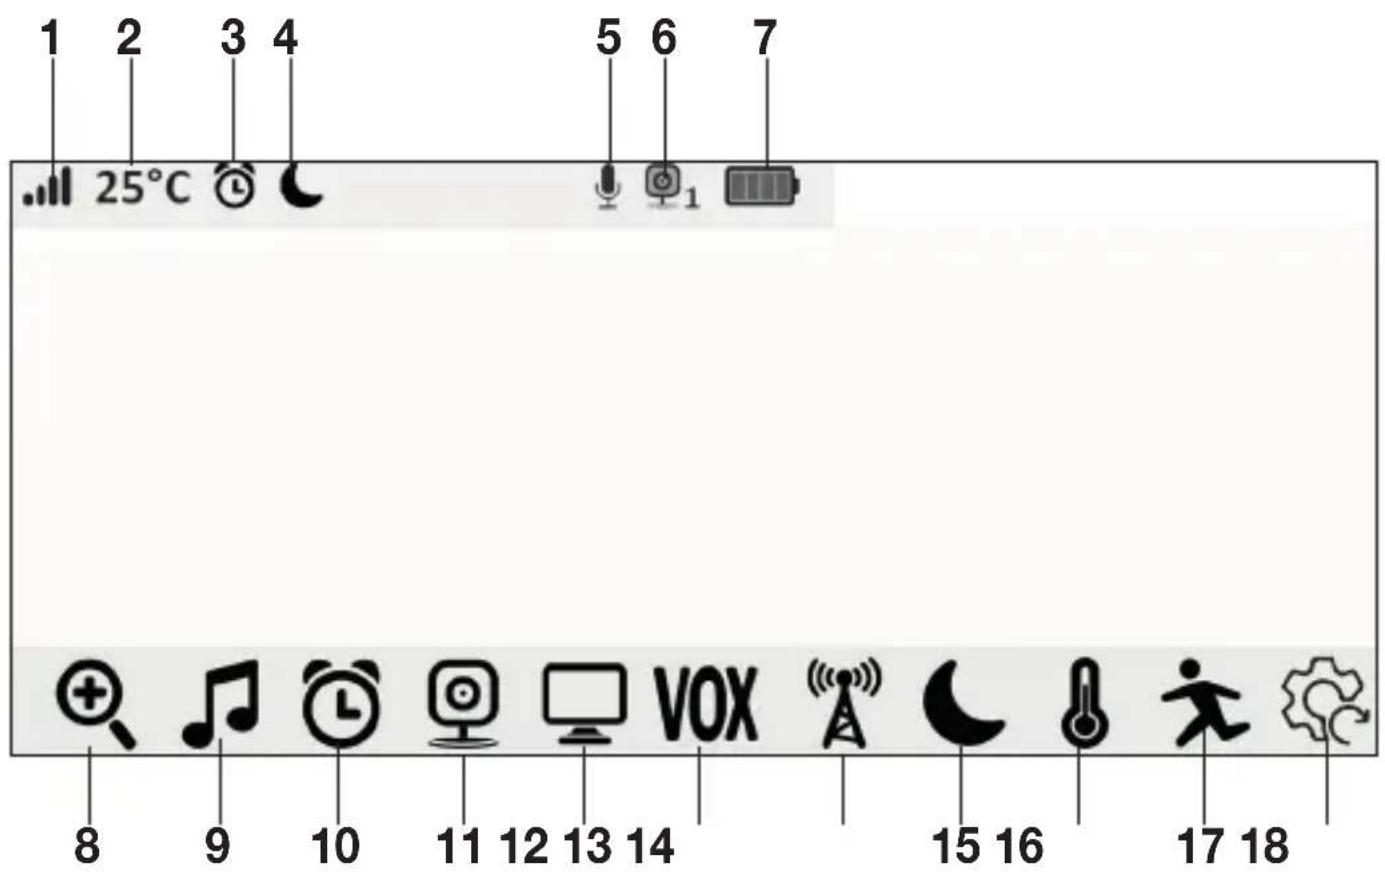
| 1. Signal strength 10. Timer menu |
| 2. Room temperature display 11. Add camera |
| 3. Timer 12. Camera change menu |
| 4. Energy saving mode 13. Noise sensitivity setting |
| 5. Intercom function 14. Frequency setting |
| 6. Camera number 15. Energy saving mode |
| 7. Battery state 16. Temperature menu |
| 8. Zoom setting 17. Movement sensor setting |
| 9. Lullabies menu 18. Resetting to factory settings |
6. Initial use
6.1 Preparing the device for first time use
Before the first use, the batteries should be fully charged. The charging process lasts for approx. 4 hours. The device then offers an operating time of approx. 8 hours. You will get the maximum capacity from your battery if you run down the battery at least once every 6 months. To do this, disconnect the device from the mains and run the battery down through normal use. Afterwards, fully charge the battery again.
The maximum battery capacity can only be reached after it has been charged several times and is dependent on many factors (battery state, ambient temperature, manner and frequency of charging etc.).
6.2 Initial use of camera
- Place the camera on a level, firm surface and point the camera lens at the area that you wish to monitor. Ensure that there are no other electrical devices nearby.

WARNING
Do NOT position the camera within reach of the baby!
- Connect the small end of the camera mains part plug to the camera. Connect the other end of the camera mains part plug to a suitable socket.
- Slide the ON/OFF switch at the top to "ON" to switch on the camera. The function light on the camera lights up green.
- Slide the ON/OFF switch to "OFF" to switch off the camera.
6.3 Initial use of parent unit with battery
-
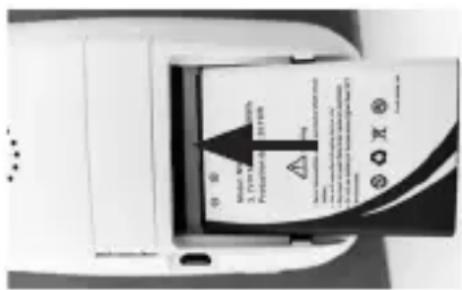
Open the battery compartment lid on the rear of the parent unit by sliding it sideways.
-
Slide the battery included in delivery into the battery compartment with the gold +/- surface going first and with the side with writing on it facing upwards, as shown. Ensure that the battery is fully inside the battery compartment, as far as it will go.
-
Close the battery compartment lid on the rear of the parent unit again, until you can hear and feel it slot into place.
- To switch on the parent unit, press and hold the ON/OFF button 📍 on the top for approx. 3 seconds. If the camera is already switched on, the transmission image from the camera will automatically appear on the screen. If the camera is still switched off, an acoustic signal is emitted and 🔒 appears on the display.
6.4 Initial use of parent unit with mains part plug
- Connect the small end of the parent mains part plug with the parent unit. Insert the other end of the parent mains part plug into a suitable socket.
- To switch on the parent unit, press and hold the ON/OFF button 📍 on the top for approx. 3 seconds. If the camera is already switched on, the transmission image from the camera will automatically appear on the screen. If the camera is still switched off, an acoustic signal is emitted and the following symbol appears on the display: 🔒
7. Usage
7.1 Adjusting the volume
The parent unit has 5 volume levels.
- To adjust the volume, press the (-) or (+) button on the side.
7.2 Adjusting the brightness
The parent unit has 5 brightness levels.
- To adjust the brightness, press the (-) or ( ) button.
7.3 Intercom function
The parent unit has an intercom function.
To activate the intercom function, hold down the (\~// button) button on the parent unit and speak into the unit. The words you have spoken can now be heard on the camera. To deactivate the intercom function, release the (\~// button again.
7.4 Settings menu
You can adjust the following settings in the menu of the parent unit: zoom function, lullabies, timer, add/delete camera, select camera, noise sensitivity, frequency, energy-saving mode, temperature unit and temperature alarm, movement alarm and resetting to factory settings.
- To access the settings menu, switch the parent unit on and press the (≡ button. The following settings menu appears at the bottom edge of the parent unit screen:

You can navigate through the menu using the (-) and the ( ) button. To exit the settings menu, press and hold the return button.
7.5 Zoom function
The parent unit has a zoom function to increase the size of the transmission image. To activate the zoom function, proceed as follows:
- Press the (button.
- Use the direction buttons ( )/() to select the zoom factor you want (1x or 2x).
- Confirm using the (OK) button.
7.6 Lullabies
Via the parent unit, you can activate one of four lullabies that will then be played over the camera. To activate one of the lullabies, proceed as follows:
- Press the (≡) button.
- Use the direction buttons ( ) to select menu item .
- Use the direction buttons ( )() to select the lullaby of your choice (1, 2, 3, 4 or random).
- Confirm using the (OK) button.
- To adjust the volume of the lullabies, press the (-) or (+) button on the side.
7.7 Timer
You can set a timer on the parent unit – this will sound on the parent unit after 2, 3, 4 or 5 hours, as desired. After the set time elapses, the parent unit starts to beep. To activate a timer, proceed as follows:
- Press the ( ) button.
- Use the direction buttons ( ) to select menu item .
- Use the direction buttons (⇐)/(≡) to select your desired alarm time (2H, 3H, 4H or 5H).
- Confirm using the (OK) button.
7.8 Adding a camera
You can connect one parent unit with up to four cameras.
To add a camera to the parent unit, proceed as follows:
• 1, 2, 3, 4 appears on the screen.
- Use the direction buttons ( )() to select a number and confirm with the (OK) button. 🔧 appears on the screen and the unit searches for a camera.
- Now hold down the PAIR button on the rear of the camera until an acoustic signal is heard and the transmission image from the camera that has been added appears on the screen.

Note
- Order information for the additional camera can be found in Chapter „10. Accessories and replacement parts“.
7.9 Deleting a camera
If you wish to delete the connection to a camera, proceed as follows:
• 1, 2, 3, 4 appears on the screen.
- Use the direction buttons ( ) to select the number of the camera that you wish to delete.
- Confirm using the (OK) button.
7.10 Selecting camera transmission image
If you wish to select the transmission image of a camera, proceed as follows:
- Press the ( ) button.
- Use the direction buttons ( - ) to select menu item .
- Confirm using the (OK) button. On the screen you will see 1, 2, 3, 4 or (alternating camera transmission image).
- Use the direction buttons ( )() to select the number of the camera which you wish to view or , if you wish to view an alternating camera transmission image.
- Confirm using the (OK) button.

Note
If you have registered multiple cameras, the “○ alternating camera transmission image” function is available. When this function is activated, the transmission images from the registered cameras appear on the screen of the parent unit in the form of a loop that changes every 5 seconds.
7.11 Noise sensitivity setting
The noise sensitivity setting on the baby unit determines what you can hear on the parent unit. If you set the sensitivity level to high (H), you will hear even very quiet noises via the parent unit. If you set the sensitivity level to medium (M), you will hear medium-loud noises via the parent unit. If you set the sensitivity level to low (L), you will only hear very loud noises via the parent unit.
To change the sensitivity level, proceed as follows:
- Press the (≡) button.
- Use the direction buttons ( - ) to select menu item .
- Use the direction buttons ( ) to select your desired sensitivity level (H=high, M=medium or L=low).
- Confirm using the (OK) button.

7.12 Selecting the frequency
The baby unit can either transmit to the parent unit at 50 Hz or 60 Hz. The frequency which is most common in Europe (50 Hz) has been preset. Choosing the correct frequency can help to reduce screen flickering with artificial lighting.
To change the frequency, proceed as follows:
- Press the (button.
- Use the direction buttons ( - ) to select menu item .
- Use the direction buttons (→)/(≡) to select your desired frequency (50Hz or 60Hz). Confirm using the (OK) button.

7.13 Energy-saving mode
The parent unit has an energy-saving mode. When you activate the energy-saving mode, the screen switches off automatically, either after 2, 5 or 10 minutes, as desired.
To set the energy-saving mode, proceed as follows:
- Press the (button.
- Use the direction buttons ( ) to select menu item .
- Use the direction buttons (1/2) to select your desired duration, after which the parent unit will automatically switch to energy-saving mode (2, 5 or 10 minutes). Confirm using the OK button.

7.14 Selecting the temperature unit
You can set the device to display the room temperature in degrees Celsius (°C) or degrees Fahrenheit (°F).
To set the temperature unit, proceed as follows:
- Press the ( ) button.
- Use the direction buttons ( - ) to select menu item .
- Use the direction buttons ( ) to select your desired temperature unit ( °C or °F ).
- Confirm using the (OK) button.
7.15 Setting the temperature alarm
Additionally, you can set a temperature alarm with an upper and lower limit. If the current ambient temperature of the camera exceeds or falls short of the set upper or lower limit, the parent unit will begin beeping.
To set the upper and lower limits for the temperature alarm, proceed as follows:
- Press the ( ) button.
- Use the direction buttons (-/-)/(-%/-%) to select the menu item
- Use the direction buttons ( ⟹)/(≡) to select the menu item ⚙.
- Confirm using the (OK) button.
- Use the direction button ( ) to select the upper or lower limit. "20" for the setting for the lower limit (range of 10 – 20°C). "40" for the setting for the upper limit (range of 20 – 40°C).
- Use the direction buttons (💡)/(💡/💡) to set your desired upper or lower limit.
- Use the direction button ( ) to select the tick √.
- Confirm using the (OK) button.
7.16 Setting the movement alarm
The baby monitor features a movement alarm. The movement alarm works as follows: as soon as the camera of the baby unit registers movement, the parent unit will begin to beep every 40 seconds.
To activate the movement alarm, proceed as follows:
- Press the (button.
- Use the direction buttons ( ) to select menu item .
- Use the direction buttons (→)/(≡) to select the "ON" field.
- Confirm using the (OK) button.
7.17 Resetting to factory settings
To reset the parent unit back to factory settings, proceed as follows:
- Press the ( ) button.
- Use the direction buttons ( ) to select menu item .

- Use the direction buttons (→)/(≡) to select the "YES" field.
- Confirm using the (OK) button.
8. Useful information about the baby monitor
- Operating the parent unit with the battery minimises electrosmog from electrical and magnetic alternating fields.
- You can increase the range of the baby monitor by positioning the camera as high up as possible near a door or window and ensuring that the battery is not too weak.
- Other radio waves may possibly interfere with the transmission of the baby monitor. Therefore, do not position the baby monitor near devices such as microwaves, WIFI, etc.
- The following additional factors can interfere with the baby monitor's transmission or shorten its range: furniture, walls, houses, trees, environmental factors (such as fog, rain).
9. Cleaning and maintenance
The service life of the camera and the parent unit depend on careful handling.

IMPORTANT
- Remove the battery from the parent unit if the video baby monitor is not in use for an extended period.
- You will obtain the maximum capacity from your battery if you run down the battery at least every 6 months. To do this, disconnect the parent unit from the mains and run the battery down through normal use. Afterwards, fully charge the battery again.
- The maximum capacity of the battery can only be reached after it has been charged multiple times and is dependent on several factors (battery state, ambient temperature, type and frequency of charging, etc.).
- Protect the camera and the parent unit from impacts, damp, dust, chemicals, drastic changes in temperature, electromagnetic fields and nearby sources of heat (ovens, heaters).
- Clean the camera/parent unit with a soft, dry cloth. Do not use any abrasive cleaning products.
10. Accessories and replacement parts
For replacement parts and additional items visit www.beurer.com or contact the corresponding service address in your country (according to the service address list).
Replacement parts and additional items are also available from retailers.
| Replacement parts and additional items Item number |
| BY 110 single camera 952.63 |
11. What if there are problems?
| Parent unit will not switch on. | Check whetherthe mains part plug is properly plugged in,the battery is correctly inserted,the battery is full, needs charging or is damaged. |
| An acoustic signal sounds from the parent unit. | Check whetherthe maximum range has been exceeded,the mains part plug for the camera is correctly connected,the camera is switched on,the parent unit battery needs charging. |
| The parent unit is switched on, but no sounds can be heard. | To set your desired volume on the parent unit, press the (−) or (+) button on the side during operation. |
| The parent unit switches itself off. | Recharge the parent unit battery.It could be that the parent unit is in energy-saving mode. Check whether the energy-saving mode has been selected in the menu and deactivate it if necessary. |
| The signal is weak, the connection keeps failing or there is interference. | ·If another technical device such as a microwave is in the area between the camera and the parent unit, remove the technical device or switch it off.·Check whether other factors, such as trees or similar, are in the area between the camera and the parent unit, and reposition the devices until the parent unit signals a connection.·Check whether the camera and parent unit are within the maximum receiving range. |
| If no transmission is possible, you have the option to retune the device signals digitally = pairing. | 1. Switch on the camera and parent unit.2. Delete the camera in the menu of the parent unit and then set up the camera again as described in the “Adding a camera” section. |
| Set functions do not work as desired. | Reset the device to factory state as described "Resetting to factory settings". |
12. Disposal
Batteries must be disposed of through specially designated collection boxes, recycling points or electronics retailers. You are legally required to dispose of the batteries.
For environmental reasons, do not dispose of the device in the household waste at the end of its useful life.
Dispose of the device at a suitable local collection or recycling point in your country. Dispose of the device in accordance with EC Directive – WEEE (Waste Electrical and Electronic Equipment).
If you have any questions, please contact the local authorities responsible for waste disposal.

- Technical specifications
| Type Digital receiver | ||
| Number of channels 21 channels | ||
| Frequency 2.4 – 2.483 GHz | ||
| Transmission power 13.01 dBm | ||
| Display 2.8” LCD | ||
| Transmission technology | Infrared technology with ECO+ mode | |
| Camera dimensions 7.4 x 7.0 x 10.0 cm | ||
| Parent unit dimensions | 13.0 x 2.1 x 7.2 cm | |
| Camera weight 114 g | ||
| Parent unit weight (without battery) | 95 g | |
| Battery weight 38 g | ||
| Operation Mains part for parent unit (5 V USB/1.5 A)Mains part for baby unit (5 V USB/1.0 A)Li-ion battery (1800 mAh) | ||
| OperationManufacturer:Modelno.:Input:Output: | Mains part for parent unitHuizhou CY-PowerCYHA050150 VWEU / UK100 -240 V AC 50/60 Hz5,0 V DC 1,5 A 7,5 W | Mains part for baby unitHuizhouCY-PowerCYHA050100 VWEU / UK100 -240 V AC 50/60 Hz5,0 V DC 1,0 A 5,0 W |
| Average active efficiency | ≥ 77,04 % | ≥ 75,11 % |
| No-load power consumption | ≤ 0,076 W | ≤ 0,07 W |
| Battery:CapacityNominal voltageType designation | 1800 mAh3.7 VLithium-ion | |
| Battery life | Parent unit: 8 hours(dependent on battery state, ambient temperature,manner and frequency of charging, etc.) | |
We hereby confirm that this product complies with the European RED Directive 2014/53/EU.
The CE Declaration of Conformity for this product can be found under: https://www.beurer.com/web/we-landingpages/de/cedeclarationofconformity.php
14. Warranty
Further information on the warranty and warranty conditions can be found in the warranty leaflet supplied.
FRANÇAIS

natural_image
Simple line drawing of an open book with no text or symbols visiblehttps://www.beurer.com/web/we-landingpages/de/cedeclarationofconfor-mity.php
14. Garantie
natural_image
Simple line drawing of an open book with no text or symbols visiblenatural_image
Simple line drawing of an open book with no text or symbols visible5.1 Telecamera "Baby"......94
5.1 Telecamera "Baby"
natural_image
Simple line drawing of an open book with no text or symbols visiblenatural_image
Simple line drawing of an open book with no text or symbols visiblehttps://www.beurer.com/web/we-landingpages/de/cedeclarationofconfor-mity.php
14. Гарантия
natural_image
Simple line drawing of an open book with no text or symbols visiblehttps://www.beurer.com/web/we-landingpages/de/cedeclarationofconfor-mity.php