OAC 100 - Air Conditioning OK - Free user manual and instructions
Find the device manual for free OAC 100 OK in PDF.

| Product type | Air conditioner (air cooler) |
| Brand | OK |
| Model | OAC 100 |
| Weight (without water) | 6.6 kg |
| Water tank capacity | 20 litres |
| Operating voltage | 220-240 V~, 50 Hz |
| Power consumption | 80 W |
| Protection class | II |
| Maximum air flow | 5.04 m³/min |
| Sound power level | 59.43 dB(A) |
| Functions | Fan, cooling, oscillation |
| Fan modes | Normal, Nature, Sleep |
| Fan speeds | Low, Medium, High |
| Timer | 1, 2, 4 or 8 hours |
| Remote control | Yes, with AAA batteries (not included) |
| Swivel castors | 4, with locking |
| Water level indicator | Yes, graduated MIN/MAX |
| Filter cleaning | Washable with lukewarm soapy water |
| Descaling | Recommended with commercial descaling product |
| Safety | Automatic shutdown if tank empty (not specified but recommended) |
| Warranty | Consult the retailer |
Frequently Asked Questions - OAC 100 OK
User questions about OAC 100 OK
0 question about this device. Answer the ones you know or ask your own.
Ask a new question about this device
Download the instructions for your Air Conditioning in PDF format for free! Find your manual OAC 100 - OK and take your electronic device back in hand. On this page are published all the documents necessary for the use of your device. OAC 100 by OK.
USER MANUAL OAC 100 OK
IMPORTANT SAFETY INSTRUCTIONS. READ CAREFULLY AND KEEP FOR FUTURE REFERENCE.
- Danger of electric shock! Do not attempt to repair the appliance yourself. In case of malfunction, repairs are to be conducted by qualified personnel only.
- Warning! Risk of injury! During operation, keep hands, hair, clothing and utensils away from the air vents to avoid injuries and damage of the appliance.
- Before connecting the appliance to the power supply, check that the power supply voltage and current rating corresponds with the power supply details shown on the appliance rating label.
- Warning! During cleaning or operation do not immerse the electrical parts of the appliance in water or other liquids. Never hold the appliance under running water.
- This appliance can be used by children aged from 8 years and above and persons with reduced physical, sensory or mental capabilities or lack of experience and knowledge if they have been given supervision or instruction concerning use of the appliance in a safe way and understand the hazards involved.
- Children shall not play with the appliance. Cleaning and user maintenance shall not be made by children without supervision.
-
Never use a damaged appliance! Disconnect the appliance from the electrical outlet and contact your supplier if it is damaged.
-
Observe all safety instructions to avoid damage through improper use! Pay attention to all warning notices on the appliance.
- No liability will be accepted for damage resulting from improper use or noncompliance with these instructions.
- Only use this appliance for its intended use. The appliance is not suitable for commercial use. This appliance is only suitable for household use. Do not use the appliance outdoors or in the bathroom. For dry indoor use.
- To avoid damaging the cord, do not squeeze, bend or chafe it on sharp edges. Keep it away from hot surfaces and open flames as well. Lay out the cord in such a way that no unintentional pulling or tripping over it is possible.
- If an extension cord is used, its capacity needs to be suitable for the power consumed by the appliance.
- Do not open the appliance casing under any circumstances. Do not insert any foreign objects into the inside of the casing.
- Never cover the product.
- Never use accessories which are not recommended by the manufacturer. They could pose a safety risk to the user and might damage the appliance. Only use original parts and accessories.
- Do not operate the appliance with wet hands or while standing on a wet floor. Do not touch the power plug with wet hands.
- Keep the appliance away from any hot surfaces and open flames. Always operate the appliance on a level, stable, clean and dry surface. Protect the appliance against heat, dust, direct sunlight, moisture, dripping and splashing water.
- Do not place heavy objects on top of the appliance. Do not place objects with open flames, e.g. candles, on top of or beside the appliance. Do not place objects filled with water, e.g. vases, on or near the appliance.
- Do not use the appliance near explosive or flammable vapours.
- Children should be supervised to ensure that they do not play with the appliance.
- Never leave the appliance unattended during use.
- Regularly check the power plug and power cord for damage. If the supply cord is damaged, it must be replaced by the manufacturer, its service agent or similarly qualified persons in order to avoid a hazard.
- Do not pull the power plug out of the electrical outlet by the power cord, only by the power plug and do not wrap the power cord around the appliance.
- Connect the power plug to an easily reachable electrical outlet so that in case of an emergency the appliance can be unplugged immediately. Pull the power plug out of the electrical outlet to completely switch off the appliance. Use the power plug as the disconnection device.
- Disconnect the power plug from the electrical outlet when not in use and before cleaning.
- Always turn the appliance off before disconnecting the power plug.
- Switch the appliance off before moving.
CONgrAtuLAtiONs
Thanks for your purchase of this ok. product. Please read this manual carefully and keep it for future reference.
iNteNded use
This product is intended for air cooling in indoor spaces only. Do not use it for other purposes. Any other type of use can lead to personal injury or damage to the product.
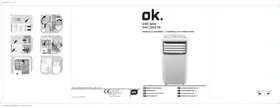
COMPONENts
The product may be available in different colours.
- User panel
- On/off switch
- Handle
- Power cord with plug
- Water level indicator
-
Castor wheels (x4)
-
Water tank
- Air vents
- Air inlet filter and filter cover
- Locking lever
- Water outlet
- Remote control
COMPONENTS
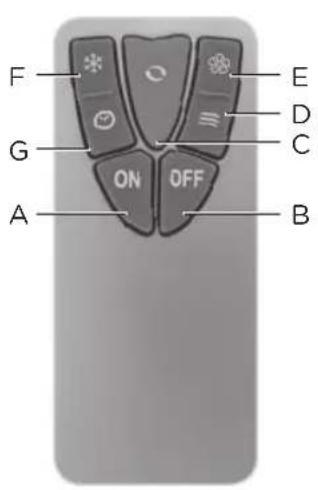
Remote control
| Key Function | |
| ON (A) | Turn on fan |
| OFF (B) | Standby mode |
| ○ (C) | Turn on/off oscillation |
| ≡ (D) | Select fan mode NATURE, SLEEP, NORMAL |
| Key Function | |
| (E) | Select fan speed LOW, MIDDLE, HIGH |
| (F) | Turn on/off cooling function |
| (G) | Select duty cycle 1/2/4/8 hr |
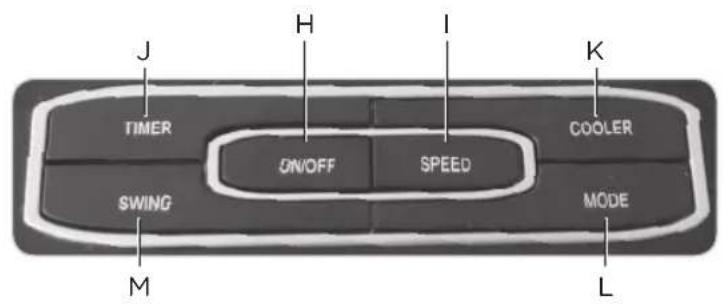
Control keys
| Key Function | |
| ON/OFF (H) | Turn on fan/Standby mode |
| SPEED (I) | Select fan speed LOW, MIDDLE, HIGH |
| TIMER (J) | Select duty cycle 1/2/4/8 hr |
| Key Function | |
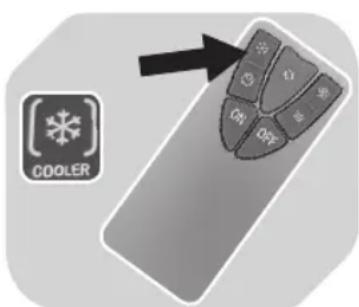
| COOLER (K) | Turn on/off cooling function |
| MODE (L) | Select fan mode NATURE, SLEEP, NORMAL |
| SWING (M) | Turn on/off oscillation |
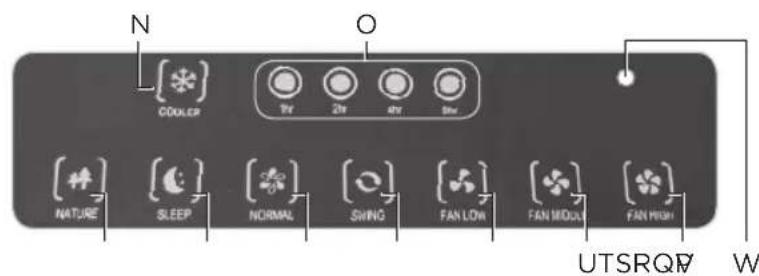
Display elements
| Display | Function |
| COOLER (N) | Cooling function on |
| 1/2/4/8 hr (0) | Shows the duty cycle. If none of the 4 LEDs is lit, the product is in continuous operating mode |
| NATURE (P) | Fan modes (→ page 31) |
| SLEEP (Q) | |
| NORMAL (R) |
| Display | Function |
| SWING(S) | Oscillation function on |
| FAN LOW(T) | Fan speeds |
| FAN (U)MIDDLE | |
| FAN HIGH(V) | |
| Powerindicator(W) | Lights up red during operation and standby mode |
BEFORE FIRST USE
Unpacking and assembling
- Remove all packaging materials.
- Check for completeness and transport damage. In case of damages or incomplete delivery please contact your dealer.
123
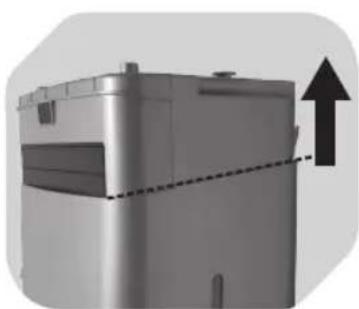
Pull up the cooling unit from the water tank. Remove the remote control and the 4 wheels from the water tank.
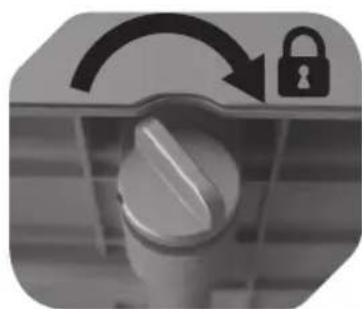
Turn the water outlet cap all the way clockwise to close it.

Fasten all 4 wheels to the water tank. The wheels must click into place.
456
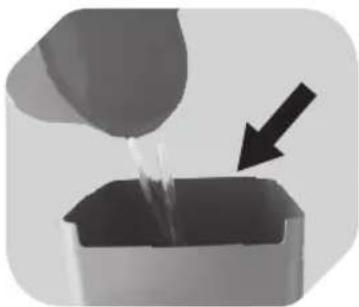
Fill the water tank with cold, clear water without any additives.
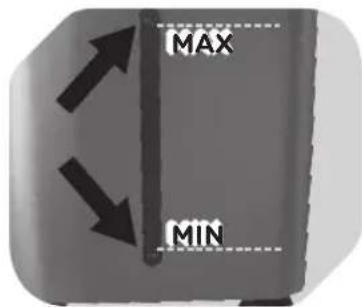
The water level must be above the MIN and below the MAX marking.
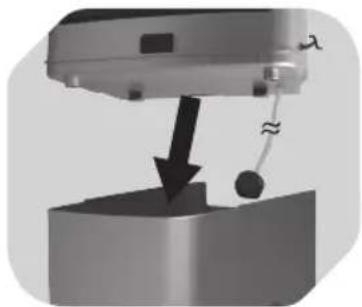
Cooling function: Fit the cooling unit onto the water tank. The hose must hang into the water tank.
BEFORE FIRST USE
7
Make sure that the 2 locking levers on the back of the cooling unit are fit correctly to the edge of the water tank.
8
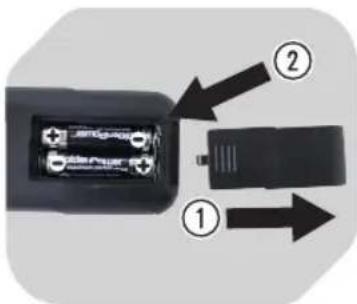
Inserting batteries: Remove the battery compartment lid. Insert 2 AAA batteries (not included), heeding correct polarity (+ / -) . Close the battery compartment.
NOTE
Replace the batteries when the range decreases noticeably or when the product no longer responds to commands from the remote control.
9 10 11
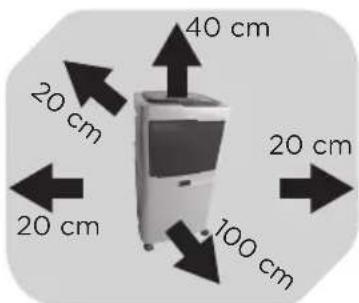
Make sure there is sufficient clearance around the product.
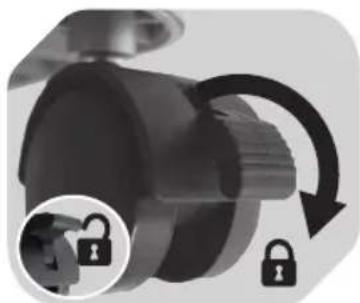
Secure the position by locking the wheels (push lever down).
Make sure the floor is level.
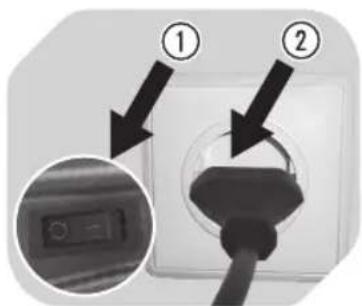
Set the power switch to position 0 (off). Connect the power plug to a suitable power outlet.
EN
OPERATION
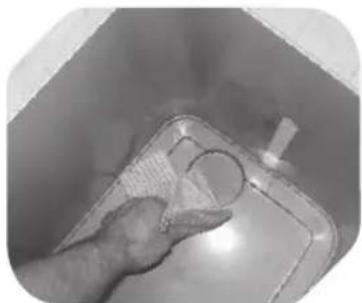
12 13
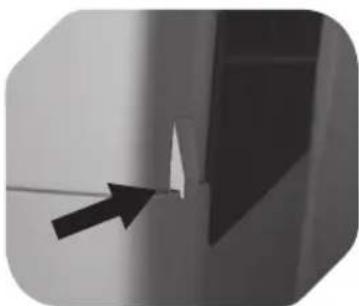
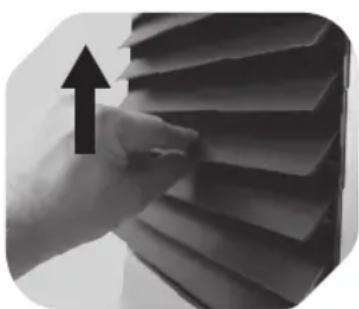
Set the desired fan angle by carefully lifting one of the fins with your fingers.
Caution: The product can be only turned on after the air vents are opened.
Turning product on:
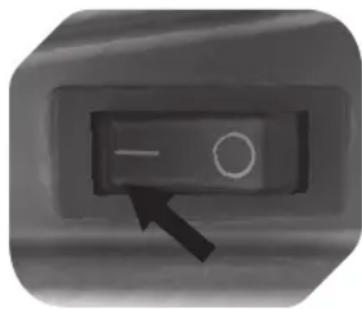
Flip the power switch to position I. The product is now in standby mode.
Please refer to the panel description page for operation (page 27).
NOTE
Turn the product off completely if you will not use the product for an extended period of time:
- Flip the power switch to position 0.
- Close the air vents by folding them down.
- Disconnect the power plug from the power outlet.
COOLING FUNCTION
14
- When the cooling function is activated, the product sucks in air from the surroundings through the air vents on the back and mixes the air with water from the tank. A very fine vapour then issues from the front air vents. The vapour condenses immediately and cools down the air in the room.
- Fan function: You can use the product as a fan if the cooling function is deactivated. There is no need to fill the tank with water in this case.
Important notes on cooling function
- Caution! Never activate the cooling function if the water tank is empty or filled below the MIN marking.
- The water pump will become increasingly loud if the cooling function is activated with too little water in the water tank. Deactivate the cooling function if this happens.
- Before filling the water tank: Set the power switch to position O (off). Disconnect the power plug from the power outlet.
OPERATION
FAN MODES
- Toggle through 3 fan modes with the MODE or key (remote control):
| Mode Description |
| NORMAL Constant fan speed, as per SPEED setting. |
| NATURE Fan speed varies to simulate a natural breeze. The change of breeze depends on the SPEED setting. |
| SLEEP Light night-time breeze. Press this button again to switch back to NORMAL mode. |
CLEANING AND CARE
GENERAL
- Caution! Never operate the product if the filter is missing or clogged.
- Make sure that no water comes into contact with the operating controls or enters the cooling unit interior.
- Do not use any chemical, aggressive or abrasive cleaning agents.
- Before cleaning: Turn the product off, unplug it and remove the cooling unit from the water tank.
- Depending on the environment and on the frequency the product is used, we recommend to clean the product at least once a month. Should you activate the cooling function for an extended period a few times a week, it may be necessary to clean the product more often than once a month.
Exercise caution to minimize health risks.
Exercise caution to prevent damage to the filter.
Empty the tank or replace the water every 2 days.
CLEANING THE AIR INLET FILTER
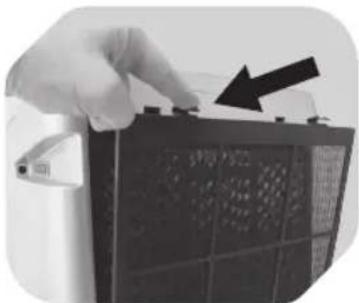
15 16 17
Push both tabs on the filter cover down. Remove the filter cover and the filter (including its frame).
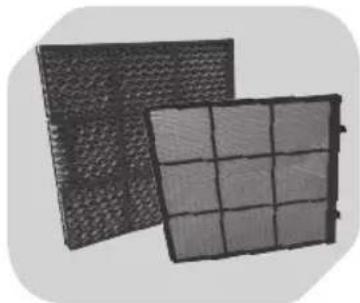
Submerge the filter and the cover in warm soapy water. Use a soft brush to remove any residue. Rinse the filter and cover thoroughly with clear water.

Use a soft brush to clean the entire air inlet and all openings on the back of the cooling unit. Allow all components to dry completely and then reassemble them in reverse order.
CLEANING AND CARE
CLEANING OTHER PARTS
18 19 20
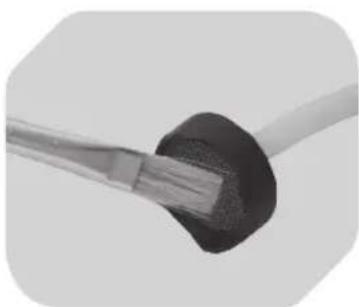
Hose filter: Wet a small soft brush in soapy water and use it to carefully clean the small filter at the end of the hose. Rinse the filter with clear water and allow it to dry completely.

Water tank: Hold the tank over a sink. Turn off the cap from the water outlet. Allow the water to drain completely. Wet a soft sponge in soapy water and clean the entire interior of the water tank. Rinse the water tank with clear water and allow it to dry completely. Close the water outlet using the cap.
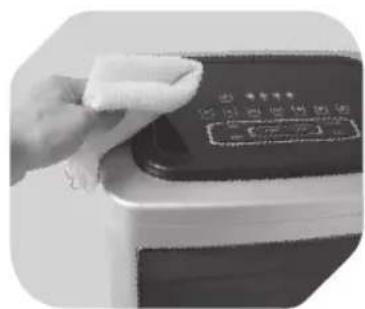
Housing: Use a soft brush to remove dust from the air vent fins. Then clean all the fins with a damp cloth. Close the air vents by pushing the fins down.
Wipe down the housing exterior using a soft, slightly damp cloth and allow it to dry completely.
DECALCIFICATION
Limescale deposits are best removed with a commercially available decalcification agent.
Follow the manufacturers directions when decalcifying (use, duration, dilution).

21 22
Hose filter: Pull off the filter from the hose. Let soak. Afterwards rinse under running water and push back onto the hose.
Water tank: Fill mixture in the tank. Then, drain tank and wipe clean tank with a wet cloth.
TROUBLESHOOTING
| Problem Cause | Solution | |
| The product does not turn on. | Plug is not connected. Connect plug to power outlet. | |
| Power switch at position O. Power switch to position I (located on the side of the product). | ||
| Air vents are closed. Open air vents. | ||
| Unusual noises during operation. | Air inlet filter and/or hose filter are clogged. | Clean filter(s). |
| Cooling function is active and tank is empty. | Fill water tank. |
TECHNICAL DATA
Operating voltage: 220 - 240 V\~, 50 Hz
Power input: 80 W
Protection class: II
Water tank capacity: 20 litres
Weight: 6.6kg (without water)
| Description Symbol Value Unit | |||
| Maximum fan flow rate | F | 5.04 m | 3/min |
| Fan power input | P | 61.97 W | |
| Service value | SV | 0.08 (m | 3/min)/W |
| Standby power consumption | PSB | 0.43 W | |
| Seasonal electricity consumption | Q | 20.31 kWh/a | |
| Fan sound power level | LWA | 59.43 dB(A) | |
| Maximum air velocity | c | 1.40 metres/sec | |
| Measurement standard for service value | Commission regulation (EU) No 206/2012 ISO 5801:2007 EN 50564:2011 EN 60704-2-7:1998 EN 60704-1:2010 | ||