
RASM07 - Air-conditioner TOSHIBA - Free user manual and instructions
Find the device manual for free RASM07 TOSHIBA in PDF.
| Product type | Split air conditioner |
| Brand | Toshiba |
| Model | RASM07 |
| Operating modes | Auto, Cool, Heat, Dehumidification, Hi-POWER, ECO, Quiet, Night Comfort, One-Touch, Timer |
| Remote control | Wireless with full functions, possible wired connection |
| Airflow direction | Vertical adjustment (louver) with auto swing, manual horizontal adjustment |
| Air filter | Washable filters with cleaning indicator (FILTER light) |
| Timer | Daily ON/OFF timer, night comfort timer (1, 3, 5, 9 hours) |
| Auto restart function | Yes (adjustable via RESET button on indoor unit) |
| Protection and safety | Three-minute protection, preheating, auto defrost, emergency stop (circuit breaker) |
| Auto clean | Auto-clean mode in Cool and Dehumidification modes (30 minutes) |
| Fan speeds | Auto, Low, Low+, Med, Med+, High |
| Temperature range | Cooling: min 17°C; Heating: max 30°C |
| Operating conditions | Outdoor heating: -15°C to 24°C; Outdoor cooling: -10°C to 46°C |
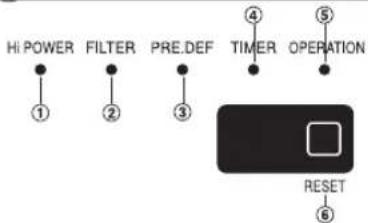
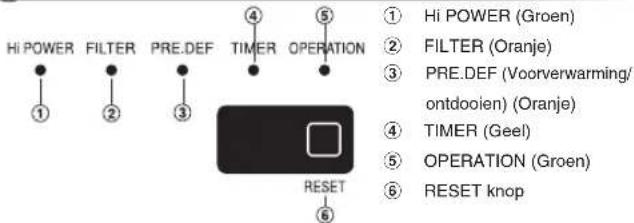
| Indoor unit display | LED indicators: Hi POWER (green), FILTER (orange), PRE.DEF (orange), TIMER (yellow), OPERATION (green) |
| Remote control batteries | 2 AAA batteries (not supplied) |
| Maintenance and cleaning | Clean with a damp cloth; do not use benzene or solvent; clean filters regularly |
| General information | 102-page manual available in multiple languages |
Frequently Asked Questions - RASM07 TOSHIBA
User questions about RASM07 TOSHIBA
0 question about this device. Answer the ones you know or ask your own.
Ask a new question about this device
Download the instructions for your Air-conditioner in PDF format for free! Find your manual RASM07 - TOSHIBA and take your electronic device back in hand. On this page are published all the documents necessary for the use of your device. RASM07 by TOSHIBA.
USER MANUAL RASM07 TOSHIBA
natural_image
Illustration of a car air conditioner unit with airflow arrows indicating airflow direction (no text or symbols)AIR CONDITIONER (SPLIT TYPE)
For general public use
Indoor unit
RAS-B10, 13, 16, 22N3KV2 Series
RAS-M07, 24N3KV2 Series
Outdoor unit
RAS-10, 13, 16, 22N3AV2 Series
RAS-M14GAV-E
RAS-M18UAV-E
RAS-3M18SAV-E
RAS-4M23SAV-E
RAS-3M26UAV-E
RAS-4M27UAV-E
RAS-5M34UAV-E1
ENGLISH
ESPAÑOL
FRANÇAIS
ITALIANO
DEUTSCH
PORTUGUÊS
POLSKI
ČESKY
РУССКИЙ
HRVATSKI
MAGYAR
TÜRKÇE
NEDERLANDS
ΕΛΛΗΝΙΚΑ
SVENSKA
SUOMI
NORSK
DANSK
ROMÂNĂ
БЪЛГАРСКИ
EESTI
LATVISKI
SLOVENČINA
SLOVENŠČINA
LIETUVIŲ
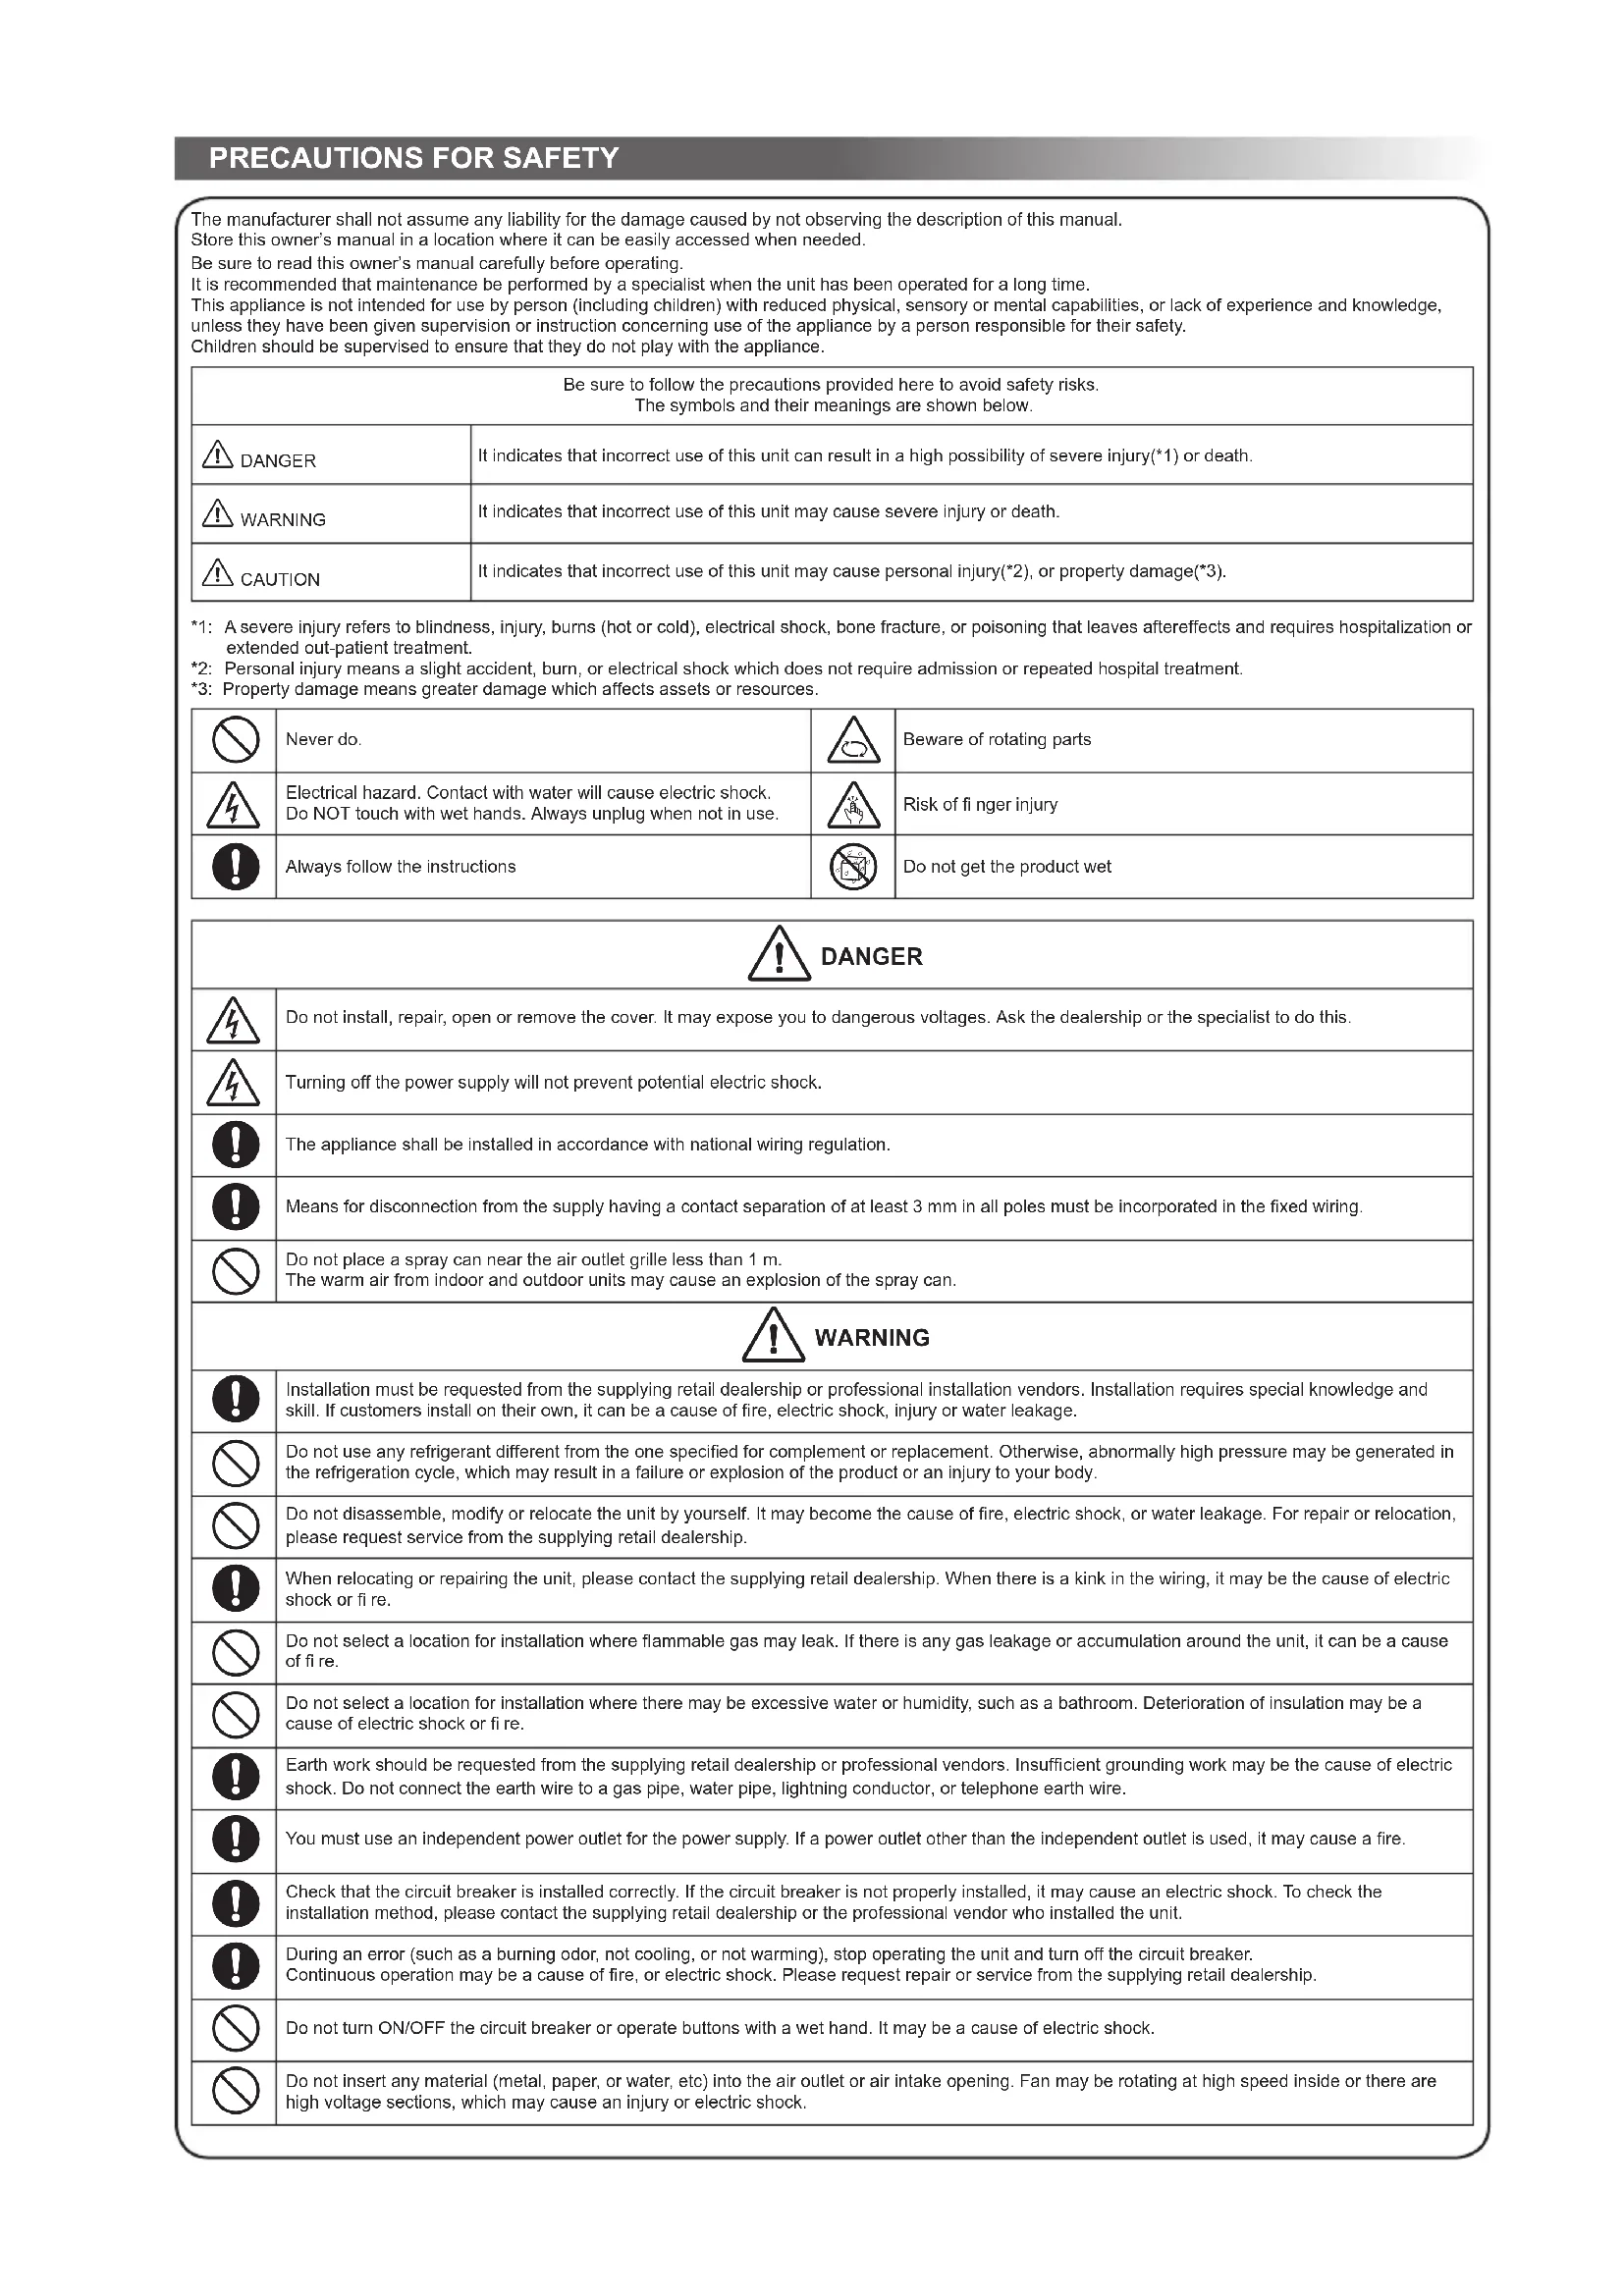
The manufacturer shall not assume any liability for the damage caused by not observing the description of this manual.
Store this owner's manual in a location where it can be easily accessed when needed.
Be sure to read this owner's manual carefully before operating.
It is recommended that maintenance be performed by a specialist when the unit has been operated for a long time.
This appliance is not intended for use by person (including children) with reduced physical, sensory or mental capabilities, or lack of experience and knowledge, unless they have been given supervision or instruction concerning use of the appliance by a person responsible for their safety.
Children should be supervised to ensure that they do not play with the appliance.
| Be sure to follow the precautions provided here to avoid safety risks.The symbols and their meanings are shown below. | |
| ⚠️ DANGER | It indicates that incorrect use of this unit can result in a high possibility of severe injury(*1) or death. |
| ⚠️ WARNING | It indicates that incorrect use of this unit may cause severe injury or death. |
| ⚠️ CAUTION | It indicates that incorrect use of this unit may cause personal injury(*2), or property damage(*3). |
*1: A severe injury refers to blindness, injury, burns (hot or cold), electrical shock, bone fracture, or poisoning that leaves aftereffects and requires hospitalization or extended out-patient treatment.
*2: Personal injury means a slight accident, burn, or electrical shock which does not require admission or repeated hospital treatment.
*3: Property damage means greater damage which affects assets or resources.
| Never do. | Beware of rotating parts | ||
| Electrical hazard. Contact with water will cause electric shock.Do NOT touch with wet hands. Always unplug when not in use. | Risk of fi nger injury | ||
| Always follow the instructions | Do not get the product wet |
| DANGER | |
| Do not install, repair, open or remove the cover. It may expose you to dangerous voltages. Ask the dealership or the specialist to do this. | |
| Turning off the power supply will not prevent potential electric shock. | |
| The appliance shall be installed in accordance with national wiring regulation. | |
| Means for disconnection from the supply having a contact separation of at least 3 mm in all poles must be incorporated in the fixed wiring. | |
| Do not place a spray can near the air outlet grille less than 1 m.The warm air from indoor and outdoor units may cause an explosion of the spray can. | |
| WARNING | |
| Installation must be requested from the supplying retail dealership or professional installation vendors. Installation requires special knowledge and skill. If customers install on their own, it can be a cause of fire, electric shock, injury or water leakage. | |
| Do not use any refrigerant different from the one specified for complement or replacement. Otherwise, abnormally high pressure may be generated in the refrigeration cycle, which may result in a failure or explosion of the product or an injury to your body. | |
| Do not disassemble, modify or relocate the unit by yourself. It may become the cause of fire, electric shock, or water leakage. For repair or relocation, please request service from the supplying retail dealership. | |
| When relocating or repairing the unit, please contact the supplying retail dealership. When there is a kink in the wiring, it may be the cause of electric shock or fi re. | |
| Do not select a location for installation where flammable gas may leak. If there is any gas leakage or accumulation around the unit, it can be a cause of fi re. | |
| Do not select a location for installation where there may be excessive water or humidity, such as a bathroom. Deterioration of insulation may be a cause of electric shock or fi re. | |
| Earth work should be requested from the supplying retail dealership or professional vendors. Insufficient grounding work may be the cause of electric shock. Do not connect the earth wire to a gas pipe, water pipe, lightning conductor, or telephone earth wire. | |
| You must use an independent power outlet for the power supply. If a power outlet other than the independent outlet is used, it may cause a fire. | |
| Check that the circuit breaker is installed correctly. If the circuit breaker is not properly installed, it may cause an electric shock. To check the installation method, please contact the supplying retail dealership or the professional vendor who installed the unit. | |
| During an error (such as a burning odor, not cooling, or not warming), stop operating the unit and turn off the circuit breaker. Continuous operation may be a cause of fire, or electric shock. Please request repair or service from the supplying retail dealership. | |
| Do not turn ON/OFF the circuit breaker or operate buttons with a wet hand. It may be a cause of electric shock. | |
| Do not insert any material (metal, paper, or water, etc) into the air outlet or air intake opening. Fan may be rotating at high speed inside or there are high voltage sections, which may cause an injury or electric shock. | |
• Batteries for remote control unit:
- Should be inserted with correct polarity (+) and (-).
- Should not be recharged.
- Do not use batteries for which the "Recommended usage period" has expired.
- Do not keep used batteries inside the remote control unit.
- Do not mix different types of batteries, or mix new batteries with old ones.
- Do not directly solder the batteries.
- Do not short-circuit, disassemble, heat, or throw batteries into a fire. If batteries are not disposed of correctly, they may burst or be the cause of fluid leakage, resulting in burns or injuries. If touching the fluid, wash thoroughly with water. If it touches devices, wipe off to avoid direct contact.
- Do not place within reach of small children. If a battery is swallowed, consult a doctor immediately.
- When you press CLOCK ●, CHECK ●, FILTER ● and RESET ● button, do not let any foreign substances enter and remain inside of the remote control.
| DANGER | |
| Do not install, repair, open or remove the cover. It may expose you to dangerous voltages. Ask the dealership or the specialist to do this. | |
| Turning off the power supply will not prevent potential electric shock. | |
| The appliance shall be installed in accordance with national wiring regulation. | |
| Means for disconnection from the supply having a contact separation of at least 3 mm in all poles must be incorporated in the fixed wiring. | |
| Do not place a spray can near the air outlet grille less than 1 m.The warm air from indoor and outdoor units may cause an explosion of the spray can. | |
| WARNING | |
| Installation must be requested from the supplying retail dealership or professional installation vendors. Installation requires special knowledge and skill. If customers install on their own, it can be a cause of fire, electric shock, injury or water leakage. | |
| Do not use any refrigerant different from the one specified for complement or replacement. Otherwise, abnormally high pressure may be generated in the refrigeration cycle, which may result in a failure or explosion of the product or an injury to your body. | |
| Do not disassemble, modify or relocate the unit by yourself. It may become the cause of fire, electric shock, or water leakage. For repair or relocation, please request service from the supplying retail dealership. | |
| When relocating or repairing the unit, please contact the supplying retail dealership. When there is a kink in the wiring, it may be the cause of electric shock or fi re. | |
| Do not select a location for installation where flammable gas may leak. If there is any gas leakage or accumulation around the unit, it can be a cause of fi re. | |
| Do not select a location for installation where there may be excessive water or humidity, such as a bathroom. Deterioration of insulation may be a cause of electric shock or fi re. | |
| Earth work should be requested from the supplying retail dealership or professional vendors. Insufficient grounding work may be the cause of electric shock. Do not connect the earth wire to a gas pipe, water pipe, lightning conductor, or telephone earth wire. | |
| You must use an independent power outlet for the power supply. If a power outlet other than the independent outlet is used, it may cause a fire. | |
| Check that the circuit breaker is installed correctly. If the circuit breaker is not properly installed, it may cause an electric shock. To check the installation method, please contact the supplying retail dealership or the professional vendor who installed the unit. | |
| During an error (such as a burning odor, not cooling, or not warming), stop operating the unit and turn off the circuit breaker.Continuous operation may be a cause of fire, or electric shock. Please request repair or service from the supplying retail dealership. | |
| Do not turn ON/OFF the circuit breaker or operate buttons with a wet hand. It may be a cause of electric shock. | |
| Do not insert any material (metal, paper, or water, etc) into the air outlet or air intake opening. Fan may be rotating at high speed inside or there are high voltage sections, which may cause an injury or electric shock.When the air-conditioning unit does not cool or warm, there may be a leakage of refrigerant. Please consult the supplying retail dealership. The refrigerant used in the air-conditioning unit is safe. It will not leak under normal operating conditions but if it leaks into the room and contacts a heat source such as a heater, or stove, it may cause a harmful reaction. | |
| When water or other foreign substances enter the internal parts, stop operating the unit immediately and turn off the circuit breaker. Operating the unit continuously may cause fire or electric shock. Please contact the supplying retail dealership for repair. | |
| Do not clean the inside of the air-conditioning unit yourself. Please request internal cleaning of the air-conditioning unit from the supplying retail dealership. Incorrect cleaning may cause breakage of resin parts or insulation defects of electrical parts, causing water leakage, electric shock or fire. | |
| Do not damage or modify the power cable. Do not connect the cable midway, or use a multiple outlet extension cord that is shared by other devices. Failure to do so may cause fi re. | |
| Do not place heavy objects on the power cable, expose it to heat, or pull it. To do so may cause electrical shock or fire. | |
| Do not expose your body directly to cool air for a long time. | |
| Do not insert your fi nger or any article into the air inlet/outlet. | |
| CAUTION | |
| Ensure that drained water is discharged. When the discharging water process is not sufficient, water may leak, causing water damage to furniture. To check that the installation method used is correct, please contact the supplying retail dealership or the professional vendor who installed the unit. | |
| If the indoor unit piping outlet is exposed due to relocation, close the opening, Touching internal electrical parts may cause injury or electric shock. | |
| Do not wash the main air-conditioning unit with water. It may cause an electric shock. | |
| Do not place any containers such as a vase containing fluid on the unit. It might cause water to enter the unit and deteriorate the electrical insulation, causing an electric shock. | |
| When using the unit in a closed room, or operating with other combustion appliances, make sure to open a window occasionally for ventilation. Insufficient ventilation may cause suffocation due to a lack of oxygen. | |
| Do not use combustion appliances in the direct flow of the air from the air-conditioning unit. Poor combustion of a combustion appliance may cause suffocation. | |
| Avoid operating for long periods in a high humidity environment (over 80%) such as with the windows or doors open. There may be condensation on the indoor unit and droplets may fall onto the furniture. | |
| When the unit won't be used for a long time, turn off the main switch or the circuit breaker. | |
| At least once a year check if the mounting table of the outdoor unit is damaged or not. If a damaged state is ignored, the unit may fall or over-turn, causing an injury. | |
| Stand on a sturdy ladder when attaching/detaching the front panel/air filter/air cleaning filter. Failure to do so may cause a fall or injury. | |
| Do not stand on the outdoor unit or place anything on the unit. It may be the cause of injury due to falling or over-turn. Any damage to the unit may cause an electric shock or fi re. | |
| Do not place anything around the outdoor unit or allow fallen leaves to accumulate around it. If there are fallen leaves, small animals could enter and contact internal electrical parts, causing a failure or fi re. | |
| Do not place animals and plants in places where wind from the air-conditioning unit flows directly. It may have a negative influence on the animal or plant. | |
| Do not use for special applications such as storage of food or animals, or to display plants, precision devices, or art objects. Do not use on ships or in other vehicles. It may cause a failure in the air-conditioning unit. In addition, it may damage these items. | |
| Do not place other electrical appliances or furniture under the unit. Water droplets might fall, causing damage or failure. | |
| When performing maintenance, you must stop operating the unit and turn off the circuit breaker. Since the fan inside may be rotating at high speed, it may cause an injury. | |
| After the front panel/air filter is cleaned, wipe away any water and allow to dry. If water remains, it may cause an electric shock. | |
| Once the front panel is removed, do not touch the metal parts (aluminum fins, etc.) of the unit. It may cause an injury. | |
| When you hear thunder and there might be a lightning strike, stop operating the unit and disconnect the circuit breaker. If lightning strikes, it may cause a failure. | |
1 INDOOR UNIT DISPLAY
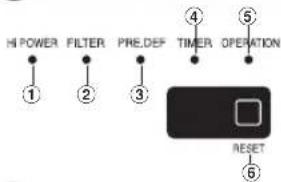
① Hi POWER (Green)
② FILTER (Orange)
③ PRE.DEF (Preheat/Defrost) (Orange)
④ TIMER (Yellow)
⑤ OPERATION (Green)
⑥ RESET button
2 PREPARATION BEFORE USE
Preparing Filters
- Open the air inlet grille and remove the air filters.
- Attach the filters. (see detail in the accessory sheet).
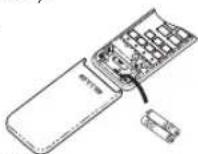
Loading Batteries (when use wireless operation.)
- Remove the slide cover.
- Insert 2 new batteries (AAA type) following the (+) and (−) positions.
Clock Setup
- Push clock by tip of the pencil. If timer indication is flashing,
- Press Set the time.
Remote Control Reset
Push RESET by tip of the pencil or
- Remove the batteries.
- Insert the batteries
natural_image
Illustration of a hand holding a flashlight emitting a cartoon-style document to an angry face (no text or symbols present)3 AIR FLOW DIRECTION
| 1 | PressFIX: Move the louver in the desired vertical direction. | |
| 2 | PressSWING: Swing the air automatically and press again to stop. | |
| 3 | For horizontal direction, adjust manually. |
Note:
- Do not move the louver manually by others.
- The louver may automation positioning by some operation mode.
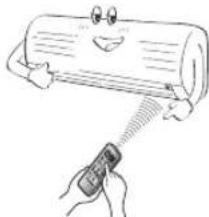
4 REMOTE CONTROL
① Infrared signal emitter
② Start/Stop button
③ Mode select button (MODE)
④ Temperature button (TEMP)
⑤ Fan speed button (FAN)
⑥ Swing louver button (SWING)
⑦ Set louver button (FIX)
⑧ On timer button (ON)
⑨ Off timer button (OFF)
⑩ Setup button (SET)
⑪ Clear button (CLR)
⑫ Memory and Preset button (PRESET)
⑬ One-Touch button (ONE-TOUCH)
⑭ High power button (Hi-POWER)
⑮ Economy button (ECO)
⑯ Quiet button (QUIET)
⑰ Comfort sleep button (COMFORT SLEEP)
⑱ Filter reset button (FILTER)
⑲ Set clock button (CLOCK)
⑳ Check button (CHECK)
②1 Reset button (RESET)
Note:
- The provided Remote Controller is a wireless type, which also can be used as a wire. Please see "How to Connect The Remote Controller for Wired Operation", located in installation instruction, in case of wired control is required.
- In wire operation, remote controller will return to initial condition (PRESET, TIMER and CLOCK will return to initial condition) when user shutdown power supply of Air conditioner.

5 ONE-TOUCH
Press the "ONE-TOUCH" button for fully automated operation that is customized to the typical consumer preferences in your region of the world. The customized settings control temperature air flow strength, air flow direction and other settings to provide you alternate contact with "ONE-TOUCH" of the button. If you prefer other settings you can select from the many other operating functions of your Toshiba unit.
Press 📄: Start the operation.
To automatically select cooling or heating operation
- Press MODE : Select A.
- Press : Set the desired temperature.
- Press FAN : Select AUTO, LOW → LOW+ → MED, MED+ → OR HIGH.
- Press MODE : Select Cool for Heat .
- Press : Set the desired temperature. Cooling: Min. 17°C, Heating: Max. 30°C
- Press FAN : Select AUTO, LOW, LOW+ MED , MED+ or HIGH .
8 DRY OPERATION
For dehumidification, a moderate cooling performance is controlled automatically.
- Press MODE : Select Dry
- Press : Set the desired temperature.
To automatically control room temperature and airflow for faster cooling or heating operation (except in DRY mode)
Press 📄 POWER: Start and stop the operation.
10 ECO OPERATION
To automatically control room to save energy (except in DRY mode)
Press ECO : Start and stop the operation.
Note: Cooling operation; the set temperature will increase automatically 1 degree/hour for 2 hours (maximum 2 degrees increase). For heating operation the set temperature will decrease.
11 TEMPORARY OPERATION
In case of the misplaced or discharged remote control
- Pressing the RESET button, the unit can start or stop without using the remote control.
- Operation mode is set on AUTOMATIC operation, preset temperature is 25°C and fan operation is automatic speed.
12 TIMER OPERATION
Set the timer when the air conditioner is operating.
| Setting the ON Timer | Setting the OFF Timer | |
| 1 | Press : Set the desired ON timer. | Press : Set the desired OFF timer. |
| 2 | Press : Set the timer. | Press : Set the timer. |
| 3 | Press : Cancel the timer. | Press : Cancel the timer. |
Daily timer allows the user to set both the ON & OFF timers and will be activated on a daily basis.
Setting Everyday Timer
| 1 | Press Set the ON timer. | 3 | Press SET. |
| 2 | Press Set the OFF timer. | 4 | Press SET button during the (1 or 2) mark flashing. |
- During the every day timer is activating, both arrows (1) are indicated.
N - Keep the remote control in accessible transmission to the indoor unit; otherwise, the time lag of up to 15 minutes will occur.
- The setting will be saved for the next same operation.
13 PRESET OPERATION
Set your preferred operation for future use. The setting will be memorized by the unit for future operation (except airflow direction).
- Select your preferred operation.
- Press and hold PRESET for 3 seconds to memorize the setting. The P mark displays.
- Press PRESET : Operate the preset operation.
To automatically restart the air conditioner after the power failure (Power of the unit must be on.)
Setting
- Press and hold the RESET button on the indoor unit for 3 seconds to set the operation. (3 beep sound and OPERATION lamp blink 5 time/sec for 5 seconds)
- Press and hold the RESET button on the indoor unit for 3 seconds to cancel the operation. (3 beep sound but OPERATION lamp does not blink)
- In case of ON timer or OFF timer are set, AUTO RESTART OPERATION does not activate.
15 QUIET OPERATION
To operate at super low fan speed for quiet operation (except in DRY mode)
Press 🔒 QUIET : Start and stop the operation.
Note: Under certain conditions, QUIET operation may not provide adequate cooling due to low sound features.
For comfortable sleep, automatically control air flow and automatically turn OFF.
Press COMFORT SLEEP : Select 1, 3, 5 or 9 hrs for OFF timer operation.
Note: The cooling operation, the set temperature will increase automatically 1 degree/hour for 2 hours (maximum 2 degrees increase). For heating operation, the set temperature will decrease.
17 MAINTENANCE
Firstly, turn off the circuit breaker.
Filter Reset
FILTER lamp lights on; the filter must be cleaned.
To turn off the lamp, push the RESET button on the indoor unit or the FILTER button on the remote control.
Indoor Unit and Remote Control
- Clean the indoor unit and the remote control with a wet cloth when needed.
- No benzine, thinner, polishing powder or chemically-treated duster.
To protect bad smell caused by the humidity in the indoor unit.
-
If the button is pressed once during "Cool" or "Dry" mode, the fan will continue to run for other 30 minutes, then it will turn off automatically. This will reduce the moisture in the indoor unit.
-
To stop the unit immediately, press the ⏻ more 2 times within 30 seconds.
- Three-minute protection feature: To prevent the unit from being activated for 3 minutes when suddenly restarted or switched to ON.
- Preheating operation: Warm up the unit for 5 minutes before blowing warm air.
- Warm air control: When the room temperature reaches the set temperature, the fan speed is automatically reduced and the outdoor unit will stop.
- Automatic defrosting: Fans will stop during defrost operation.
- Heating capacity: Heat is absorbed from outdoor and released into the room. When the outdoor temperature is too low, use another recommended heating apparatus in combination with the air conditioner.
- Consideration for accumulated snow: Select the position for outdoor unit where it will not be subjected to snow drifts, accumulation of leaves or other seasonal debris.
- Some minor cracking sound may occur when unit operating. This is normal because the cracking sound may be caused by expansion/contraction of plastic.
Note: Item 2 to 6 for Heating model
Air conditioner operating conditions
| Operation\Temp. | Outdoor Temperature Room Temperature | |
| Heating -15°C ~ 24°C Less | than 28°C | |
| Cooling -10°C ~ 46°C | 21°C ~ 32°C | |
| Dry | -10°C ~ 46°C | 17°C ~ 32°C |
20 TROUBLESHOOTING (CHECK POINT)
| The unit does not operate. | Cooling or Heating is abnormally low. |
| The power main switch is turned off.The circuit breaker is activated to cut off the power supply.Stoppage of electric currentON timer is set. | The filters are blocked with dust.The temperature has been set improperly.The windows or doors are opened.The air inlet or outlet of the outdoor unit is blocked.The fan speed is too low.The operation mode is DRY. |
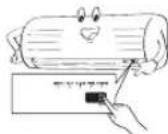
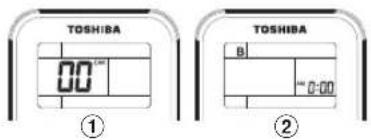
21 REMOTE CONTROL A-B SELECTION
To separate using of remote control for each indoor unit in case of 2 air conditioners are installed nearly.
Remote Control B Setup.
- Press RESET button on the indoor unit to turn the air conditioner ON.
- Point the remote control at the indoor unit.
- Push and hold CHECK button on the Remote Control by the tip of the pencil. "00" will be shown on the display.
- Press MODE during pushing "B" will show on the display and "00" will disappear and the air conditioner will turn OFF. The Remote Control B is memorized.
Note: 1. Repeat above step to reset Remote Control to be A.
- Remote Control A has not "A" display.
- Default setting of Remote Control from factory is A.
The Ground Truth image displays a single, continuous horizontal line, which is a stylistic or background element (like a ruled paper line or separator). According to Rule 2, such lines must be ignored by the OCR result. The provided OCR content is "____", which consists of underscores. Underscores are not equivalent to a solid line and are not permitted under the “Stylistic/Background Lines (Ignore)” rule. Outputting underscores for a stylistic line is incorrect because it misinterprets the line as a fill-in-the-blank placeholder. Since the OCR output incorrectly rendered a stylistic line as underscores (which should be ignored), this violates the rule. Therefore, the OCR result is inconsistent with the Ground Truth.
natural_image
Cartoon illustration of a smiling character holding a flashlight, no text or symbols present1 DISPLAY DELL'UNITÀ INTERNA
① Hi POWER (Verde)
② FILTER (Arancione)
③ PRE.DEF (Preriscaldamento/Scongelamento) (Arancione)
④ TIMER (Giallo)
⑤ OPERATION (Verde)
⑥ Tasto RESET
2 PREPARATIVI PRIMA DELL'USO
natural_image
Illustration of a smiling cylindrical object being sprayed with a flashlight (no text or symbols)Reset telecomando
| (in millions) | ||
| 2017 | 2016 | |
| Net earnings | 3,458 | 3,394 |
| Earnings per share: | ||
| (€) | 1.04 | 1.03 |
| Weighted average of common stock | 1.04 | 1.03 |
| Year Ended December 31, | ||
| 2018 | 2017 | |
| Revenues | 1,469 | 1,505 |
| Costs and expenses | (1,469) | (1,469) |
| Year Ended December 31, | ||
| 2018 | 2017 | |
| Accrued expenses | 1,465 | 1,394 |
| Accrued tax benefits | (1,000) | (1,000) |
| Net income | 1,465 | 1,394 |
| Year Ended December 31, | ||
| 2017 | 2016 | |
| Revenues | 1,485 | 1,395 |
| Costs and expenses | (1,485) | (1,395) |
| Net income | 1,485 | 1,395 |
| Year Ended December 31, | ||
| 2017 | 2016 | |
| Accrued expenses | 1,485 | 1,395 |
| Accrued tax benefits | (1,000) | (1,000) |
| Net income | 1,485 | 1,395 |
| Year Ended December 31, | ||
| 2017 | 2016 | |
| Revenues | 1,485 | 1,490 |
| Costs and expenses | (1,485) | (1,490) |
| Year Ended December 31, | ||
| 2017 | 2016 | |
| Revenues | 1,485 | 1,395 |
| Costs and expenses | (1,485) | (1,395) |
| Net income | 1,485 | 1,395 |
| Year Ended December 31, | ||
| 2018 | 2017 | |
| Revenues | 1,469 | 1,505 |
| Costs and expenses | (1,469) | (1,469) |
| Year Ended December 31, | ||
| 2018 | 2017 | |
| Revenues | 1,469 | 1,505 |
| Costs and expenses | (1,469) | (1,469) |
| Year Ended December 31, | ||
| 2017 | 2016 | |
| Revenues | 1,485 | 1,395 |
| Costs and expenses | (1,485) | (1,395) |
| Net income | 1,485 | 1,395 |
| Year Ended December 31, | ||
| 2018 | 2017 | |
| Revenues | 1,465 | 1,395 |
| Costs and expenses | (1,465) | (1,395) |
| Net income | 1,465 | 1,395 |
| Year Ended December 31, | ||
| 2018 | 2017 | |
| Accrued expenses | 1,465 | 1,394 |
| Accrued tax benefits | (1,000) | (1,000) |
| Net income | 1,465 | 1,394 |
| Year Ended December 31, | ||
| 2017 | 2016 | |
| Revenues | 1,485 | 1,395 |
| Costs and expenses | (1,485) | (1,395) |
| Net income | 1,485 | 1,395 |
| Year Ended December 31, | ||
| 2017 | 2016 | |
| Revenues | 1,485 | 1,490 |
| Costs and expenses | (1,485) | (1,490) |
| Year Ended December 31, | ||
| 2018 | 2017 | |
| Revenues | 1,465 | 1,395 |
| Costs and expenses | (1,465) | (1,395) |
| Net income | 1,465 | 1,395 |
| Year Ended December 31, | ||
| 2018 | 2017 | |
| Accrued expenses | 1,465 | 1,394 |
| Accrued tax benefits | (1,000) | (1,000) |
| Net income | 1,465 | 1,394 |
| Year Ended December 31, | ||
| 2017 | 2016 | |
| Revenues | 1,485 | 1,490 |
| Costs and expenses | (1,485) | (1,490) |
| Year Ended December 31, | ||
| 2017 | 2016 | |
| Revenues | 1,485 | 1,395 |
| Costs and expenses | (1,485) | (1,395) |
| Net income | 1,485 | 1,395 |
| Year Ended December 31, | ||
| 2017 | 2016 | |
| Revenues | 1,485 | 1,490 |
| Costs and expenses | (1,485) | (1,490) |
[Non-Text]
[Non-Text]
[Non-Text]
[Non-Text]
[Non-Text]
[Non-Text]
[Non-Text]
[Non-Text]
[Non-Text]
[Non-Text]
[Non-Text]
[Non-Text]
[Non-Text]
[Non-Text]
[Non-Text]
[Non-Text]
[Non-Text]
[Non-Text]
[Non-Text]
[Non-Text]
[Non-Text]
[Non-Text]
[Non-Text]
[Non-Text]
[Non-Text]
[Non-Text]
[Non-Text]
[Non-Text]
[Non-Text]
[Non-Text]
[Non-Text]
[Non-Text]
[Non-Text]
[Non-Text]
[Non-Text]
[Non-Text]
[Non-Text]
[Non-Text]
[Non-Text]
[Non-Text]
[Non-Text]
[Non-Text]
[Non-Text]
[Non-Text]
[Non-Text]
[Non-Text]
[Non-Text]
[Non-Text]
[Non-Text]
[Non-Text]
[Non-Text]
[Non-Text]
[Non-Text]
[Non-Text]
[Non-Text]
[Non-Text]
[Non-Text]
[Non-Text]
[Non-Text]
[Non-Text]
[Non-Text]
[Non-Text]
[Non-Text]
[Non-Text]
[Non-Text]
[Non-Text]
[Non-Text]
[Non-Text]
[Non-Text]
[Non-Text]
[Non-Text]
[Non-Text]
[Non-Text]
[Non-Text]
[Non-Text]
[Non-Text]
[Non-Text]
[Non-Text]
[Non-Text]
[Non-Text]
[Non-Text]
[Non-Text]
[Non-Text]
[Non-Text]
[Non-Text]
[Non-Text]
[Non-Text]
[Non-Text]
[Non-Text]
[Non-Text]
[Non-Text]
[Non-Text]
[Non-Text]
[Non-Text]
[Non-Text]
[Non-Text]
[Non-Text]
[Non-Text]
[Non-Text]
[Non-Text]
[Non-Text]
[Non-Text]
[Non-Text]
[Non-Text]
[Non-Text]
[Non-Text]
[Non-Text]
[Non-Text]
[Non-Text]
[Non-Text]
[Non-Text]
[Non-Text]
[Non-Text]
[Non-Text]
[Non-Text]
[Non-Text]
[Non-Text]
[Non-Text]
[Non-Text]
[Non-Text]
[Non-Text]
[Non-Text]
[Non-Text]
[Non-Text]
[Non-Text]
[Non-Text]
[Non-Text]
[Non-Text]
[Non-Text]
[Non-Text]
[Non-Text]
[Non-Text]
[Non-Text]
[Non-Text]
[Non-Text]
[Non-Text]
[Non-Text]
[Non-Text]
[Non-Text]
[Non-Text]
[Non-Text]
[Non-Text]
[Non-Text]
[Non-Text]
[Non-Text]
[Non-Text]
[Non-Text]
[Non-Text]
[Non-Text]
[Non-Text]
[Non-Text]
[Non-Text]
[Non-Text]
[Non-Text]
[Non-Text]
[Non-Text]
[Non-Text]
[Non-Text]
[Non-Text]
[Non-Text]
[Non-Text]
[Non-Text]
[Non-Text]
[Non-Text]
10 STROMSPARMODUS (ECO)
natural_image
Cartoon illustration of a smiling character holding a tool, no text or symbols present5 TOQUE ÚNICO
natural_image
Illustration of a smiling cartoon character holding a tool, with no visible text or symbols5 SENSOR DOTYKOWY
natural_image
Illustration of a hand holding a flashlight emitting a device to a smiling cylindrical device (no text or symbols present)3 SMĚR PRŮTOKU VZDUCHU
natural_image
Illustration of a smiling cylindrical object with a hand holding a flashlight emitting light, no text or symbols present.natural_image
Illustration of a hand holding a flashlight emitting a dropper into a cylindrical device (no text or symbols)Resetiranje daljinskog upravljača
Pritisnite vhom olovke ili
- Uklonite bateriju.
- Pritisnite tinku
- Umetnite bateriju.

natural_image
Illustration of a hand holding a flashlight emitting a trail, with no text or symbols present.natural_image
Illustration of a hand holding a flashlight emitting powder from a cylindrical object (no text or symbols)1 DISPLAY BINNENMODULE
2 VOORBEREIDSELEN
Filters klaarmaken
natural_image
Cartoon illustration of a smiling scroll with a hand holding a pen, no text or symbols present3 LUCHTSTROOMRICHTING
7 KOELING / VERWARMING WERKING
9 HOOGVERMOGENSWERKING
natural_image
Cartoon illustration of a smiling rectangular object being brushed with a tool, no text or symbols present3 LUFTFLÖDETS RIKTNING
natural_image
Cartoon illustration of a smiling rectangular object being brushed with a tool, no text or symbols presentnatural_image
Illustration of a hand holding a flashlight emitting a trail, with a smiling cylindrical object above (no text or symbols)3 LUFTSTR∅MSRETNINGER
SIKKERHEDSFORBEHOLD
natural_image
Illustration of a smiling cylindrical object being brushed with a flashlight, no text or symbols present3 LUFTSTRÖMMENS RETNING
natural_image
Illustration of a hand holding a flashlight emitting a device to a smiling cylindrical object (no text or symbols present)3 DIRECTIA CURENTULUI DE AER


natural_image
Illustration of a hand holding a flashlight emitting a trail from a cylindrical device (no text or symbols)3 ÖHUVOOLU SUUND
20 VEAD (CHECK POINT)
21 KAUGJUHTIMIPULDI A-B VALIK
natural_image
Illustration of a hand holding a flashlight emitting a dropper into a cylindrical device (no text or symbols)3 GAISA PLÜSMAS VIRZIENS
15 KLUS S DARBĪBAS REŽĪMS
natural_image
Illustration of a hand holding a flashlight emitting a dropper into a cylindrical device (no text or symbols)3 SMER PRÚDENIA VZDUCHU
natural_image
Illustration of a hand holding a flashlight emitting light rays from a cylindrical object (no text or symbols)3 SMER ZRAČNEGA TOKA
| 1 | Pritisnite naFIX: Premaknite loputo v želeno navpično smer. |  |
| 2 | Pritisnite naSWING: Samodejno nihanje lopule, ponovno pritisnite za zaustavitev. | |
| 3 | Vodoravno smer nastavite ročno. |
Opomba:
natural_image
Illustration of a hand holding a flashlight emitting a dropper into a cylindrical device (no text or symbols)3 ORO SRAUTO KRYPTIS
| Information according to EMC Directive 2004/108/EC | |
| (Name of the manufacturer) TOSHIBA CARRIER (THAILAND) CO., LTD. | |
| (Address, city, country) 144/9 MOO 5, BANGKADI INDUSTRIAL PARK, TIVANON ROAD,TAMBOL BANGKADI, AMPHUR MUANG, PATHUMTHANI 12000, THAILAND. | |
| (Name of the Importer/Distributor in EU) TOSHIBA CARRIER UK LTD. | |
| (Address, city, country) Porsham Close, Belliver Industrial Estate, PLYMOUTH, Devon, PL6 7DB.United Kingdom |
TOSHIBA

- AIR CONDITIONER (SPLIT TYPE)
- INDOOR UNIT DISPLAY
- PREPARATION BEFORE USE
- Preparing Filters
- Loading Batteries (when use wireless operation.)
- Clock Setup
- Remote Control Reset
- AIR FLOW DIRECTION
- Note:
- REMOTE CONTROL
- ONE-TOUCH
- DRY OPERATION
- ECO OPERATION
- TEMPORARY OPERATION
- TIMER OPERATION
- PRESET OPERATION
- Setting
- QUIET OPERATION
- MAINTENANCE
- Filter Reset
- Indoor Unit and Remote Control
- TROUBLESHOOTING (CHECK POINT)
- REMOTE CONTROL A-B SELECTION
- Remote Control B Setup.
- DISPLAY DELL'UNITÀ INTERNA
- PREPARATIVI PRIMA DELL'USO
- Reset telecomando
- STROMSPARMODUS (ECO)
- TOQUE ÚNICO
- SMĚR PRŮTOKU VZDUCHU
- Resetiranje daljinskog upravljača
- DISPLAY BINNENMODULE
- VOORBEREIDSELEN
- Filters klaarmaken
- LUCHTSTROOMRICHTING
- KOELING / VERWARMING WERKING
- HOOGVERMOGENSWERKING
- LUFTFLÖDETS RIKTNING
- LUFTSTR∅MSRETNINGER
- SIKKERHEDSFORBEHOLD
- LUFTSTRÖMMENS RETNING
- DIRECTIA CURENTULUI DE AER
- ÖHUVOOLU SUUND
- VEAD (CHECK POINT)
- KAUGJUHTIMIPULDI A-B VALIK
- GAISA PLÜSMAS VIRZIENS
- KLUS S DARBĪBAS REŽĪMS
- SMER PRÚDENIA VZDUCHU
- SMER ZRAČNEGA TOKA
- Opomba:
- ORO SRAUTO KRYPTIS
- TOSHIBA
Brand : TOSHIBA
Model : RASM07
Category : Air-conditioner