
9CFM60N - Range hood FAGOR - Free user manual and instructions
Find the device manual for free 9CFM60N FAGOR in PDF.
Pick your language and provide your email: we'll send you a specifically translated version.
| Product Type | Cooker Hood |
| Brand | Fagor |
| Model | 9CFM60N |
| Width | 60 cm |
| Depth | Approx. 50 cm |
| Height | Approx. 15 cm (built-in) |
| Net Weight | Approx. 12 kg |
| Power Supply | 220-240 V ~ 50 Hz |
| Motor Power | 200 W |
| Number of Speeds | 3 + intensive |
| Lighting | 2 x LED 3 W |
| Grease Filter | Aluminum (dishwasher safe) |
| Charcoal Filter (optional) | Yes, for recirculation mode |
| Exhaust Duct Diameter | 150 mm |
| Maximum Noise Level | 65 dB(A) |
| Installation | Built-in or under cabinet |
| Functions | Electronic control, delayed shut-off |
| Maintenance | Regular cleaning of filters and surface |
| Repairability | Spare parts available through after-sales service |
| Repairability Index | 6.5/10 (estimate) |
Frequently Asked Questions - 9CFM60N FAGOR
How to install the Fagor 9CFM60N hood?
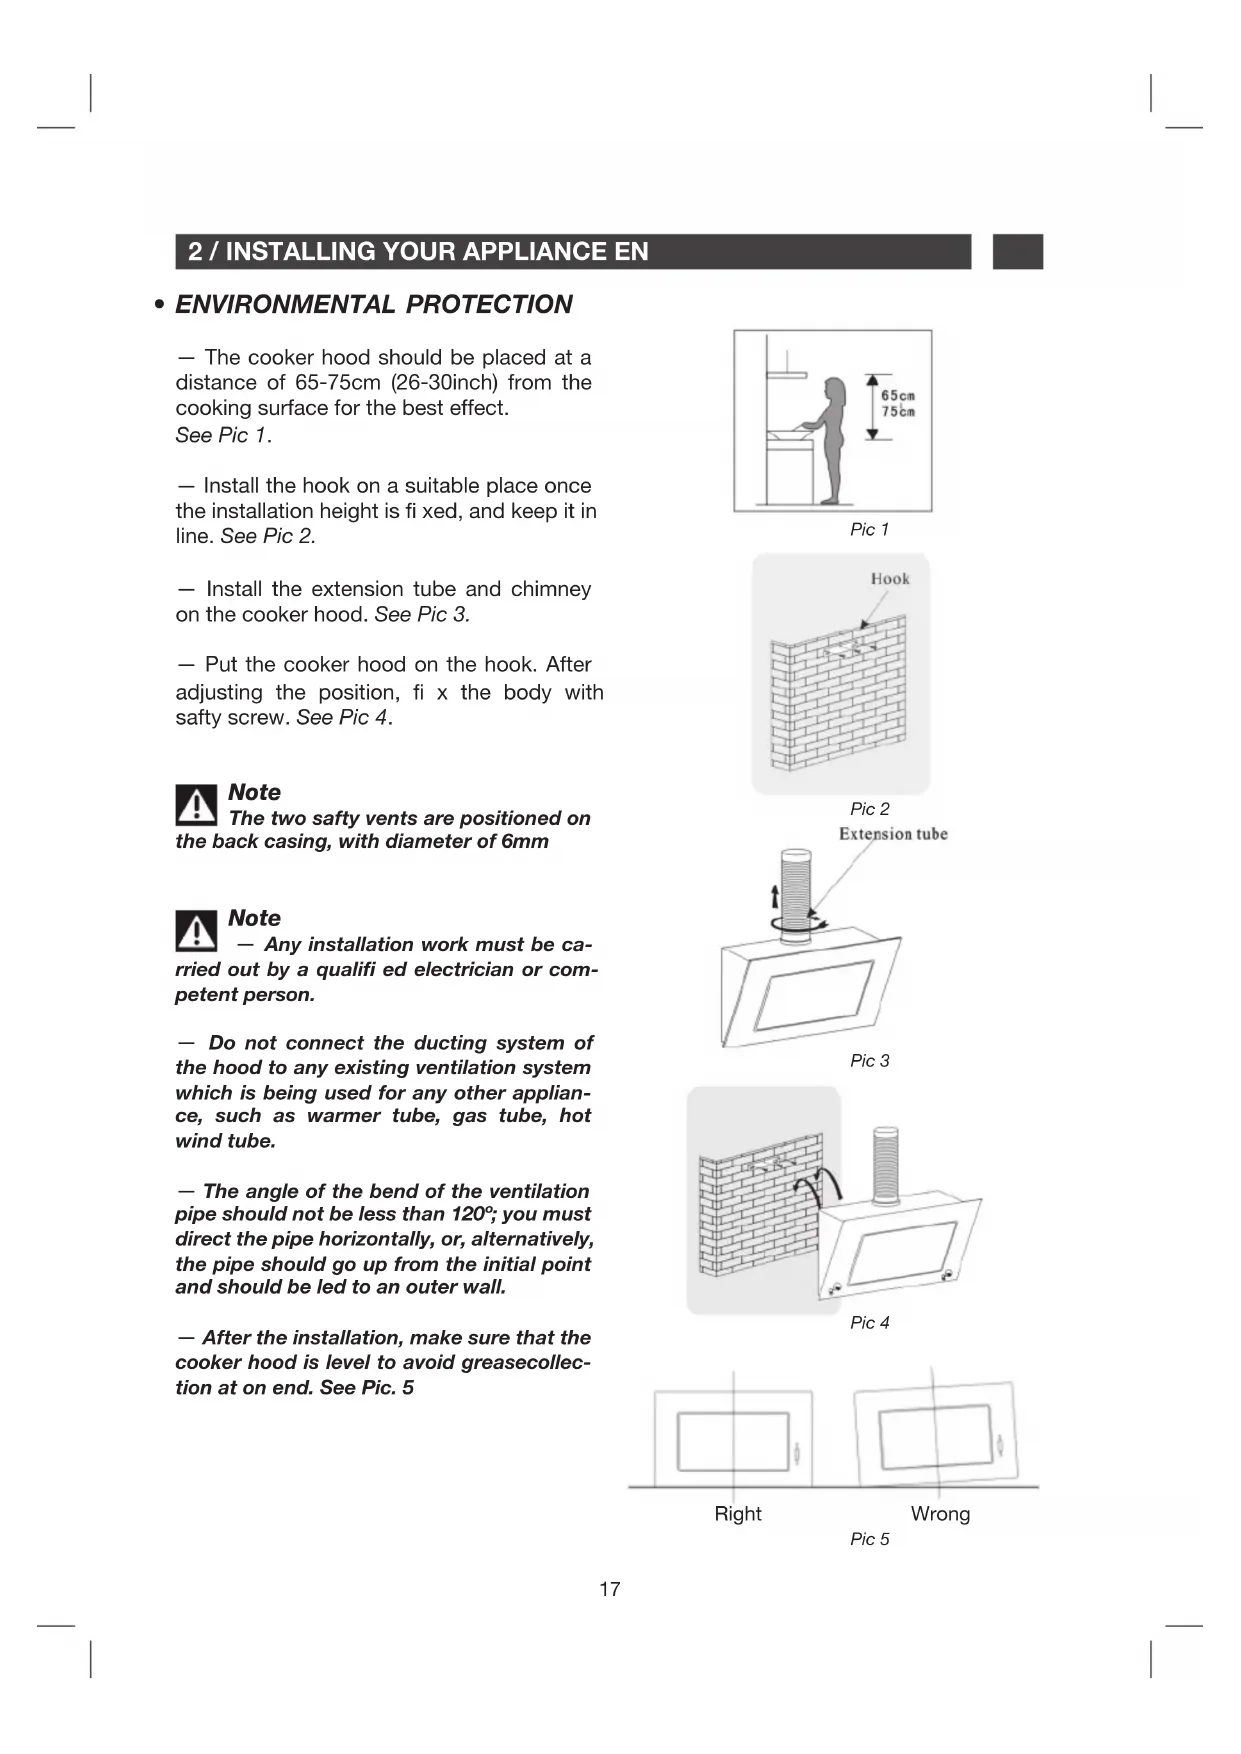
Installation must be carried out by a qualified professional. Ensure you respect safety distances (minimum 65 cm for an electric cooker, 75 cm for a gas cooker) and securely fix the hood to the wall or under the cabinet. Follow the instructions in the manual for the electrical connection and exhaust connection.
How to clean the grease filters?
The aluminum grease filters can be cleaned in the dishwasher or by hand with hot water and detergent. It is recommended to clean them every month or more often if the hood is heavily used. Let them dry completely before replacing.
How to replace the charcoal filter?
The charcoal filter is used in recirculation mode. It should be replaced every 3 to 6 months depending on usage. To change it, unclip the used filter and insert the new one following the marks on the hood.
The hood is noisy, what to do?
Check that the hood is properly fixed and that the filters are clean. An abnormal noise may come from a blocked duct or a dirty motor. If the noise persists, contact after-sales service.
How to adjust the speeds?
Use the electronic controls to select the desired speed (1, 2, 3 or intensive). The intensive speed stops automatically after a few minutes. An indicator light shows the active speed.
Can the hood be used without external evacuation?
Yes, the hood can operate in recirculation mode with an activated charcoal filter. The air is filtered and then returned to the room. Make sure to install the charcoal filter and replace it regularly.
How to replace the LED bulbs?
The LED bulbs are integrated and must be replaced by a professional. If the lighting stops working, contact after-sales service to obtain spare parts.
The hood does not turn on, what to check?
First check that the hood is plugged in and that the circuit breaker has not tripped. If the power supply is correct, the motor or the electronic board may be defective. Call an authorized repairer.
What is the recommended installation height above the cooker?
The minimum height between the hood and the cooker is 65 cm for an electric hob and 75 cm for a gas cooker. Respect these distances for optimal efficiency and safety.
Where to find spare parts?
Spare parts for the Fagor 9CFM60N are available from the Fagor after-sales service or authorized dealers. You can also order them online from specialized sites using the model number.
User questions about 9CFM60N FAGOR
0 question about this device. Answer the ones you know or ask your own.
Ask a new question about this device
No questions yet. Be the first to ask one.
Download the instructions for your Range hood in PDF format for free! Find your manual 9CFM60N - FAGOR and take your electronic device back in hand. On this page are published all the documents necessary for the use of your device. 9CFM60N by FAGOR.
USER MANUAL 9CFM60N FAGOR


Manual assistant
Powered by Anthropic
Waiting for your message
Product information
Brand : FAGOR
Model : 9CFM60N
Category : Range hood