Aquatak 160 X - Pressure washer BOSCH - Free user manual and instructions
Find the device manual for free Aquatak 160 X BOSCH in PDF.
| Product type | High-pressure washer |
| Brand | Bosch |
| Model | Aquatak 160 X |
| Reference | 3 600 H77 C.. |
| Power consumption | 3000 W |
| Nominal pressure / working pressure | 15 MPa |
| Maximum pressure | 16 MPa |
| Flow rate | 600 l/h |
| Max. supply temperature | 60 °C |
| Min. water supply flow | 17 l/h |
| Max. water supply pressure | 0.15 – 0.6 MPa |
| Detergent tank capacity | 3.0 L |
| Weight | 29.1 kg |
| Protection class | I (with protective conductor) |
| Voltage / Frequency | 230 V ~ 50 Hz |
| Sound pressure level | 80 dB(A) |
| Sound intensity level | 91 dB(A) |
| Vibrations (a_h) | 4.0 m/s² (K=1.0 m/s²) |
| Max. extension cord length | 20 m (section 1.5 mm²) / 50 m (section 2.5 mm²) |
| Recommended safety device | Residual current device 30 mA |
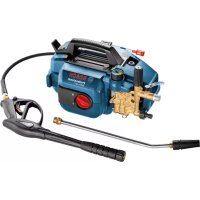
| Included accessories | Spray lance, high-pressure hose, fan jet tube, rotary jet tube, connection, cable holder, crank handle |
| Intended use | Cleaning of outdoor surfaces, tools, vehicles, boats. Not for industrial use. |
Frequently Asked Questions - Aquatak 160 X BOSCH
User questions about Aquatak 160 X BOSCH
0 question about this device. Answer the ones you know or ask your own.
Ask a new question about this device
Download the instructions for your Pressure washer in PDF format for free! Find your manual Aquatak 160 X - BOSCH and take your electronic device back in hand. On this page are published all the documents necessary for the use of your device. Aquatak 160 X by BOSCH.
USER MANUAL Aquatak 160 X BOSCH
OHJ DOKU-23537-011.fm Page 1 Thursday, September 15, 2011 9:02 AM
WEU WEU
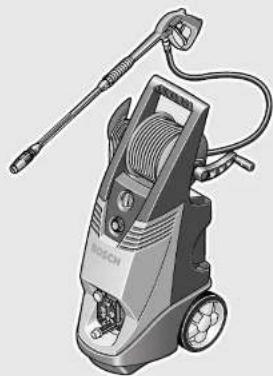
natural_image
Illustration of a Bosch pressure cooker with attached hose and wheels (no text or symbols visible)Robert Bosch GmbH
Power Tools Division
70745 Leinfelden-Echterdingen
Germany
www.bosch-garden.com
F 016 L70 723 (2011.09) O / 101 WEU
Aquatak
150|150X|160X

BOSCH
www.bosch-garden.com
Senior Vice President Engineering Director
Engineering PT/ESI

i.v. Nuoyen
Robert Bosch GmbH, Power Tools Division
D-70745 Leinfelden-Echterdingen
02.09.2011
Before start-up please read these instructions!

Before using the machine please read the operating instructions for your unit and comply in particular with these safety instructions. Please keep the instructions safe for later use.
The warning and information signs attached to the unit provide important information for safe operation.
Apart from the information in the operating instructions comply with the general safety regulations and regulations for the prevention of accidents.
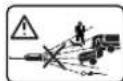
Never direct the water jet at people, animals, the unit or electric components.
Warning: High pressure jets can be dangerous if subject to misuse.
Power Supply
■ The voltage indicated on the rating plate must correspond to the voltage of the power source.
■ Class 1 units may only be connected to properly earthed power sources.
■ We recommend that this equipment is only connected into a socket which is protected by a circuit-breaker that would be actuated by a 30 mA residual current.
If an extension cord is used, the plug and socket must be of a water tight construction.
Warning: Inadequate extension cords can be dangerous.
■ Never touch the mains plug with wet hands.
■ Do not use appliance if the supply cable or other important parts like safety devices, high pressure hose or trigger gun, are damaged.
■ Do not run over, crush or pull the power supply cable or extension lead, otherwise it may be damaged. Protect the cable from heat, oil and sharp edges.
The extension lead must have a cross section in accordance with the operating instructions and be protected against splashed water. The connection must not be in water.
If the supply cord is damaged, it must be replaced by the manufacturer, its service agent or similarly qualified persons in order to avoid a hazard.
Water connection
■ Comply with the regulations of your water supply company.
■ All connecting hoses must have properly sealed joints.
The high-pressure hose must not be damaged (danger of bursting). A damaged high-pressure hose must be replaced immediately. Only use hoses and connections recommended by the manufacturer.
■ Flexible hose, accessories and fittings are important for appliance safety. Use only flexible hose, accessories and fittings recommended by the manufacturer.
Application
■ Before use, check that the unit and operating equipment are in perfect condition and are safe to operate. Do not use the unit if it is not in perfect condition.
■ Never draw in solvent-containing liquids, undiluted acids or solvents! This includes petrol, paint thinners heating oil. The sprayed vapour is highly flammable, explosive and toxic; also acetone, undiluted acids and solvents as these corrode the materials used on the unit.
■ The appropriate safety regulations must be observed when using the unit in dangerous area (e.g. petrol stations). It is forbidden to operate the unit in potentially explosive locations.
■ The unit must be placed on solid base.
■ Only use detergents recommended by the manufacturer and comply with the application, disposal and warning instructions of the detergent manufacturers.
■ All current-conducting components in the working area must be protected against splashed water.
■ The gun trigger must not be jammed in the "ON" position during operation.
■ If necessary wear suitable protective clothing to protect against splashing from some parts.
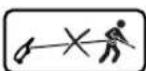
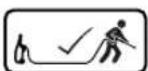
■ Vehicle tyres/tyre valves may only be cleaned from a minimum distance of 30 cm, otherwise the vehicle tyre/tyre valve could be damaged by the high-pressure jet. The first indication of this is a discoloration of the tyre. Damaged vehicle tyres/tyre valves can be deadly dangerous.
■ Materials containing asbestos and other materials which contain substances which are hazardous to your health must not be sprayed.
■ Only use detergents which have been approved by the manufacturer of the unit.
■ Detergents must not be used undiluted. The products are safe to use as they contain no acids, alkalis or substances which are detrimental to the environment. We recommend that the detergents are kept out of the reach of children. If detergent comes into contact with the eyes wash immediately with plenty of water and if swallowed contact a doctor immediately.
Operation
The operator must use the unit in accordance with the regulations. He/she must take local conditions into account and be aware of other people, especially children, when operating the unit.
■ Do not use the appliance within the range of persons, unless they wear protective clothing.
■ Do not direct the jet against yourself or others in order to clean clothes or footwear.
This appliance is not intended for use by persons (including children) with reduced physical, sensory or mental capabilities, or lack of experience and knowledge, unless they have been given supervision or instruction concerning use of the appliance by a person responsible for their safety.
The unit may only be used by authorised persons who have received training or have demonstrated their ability to operate the unit. The unit must not be operated by children or juveniles (danger of accidents due to incorrect use of the unit).
■ The unit must never be left unsupervised while the motor is running.
■ The water jet from the high-pressure nozzle produces a recoil on the gun. You should therefore hold the gun and spray lance firmly.
Transport
■ Switch off the motor and secure the unit before transporting.
Maintenance
■ Remove the plug from the socket:
— whenever you leave the machine unattended for any period
— before checking, cleaning or working on the unit
■ Repairs may only be carried out by authorised Bosch Service Centres.
Accessories and spare parts
■ Only use accessories and spare parts which have been approved by Bosch. Original accessories and spare parts guarantee that the unit can be operated safely and without any breakdowns.
Technical data
Power washer Aquatak 150 Aquatak 150 X Aquatak 160 X
| Part number 3 600 H77 A.. 3 600 H77 B.. 3 600 H77 C.. | ||||
| Rated power [W] 2 700 2 700 3 000 | ||||
| Supply Temperature max. [°C] 60 60 60 | ||||
| Supply rate min. [l/h] 17 17 17 | ||||
| Supply pressure max. | [MPa] | 0.15–0.6 | 0.15–0.6 | 0.15–0.6 |
| Rated (Working) pressure | [MPa] | 14 14 15 | ||
| Max. Operating pressure [MPa] 15 15 16 | ||||
| Flow rate | [l/h] | 550 | 550 | 600 |
| Detergent capacity | [l] 3.0 | 2 x 1.5 3.0 | ||
| Weight | [kg] | 26 27.5 | 29.1 | |
| Protection class | ⊕/I | ⊕/I | ⊕/I | |
| Serial Number | See serial No 15 (rating plate) on machine. | |||
Intended Use
The product is intended for cleaning areas and objects outside the house, tools, vehicles and boats. Drainage pipes can be unclogged and rust or paint coatings can be removed, if the appropriate accessories such as cleaning agents approved by Bosch are used.
This product should not be used for professional use.
Intended Use is related to operation within 0 °C and 40 °C ambient temperature.
– Power gun/high pressure hose
- Vario-jet-fan power lance
- Roto power lance
- Inlet connector
- Operating instructions
- Storage hooks
(Aquatak 150 - 2x, Aquatak 150 X/160 X - 1x)
- Hose reel handle (Aquatak 150 X/160 X)
– Retaining screw (Aquatak 150 X/160 X)
When parts are missing or damaged, please contact your dealer.
Introduction
This manual gives instructions on the correct assembly and safe use of your machine. It is important that you read these instructions carefully.
When fully assembled the machine weighs approximately 26 - 29.1 kg. If necessary, obtain assistance to remove from packaging.
Delivered Items
Carefully remove the machine from its packaging and check that you have all the following items:
- Power washer
Product Features
1 Trigger safety lock
2 Trigger
3 High pressure hose
4 Hose drum (Aquatak 150 X/160 X)
5 Handle (Aquatak 150 X/160 X)
6 Detergent tank
7 Power gun
8 Storage hooks
9 Vario-jet-fan power lance
10 Main switch
11 Detergent adjustment knob
12 Pressure gauge
13 Water inlet connection
14 Roto power lance
15 Serial Number
16 Inlet connector
17 Connection for high pressure hose (Aquatak 150)
18 Filter
Not all of the accessories illustrated or described are included as standard delivery.

For Your Safety
Warning! Switch off, remove plug from mains before adjusting, cleaning or if cable is cut, damaged or entangled.
Electrical Safety
Your machine requires an earth connection. The operating voltage is 230 V AC, 50 Hz (for non-EU countries 220 V, 240 V as applicable). Only use approved extension cables. Contact your Bosch Service Centre for details.
If you want to use an extension cable when operating your high pressure washer, only the following cable dimensions should be used:
1.5 mm ^2 – max length 20 m
2.5 mm ^2 – max length 50 m
Note: If an extension cable is used it must be earthed and connected through the plug to the earth cable of your supply network in accordance with prescribed safety regulations.
If in doubt contact a qualified electrician or the nearest Bosch Service Centre.
WARNING! Inadequate extension cables can be dangerous. Extension cable, plug and socket must be of watertight construction and intended for outdoor use.
Cable connections should be kept dry and off ground.
It is recommended for increased electrical safety to use a Residual Current Device (RCD) with a tripping current of not more than 30 mA. Always check your RCD every time you use it.
For products not sold in GB: WARNING: For safety, it is essential that the mains plug attached to the machine is fitted to the power supply cable. The couplings of connection leads must be protected against splashes and the coupling sockets on the leads must be made of rubber or coated with rubber. Fixing means for the connection leads must be used.
If the supply cord is damaged, it must be replaced by a Bosch Service Centre.
Products sold in GB only: Your machine is fitted with an approved 13 A (BS 1363/A) electric plug and is protected by a 13 A fuse (ASTA Approved to BS 1362).
If the fitted plug is not suitable for your socket outlets, it should be cut off and an appropriate plug fitted in its place by an authorized customer service agent.
The severed plug must be disposed of to avoid a possible shock hazard and should never be inserted into a 13 A socket elsewhere.
Water supply

According to the applicable regulations, the appliance must never be used on the drinking water network without a system separator.
Use a separator as per IEC 61770 Type BA.
Water flowing though a system separator is considered not drinkable.
Assembly
Before use
A Assemble storage hook(s) 8 to handle. Push firmly to ensure hook is secure.
B Fit handle 5 to hose reel using supplied screw. (Aquatak 150 X/160 X)
Water connection
C Screw inlet connector 16 onto machine water inlet connection 13.
Attach water supply hose (not supplied) to the mains water supply and machine.
Connecting high pressure water supply hose/nozzle
D / E-ecurely screw high pressure hose 3 onto machine at connection 17 and to the power gun 7. (Aquatak 150)
E Securely screw the high pressure hose 3 to the power gun 7. (Aquatak 150 X/160 X)
G Inserting the vario-jet/fan power lance 9 into the power gun 7. Depress and turn the vario-jet/fan power lance 90° clockwise to lock in place. (Aquatak 150/150 X)
Screw the vario jet-fan power lance 9 into the power gun 7. (Aquatak 160 X)
only Aquatak 150 X/160 X
F Unwind the pressure hose 3 off the hose drum 4.
Never use the pressure washer with the high pressure hose 3 on the hose drum 4.
Adjustments and using different nozzles
Vario-jet-fan power lance
Aquatak 150/150 X
H Twist the front ring to adjust from a pencil to a fan jet and vice versa.
To apply the detergent twist the rear ring as shown from high pressure mode to low pressure mode.
To adjust the spray pattern twist the front ring.
Also refer to Advice on using pressure washer regarding the detergent suction rate.
Aquatak 160 X
J Twist the nozzle sleeve to adjust from a pencil to a fan jet and vice versa.
K To apply the detergent move the nozzle from high pressure mode to low pressure mode by pulling the nozzle forward.
To adjust the spray patten twist the nozzle.
Also refer to Advice on using pressure washer regarding the detergent suction rate.
Roto power lance
Turn the vario-jet/fan power lance 9 90° anticlockwise. Extract the vario-jet/fan power lance. (Aquatak 150/150 X)
Unscrew the vario jet-fan power lance 9 from the power gun 7. (Aquatak 160 X)
P Insert the roto-power lance 14 into the power gun 7. Depress and turn the roto-power lance 90° clockwise to lock in place. (Aquatak 150/150 X)
Screw the roto-power lance 14 into the power gun 7. (Aquatak 160 X)
Starting and Stopping
Starting
Connect the product to the mains supply ensuring that the mains switch is in the (position.
Open water tap.
R Press the safety lock 1 to release the trigger 2. Fully press the trigger 2 until there is a constant flow of water to clear the air from the machine and water supply hose. Release trigger 2. Press the trigger safety lock 1.
Turn on main switch 10.
Point the power gun 7 downwards. Press the trigger safety lock to release the trigger 2. Fully press the trigger 2.
Stopping
Release trigger 2. Press the trigger safety lock. The power gun is now locked and cannot be operated accidentally.
Turn off the main switch 10.
Close water tap. Unplug the machine from the electric supply.
Press the trigger safety lock 1 to release the trigger 2. Fully press the trigger 2 until there is no more water pressure in the machine. Release trigger 2. Press the trigger safety lock 1.
Disconnect water supply hose from machine and water supply.
Advice using pressure washer
General
Ensure that the machine is on level ground.
Do not overreach with the high pressure hose or move the pressure washer by pulling the hose, this could cause the machine to become unstable and fall over.
Do not kink or drive a motor vehicle over the high pressure hose. Do not expose the high pressure hose to sharp edges or corners.
Never use the roto nozzle to clean motor vehicles.
Operating with Detergents
Only use Bosch approved detergents. Unsuitable detergents may damage the unit and the object being cleaned.
M / N fill the detergent tank 6 with detergent, dilute as recommended. The tank(s) can be removed to aid filling and emptying.
I / Ko spray detergent move vario-jet-fan power lance to low pressure mode.
We recommend that you use detergent sparingly for the sake of the environment. Observe the recommended dilution on the detergent label.
By offering you an individualised range of cleaning and preserving agents, Bosch guarantees trouble-free operation of the unit.
only Aquatak 150/160 X
The product is fitted with one detergent tank. The detergent adjustment knob 11 is used to increase/decrease detergent flow.
L only Aquatak 150 X
The product is fitted with two detergent tanks. The detergent adjustment knob 11 is used to switch the suction between detergent tanks and increase/decrease detergent flow.
Recommended cleaning method
Step 1: Loosening dirt
Spray on detergent sparingly and allow to react for a short time.
Step 2: Removing dirt
Spray off the loosened dirt with the high-pressure spray.
Note: When cleaning a vertical surface spray off dirt/detergent from the bottom and work in an upwards direction. Rinse from the top and work downwards.
Chemicals dangerous to the environment must not be allowed to enter the ground, ground water or ponds, streams, etc.
For the use of cleaning agents, observe the instructions on the package and the prescribed concentration exactly.
For the cleaning of motor vehicles the local regulations should be observed: Do not allow oil sprayed off to enter into the ground water. Recycle raw materials instead of waste disposal.
Maintenance

Stop, remove plug from the power supply and disconnect from water supply.
Note: To ensure long and reliable service, carry out the following maintenance regularly.
Regularly check for obvious defects such as loose fixings, and worn or damaged components.
Check that covers and guards are undamaged and correctly fitted. Carry out necessary maintenance or repairs before using.
If the pressure washer should happen to fail despite the care taken in manufacture and testing, repair should be carried out by an authorised service agent for Bosch garden products.
For all correspondence and spare parts orders, always include the 10-digit part number (TYP) from the nameplate of the machine!
Cleaning/inspecting the filter
S Expose the filter 18 in the machine water inlet connection 13 by removing the inlet connector 16.
The filter 18 can be easily removed with long nose pliers. Rinse and replace. If damaged replace.
Never use the pressure washer without the filter 18 or a damaged filter.
Using the pressure washer without/damaged filter 18 will invalidate the warranty.
Transport
To move the machine use the top handle and roll the machine on the wheels.
To transport the unit up or down steps or over obstacles, it must be lifted by the top handle.
If the unit is to be stored or transported horizontally the detergent tank should be drained first.
After use storage
Clean the exterior of the machine thoroughly using a soft brush or cloth. Do not use water, solvents or polishes. Remove all debris, especially from the ventilation slots.
Frost will damage a pressure washer that has not been completely emptied of water. The machine should be stored in a frost free room.
Do not place other objects on top of the machine.
Ensure cables are not trapped when storing. Do not kink high pressure hose.
Fault Finding
The following table gives checks and actions that you can perform if your machine does not operate correctly. If these do not identify/remedy the problem, contact your service agent.
Warning: Switch off and remove plug from mains before investigating fault.
| Symptom Possible Cause | Remedy | |
| Motor refuses to start Plug | not connectedMains socket faultyFuse faulty/blownExtension cable damagedMotor protector has activatedFrozen | Connect plugUse another socketReplace fuseTry without extension cableAllow to cool for 5 minutesWait for pump/water supply hose/accessory to thaw |
| Motor stops Fuse faulty/blownWrong mains voltageMotor protector has activated | Replace fuseCheck that mains voltage corresponds to specifications on the model tagAllow to cool for 5 minutes | |
| Fuses blow Fuses incorrectly rated Change to a mains supply higher thanthe pressure washer amp consumption | ||
| Excessive working pressure | Nozzle partly blocked Clean nozzle | |
| Pressure pulsating Air in the inlet water supply hose/pumpInadequate water supplyWater filter blockedWater supply hoses squeezedHigh pressure hose too long | Allow pressure washer to run with open spray handle and nozzle at low pressure until regular working pressure is obtainedCheck that the water supply corresponds to specifications. The minimum specification for the water supply hose is 1/2" or 13 mm diameterClean the water filterStraighten out kinked water supply hosesDismount high pressure extension hose. Retry (extension hose max. 10 m) | |
| Pressure too low, but steadyNote: Several types of accessory will normally deliver a lower pressure | Nozzle wornStart/stop valve worn | Change the nozzleActivate trigger five times in quick succession |
| Motor starts up but no working pressure | No water supplyWater filter clogged upNozzle clogged up | Connect water supplyClean the water filterClean nozzle |
| The pressure washer starts irregularly by itself | Pump/power gun leaky Contact your Bosch Service Centre | |
| Water leaks from machine | Leaking pump 6 drops per minute are permissible. In case of more serious leakage, you should contact your Bosch Service Centre. | |
Disposal
Power tools, accessories and packaging should be sorted for environmental-friendly recycling.
Do not dispose of power tools into household waste!
Only for EC countries:
According to the European Directive 2002/96/EC on waste electrical and electronic equipment and its incorporation into national law, products that are no longer suitable for use must be separately collected and sent for recovery in an environmentally-friendly manner.
After-Sales Service and Customer Assistance
Our after-sales service responds to your questions concerning maintenance and repair of your product as well as spare parts. Exploded views and information on spare parts can also be found under:
www.bosch-garden.com
Our customer consultants answer your questions concerning best buy, application and adjustment of products and accessories.
Great Britain
Robert Bosch Ltd. (B.S.C.)
P.O. Box 98
Broadwater Park
North Orbital Road
Denham
Uxbridge
UB 9 5HJ
Tel. Service: +44 (0844) 736 0109
Fax: +44 (0844) 736 0146
E-Mail: boschservicecentre@bosch.com
Ireland
Origo Ltd.
Unit 23 Magna Drive
Magna Business Park
City West
Dublin 24
Tel. Service: +353 (01) 4 66 67 00
Fax: +353 (01) 4 66 68 88
Australia, New Zealand and Pacific Islands
Robert Bosch Australia Pty.Ltd.
Power Tools
Locked Bag 66
Clayton South VIC 3169
Customer Contact Center
Inside Australia:
Phone: +61 (01300) 307 044
Fax: +61 (01300) 307 045
Inside New Zealand:
Phone: +64 (0800) 543 353
Fax: +64 (0800) 428 570
Outside AU and NZ:
Phone: +61 (03) 9541 5555
www.bosch.com.au
Republic of South Africa
Customer service
Hotline: +27 (011) 6 51 96 00
Gauteng – BSC Service Centre
35 Roper Street, New Centre Johannesburg
Tel.: +27 (011) 4 93 93 75
Fax: +27 (011) 4 93 01 26
E-Mail: bsctools@icon.co.za
KZN – BSC Service Centre
Unit E, Almar Centre
143 Crompton Street
Pinetown
Tel.: +27 (031) 7 01 21 20
Fax: +27 (031) 7 01 24 46
E-Mail: bsc.dur@za.bosch.com
Western Cape – BSC Service Centre
Democracy Way, Prosperity Park Milenerton
Tel.: +27 (021) 5 51 25 77
Fax: +27 (021) 5 51 32 23
E-Mail: bsc@zsd.co.za
Bosch Headquarters
Midrand, Gauteng
Tel.: +27 (011) 6 51 96 00
Fax: +27 (011) 6 51 98 80
E-Mail: rbsa-hq.pts@za.bosch.com
19 • F 016 L70 723 • TMS • 13.09.11
English - 7


CE Declaration of Conformity
Measured sound values determined according to EN 60335.
Typically the A-weighted noise level of the product is: sound pressure level 80 dB(A) (Aquatak 150/150 X)/80 dB(A) (Aquatak 160 X); sound power level 90 dB(A) (Aquatak 150/150 X)/91 dB(A) (Aquatak 160 X). Uncertainty K =3 dB (Aquatak 150/150 X)/3 dB (Aquatak 160 X).
Vibration total values a_h (triax vector sum) and uncertainty K determined according to EN 60335: a_h=4.0 m/s^2 , K=1.0 m/s^2 .
We declare under our sole responsibility that the product described under „Technical data“ is in conformity with the following standards or standardization documents: EN 60335 according to the provisions of the directives 2011/65/EU, 2004/108/EC, 2006/42/EC, 2000/14/EC. 2000/14/EC: Guaranteed sound power level 93 dB(A) (Aquatak 150/150 X)/94 dB(A) (Aquatak 160 X). Conformity assessment procedure according to Annex V.
Equipment category: 27
Technical file (2006/42/EC, 2000/14/EC) at: Bosch Lawn and Garden Ltd., PT-LG/ENS, Stowmarket, Suffolk IP14 1EY, England Dr. Egbert Schneider Dr. Eckerhard Strötgen Senior Vice President Engineering Director Engineering PT/ESI
Subject to change without notice
20 • F 016 L70 723 • TMS • 13.09.11
English - 8


www.bosch-garden.com
Robert Bosch (France) S.A.S.
Documents techniques (2006/42/CE, 2000/14/CE) auprès de: Bosch Lawn and Garden Ltd., PT-LG/ENS, Stowmarket, Suffolk IP14 1EY, England
Dr. Egbert Schneider Dr. Eckerhard Strötgen Senior Vice President Engineering Director Engineering PT/ESI
ppa. Amcena i.v. Wuzyu
Robert Bosch GmbH, Power Tools Division D-70745 Leinfelden-Echterdingen
02.09.2011
www.bosch-garden.com
2004/108/CE, 2006/42/CE, 2000/14/CE.
2000/14/CE: Nivel de potencia acústica garantizado 93 dB(A) (Aquatak 150/150 X)/94 dB(A) (Aquatak 160 X).
Expediente técnico (2006/42/CE, 2000/14/CE) en: Bosch Lawn and Garden Ltd., PT-LG/ENS, Stowmarket, Suffolk IP14 1EY, England
Dr. Egbert Schneider Dr. Eckerhard Strötgen Senior Vice President Engineering Director Engineering PT/ESI
ppa. Amata i.v. Moyen
Robert Bosch GmbH, Power Tools Division D-70745 Leinfelden-Echterdingen 02.09.2011
www.bosch-garden.com
Processo técnico (2006/42/CE, 2000/14/CE) em: Bosch Lawn and Garden Ltd., PT-LG/ENS, Stowmarket, Suffolk IP14 1EY, England
Dr. Egbert Schneider Dr. Eckerhard Strötgen Senior Vice President Engineering Director Engineering PT/ESI
ppa. Jhaka i.v. Mioyou
Robert Bosch GmbH, Power Tools Division D-70745 Leinfelden-Echterdingen 02.09.2011
www.bosch-garden.com
Fascicolo tecnico (2006/42/CE, 2000/14/CE) presso: Bosch Lawn and Garden Ltd., PT-LG/ENS, Stowmarket, Suffolk IP14 1EY, England
Dr. Egbert Schneider Dr. Eckerhard Strötgen Senior Vice President Engineering Director Engineering PT/ESI
ppa. Amata i.v. Noyen
Robert Bosch GmbH, Power Tools Division
D-70745 Leinfelden-Echterdingen
02.09.2011
Stap 1: Vuil losmaken
www.bosch-garden.com
Dr. Egbert Schneider Dr. Eckerhard Strötgen Senior Vice President Engineering Director Engineering PT/ESI
ppa. A##ca i.v. Mo#gen
Robert Bosch GmbH, Power Tools Division D-70745 Leinfelden-Echterdingen 02.09.2011
www.bosch-garden.com
Bosch Service Center
Telegrafvej 3
2750 Ballerup
Tlf. Service Center: +45 (44 89) 88 55
Fax: +45 (44 89) 87 55
E-Mail: vaerktoej@dk.bosch.com
CE Overensstemmelseserklæring
Teknisk dossier (2006/42/EF, 2000/14/EF) ved: Bosch Lawn and Garden Ltd., PT-LG/ENS, Stowmarket, Suffolk IP14 1EY, England
Dr. Egbert Schneider Dr. Eckerhard Strötgen Senior Vice President Engineering Director Engineering PT/ESI
ppa. Jhaka i.v. Miofgen
Robert Bosch GmbH, Power Tools Division D-70745 Leinfelden-Echterdingen 02.09.2011
www.bosch-garden.com
Bosch Service Center
Telegrafvej 3
2750 Ballerup
Danmark
Tel.: +46 (020) 41 44 55
Fax: +46 (011) 18 76 91
Dr. Egbert Schneider Dr. Eckerhard Strötgen Senior Vice President Engineering Director Engineering PT/ESI
ppa. Jhaka i.v. Moyen
Robert Bosch GmbH, Power Tools Division D-70745 Leinfelden-Echterdingen 02.09.2011
www.bosch-garden.com
Tekniske data (2006/42/EF, 2000/14/EF) hos: Bosch Lawn and Garden Ltd., PT-LG/ENS, Stowmarket, Suffolk IP14 1EY, England
Dr. Egbert Schneider Dr. Eckerhard Strötgen Senior Vice President Engineering Director Engineering PT/ESI
ppa. A##ca i.v. Mo#gen
Robert Bosch GmbH, Power Tools Division D-70745 Leinfelden-Echterdingen 02.09.2011
www.bosch-garden.com
Tekninen tiedosto (2006/42/EY, 2000/14/EY): Bosch Lawn and Garden Ltd., PT-LG/ENS, Stowmarket, Suffolk IP14 1EY, England
Dr. Egbert Schneider Dr. Eckerhard Strötgen Senior Vice President Engineering Director Engineering PT/ESI
ppa. Amana i.v. Mozyen
Robert Bosch GmbH, Power Tools Division D-70745 Leinfelden-Echterdingen 02.09.2011
www.bosch-garden.com
Τεχνικόσ φάκελοσ (2006/42/EK, 2000/14/EK) από: Bosch Lawn and Garden Ltd., PT-LG/ENS, Stowmarket, Suffolk IP14 1EY, England
Dr. Egbert Schneider Dr. Eckerhard Strötgen Senior Vice President Engineering Director Engineering PT/ESI
ppa. Jhaka i.v. Nuoyen
Robert Bosch GmbH, Power Tools Division D-70745 Leinfelden-Echterdingen 02.09.2011
www.bosch-garden.com
Bosch San. ve Tic. A.S.
Ahi Evran Cad. No:1 Kat:22
Polaris Plaza
80670 Maslak/Istanbul
Bosch Uzman Ekibi: +90 (0212) 367 18 88
CE Uygunluk beyani
Dr. Egbert Schneider Dr. Eckerhard Strötgen Senior Vice President Engineering Director Engineering PT/ESI
i.v. Nuoyen
Robert Bosch GmbH, Power Tools Division
D-70745 Leinfelden-Echterdingen
02.09.2011