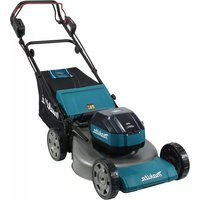
UM401DW - Lawn mower MAKITA - Free user manual and instructions
Find the device manual for free UM401DW MAKITA in PDF.
User questions about UM401DW MAKITA
0 question about this device. Answer the ones you know or ask your own.
Ask a new question about this device
Download the instructions for your Lawn mower in PDF format for free! Find your manual UM401DW - MAKITA and take your electronic device back in hand. On this page are published all the documents necessary for the use of your device. UM401DW by MAKITA.
USER MANUAL UM401DW MAKITA
natural_image
Line drawing of a lawn mower with visible blades and wheels (no text or symbols)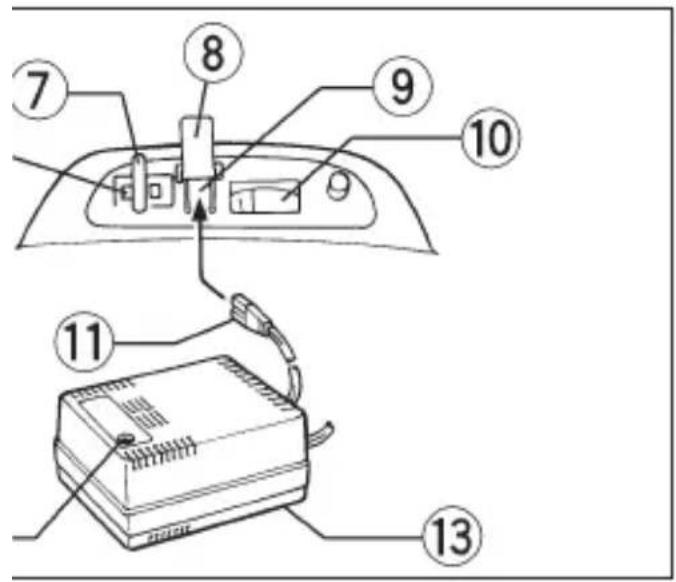
text_image
Diagram showing a device with numbered parts, including a top panel and a base device labeled 13.
text_image
Technical diagram of a mechanical assembly with numbered parts labeled 2 and 44
text_image
Technical diagram showing mechanical assembly with labeled component '14' and directional arrows indicating motion or movement.
text_image
Technical diagram of a mechanical assembly with numbered components and directional arrows indicating motion or force.6

text_image
19 20 21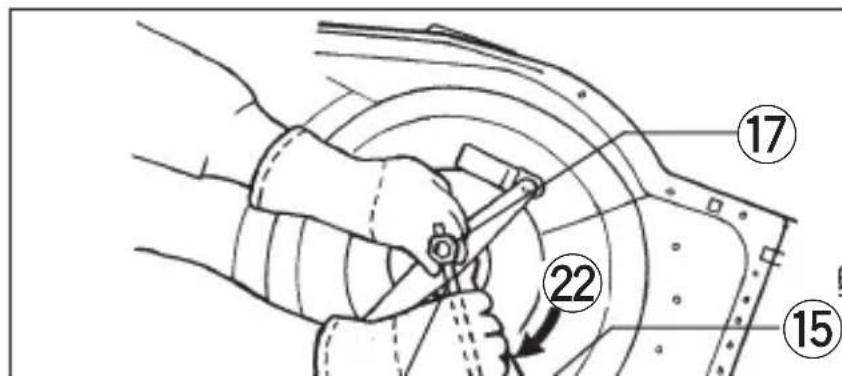
text_image
Technical diagram showing a hand operating a mechanical component with numbered parts labeled 15, 17, and 22.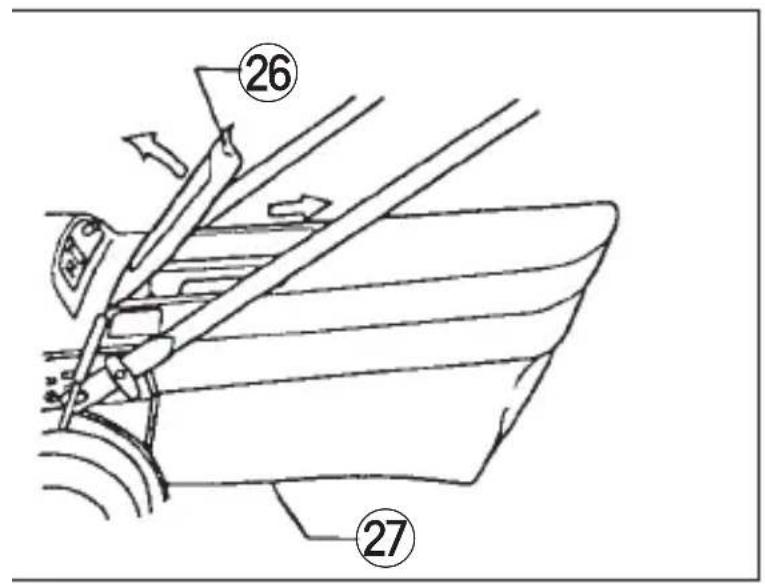
text_image
26 27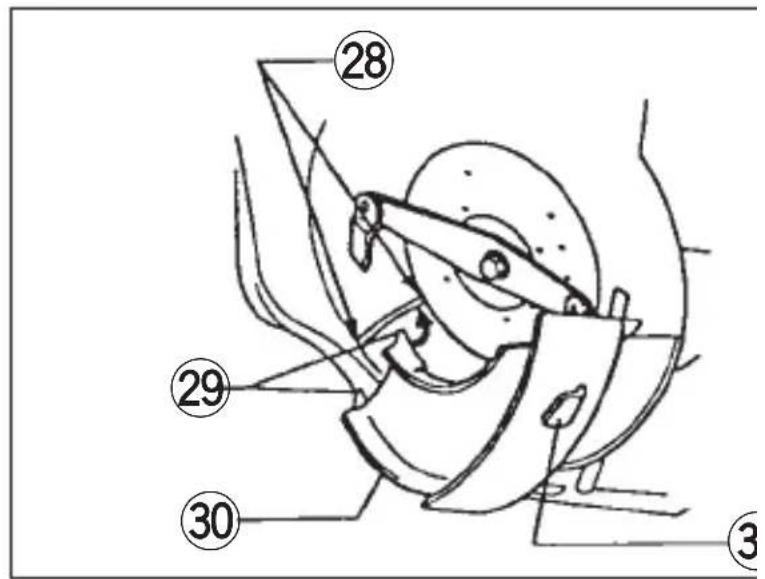
text_image
Technical diagram of a mechanical component with numbered parts labeled 28, 29, and 3012
text_image
26 30 31 32
text_image
⑥ ⑩ ⑦ ③14
text_image
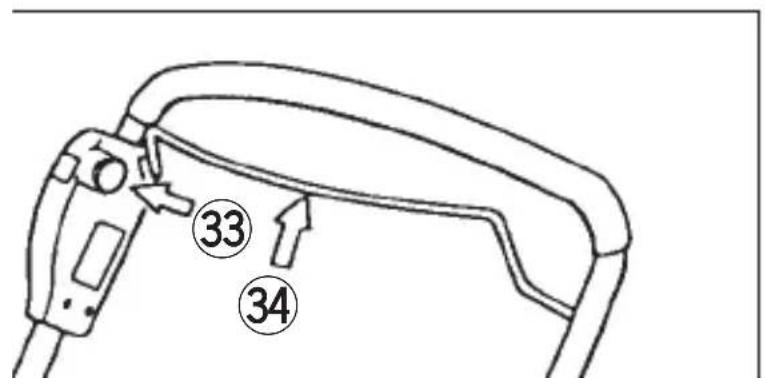
33 34ENGLISH
Explanation of general view
| 1 Raise | 13 Charger | 25 Screwdriver |
| 2 Handle | 14 Lever | 26 Rear guard |
| 3 Square hole | 15 32 mm wrench | 27 Rear bag |
| 4 Clamp nut | 16 Loosen | 28 Holes |
| 5 Protrusion | 17 Hex bolt | 29 Protrusions |
| 6 Interlock switch | 18 13 mm socket wrench | 30 Mulching plate |
| 7 Key | 19 Blade holder | 31 Hook |
| 8 Inlet cover | 20 Blade | 32 Undercover |
| 9 Charging inlet | 21 Cup spring | 33 Depress switch button |
| 10 Indicator | 22 Tighten | 34 Pull switch lever |
| 11 Charging plug | 23 File or sharpening stone | 35 Restart button |
| 12 Charging light | 24 Vice | 36 Deck |
SPECIFICATIONS
Model UM401DW
Effective cutting width 406 mm
No load speed (RPM) 3,8007.
Dimensions (L x W x H) ..... 1,316 x 482 x 1,010 mm
Net weight 31.9 kg
Output D.C. 24 V
Charging time .... Approx. 4 hrs
Batteries used in UM401DW
- Sealed Lead-acid Battery 12 V – 1.5 A h x 2
• Number of cells - 12
- Due to the continuing program of research and development, the specifications herein are subject to change without prior notice.
- Note: Specifications may differ from country to country.
Safety hints
For your own safety, please refer to enclosed safety instructions.
These symbols mean:

Indoor use only

Read instruction manual.

DOUBLE INSULATION
IMPORTANT SAFETY INSTRUCTIONS FOR BATTERIES & CHARGER
-
SAVE THESE INSTRUCTIONS — This manual contains important safety and operating instructions for battery charger.
-
Before using battery charger, read all instructions and cautionary markings on (1) battery charger and (2) product using battery.
-
CAUTION — To reduce risk of injury, charge ONLY MAKITA type rechargeable batteries used in Model UM401D. Other types of batteries may burst causing personal injury and damage.
-
Do not expose charger to rain or snow.
-
Use of an attachment not recommended or sold by the battery charger manufacturer may result in a risk of fire, electric shock, or injury to persons.
-
To reduce risk of damage to electric plug and cord, pull by plug rather than cord when disconnecting charger.
-
Make sure cord is located so that it will not be stepped on, tripped over, or otherwise subjected to damage or stress.
-
Do not operate charger with damaged cord or plug — replace them immediately.
-
Do not operate charger if it has received a sharp blow, been dropped, or otherwise damaged in any way; take it to a qualified serviceman.
-
Do not disassemble charger or product which contains battery; take it to a qualified serviceman when service or repair is required. Incorrect reassembly may result in a risk of electric shock or fire.
-
To reduce risk of electric shock, unplug charger from outlet before attempting any maintenance or cleaning. Turning off controls will not reduce this risk.
ADDITIONAL SAFETY RULES FOR BATTERIES IN MOWER
-
Use ONLY the Makita charger Model DC240 specified to charge the Makita Model UM401D.
-
Do not short the battery:
(1) Do not touch the charging inlet with any conductive material.
(2) Shut the cover on the charging inlet when not charging.
(3) Do not expose mower to water or rain. A battery short can cause a large current flow, overheating, possible burns and even a breakdown.
-
Do not leave mower exposed to direct sunlight. Do not store mower in locations where the temperature may reach or exceed 40^ C ( 104^ F).
-
Batteries in Makita Model UM401D contains a strong electrolyte (dilute sulfuric acid). Do not apply undue force to the batteries, drop or strike them. Do not attempt to disassemble or make modifications to the batteries.
-
If the batteries break open and electrolyte 8. (dilute sulfuric acid) contacts skin or clothing, wash immediately with running water. If elec-9. trolyte gets into your eyes, rinse them out with clear water and seek medical attention right 10. away. 11.
-
As service life of the batteries ends, their capacity and operation time decrease. Contact12. your nearest Makita Service Center or Distributor to replace them with new batteries.
-
When replacing batteries, all batteries should 13. be replaced at the same time. Mixing fresh and discharged batteries could increase internal 14. cell pressure and rupture the discharged battery.
-
When inserting batteries into this product, the15. proper polarity or direction must be observed16. Reverse direction of batteries can result in 17. leakage or explosion.
-
Never expose mower or batteries to flames, fire or great heat. Breakage may cause release of injurious material. 18
TIPS FOR MAINTAINING MAXIMUM RUN PERFORMANCE AND BATTERY LIFE
- Charge the mower immediately after purchase.
- Always recharge the mower after each use without fail.
-
We recommend that you leave the charger connected to the mower even after the charging cycle is complete. The charger will switch into its "maintenance charge (trickle charge)" mode and keep the battery fresh and fully charged.
-
Be sure to charge the mower every six months when it is left uncharged for long periods. If you fail to do so, the mower may become 2. unchargeable.
ADDITIONAL SAFETY RULES FOR CHARGER
-
The Makita charger Model DC240 is specifically designed to charge only the Makita bat-5. teries used in Model UM401D. Do not attempt to charge any other battery with this charger6.
-
Handle the charger carefully. Do not drop or strike it.
-
Never carry the charger by cord or yank it to disconnect from receptacle.
-
Keep cord from heat, oil, chemicals, and sharp edges.
-
Use only a power source of the same voltage as indicated on the nameplate of the charger ^9 . when charging.
-
Do not attempt to use a step-up transformer, an engine generator, a DC-AC inverter or DC power receptacle.
-
Charge mower at a room temperature between 5^ C ( 41^ F) and 40^ C ( 104^ F).
-
Do not charge in place exposed to direct sunlight.
- Do not charge lawn mower in rain, or in wet with locations.
-
Do not allow the charger to get wet.
-
Do not charge inside a box or container of an kind.
-
Do not charge near volatile, flammable materials such as gasoline, paint, gas, adhesive, etc.
-
Do not charge on top of paper, carpet, vinyl and sheeting, cloth materials, etc.
-
Do not allow anything to cover or clog the charger vents. Do not attempt to insert anything into the vents.
-
Do not touch the charger with wet hands.
-
Do not charge in dusty place.
-
Stop charging immediately if you notice anything abnormal. Ship or take the charger and the mower to your nearest Makita Service Center or Distributor for checking them.
-
Do not attempt to disassemble or make modifications to the charger.
-
Do not put any metal object or foreign matter into the charging plug. Short circuit will occur, causing a burn injury and charger breakdown.
-
This charger incorporates parts such as switches and relays that are likely to produce arcs or sparks; therefore, when charging mower in a garage or similar location, locate the charger in a room or enclosure provided for this purpose.
ADDITIONAL SAFETY RULES FOR MOWER
Ms DO NOT INSERT KEY INTO MOWER UNTIL IT IS READY TO BE USED.
-
Don't grasp the exposed cutting blades or cutting edges when picking up or holding the appliance.
-
Physical Condition — Do not operate mower while under the influence of drugs, alcohol, or any medication.
-
Keep guards in place and in working order.
- Keep hands and feet away from rotating blades. Caution — Blades coast after turn off.
-
Remove key before servicing, cleaning or removing material from the gardening appliance.
-
Use only Makita genuine blades specified in this manual.
Check the blades carefully for cracks or damage before operation. Replace cracked or damaged blades immediately.
-9. Remove foreign matters such as rocks, wire, bottles, bones and large sticks from the work area before cutting to prevent personal injury or damage to the appliance.
-
Stop operation immediately if you notice anything abnormal. Switch off the appliance and remove the key from the appliance. Then inspect the appliance.
-
NEVER ATTEMPT TO MAKE WHEEL HEIGHT Charging (Fig. 3)
ADJUSTMENTS WHILE MOWER IS RUNNING.
-
RELEASE SWITCH LEVER AND WAIT FOR BLADE ROTATION TO STOP BEFORE CROSSING DRIVEWAYS, WALKS, ROADS, AND ANY • GRAVEL-COVERED AREAS. Also remove key if you leave it, reach to pick up or remove something out of your way, or for any other reason that may distract you from what you • are doing.
-
Objects struck by the lawn mower blade can cause severe injuries to persons. The lawn should always be carefully examined and cleared of all objects prior to each mowing.
-
If lawn mower strikes a foreign object, follow these steps:
I) Stop lawn mower. Release the switch lever;
II) Remove key.
III) Inspect for damage.
IV) Repair any damage before restarting and operating the lawn mower.
- CHECK THE REAR BAG FREQUENTLY FOR WEAR OR DETERIORATION. For storage, always make sure the rear bag is empty. Replace a worn bag with a new factory replacement bag for safety.
- Stop the motor and remove key whenever yo leave the equipment, before cleaning the mower housing, and before making any repairs or inspections.
- Mow across the face of slopes, never up and down. Exercise extreme caution when changing direction on slopes. Do not mow excessively steep slopes.
- Do not wash with a hose; avoid getting water in motor and electrical connections.
- Check the blade mounting bolt at frequent intervals for proper tightness.
- Keep all nuts, bolts, and screws tight to be sure the equipment is in safe working condition.
SAVE THESE INSTRUCTIONS.
OPERATING INSTRUCTIONS
Unpacking (Fig. 1 & 2)
Your mower has been completely assembled at the ^3) factory except for the rear bag.
- Remove the rear bag, instruction manual, charger ^4) and plastic bag containing accessories from the carton.
- Remove the mower from the carton and place all four wheels on the ground or floor.
- Check the carton thoroughly and make sure there are no loose parts.
-
To unfold the handle, raise it into place. Fit the protrusion of the handle into one of the square holes in left and right sides of the mower, and then secure the handle by tightening the clamp nuts.
-
Remove the key from the mower (slide it to your left and pull out) and store it in a safe place — out of the reach of children.
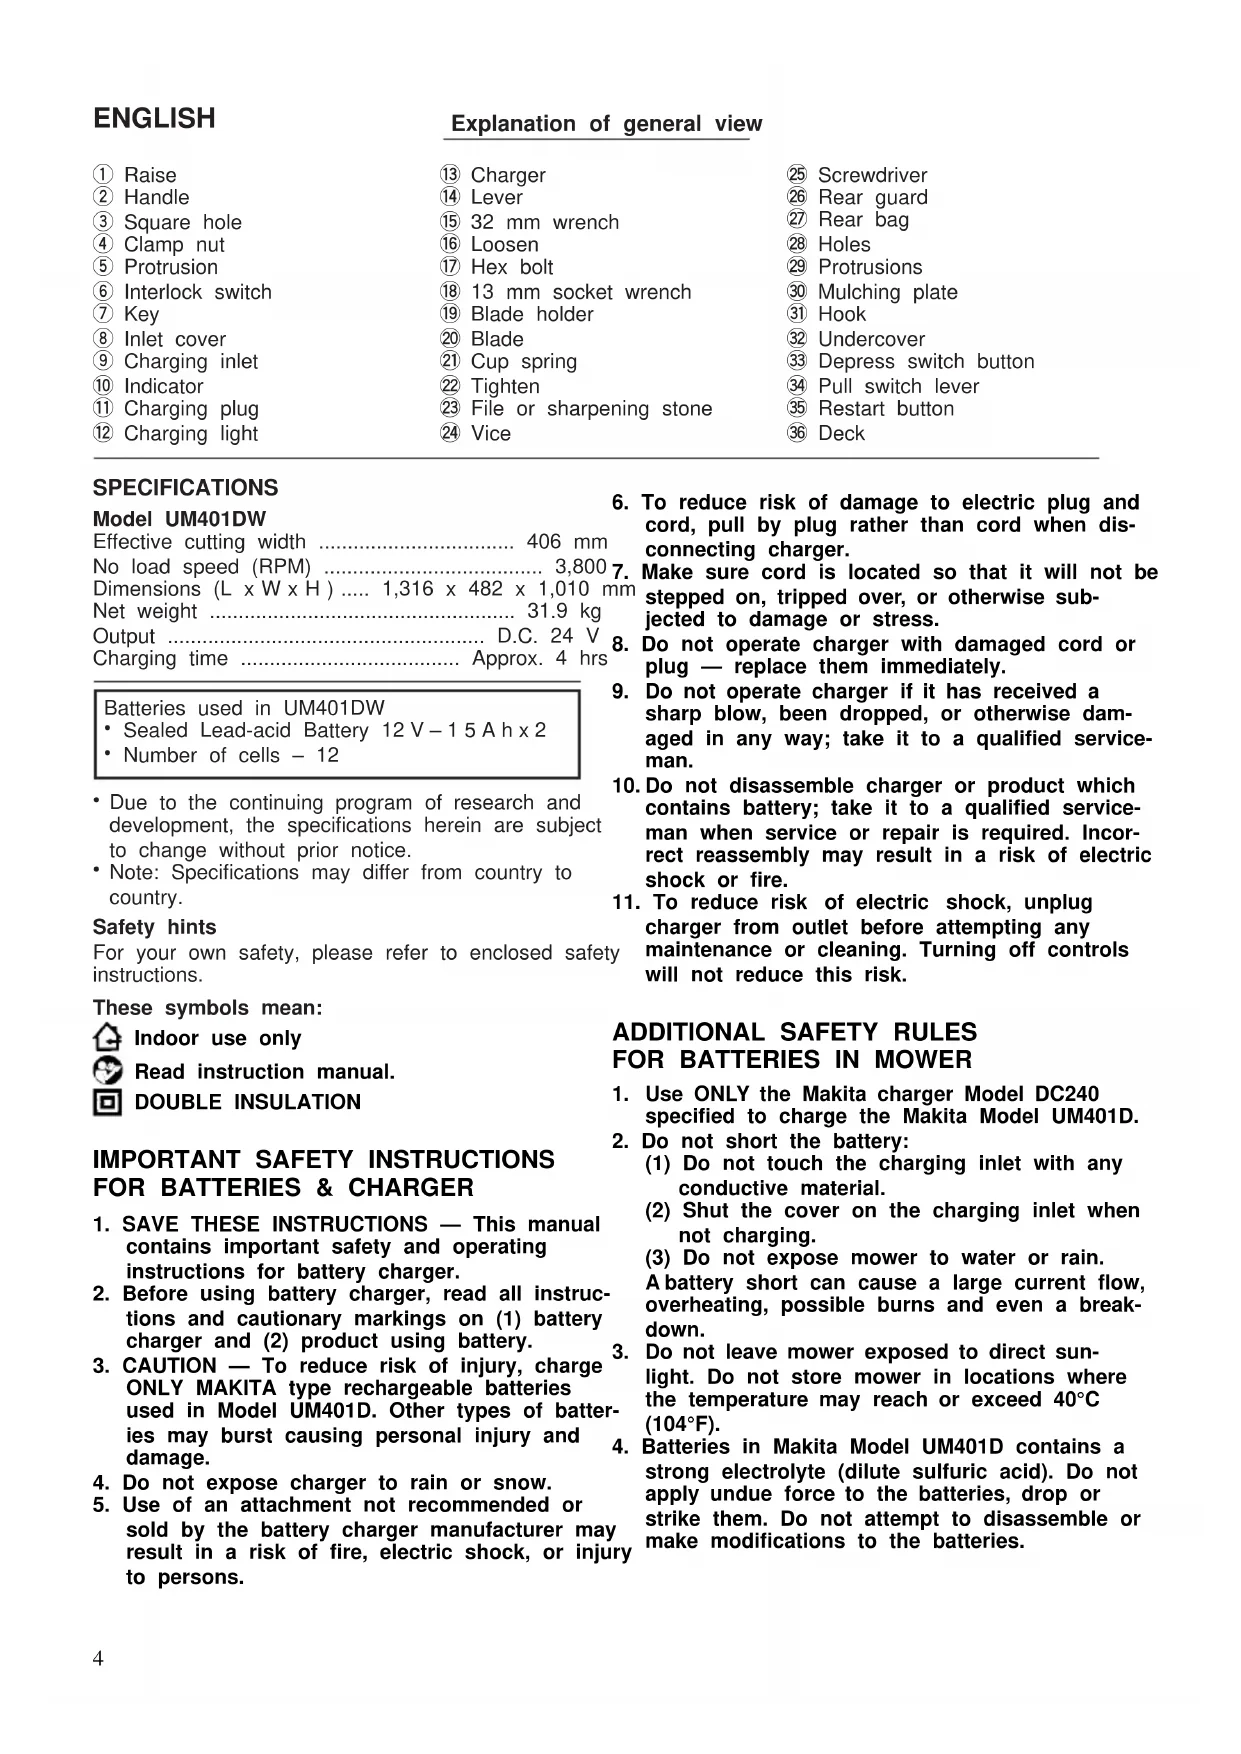
- Open the inlet cover and insert the charging plug into the inlet. (REMEMBER: The charging inlet has polarity. DO NOT DAMAGE OR ABUSE THE PLUG AND INLET.)
- Then plug the charger into the power source. The charging light will turn on in green color, and immediately the color of the charging light will change to red and charging will begin. The charging light will remain lit steadily during charging.
- When the charging light color changes from red to green, the charging is complete. Charging takes approx. 4 hours.
After charging, unplug the charger from the power source and pull out the charging plug from the charging inlet.
NOTE:
- If the charging light flashes in green color, the charging plug may not be inserted into the charging inlet correctly. Check the charging plug and charging inlet.
- If the charging light flashes in red color, the batteries are too weak for normal charging. Wait for a while until normal charging starts after recovery charging is finished.
- If the mower has not been used for long periods, it will take more than specified time to charge the mower.
- If the mower is left uncharged for more than six months, it may become unchargeable.
• The indicator does not indicate progress during charge cycle.
CAUTION:
Any of the following conditions indicates damages to the charger and/or batteries. Unplug the charger from power source and disconnect the charging plug immediately. Have them checked by your nearest Makita Authorized or Factory Service Center.
1) The charging light remains flashing in green color (does not change to red), although the charging plug is correctly inserted into the charging inlet.
2) The charging light color does not change to green in more than 5 hours after you start charging.
3) The charging light does not light up or flash in any colors while power is supplied.
The charging light flashes alternately in green and red color. (Probably the batteries are worn out or damaged.)
Handle adjustment (Fig. 4)
- Turn off the interlock switch and remove the key you are recharging the mower, stop recharging and disconnect the charging plug.
- Loosen the clamp nuts on the left and right side
- Fit the protrusion of the handle into one of three square holes according to your preference.
- Tighten the clamp nuts firmly to secure the handle.
CAUTION:
Always tighten the clamp nut on the left and right sides. Failure to do so may cause the handle to co loose unexpectedly during operation, resulting in serious injury to operator.
Wheel height adjustment (six steps between 25 mm and 89 mm) (Fig. 5)
- Turn off the interlock switch and remove the key: you are recharging the mower, stop recharging and disconnect the charging plug.
- Push the lever outward and fit it into one of the grooves for your desired cutting height. This one touch wheel height adjustment system can adjust all four wheels at the same time.
CAUTION:
Always make sure that the lever is fit in the groove properly before operation.
Installing or removing blade
WARNING:
• Always turn off the interlock switch and remove the key before installing or removing the blade. If you are recharging the mower, stop recharging and disconnect the charging plug.
- The blade coasts for several seconds after the switch is turned off. Always remove the blade after has come to a complete stop.
- Wear gloves.
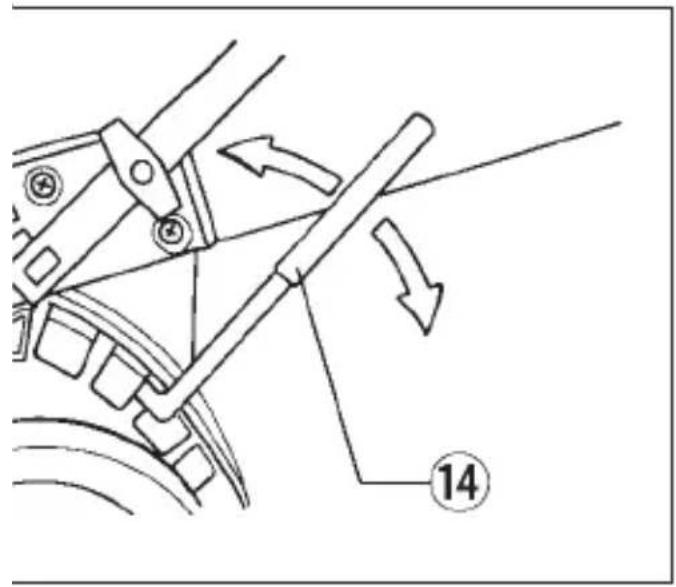
- Turn the mower on its side to expose the blade. ^3
-
Hold the blade holder with 32 mm wrench so that the other end of 32 mm wrench will contact the ^4 underside of mower deck. Hold the hex bolt with 13 mm socket wrench and turn it lightly counter clockwise until the 32 mm wrench is firmly held by the underside of mower deck. (Fig. 6)
-
To loosen the hex bolt, turn the 13 mm socket wrench counterclockwise while holding down its top. (Fig. 6)
-
Remove the hex bolt, cup spring and blade. Be sure to remember the removal procedures.
-
To installing the blade, follow the removal proce- v dures in reverse. Be careful not to install it upsid down. When installing the blade, always make a sure that the end of blade holder fits in the cup spring. (Fig. 7)
-
Tighten the hex bolt firmly with the wrenches provided. To tighten it, turn the 13 mm socket wrench clockwise while holding down its top. When doing so, the 32 mm wrench should be firmly held by the underside of mower deck. (Fig. 8)
WARNING:
Replace bent or damaged blade immediately. A bent or damaged blade may cause excessive vibration, resulting in damage to the mower or serious injury to operator.
Blade sharpening (Fig. 9)
Keep the blade sharp and clean for best performance. A dull blade does not cut grass cleanly and evenly. If may overload the motor and waste more battery energy.
-
Turn off the interlock switch and remove the key. I come you are recharging the mower, stop recharging and disconnect the charging plug.
-
Remove the blade as described in "Installing or removing blade".
-
Secure the blade in a vice or the like.
-
Carefully sharpen the cutting edges of the blade with a file or sharpening stone.
-
Check the balance of the blade as described in "Blade balancing".
-
Install the blade and secure it by tightening the hex bolt with the wrenches provided.
CAUTION:
- Wear gloves and safety glasses during sharpening.
• Make sure the blade remains balanced.
Sharpen the blade at the original cutting angle. - Sharpen the cutting edges on both end of blade, removing equal amounts of material from both ends.
Blade Balancing (Fig. 10)
When sharpening the blade, care should be taken to keep it balanced. An unbalance blade may cause excessive vibration, resulting in damage to the mower.
er. it Secure a screwdriver horizontally in a vice.
-
Place the center hole in the blade on screwdriver shank.
-
If the blade is balanced, it will remain in a horizon that tal position.
-
If either of the blade drops downward, sharpen the h heavy side until the blade is balanced.
Emptying rear bag (Fig. 11)
- ^by Release the switch lever.
- Turn off the interlock switch and remove the key.
- Open the rear guard.
- Hold the rear bag handle and remove the rear bag from the mower.
- Empty the grass from the rear bag.
The reduce risk of injury, inspect rear bag frequently and replace with recommended replacement if there are signs for wear or deterioration.
The reduce risk of injury, inspect rear bag frequently and replace with recommended replacement if there are signs for wear or deterioration.
The reduce risk of injury, inspect rear bag frequently and replace with recommended replacement if there are signs for wear or deterioration.
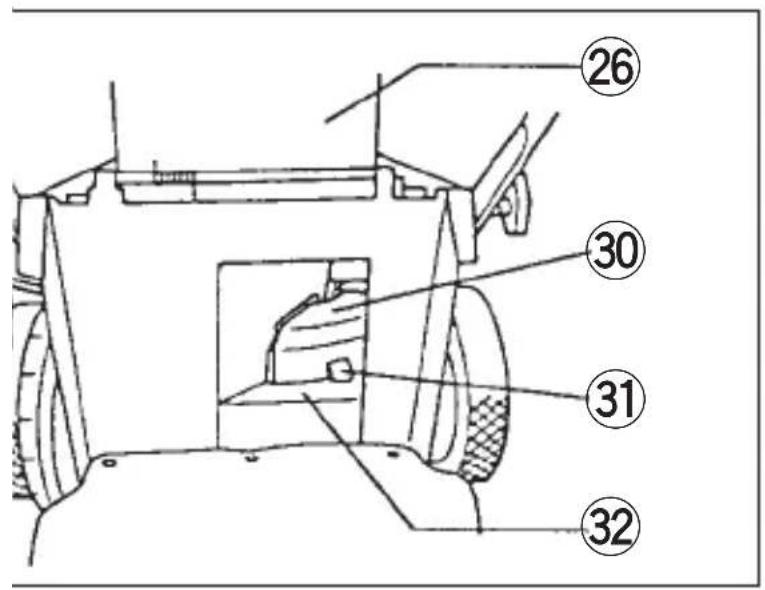
Installing mulching plate (Fig. 12 & 13)
Switch action (Fig. 14 & 15)
- Turn off the interlock switch and remove the key This mower is equipped with the interlock switch and you are recharging the mower, stop recharging handle switch. If you notice anything abnormal with and disconnect the charging plug. either of these switches, stop operation immediately
- Turn the mower on its side to expose the blade and have them checked by your nearest Makita
- Install the two protrusions of the mulching plate Authorized or Factory Service Center. into the holes in the deck. Push the mulching plate insert the key into the interlock switch. into the discharge opening until the hook of the 2. Slide the key to turn on the interlock switch. mulching plate is held by the undercover. Open 3. Depress the switch button. the rear guard and make sure that the hook of the Pull the switch lever toward you while depressing mulching plate is properly held by the undercover. the switch button.
WARNING:
Always install the mulching plate when operating the mower with the rear bag removed.
Mulching
While mulching, your new mower is designed to cut ^7 . the grass clippings into small pieces and distribute 8. them back into the lawn. Under normal conditions, the mulched grass will biodegrade quickly to provide nutrients to the lawn.
Please review the following recommendations for optimum mulching performance.
-
Avoid mowing when the grass is wet from rain dew. Wet grass may form clumps which interfere with the mulching action and reduce run-time. The best time to mow grass is in the late afternoon when the grass is dry and the newly cut area not be exposed to direct sunlight.
-
For best mulching performance, set the cutting height to remove about one third of the grass blade length, ideally no more than 38 mm at or time. If the lawn is overgrown, it may be necessary to increase the cut height to reduce the pushing effort and prevent overloading the motor. For extremely heavy mulching, it is advisable to first cut at a high cut height setting, and then re-cut the final cut height. Otherwise, make narrower cuts and mow slowly.
-
For best performance, keep the mower housing free of built-up grass. From time to time turn off mower and wait for the blade to come to a complete stop. Then unplug the key and turn mower on its side. Using an object such as a swipe out any accumulation of grass in the blade area. Be careful of the sharp edges of the blade Clean often in wet, spring grass, and always after every use.
-
Certain types of grass or grass conditions may require that an area be mulched a second time to fully disperse the grass throughout the lawn. If cutting a second time, it is advisable to cut perpendicular (across) the first cut pattern. DO NOT CHANGE CUT PATTERN IN ANY WAY THAT WOULD CAUSE MOWING DOWN A HILL.
-
Change your cutting pattern from week to week. This will help prevent matting and graining of the lawn.
-
Release the switch button as soon as the motor e starts running. The mower will continue to run until you release the switch lever.
- The indicator indicates remaining capacity of the battery only when the motor is running.
- Release the switch lever to stop the motor.
- When not in use, turn off the interlock switch and the remove the key. Store the key in a safe place out of reach of children.
Overload protector (Fig. 14)
This mower is equipped with an overload protector which automatically cuts out to break the circuit whenever heavy work is prolonged. When it cuts out, turn off the interlock switch and remove the key. The respect the blade for damage or something wrong. After making sure that there is nothing wrong with the will mower, push the restart button to resume operation.
Run time
Actual run time for your mower will vary depending on the season and grass conditions. Average run time on full charge is 75 minutes. The following chart provides approximate run times when using mower with a partial charge.
| to time on charge | % of full charge | Run time |
| 1 Hour | 25% | 20 Minutes |
| 3 Hours | 75% | 55 Minutes |
| 4 Hours | FULL | 75 Minutes |
- REMOVE KEY. Store it in a safe place out of reach of children.
- Clean your mower using only mild soap and a damp cloth. Do not spray or pour water on your mower when cleaning.
- Turn mower on its side and clean grass clippir that have accumulated on the underside of mo deck.
- Check all nuts, bolts, knobs, screws, fasteners, etc. for tightness.
- Inspect moving parts for damage, breakage, and wear. Have repairs made on any damaged or missing parts.
- Recharge the batteries to a full charge. Do not store mower with discharged batteries. Battery failure will occur in a very short time if mower is stored without having a full charge. We recommend that you charge batteries continuously while in storage and during the off season.
- Store mower indoors in a cool, dry place. Don't store the mower and charger in locations where the temperature may reach or exceed 40°C (104°F).
[Non-Text]
[Non-Text]
[Non-Text]
[Non-Text]
[Non-Text]
[Non-Text]
[Non-Text]
[Non-Text]
[Non-Text]
[Non-Text]
[Non-Text]
[Non-Text]
[Non-Text]
CAUTION:
Always be sure that charger is unplugged and disconnect charging plug from the mower before attempting to perform inspection or maintenance.
To maintain product safety and reliability, repairs, maintenance or adjustment should be carried out by Makita Authorized Service Center.
Recycling the batteries
CAUTION:
The product you have purchased contains a rechargeable battery. The battery is recyclable. At the end of its useful life, under various state and local laws, it may be illegal to dispose of this battery into the municipal waste stream. Check with your local solid waste officials for details in your area for recycling options or proper disposal.
GUARANTEE
the guarantee Makita machines in accordance with statutory/country-specific regulations. Damage attributable to normal wear and tear, overload or improper handling will be excluded from the guarantee. In case of complaint, please send the machine, undismantled,
with the enclosed GUARANTEE CERTIFICATE, to your dealer or the Makita Service Center.
[Non-Text]
[Non-Text]
[Non-Text]
[Non-Text]
[Non-Text]
FRANÇAIS
Descriptif
⑮ Gabelschlüssel 32 mm
⑯ Lösen
⑰ Sechskantschraube
⑱ Steckschlüssel 13 mm
⑲ Messerhalter
⑳ Messer
②1 Tellerfeder
⑳ Festziehen
[Non-Text]
[Non-Text]
[Non-Text]
[Non-Text]
[Non-Text]
[Non-Text]
[Non-Text]
[Non-Text]
[Non-Text]
[Non-Text]
Triturazione
VEILIGHEIDSVOORSCHRIFTEN VOOR ACCU'S EN ACCULADER
TIPS VOOR HET HANDHAVEN VAN
MAXIMALE PRESTATIE EN
ACCU-LEVENSDUUR
VEDLIKEHOLD & LAGRING
These accessories or attachments are recommended for use with your Makita machine specified in this manual. The use of any other accessories or attachments might present a risk of injury to persons. The accessories or attachments should be used only in the proper and intended manner.