
K2601 - Effect machine VELLEMAN - Free user manual and instructions
Find the device manual for free K2601 VELLEMAN in PDF.

| Product type | Wet and dry vacuum cleaner |
| Brand | Velleman |
| Model | K2601 |
| Power supply | 230 V ~ 50/60 Hz |
| Power consumption | 5 A |
| Rated power | 1200 W (max 1400 W) |
| Mains fuse | 10 A (time-lag) |
| Tank capacity | 18 L (solids), 11 L (liquids) |
| Airflow rate | 74 L/s |
| Suction pressure | 175 mbar |
| Dimensions (L x W x H) | 370 x 290 x 470 mm |
| Weight | Approx. 6 kg |
| Sound pressure level | 72 dB(A) |
| Cable length | 5 m |
| Accessory socket diameter | 35 mm and 60 mm |
| Filtration | Paper filter bag, flat pleated filter, hygienic microfilter |
| Main functions | Wet/dry vacuuming, automatic shut-off in liquid mode, filling indicator |
| Routine maintenance | Emptying tank, replacing filter bag, cleaning flat pleated filter, replacing microfilter |
| Safety | Protection class II, safety microswitch |
| Spare parts (ref.) | Paper filter bag (6.904-143), flat pleated filter (6.414-498), hygienic microfilter (6.904-143) |
| Warranty | According to conditions of the authorized Karcher dealer |
Frequently Asked Questions - K2601 VELLEMAN
User questions about K2601 VELLEMAN
0 question about this device. Answer the ones you know or ask your own.
Ask a new question about this device
Download the instructions for your Effect machine in PDF format for free! Find your manual K2601 - VELLEMAN and take your electronic device back in hand. On this page are published all the documents necessary for the use of your device. K2601 by VELLEMAN.
USER MANUAL K2601 VELLEMAN
natural_image
Icon showing an open book with a large lowercase 'i' symbol, representing information (no text or symbols present)
KARCHER
2601

KARCHER
2601 plus
English Operating Instructions Page 4
Please refer to the illustrations on the two fold-out pages at the front of this manual when reading the main text.
text_image
A H D C I E B G F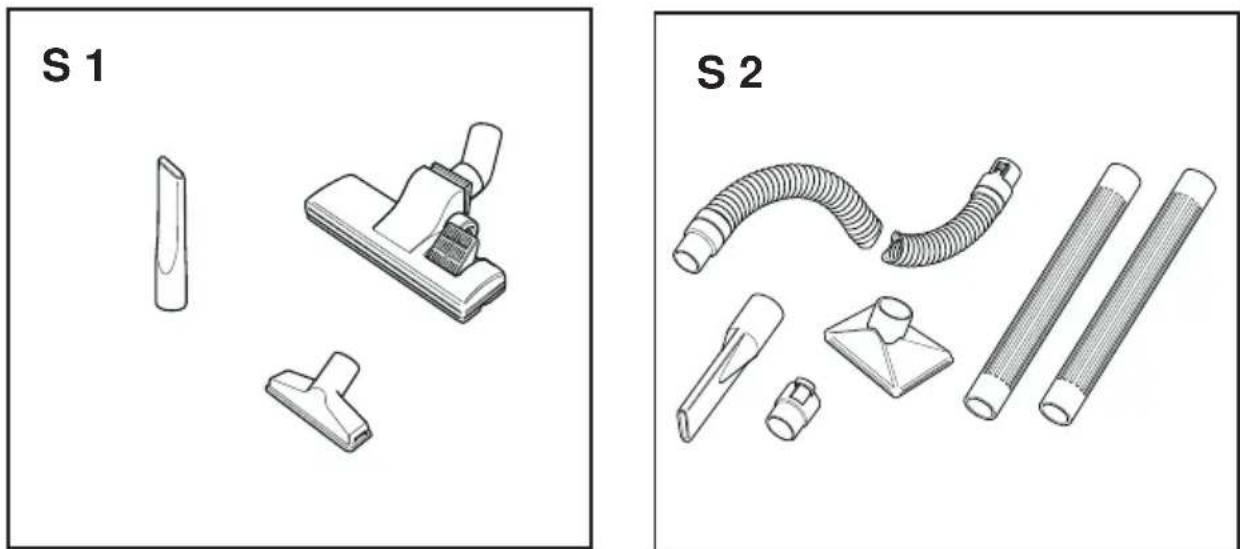
natural_image
Two technical diagrams labeled S1 and S2 showing various mechanical components including clips, connectors, and tubing (no text or symbols beyond labels)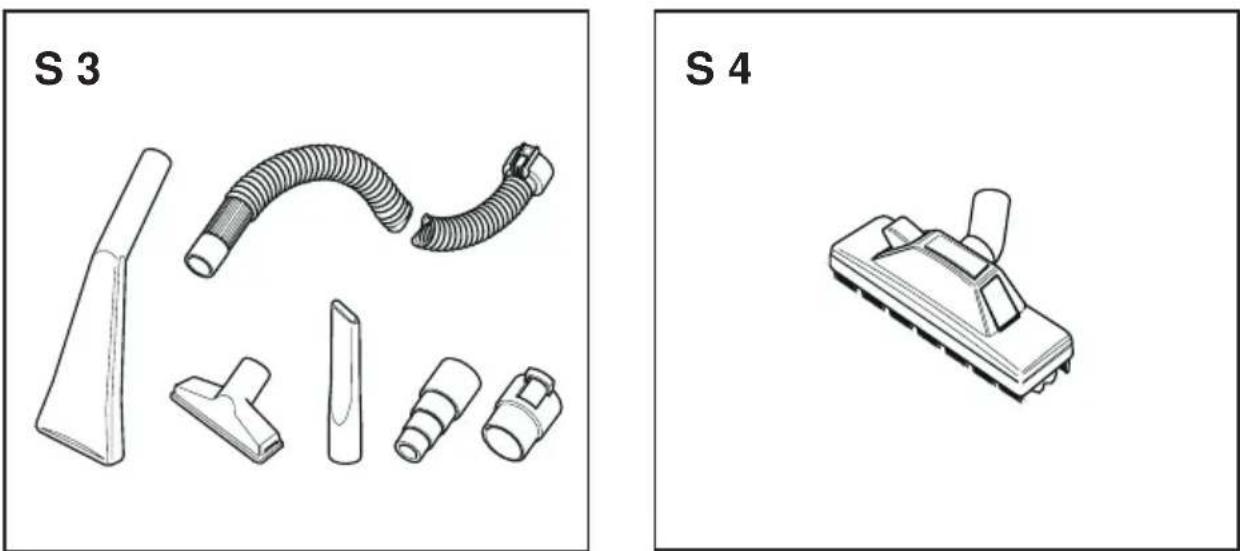
natural_image
Two technical diagrams labeled S 3 and S 4 showing various mechanical components (no text or symbols on the diagrams themselves)①
text_image
PUSH②
natural_image
Mechanical assembly diagram showing a lever mechanism with pulleys and a circular component (no text or symbols)③
natural_image
Technical line drawing of a mechanical component with three downward arrows indicating assembly or force (no text or symbols present)④

natural_image
Diagram of a mechanical component with directional arrows indicating rotation or movement (no text or symbols)5
natural_image
Technical line drawing of a mechanical component with a handle and base, showing a downward arrow indicating a process or assembly (no text or symbols present)⑥
natural_image
Diagram of a car's front panel showing valve and gear mechanism (no text or symbols)⑦
natural_image
Diagram of a mechanical device with directional arrows indicating movement or force (no text or symbols present)⑧
text_image
PUSH⑨
natural_image
Diagram of a car interior showing a door, seatbelt, and exhaust pipe (no text or symbols)10
natural_image
Illustration of two cleaning tools with brush and filter components, no text or symbols present11
natural_image
Technical line drawing of a vacuum cleaner with attached tool and pipe (no text or symbols)12
natural_image
Line drawing of a mechanical device with a lightning bolt and 'PUSH' label (no text or symbols beyond basic diagram)13
text_image
PUSH14
natural_image
Line drawing of a mechanical component with a screw and a warning symbol (no text or labels)15
text_image
X1 2.1 S1 2.2 S2 1.1 1.2 C1 M1This is your new vacuum cleaner
A Switching ON and OFF
B Carrying handle
C Storing accessories
D Storing the mains cable
E Turbine cover latch – release to clean/replace flat folding filter
F Fastening catch – undo to empty dirt box or replace paper filter bag
G Fastening catch – undo to empty the dirt box or replace the paper filter bag
H Filter level indicator Shows when the paper filter bag is full
I Replacing the hygienic microfilter
Special accessories
S1 Household Kit 2.638-510 Used for: Cleaning carpets, floors with hard surfaces and upholstery.
S2 Coarse-dirt Kit (∅ 60 mm) 2.637-945 Used for: Vacuuming coarse dirt in and around the house.
S3 Vehicle and Hobby Kit 2.638-204 Used for: Cleaning vehicles, in the hobby workshop and in the garage.
S4 Wet & Dry Nozzle 6.415-737 Used for: Picking up liquid substances on a flat surface.
S5 Adapter-Set * 2.420-015 Reducing adapter from 37 mm to 35 mm, enables use of accessories with ∅ 37 mm
* not illustrated.
Important information
For your safety
Before using this cleaner for the first time, read this user guide and pay particular attention to the contents of the enclosed brochure "Safety Information for Wet & Dry Cleaners" No. 5.956-249.
Using the cleaner for its correct purpose
This cleaner is intended for use
– as a wet and dry vacuum cleaner
– in a domestic environment, such as in the home, in a hobby workshop or with automobiles
– in accordance with the instructions given in this user guide and all safety information.
Using the cleaner for any other purpose is not approved and is considered incorrect. The manufacturer can not be held responsible for any damage resulting from the improper use of this cleaner; liability in such a case rests with the user.
On behalf of the environment
When unpacking the cleaner, do not dispose of the packaging materials as part of your domestic rubbish.
Take all packaging materials to a suitable collection point for recycling.
Warranty
The applicable warranty conditions in different countries are issued by the respective national distributor of KÄRCHER products. During the warranty period, any malfunctions of the cleaner caused by a material or manufacturing defect will be repaired free of charge.
In the event of a warranty claim, please take the cleaner and accessories, with proof of purchase, to your original dealer or to the nearest authorised customer service centre.
Preparing the vacuum cleaner for use
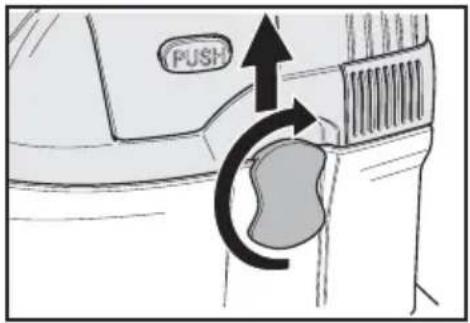
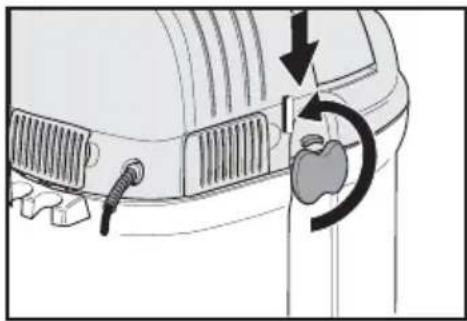
n Undo both catches (turn clockwise), and lift motor housing off dirt box. ①
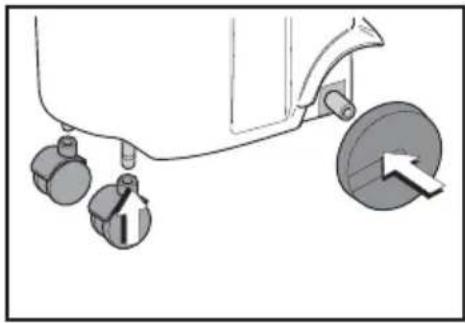
n Push both wheels into their mountings until they lock in place. ②
n Push both swivel casters into their mountings until they lock in place. ②
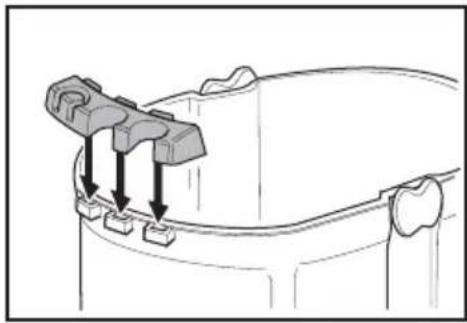
n Insert the accessories holder, ensuring that it locks in place. ③
For dry-vacuuming:
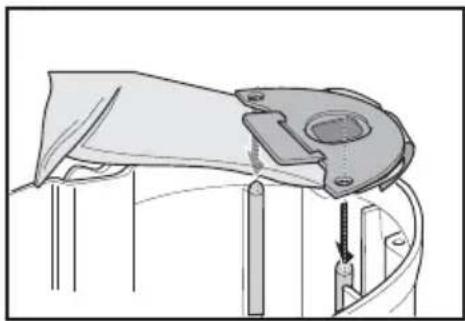
n Fit the paper filter bag. ④ ⑤
n Place the motor housing on the dirt box, and secure in place (turn catches anti-clockwise as far as they will go). ⑥
Attaching the accessories
n Insert the suction hose as far as possible until it locks in place.
n Join the extension tubes together, and attach them to the suction hose.
n Fit the nozzle onto the extension tube.
How to operate the vacuum cleaner
At the start of your work
n Check that the paper filter bag and the dirt box are not full.
n Insert the mains plug into a 230 V socket.
n Press the ON/OFF switch.
When work has finished
n Press the ON/OFF switch.
n Unplug cleaner from the mains electricity.
n Replace the paper filter bag or empty the dirt box, if required.
Examples of how to use the cleaner
Dry-vacuuming
Fine, dry dirt is best vacuumed with the paper filter bag fitted.
Note: Damage could be caused to the paper filter bag if any coarse or sharp objects are picked up by the cleaner.
Coarse, dry dirt can be vacuumed without a paper filter bag.
The paper filter bag is full when the indicator has turned red. ⑫
Wet-vacuuming
Always operate the cleaner with the paper filter bag removed.
n Empty dirt box so that no sludge is formed during cleaning.
When the dirt box is full, the cleaner switches off automatically.
n Press the ON/OFF switch, and empty dirt box.
These jobs must be carried out regularly
Emptying the dirt box
n With solids: no later than when the box is full.
n With liquids: no later than when the cleaner cuts out.
Note: After the cleaner has cut out, please set the ON/OFF switch to "0", otherwise the motor will start up again when the cleaner is opened.
n Undo both catches (turn clockwise), and lift motor housing off dirt box. ①
n Empty dirt box, rinse out if required, and dry the inside.
n Place the motor housing on the dirt box, and secure in place (turn catches anti-clockwise as far as they will go). ⑥
Replacing the paper filter bag
(Order no. 6.904-143)
n Switch OFF the cleaner.
n Undo both catches (turn clockwise), and lift motor housing off dirt box. ①
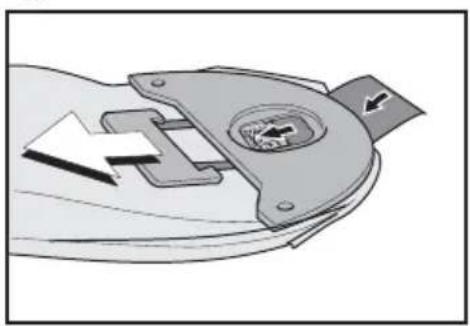
n Remove the paper filter bag from the dirt box and seal it. ⑦
n Fit a new paper filter bag. ④ ⑤
n Place the motor housing on the dirt box, and secure in place (turn catches anti-clockwise as far as they will go). ⑥
Replacing the hygienic microfilters
(Order no. 6.904-143)
The hygienic microfilter should be replaced whenever the paper filter bag is changed for the fifth time.
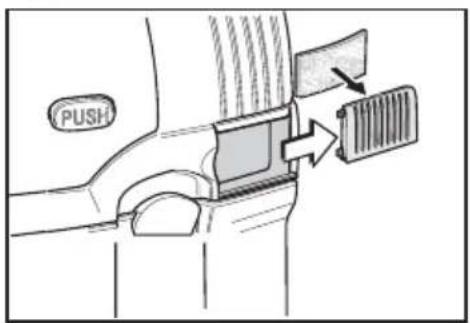
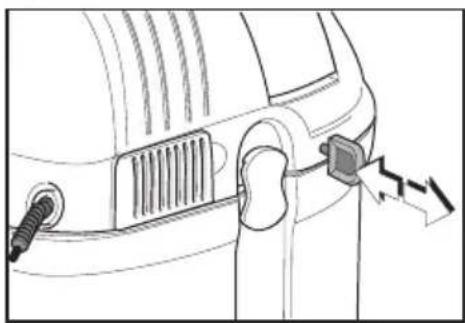
n Push the cover towards the rear.
n Insert the hygienic microfilter into the cover, and refit both together. ⑬
Cleaning the flat folding filter
Every now and then (depending upon amount of dirt):
n Switch OFF the cleaner.
n Pull on the knob for the filter shaker mechanism.
⑭
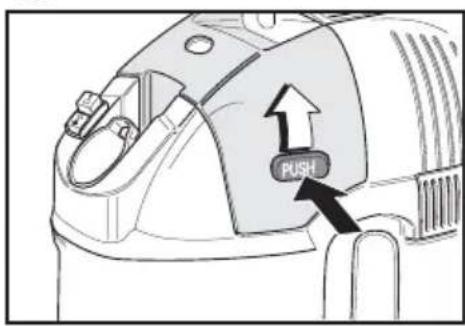
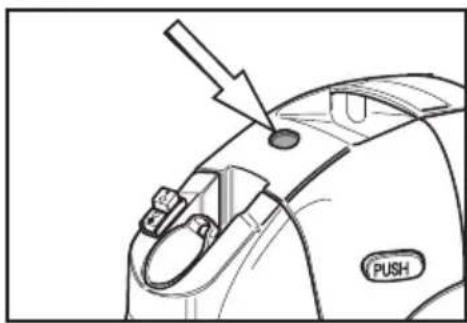
n Press button and open filter compartment. ⑧
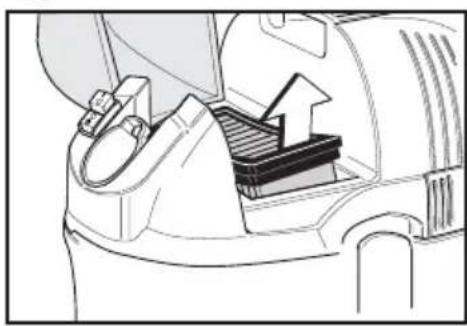
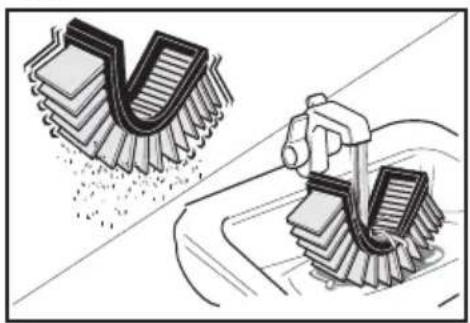
n Lift out the flat folding filter and knock of any dust, ⑨ or
n if the dirt can not be easily removed, clean the filter under running water, and leave to dry, ⑩ or
n if the dirt is particularly stubborn, replace the filter.
Checking/replacing the flat folding filter
(Order no. 6.414-498)
Check the flat folding filter regularly for damage. If any has occurred, you should replace the filter immediately, otherwise the motor could also be damaged.
n Switch OFF the cleaner.
n Press button, and open filter compartment. ⑧
n Replace flat folding filter, and close cover to filter compartment. ⑨
Checking and cleaning the accessories
n Check the nozzle, suction hose or extension tubes for blockages, and rinse out with water if required.
Storing the vacuum cleaner
n Switch OFF the cleaner.
If you have been using the cleaner for wet-vacuuming:
n Empty dirt box, and rinse out if required.
If the vacuum cleaner has taken in any sticky liquids:
n Rinse out the accessories.
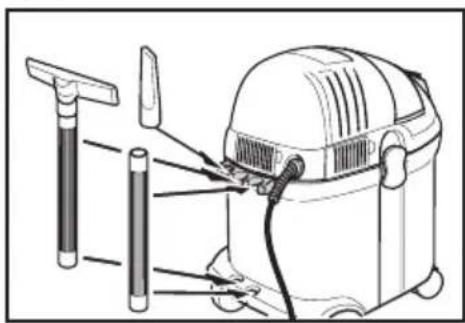
n Place the accessories in the holder on the cleaner. ⑪
n Wind up the mains cable, and lay it round the accessories.
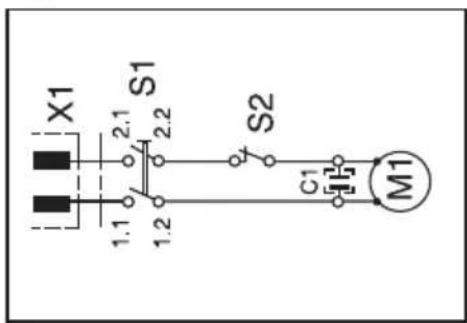
Circuit diagram ⑮
M1 Suction turbine
S1 Turbine switch
S2 Microswitch
X1 Plug
C1 Interference suppression capacitor
Technical information
Mains electricity supply 230 V single-phase, 50/60 Hz
Current consumption 5 A
Mains fuse (slow) 10 A
Power (suction turbine) P 1400 Watt P_nom 1200 Watt
Air volume 74 L/sec
Vacuum 175 mbar
Overall capacity 18 L
MAX. capacity for liquids 11 L
Length 370 mm
Width 290 mm
Height 470 mm
Weight approx. 6 kg
Attachment size for accessories 35 mm + 60 mm
Noise level 72 dB(A)
Protection class II
Connecting cable Type H 05 VV - F 2x1
Length 5 m
Order no. GB 6.959-246 AUS 6.959-245
Troubleshooting guide
| Problem | Possible cause | Remedy |
| Cleaner does not start up. | No electricity supply. | Check fuse, cable, plug and socket and, if required, have them replaced by a qualified electrician. |
| Cleaner switches off. | During wet-vacuuming:Too much liquid in dirt box, cleaner switches off automatically. | Press ON/OFF switch, empty dirt box. |
| Reduced suction power. | Clogged paper filter bag or flat filter, or blockage in nozzle, suction hose or extension tube. Level indicator on "red".Paper filter bag or dirt box are full.Flat folding filter is not fitted properly, or is missing altogether. | Check, and clean if required.Replace paper filter bag or empty dirt box.Refit flat folding filter properly. |
| Dust is expelled during vacuuming. | Suction hose is not attached properly.Flat folding filter is not fitted properly, is defective or is missing altogether. | Attach suction hose properly.Refit flat folding filter properly or replace. |
| During wet-vacuuming:Water leaks out. | Sticking float.Defective float switch. | Arrange for dealer to inspect. |
If none of the above-mentioned remedies resolves the problem, please contact your nearest Kärcher service centre, where they will be pleased to provide further assistance.
E Deksellås – flate/foldefilter rengjøring/skifting
(89/336/EWG) i.d.F. 93/31/EWG
EU Declaration of Conformity
We
Alfred Kärcher GmbH & Co. D-71349 Winnenden
hereby declare that the machine described below both in its basic design and construction and in the version marketed by us conforms to the relevant safety- and health-related requirements of the appropriate EU Directives.
This declaration shall cease to be valid if modifications are made to the machine without our approval
Product: Wet/dry vacuum cleaner
Model: Kärcher 2601
Technical Data: 230 V AC 50/60 Hz
Serial number:
(see rating plate; to be entered by customer)
Applicable EU Directives:
EU Machinery Directive (89/392/EU) in version 93/44/EU
EU Low-Voltage Equipment Directive (73/23/EU)
EU Directive on Electromagnetic Compatibility (89/336/EU) in version 93/31/EU
Harmonised standards applied:
DIN EN 292-1
DIN EN 292-2
DIN EN 55 014
DIN EN 55 104
DIN EN 60 555
DIN EN 60 335-1
DIN EN 60 335-2-2
National standards applied:
It is ensured through internal measures that series-production units conform at all times to the requirements of current EU Directives and relevant standards.

6975 Creditview Road, Unit 2
Mississauga, Ontario L5N 8E9
(905) 672 98 23
CH
Kärcher AG
Industriestraße 16
8108 Dällikon
0844 850 863
CZ
Kärcher spol.s.r.o.
Za Mototechnou 1114/4
155 00 Praha 5 -Stodúlky
0235 521 665
D
Banbury, Oxon, OX16 1TB
01295 / 752000; 09066 / 800632
GR
Kärcher Cleaning Systems A.E.
31-33, Nikitara str. &
Konstantinoupoleos str.
136 71 Acharnes
210 - 23 16 153
H
Kärcher Hungária Kft
Tormásrét ut 2.
2501 Biatorbagy
23 / 530-640
HK
Kärcher Ltd.
Unit 10, 17/F., APEC Plaza
49 Hoi Yuen Road,
Kwun Tong, Kowloon
2357 5863
|
Kärcher S.p.A.
Via Elvezia 4
21050 Cantello (VA)
03 32 / 848 - 99 88 77
IRL
Karcher Limited
12 Willow Business Park
Nangor Road
Clondalkin
Dublin 12
01 / 409 77 77
J
Kärcher (Japan) Co., Ltd.
Irene Kärcher Building
No.2, Matsusaka-Daira 3-chome
Taiwa-cho, Kurokawa-gun
Miyagi, 981-3408
022 / 344 3140
MAL
Karcher Cleaning Systems Sdn. Bhd.
8 Jalan Serindit2
Bandar Puchong Jaya
47100 Puchong, Selangor
5882 1148
MEX
Karcher México, SA de CV
East Tamaki, Auckland
09 / 274 46 03
P
Neoparts Com. e Ind. Automóvel, Lda.
Kärcher Poland Ltd. Sp. z o.o.
Ul. Stawowa 140
31-346 Kraków
012/6397222
PRC
BKC Equipment Co., Ltd.
No 16, Honda Beilu
Beijing Economic and Technological Area
Beijing 100176
010/67881653
S
Kärcher AB
Tagenevägen 31
42502 Hisings-Kärra
031-577300
SGP
Karcher Asia Pacific Pte Ltd
30 Toh Guan Road Singapore
07-05 ODC Building
Singapore 608840
6897 1811
TR
Kärcher Servis Ticaret A.S.
9 Eylül Mahallesi
307 Sokak No. 6
Gaziemir / Izmir
0232 / 252 07 08
TWN
Karcher Taiwan Limited
5F/6. No.7
Wu-Chuan 1st Rd
Taipei County, Taiwan R.O.C
2 2299 9626
UAE
Karcher FZE
Jebel Ali Free Zone
RA 8, XB 1, Jebel Ali, Dubai
04 / 8836 776
USA
Alfred Karcher, Inc
2170 Satellite Blvd, Suite 350
Duluth, GA 30097
678-935-4545; 877-527-2437
ZA
Kärcher (Pty) Ltd.
P.O. Box 11818
Vorna Valley 1686
011/4662434

KÄRCHER
www.karcher.com
07/03