BSGL5319 AQPA - Vacuum Cleaner BOSCH - Free user manual and instructions
Find the device manual for free BSGL5319 AQPA BOSCH in PDF.
Download the instructions for your Vacuum Cleaner in PDF format for free! Find your manual BSGL5319 AQPA - BOSCH and take your electronic device back in hand. On this page are published all the documents necessary for the use of your device. BSGL5319 AQPA by BOSCH.
USER MANUAL BSGL5319 AQPA BOSCH
Register your n www.bosch-hom
he mains socket must be protected by at least a 16
mp circuit breaker. If a circuit breaker is tripped when you switch on the vacuum cleaner, this may be because other electrical appliances which have a high current draw are con- nected to the same power circuit. To prevent the circuit breaker from tripping, select the lowest power setting before switching the appli- ance on, and increase the power only once it is run-
ing. Disposal information Packaging The packaging is designed to protect the vacuum
leaner from being damaged during transportation. It is made of environmentally friendly materials and can therefore be recycled. Dispose of packaging that is no longer required at an appropriate recycling point. Old appliance Old appliances still contain many valuable materials. Therefore, please take appliances that have reached the end of their service life to your retailer or recy- cling centre so that they can be recycled. For current disposal methods, please enquire at a retailer or your local council. Disposal of filters and dust bags Filters and dust bags are manufactured from envi- ronmentally friendly materials. Provided they do not contain substances that are not permitted in house- hold waste, you can dispose of them with your nor- mal household waste. Notes on the energy label This vacuum cleaner is a general purpose vacuum cleaner. To achieve the declared energy efficiency and cleaning performance class on carpet and hard floor, please use the interchangeable universal nozzle. The values provided on the energy label have been determined according to the prescribed measuring process (in accordance with EN60312-1). Plastic bags and films must be kept out of the reach of children before disposal. => Risk of suffocation. Proper use Only connect and use the vacuum cleaner in accor-
ance with the specifications on the rating plate. Never vacuum without the dust bag or dust contain- er, motor protection or exhaust filter. => This may damage the vacuum cleaner. Always keep the vacuum cleaner away from your head when using nozzles and tubes. => This could cause injury!
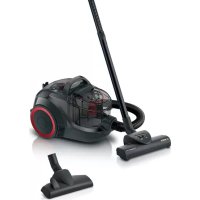
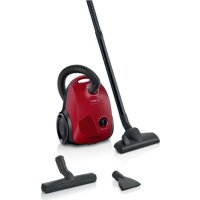
Congratulations on your purchase of a Bosch vacuum
leaner from the GL50 product series. This instruction manual describes various GL50 models, which means that some of the equipment features and functions described may not apply to your model. You should only use original Bosch accessories, which have been specially developed for your vacuum cleaner, to achieve the best possible vacuuming results.
old out the picture pages. Your vacuum cleaner 1 Adjustable floor tool with locking collar* 2 Hard-floor tool with locking collar* 3 TURBO-UNIVERSAL® brush for floors* 4 Telescopic tube with adjusting sleeve (and locking collar)* 5 Handle 6 Flexible hose* 7 Dust bag change indicator* 8 ON/OFF button 9 Parking aid 10 Power cord 11 Exhaust grille (corresponds to one of the two variants shown)* 12 Upholstery nozzle* 13 Crevice nozzle* 14 Accessories compartment 15 Dust bag 16 Motor protection filter, washable* 17 Exhaust filter* 18 Storage aid (on underside of unit) 19 Carrying handle 20 Dust bag compartment lid 21 “Animal”* turbo nozzle 22 Pet hair upholstery tool* Replacement parts and special accessories A Dust bag To get the most out of your appliance, we recommend using PowerProtect genuine replacement bags (BBZ41GALL). Contents: - 4 dust bags with fasteners - 1 micro-hygiene filter
hat can only achieve its best cleaning results using
enuine dust bags. Only if high-quality dust bags are used, such as genuine Bosch dust bags, can the figures specified on the EU energy label pertaining to energy efficiency class, suction and dust retention capacity be achieved. Additionally, using inferior quality dust bags (e.g. paper bags) can have a significant impact on the
ervice life and performance of your appliance.
arranty claims can only be made if genuine Bosch dust bags are used. For more information and to order genuine Bosch dust bags, go to www.bosch-home.com/dust-bag
Hepa filter BBZ154HF Additional filter for cleaner exhaust air. Recommended for allergy sufferers. Replace once a year. C TURBO-UNIVERSAL® brush for upholstery BBZ42TB All in one brushing and vacuuming of upholstered furniture, mattresses, car seats, etc. Especially suit- able for picking up pet hair. The brush roller is dri- ven by the air flow through the vacuum cleaner. No separate electrical connection is needed. D TURBO-UNIVERSAL® brush for floors BBZ102TBB All-in-one brushing and vacuuming of rugs and car- pets, and for all floor coverings. Particularly suitable for vacuuming up pet hair. The brush roller is driven by the air flow through the vacuum cleaner. No separate electrical connection is needed. E Hard floor tool BBZ123HD For vacuuming hard floors (parquet, tiles, terracotta, etc.) F Bionic filter BBZ11BF Combats unpleasant odours over a long period Please replace the filter once it begins to lose its effect (after approx. 1 year) Ordering code: 468637 Before using for the first time Figure ● Push the handle onto the flexible hose and lock it in place. Figure ● Open the accessories compartment. ● Insert the crevice nozzle and upholstery nozzle in the accessories compartment in the appliance lid. ● Close the accessories compartment.
Open the dust bag compartment lid. Figure ● Remove the motor protection filter from the appliance. ● Place the Bionic filter onto the motor protection filter. ● Push the filters into the appliance and close the dust bag compartment lid. Initial use
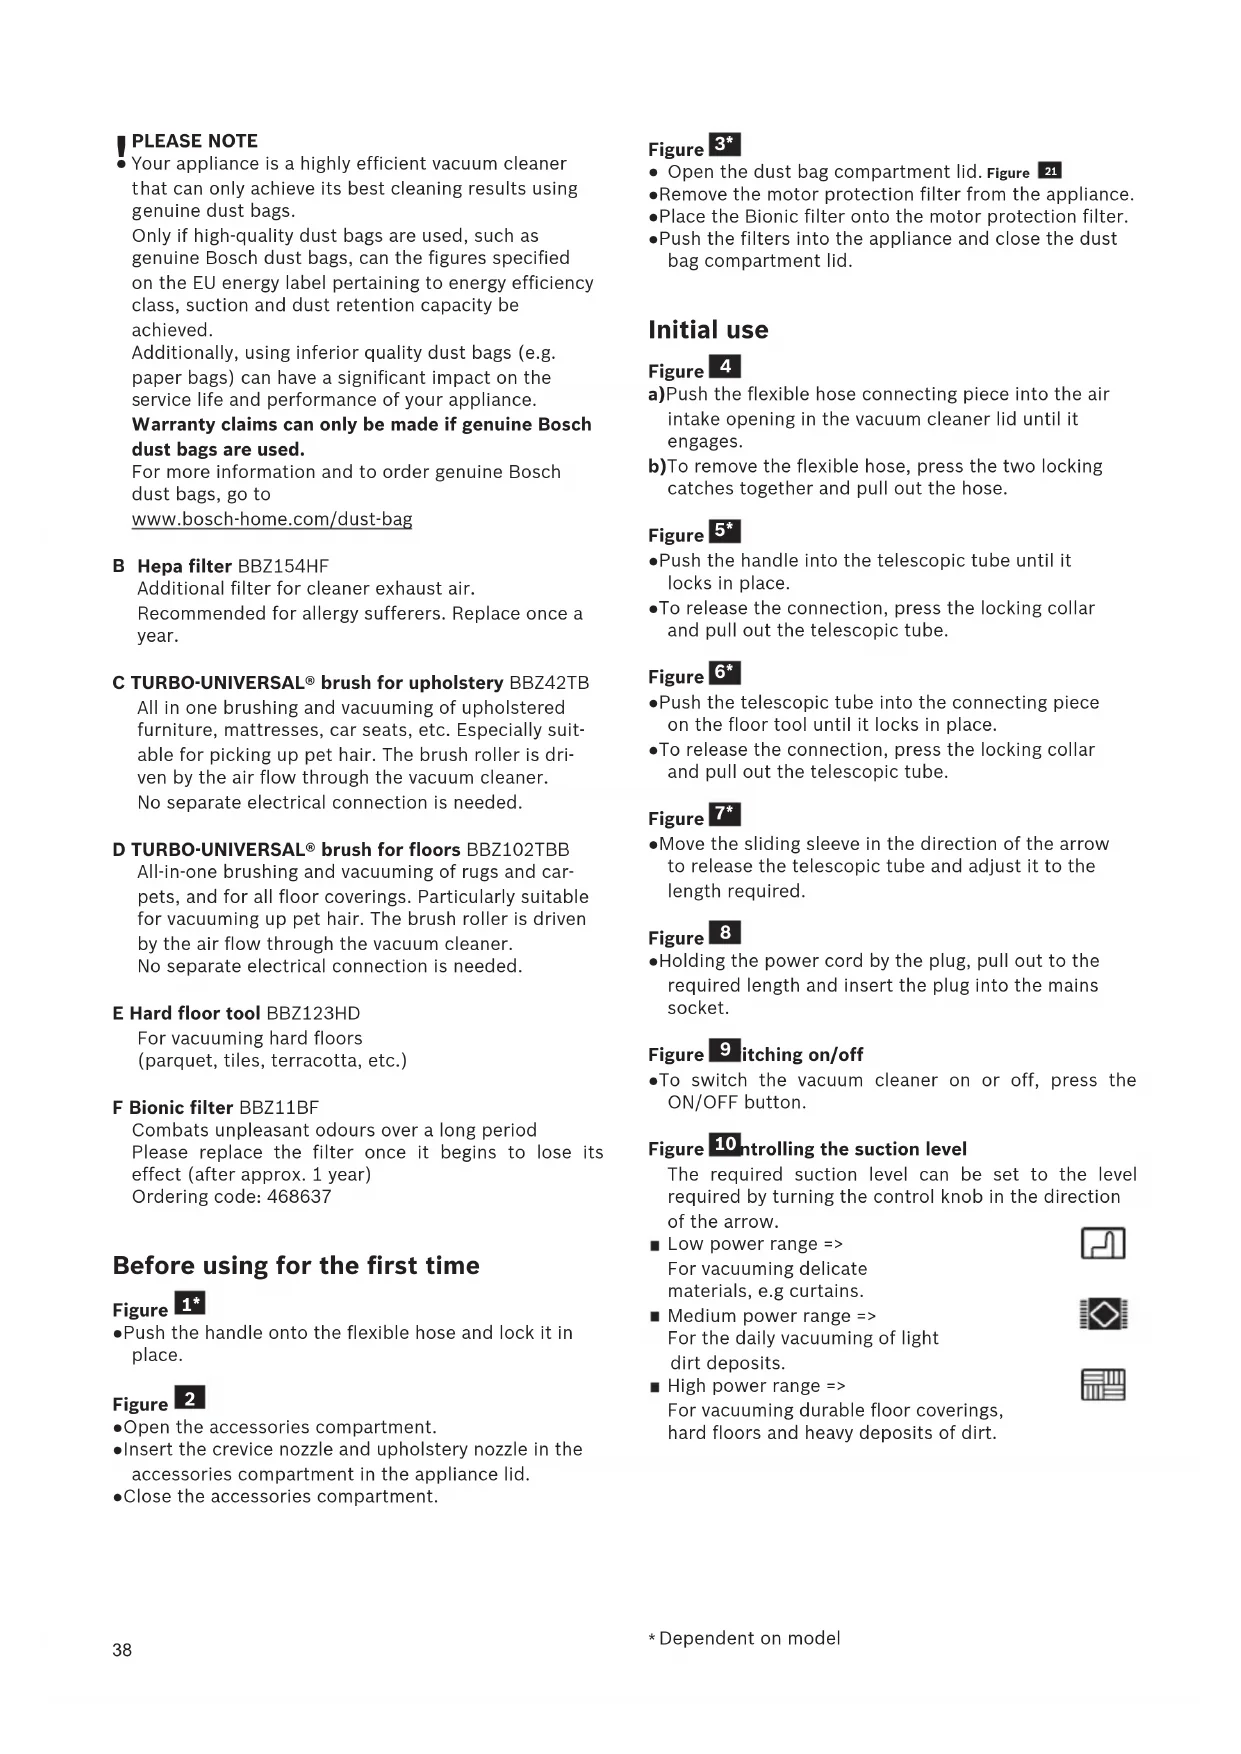
igure a)Push the flexible hose connecting piece into the air intake opening in the vacuum cleaner lid until it engages. b)To remove the flexible hose, press the two locking catches together and pull out the hose. Figure ● Push the handle into the telescopic tube until it locks in place. ● To release the connection, press the locking collar and pull out the telescopic tube. Figure ● Push the telescopic tube into the connecting piece on the floor tool until it locks in place. ● To release the connection, press the locking collar and pull out the telescopic tube. Figure ● Move the sliding sleeve in the direction of the arrow to release the telescopic tube and adjust it to the length required. Figure ● Holding the power cord by the plug, pull out to the required length and insert the plug into the mains socket. Figure Switching on/off ● To switch the vacuum cleaner on or off, press the ON/OFF button. Figure Controlling the suction level The required suction level can be set to the level required by turning the control knob in the direction of the arrow. Low power range => For vacuuming delicate materials, e.g curtains. Medium power range => For the daily vacuuming of light dirt deposits. High power range => For vacuuming durable floor coverings, hard floors and heavy deposits of dirt.
Dependent on model Vacuuming
Please note: Depending on the type of hard floor involved (e.g. rough rustic tiles), floor tools are subject to a certain amount of wear. Therefore, you must check the
nderside of the floor tool at regular intervals. Worn undersides of floor tools may have sharp edges that can damage sensitive hard floors, such as parquet or linoleum. The manufacturer does not accept any responsibility for damage caused by worn floor tools.
djusting the floor tool: Rugs and carpets => Hard floors => Figure
Remove the crevice nozzle or upholstery nozzle from the accessories compartment in the appliance lid. Figure Vacuuming with accessories Attach the nozzles to the suction pipe or handle as required: a)Crevice nozzle for vacuuming crevices and corners, etc. b)Upholstery nozzle for vacuuming upholstered furniture, curtains, etc. c)Hard-floor tool For vacuuming hard floor coverings (tiles, parquet flooring, etc.) ● Push the telescopic tube into the connecting piece of the hard floor tool until it locks in place. ● To release the connection, press the locking collar and pull out the telescopic tube. Figure Professional upholstery nozzle ● For intensive cleaning of upholstered furniture (attach to the handle or suction pipe, depending on requirements). ● To clean the professional upholstery nozzle, simply vacuum it using the handle. Figure ● After use, place the crevice or upholstery nozzle back into the accessories compartment in the appliance lid. Turbo brush If your appliance is equipped with a turbo brush, consult the accompanying instruction manual for instructions on its use and maintenance. Figure ● You can use the parking aid on the back of the appliance if you wish to stop vacuuming for a short time. ● Once you have switched off the appliance, slide the hook on the floor tool into the recess on the rear of the appliance.
Figure To overcome obstacles, e.g. steps, the appliance can also be carried by the handle on the appliance body. When the work is done Figure ● Pull out the mains plug. ● Tug the power cord briefly and then let go (the power cord retracts automatically).
igure ● To store or transport the appliance, you can use the storage aid on the underside of the appliance. ● Stand the appliance up on its end. Slide the catch on the floor tool into the groove on the underside of the appliance. Changing the filter
Please note: Always switch off the appliance before changing the filter. Replacing the bag Figure a)If the dust bag change indicator lights up red continuously when the floor tool is lifted from the floor and the highest power setting has been selected, the dust bag must be changed, even though it may not yet be full. Even if the dust bag is not full, it may still need changing, due to the type of dust which has been vacuumed. First check that the nozzle, suction pipe and flexible hose are not blocked, as this would also lead to the dust bag change indicator being triggered. b)The handle can easily be detached from the hose to remove blockages. Figure Opening the lid ● Open the lid by moving the locking lever in the direction of the arrow. Figure a)Seal the dust bag by pulling the sealing plate, and remove the bag. b)Slide the new dust bag into the holder up to the stop.
Please note: the lid will only close if a dust bag has been inserted.
GA 9000 953 375_BSGL5_GL50 13.05.2014 15:08 Seite 3940 Cleaning the motor protection filter The motor protection filter should be cleaned regularly by tapping out the dirt and rinsing. Figure ● Open the dust bag compartment lid. Figure
Remove the motor protection filter from the appliance in the direction of the arrow. ● Disconnect the motor protection filter from the Bionic
ilter.* ● Clean the motor protection filter by tapping out the dirt. ● If it is very dirty, the motor protection filter should be rinsed. The filter must then be left to dry for at least
Please note: the Bionic filter must not come into contact with water, as this will adversely affect the
orrect operation of the filter. ● After cleaning, place the Bionic filter onto the motor protection filter as necessary and push both filters into the appliance. ● Close the dust bag compartment lid. Replacing the Bionic filter If your appliance is equipped with a Bionic filter, it should be replaced once it begins to lose its effect (after approx. 1 year). Figure ● Open the dust bag compartment lid. Figure ● Remove the motor protection filter together with the Bionic filter from the appliance. ● Remove the old Bionic filter from the motor protection filter and dispose of it. ● Place the Bionic filter onto the motor protection filter. ● Push the filters into the appliance and close the dust bag compartment lid. ● The motor protection filter must also be inserted into the appliance if you no longer wish to use the Bionic filter Replacing the exhaust filter Replacing the micro-hygiene filter This should be replaced with every replacement filter pack. Figure ● Open the dust bag compartment lid. Figure ● Release the filter holder by turning the locking lever in the direction of the arrow. ● Remove the micro-hygiene filter. Insert the new micro-hygiene filter into the appliance. ● Insert the filter holder in the appliance and lock it in place.
Dependent on model Replacing the HEPA filter If your vacuum cleaner is equipped with a HEPA filter, this should be replaced once a year. Figure
Open the dust bag compartment lid. Figure ● Unlock the Hepa filter by turning the locking lever in the direction of the arrow and remove the filter from the appliance. ● Insert the new HEPA filter and lock it in place.
f you have vacuumed up fine dust particles, clean the
otor protection filter and, if necessary, replace the micro-hygiene filter or HEPA filter. Care Always switch off the vacuum cleaner and disconnect it from the mains before cleaning the vacuum cleaner. The vacuum cleaner and plastic accessories can be cleaned with a commercial plastic cleaner.
Do not use abrasive agents, glass or all-purpose cleaning products. Never immerse the vacuum cleaner in water. If necessary, the dust compartment can be cleaned with a second vacuum cleaner or simply wiped with a dry cloth or dusting brush. Subject to technical modifications.
2QOLQH$XIWUDJVVWDWXV)LOWHUEHXWHO
(XURSHDQ7UDGH&HQWHU%XLOGLQJ
PDLOWRFKHUVDW]WHLO#EVKJFRP
ZZZERVFKKRPHFRP CY Cyprus, ȀȪʌȡȠȢ
%6+,NLDNHV6\VNHYHV6HUYLFH
(JRPL1LNRVLD/HINRVLD
PDLOWR&$8%RVFK#EVKJFRP
GR Greece, ǼȜȜȐȢ %6+,NLDNHV6LVNHYHV$%(
%6++RPH$SSOLDQFHV/LPLWHG
PDLOWRDONDWUHV]UHQGHOHV#EVKKX
ZZZERVFKKRPHFRPKX IE Republic of Ireland
0D0DDGKHOL0DMHHGKHH0DJX
PDLOWREVKQ]FV#EVKJFRP
((waste electrical and electronic equipment - WEEE
Register your n www.bosch-hom