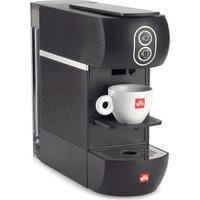
Y3 Iperespresso - Coffee machine ILLY - Free user manual and instructions
Find the device manual for free Y3 Iperespresso ILLY in PDF.
User questions about Y3 Iperespresso ILLY
0 question about this device. Answer the ones you know or ask your own.
Ask a new question about this device
Download the instructions for your Coffee machine in PDF format for free! Find your manual Y3 Iperespresso - ILLY and take your electronic device back in hand. On this page are published all the documents necessary for the use of your device. Y3 Iperespresso by ILLY.
USER MANUAL Y3 Iperespresso ILLY
GENERAL MACHINE OPERATING RULES 18
TECHNICAL SPECIFICATIONS 18
Safety devices 18
IMPORTANT SAFETY MEASURES. 18
MACHINE PARTS 20
Starting the appliance/heating 21
Power saving function 21
Rinsing of internal circuits. 22
Using cups. 22
MAKING COFFEE 23
Programming the coffee temperature 24
Programming the delivery volume 25
Maintenance 26
REPAIRS 26
CLEANING 26
DESCALING 27
PROBLEM - CAUSE - SOLUTION 29
WASTE DISPOSAL 31
Packaging 31
GENERAL MACHINE OPERATING RULES
Before using this coffee machine, read the manual carefully and keep it safely for future reference.
The use and maintenance manual ensures that the appliance is used safely in an informed manner and also describes all its functions. Bear in mind that good and especially safe operation of the machine also depends on knowledge of the appliance and correct maintenance over time.
The manufacturer declines any and all responsibility in the event of incorrect use in relation to the information provided, as well as adaptations, modifications or repairs that are improvised or not performed by qualified personnel. Such incorrect use will render the warranty provided for the device null and void.
If faults or manufacturing defects are found on the appliance, contact the point of sale where the it was purchased together with the receipt.
TECHNICAL SPECIFICATIONS Mod.626
Power supply voltage: 220-240 V / 50-60 Hz
Pump: 48 W / 230 V CL. F NSF BAR 20
Appliance power: 800 W
Length of power cable: 1m
Tank capacity: 11
Power saving function
Safety devices
Safety thermal fuse
IMPORTANT SAFETY MEASURES
- Place the coffee machine on a flat, dray and stable surface suitable for withstanding weight and heat away from sources of water and heat.
- Do not place it on top of other household appliances (washing machines, dishwashers, refrigerators, etc.).
- Never set it up or leave it outside.
Avoid risks of electrical shocks and fires:
- Connect the coffee machine exclusively to a suitable mains connections complete with an earth/ground connection. Check that the voltage shown on the appliance's ID plate matches the power supply voltage.
- Never use an appliance if the cable or plug is damaged, after a machine malfunction or after damage of any kind. Contact authorised service centres to check, repair or verify correct operation.
- If the power cable is damaged, it must only be replaced by the manufacturer or an authorised service centre.
- Never pass the power cable around corners or over sharp edges. Keep it away from sources of heat and moisture.
- To avoid damage, never place the coffee machine next to or on warm shelves (heaters, cooking tops, gas burners, etc.).
- If the appliance is not to be used for long periods, disconnect it from the power supply.
- To avoid damage, disconnect the coffee machine by pulling on the plug and not on the power cable; never carry the appliance by holding it with the power cable.
- Never touch the power cable with wet hands.
- Do not expose the machine to jets of water or immerse partially or completely in water. Water in the presence of electricity is a source of danger and may cause electric shocks.
- Never implement any technical modifications to the coffee machine.
Always unplug the power cable from the power socket:
- Before removing or inserting the water tank.
To fill the tank with water. - When the appliance is not to be used for an extended period of time.
If the machine is faulty. - Before cleaning the appliance.
Avoid risks during operation:
-
This coffee machine is intended to be used in domestic and similar applications, such as:
-
in cooking areas reserved for personnel in shops, offices and other professional environments;
on holiday farms; -
use by guests in hotels, motels and other residential venues;
-
in contexts such as bed and breakfast accommodation.
-
Exclusively use this coffee machine as described in these instructions.
-
This appliance may be used by children over the age of 8 years if supervised by adults or instructed about safe use and provided they are aware of the risks entailed. Keep the appliance and the power cable out of reach of children.
- Make sure that no child is able to play with this coffee machine by leaving it within reach.
- This appliance can be used by people with reduced physical, sensory or mental capacities or with insufficient experience and/or skills provided they are supervised or instructed how to use the appliance safely and are aware of the risks entailed.
- Steam and hot water can cause scalds/burns! Never insert your fingers under the coffee dispenser while the machine is operating.
- Always re-close the lever and do not open it while the appliance is delivering coffee. Risk of scalds/burns.
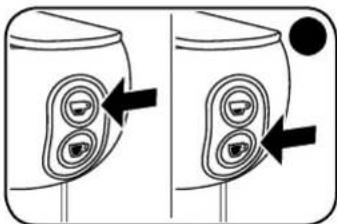
- Do not insert your fingers inside the E.S.E. coffee pod holder. Risk of injury.
- Do not use damaged or deformed E.S.E. coffee pods. This could damage the appliance.
- Do not use the coffee machine without the drip tray to avoid leaks of liquid.
Avoid damaging the machine:
- Fill the tank exclusively with drinking water; never use sparkling water or other liquids.
- To prevent no-load operation of the pump and overheating, always make sure that the tank contains sufficient water before starting the appliance.
CAUTION:
We accept no responsibility/ liability for any damage caused by:
- Incorrect use that does not comply with the intended purposes;
- Repairs not performed by authorised service centres;
- Tampering with the power cable;
- Tampering with any machine component;
- The use of non-original spare parts and accessories;
In such cases, the warranty will be null and void.
EN
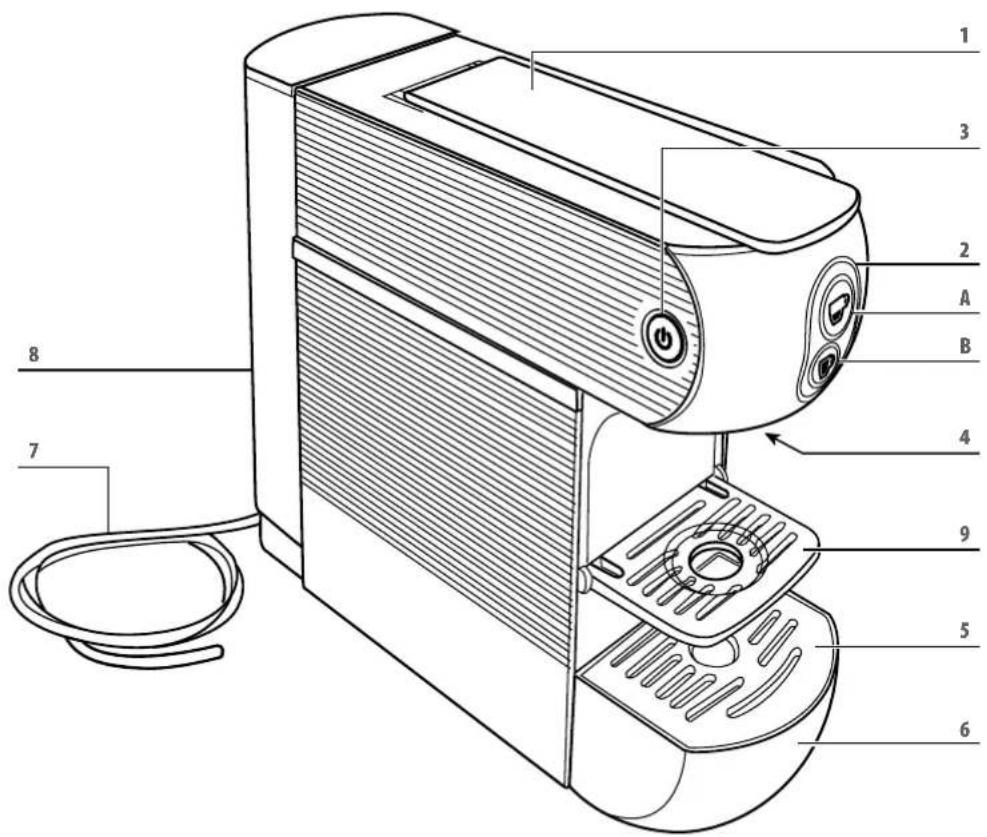
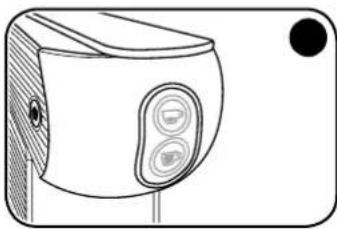
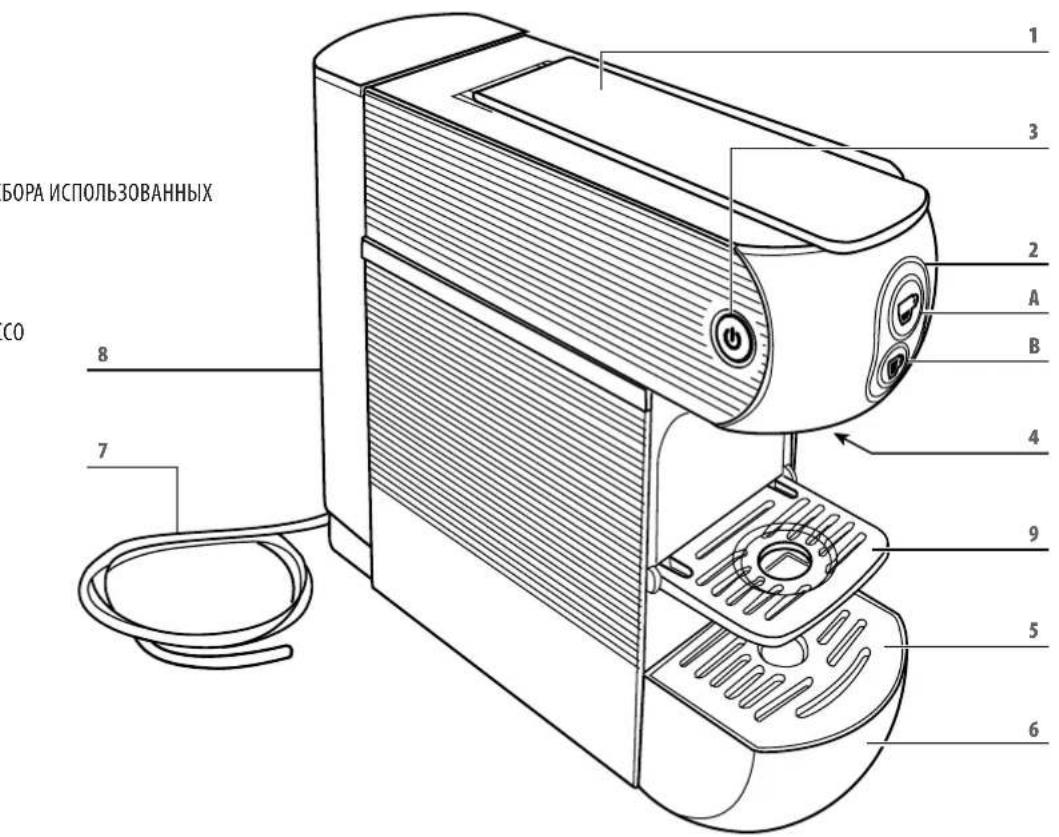
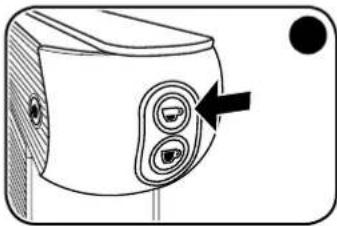
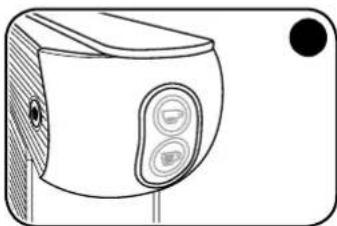
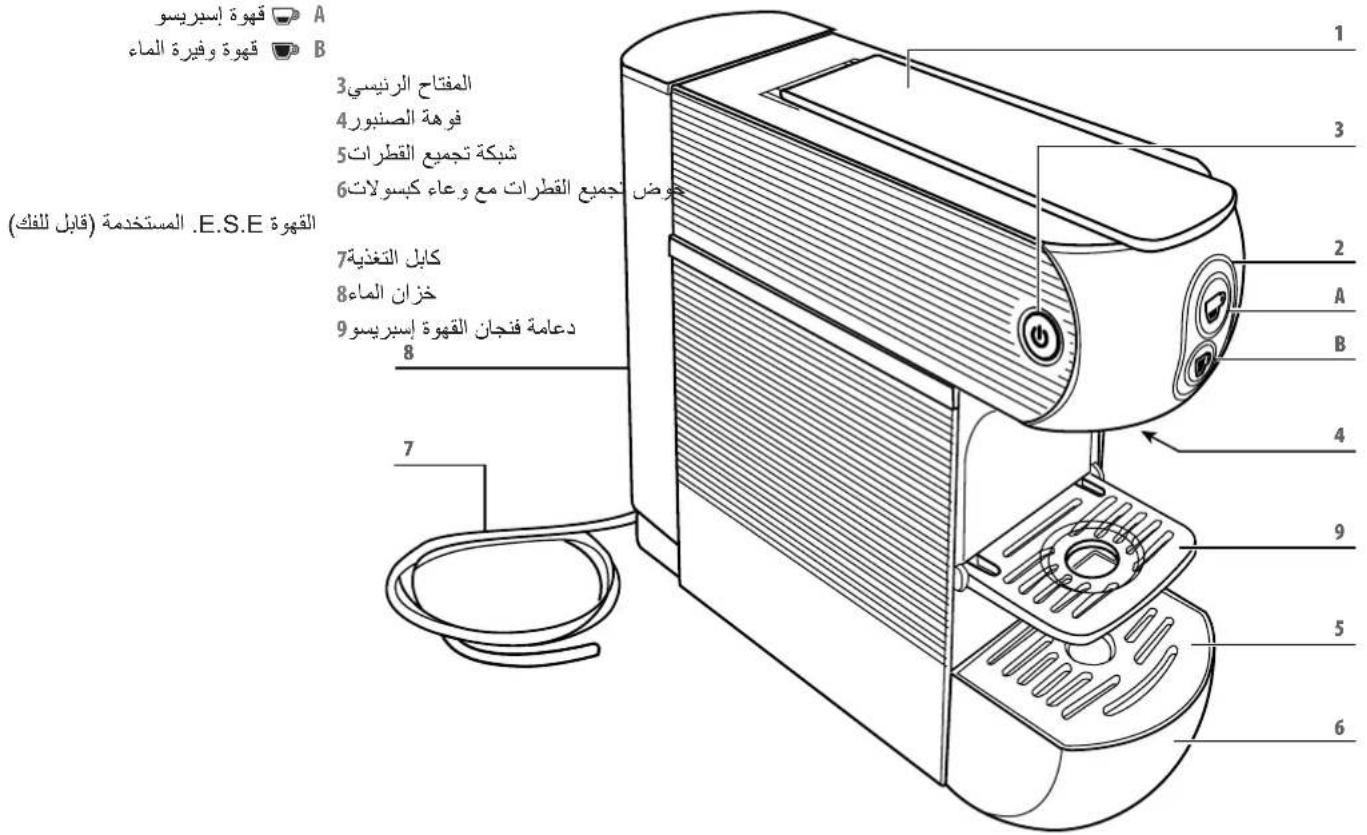
MACHINE PARTS
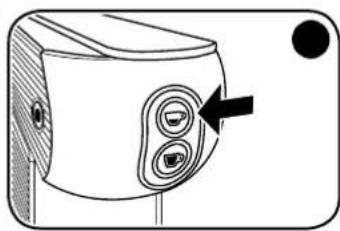
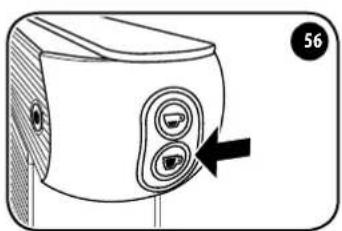
1 E.S.E. COFFEE POD HOLDER OPEN/CLOSE LEVER
2 BREW BUTTONS:


RESSO COFFEE


OEEE
3 MAIN SWITCH
4 DELIVERY SPOUT
5 DRIP GRID
6 DRIP TRAY WITH CONTAINER FOR USED E.S.E. PODS (PULL-OUT)
7 POWER CABLE
8 WATERTANK
9 ESPRESSO CUP SUPPORT
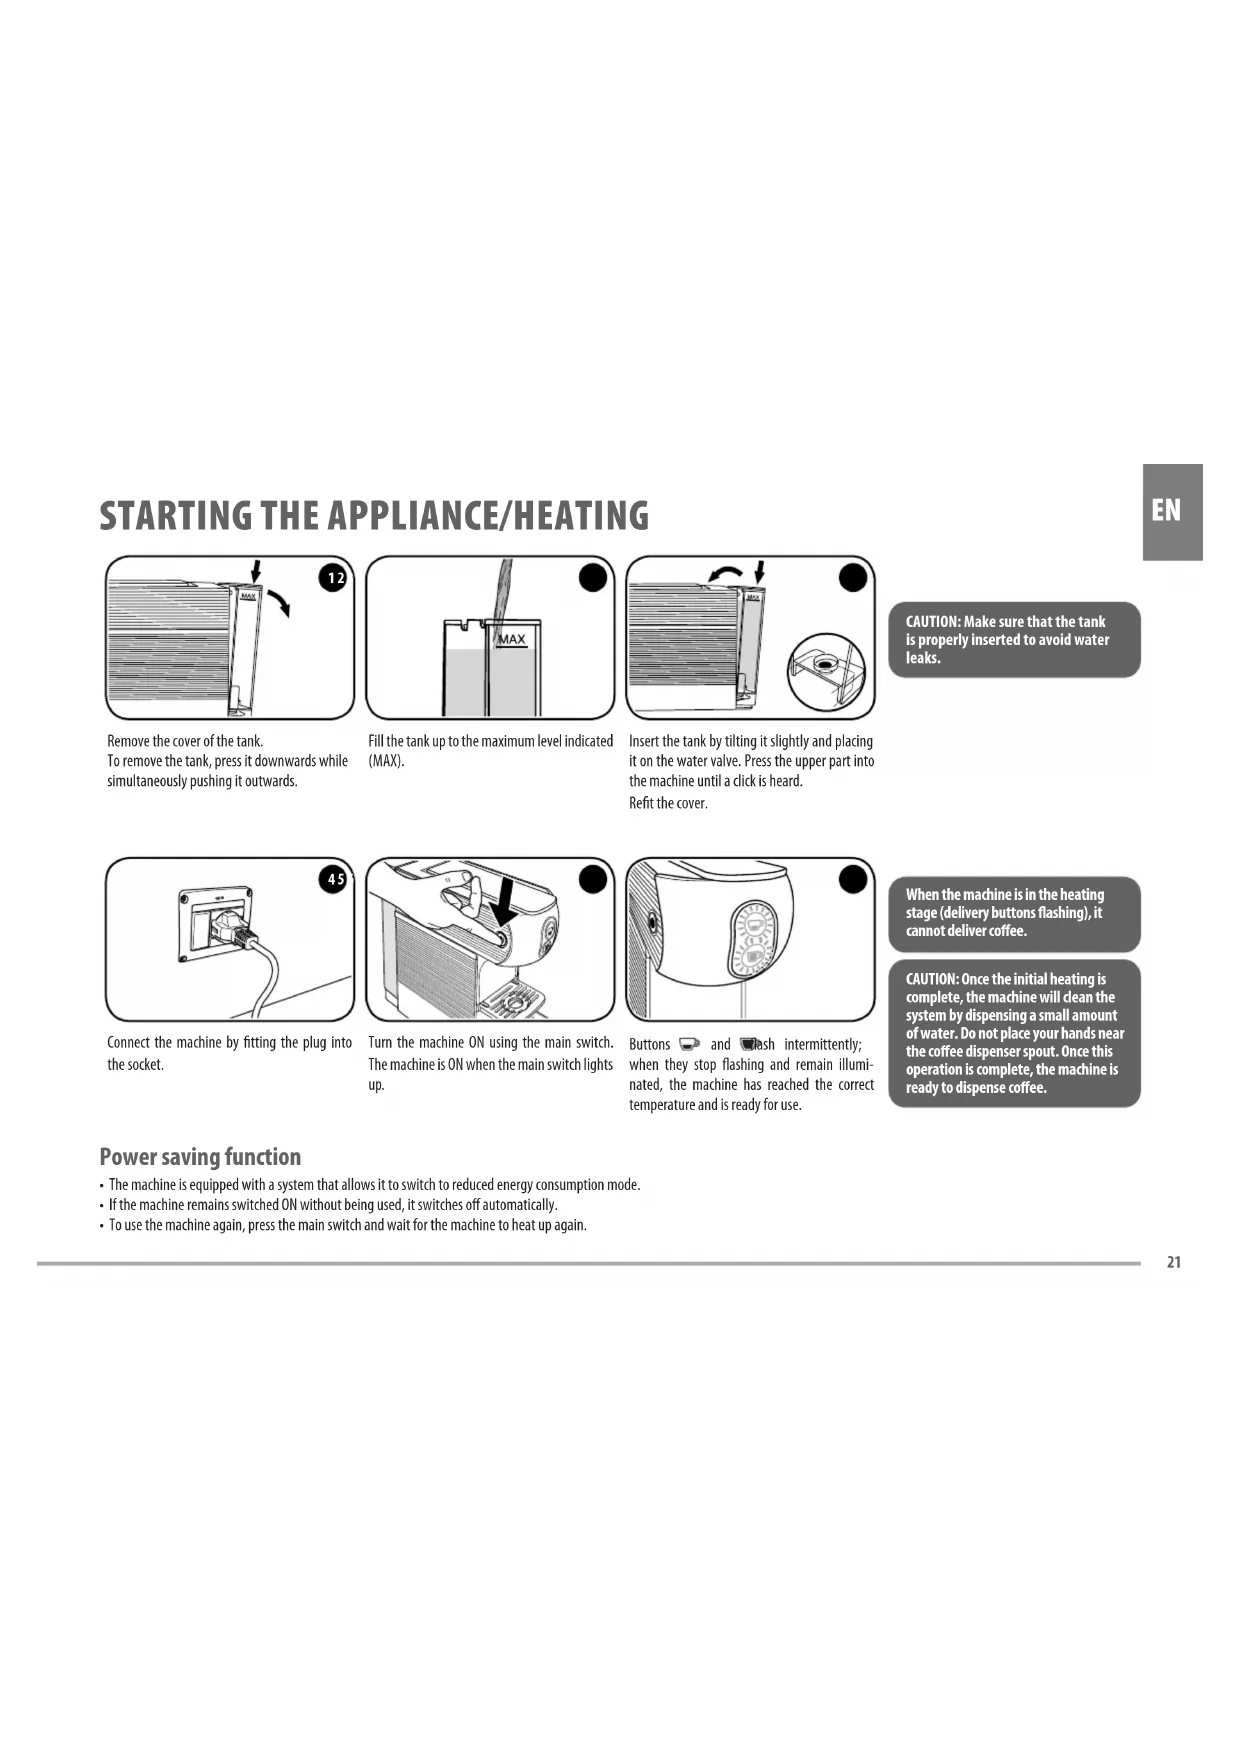
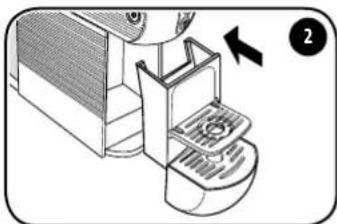
STARTING THE APPLIANCE/HEATING

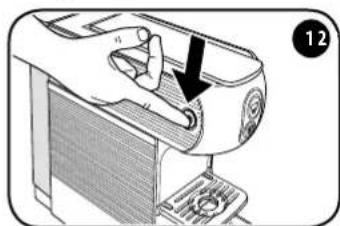
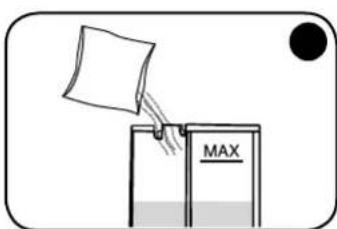
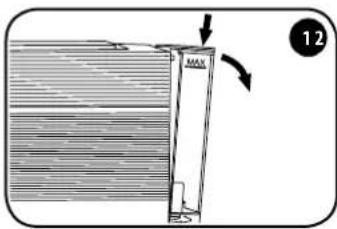
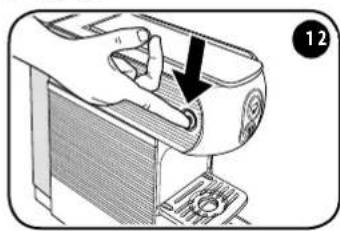
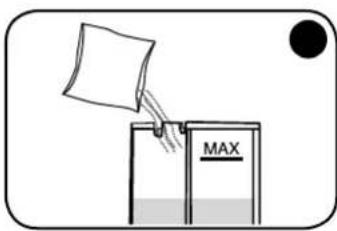
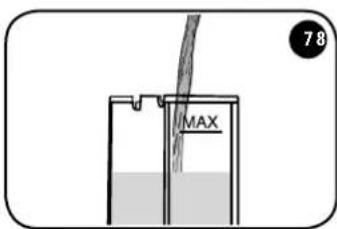
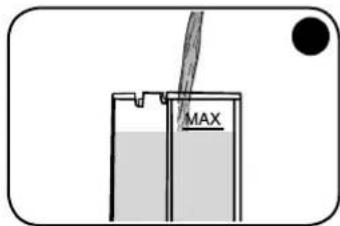
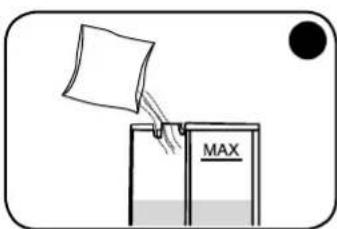
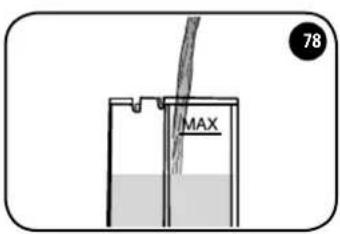
Remove the cover of the tank. To remove the tank, press it downwards while simultaneously pushing it outwards.
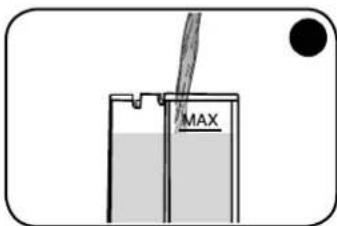
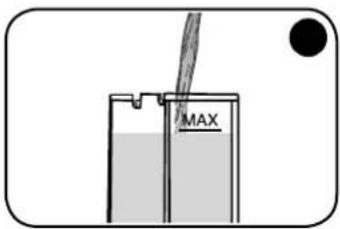
Fill the tank up to the maximum level indicated (MAX).
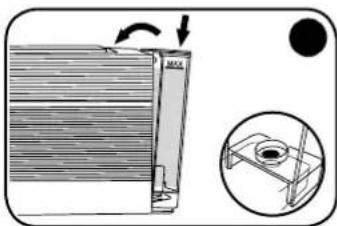
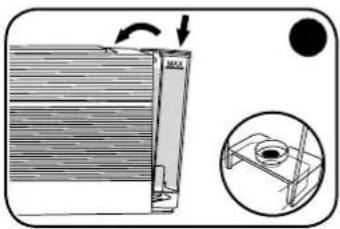
Insert the tank by tilting it slightly and placing it on the water valve. Press the upper part into the machine until a click is heard. Refit the cover.
EN
CAUTION: Make sure that the tank is properly inserted to avoid water leaks.

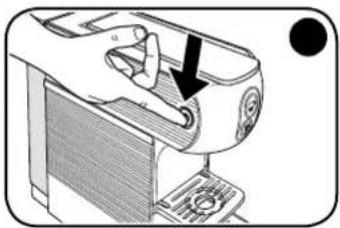
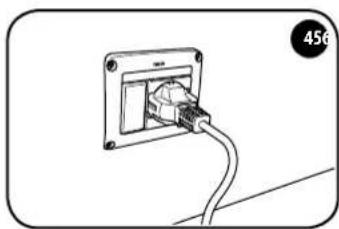
Connect the machine by fitting the plug into the socket.
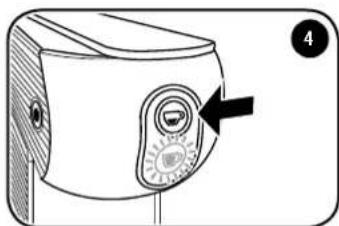
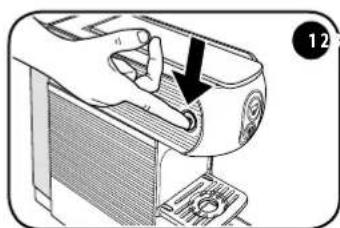
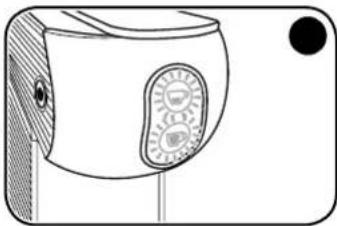
Turn the machine ON using the main switch. The machine is ON when the main switch lights up.

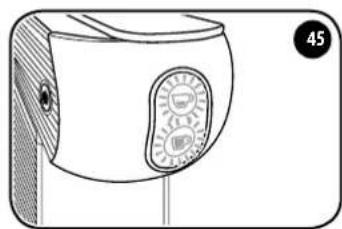
Buttons and flash intermittently; when they stop flashing and remain illuminated, the machine has reached the correct temperature and is ready for use.
When the machine is in the heating stage (delivery buttons flashing), it cannot deliver coffee.
CAUTION: Once the initial heating is complete, the machine will dean the system by dispensing a small amount of water. Do not place your hands near the coffee dispenser spout. Once this operation is complete, the machine is ready to dispense coffee.
Power saving function
- The machine is equipped with a system that allows it to switch to reduced energy consumption mode.
- If the machine remains switched ON without being used, it switches off automatically.
- To use the machine again, press the main switch and wait for the machine to heat up again.
EN
RINSING OF INTERNAL CIRCUITS
After the first use, or if the coffee machine has not been used for a long time, rinse the internal circuits by applying the following procedure:
Make sure that there are no E.S.E.pods inside the machine, and switch it ON using the main switch.

Close the espresso cup holder and place a large empty cup under the dispenser spout.
When buttons and illuminated and unblinking, the machine is ready to be used.
Press the button; the machine will dispense water; press the button again. The rinsing operation is completed when at least three cups of water have been delivered.
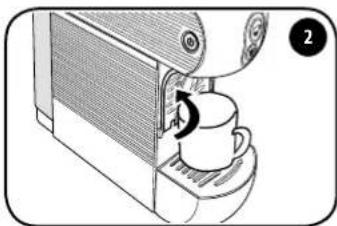
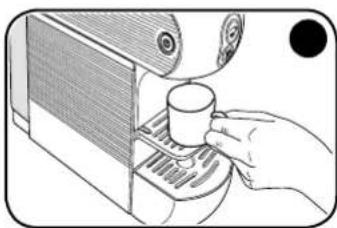
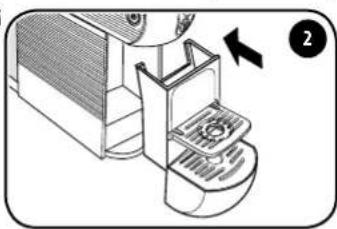
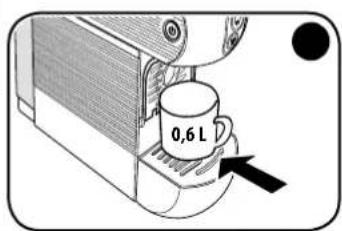
Using cups
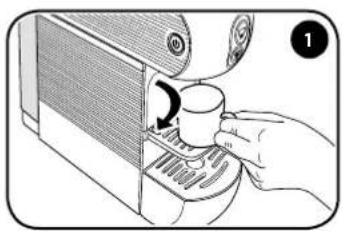
Lower the support to prepare an espresso coffee correctly, and to use espresso cups.
To use large cups, close the support and place the cup directly on the drip tray.
MAKING COFFEE
It is recommended to use E.S.E. illy pods. The machine is optimised for extracting coffee from E.S.E. illy pods.
Wait until buttons and illuminat ed and unblinking.
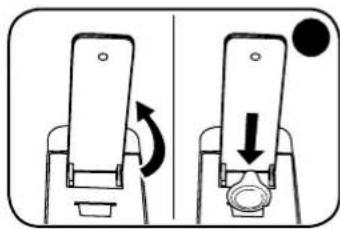
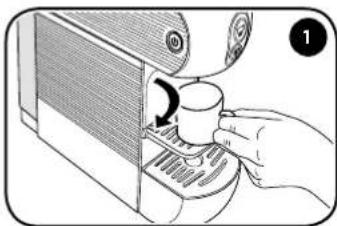
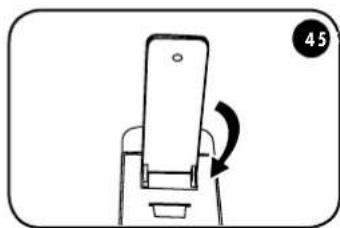
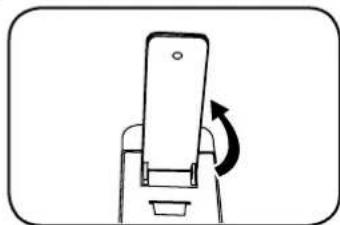
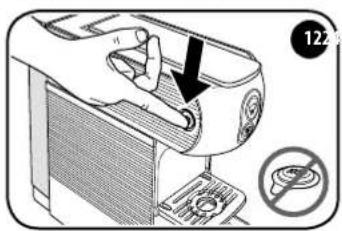
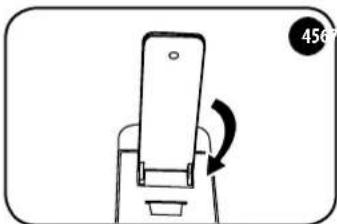
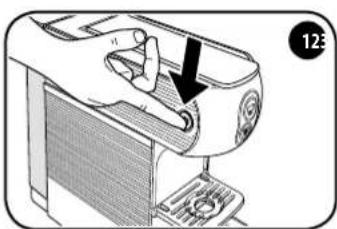
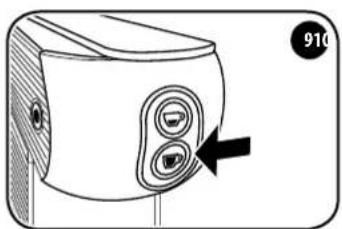
Lift the lever and insert the E.S.E. illy pod into the slot with the logo facing the lever. Check that the entire pod, with the exception of the tab, is inserted into the slot.
Before inserting the E.S.E. pod, slowly lift the lever as far as it will go in order to expel the used E.S.E. pod. To ensure correct hygiene and maintain high product quality, it is advisable to expel the E.S.E. pod immediately after the coffee is delivered.
To insert E.S.E. pods, the lever must be raised until it stays up on its own. To expel the E.S.E. pods, the lever must be fully raised.

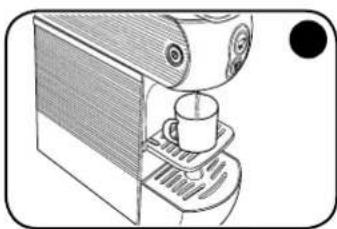
Close the lever completely. Place the cup on the support under the dispenser spout.

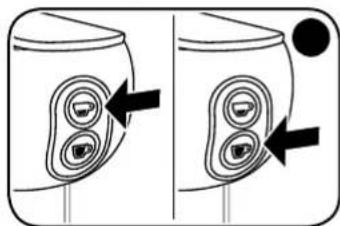
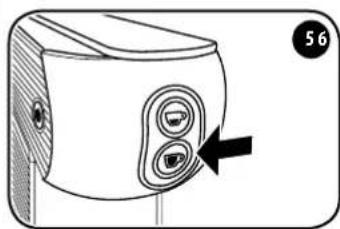
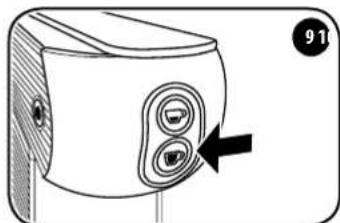
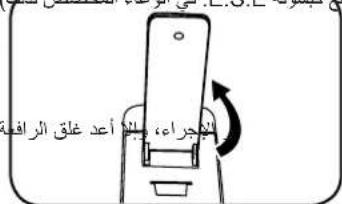
To dispense an espresso coffee, press the button. To dispense a long coffee, press the button. If there is some difficulty in closing it, re-open the lever and close it again.
CAUTION: After delivering 10 successive cups of coffee, wait for at least 2 minutes before preparing another coffee. The machine is designed for single deliveries with a maximum duration of 75 seconds.
Hint
To prepare a good cup of espresso coffee, use thick, ready-warmed espresso cups if possible, to prevent the coffee from cooling down too quickly. Eessro cups can be warmed by dispensing hot water from the dispenser nozzle into the cup.
- Use E.S.E. illy pods for espresso coffee, pressing the button. Use E.S.E. illy pods for long espresso coffee, pressing the button.
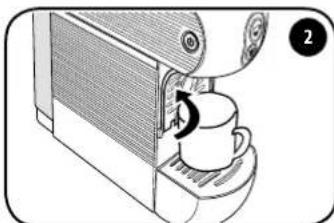
After making a cup of coffee, the used E.S.E. pod must be expelled as follows:

- Lift the opening/closing lever fully (the E.S.E. pod will fall into the relative container).
CAUTION: in the interests of hygiene, it is advisable to remove the E.S.E. pod at the end of each delivery and dispense a small amount of water to remove any residue.
The specific E.S.E. pod container can hold up to 9 used E.S.E. pods. Empty this container on a regular basis.
If you want to make another coffee, fit a new E.S.E. pod and repeat the procedure, otherwise close the lever.
The used E.S.E. pod drawer can hold a maximum of 9 E.S.E. pods, so it is advisable to empty it regularly to prevent the E.S.E. pods from getting stuck.

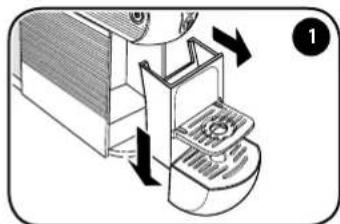
To perform this operation, remove the tray and separate it from the E.S.E. pod drawer by pushing it downwards; be aware that there may be liquid in the tray.

Empty the drawer and rinse and dry the components before replacing them in their housings.
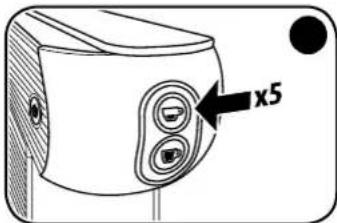
PROGRAMMING THE COFFEE TEMPERATURE


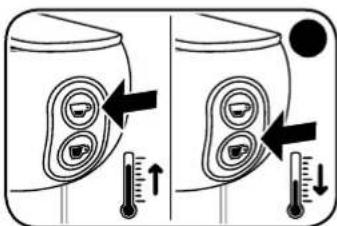
Turn the machine OFF using the main switch.
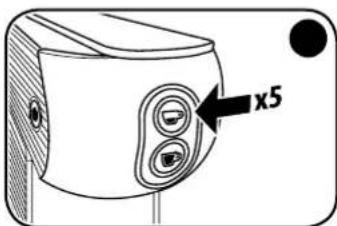
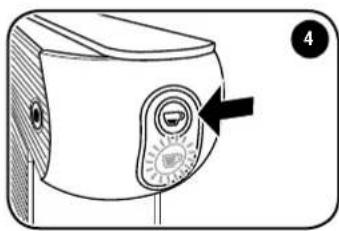
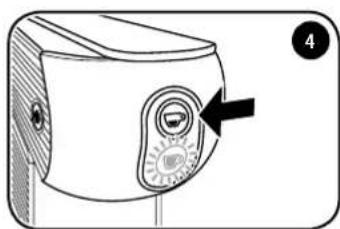
With the machine off, press the button 5 times to access the temperature change function. The and buttons will begin to flash.
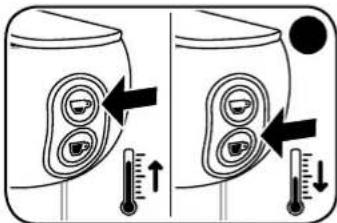
Press the button to increase the temperature by 3 degrees. Press the button to decrease the temperature by 3 degrees.
PLEASE NOTE: The factory-set temperature can be increased and/or reduced by 3^ or 6^ .

After 5 seconds without any other action being carried out, both and buttons will flash for 2 seconds, after which the machine will exit the temperature change function.

The new set temperature will then be stored for subsequent dispensing.
Coffee temperature set indicator:
| Both and button flash. | The set temperature corresponds to the factory temperature. |
| Only the button flashes slowly (0.5 secs). | The set temperature has been increased by 3°C compared to the factory settings. |
| Only the button flashes quickly (0.2 secs). | The set temperature has been increased by 6°C compared to the factory settings. |
| Only the button flashes slowly (0.5 secs). | The set temperature has been decreased by 3°C compared to the factory settings. |
| Only the button flashes quickly (0.2 secs). | The set temperature has been decreased by 6°C compared to the factory settings. |
PROGRAMMING THE DELIVERY VOLUME
Follow the instructions given in the "starting the appliance/heating" paragraph.

Adjusting the volume of an espresso coffee:
Press and hold the button. The machine will start delivering coffee. Once the desired quantity is reached, release the button. The machine will then stop dispensing coffee and the amount will be stored for subsequent deliveries.
Adjusting the volume of a long espresso coffee:
Press and hold the button. The machine will start delivering coffee. Once the desired quantity is reached, release the button. The machine will then stop dispensing coffee and the amount will be stored for subsequent deliveries.
The factory-set volumes and temperatures are optimised for the best extraction of illy espresso 豆 and illy long espresso coffee.
MAINTENANCE
If the machine is not going to be used for a long time, dispense a small amount of water, turn it OFF, unplug it from the power supply and empty the tank.
Store the appliance in a dry place, away from dust and out of reach of children.
It is advisable to store the appliance in its original packaging.
Store the machine at a temperature not lower than 5^ to prevent any residues of water from freezing and damaging the appliance.
REPAIRS
In the event of faults, malfunctions or a damaged power cable, do not attempt to repair the appliance yourself but contact qualified personnel. Never attempt to operate a defective or damaged machine. Only authorised service centres may carry out interventions and repairs. The manufacturer declines any and all responsibility for damage to things and/or persons that may occur as a result of adaptations, modifications or repairs that are improvised or not carried out by qualified personnel.
CLEANING
Performing correct and regular maintenance of the coffee machine ensures better performance over time and a longer lifespan.
Disconnect the switches and remove the plug from the socket before performing any cleaning operation.
Never immerse the appliance in water. Clean it exclusively with a damp cloth using non-abrasive detergents and dry it immediately.
The components (grille, drip tray, E.S.E. pod drawer and water tank) can be washed by hand using non-abrasive detergents or in a medium temperature dishwasher.
DESCALING
Limescale accumulation is a normal result of machine use. The machine has an automatic programme that helps optimise cleaning and removes scale deposits from the interior.
CAUTION: If the descending procedure is not carried out, scale may cause malfunctions that are not covered by the warranty.
If the dispensing buttons flash in alternation, the machine must be descaled.
PLEASE NOTE:
- Make sure that there are no E.S.E. pods inside the machine.
- If there is a voltage drop or the machine is switched off, the cycle continues from where it was stopped when switched on again.
- Do not lift the lever when descending or rinsing.
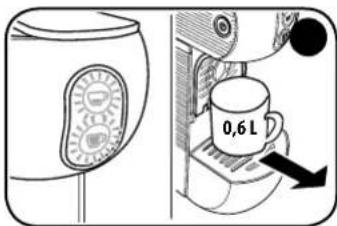
Dscaling procedure:
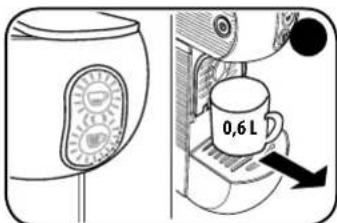
Turn the machine OFF using the main switch. Fill
the tank with 0.6 lt of fresh water and add the descending solution.
Make sure that the descending solution has to be dissolved in the water in the tank.

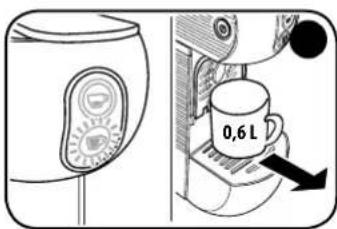
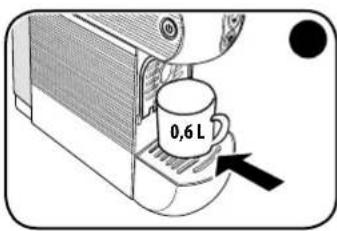
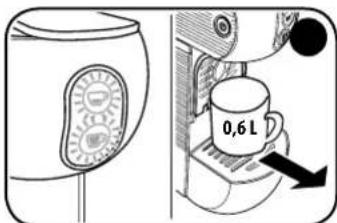
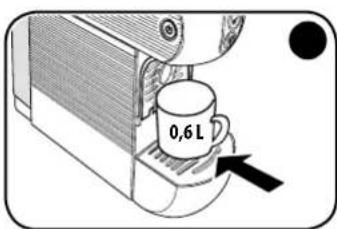
Place a container of at least 0.6 lt under the dispenser.
Turn the machine off by pressing the button for 5 seconds. The button flashes.
EN

The button flashes. The machine begins dispensing water in an alternating cycle. The button flashes.
At the end of the descending cycle, the button is steady on while the button flashing. Remove the container and empty it.

Remove the tank, rinse it and fill with fresh water. Reinsert the tank with fresh water into the machine.
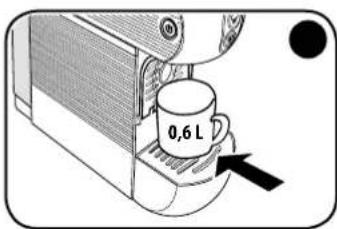
Place a container of at least 0.6 lt under the dispenser.

Press the button to start the rinse cycle. The button is steady on while the button flashes.
The machine automatically interrupts the
rinsing cycle. The and buttons flash simultaneously. Remove the container and empty it. Wait until the and butts are steady on. The machine is now ready for use.
PROBLEM - CAUSE - SOLUTION
| Problem Cause Remedy | ||
| The machine does not turn on. | The plug is not inserted correctly. | Make sure that the plug is inserted in a socket supplying voltage and that the main switch is pressed. |
| Faulty components. Contact the service centre. | ||
| The machine brews coffee slowly. | Internal components clogged with scale. | Descale the machine as described in the specific paragraph. |
| The machine switches ON but does not brew coffee. | The water tank is empty or fitted incorrectly. | Make sure that the water tank is correctly inserted in its housing and that it contains sufficient water. |
| Open/close lever not fully closed. Make sure that the open/close lever is fully closed. | ||
| Faulty pump. | Check that the pump delivers water: after pressing the button, a vibration should be felt. This indicates that the pump is working correctly. If no vibration is felt, contact the service centre. If the vibration is felt but the machine does not start to deliver coffee, repeat the operation 2/3 times at intervals of a few minutes. If the machine still does not deliver coffee at the end of this procedure, contact the service centre. | |
| Hydraulic components clogged with scale. | Perform descaling. If the problem persists, contact the service centre. | |
| The machine has turned OFF automatically. | This is not a defect. It is a programmed power saving mode: the machine is designed to turn OFF automatically. | |
| The machine vibrates a great deal and is noisy. | Insufficient water level in the tank. | Strong vibrations are caused by the pump that is unable to draw water correctly. Restore the correct water level in the tank. |
| The E.S.E. pod cannot be inserted in the coffee machine. | The E.S.E. pod is not compatible. Make sure you are using a compatible E.S.E. pod. | |
| The E.S.E. pod is not inserted correctly. Insert the E.S.E. pod, ensuring it is facing the right way. | ||
| Used E.S.E. pod holder full. | Check whether the used E.S.E. pod holder contains too many used E.S.E. pods and cannot accept any more. Empty it if necessary. | |
| If the defect persists, contact the service centre. | ||
| The E.S.E. pod is not retained in the brewing unit and falls directly into the used E.S.E. pod container. | Open/close lever not fully open. | Open the open/close lever completely, recover the unused E.S.E. pod from the used E.S.E. pod container and insert it again. If the defect persists, contact the service centre. |
| After inserting the E.S.E. pod into the brewing unit, the open/close lever cannot be closed. | The E.S.E. pod is not aligned with the brewing unit. | Open the open/close lever again and then re-close it completely. If the defect persists, contact the service centre. |
| Used E.S.E. pod holder full. | Check whether the used E.S.E. pod holder contains too many used E.S.E. pods and cannot accept any more. Empty it if necessary. | |
| The coffee delivered by the machine is cold. | The E.S.E. pod was inserted before theand buttons came ON steady. | Insert the E.S.E. pod when theand buttons come ON steady. |
| Faulty boiler. Contact the service centre. | ||
| The E.S.E. pod is not expelled correctly. | The E.S.E. pod is jammed in the brewing unit. | Re-close the open/close lever and then open it slowly again. |
| Press the button and while water is being dispensed, slowly open the open/close lever. | ||
| Used E.S.E. pod holder full. | Check whether the used E.S.E. pod holder contains too many used E.S.E. pods, preventing the E.S.E. pods from being expelled. Empty it if necessary. | |
| If the defect persists, contact the service centre. | ||
| Single drops fall from the spout at the end of delivery. | This is not a defect. A few drops falling at the end of delivery is normal. | |
| The delivery of coffee does not stop even if you press the delivery button. | Faulty components. Disconnect the plug from the socket and contact the service centre | |
| The coffee delivered has a sour taste. The machine was not rinsed correctly after descaling. | Rinse the machine again. | |
| Using E.S.E. pods after the best-before date. | Check the best-before date on the E.S.E. pods. | |
WASTE DISPOSAL
At the end of the appliance's lifespan, make sure it can no longer be operated before disposing of it in compliance with waste disposal regulations. Remove the plug from the socket and cut the power cable.

The crossed-out bin symbol on the appliance indicates that, at the end of its useful life, the product must be processed separately from household waste: i.e., it must be sent to a differential collection centre for electrical and electronic equipment or returned to the retailer when
purchasing equivalent new equipment.
Appropriate differential waste collection so that the appliance is sent for recycling, processing and compatible disposal helps avoid possible negative impacts on the environment and health and promotes the recovery of materials and components. The user is responsible for delivering the appliance at the end of its lifespan to suitable collection facilities.
For more detailed information about the waste collection systems available, contact your local waste disposal service or the point of sale where the appliance was purchased. Anyone who disposes or trashes this appliance rather than return it to a differential waste collection centre for electrical and electronic waste may be subject to fines envisaged by applicable legislation concerning the illegal disposal of waste.
Packaging
Packaging is important in order to protect the product during transport. Before disposing of packaging materials, check the integrity of the appliance and make sure it operates correctly. If any complaints arise, the appliance must be returned in its original packaging. Packaging materials must be kept out of reach of children since they are a potential source of hazards.
Dispose of packaging materials in accordance with local differential waste collection regulations. The special symbols shown on packaging materials indicate the correct disposal methods. Informed disposal is the first step towards correct defence of the environment.
FR
SOMMAIRE
RÉGLES GÉNÉRALES POUR L'UTILISATION DE LA MACHINE 32
CHARACTERISTIQUES TECHNIQUES 32
Dispositifs de sécurité 32
MESURES IMPORTANTES DE SECURITE 32
PARTIES DE LA MACHINE 34
Mise en service/prechauffage 35
Fonction economie d'énergie 35
Rinage circuits interieurs 36
Utilisation des tasses 36
PREPARATION DU CAFE 37
Programmation temperature cafe 38
Programmation du volume de distribution. 39
Entretien 40
REPARATIONS 40
NETTOYAGE 40
DETARTRAGE 41
PROBLÉME - CAUSE - SOLUTION 43
MISE AU REBUT 45
Emballage. 45
RÉGLES GÉNÉRALES POUR L'UTILISATION DE LA MACHINE
PROBLÈME - CAUSE - SOLUTION
PROBLEM - CAUSA - SOLUÇAO
Pumpe:48W/230VCL.FNSF BAR 20
Apparatets effekt: 800 W
PROGRAMMING AF KAFFETEMPATUREN

NOTABENE: Den fabriksindstillede temperatur kan forges og/eller reduceres med 3^ celer 6^
TENIKOI KANONEZ TIA TH XPHESH THE MHXANH
Pivxpnaionoiote autivtniunxavn,diabaoTe npoeektkauto to eyyeipidio kai puaCTe to yia eAovtki avapopap.
To eyepipio x npionk kai ouvtnpnongac Bona va xponoioite t n ooukeun ie aopaleia kai ueuuvotnta kai va avakaluntete oace tnc aeioupyie tnc. Na upaote ot n kaan leioupyia, aaaa kuipcn naopamc aeoupyia, eapatai enionc ano tn ywnon tnc ouokueuc kai tn owotn ouvtnpnntnc me ty npaofo tvxovou.
TEXHUNCHECKNEXAPAKTE- PACTUKMop.626
HapnpxkHe HeekpnHtAnHa: 220-240 B/50-60
Nomna:48Bt/230B KJI.FNSF 205AP
MoIIOHOCTb PnH6Opa:800BT
Bcerda BbyHMaJte IHHyp NITaHMaI 3 p03eTtM:
- nepei n3BnueHemm uynyctaHOBKO bKa dna BODI;
-ДЯнанонselfaБаубд;
B Cnyae nnTebHOro HeCnOJIb30BaHm npi60pa;
B CNYahe HcNpBaHbOCTn npi60pa; - pepeid qinckoi npmbopa.
Yt06bI n36exKaTb pncKa BO BpEmr NcTOnb3OBAHn:
JaHHa KofemaunHa IpeHa3HaHe dIy NcIOJIb3OBAHnB DOMaUNHX INoO6HbIX yCIOBmX, HanpIMMep:
B KyXOHbIX 30Hax, OTBeHeHHbIX DnI NepcoHaJa B MaRa3InHax, OΦmcaX I DpyTnx Ipo-ΦeCCuHOHaJIbHbIX CpeJax;
-BaPpOtpn3Me;
-ДЯ KMENTOB BROCTMHUax, MToTeJx INdpyTmN OMeUeHnIX XmIoro Tmna;
BCTpykTypax Tuna B&B.
IcnoBzye TaHHyIO KoFeMaUHHy NCKNIOHTeBHO CnOCoBOM, npNBedeHHbIM B HaCTOaIXM INHCTpyKUHX.
JaHnBnI npB6p MoKET nCIOBb3OBAbCa DeTbMn B Bo3paTe oT 8 let n CTapJe,ecnn
OHn HaxoTcTPOI pncmOTpmb 3bpcnbix mO6yehbl 6e30nacHMy o6paueHHC nPb6Opom I Oco3HaIO TCBaAHhBle C 3TMM PnCKN. Pn6op u Hpy nHTaHn DOnKHBn HaxoTbcB HneocraeMOCTm DeTe.
Y6eNTcB B TOM, YTO KoΦemaUHa HaxOuTcB HBe DOcraEoCTn DTeTn, H He N03BOJNAITE MM CHe MrgPaTb.
- PnIb6Op MoKTe NcIIOJIb3OBAbCra IIOJbIM C OgPAHUYeHbIM MfN3UeCKMIM, CEHCOPHbIMMN MEHTaJIbHbIM CIOOCHOCTrMM W/IN C HeIOCTaTOHbIM ONbITOM, TOJIbKO EONOHAXOJATCR NOI PPNCMOPTOM MN 06yHeB6eOpaChOMy 6oPaueHmIO C PnIb6OpMNOOC3HaOT CB8aHHbE C TTM DNCKN.
Iap I ropraa BOa MOrT npBecn K Oxoram! He Nmoeaae TaNbCuI NOHOCK nOdaH KOe BO BpMa paobToI KoEmaunHbI.
Bcerda3aKpbBaTe pbiar n He otKpbBaTe ero BO Bpem npiroToBJeHnHaNTka. PnCK OXOROB.
He BCTabJIte naIbI b KOnTeHep Ia cOpa KaCyn E.S.E. Pnck TpaMbI.
He nIIOJIb3yIte NOBpeJdeHHbIe WIM DeΦOpMMIpOBaHHbIe KaIcIbI E.S.E., TAK KAK OHN MOrT NOBpeJITb Ipi6Op.
HeNcTIOb3yIteKoFemaMunHy63KaJIeNc6OpHnKa,HTO6bIu36ExaTbYTeKmJIMKOCTn.
Bo 36ekaHne NOBpeKdEHHa KOpemaunHbI:
HanoHnAte6aKToIbKO NITBeB0B ODo; HNkoTgA He NcNoB3yTe Ra3npoBaHHyo BDO UIM DpyTne XmDkOCTM.
YTO6bI 36EkaTb paObTo bHacoca BXONOCyHO, nepeB KBNIOueHMeM npi6oBa CBERDA npoBepRte, YTO6bI B pNIO DOCTaTOHBOBbl.
BHIMAHHE:
PpON3BOyNTeJIb CHIMMaET C Ce6aBCaKyIO OTBETCTBeHNOCtB 3a BO3MOxHbI yIep6 B CnUyae:
- HenpaBbHoro MCNoB3ObaHnnpu6opa n erO
MCNoB3ObaHnHE NO Ha3NaueHnIO; - pEMOHTa, npON3BedeHHORo HeaBTOpN3OBaHHbIMN cepBnCHbIMN ueHTpaM;
-HeCaHKUHOHPOBaHHORO N3MeHeHMa Hn HapuWeHn
CeIOCTHOCTN Ka6Ea 3NeKTPoNTaHn; - HecaHKUOHUPOBAHHORO N3MeHeHnJIIO6OTo KOMHOHEHTa KOeMaunHbI;
- nCIOJIb3OBAHnHa HeOpuHaHaJIbHbIX 3aNaChbIX qAteN i akceccyapOB. B 3Tnx cIyuaX rapaHTna 6yJeTaHHyniPobaHa.
RU KOMNOHEHTbIMAUHbI
1 PbyAFTKpBITN/3AKPbITNAOTCEKAIKAICYI E.S.E.
2 KHOPIKNIIOAUYI:


BKNIOUOYEHNE/HARPEB
CHMMITE KpbIbKc 6ka.
YTObblBtAaTIb 6ak,HaDaBnTe Ha Hero CBepx BnH3 N OJHObpemEHNO NotAHnTE erO HApKy.
3aONHHTe 6aKdo yka3aHHOro MaKCmMaJIbHo- ro ypoBHra(MAKC.)
yCTAHOBITE 6aK o6paTHO, CnERKa HAKJIOHM
ero N NOCTABNB Eero HA KNAHAN ODAuH BObl.
Hakatmem BCTabBe BepXHOO 4actb 6aka B MaunHy, HadaBn DO ueNkA.
yCTAHOBITE 6oPAtho KpbIiKy.

IpoKIOUHTe KoFemaunHy, BCTaBb BNky Ka6Era 3NeKTpOnnTaHn Bpo3eTy.
BknOHTe KofemaunHy, HaxKaB Ha nabHbI bblknoateB. MaunHa BknOyeHa, ecm ropntnabHbblkbKnOaTeB.
KHONKn HOnepemehNO MTRAO. KOrda OHN 3aropakTcPOBbIM CBETOM,30 yKa3bIbAeHaTO,4TO MaUNHa NODorpeNa BOyDo HnykHON TEMNepaTypbl N rotoba K nONoB3OBaHHIO.
BHIMAHHE:Y6eHNTecb B TOM, YTO 6aK HauExHo 3aФИКСИРОВАн,ДЯ ПЕДOT-BpaUeHnYteuE K BoDbl.
BoBpMaHarpeBaBoDbl (KHOJI KIOaH KoOe MuaIOT) pnpuroToBHeHne KoOe HEBO3MOxHO.
BHIMAHHE:No3abepwehenn nepbonaaybHoroHaPeba MaHINH BbIIOHNHT YCTKc CNTeMbI, BvIaB He60bnOoe KOINcTeBO BoIbI. He NOHOcTe pyKn K HOCNky NODaH N KoFe, No 3abepwehenn 3toI onepaunMaaHnHa 6ydt roToba K PnIRTOBLeHNIO KoFe.
Pekn3Hepro6epeXeHna
KoefmaHnHa OChaSeHa CInTeMoH, N03BOnHIOSeE HnepeXoJtB B pexm 3hepro6bepexhenra.
EcnKofoemaunHa BKNIOUeHa,HO He HcIOJb3yETc,OHAaBtOMaTmueckn BbIKIOuAeTC.
YTO6bI CBOBA BOCN0B3OBaTbC KoΦeMaUHNO, Heo6XoDUMHO HxAaTb Ha TnABHb BYkJIIOuTeNb IIOJxDaTbCA HArpeBaBObl.
RU
RU INPOMbIBKA BHYTPEHHErO KOHTyPA
IpeepnepbIMMnloB3OBAHmE KOeMaunHHNII NIOCE ee npoONKHTenbHO rpoCToHne6xOIMO npOMbIT BBytpEHnnKoHTyp, BbInOnHBcIeDyUHmeDeICTBIA:
Y6eHNTecb B OTCyTCTBNN KANCyn E.S.E. B KOHTHepe IN BKKIOUHTe KoFemaunHy, Haxab Ha TnABHBblBkNIOuATenb.
3aKpOte NoCTabKy NoI qauKy IIN 3cnpceco nNoCTabBe 6oIbUy OauKy noI HocN nOdaH KoPe.
Korda KhoNkM H Naropatc HnpepbBbIM CBeTom, KoemMaHHa 6yDet roTobaKINJb30aHmO.
HaxMMTe KONKy, MaMHa HauHET NoaBaTb Body. Nocne Yero CHOba HaxMMTe KONKy
PombybKa KOHTypa 6dyet 3aBepWeHa, KOrDa BOOoi 6dyT HAnOpHeHb XOTa 6bl TpN aUKN.
IcnoJIb3OBAHne qaWeK

Onyntne noctabky dny npabmblhoro npuroTOBHeHMA 3cnpccn HcNolb3oBaHMa yawek dny cnpccco.
ДлнньогиньхучseK 3akpoTe noCTabky uYctahOBITE qaukHy HocpeDcTBENHO ha peWetky kannec6opnka.
ПРИГOTOBЛЕHNEKOФЕ
PekomeHnyetc Hcnonb30BaTbkCanybE.S.E. illy.KoFemaunHa ONTNMnHPOBaHa IIN 3- BneueHHa Kancyn E.S.E.illy.
JIOXDNTEcB, KOrJa KHONKIN HOPRATC HENpepbIBHbIM CBETom.

IOnHIMNTE pbyar n BCTABBe KANCyE S.E. illy B cneuHaNBHOe OTBepCTHe TaK, YTO6b IOROTIN 6bln OpaueH B CTOPOHy PbUra. IPOcNEITHe 3a TEM, YTO6bl BCa KANCyHa 3a NCKIOHEmEM RaBka NOMeuaanac BHYTPM OTBepCTH.
IpekdeyemBCTabntbKanCny E.S.E.MedneHNOdoKoHa naDMnmtpepbHAR,HTO6by6paTb HcnoIb30baHHyoKanCnyE.S.E. BueJaxcoNIODEHnRmHeHbIN DIOBEcNEHnBBICOKTO KaeeCTBA npOdyTKa peKOMeHpyTeONBeKaTbKanCnyE.S.E.cpa3y Xe noCteNoDAuHNHaNTKa.
PONHOCTbO 3aKpOte pIyar. IocTABTe yAaKy Ha cneuaJIbHyIO NOCTaBky IOHOCNK NOaH NKe


I npirotoBnHnKofoe3Cnpccco HaxMMTe KhoNky. I npirotoBnHnKofoeIyHro HaxMMTe KhoNky 1 npi 3akpbmbaHm BO3HnKaHT TpydHcT, OTKpOte pbUar n nonpo6yTe 3akpbItb er o else pa3.
BHIMAHHE: Iocne npnroTOBHeHMa 10aWeK KoFe npOpaRd Heo6xOaMm PoOoxDaTb He MeHee 2 MHyT nepeD npnroTOBHeHem HOBORo HanNTka. KoFemaunHa paccHTaHa Ha npnroTOBHeHne OTeIbHbIX NOpzM KoFe dNITenbHOcTBIO He 6Oe 75 cekyHd.
Pekomehdaun
I pynroTOBNEHINXoPoWero 3cnpcecoNcnoJb3yTeaueeKCTOCTbMI CTeHKAMN,NO BO3MOxHOCTM npedBaPteBHO NOORpeTbe, YTO6bH HAnITOK He OCTbIBaN CNIKOM 6bICTPO.uaeeKMOxHO NOOrpeTB,HANUB HHe ropayu BDOY INHOCNA NOaH HANITKA.
Mncnbl3yte KancnybEs.E.S.E. illy nprurotobneHnKofoe 3npceco, Hkab KhoNky . Mcnbn3yte KancnybEs.E.S.E. illy nprurotobneHnKofoe npHyro, Hkab KhoNky
Ipcne nprrtoobennn Koe mclnb3oabnny Kaunny E.S.E. HeooxOIMO y6paTb cneDyoom o6pa3om:
- PONHOCTbO NOHMnTE pbHar OTKpbTnA/3aKpbTnA (KANCyA E.S.E. ynaTeB CneMaNbHbKOHTeHep).
BHIMAHVE:ИЗ coo6paxeHm rrrnneHbI nДЯ obecneeyHn BbICOKO KaeeCTBa npOdykTa peKOMeHdyetcY yBupaTb ICnonb3oBaanHyKancyLy E.S.E. cpa3y Je nocTe noaHnHTKa n NOdaBaTb He60nbOe KOnueCTBO BoDbl dny ydaHHeNBo3MOxHbIX OCTaTKOB KoΦe.
CneuMbHbIKoHTeHepIaKcyn E.S.E.MoKET BMeuaTbdo 9 McnoB3ObaHHbx Kancyn E.S.E.IepnoMueckn ocbo6kdaTe KOHTeHep ot Kancyn.
EcnH NyKHO pIroTOBHTe eOE OHN KOe, BCTaBBte HObYIO KAncyU E.S.E. I NOBtOpTe npOeUpy. B npOTMBHom cNYae 3akpoTHe pyHar.
KoTHeHepIaNcPb30BaHbXkANCyE.S.E.MoxeT BMeAaTb He 6oOe9 KANCyE.S.E.1030myeroHyxHOpeMOnuecknOCBO60KaTaBbOIN36ekaHne3actpeBaHnKANCyE.S.E.
IINBbINONHn30I ONepaUNBbTAuHTe KANNEc6OpNHN,NOTAHYBero BHMN,OTcoEHNTEOTKOnTeHepaNINCBopaHNCNOHB3OBAHHbIXKANCy,OpaauBaBHMaHHeHaBO3MOHhIEOCTATKNXWDKoCTN.
0Cbo6oBnTe KOHTeHep, NOMOHTe HbCyUHTe 3TN KOMIOHENTbl, PpEXe YEM yCTaHOBTb XX 6paTHo HA CBOE MECTo.
ПОГРAMMЮВАНЕ TEMПЕРТYPБI KOФЕ

BbIKIOHTe KoEmaunHy, Haxab Ha rnaHBbl BbIKIOATenb.
Noe BIKIOHcHMAIIMHbI HAKIMTE 5 pa3 KHOKny,TOObB BOINB PEKHM NsMeHHeHr TEMnepaTyb.KHOKN HAHTMMRtB.
Hakmte KhoNky DnryyBemueHn TEm- nepaTybHa 3 rpaDyca.Hakmte KhoNky Dnry yMeHbWeHn TEmpeaTybHa 3 rpaDyca.
BHIMAHHE:3aJdAnHyu Na 3aBode TemnepaTyPOMOxHO yBeHnHTb H/nnm UMeHbIHTb Ha 3°C mnn 6°C.

No nCTeEHn 5 cekyHd 63deJCTBn 06e KHOKNu HcHHT MHaTb KaXdIbe 2 cekyHdb, noce yero KoFemaunHa BbIeTe N3 CneuaHbHoro pexmHa N3MeHeHHa TeMnepaTybl.
HOBa 3aDaHHa TeMnepaTypa 6yJET coXpAne-Ha B nAmTIN DnI NOcNeDyUoero npIrTOBHeHna HApITKOB.
CnHbIyCTaHOBneHHoTEmnpaTypbo Kofoe:
Ecn KhoKn PnoaHnHNTKOB MrrAOT No OpeepMaHHa HxJaTeB ydaenHn HaKNM
BHIMAHVIE:
- y6eintecb, qTO BHytpn KofoMaunHbI HeT Kancyn E.S.E.
-BcIyuee naedHn HnnpxHn nn OTKIOUeyHn KOeMaunHbI npE ee NOBTOPHOM BKNIOUeyHn UIKN BO3O6HOBJEETC TOTO MOMeHTa, KOrda OH 6bl npepbaH. - He noDHMaTe pbIur Bo BpeM IpoeIpybI ydaIeHnHaKnnn Hnn OnonackBaHna.
PpoaeDpya ydanenHaKnHn:
BbIKIOUHTe KoFemaunHy,HaxaBaHa rnaBbHbB BbIKIOHTenb.
3aene6ak0,6nCBexek BoBn HdoabbTe pactbopdnyydanenHnHaKNnn.
y6eIMTeB TOM, yTO paTbOp IyUdaneHn HAKINI NIOHOCTbIO paTbOpMCA B BOe, CO-epKxaueCB E MKOCTN.
IocTabte noHOCNK noDaun EMKoCTb 06bemom He MeHee 0,6n.
PnB BbIKIOUeHHo MaUNHe DepKHTe HAKaTOn B TeueHne 5 cekyHKnKHOkky KhoNka Raet.
U
RU
Hakmte KhoNky foemaaHnHa HaHnet nOaBaTb Body c nepeMeHHbIM uKlOM. Khonka Hraet.

IIO 3aBepueHn nKkA oOHTKn OT HAKINN KHOKA rOpNT HnpepbIBHO, a KHOKNa MURAeT.
y6epnte eMKoCTb nOnyctOunTe ee.
V3BleKHTe 6ak, npOMoIe erO n ChOBa HAnONHITe CBExe BDOJ. BCTabTe 6ak co CBexe BOJO B KoFeMaunHy.

IocTabTe NOHOCMK NOaHm EMKoCTb 06beMOM He MeHee 0,6 n.

Ia 3nycka uKna onoJnackBaHn HAKMTe KHOKNy KHOKNa FOT HENpepbIBHO, a KOHNKa Hraet.
KoFemaunHa ABOtOMuYeCKn NpepbIbAet
OOnaACKBaHne. KHOKN MAnOT
OHOBpEmHo.
y6epnte eMKoCTb n ONyCTouHte ee.
PiOnkDHTe, nOKa KHONK Ne OApTc HEnpepbIBHM CBETOM. KoFemaunHa TOTOBa
KICNOL30BAHIO.
ПОНБЛЕМА - ПИЧИHA - PEWEHNE
RU
默默默到本拉如默默和默默的默默到本默默默的默默到本默默默的默默到本默默默的默默到本默默默的默默到本默默默的默默到本默默默的默默到本默默默的默默到本默默默的默默到本默默默的默默到本默默默的默默到本默默默的默默到本默默默的默默到本默默默的

承図上0.6RTEI的用
遍国森自歌,于事者,越, 越,
= 0 = 0 = 0 = 0 = 0 = 0 = 0 = 0 = 0 = 0 = 0 = 0 = 0 = 0 = 0 = 0 = 0 = 0 = 0 = 0 = 0 = 0 = 0 = 0 = 0 = 0
R
m = 311
·
.
中
.
·
-2g3
( 2k + 2,2k + 2 )
aLol 1jz
1.E.S.E aagai 2.
2:wall
a_4 = 8
C. all 等于,等于
J 1
AR
124 125 126 127 128 129 130

slll 1111111111111111111111111111111111111
(MAX)

aaiy aaiyaiyaiyaiyaiyaiyaiyaiyaiyaiyaiyaiyaiyaiyaiyaiyaiyaiyaiyaiyaiyaiyaiyaiyaiyaiyaiyaiyaiyaiyaiyaiyaiyaiyaiyaiyaiyaiyaiyaiyaiyaiyaiyaiyaiyaiyaiyai
jll jll jll jll jll jll jll jll jll jll jll jll jll jll jll jll jll jll jll jll jll jll jll jll jll jll jll jll jll jll jll jll jll jll jll jll jll jll jll jll jll jll jll jll jll jll jll jll jll jll jll
a 100000000000000000000000000000000000000000000000000000

cllll jai jy jie ai slal Jaii
cllll oay laic ai slal Jaai
J 1
aalb
i 1
.
.
.
y 1
iie gaiy jia jia Jai 1
J. E.S.E 15
a, jaiill 5s yjus jy

gss sss ssss ssss ssss ssss ssss ssss
#
E.S.Ea 1
E.S.Ea 1
E.S.Ea 1
E.S.Ea 1
E.S.Ea 1
E.S.Ea 1
yE.S.E. 1
Jae gae jae E.
E.S.E. illy algssll jai gai jai jai jai jai jai jai jai jai jai jai jai jai jai jai jai jai jai jai jai jai jai jai jai jai jai jai jai jai jai jai jai
a
E.S.E.illy Cys
laal colall 8 yg ygd yda jao 1 1 1 1 1 1 1 1 1 1 1 1 1 1 1 1 1 1 1 1 1

a
Jalshj jdi jie jai Jua
10.5y 10.5y 10.5y 10.5y 10.5y 10.5y 10.5y 10.5y 10.5y 10.5y 10.5y 10.5y 10.5y 10.5y 10.5y 10.5y 10.5y 10.
C
jssssssssssssssssssssssssssssssssssssssssssssssssssssssssssssssssssssssssssssssssssssss
E.S.E. illy E.S.E. illy
S.E.E
aaii/
(1)
algsa aaiy eaae aee aae aee aee aee aee
. E.S.Ey 9 y La.E.S.Ey y aasall eeg y j S y .E.S.E y
E.S.E 9
Lg Lg 1
a a a a a a a a a a a a a a a
j 5 j 10 10 10
"Jnnnnnnnnnnnnnnnnnnnnnnnnnnnnnnnnnnnnnnnnnnnnnnnnnnnnnnnnnnnnnnnnnnnnnnnnnnnnnnnnnnnnnnnnnnnnnnnnnnnnnnnnnnnnn
: g
aal aal aal aal aal aal aal aal aal aal aal aal aal aal aal aal aal aal aal aal aal aal aal aal aal aal aal aal aal aal aal aal aal aal aal aal aal aal aal aal aal aal aal aal

aal aal aal aal aal aal aal aal aal aal aal aal aal aal aal aal aal aal aal aal aal aal aal aal aal aal aal aal aal aal aal aal aal aal aal aal aal aal aal aal aal aal aal aal aal aal aal aal aal aal aal
J 1 J 1 J 1 J 1 J 1 J 1 J 1 J 1 J 1 J 1 J 1 J 1 J 1 J 1 J 1 J 1 J 1 J 1 J 1 J 1 J 1 J 1 J 1 J 1 J 1 J 1 J 1 J 1 J 1 J 1 J 1 J 1 J 1 J 1 J
a
a a a a a a a a a a a a a a a a a a a a a a a a a a a a a
y 1
Aailllll lllllllllllllllllllllllll
E. E. E. E. E. E. E. E. E. E. E. E. E. E. E. E. E. E. E. E. E. E. E. E. E. E. E. E. E. E. E. E. E. E. E. E. E. E. E. E. E. E. E. E. E. E. E. E. E. E. E.
a
jill bcailll g jaiil slaibn aikslal, 5
0.6 1
0.6 0jall
aikll jll jLjla
aikll jll jLjla jLjla
i 1
6.0 6
120 120 120 120 120 120 120 120 120 120 120 120

a 11 11 11 11 11 11 11 11
1 1
Ae jbjc0e 1j

Jyj 1000000000000000000000000000000000000000000000000000000
g 1
J11 - 111
AR
| العربية | ||
| العربية | العربية | |
| العربية | العربية | |
| العربية | العربية | العربية |
| العربية | العربية | العربية |
| العربية | العربية | العربية |
| العربية | العربية | العربية |
| العربية | العربية | العربية |
| العربية | العربية | العربية |
| العربية | العربية | العربية |
| العربية | AL | AL |
| العربية | AL | AL |
| العربية | AL | AL |
| العربية | AL | AL |
| العربية | AL | AL |
| العربية | AL | AL |
| العربية | AL | AL |
| العربية | AL | AL |
| العربية | AL | AL |
| العربية | AL | AL |
| العربية | AL | |
| العربية | AL | AL |
| العربية | AL | AL |
| العربية | AL | AL |
| العربية | AL | AL |
| العربية | AL | AL |
| العربية | AL | AL |
| العربية | AL | AL |
| العربية | AL | AL |
| العربية | AL | AL |
| العربية | AL | Al |
| العربية | AL | AL |
| العربية | AL | AL |
| العربية | AL | AL |
| العربية | AL | AL |
| العربية | AL | AL |
| العربية | AL | AL |
| العربية | AL | AL |
| العربية | AL | AL |
| العربية | AL | AL |
| العربية | AL | AL |
| العربية | AL | AL |
| العربية | AL | AL |
| العربية | AL | AL |
| العربية | AL | AL |
| العربية | AL | AL |
| العربية | AL | AL |
| العربية | AL | AL |
| العربية | AL | AL |
| العربية | AL | AL |
| العربية | AL | (AL) |
| العربية | AL | AL |
| العربية | AL | AL |
| العربية | AL | AL |
| العربية | AL | AL |
| العربية | AL | AL |
| العربية | AL | AL |
| العربية | AL | AL |
| العربية | AL | AL |
| العربية | AL | AL |
| العربية | AL | (2) |
| العربية | AL | (3) |
| العربية | AL | (4) |
| العربية | AL | (5) |
| العربية | AL | (6) |
| العربية | AL | (7) |
| العربية | AL | (8) |
| العربية | AL | (9) |
| العربية | AL | (10) |
| العربية | AL | (11) |
| العربية | AL | (12) |
| AL | AL | AL |
| AL | AL | AL |
| AL | AL | AL |
| AL | AL | AL |
| AL | AL | AL |
| AL | AL | AL |
| AL | AL | AL |
| AL | AL | AL |
| AL | AL | AL |
| AL | AL | AL |
| AL | AL | AL |
| AL | AL | AL |
| AL | AL | AL |
| AL | AL | |
| AL | AL | AL |
| AL | AL | AL |
| AL | AL | AL |
| AL | AL | AL |
| AL | AL | AL |
| AL | AL | AL |
| AL | AL | AL |
| AL | AL | AL |
| AL | AL | AL |
| AL | AL | AL |
| AL | AL | AL |
| AL | AL | (1) |
| AL | AL | (2) |
| AL | AL | (3) |
| AL | AL | (4) |
| AL | AL | (5) |
| AL | AL | (6) |
| AL | AL | (7) |
| AL | AL | (8) |
| AL | AL | (9) |
| AL | AL | (10) |
| AL | AL | (11) |
| AL | AL | (12) |
| العربية الحرفية | ||
| .E.S.E عوَلُّهِ وَعَلُّهِ مَنْفَسِيرِ وَعَلُّهِ وَعَلُّهِ وَعَلُّهِ وَعَلُّهِ وَعَلُّهِ وَعَلُّهِ وَعَلُّهِ وَعَلُّهِ وَعَلُّهِ وَعَلُّهِ وَعَلُّهِ وَعَلُّهَ وَعَلُّهِ وَعَلُّهِ وَعَلُّهِ وَعَلُّهِ وَعَلُّهِ وَعَلُّهِ وَعَلُّهِ وَعَلُّهِ وَعَلُّهِ وَعَلُّهِ وَعَلُّهِ和其他\(\text{العَد}\) | العربية الحرفية | |
| .E.S.E عوَلُّهِ وَعَلُّهِ مَنْفَسِيرِ وَعَلُّهِ وَعَلُّهِ وَعَلُّهِ وَعَلُّهِ وَعَلُّهِ وَعَلُّهِ和其他\(\text{العَد}\) | \(E.S.E\)gol'gol\(\text{العَد}\) | |
| .E.S.E عوَلُّهِ وَعَلُّهِ مَ�َنْفَسِيرِ وَعَلُّهِ和其他\(\text{العَد}\) | \(E.S.E\)gol'gol\(\text{العَد}\) | |
| .E.S.E gol'gol\(\text{العَd}\) | \(E.S.E\)gol'gol\(\text{العَd}\) | |
| \(E.S.E\)gol'gol\(\text{العَd}\) | \(E.S.E\)gol'gol\(\text{العَd}\) | |
| \(E.S.E\)gol'gol\(\text{العَd}\) | \(E.S.E\)gol'gol\(\text{العَd}\) | |
| \(E.S.E\)gol'gol\(\text{العَد}\) | \(E.S.E\)gol'gol\(\text{العَd}\) | |
| \(E.S.E\)gol'gol\(\text{العَd}\) | \(E.S.E\)gol'gol\(\text{العَd}\) | |
| \(E.S.E\)gol'gol\(\text{العَd}\) | \(E.S.E\)gol' gol\(\text{العَd}\) | |
| \(E.S.E\)gol'gol\(\text{العَd}\) | \(E.S.E\)gol'gol\(\text{العَd}\) | |
| \(E.S.E\)gol'gol\(\text{العَd}\) | \(E.S.E\)gol'gol\(\text{العَd}\) | \(E.S.E\)gol'gol\(\text{العَd}\) |
| \(E.S.E\)gol'gol\(\text{العَd}\) | \(E.S.E\)gol'gol\(\text{العَd}\) | |
| \(E.S.E\)gol'gol \(\text{العَd}\) | \(E.S.E\)gol'gol\(\text{العَd}\) | |
| \(E.S.E\)gol'gol\(\text{العَd}\) | \(E.S.E\)gol'gol\(\text{العَd}\) | |
| \(E.S.E\)gol'gol\(\text{العَd}\) | \( E.S.E\)gol'gol\(\text{العَd}\) | |
| \(E.S.E\)gol'gol\(\text{العَd}\) | \( E.S.E\)gol'gol\(\text{العَd}\) | |
| \(E.S.E\)gol'gol\(\text{العَd}\) | \( E.S.E\)gol'gol\(\text { }^{\prime \prime }\) | |
| \(E.S.E\)gol'gol\(\text{ 美}\) | \( E.S.E\)gol'gol\(\text{ 美}\) | |
| \(E.S.E\)gol'gol\(\text{ 美}\) | \( E.S.E\)gol'gol\(\text{ 美}\) | |
| \(E.S.E\)gol'gol\(\text{ 美}\) | \( E.S.E\)gol'gol\(\text{ 美}\) | |
| \(E.S.E\)gol'gol\)\(\text{ 美}\) | \( E.S.E\)gol'gol\)\(\text{ 美}\) | |
| \(E.S.E\)gol'gol\)\(\text{ 美}\) | \( E.S.E\)gol'gol\)\(\text{ 美}\) | |
| \(E.S.E\)gol'gol\)\(\text{ 美}\) | \( E.S.E\)gol'gol\)\(\text{ 美}\) | |
| \(\text{ 美}\) | \( E.S.E\)gol'gol\)\(\text{ 美}\) |
a 1111111111111111111111111111