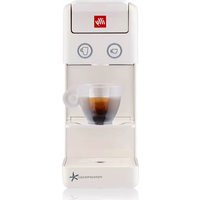
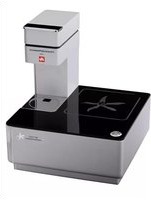
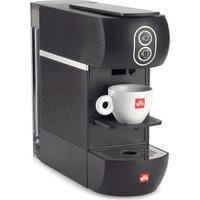
Y3 - Coffee machine ILLY - Free user manual and instructions
Find the device manual for free Y3 ILLY in PDF.


| Product type | Capsule coffee machine |
| Brand | Illy |
| Model | Y3 |
| Capsule system | Iperespresso (Illy capsules) |
| Dimensions (L x H x D) | 26 x 35 x 15 cm |
| Weight | Approximately 5 kg |
| Power supply | 220-240 V, 50/60 Hz |
| Power | 1350 W |
| Water tank capacity | 1.2 L |
| Pump pressure | 19 bar |
| Main features | Coffee extraction, quick heating, automatic shut-off, removable water tank |
| Maintenance and cleaning | Regular cleaning of nozzles, descaling recommended every 3 months |
| Safety | Automatic shut-off after 30 minutes of inactivity, overheat protection |
| Spare parts available | Water tank, filter holder, drip tray |
| Repairability index | 7/10 |
| Warranty | 2 years |
| General information | Use with Illy capsules, compact design, ideal for domestic use |
Frequently Asked Questions - Y3 ILLY
User questions about Y3 ILLY
0 question about this device. Answer the ones you know or ask your own.
Ask a new question about this device
Download the instructions for your Coffee machine in PDF format for free! Find your manual Y3 - ILLY and take your electronic device back in hand. On this page are published all the documents necessary for the use of your device. Y3 by ILLY.
USER MANUAL Y3 ILLY
Dimensioni (L x P x A) (mm): 100x310x265
Fig. 5
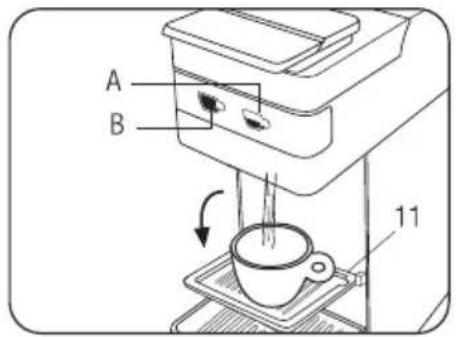
Fig. 6
PREPARAZIONE DEL CAFFE'

Fig. 7
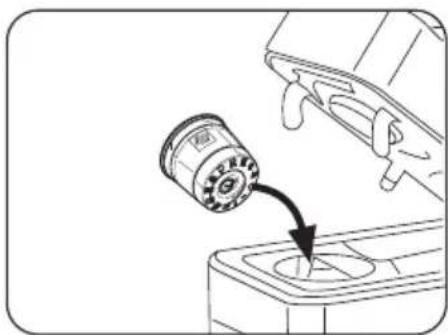
Fig. 8
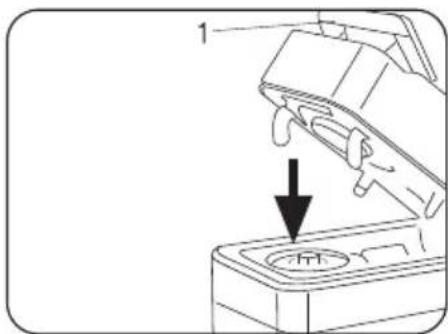
Fig. 9

Fig. 10
SVUOTARE IL PORTA CAPSULE
Fig. 11

Fig. 12
DECALCIFICAZIONE
- General operating rules....16
- Technical data....16
- Important safeguards....16
• Using the espresso machine....16
- Installation of the espresso machine....17
- Cleaning the espresso machine....17
- In case of malfunctioning....18
- Improper use of the appliance....18
- Machine components....19
-
Operating the coffee machine....8
-
Filling the tank....20
- Starting/warming up the coffee machine....20
- Energy saving function....20
-
Rinsing the machine/inner circuits....21
-
Preparation of coffee....22
- Programming the dispenser buttons....22
- Emptying the capsule receptacle....23
- Storing the coffee machine away....23
- Repair/maintenance....23
- Descaling....23
- Warranty limitations....24
- Troubleshooting....25
GENERAL OPERATING RULES
Carefully read the instruction manual and warranty limitations. The machine must be connected to a grounded power outlet. The machine must be kept clean by frequently washing the cup support rack, the drip tray, the used capsule tray, and the water tank.
Maintenance may only be performed while the machine is off.
IMPORTANT:
Never immerse the machine or its removable components in water or put it in the dishwasher. The water contained in the tank must be replaced regularly. Do not use the machine if the tank is empty. We recommend descaling the machine at least every 2 months using a descaling agent made especially for espresso machines. See instructions in the Descaling chapter. The machine is fitted with a valve that maintains constant pressure, which may cause some water to drip from the brew group.
TECHNICAL DATA
Casing: ABS
Heat exchange material: Aluminum
Water tank: 1 liter / 33.8 oz.
Used capsule container capacity: 8 capsules
Pump: 19 bar
Weight without packaging: 3,6 Kg / 127 oz.
Electric powered: 230 V, 50 Hz
Power: 1000 W - With "Power Save" function
Size (W x D x H): 100 x 310 x 265 (mm) / 3.94 x 12.21 x 10.43 (inch).
The manufacturer reserves the right to make changes or improvements without notice.
IMPORTANT SAFEGUARDS
When using electrical appliances always follow the safety precautions below.
Using the espresso machine
Read all Instructions.
- This machine is intended for household use only. Any other use is considered improper and therefore dangerous.
- Unplug the power cord from the electrical socket when the machine is not in use.
- Do not touch hot surfaces. The water/coffee dispensed from the machine may cause burns..
- This machine is manufactured to “make espresso coffee”: use care to prevent scalding due to water jets or any improper use of the machine.
- The machine is not designed to be used by people (including children) with limited physical, mental or sensory abilities or insufficient experience and/or skills, unless they are supervised by a person responsible for their safety who provides instructions on how to use the appliance.
- Children must be supervised to prevent them from playing with the appliance.
• The machine is intended for indoor use only. -
To protect against fire, electric shock or personal injury do not immerse the cord, plug or the body of the machine in water or any other liquid.
-
Do not use the machine for purposes other than those for which it was designed.
- Do not place the machine on, or near, electrical or gas burners or inside a hot oven.
- The machine must be turned on only when being used. After use, it must be turned off by moving the main on/off switch (9) to the "0" position and disconnecting the plug from the power outlet.
- Before unplugging the machine make sure that the ON/OFF switch (9) is in the "0" position.
- Using attachments not recommended by the manufacturer may result in fire, electric shocks or personal injury.
- Do not let the cable hang from the tables or counters. Do not pull the plug out by the cable and never touch it with wet hands.
- Do not carry or pull the coffee machine by the cable.
- To reduce the risk of injury, do not drape cord over the counter top or table top where it can be pulled by children or tripped over unintentionally.
- Do not operate any appliance with a damaged cord or plug, or after the appliance malfunctions, or has been damaged in any manner. Return appliance to the nearest authorized service facility for examination, repair or adjustment.
- Do not use extension cables or power strips. In case of fire, use carbon dioxide (CO2). Do not use water or powder extinguishers.
- Do not use appliance for anything other than intended use.
Installation of the espresso machine
- Read the instructions carefully.
- Do not install the machine in an area where the temperature may reach 5°C/41°F or lower (if water freezes, the appliance may be damaged) or higher than 40°C/104°F.
- Check that the main electric voltage corresponds to the requirements indicated on the machine data plate. Connect the machine only to a properly grounded power outlet with a minimum rating of 6A for models powered at 230Vac, and 15A for models powered at 120Vac.
- If the plug and the outlet are not compatible, have the plug replaced with a proper one by an authorized service center.
- Place the machine on a countertop away from water taps and sinks.
• After removing the packaging, check that the appliance is in perfect condition before installation. - Do not leave the packaging materials within children's reach.
Cleaning the espresso machine
- Before unplugging the machine check that the main on/off switch (9) is in the "0" position.
- Unplug the machine before cleaning.
- Wait until the machine has cooled before cleaning.
- Extract the water tank (8) by lightly pushing it downwards, then outwards
- Clean the body and attachments with a wet cloth and then wipe with a non-abrasive dry cloth. Do not use detergents.
- Do not expose the machine to extended jets of water or immerse it in water, partially or fully.
In case of malfunctioning
Do not use the appliance if the cord (7) or plug (10) are damaged or if the appliance shows signs of malfunctioning or has been damaged in any way. Take the machine to the nearest authorized service center for checks or repairs. If the power cord (7) is damaged it must be replaced by the manufacturer or an authorized service center. In case of damage or malfunction, turn off the appliance and do not tamper with it. For repairs contact a service center authorized by the manufacturer and request the use of original spare parts only. Failure to comply with these instructions may compromise the safe operation of the machine and will result in the forfeiture of warranty rights.
Improper use of the appliance
- This appliance is intended for household use only. Any other use is to be regarded as improper and thus dangerous.
- The manufacturer is not liable for accidents caused by noncompliance with existing legislation on electrical grounding systems.
- The manufacturer is not liable for possible damage caused by improper, incorrect or unreasonable use. This appliance is intended to be used in household and similar applications such as:
- staff kitchen areas in shops, offices and other working environments;
- farm houses;
- hotel rooms, motels and other residential type environments;
- bed and breakfast type environments.
MACHINE COMPONENTS
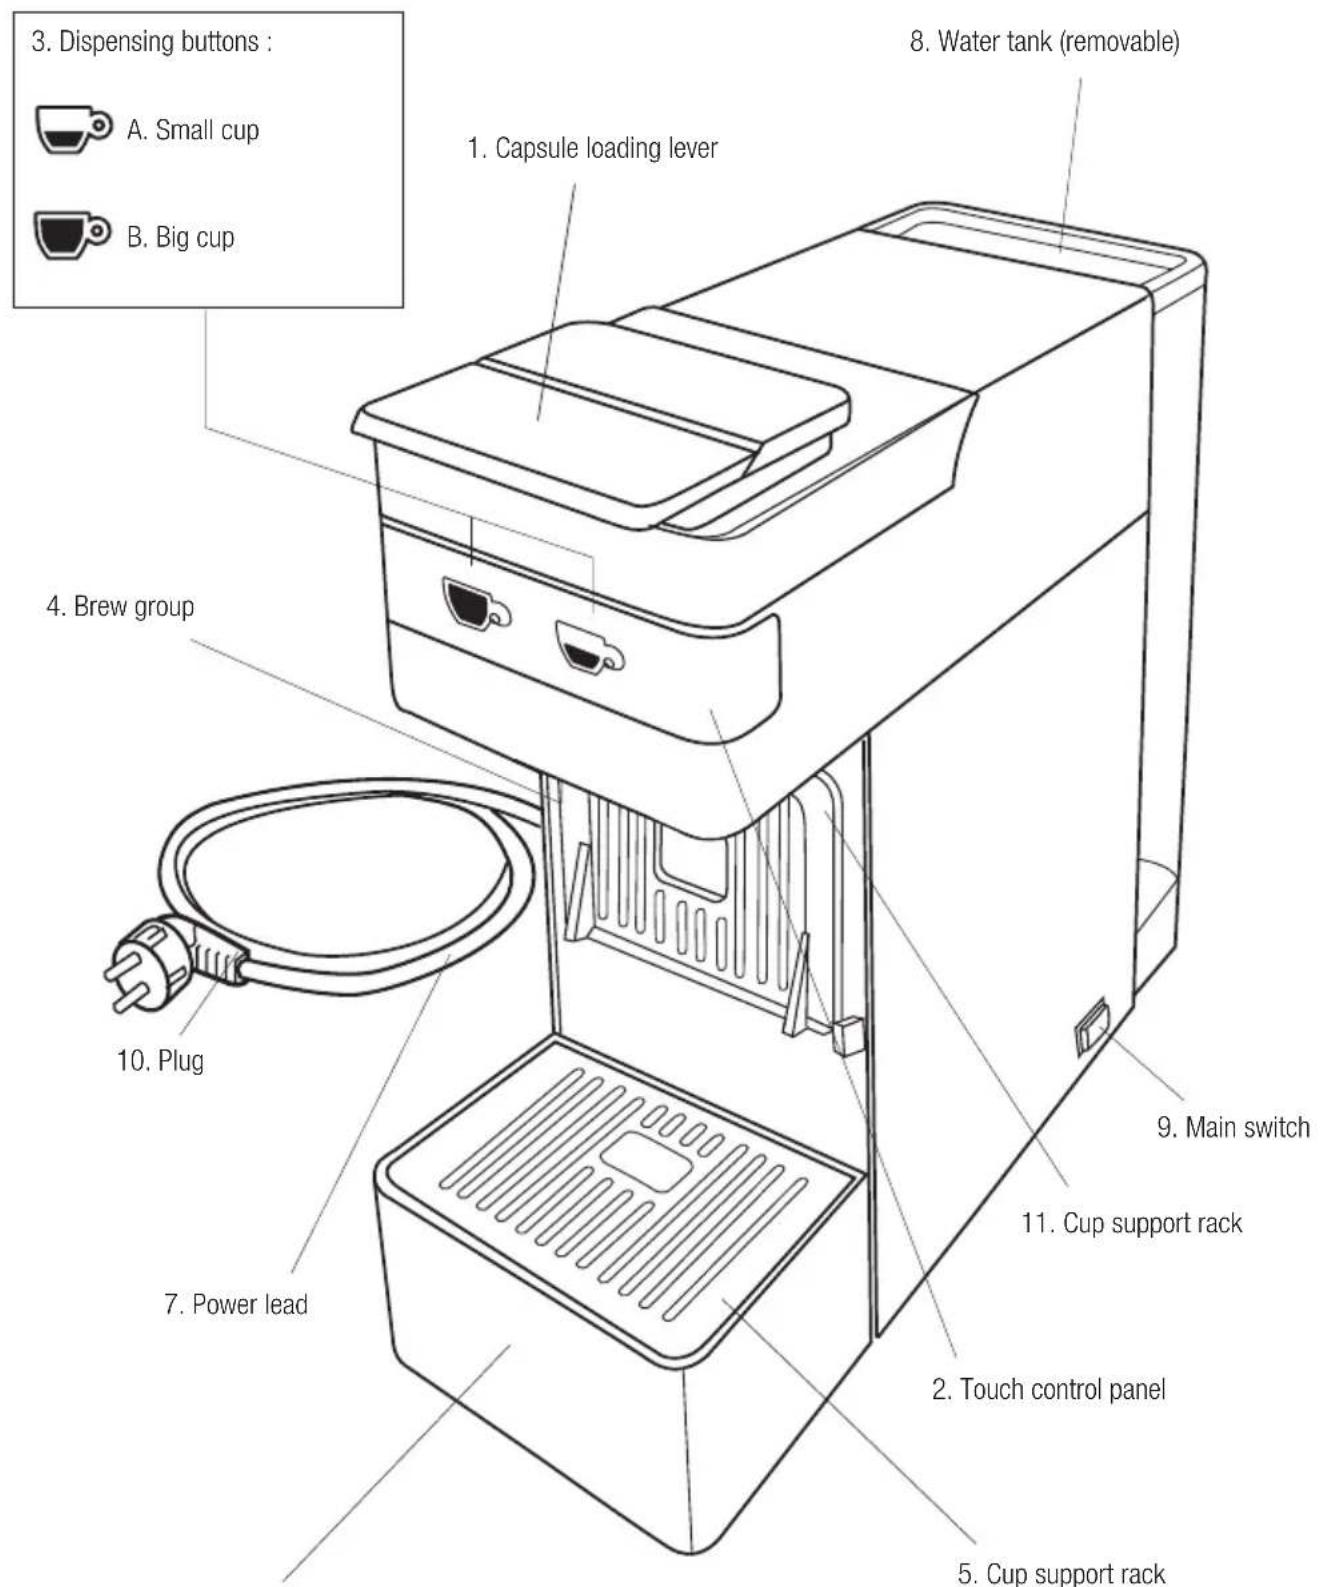
- Drip tray and capsule receptacle(removable)
- To extract the tank (8), press it down and turn it outwards at the same time (Fig.1)
- Fill the tank with up to 1 liter of fresh cold water (Fig.2)
- Reinstall the tank by slightly tilting and resting it on the water valve (Fig.3)
Starting/warming up the coffee machine
- Plug the coffee machine into an electrical socket
• Power the coffee machine by turning on the main switch (9) (Fig.4) - Buttons (A) and (B) will start to flash; after about a minute the lights remain permanently on and the machine is ready for use (Fig.4)
Energy saving function
If the machine is left switched on and is not used, after half an hour the energy saving function is activated and the buttons (A) and (B) blink every 2 seconds.
To use the machine again press one of the buttons (A) or (B) and wait for it to heat up; when the buttons (A) and (B) appear with a fixed light the machine is ready for use.
SAFETY AND ENERGY-SAVING TIPS:
If you are going to be away from home for some time, remember to power off the machine at the main switch (9). Do the same at night before going to bed. The coffee machine heats up very rapidly and is normally ready for use in 1 minute after power-on.
If you plan not to use the coffee machine for a long period of time, empty the tank and unplug the appliance.

Fig.1
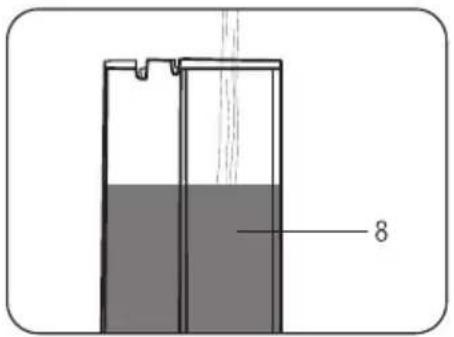
Fig.2

Fig.3

Fig.4
Rinsing the machine/inner circuits
When used for the first time, or if the machine has been turned off for a prolonged period, it is advisable to make at least three cups of hot water, to rinse out the machine's internal circuits, using the following procedure.
- Ensure that there are no capsules inside; power on the machine via the main switch(on the back) (9)
- Place a large empty cup under the coffee spout.(Fig. 5)
When the buttons (A) and (B) appear with a fixed light the machine is ready for use. Press a button (A) or (B); the machine dispenses water, press the button again when you have obtained the desired amount of water (Fig. 6). The machine has been rinsed once at least three cups of water have been made.
NOTE
To make an espresso using button (A) (small cup), place the rack (11) as in Fig.6. When tall cups are needed, place the rack (11) as in Fig.5, and place the cup directly on the rack (5) (Fig.5)
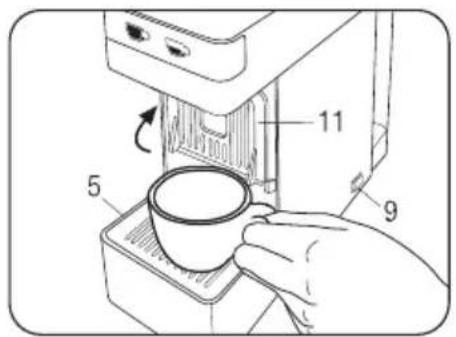
Fig. 5

Fig. 6
PREPARATION OF COFFEE
• Use only illy Iperespresso capsules
- Place the cup underneath the coffee spout
- Slowly lift the control lever (1) backwards (until it stops) (Fig. 7) and introduce a capsule in the slot provided (Fig. 8)
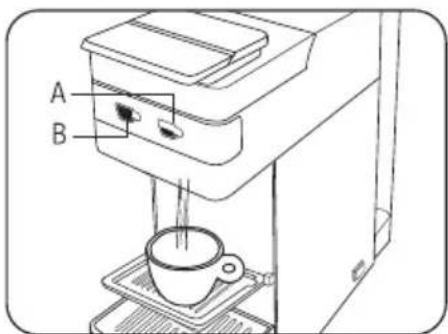
- Close the lever (1) (Fig. 9) completely and press one of the dispensing buttons: short (A), big (B) according to your taste (Fig. 10)
NOTE
The machine is equipped with a pre-infusion system: when one of the coffee buttons - (A) or (B) – is pressed, the machine begins to make coffee, stops, and automatically restarts until the programmed volume has been delivered.
- Repeat the steps above for additional cups of coffee using a new capsule for each drink
- To expel used capsules, slowly lift the lever and the capsule will automatically fall into the used capsule tray.
Repeat if unsuccessful.
WARNING:

Before introducing a capsule into the coffee machine, lift the control lever (1) on the top of the machine slowly and fully. For proper hygiene, and to preserve the high product quality, it is advisable to eject the capsule soon after the drink has been dispensed.
USEFUL TIP:
Use thick cups when preparing Espresso and heat them beforehand. This will keep your coffee warm longer. Cups can be heated under hot running water.
PROGRAMMING THE DISPENSER BUTTONS
Big cup: Press and hold the button (B). The machine will start delivering water. Once the desired water level is reached release the button (B). The machine will then stop delivering water and the desired quantity will be memorized for future dispensing. (Fig. 10)
Small cup: Press and hold the button (A). The machine will start delivering water. Once the desired water level is reached release the button (A). The machine will then stop delivering water and the desired quantity will be memorized for future dispensing. (Fig. 10)


Fig. 7

Fig. 8

Fig. 9

Fig. 10
EMPTYING THE CAPSULE RECEPTACLE
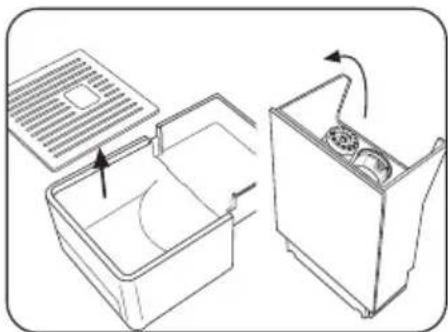
Up to 8 capsules can fit into the capsule receptacle. It is advisable to regularly empty the receptacle to prevent the capsules from getting stuck inside it. To do this, you need to remove the capsule receptacle (6). (Fig. 11) Empty the capsule receptacle and rinse. Clean off any water and coffee residues from the drip tray and grid(Fig. 12). Once clean, reintroduce the tray and the capsule receptacle into the machine.
STORING THE COFFEE MACHINE AWAY
Power off and unplug the machine if it is not going to be used for a prolonged period of time. Store the coffee machine in a dry place, away from dust and out of the reach of children. We would advise you to store the machine in its original packaging.
Temperatures in the storage area should not be lower than 5° C, to avoid damage to the inner parts of the machine from water freezing inside them.
REPAIR/MAINTENANCE
In case of malfunction, unplug the machine and contact your retailer. Only authorized assistance centres can perform maintenance and repairs covered by warranty. In the case of services provided by an unauthorized assistance centre, we decline any responsibility in the event of damage to persons and/or things.
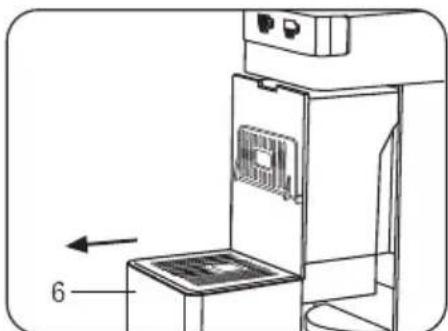
Fig. 11
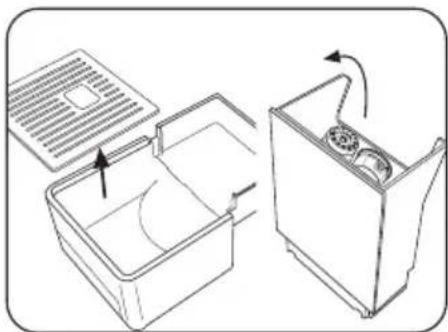
Fig. 12
DESCALING
The formation of lime scale is a natural consequence of using the machine. Lime scale must be removed every 1-2 months; if the water is very hard, descale the machine more frequently. Use a non-toxic decalcifier for coffee machines of the type commonly available in stores. Do not use vinegar, lye, salt or formic acid because they may damage the machine.
- Switch off the machine
- Remove the tank and empty out the water residue
- Fill the tank with the descaling solution, following the instructions on the descaler pack
• After carrying out a second rinse cycle, fill the tank again.
• The machine is ready to use
WARRANTY LIMITATIONS
The warranty does not cover damage or malfunctions caused by:
- Failure to carry out periodic descaling.
- Operation with a voltage that differs from the rating shown on the data plate
- Improper use or use that is not compliant with the instructions.
- Internal modifications.
The warranty does not cover the costs of repairs on machines previously handled by non-authorized service centers. Such costs will be borne entirely by the machine owner.
We advise you not to put the drip tray (6) and used capsule tray (6) in the washing machine, and to keep them clean. Failure to do so may result in damages to these two components, which are not under warranty.
WARNING:
It is advisable to keep the original packaging (at least for the duration of the warranty period) in order to ship the machine to a service center for repair if necessary. Any damage caused by transport without adequate packaging will not be covered by the warranty.

IMPORTANT INFORMATION FOR CORRECT DISPOSAL OF THE PRODUCT IN ACCORDANCE WITH EC DIRECTIVE
Disposal of end-of-life electric and electronic equipment by private households in the European Union. The WEEE symbol used on this product means that it must not be disposed of together with other domestic waste and should be collected separately. Consumers have the opportunity to hand in their used appliance to distributors free of charge on a 1:1 basis when they purchase a new product..
For further information about the collection of appliances to be scrapped, please contact the local authority in your town of residence, the local waste disposal service or the retailer where the product was purchased. Consumers are responsible for disposing of end-of-life appliances in accordance with the current provisions of law and noncompliance therewith may be subject to fines and criminal sanctions.
The correct disposal of this product will contribute to protecting the environment, natural resources and human health.
Made in Italy
CE
| Problem | Causes Corrective action | |
| The machine does not turn on. | The power supply cable is not connected | Connect the plug to a power outlet in accordance with the specifications given on the data plate. |
| The main on/off switch (9) is positioned on “0”. | Position the main on/off switch (9) on “1”. | |
| The machine doesn’t dispense coffee. | No water in the tank. | Fill tank with water. |
| The water tank has not been correctly inserted. | Insert the water tank completely into the machine until it clicks firmly into place. | |
| The moveable part of the top of the machine is not completely closed. | Lift the lever (1) and make sure that a capsule has been inserted into the capsule compartment. Lower the lever (1) into the locked position. Try again to brew a coffee with a capsule. | |
| The capsule is not inserted in the capsule compartment. | Insert a capsule in the capsule compartment. | |
| The capsule is not fully pierced | Use a new capsule. If you cannot solve the problem, you are kindly requested to contact your service center. | |
| The pump did not prime. | Check that the capsule compartment is empty of capsules, lower the lever (1) into the locked position and touch the button to dispense water. Try again to brew a coffee with a capsule. | |
| The pump is defective. Call the service centre. | ||
| The capsule is not ejected. | The capsule is still positioned in the compartment. | Close the lever (1), then slowly open it again. |
| The pump is too noisy. The tank is empty. | Fill the tank. | |
| Seat the tank properly take a new capsule. | ||
| Use a new capsule. If you cannot solve the problem, you are kindly requested to contact your service center. | ||
| Coffee is cold. The heating system is defective. Call the service centre. | ||
| A few drops come out of the dispenser, especially when the machine is warming up. | The machine is fitted with a valve that maintains constant pressure. | THIS IS NOT A FAULT. |
| The machine brews coffee slowly. Internal components with scale build up. | Descale the machine as described in the related paragraph. | |
| Coffee tastes sour. | The machine was not rinsed properly after descaling. | Carry out a other rinse cycle as described in the related paragraph |
| Capsule expired. Use a new capsule. | ||

INHALTSVERZEICHNIS
Abb.1

Abb.2

Abb.3

Abb.4
Gerät spülen
Abb. 5

Abb. 6
ESPRESSOZUBEREITUNG

Abb. 7

Abb. 8
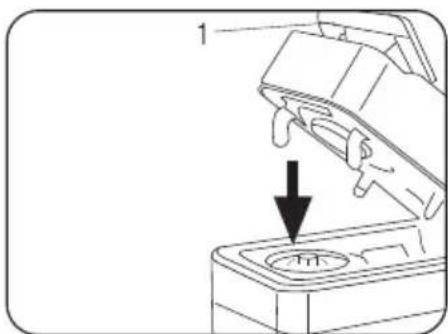
Abb. 9
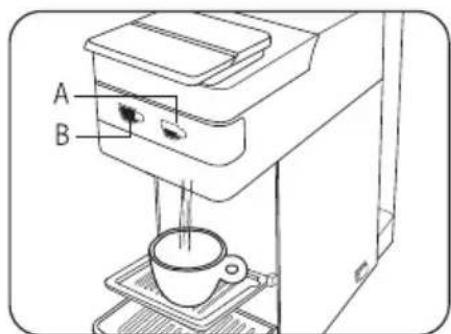
Abb. 10
Abb. 11

Abb. 12
ENTKALKEN
Fig.1

Fig.2

Fig.3

Fig.4
Rinçage machine/circuits internes
Fig. 5

Fig. 6
PRÉPARATION DU CAFÉ

Fig. 7

Fig. 8
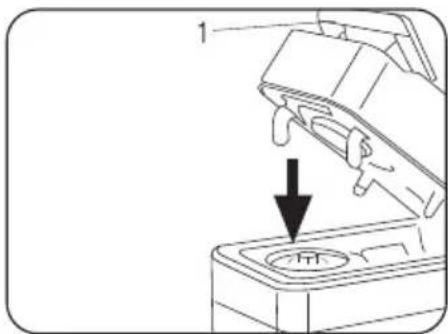
Fig. 9

Fig. 10
VIDER LE RÉCIPIENT DES CAPSULES UTILISÉES
Fig. 11
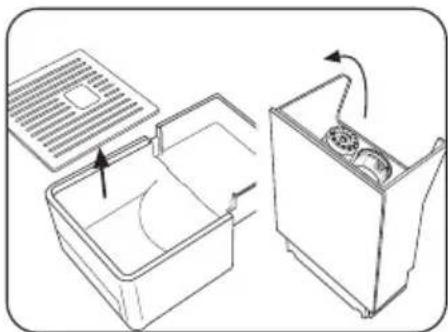
Fig. 12
DÉTARTRAGE
Fig.3

Fig.4
Aclarado máquina/circuitos internos
Fig. 5

Fig. 6
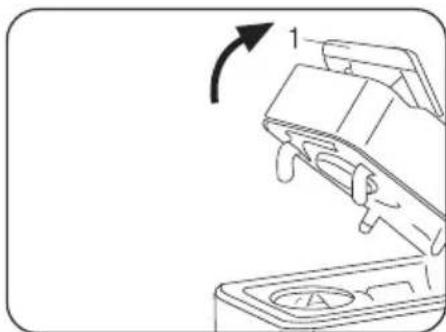
Fig. 7
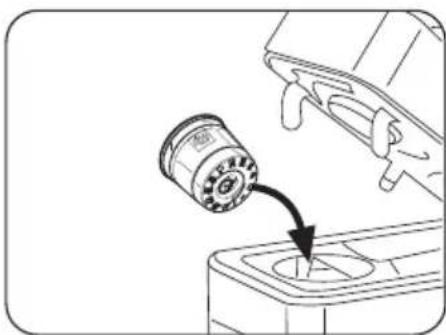
Fig. 8
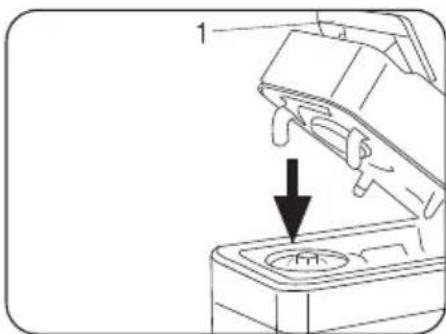
Fig. 9
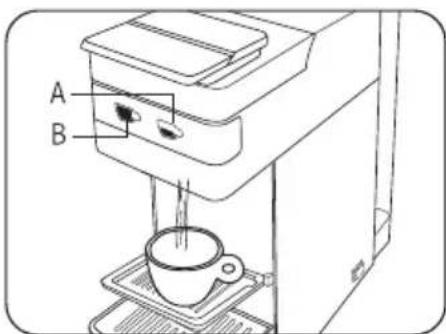
Fig. 10
Fig. 11

Fig. 12
DESCALCIFICACIÓN
Afb.3

Afb.4
Machine spoelen/interne circuits
PROGRAMMERING AFGIFTE

Afb. 7

Afb. 8

Afb. 9
Afb. 10
DE CAPSULEHOUDER LEGEN
Afb. 11
Afb. 12
ONTKALKEN
WAARSCHUWING VOOR DE CORRECTE VERWERKING VAN HET PRODUCT VOLGENS DE EUROPESE RICHTLIJNEN

- PREPARAZIONE DEL CAFFE
- SVUOTARE IL PORTA CAPSULE
- DECALCIFICAZIONE
- GENERAL OPERATING RULES
- IMPORTANT
- TECHNICAL DATA
- IMPORTANT SAFEGUARDS
- USING THE ESPRESSO MACHINE
- INSTALLATION OF THE ESPRESSO MACHINE
- CLEANING THE ESPRESSO MACHINE
- IN CASE OF MALFUNCTIONING
- IMPROPER USE OF THE APPLIANCE
- MACHINE COMPONENTS
- STARTING/WARMING UP THE COFFEE MACHINE
- ENERGY SAVING FUNCTION
- SAFETY AND ENERGY-SAVING TIPS
- RINSING THE MACHINE/INNER CIRCUITS
- NOTE
- PREPARATION OF COFFEE
- WARNING
- PROGRAMMING THE DISPENSER BUTTONS
- EMPTYING THE CAPSULE RECEPTACLE
- STORING THE COFFEE MACHINE AWAY
- REPAIR/MAINTENANCE
- DESCALING
- WARRANTY LIMITATIONS
- IMPORTANT INFORMATION FOR CORRECT DISPOSAL OF THE PRODUCT IN ACCORDANCE WITH EC DIRECTIVE
- INHALTSVERZEICHNIS
- GERÄT SPÜLEN
- ESPRESSOZUBEREITUNG
- ENTKALKEN
- RINÇAGE MACHINE/CIRCUITS INTERNES
- PRÉPARATION DU CAFÉ
- VIDER LE RÉCIPIENT DES CAPSULES UTILISÉES
- DÉTARTRAGE
- ACLARADO MÁQUINA/CIRCUITOS INTERNOS
- DESCALCIFICACIÓN
- MACHINE SPOELEN/INTERNE CIRCUITS
- PROGRAMMERING AFGIFTE
- DE CAPSULEHOUDER LEGEN
- ONTKALKEN
- WAARSCHUWING VOOR DE CORRECTE VERWERKING VAN HET PRODUCT VOLGENS DE EUROPESE RICHTLIJNEN
Brand : ILLY
Model : Y3
Category : Coffee machine